Raspberry Pi Daily Timelapse Security Camera
by 10log10 in Circuits > Raspberry Pi
3081 Views, 16 Favorites, 0 Comments
Raspberry Pi Daily Timelapse Security Camera

This tutorial uses a wireless web camera to upload images to a Raspberry Pi throughout the day. We edit the Raspberry Pi crontab so that it schedules scripts at the end of the day that generates a timelapse video file of all the photos throughout the day and then uploads that video to YouTube. This process is completely automated so you don't have do do anything once it is setup.
There are many benefits to this setup. It provides you a permanent record of what your webcam saw throughout the day. The videos are overwritten once a day and uploaded to YouTube so you don't have to worry about running out of memory on your Pi. Finally, the videos are on YouTube so they can be viewed anywhere!
These are the items I used:
- Raspberry Pi 2
- D‑Link DCS‑932L WiFi Camera (almost any WiFi camera should work)
- Wireless Router to connect the two, and a computer to set everything up
See an example here: https://www.youtube.com/watch?v=w0rfkuA4pl0
Step 1: Setup Your Pi
There are tons of Instructables on how to setup a Raspberry Pi, so I won't go into details here but these are the basic initial things you need to do:
- Install Raspian and Connect the Pi to your home network
- Setup an FTP Server on the PI so the WiFi Camera can upload Images to the Pi
Step 2: Setup WiFi Camera

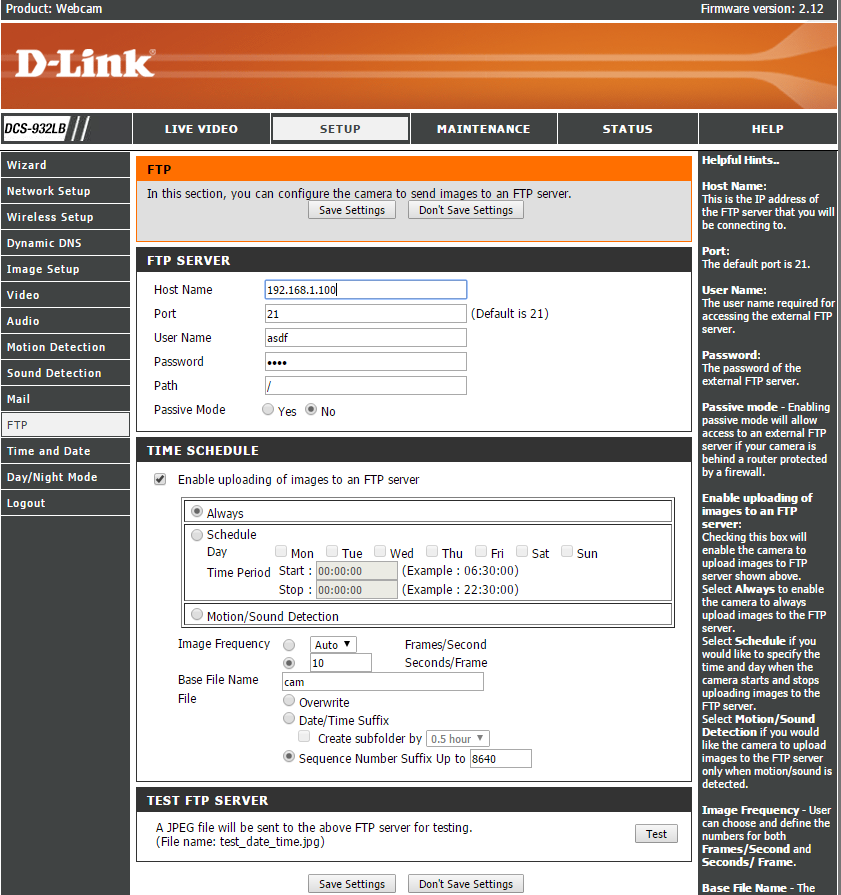
Next setup your WiFi camera to periodically upload images to your Pi. I attached an example.
Key Things:
- FTP Server settings are what you setup for your Pi
- Time Schedule: Sets up how to upload the images. In my setup I take a picture every 10 seconds. It will take 8640 pictures (8640 * 10 sec = 86400 sec = 1 day) before looping and overwriting the previous days images.
The DCS-932L will loop over the images and once it gets to the end of the sequence will overwrite existing photos.
(In case your wondering no that is not my real FTP server settings, but just an example for here)
Step 3: Create Timelaspe Videos
At this point your Pi will be setup, and your WiFi camera will be uploading images throughout the day. Now we need to convert those photos into a timelapse video. For this we can use a Linux program called avconv as part of libav-tools.
Run this script to install libav-tools (and avconv):
sudo apt-get -y install libav-tools
Next you can generate an mp4 video ("yesterday.mp4")
avconv -i "~/imgs/cam%04d.jpg" -r 30 -c:v libx264 -preset ultrafast ~/imgs/yesterday.mp4
Since we want to generate a video at the end of the day we add this command to the crontab
sudo crontab -e
Once the crontab editor comes up, add this line. This will run avconv and generate the yesterday.mp4 video at 12:01 AM every day
1 0 * * * avconv -i "~/imgs/cam\%04d.jpg" -r 30 -c:v libx264 -preset ultrafast ~/imgs/yesterday.mp4
If your curious about crontab you can find more information here:
http://www.computerhope.com/unix/ucrontab.htm
At this point the Pi will be generating a timelapse video (yesterday.mp4) of the previous day at 12:01 AM every day. Next we will create a script to upload that video to Youtube an 2 hours later.
Step 4: Automatically Upload Video to Youtube
To upload yesterday.mp4 to Youtube I used this python script: https://github.com/tokland/youtube-upload
Follow their instructions to setup youtube-upload:
sudo pip install --upgrade google-api-python-client progressbar2
wget https://github.com/tokland/youtube-upload/archive...
unzip master.zip
cd youtube-upload-master
sudo python setup.py install
Go ahead and upload a test video to youtube:
youtube-upload --title="test" test.mp4
You will be directed to log into your YouTube account, and given an authorization code to enter into your Raspberry Pi. And your test video should upload.
Next go ahead and create an OAuth 2.0 File following the instructions under youtube-upload:
Goto the Google console.
Create project.
Side menu: APIs & auth -> APIs
Top menu: Enabled API(s): Enable all Youtube APIs.
Side menu: APIs & auth -> Credentials.
Create a Client ID: Add credentials -> OAuth 2.0 Client ID -> Other -> Name: youtube-upload -> Create -> OK
Download JSON: Under the section "OAuth 2.0 client IDs". Save the file to your local system. (I used mysecret.json)
Use this JSON as your credentials file: --client-secrets=mysecret.json
Now you will be able to upload videos to YouTube from the Pi Command line:
youtube-upload --title="My Video" --client-secrets=mysecret.json ~/imgs/yesterday.mp4
But because we want to upload these videos periodically, at the end of the day we will add this to the crontab as well
sudo crontab -e
Add this line:
1 2 * * * /usr/local/bin/youtube-upload --title=`date --date="yesterday" +\%Y-\%m-\%d` --client-secrets=/home/pi/mysecret.json --credentials-file=/home/pi/.youtube-upload-credentials.json --playlist "Playlist" --privacy unlisted ~/yesterday.mp4
This will upload your video at 2:01AM (2 hours is hopefully enough time for avconv to process the video). The title will be yesterdays date. It will use mysecret.json. It will upload to the "Playlist" playlist (change that to whatever playlist you want it to be). And it will be an unlisted video (so only people who know about it will be able to find it)