ROOM TEMP Meter With Arduino Nano and AHT10
by Arnov Sharma in Circuits > Arduino
12073 Views, 27 Favorites, 0 Comments
ROOM TEMP Meter With Arduino Nano and AHT10

.gif)
Hey guys, what's up?
Here's something super useful: a simple room TEMPERATURE and HUMIDITY measurement setup that uses an AHT10 sensor connected to the Arduino Nano, An SSD1306 Display is being used to display the temperature Readings taken by the AHT10 Sensor.
This whole setup was made as a prototype for a future ROOM temperature meter, which will be an AVR-based setup that will use an Attiny, Atmega, or SAMD21 microcontroller with the AHT10 Sensor and SSD1306 display.
The purpose of undertaking this project was to stay informed about the real-time temperature of my room, considering that I am currently residing in Delhi, where the temperature can unpredictably soar during the summer. It is essential to continuously monitor the surrounding area's heat levels.
This INSTRUCTABLES is about how you can make this simple project in a few easy steps. Let's get started.
Supplies
These were the materials used in this built-
- Arduino Nano
- AHT10 Sensor
- SSD1306 Display
- Breadboard
- Jumper wires
- Power Bank
AHT10 TEMP and HUMIDITY SENSOR


The AHT10 Temp and Humidity Sensor Module is a compact and highly accurate sensor designed to measure temperature and humidity in various applications. The module integrates a high-performance AHT10 sensor chip, which utilizes a capacitive sensing element to detect changes in temperature and humidity.
It provides reliable and precise measurements with a temperature accuracy of ±0.3°C and a humidity accuracy of ±2% RH.
The AHT10 module operates between 1.6V and 6V, which is ideal if we use an external 5V source to power this sensor along with the SSD1306 display and Arduino board.
It communicates with the host device through a standard I2C interface, allowing for easy integration and data retrieval. With its low power consumption and fast response time, the AHT10 Temp and Humidity Sensor Module is an excellent choice for applications such as environmental monitoring, weather stations, HVAC systems, and industrial automation.
PCBWAY GIFTSHOP
.gif)
.gif)
As for sourcing components for this project, i got the Arduino Nano from PCBWAY's Giftshop along with AHT10.
https://www.pcbway.com/project/gifts_detail/Arduino_Nano_V3_0_ATMEGA328P.html
PCBWAY Gift Shop is an online marketplace where you can get a variety of electronics modules and boards for their genuine price, or you could use the PCBWAY currency, which is called beans.
You get beans after ordering something from PCBWAY as reward points, or you can also get them by posting any project in the PCBWAY community.
Check PCBWAY out for great PCB service from here: https://www.pcbway.com/
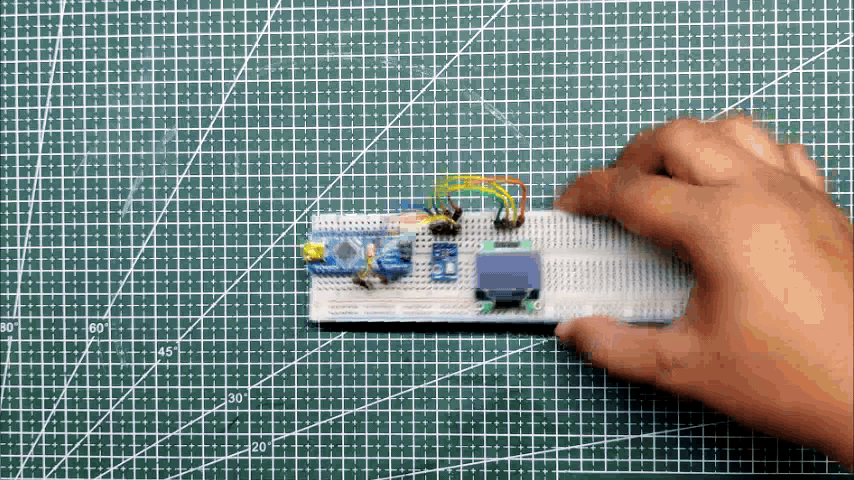
BASIC SETUP
.gif)
For the Temperature and Humidity Meter setup, we use an Arduino Nano as the main control unit, the AHT10 as the sensor, and an SSD1306 I2C OLED to display the temperature Readings we get from the AHT10 Sensor.
This setup is temporary, so we used a breadboard to create this project.
WIRING ASSEMBLY

.gif)
.gif)
- This setup is easy; we connect VCC of both the display and temperature sensor with 5V of Arduino
- GND of TEMP sensor and Display goes to GND of Arduino Nano
- The SCL of TEMP Sensor and display get connected together and then added to A5 of Nano
- The SDA of the TEMP Sensor and display get connected together and then added to A4 of the nano.
- We use jumper wires to connect everything together, and after following the wiring diagram, the setup is ready.
CODE and LIBRARY REQUIRED
#include <Wire.h>
#include <AHTxx.h>

#include <Adafruit_SSD1306.h>
#include <Adafruit_GFX.h>

#define OLED_WIDTH 128
#define OLED_HEIGHT 64

#define OLED_ADDR   0x3C
Adafruit_SSD1306 display(OLED_WIDTH, OLED_HEIGHT);

float ahtValue;                               //to store T/RH result

AHTxx aht10(AHTXX_ADDRESS_X38, AHT1x_SENSOR); //sensor address, sensor type


void setup()
{
  #if defined(ESP8266)
  WiFi.persistent(false);  //disable saving wifi config into SDK flash area
  WiFi.forceSleepBegin();  //disable AP & station by calling "WiFi.mode(WIFI_OFF)" & put modem to sleep
  #endif

  display.begin(SSD1306_SWITCHCAPVCC, OLED_ADDR);
  display.clearDisplay();

  Serial.begin(115200);
  Serial.println();

  while (aht10.begin() != true) //for ESP-01 use aht10.begin(0, 2);
  {
    Serial.println(F("AHT1x not connected or fail to load calibration coefficient")); //(F()) save string to flash & keeps dynamic memory free

    delay(5000);
  }

  Serial.println(F("AHT10 OK"));

  //Wire.setClock(400000); //experimental I2C speed! 400KHz, default 100KHz
}


void loop()
{
  /* DEMO - 1, every temperature or humidity call will read 6-bytes over I2C, total 12-bytes */
  Serial.println();
  Serial.println(F("DEMO 1: read 12-bytes"));

  ahtValue = aht10.readTemperature(); //read 6-bytes via I2C, takes 80 milliseconds

  display.clearDisplay();
  display.setTextSize(2);
  display.setTextColor(WHITE);
  display.setCursor(30, 0);
  display.println(F("Temp-"));

//  Serial.print(F("Temperature...: "));

  if (ahtValue != AHTXX_ERROR) //AHTXX_ERROR = 255, library returns 255 if error occurs
  {

  display.setTextSize(2);
  display.setTextColor(WHITE);
  display.setCursor(35, 25);
  display.println(ahtValue);
  display.display();
//    Serial.print(ahtValue);

  }
  else
  {
    printStatus(); //print temperature command status

    if   (aht10.softReset() == true) Serial.println(F("reset success")); //as the last chance to make it alive
    else                             Serial.println(F("reset failed"));
  }

  delay(2000); //measurement with high frequency leads to heating of the sensor, see NOTE

  ahtValue = aht10.readHumidity(); //read another 6-bytes via I2C, takes 80 milliseconds

  display.clearDisplay();
  display.setTextSize(2);
  display.setTextColor(WHITE);
  display.setCursor(30, 0);
  display.println(F("Humd-"));


//  Serial.print(F("Humd-"));

  if (ahtValue != AHTXX_ERROR) //AHTXX_ERROR = 255, library returns 255 if error occurs
  {

  display.setTextSize(2);
  display.setTextColor(WHITE);
  display.setCursor(35, 25);
  display.println(ahtValue);
  display.display();


 //   Serial.println(F(" +-2%"));
  }
  else
  {
    printStatus(); //print humidity command status
  }

  delay(2000); //measurement with high frequency leads to heating of the sensor, see NOTE

  /* DEMO - 2, temperature call will read 6-bytes via I2C, humidity will use same 6-bytes */
  Serial.println();
  Serial.println(F("DEMO 2: read 6-byte"));

  ahtValue = aht10.readTemperature(); //read 6-bytes via I2C, takes 80 milliseconds

  Serial.print(F("Temperature: "));

  if (ahtValue != AHTXX_ERROR) //AHTXX_ERROR = 255, library returns 255 if error occurs
  {
    Serial.print(ahtValue);
    Serial.println(F(" +-0.3C"));
  }
  else
  {
    printStatus(); //print temperature command status
  }

  ahtValue = aht10.readHumidity(AHTXX_USE_READ_DATA); //use 6-bytes from temperature reading, takes zero milliseconds!!!

  Serial.print(F("Humidity...: "));

  if (ahtValue != AHTXX_ERROR) //AHTXX_ERROR = 255, library returns 255 if error occurs
  {
    Serial.print(ahtValue);
    Serial.println(F(" +-2%"));
  }
  else
  {
    printStatus(); //print temperature command status not humidity!!! RH measurement use same 6-bytes from T measurement
  }

  delay(10000); //recomended polling frequency 8sec..30sec
}

void printStatus()
{
  switch (aht10.getStatus())
  {
    case AHTXX_NO_ERROR:
      Serial.println(F("no error"));
      break;

    case AHTXX_BUSY_ERROR:
      Serial.println(F("sensor busy, increase polling time"));
      break;

    case AHTXX_ACK_ERROR:
      Serial.println(F("sensor didn't return ACK, not connected, broken, long wires (reduce speed), bus locked by slave (increase stretch limit)"));
      break;

    case AHTXX_DATA_ERROR:
      Serial.println(F("received data smaller than expected, not connected, broken, long wires (reduce speed), bus locked by slave (increase stretch limit)"));
      break;

    case AHTXX_CRC8_ERROR:
      Serial.println(F("computed CRC8 not match received CRC8, this feature supported only by AHT2x sensors"));
      break;

    default:
      Serial.println(F("unknown status"));
      break;
  }
}
This code uses the AHT10 library to read temperature and humidity values from an AHT10 sensor and display them on an SSD1306 OLED display.
Let's go through the code step by step:
- The code includes the necessary libraries for the AHTxx sensor (AHTxx.h), the OLED display (Adafruit_SSD1306.h and Adafruit_GFX.h), and the Wire library for I2C communication.
The code defines constants for the OLED display width, height, and I2C address.
- The code defines constants for the OLED display width, height, and I2C address.
- An instance of the Adafruit_SSD1306 class is created, named "display," with the specified width and height.
- A floating-point variable "ahtValue" is declared to store the temperature and humidity values.
- An instance of the AHTxx class is created, named "aht10," with the specified I2C address and sensor type.
In the setup() function:
- WiFi-related configuration (for the ESP8266) is disabled.
- The OLED display is initialized.
- Serial communication is started.
- The AHT10 sensor is initialized using the begin() function. It waits until the sensor is connected and the calibration coefficients are loaded.
In the loop() function:
- DEMO 1: Temperature measurement is performed by calling the readTemperature() function, which returns the temperature value in Celsius. The result is stored in "ahtValue."
- The OLED display is cleared, and the temperature value is printed on the display using the display library functions.
- If the temperature value is valid (not equal to AHTXX_ERROR), it is displayed on the OLED display. Otherwise, the printStatus() function is called to print the status of the temperature command and perform a soft reset if necessary.
- A delay of 2000 milliseconds is added between temperature and humidity measurements.
- Humidity measurement is performed by calling the readHumidity() function, which returns the relative humidity value in percentage. The result is stored in "ahtValue."
- The OLED display is cleared, and the humidity value is printed on the display using the display library functions.
- If the humidity value is valid, it is displayed on the OLED display. Otherwise, the printStatus() function is called to print the status of the humidity command.
- A delay of 2000 milliseconds is added before moving on to DEMO 2.
- DEMO 2: Temperature measurement is performed again using the readTemperature() function, and the result is stored in "ahtValue.
- If the temperature value is valid, it is printed on the serial monitor along with an accuracy range.
- Humidity measurement is performed using the readHumidity() function, specifying AHTXX_USE_READ_DATA. This reuses the 6-byte data previously read during the temperature measurement, resulting in faster execution.
- If the humidity value is valid, it is printed on the serial monitor along with an accuracy range.
- A delay of 10000 milliseconds is added before repeating the loop.
In the loop() function:
- DEMO 1: Temperature measurement is performed by calling the readTemperature() function, which returns the temperature value in Celsius. The result is stored in "ahtValue."
- The OLED display is cleared, and the temperature value is printed on the display using the display library functions.
- If the temperature value is valid (not equal to AHTXX_ERROR), it is displayed on the OLED display. Otherwise, the printStatus() function is called to print the status of the temperature command and perform a soft reset if necessary.
- A delay of 2000 milliseconds is added between temperature and humidity measurements.
- Humidity measurement is performed by calling the readHumidity() function, which returns the relative humidity value in percentage. The result is stored in "ahtValue."
- The OLED display is cleared, and the humidity value is printed on the display using the display library functions.
- If the humidity value is valid, it is displayed on the OLED display. Otherwise, the printStatus() function is called to print the status of the humidity command.
- A delay of 2000 milliseconds is added before moving on to DEMO 2.
- DEMO 2: Temperature measurement is performed again using the readTemperature() function, and the result is stored in "ahtValue."
- If the temperature value is valid, it is printed on the serial monitor along with an accuracy range.
- Humidity measurement is performed using the readHumidity() function, specifying AHTXX_USE_READ_DATA. This reuses the 6-byte data previously read during the temperature measurement, resulting in faster execution.
- If the humidity value is valid, it is printed on the serial monitor along with an accuracy range
- A delay of 10000 milliseconds is added before repeating the loop.
- The printStatus() function is defined to print the status of the AHT10 sensor. It checks the status returned by the getStatus() function and prints an appropriate message based on the status code.
Overall, this code sets up the OLED display, initializes the AHT10 sensor, reads temperature and humidity values using the AHTxx library, and displays the values on the OLED display and serial monitor.
RESULT

.gif)
.gif)
.gif)
The temperature sensor AHT10 is working successfully and is displaying the TEMPERATURE reading and then the HUMIDITY reading one after the other at a time interval of 2000 milliseconds after the code has been uploaded.
We use a powerbank module to provide the Arduino Setup with 5V from the USB Port, which powers the Arduino Board.
Version 2


The TEMP Meter arrangement we created on the breadboard is just the beginning; the final product will be an all-in-one board with a smaller MCU, either an XIAO M0 MCU or an Atmega328AU CHIP. A battery will also be added to this setup to power the MCU, Display, and temperature Sensor.
The entire device will be housed in an elegantly designed 3D printed body with holes for mounting it on a wall.
For the time being, this is all there is for Version 2 of the project.
Leave comments or DM me if you run into any issues.
Special thanks to PCBWAY for supporting this project; do check them out for great PCB service at a lower cost.
Thanks again, and I will be back with a new project soon.