RFID Security System With LCD 1602
by Jawad Makki in Circuits > Raspberry Pi
4550 Views, 8 Favorites, 0 Comments
RFID Security System With LCD 1602

Introduction
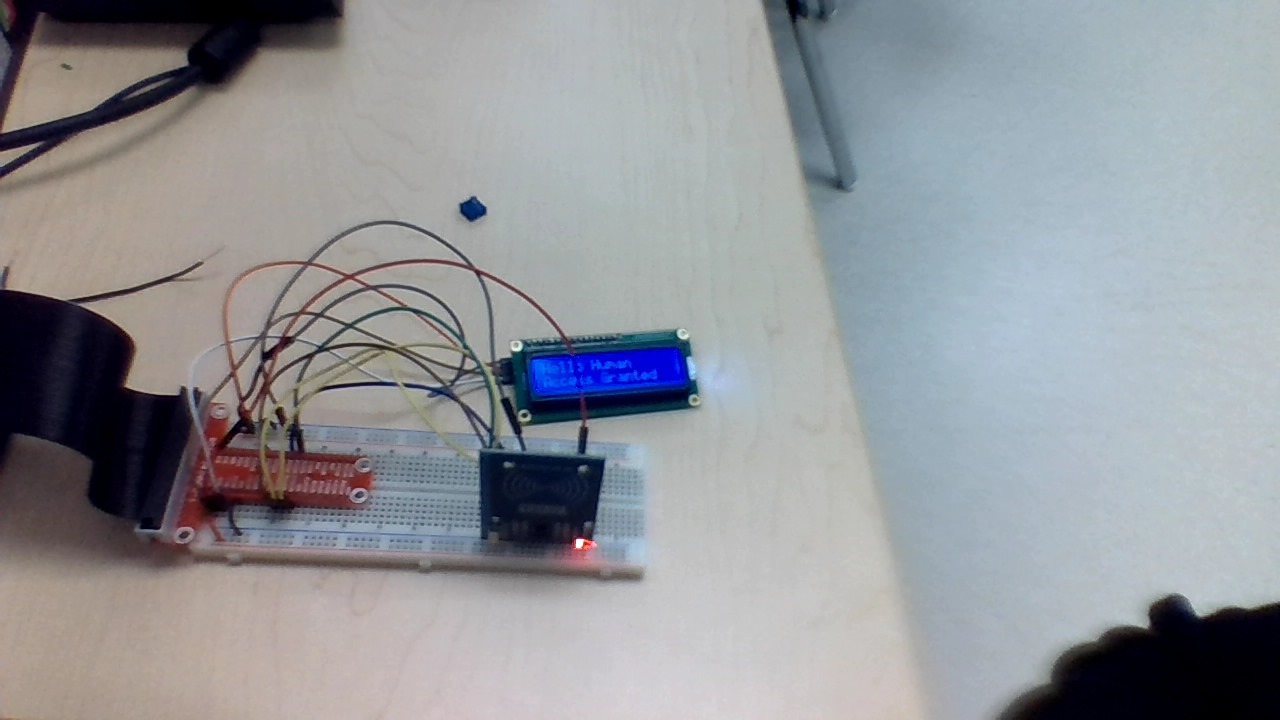
Today we will be making an RFID Security System. This will work like a security system so when an RFID tag or card is near it will display a message on the LCD 1602. The purpose of this project is to simulate how RFID door locks work. So, it will work when an RFID tag or card is near the RFID Reader, it will detect the card or tag and display a message on the LCD.
Equipment
- RFID RC522 Reader
- Raspberry Pi 3
- Breadboard
- Jumper Wires
- LCD 1602
- T-Cobbler
Now, Let's get started!
Assembling the RFID RC522 and LCD 1602

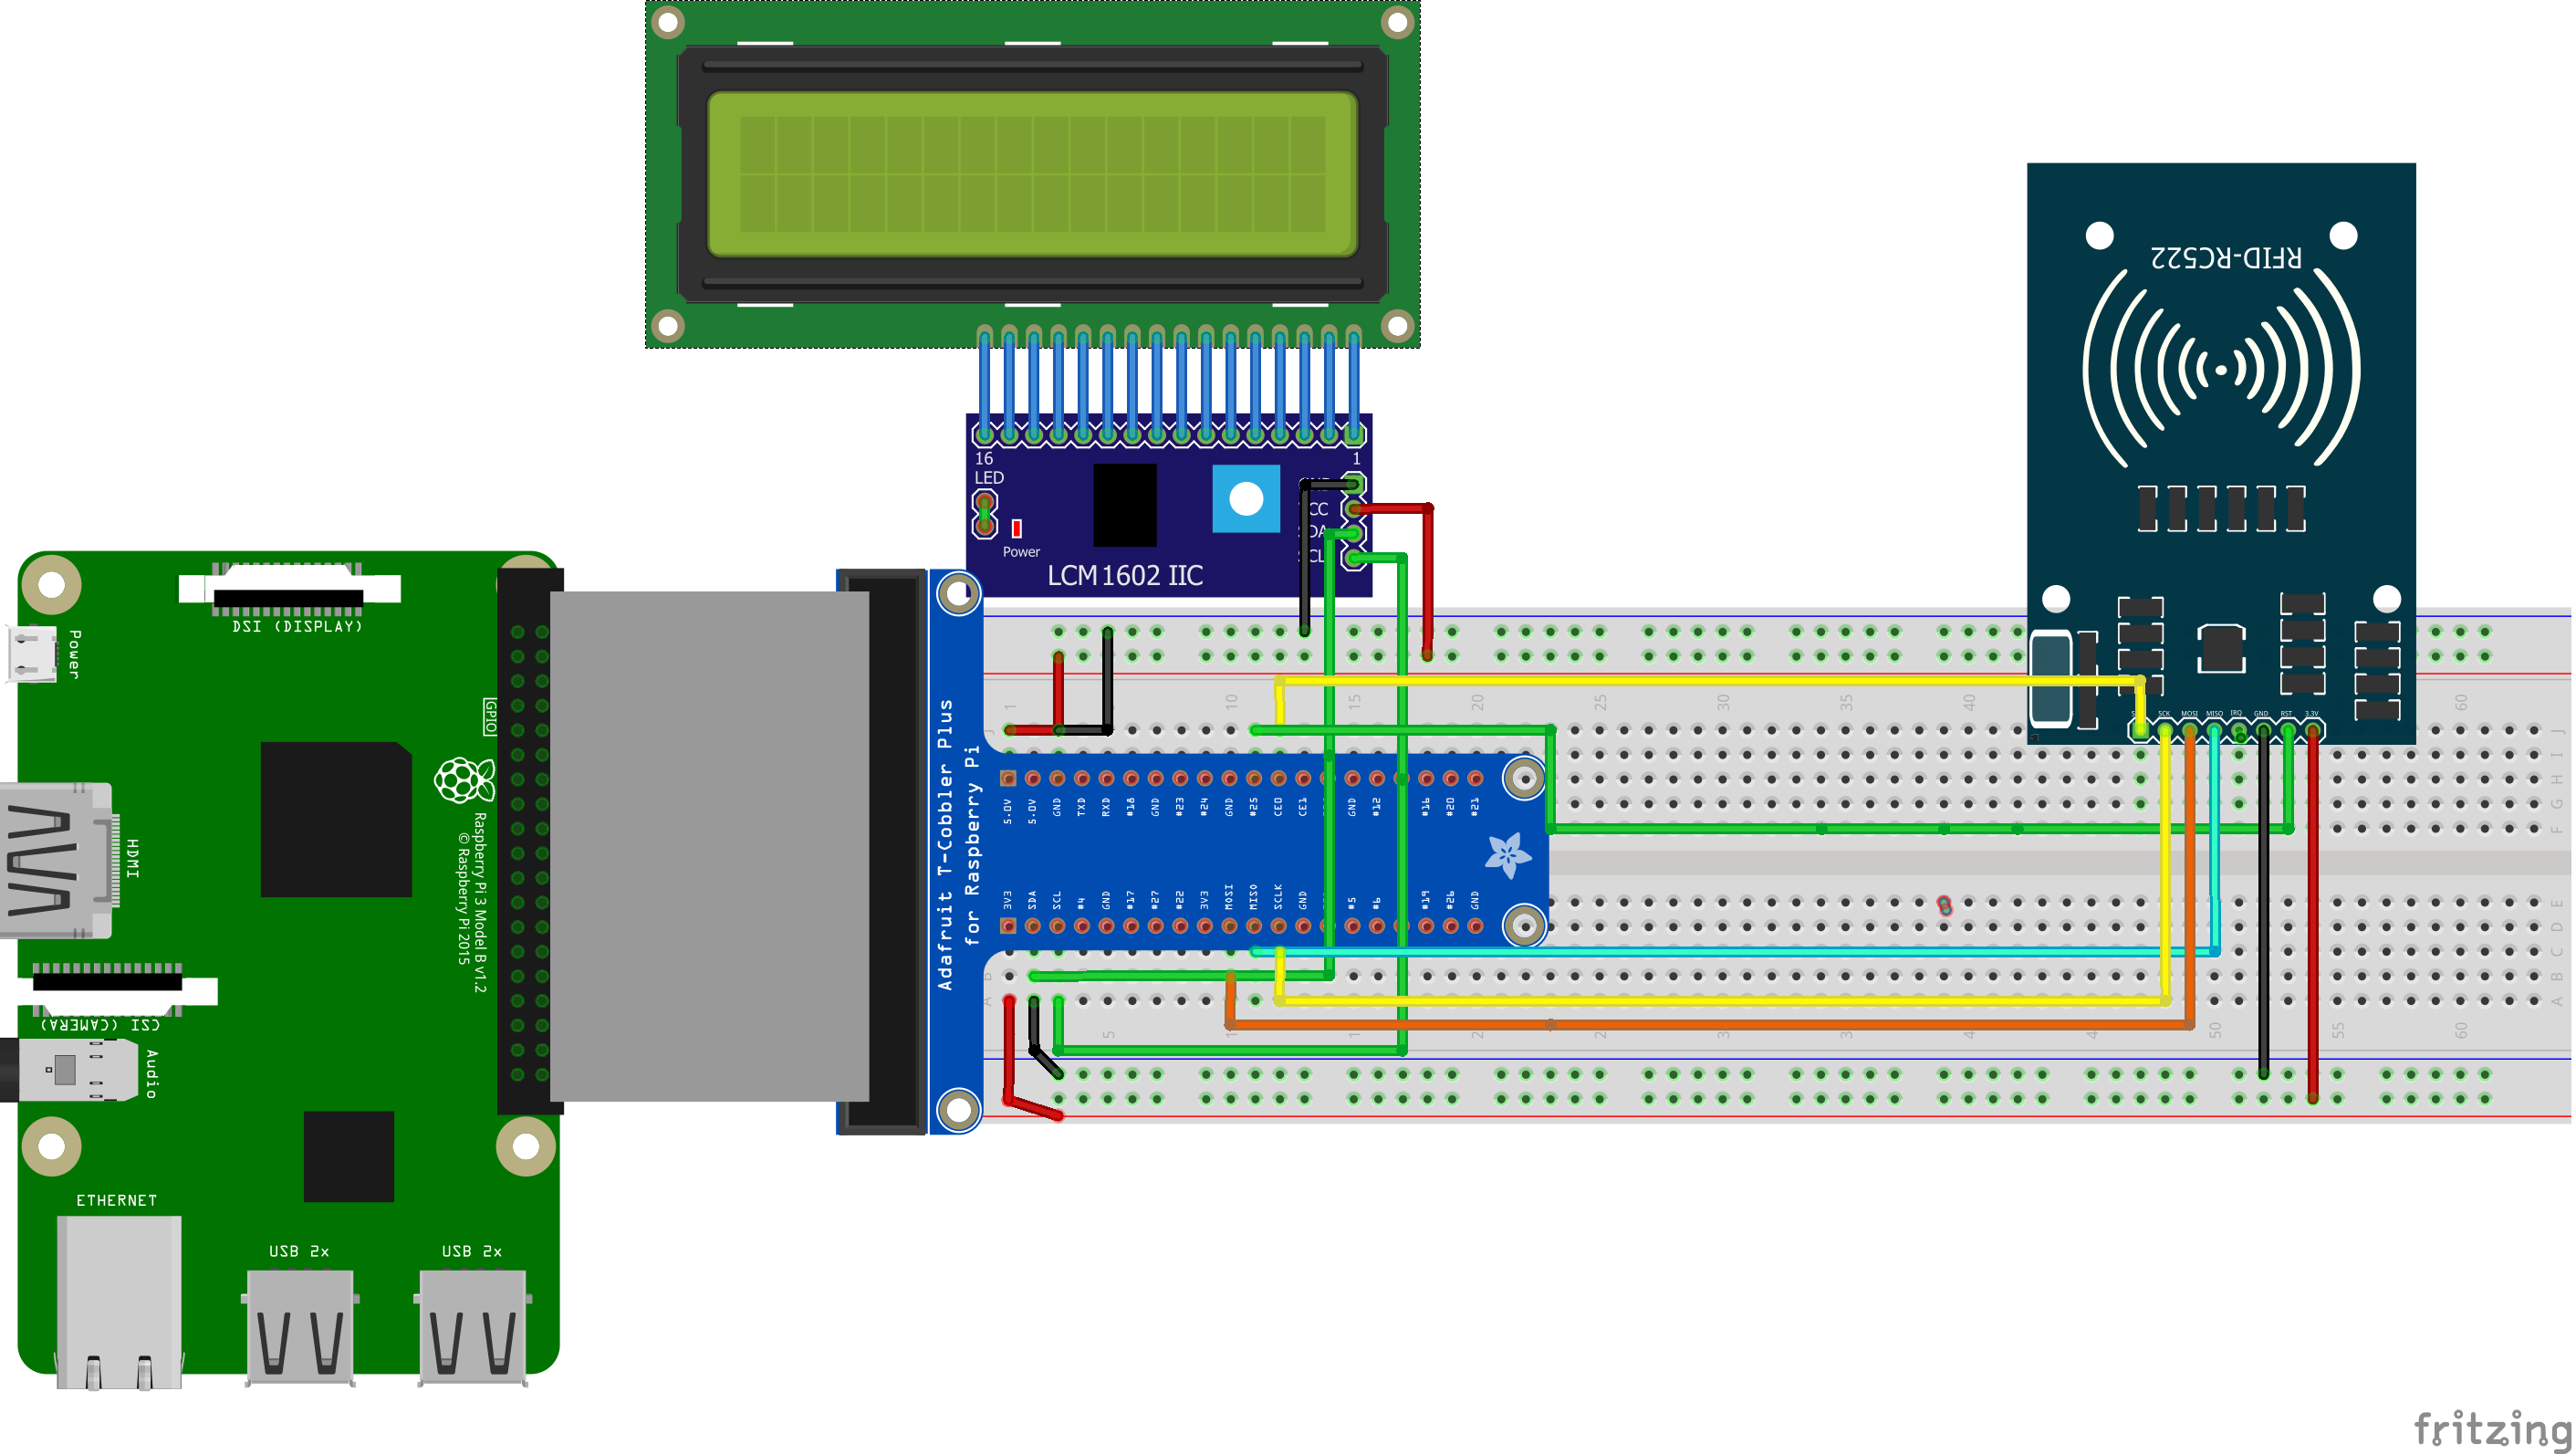
So, now we are going to wire the LCD and RFID to the breadboard. Below is a picture with a diagram of the pin number. It's also in written form for people who don't need pictures. On your RFID RC522 you will notice that there are 8 possible connections on it, these being SDA (Serial Data Signal), SCK (Serial Clock), MOSI (Master Out Slave In), MISO(Master In Slave Out), IRQ (Interrupt Request), GND (Ground Power), RST (Reset-Circuit) and 3.3v (3.3v Power In). We will need to wire all of these but the IRQ to our Raspberry Pi’s GPIO pins.
You can either wire these directly to the GPIO Pins or like we did in this tutorial, plug the RFID RC522 into our Breadboard then wire from there to our Raspberry Pi’s GPIO Pins.
Wiring your RFID RC522 to your Raspberry Pi is fairly simple, with it requiring you to connect just 7 of the GPIO Pins directly to the RFID reader. Follow the table below, and check out our GPIO guide to see the positions of the GPIO pins that you need to connect your RC522 to.
SDA connects to Pin 24.
SCK connects to Pin 23.
MOSI connects to Pin 19.
MISO connects to Pin 21.
GND connects to Pin 6.
RST connects to Pin 22.
3.3v connects to Pin 1.
Once you have finished with the wiring we can get to the fun part, coding! Let's go
RFID Setup
In order to get the RFID to work, we have to download some repository from GitHub using the terminal on the Raspberry Pi. So, first of all, give your raspberry some juice so it can turn on.
- Open Terminal and type this:
sudo raspi-config
2. This command will bring up another screen and from there, go down to Interfacing Options and then go to P4 SPI to enable that option.
3. Go back to the terminal and type this:
sudo reboot
We are doing this so the SPI can be enabled properly.
4. Once the Raspberry Pi has rebooted open Terminal and type:
lsmod | grep spi
We need to do this to check if the SPI is enabled properly. So, if you see spi_bcm2835 then your RFID is registered by the Raspberry Pi and now you can move to set up the LCD 1602
Troubleshooting
If for some reasons the SPI is not activated then follow these steps to get your SPI to work.
7. If for some reason the SPI module has not activated, we can edit the boot configuration file manually by running the following command on our Raspberry Pi.
sudo nano /boot/config.txt
8. Within the configuration file, use Ctrl + W to find “dtparam=spi=on“. If you have found it, check to see if there is a # in front of it. If there is remove it as this is commenting out the activation line. If you can’t find the line at all, just add “dtparam=spi=on” to the bottom of the file.
Once you have made the changes, you can press Ctrl + X then pressing Y and then Enter to save the changes. You can now proceed from Step 5 again, rebooting your Raspberry Pi then checking to see if the module has been enabled.
So now we are finished with the RFID and let's go to the LCD 1602!
Setting Up the LCD 1602
So to make the LCD to display letters we need to do download a repository and also we have to download some other things.
1. Open terminal and type this to install the LCD repository:
<p>git clone <a href="https://github.com/the-raspberry-pi-guy/lcd" rel="nofollow"> https://github.com/the-raspberry-pi-guy/lcd</a></p>
2. To check if the repository was installed correctly we have to type this function in the terminal:
ls
If you see a folder named lcd then you have successfully installed the repository.
3. Now, we need to change the directory, we can do this by typing in this function:
cd lcd
4. Finally, we have to make a new python file so make a new python 3 file and save it in the new folder and name it Security.py.
5. After, type this code in the file and save it.
<p>#!/usr/bin/env python</p><p>import RPi.GPIO as GPIO
import MFRC522
import signal
import time
import lcddriver</p><p>continue_reading = True
display = lcddriver.lcd()</p><p># Capture SIGINT for cleanup when the script is aborted
def end_read(signal,frame):
    global continue_reading
    print ("Ctrl+C captured, ending read.")
    continue_reading = False
    GPIO.cleanup()</p><p># Hook the SIGINT
signal.signal(signal.SIGINT, end_read)</p><p># Create an object of the class MFRC522
MIFAREReader = MFRC522.MFRC522()</p><p># Welcome message
print ("Welcome to the MFRC522 data read example")
print ("Press Ctrl-C to stop.")</p><p># This loop keeps checking for chips. If one is near it will get the UID and authenticate
while continue_reading:

    # Scan for cards
    (status,TagType) = MIFAREReader.MFRC522_Request(MIFAREReader.PICC_REQIDL)</p><p>    # If a card is found
    if status == MIFAREReader.MI_OK:
        print ("Card detected")
	display.lcd_display_string("Hello Human", 1)
	display.lcd_display_string("Access Granted", 2)
	time.sleep(1.5)
	display.lcd_clear()


    # Get the UID of the card
    (status,uid) = MIFAREReader.MFRC522_Anticoll()</p><p>    # If we have the UID, continue
    if status == MIFAREReader.MI_OK:</p><p>        # Print UID
        print ("Card read UID: %s,%s,%s,%s") % (uid[0], uid[1], uid[2], uid[3])

        # This is the default key for authentication
        key = [0xFF,0xFF,0xFF,0xFF,0xFF,0xFF]

        # Select the scanned tag
        MIFAREReader.MFRC522_SelectTag(uid)</p><p>        # Authenticate
        status = MIFAREReader.MFRC522_Auth(MIFAREReader.PICC_AUTHENT1A, 8, key, uid)</p><p>        # Check if authenticated
        if status == MIFAREReader.MI_OK:
            MIFAREReader.MFRC522_Read(8)
            MIFAREReader.MFRC522_StopCrypto1()
        else:
            print ("Authentication error")</p>
Make the Security System Work!
We are all set and now we can finally get the Security System to work! To make it work we have to open terminal.
1. Open terminal
2. We need to change the directory to lcd folder so type this on the terminal:
cd lcd
3. Type this:
python Security.py
Nice! The terminal should say this "Welcome to the Security System."
Place your ID tag on the RFID reader and see what happens.
If the RFID reads it then it will say card detected on the terminal and on the LCD it will display "Hello Human" and underneath it "Access Granted"
If this doesn't happen with you then please check your circuit and ask for help