Quickly Restore an Old Photo in Adobe Photoshop.
by AnitaMorrison in Design > Digital Graphics
52404 Views, 12 Favorites, 0 Comments
Quickly Restore an Old Photo in Adobe Photoshop.
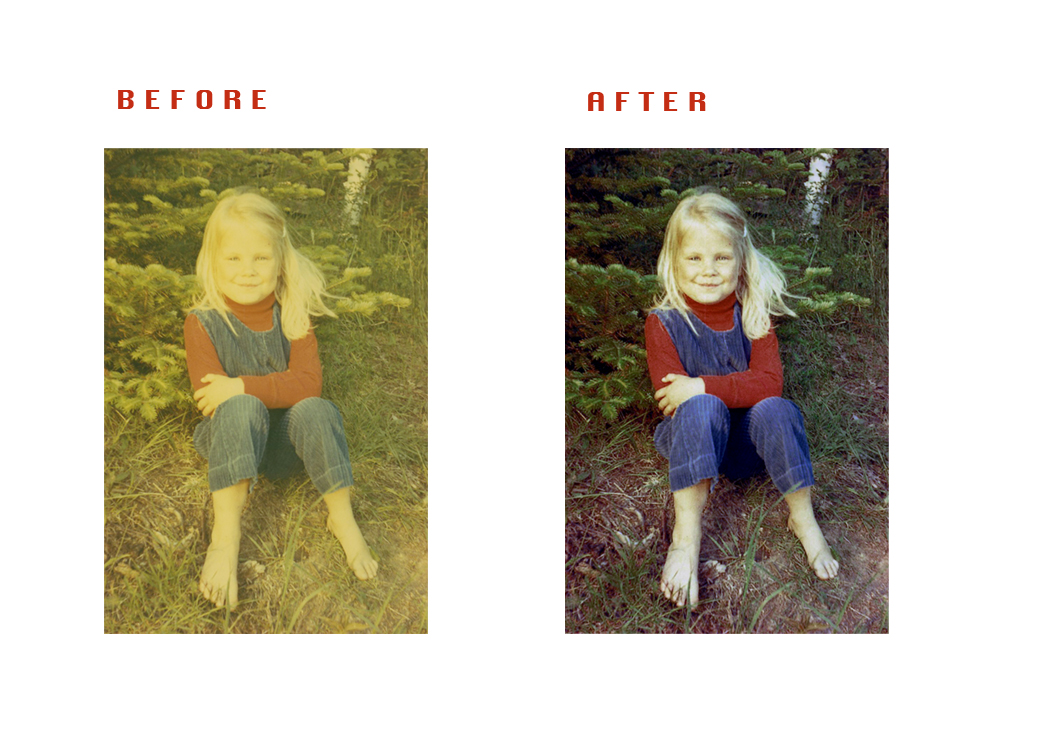
While full restoration of damaged photos can be very time consuming with lots of detailed work involved, some basic steps can result in a major improvement to a lot of photos. So, in the next steps, I will show you how to make some very basic adjustments to help you improve your old photos to share with family and friends.
Supplies
- An old photo that needs repair.
- A scanner (or a digitally scanned image of your photo from your local scanning service provider).
- Adobe Photoshop (I used Photoshop CS5) software on your computer.
Please note: The assumption will be made that you have a basic understanding of using Adobe Photoshop.
Open Your File in Photoshop.
The first thing you need to do is open your software and open the digital file of the photo you want to repair.
Cropping
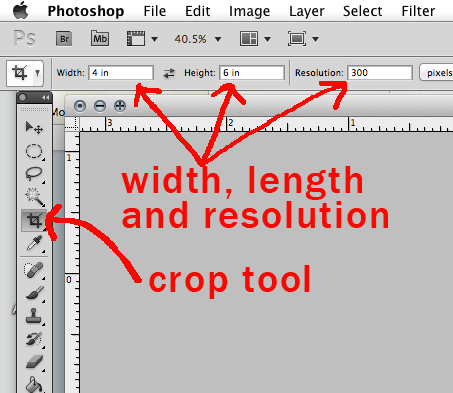
Next, you need to crop your photo before beginning work as you do not want Photoshop to take into consideration information in the photo that it does not need or that will affect the algorithms it uses to make calculations with the filters etc. you will be using - so, let's get rid of any unwanted data/pixels first.
Select the crop tool on the left tool panel and adjust the settings on the top menu bar for the width and length. Make sure you set the resolution to 300, which is print resolution. This means that when you go to print with the resolution set to 300, your image will be the width and length dimensions you have set, so in my case, it will be 4x6". If you use a resolution that is smaller than 300, then your image will print smaller than 4x6, and if you use higher than 300, it will be larger than 4x6.
Always use 300dpi (print resolution), and your images will print the size you have set.
Copy the Layer.
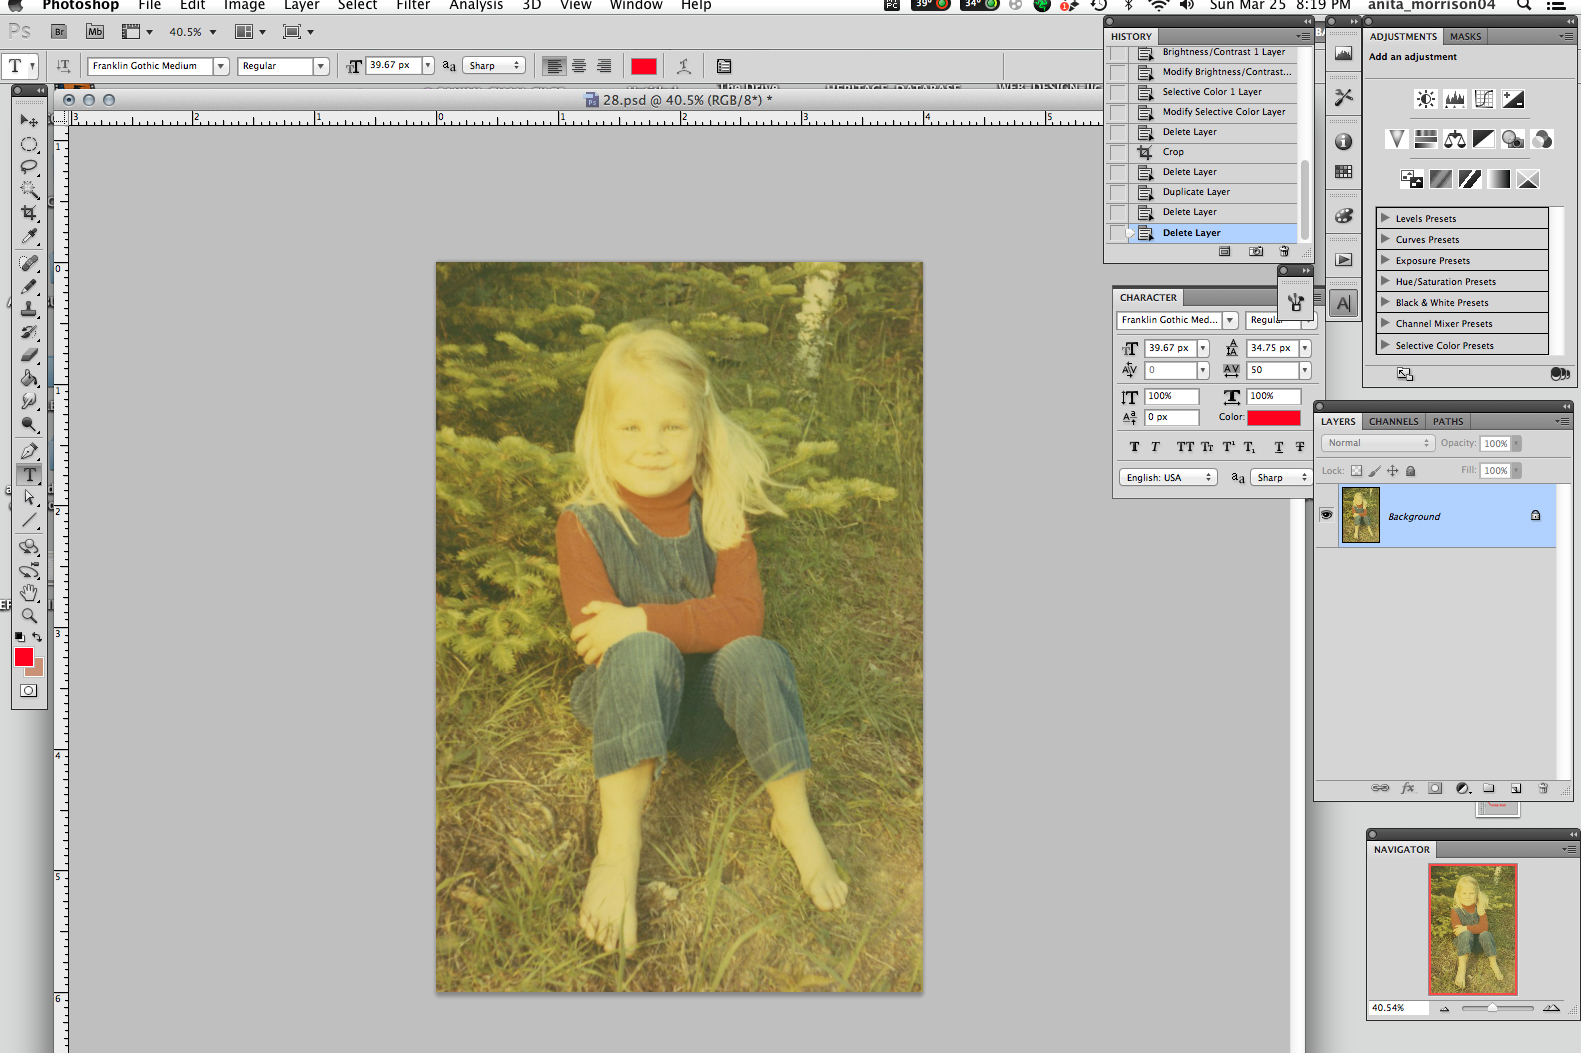
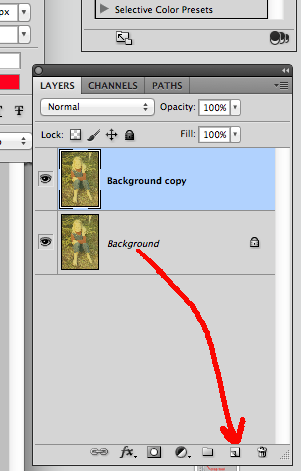
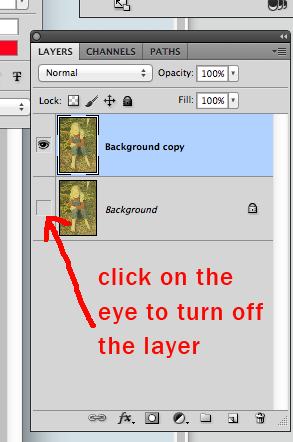
Your image will open with the layers panel showing the original file with the default title of "Background" layer. You will want to leave this layer alone while you are working in case you need to refer back to the original image.
So, first we will copy this layer by dragging the "Background" layer down to the copy layer icon on the bottom of the panel, and it will create a copy of the "Background" layer and rename it "Background Copy."
Now, turn off the original "Background" layer by clicking on the "eye" next to the layer to hide it for now.
Assessing
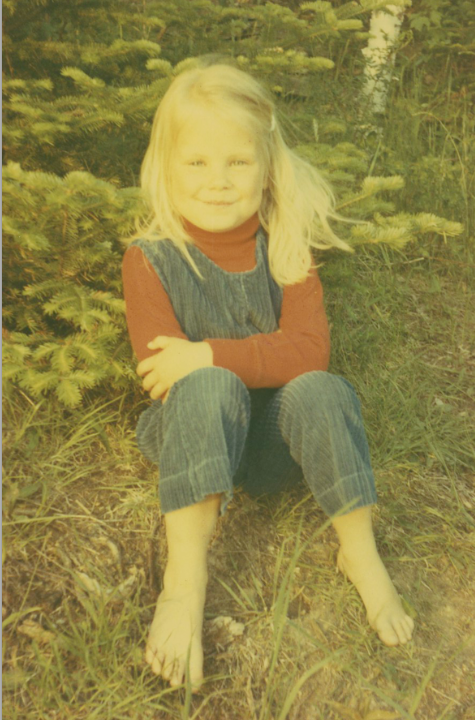
As you can see, the photo has a really distinctive yellow color cast and some serious fading and blowouts in the highlights.
We can help to remove the color cast and bring back some of the highlights and shadows. Some of the blowouts we will have to see how much we can bring back in this basic tutorial.
Let's start with the color cast.
Levels Adjustment
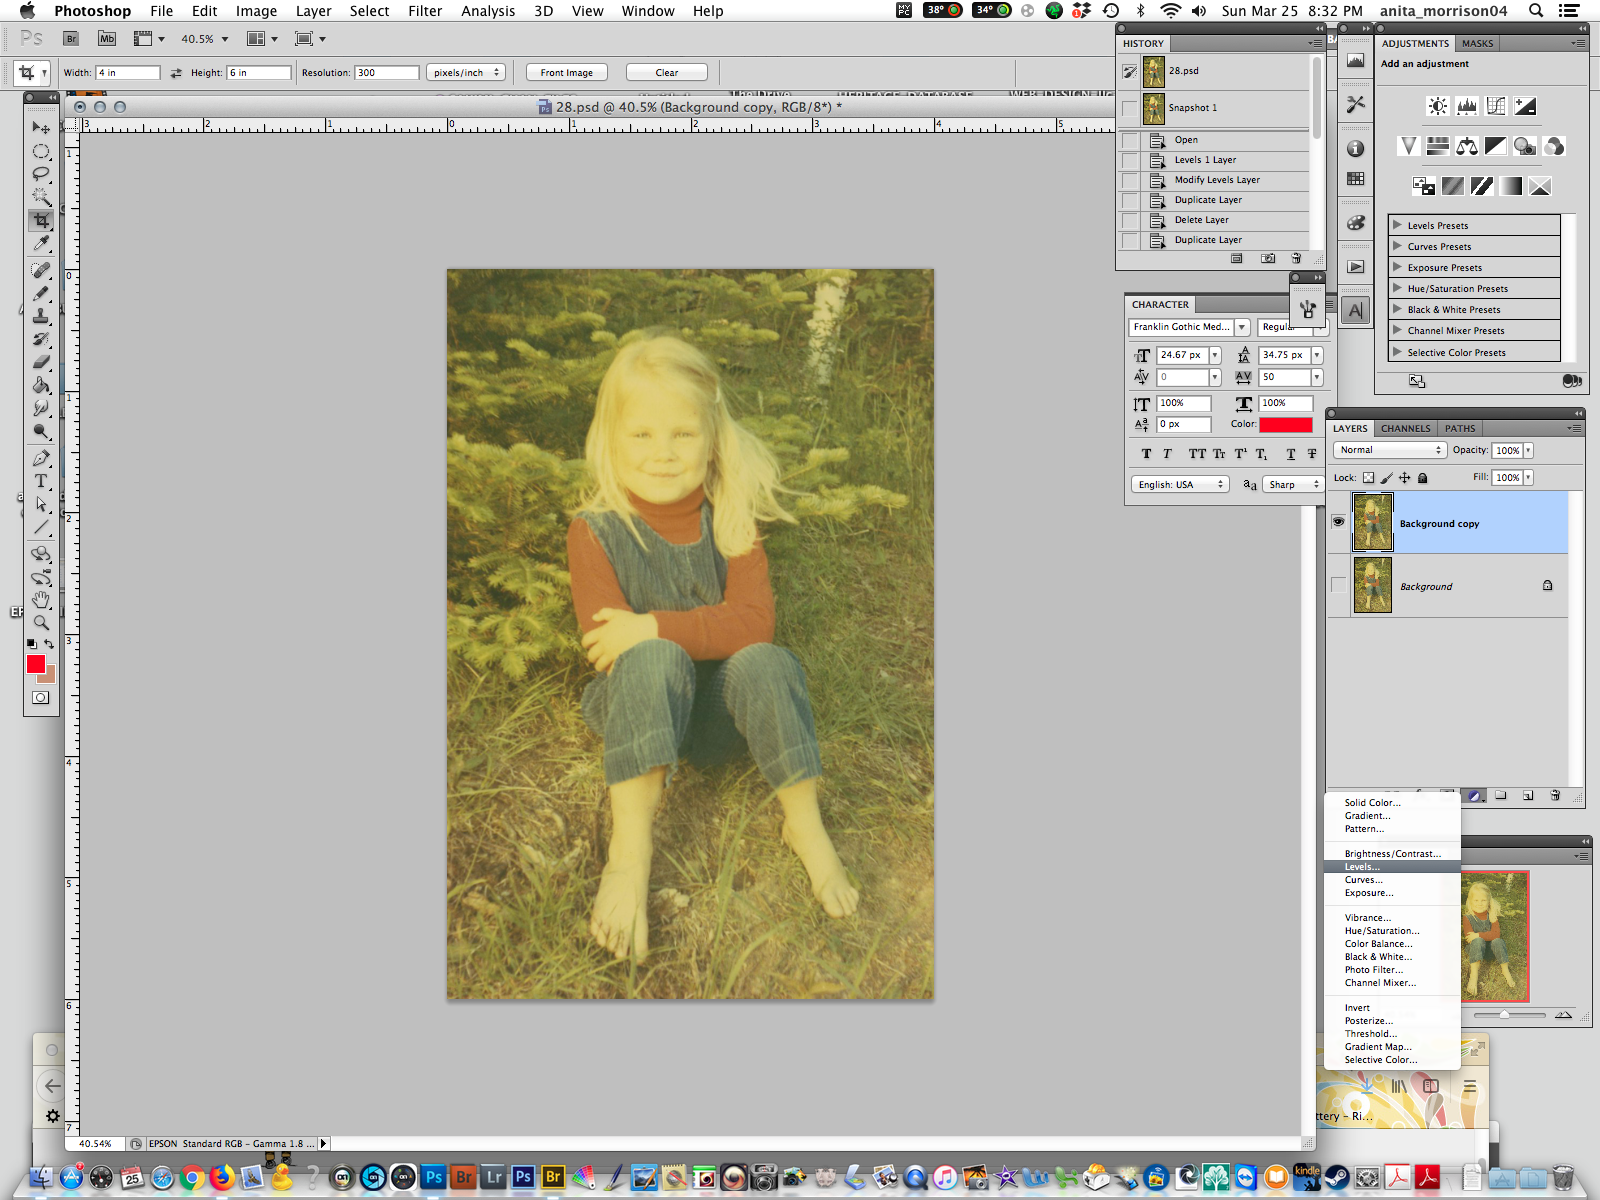
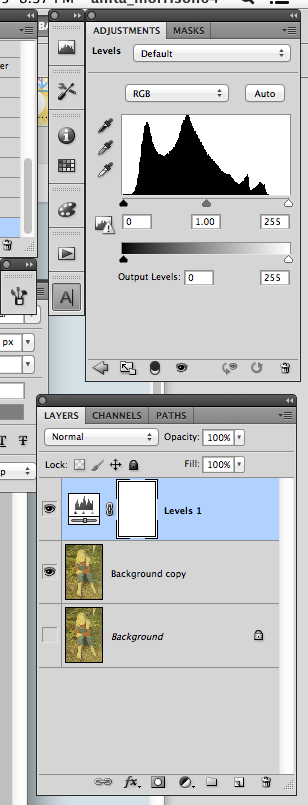
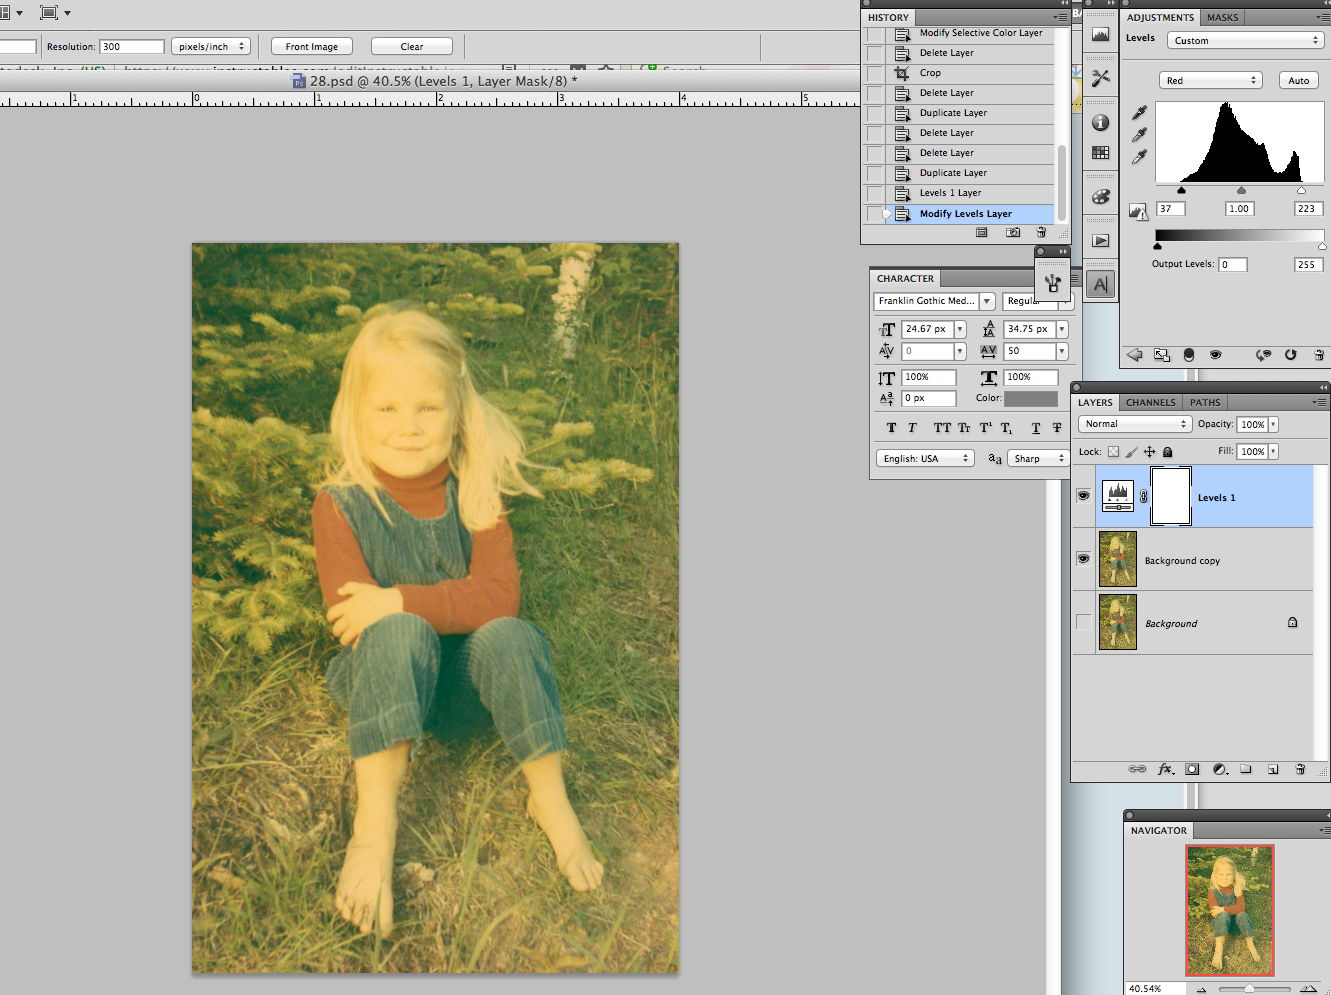
Our ideal process should be non-destructive, meaning we want to be able to change the things we do in case we don't like the changes and keep the original image in tact.
So let's make a levels adjustment layer to sit on its own on the top of the layer stack so it will affect the layers below it.
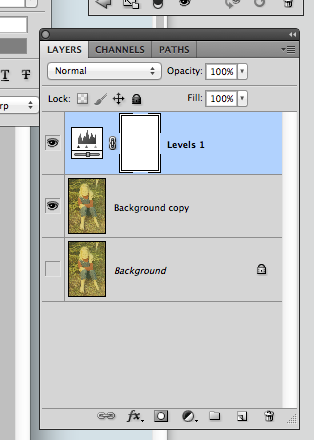
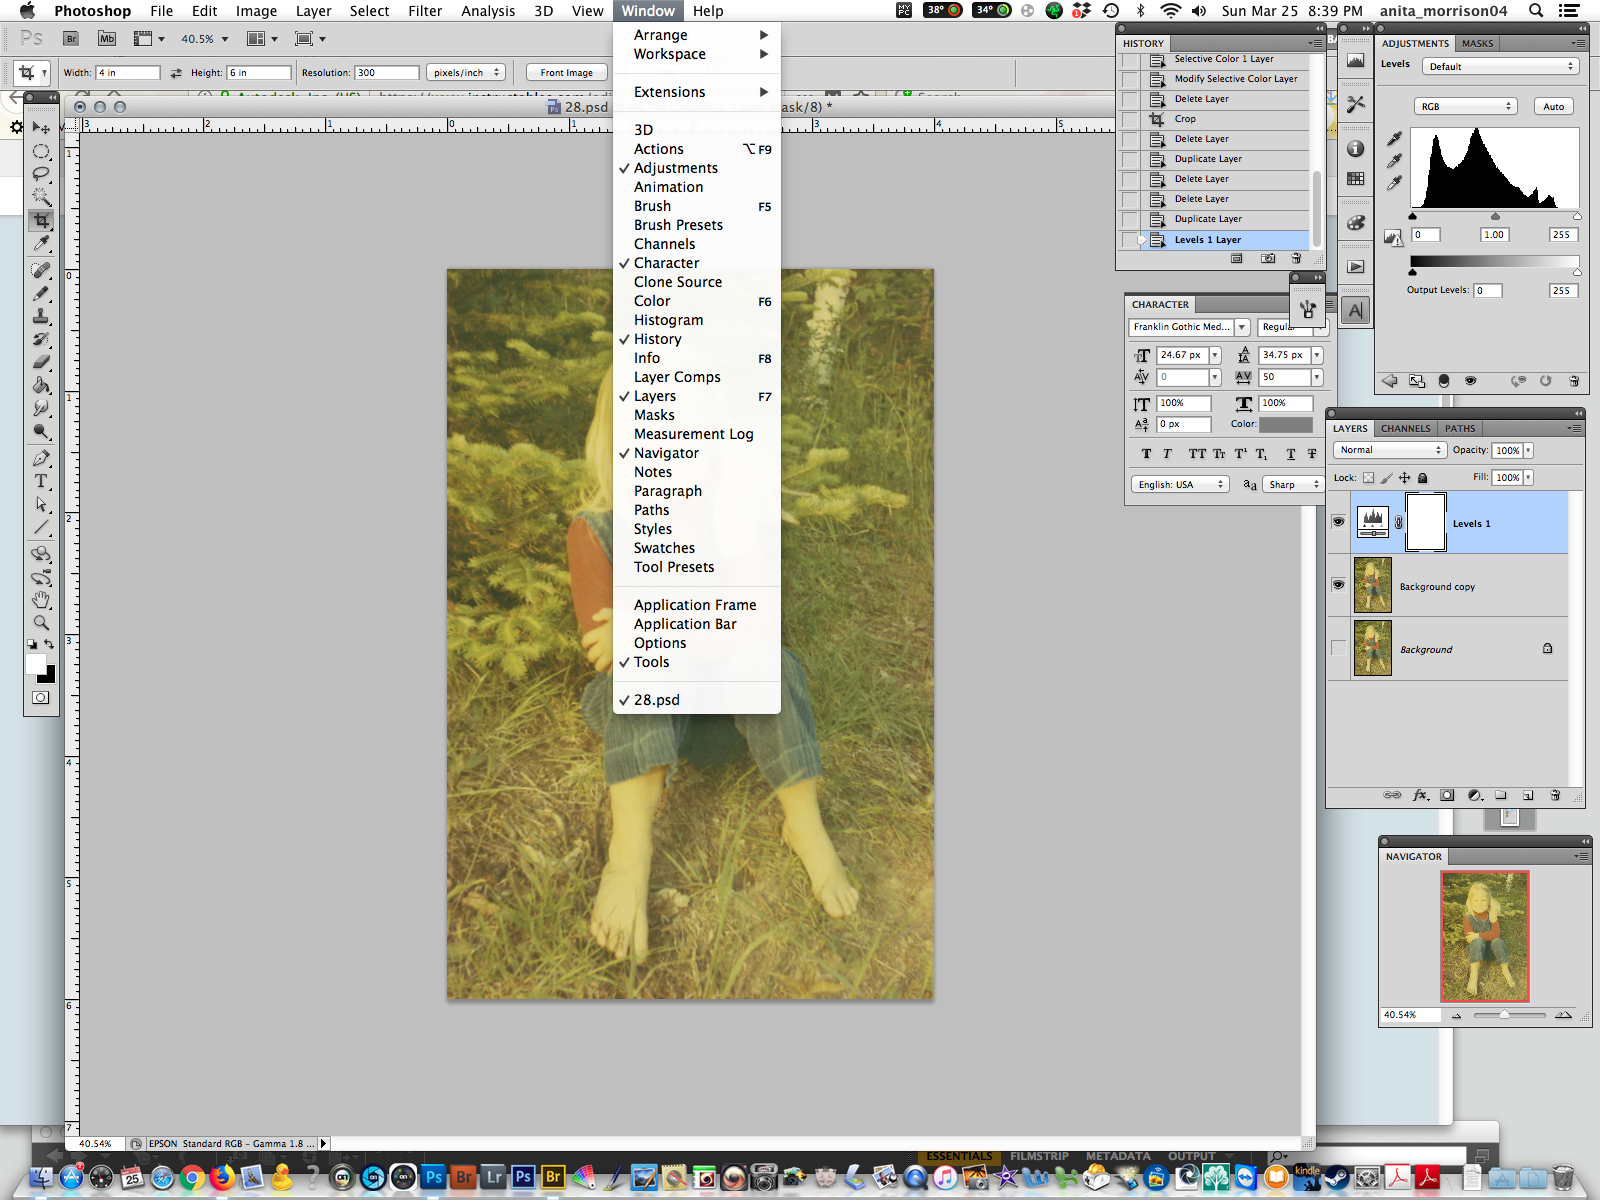
You can see that the layer of the image is highlighted in blue, which means anything we do will actually be done to that layer. However, we are going to choose to make a levels adjustment on its own layer by selecting the levels adjustment tool just down below by selecting the half white/half black icon on the bottom of the panel. This will bring up a series of adjustment choices for you to use. Select the one called levels, and Photoshop will automatically place a levels adjustment layer just above the layer you have currently highlighted (in our case, it will be placed on the top of the layer stack.)
You should also see the levels adjustment panel appear up above in your panels. If you don't see it, go to the "windows" menu at the top menu bar and select it in the drop down menu.
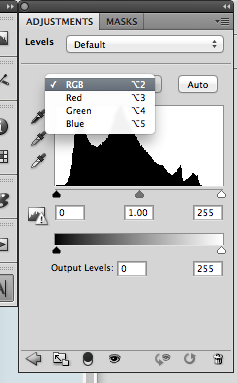
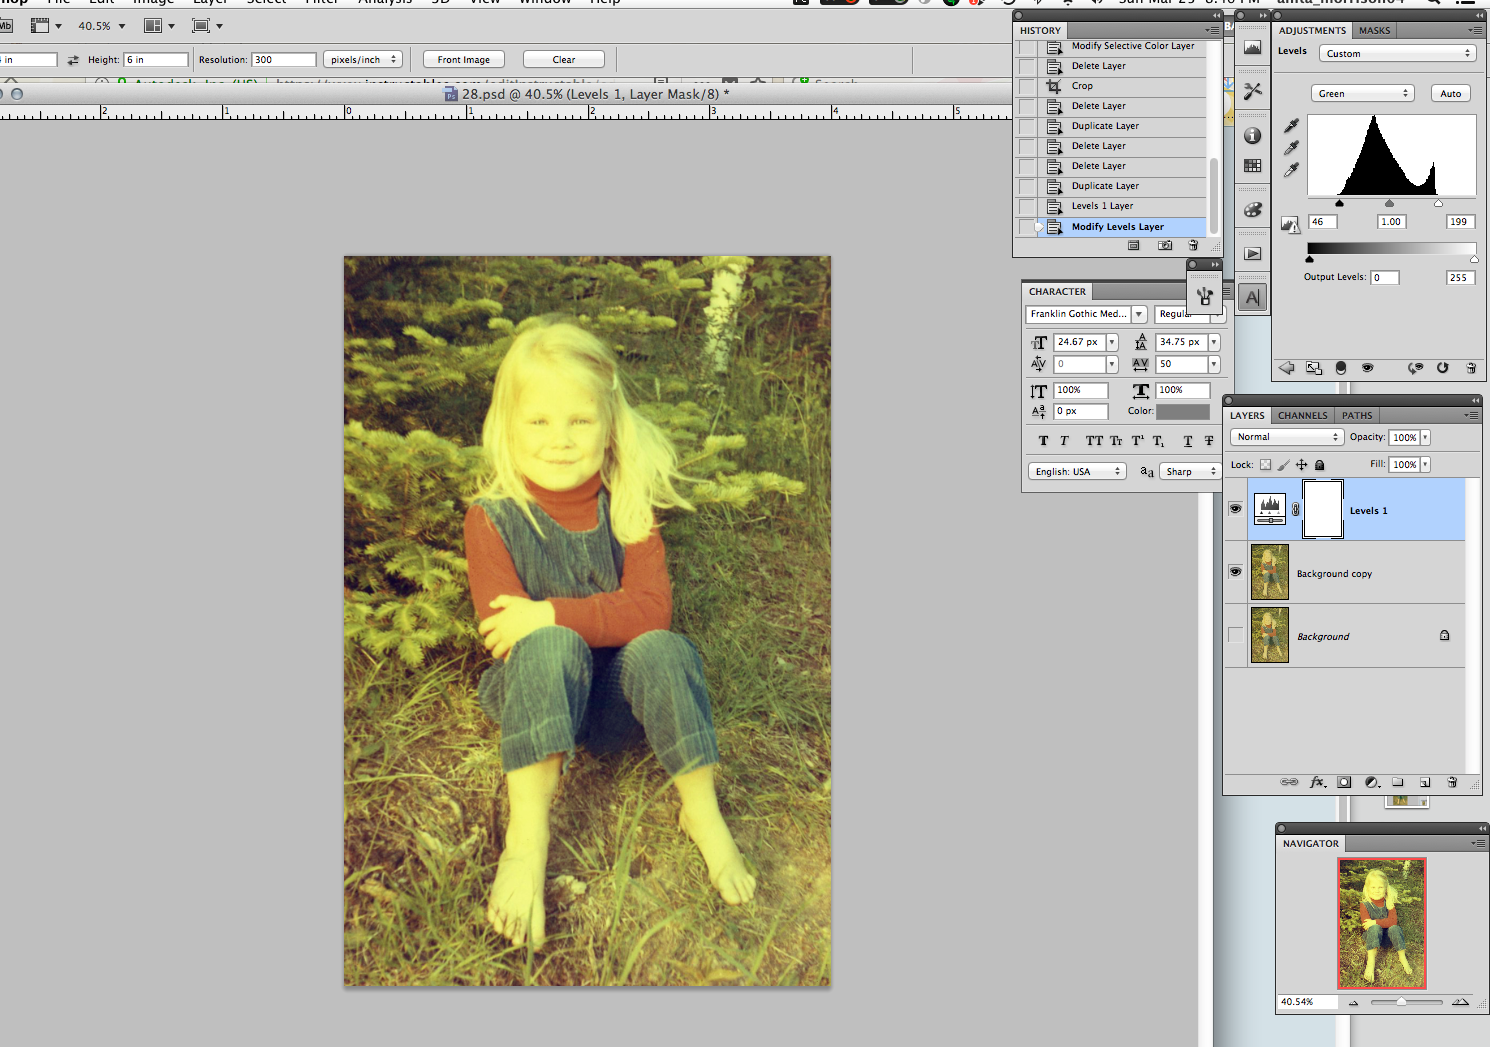
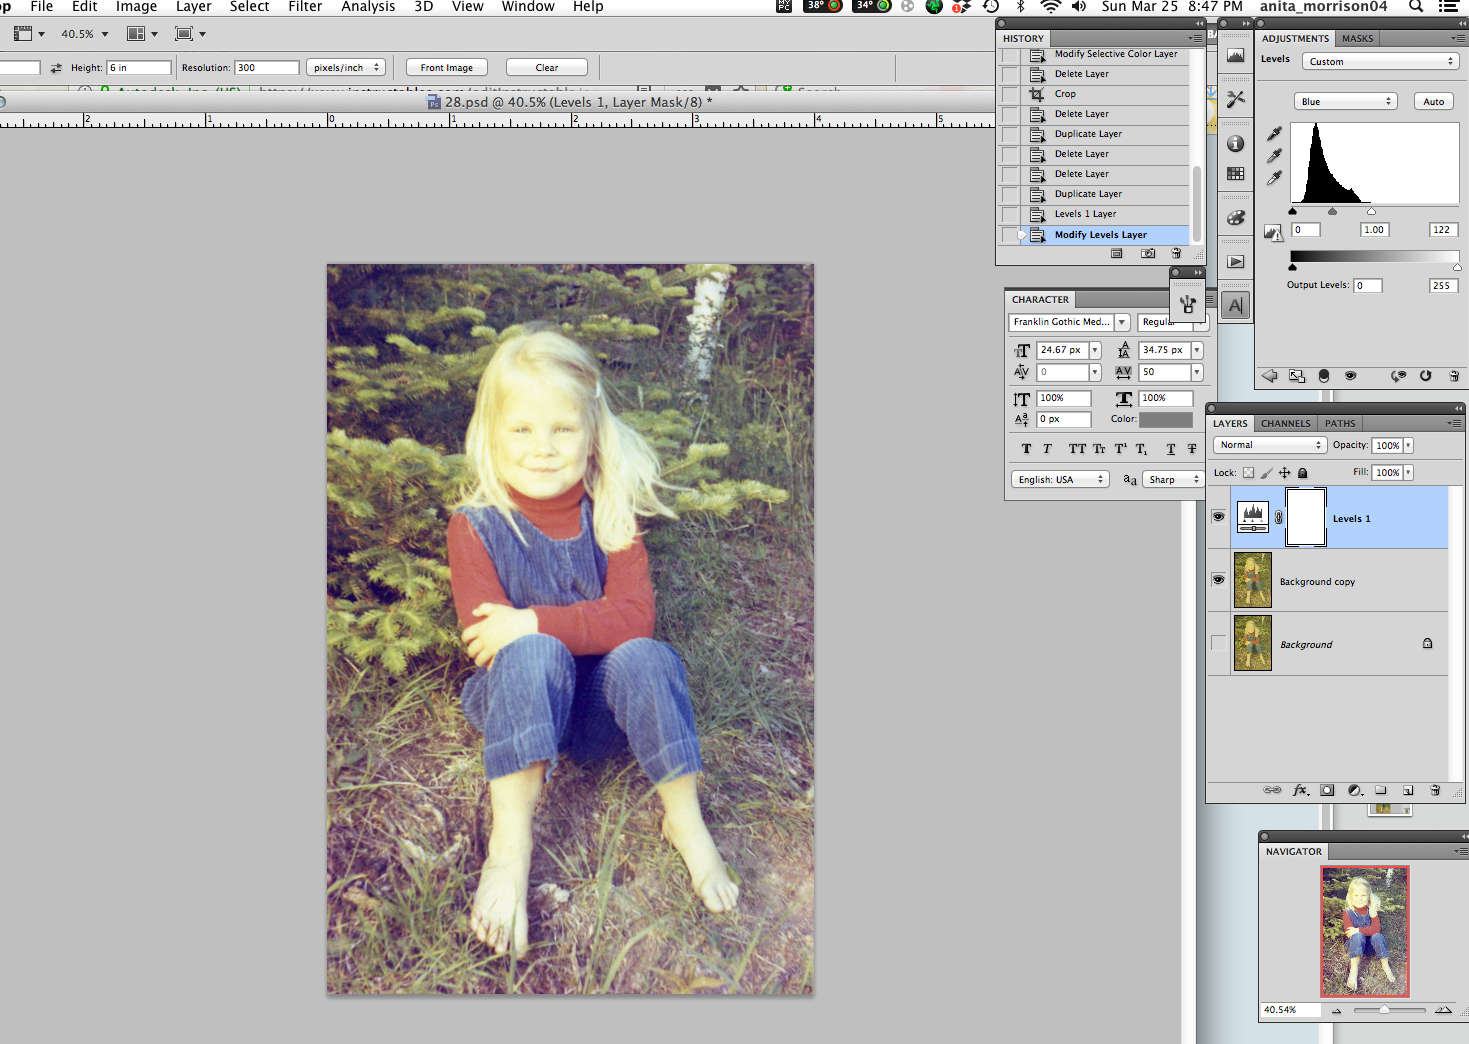
Next you are going to make adjustments to the separate color channels in the levels adjustment panel. If you click on the "RGB" icon, it will drop down with the red, green, and blue channels to choose.
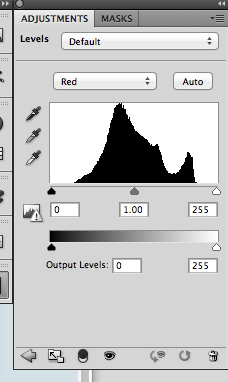
Click on the "red" channel first. This will bring up the red channel's histogram (graph) and the adjustment buttons for this channel. Slide the far left (black) button towards the center until it hits the edge of the graph and then pull the far right button (white) into the center until it also hits the other edge of the graph.
Do this same thing on each of the other channels for green and blue.
TIP: If you want to "see" when you hit the edge of the graph, hold down your alt/option key as you click on the little button, and the image will turn black. As you move the button towards the graph, little spots will start to appear on your screen indicating when you hit the graph....stop moving your button when the little highlights begin to appear. So the same with the white button and on the other channels. Once you get used to this method, you really won't be using the alt/option tip, you will get a feel for when you hit the edge of the histogram/graph.
Adjusting the Adjustment.
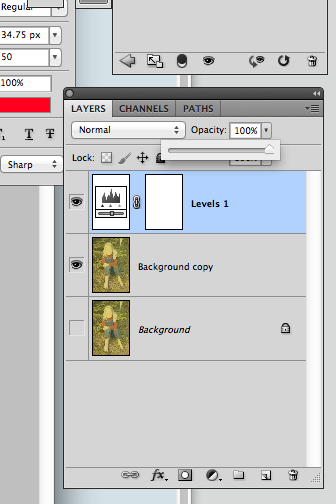
Once you have made the adjustments to each channel, you may find that the result is a bit too contrasty for you. You can either return to each of the channels and pull the buttons a bit back outwards (perhaps you went a bit too far into the graph edge and want to pull them back a bit).
Or
You can reduce the opacity of the adjustment layer. With the adjustment layer highlighted (in the above picture it is blue), you can go to the "opacity" slider just above the layer and move the slider a bit to the left to reduce the affect of the adjustment layer on the layer below it. This is the beauty of Photoshop as it allows you to perform tasks on separate layers that you can then decide how much each layer affects the ones below it.
If you want to reduce the adjustment, just move the slider a bit to the left and make the affect less than 100%.
Adding Some Shadows or Highlights.
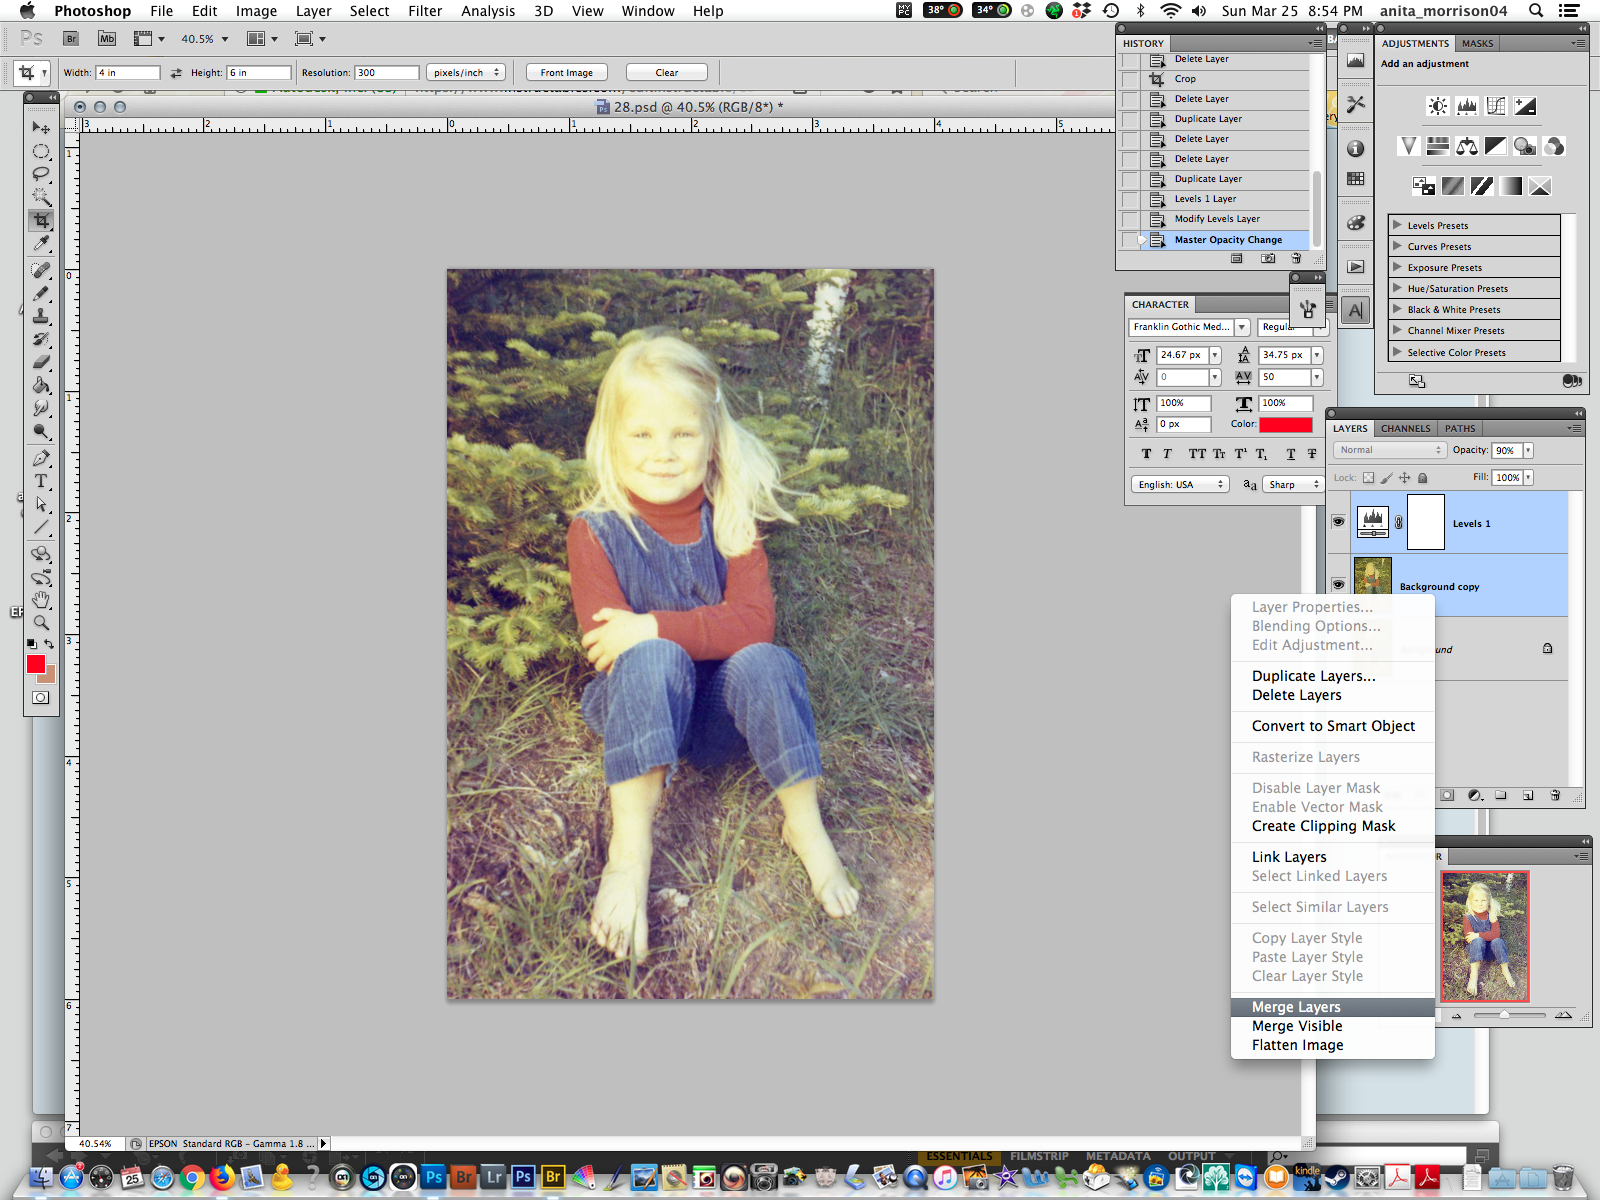
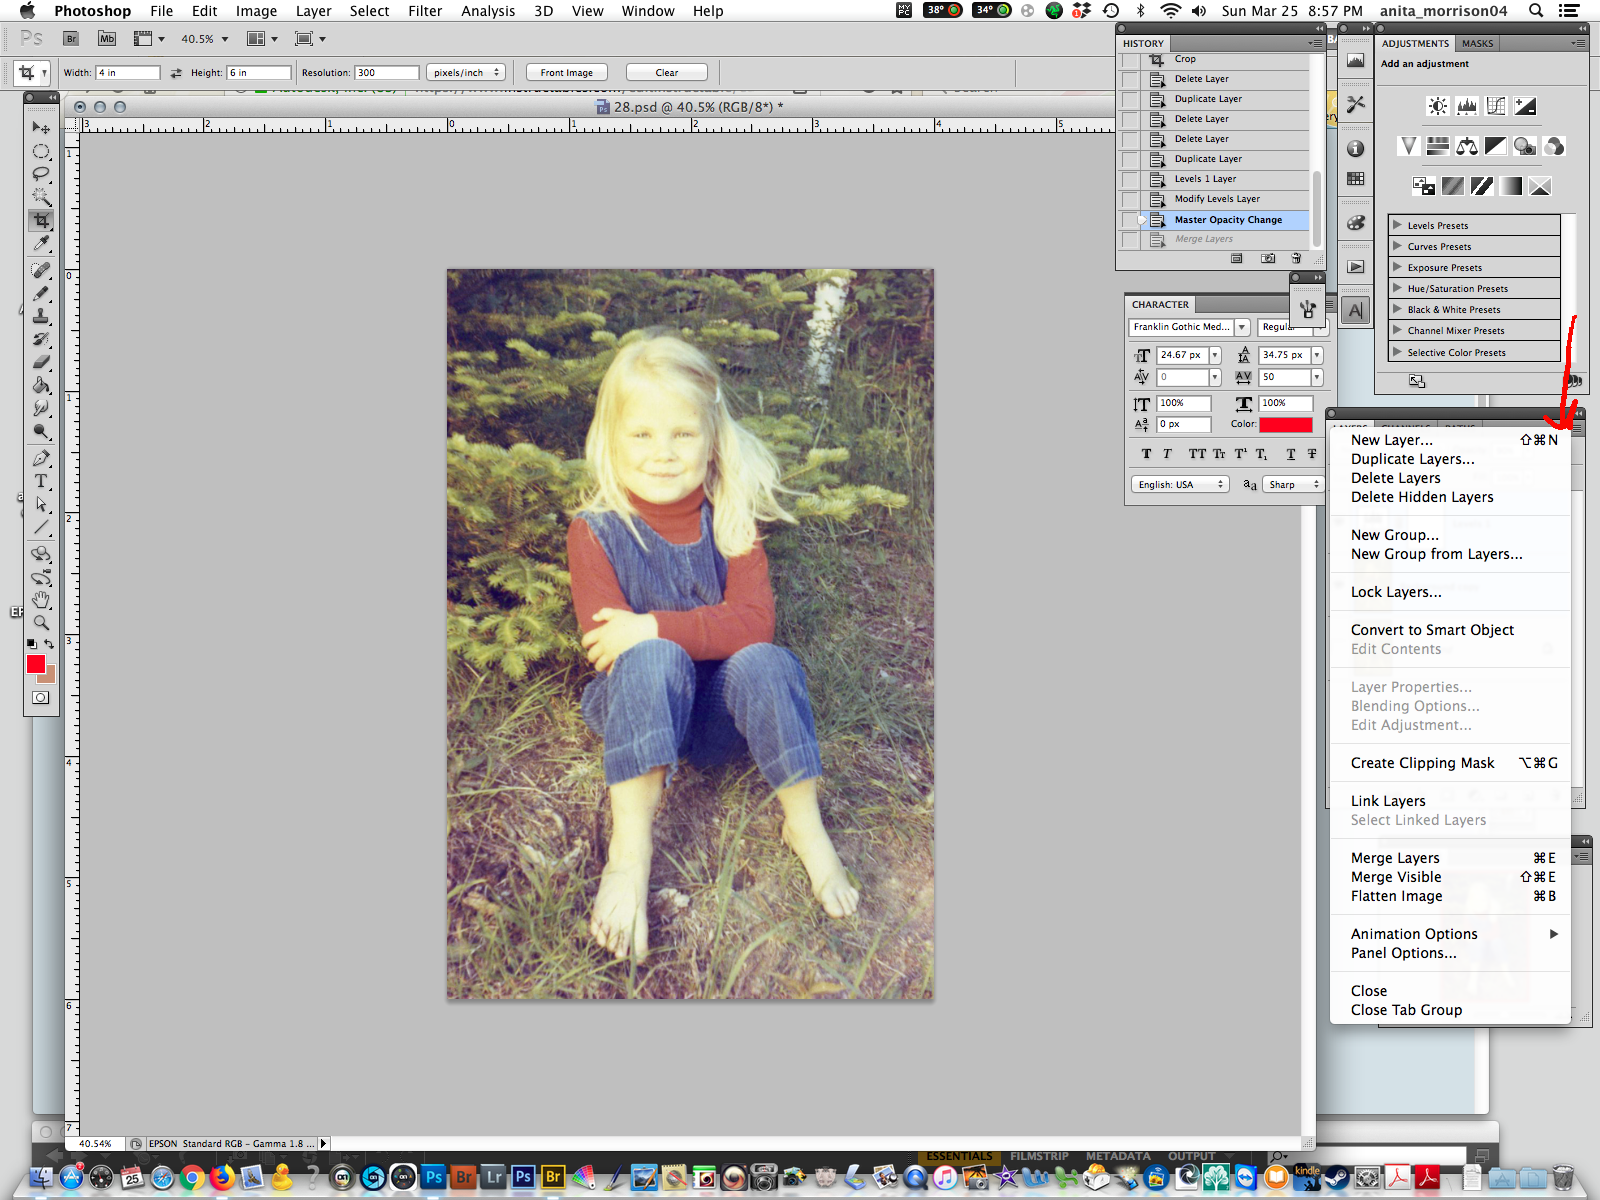
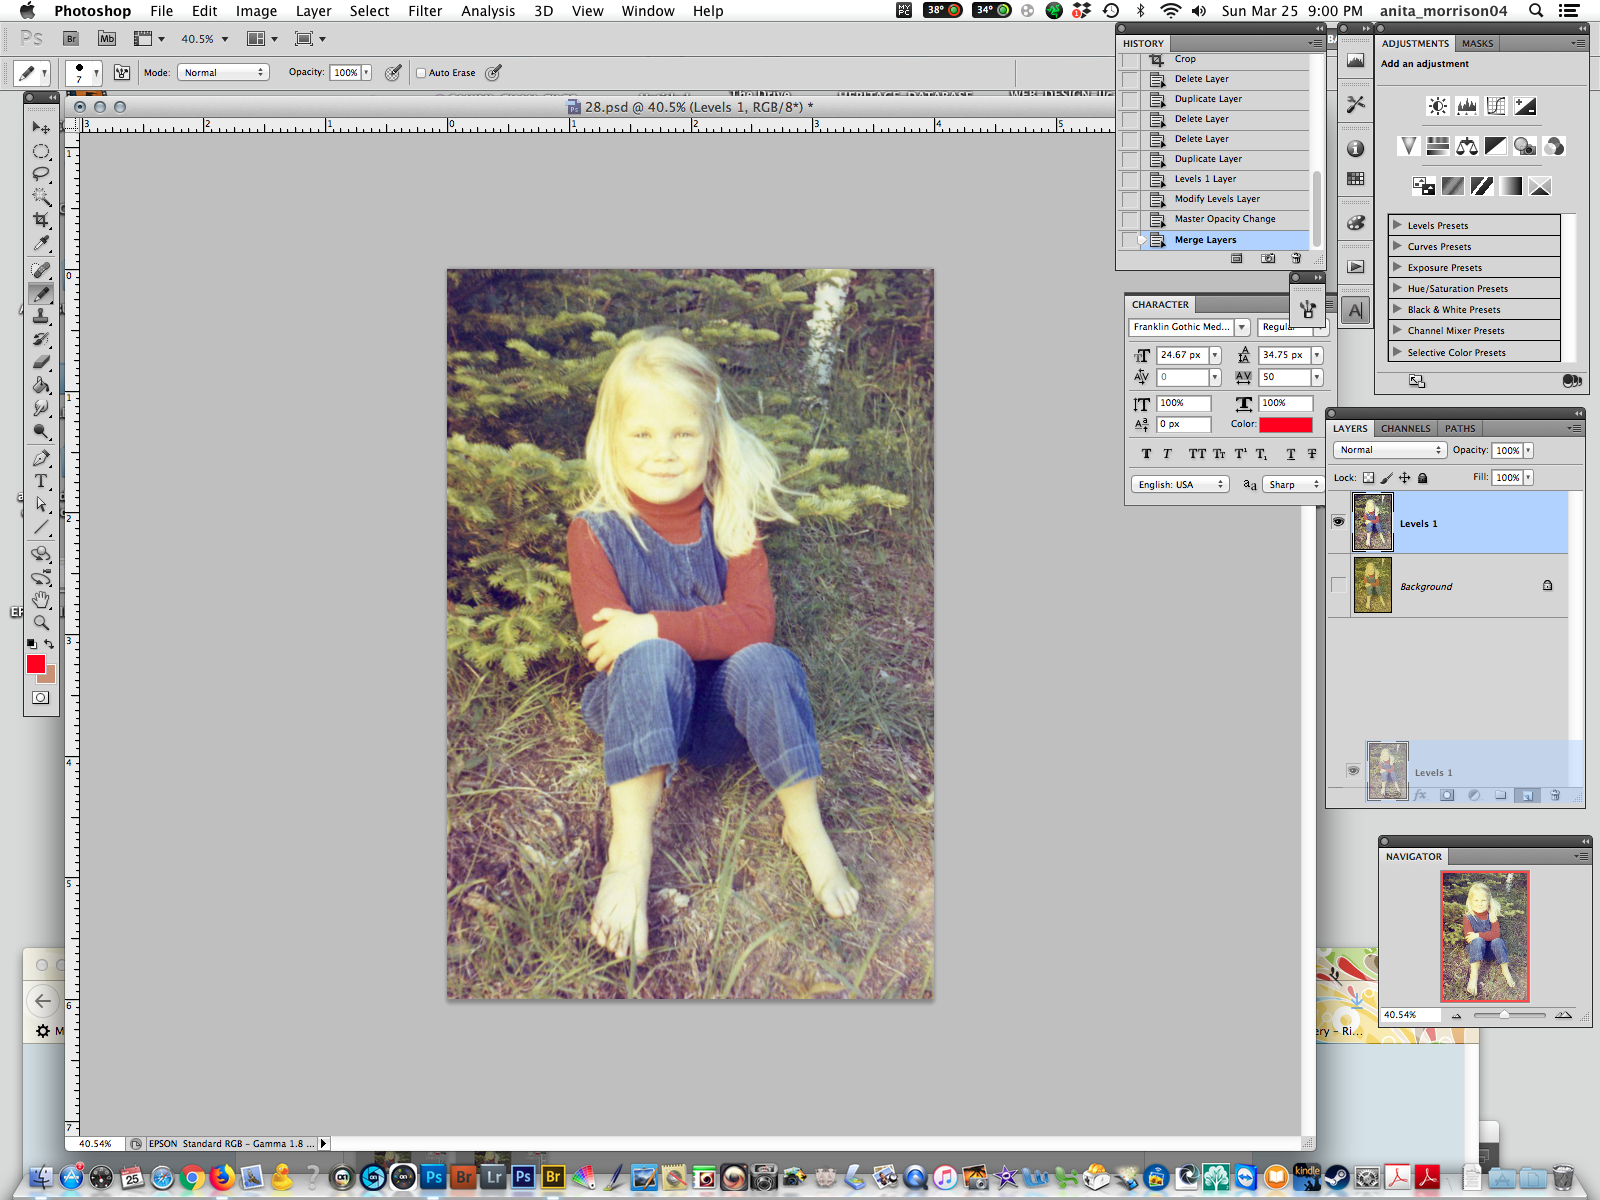
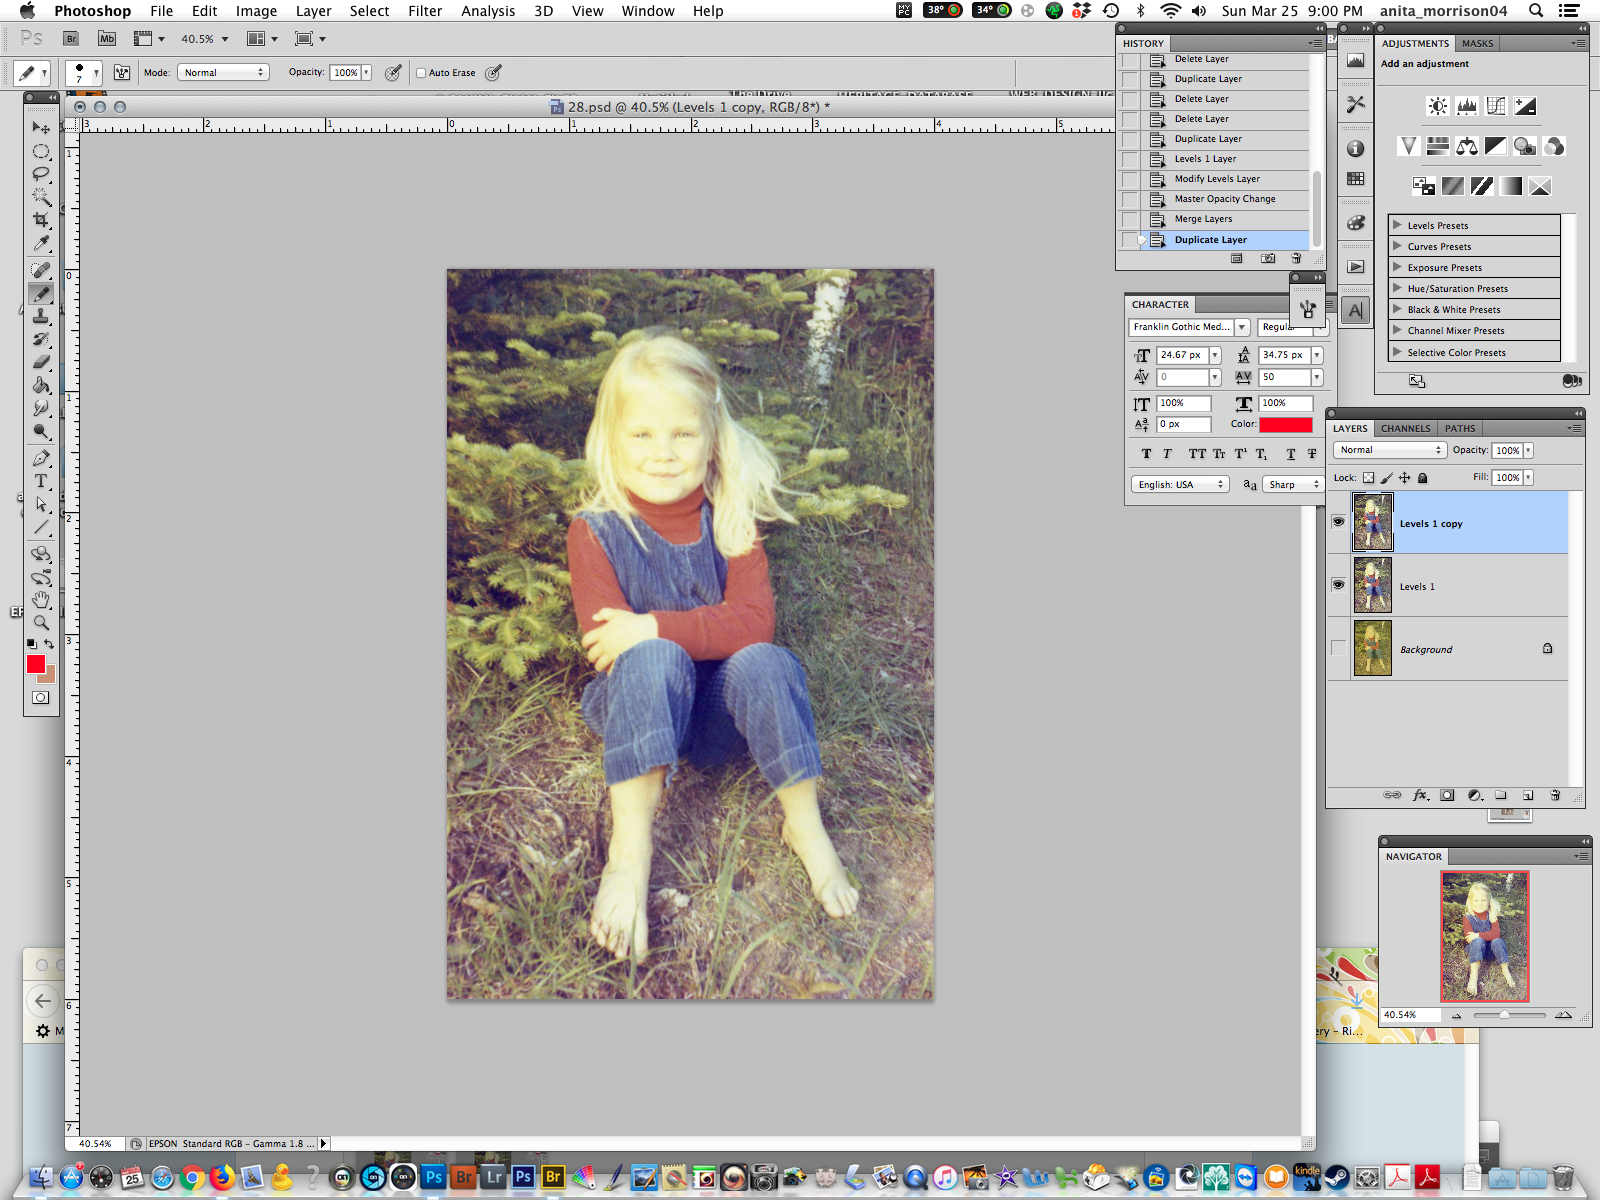
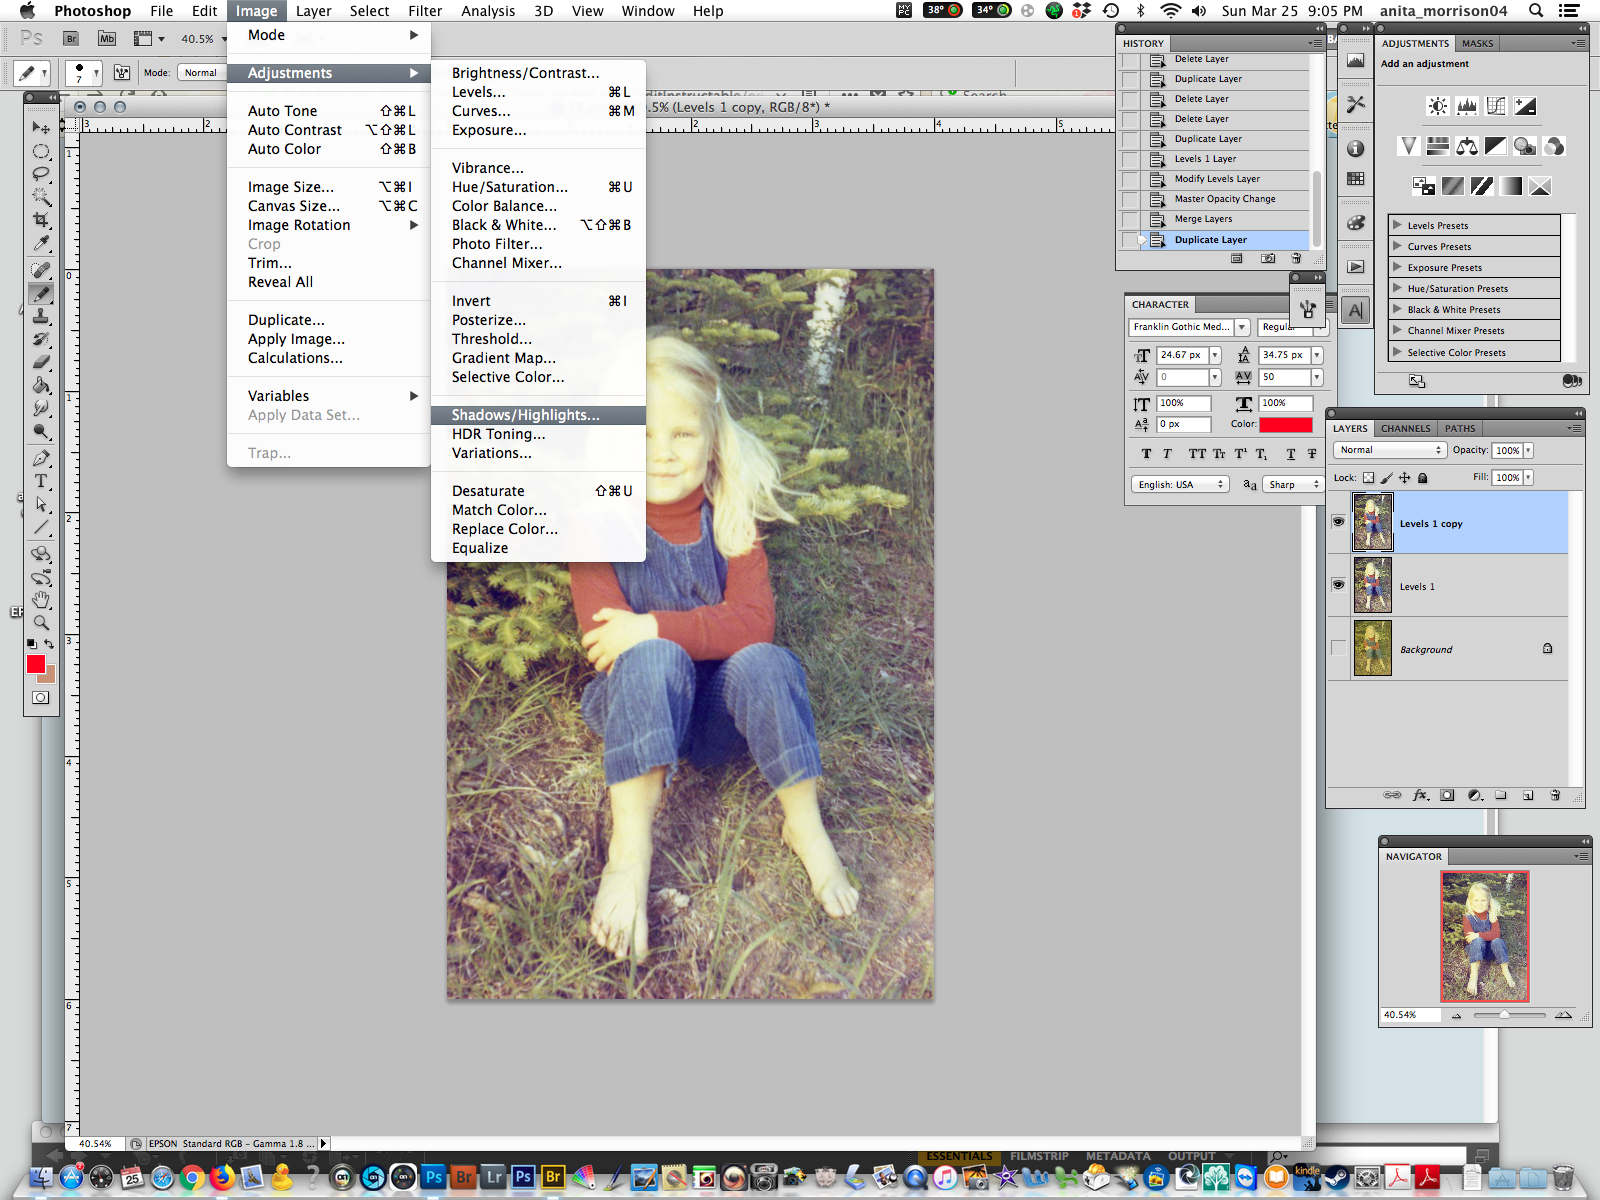
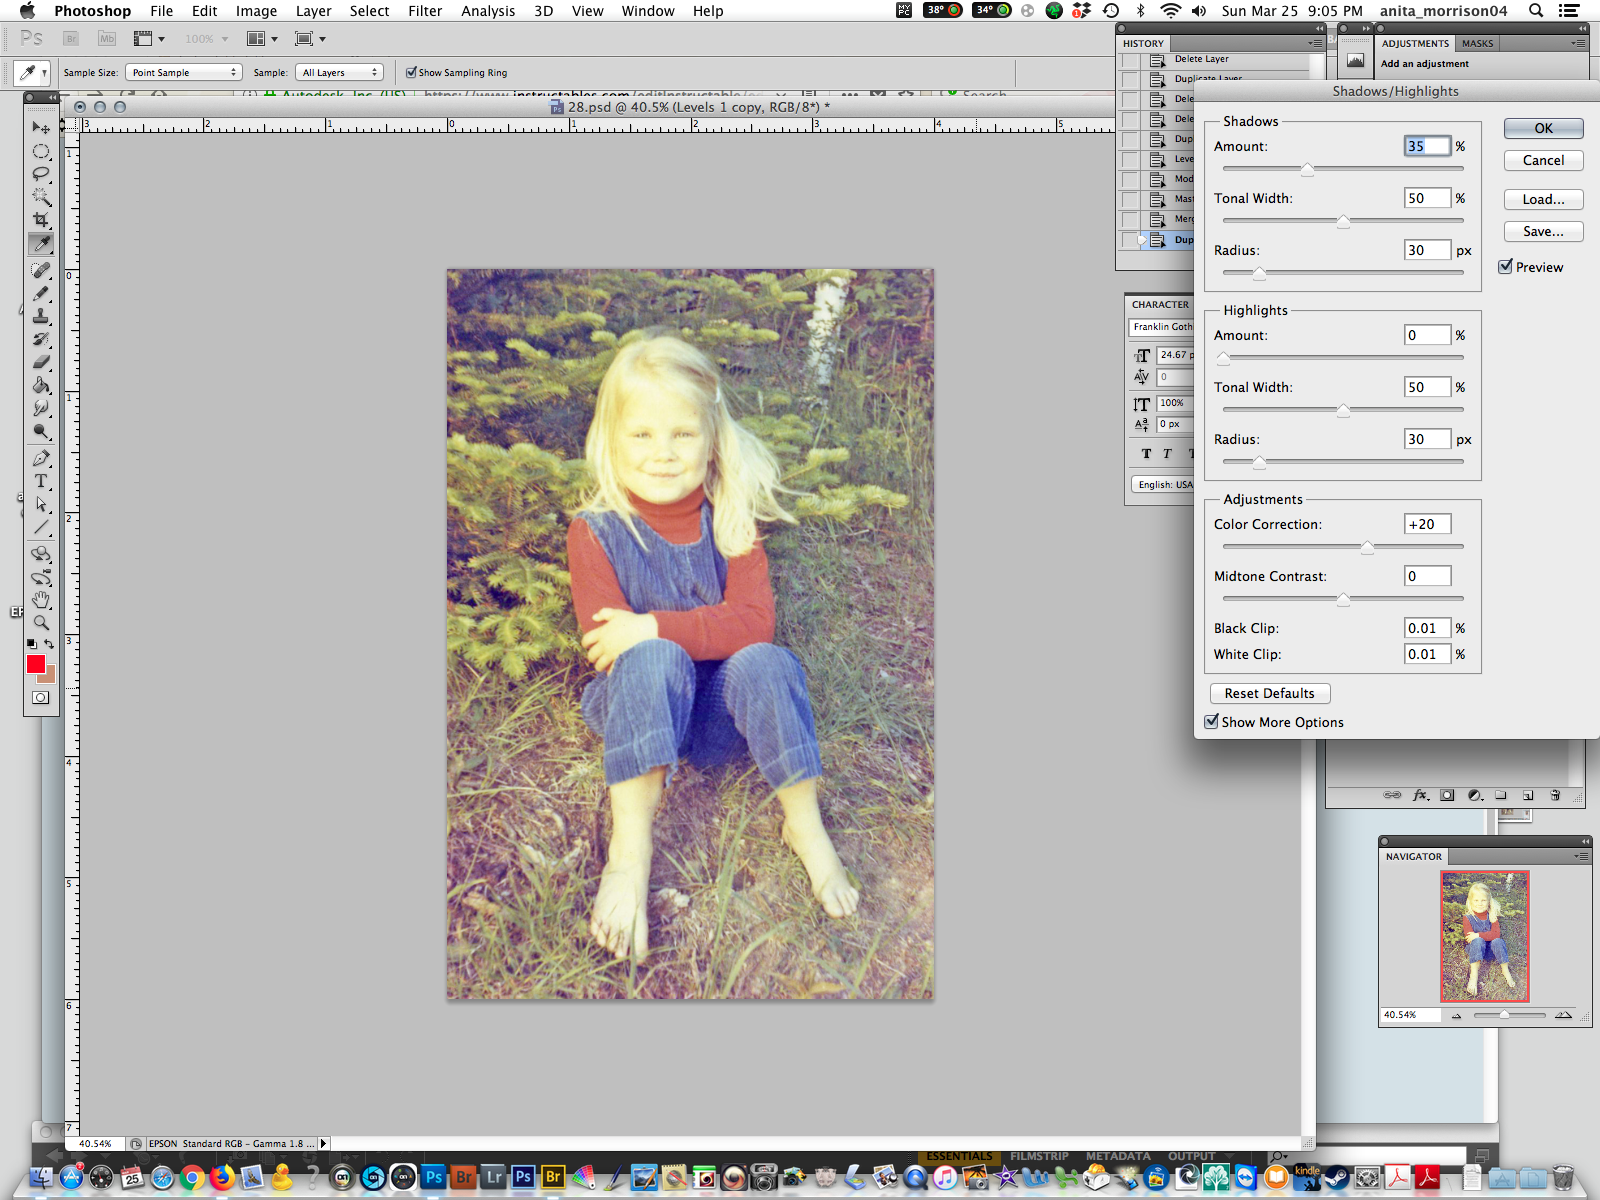
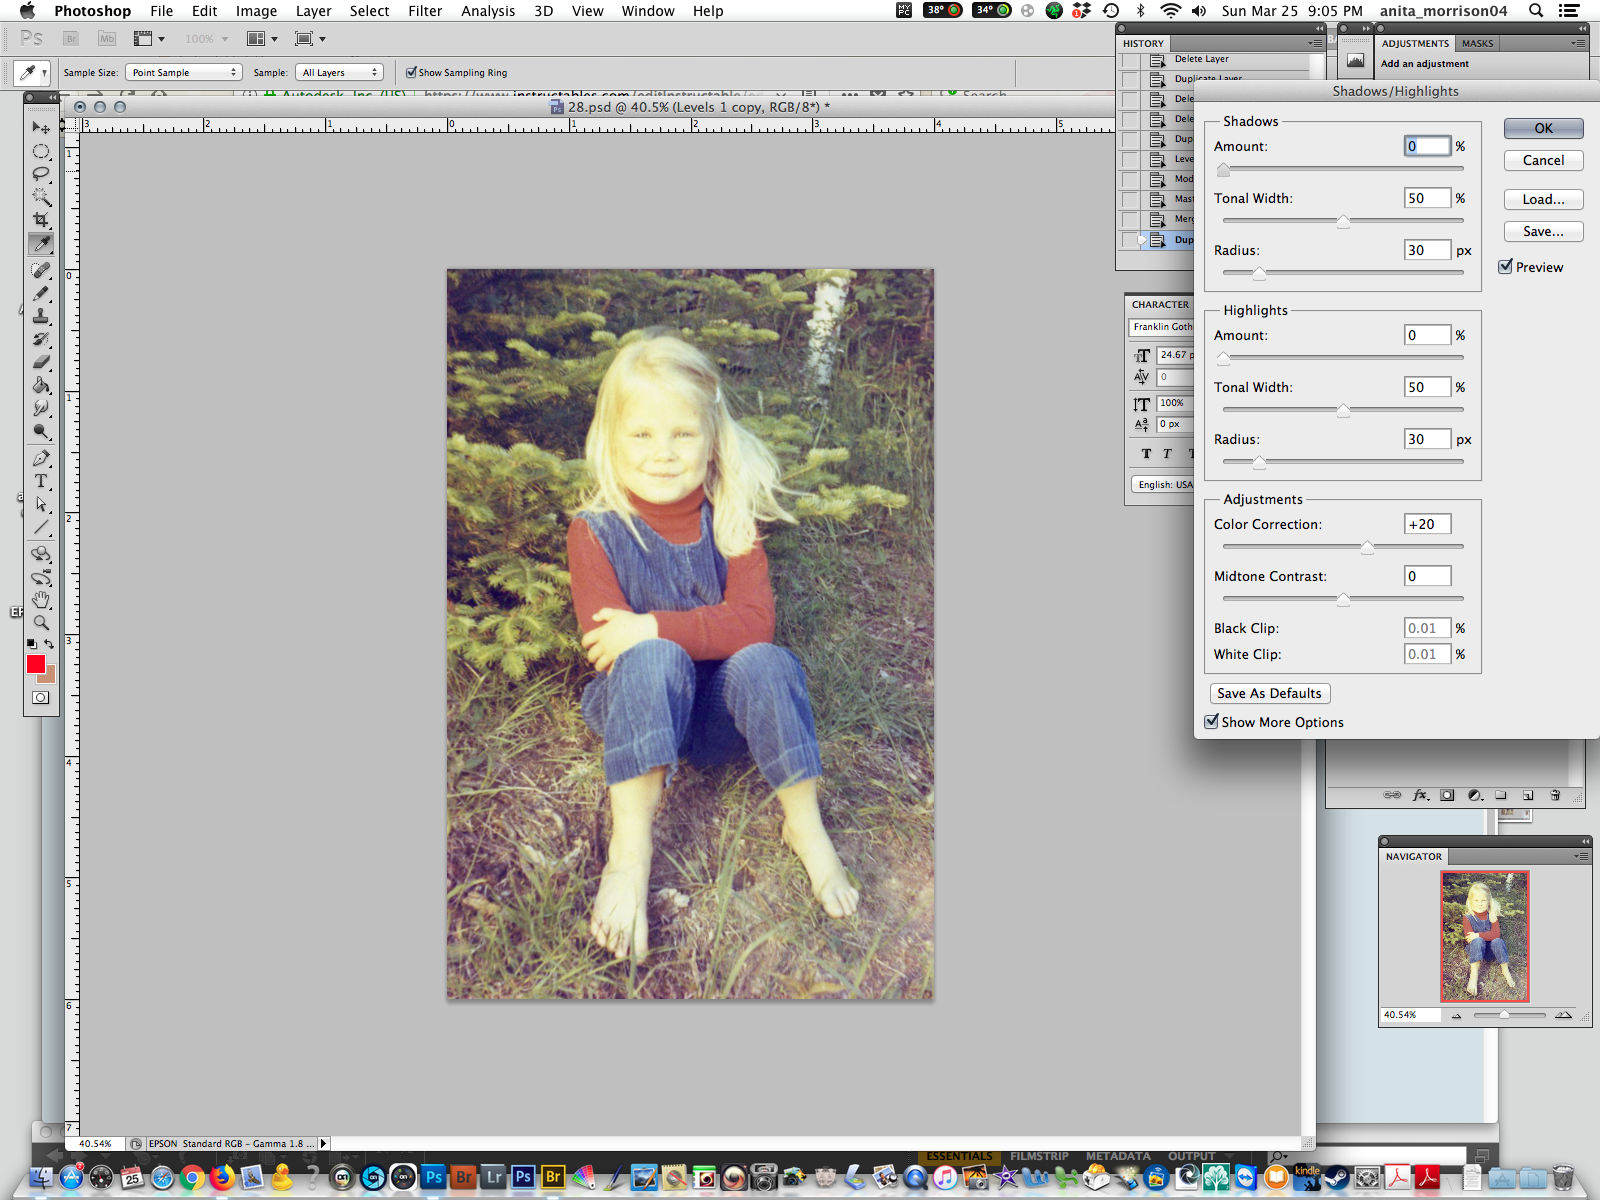
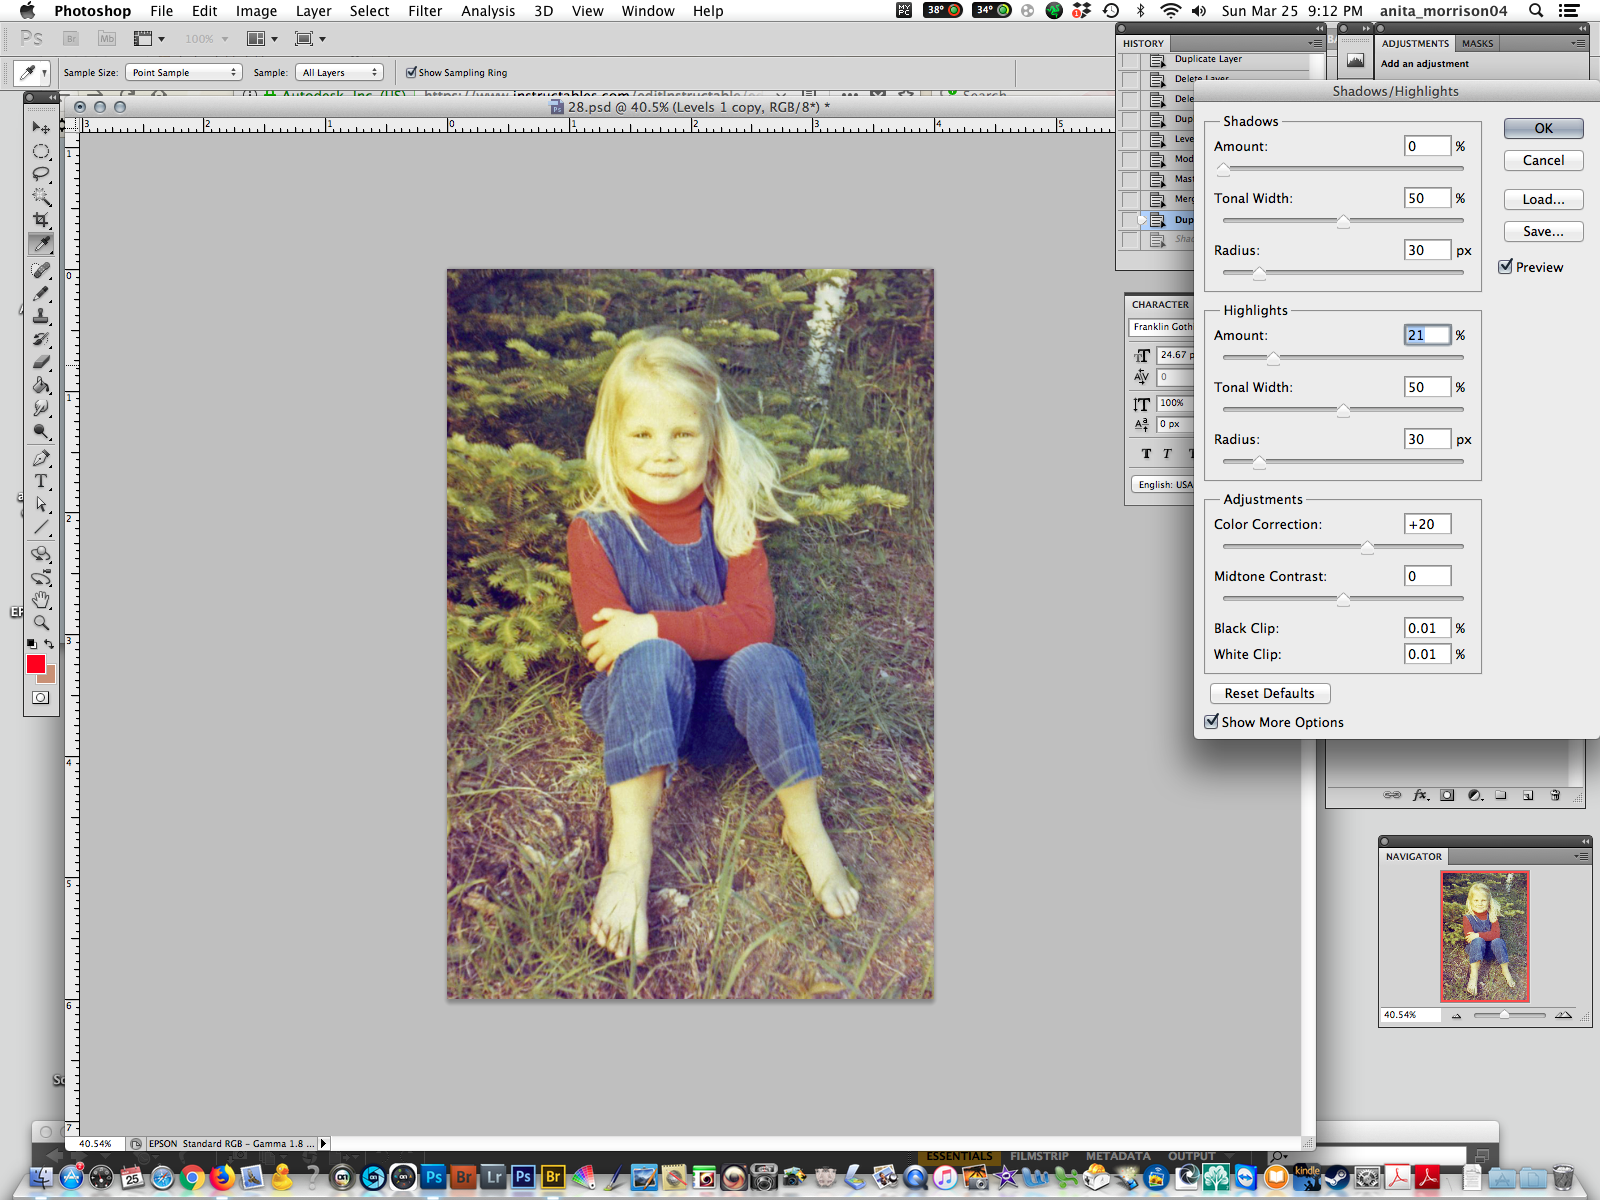
To make this simple, we are going to merge the two layers we are working on to go forward with the next step. Highlight the adjustment layer, and while holding the shift key, click on the layer below it. Then click on the small arrow on the top right menu to get the drop down menu to select "merge layers." This will merge the two highlighted layers together.
Since the highlights and shadows adjustment cannot be done on its own layer (not sure why Photoshop didn't make it part of the adjustments you can choose separately), we will copy our layer so that we can keep it separate anyway. Click and drag the layer called "levels 1" to the copy icon down on the bottom of the panel, and it will create a copy of the layer on top of the layer stack. So now, we will make the adjustment to this layer and still have our levels 1 layer unaffected by the change in case we need to reduce the effect with the opacity slider again or delete it altogether.
With the top layer (levels 1 copy) selected, go to the top menu bar and select Image>Adjustments>Shadows/Highlights. This will make a Shadows & Highlights adjustment right on this layer. First move the amount slider in the Shadows all the way to the left. Then move the Highlights amount slider slowly to the right and watch the affect on your image. Stop when you have just enough of the highlights reduced and bring back some contrast.
Final Adjustment.
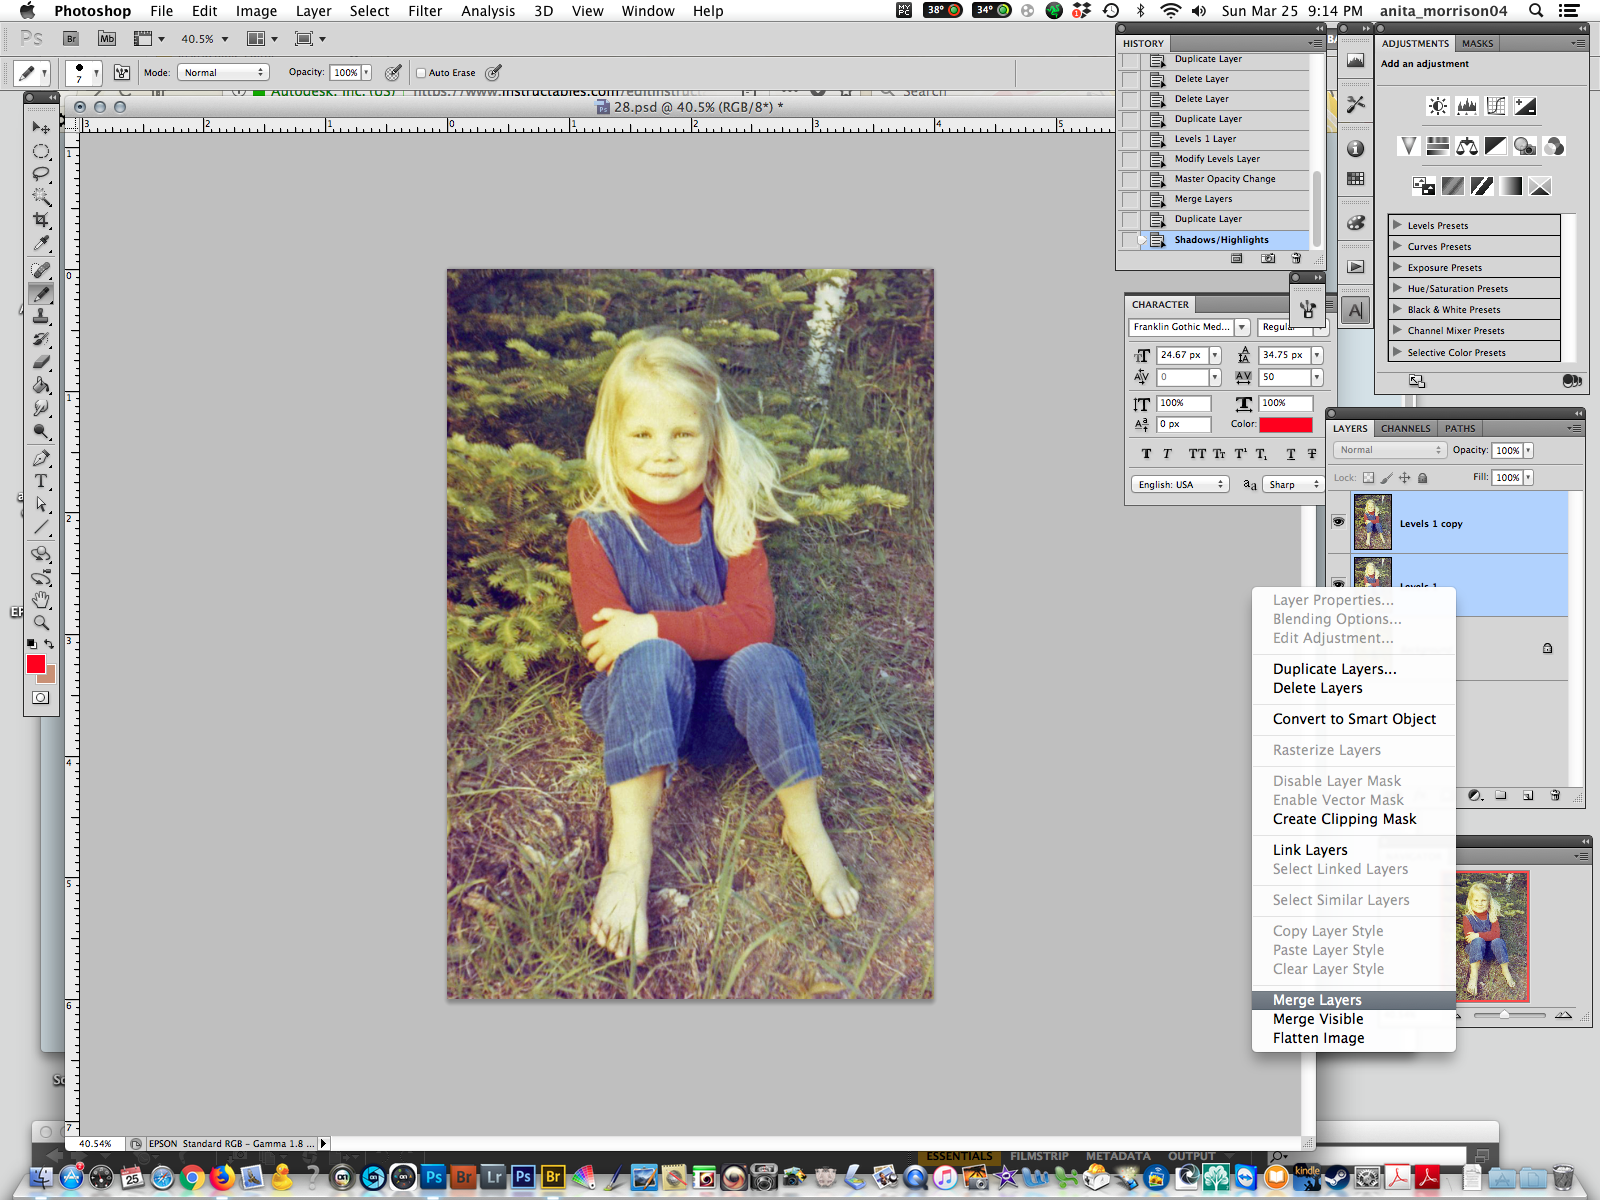
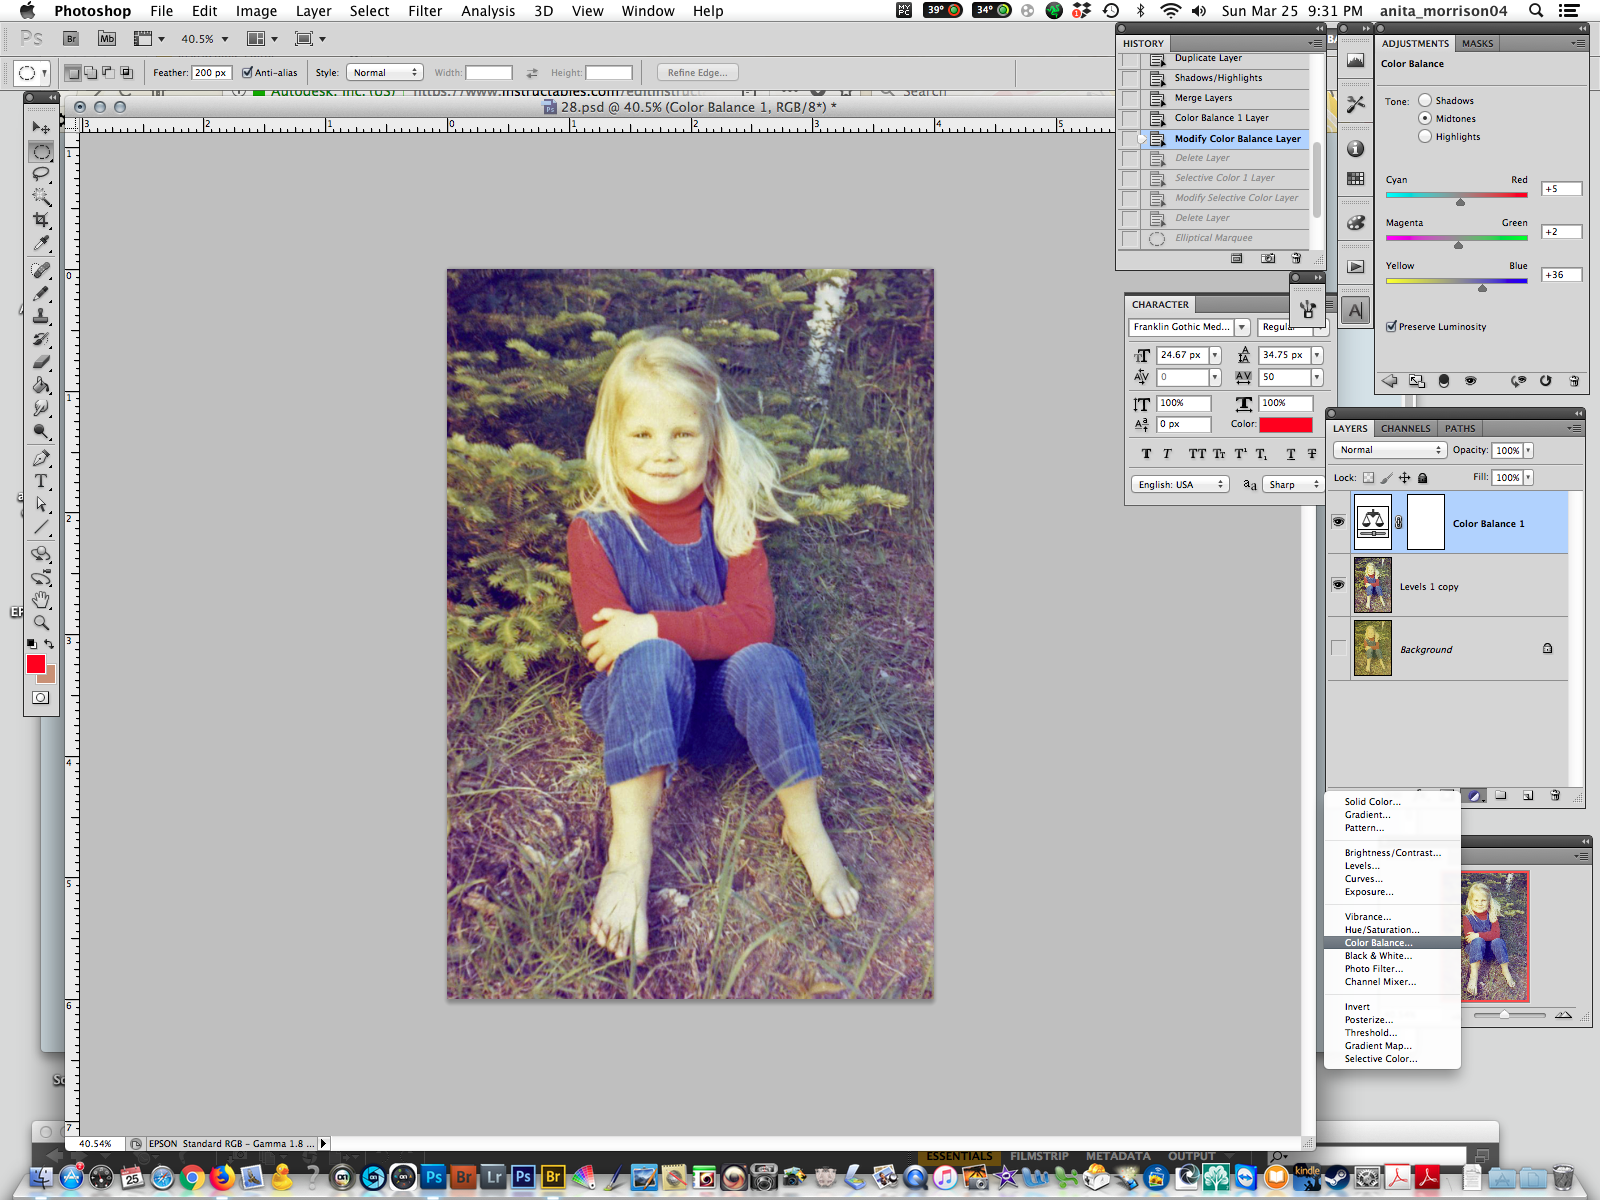
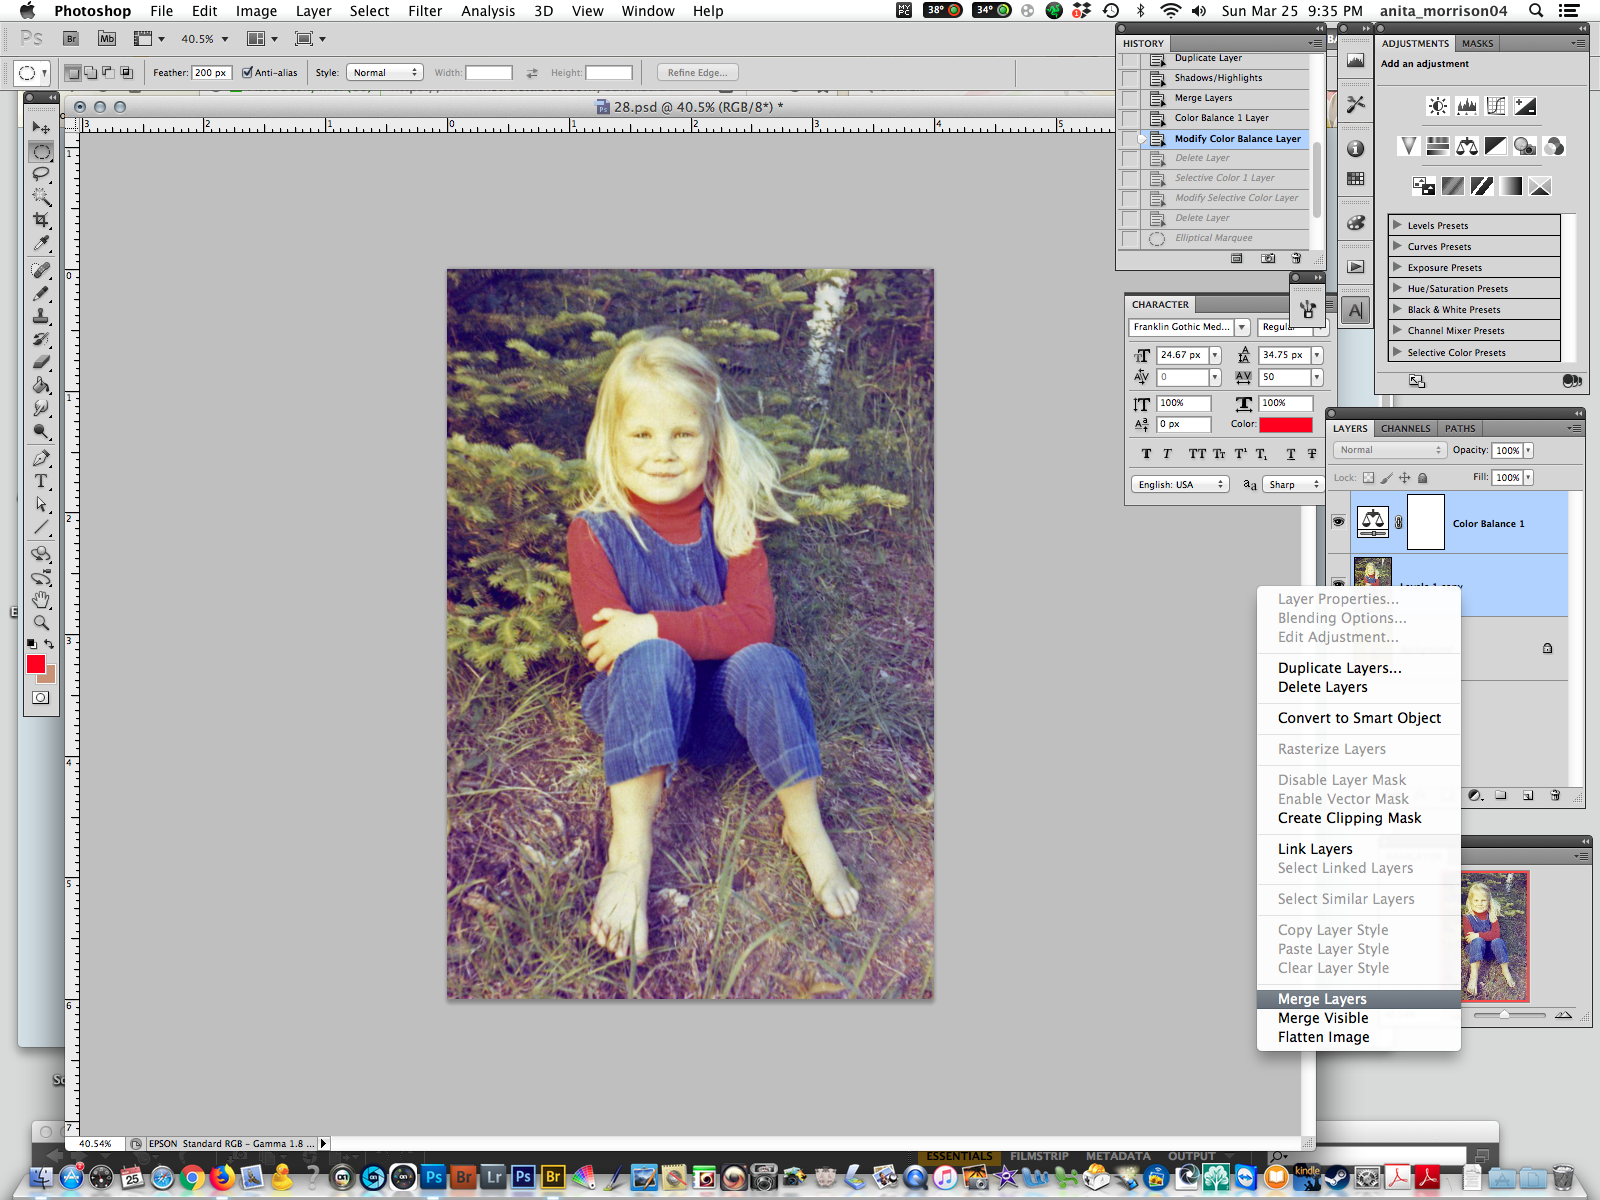
When you are pleased with the result, we will merge these top two layers like we did before. Again, you might save your document before merging these layers, but I will assume that for this basic tutorial, you are pleased with each adjustment and merging the layers will not be a problem for the final result.
When merged, you may want to make a final tweak by adjusting the overall color and adding a vignette to highlight the subject.
You can add a color balance adjustment layer (by following the same steps as earlier to add an adjustment layer from the bottom half white, half black circle icon and select color balance from the drop down list. When you do this, the color balance adjustment panel will appear at the top where you can make an adjustment to the different colors. In my case, I moved the yellow-blue slider slightly to the right to remove a tiny bit of the yellow and make the image a bit cooler.
When I was pleased with the result, I merged the top two layers together again.
Adding a Vignette.
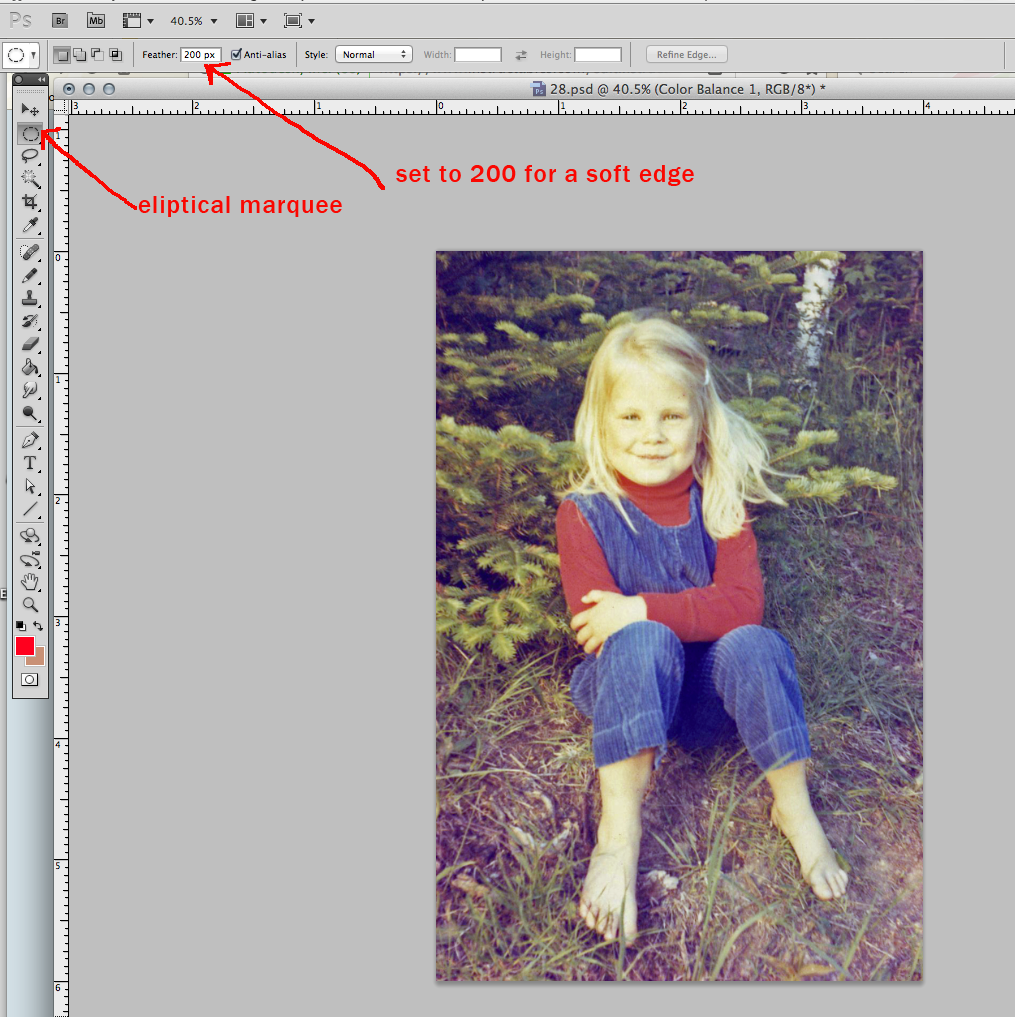
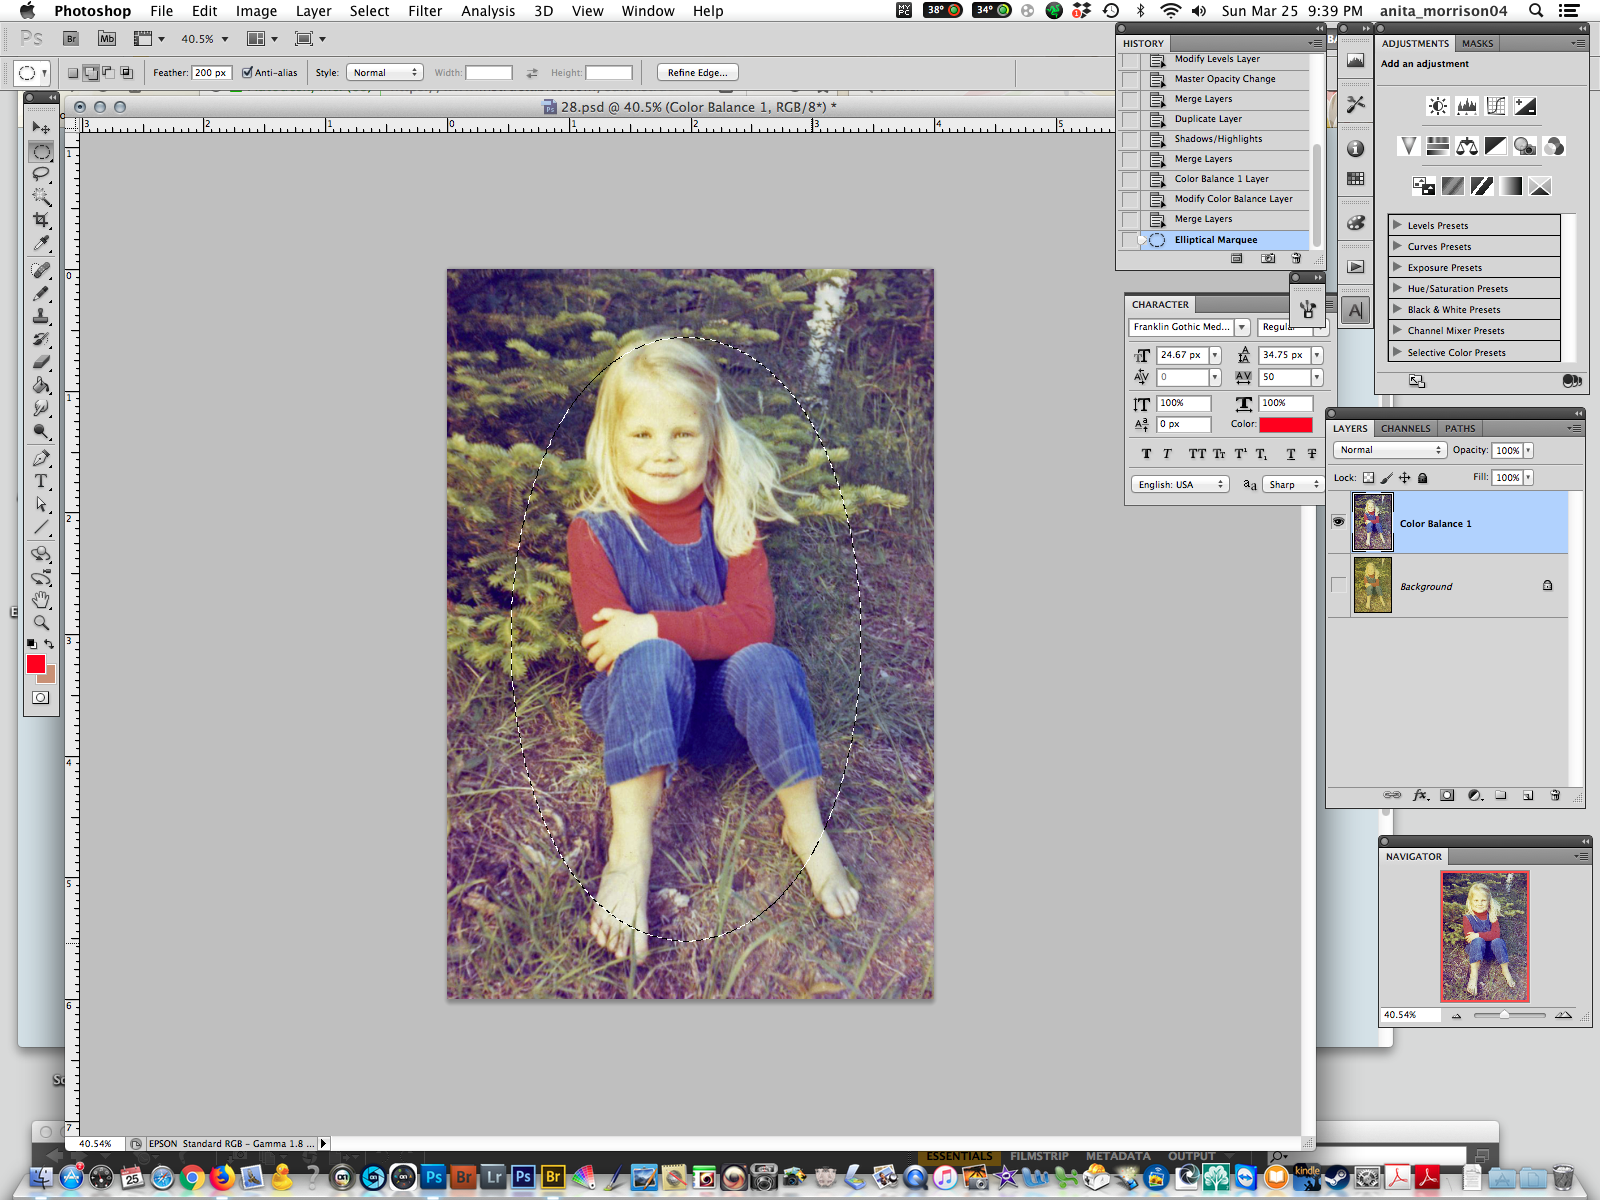
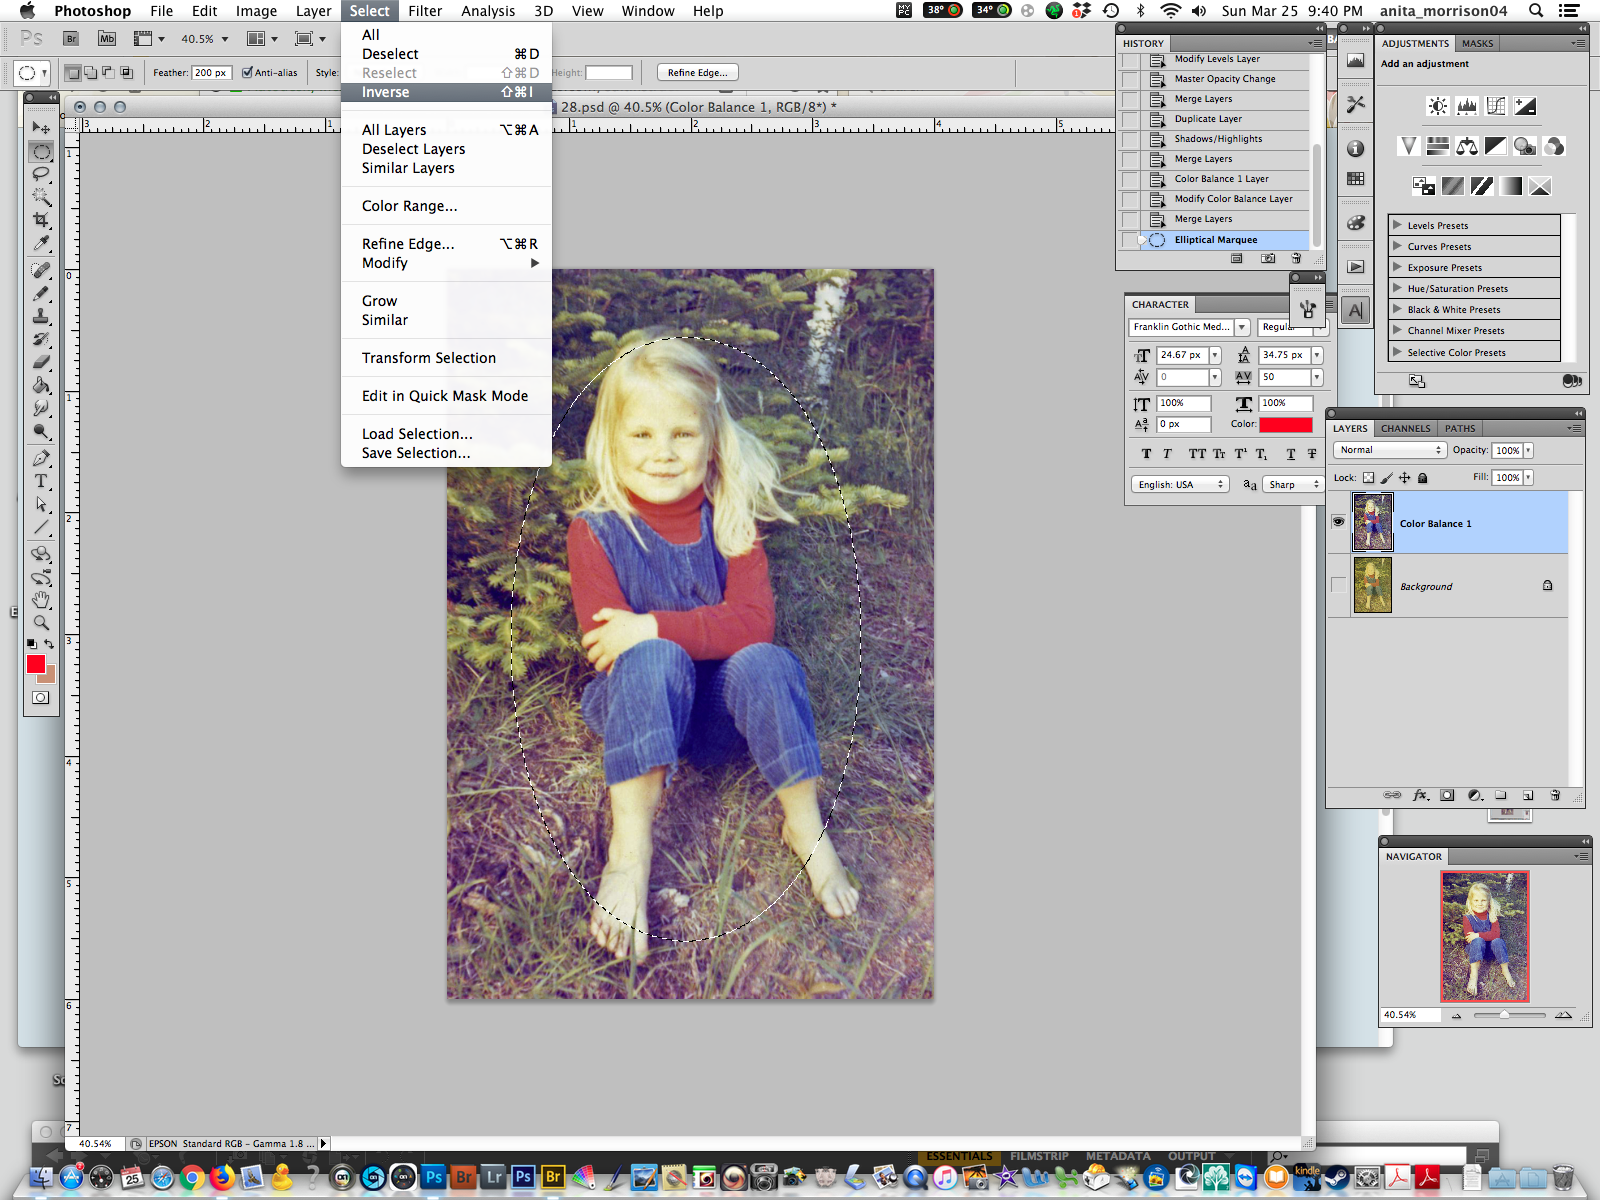

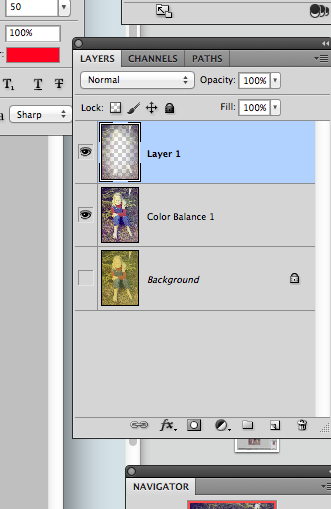
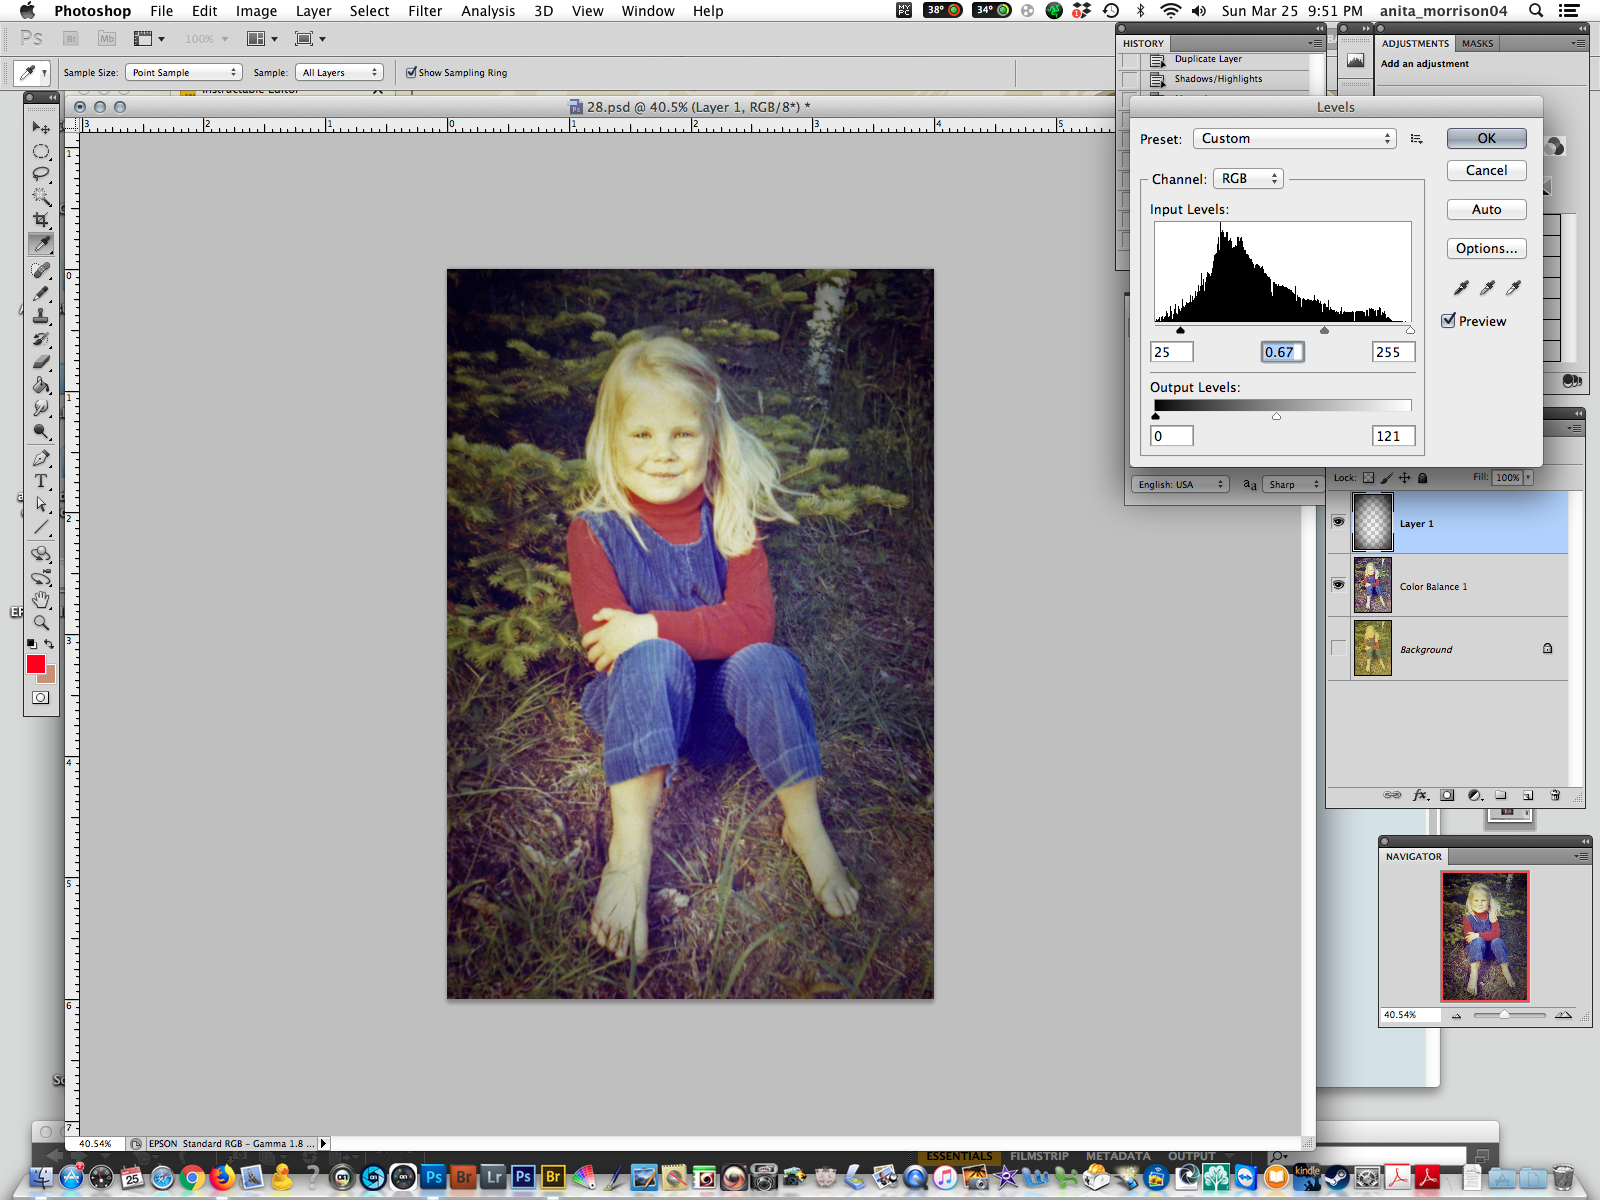
If you add a vignette (or darkened border) to the image, the subject will be highlighted from the background. To do this, choose the eliptical marquee and make sure the feather amount is sett quite high, I usually choose 200px, to make sure it is a very soft edged selection. Make a selection around the subject and then choose select>invert selection to make the selection of everything around the subject. Then hit alt/cmd+c (to copy the selection) and then alt/cmd+v (to copy it to a new layer) on the top of the layer stack. With the new layer on top selected, add a levels adjustment to this layer by choosing cmd+L and bring the white slider in the output section towards the centre a it and move the black slider on the input graph towards the right a bit and then move the next one (the gray one) towards the right a bit also. Watch your image as you move these sliders so that you do not over exaggerate the effect. Be frugal with the sliders so that you create just a light vignette on the edges of the picture.
Once you are done, save your image to your computer as a jpeg file. You can also save it as a psd file if you wish to be able to have the file without the vignette as well.
And there you have it. This is just a basic adjustment to fix a damaged file, but very often, this is all that is needed to accomplish a significant difference and retrieve some of the original color to an image. I hope you find this tutorial helpful.