Powertank / Backup Generator

Some people would say that it is useless. But it is only foresight.
Indeed, when we see that power outages are becoming more and more common, it could be a good idea to get ready with a backup power source to supply critical needs. That's why I decided to build my own Powertank last autumn using two lead batteries and a charger/inverter.
I've also made a Lithium version, it's explained at the end.
That's why I made, last autumn, a battery box with two lead batteries, and a charger/inverter, to generate 230 VAC.
I've also made a Lithium version, it's explained at the end.
Here's a step-by-step guide to make your own Powertank !
Supplies

To build this battery box, you will need :
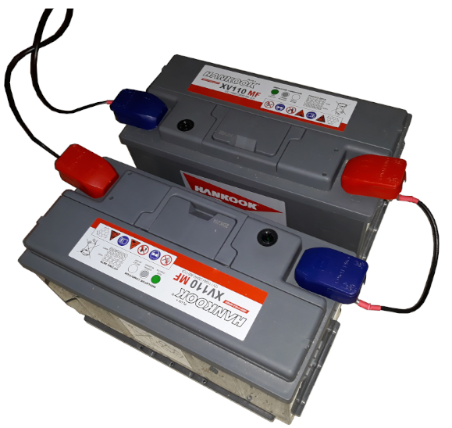
- 2 lead batteries of 12V (the same as in your car).
My batteries have a capacity of 110 Ah each :
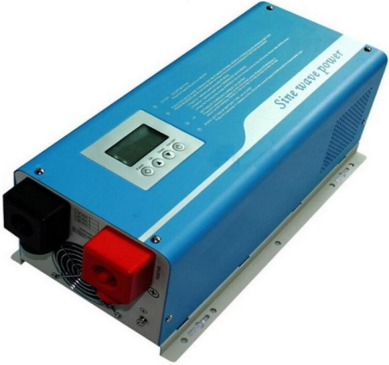
- 1 charger/inverter
Mine generates 230VAC - 1000W, and can charge with a power of 700W. Rembember to use an inverter which produces the right voltage and frequency for your devices ! For the EU type, it's 220-230V, 50Hz
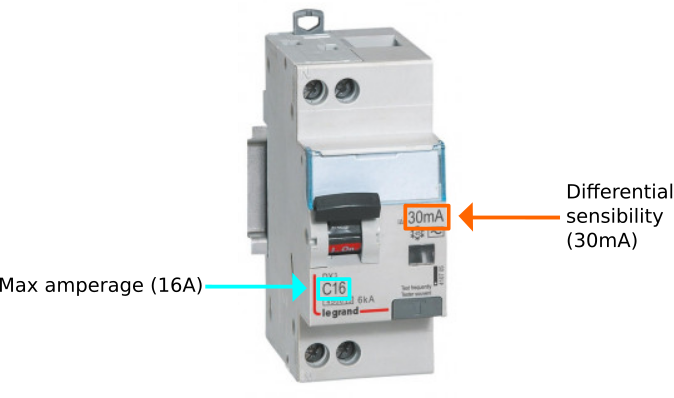
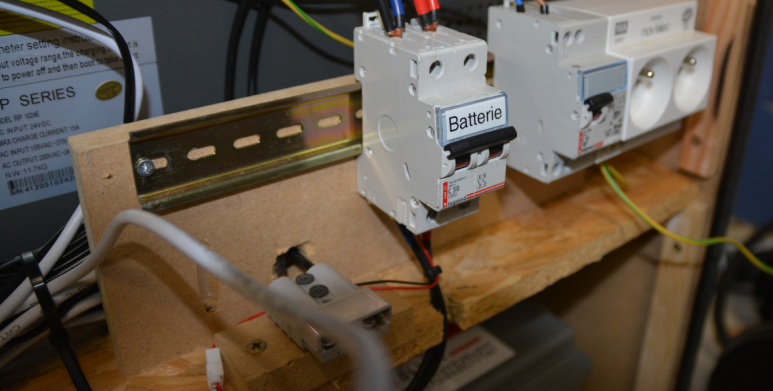
- 1 differential circuit breaker (for the output of the inverter)
A circuit-breaker like this one cuts the circuit when the total amperage is higher than 16A or when the current leakage to the ground is higher than 30 mA. It is the same that I used in my battery box.
- 1 double circuit-breaker (which cuts directly after the batteries) used as battery switch
This is the one that I used, its max amperage is 50A :

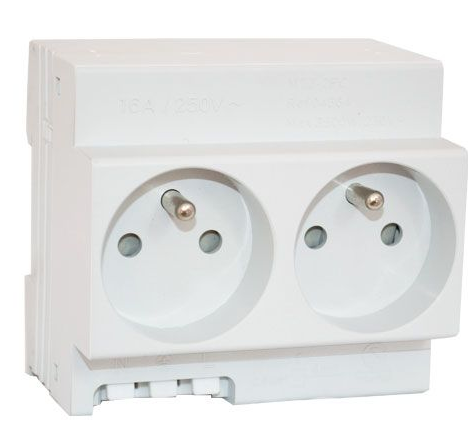
- 2 electrical outlet
You can also put 1, or more, but don't forget the max amperage provided by your inverter and your circuit breaker.
- 1 mini voltage display and a push-button to test batteries

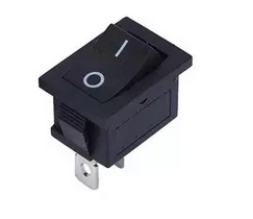
- A little switch to turn on the inverter
It is not necessarily needed, see according to your inverter...
- Wires and connectors
You may need large and smaller sections for your wires, for example 10 mm² between the battery and the inverter, and 2,5 mm² for the 230VAC. For commands you don't need big sections, because informations use a very little current.
For connectors, you'll need some terminals (in blue, in the middle) for low amperages, and to connect the battery there are the top red connectors which could be used to have a convenient connection to batteries out of the box.
The connectors on the bottom right corner are very useful to connect quickly a wire to the battery, we can see them fixed on my batteries above.

- Wooden boards and cleats to make the box
You'll need thick boards, because lead batteries are very heavy and the box has to be rigid and strong.
- Screws and accessories (handles, casters, paint)
The Circuit


Here is the circuit :
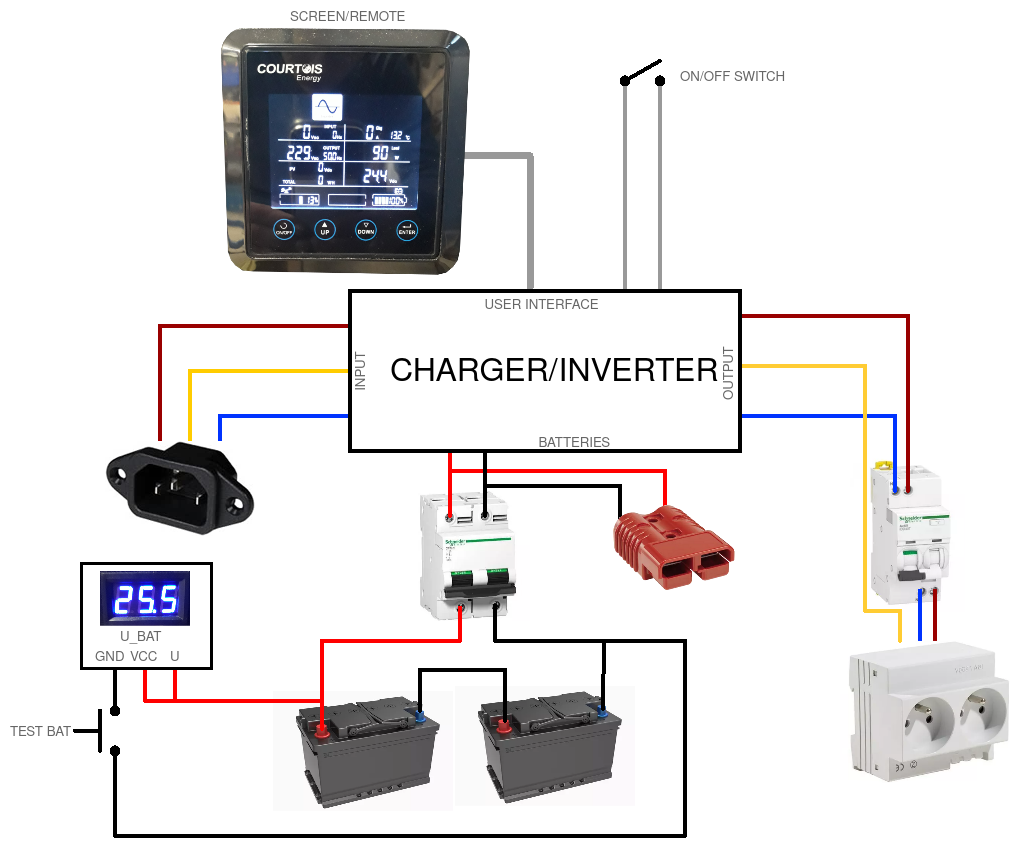
In the order :
- The "input" on the left can be used to charge batteries, or directly to transfer energy to the outlets.
- The charger/inverter is equipped with a remote screen, they are connected by a cable that allows me to use the screen on the front of the box. The screen allows to control the parameters, especially battery charge and cut-off voltage, max charge current. There is also a remote switch to turn it on.
- The batteries are protected by a circuit-breaker of 50A. In case of short-circuit, it cuts all. Why 50A ? Simply because for a lower voltage, the amperage is far higher. Let's do a short calculation :
On the output, we have 1000W, provided by the inverter.
For 24V, 1000W does 41A (1000 / 24 = 41).
Taking into account the thermic losses of the inverter, I choosed a 50A circuit-breaker.
- I put a high amp DC connector (Anderson) before the circuit-breaker : on the front of the box, it allows me to access easily to the batteries (e.g. to use lithium batteries instead of lead batteries, or to add batteries in bypass).
This input is not protected by a circuit-breaker : everything connected to it must have its own protection !
- Then, the batteries : they are in a series, it allows me to have a higher voltage (24V) consistent with the choosen charger/inverter, so a lower amperage and thinner wires.
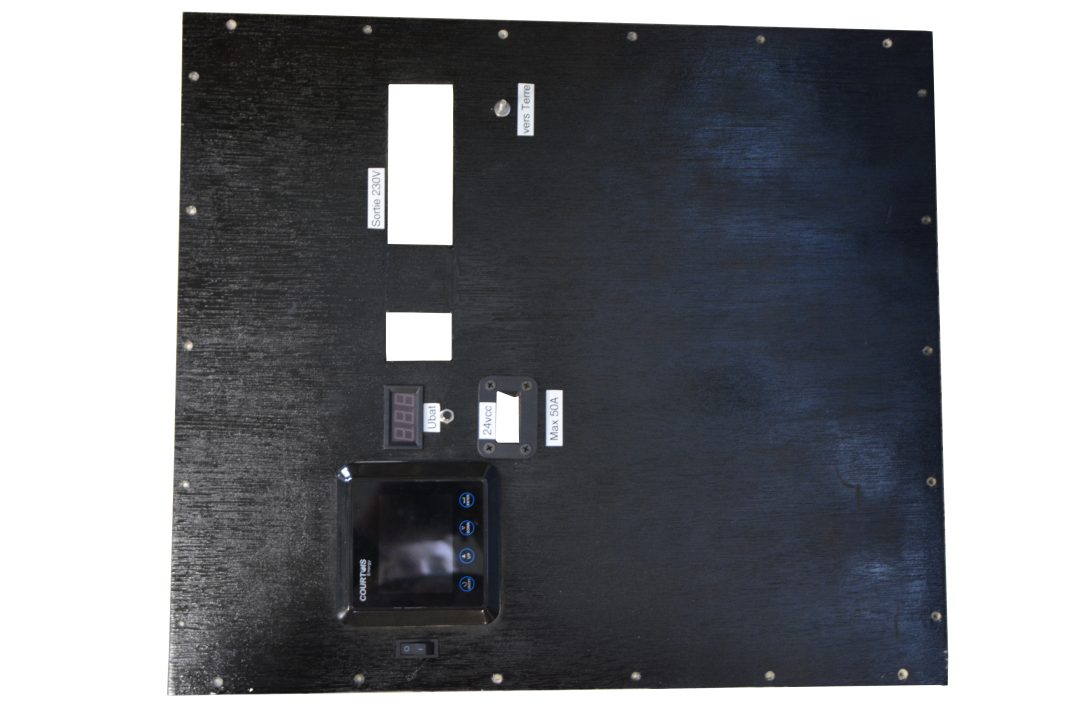
- There is a mini-voltmeter that I use to test the battery : when the pushbutton is pressed, the voltmeter turns on and displays the batteries voltage.
- Before the outlets, I have a differential circuit-breaker : it detects if the amperage surpasses 16A, or if there is a loss of amperage towards the ground (30mA). It cuts in case of malfunction or issue.
WARNING ! the differential mode of circuit-breaker works only if the circuit is connected to the ground. So even if there is a power outage, let your box connected to the electrical network to keep the ground !
- Last, the outlets : use the type of your state, in France we use EU outlets.
I added a metallic rod, attached on the front of the box and connected to the ground. It allows to easily get the ground, or to wire it to the ground when the plug is disconnected from the mains. Grounding is necessary to protect people from electric shock by allowing the differential switch to work.
Don't forget to use the appropriate sections for the wires ! As I said above, you'll need to use very large sections near the batteries (at least 10mm²), and 2,5mm² for the 230V. Other things (for example the mini voltmeter) will need thinner wires, because they don't have to support high amperage.

The Box


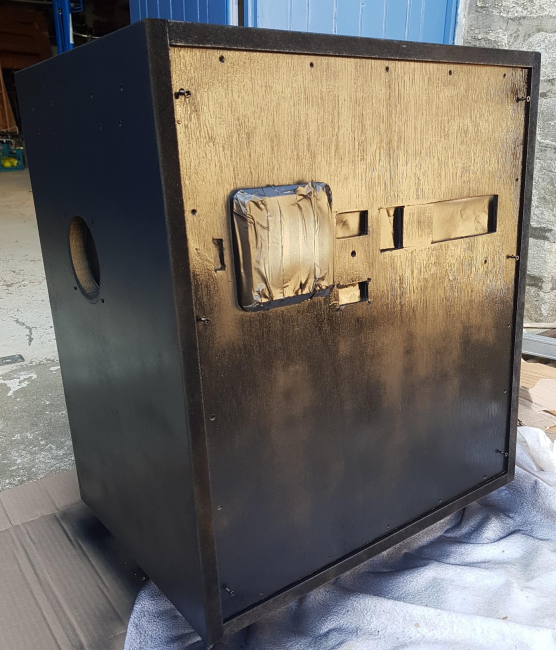
I made a wooden box for the system, to make it transportable.
1) Structure
It is made on 2 levels : the bottom one houses batteries : because of their weight (2*25 kg), it is more safe. It is necessary to use boards of at least 2cm thick, in order to be strong enough to support this huge weight.
The second level is a board attached to cleats, which are screwed to the side panel.
It supports the inverter and the circuit. I put openings on each tip of the inverter, to make it refresh (this grid is close to the inverter fan discharge).
The circuit-breakers are attached to a rail, screwed to a little board (fixed with non-visible stiffeners).
2) Facade
The facade holds all the commands. It is a thin plywood board (5mm thick), and it is opened with holes to let out the circuit breakers. The remote screen and the mini-voltmeter are directly fixed to the board.
 I screwed cleats in the box, where the frontage is fixed.

3) Finishing touches
After having made the box, there still some little things to do, in order to make the box better.
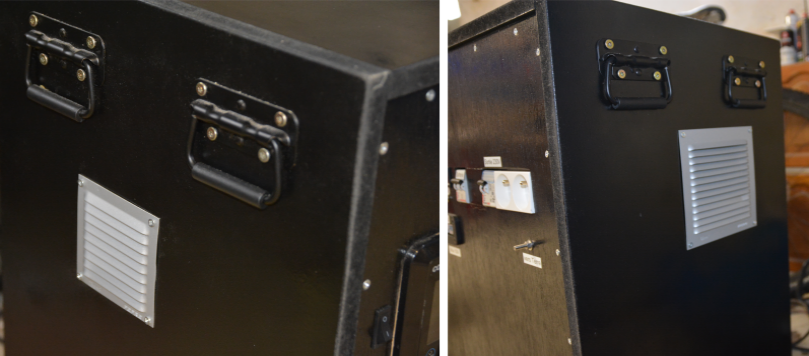
First, I painted the box with a spray, in black : it protects the wood and it's more aesthetically pleasing.
Paint it outside, it is better for your health !
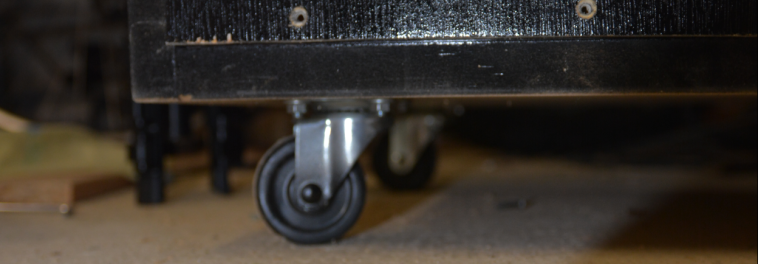
I added wheels, to transport the box more easily despite of the weight of the box (due to the batteries) :
Then, I attached 4 handles, 2 on the left and 2 on the right. Even if the box is very heavy (due to the batteries), it allows to transport the box more easily, and if it is too heavy we can also take the batteries out.

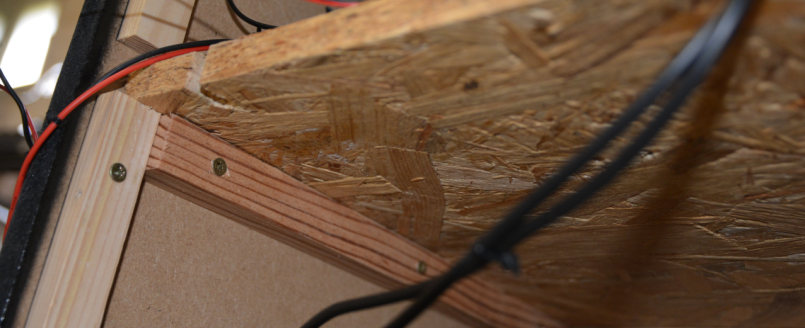
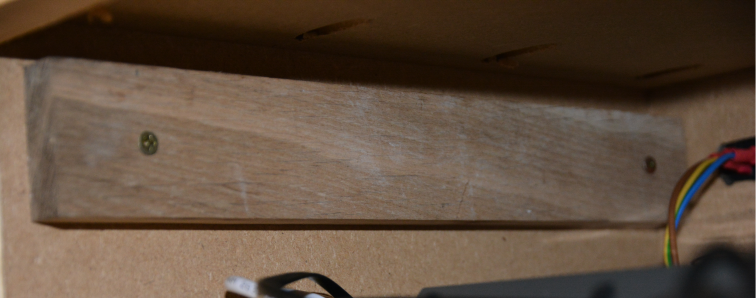
I also put reinforcement in oak behind the handles (it allowed me to put longer screws):
Using the Powertank

The Powertank is quite easy to use (however it depends of your inverter) :
- Test the battery's voltage using the pushbutton and the mini-voltmeter : it should be between 21,2V and 26V (refer to you own batteries specs). Below, your batteries are probably dead.
- Connect the battery box to the ground, with the back connector or with the rod on the facade.
- Switch on the circuit-breakers.
- Switch on the inverter.
- The inverter should produce 230 VAC, and display the power.
- If your Powertank is connected to the main, the inverter charges the batteries when necessary.
The longevity of your lead batteries will depend of your use. The deeper you discharge the batteries, the shorter their life will be. Try not to discharge them below half to allow hundreds of charge-discharge cycles.
Version With Lithium Batteries

Lead batteries are a good solution... For those who want to save money. But let's talk about Lithium batteries, which are more expensive but far more efficient.
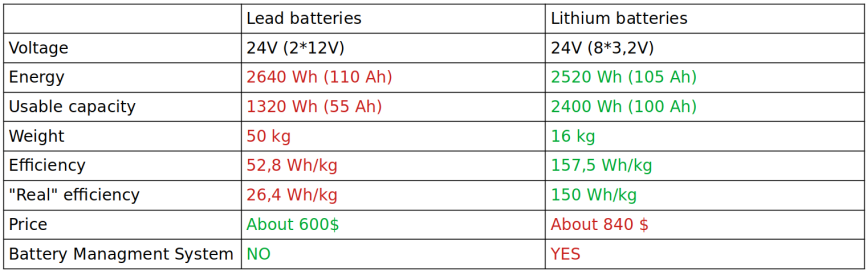
We can see that the Lithium batteries are absolutely superior... But you'll need an extra 250$, not including the BMS (100$)...
1) Supplies
You'll need, in addition to the list below :
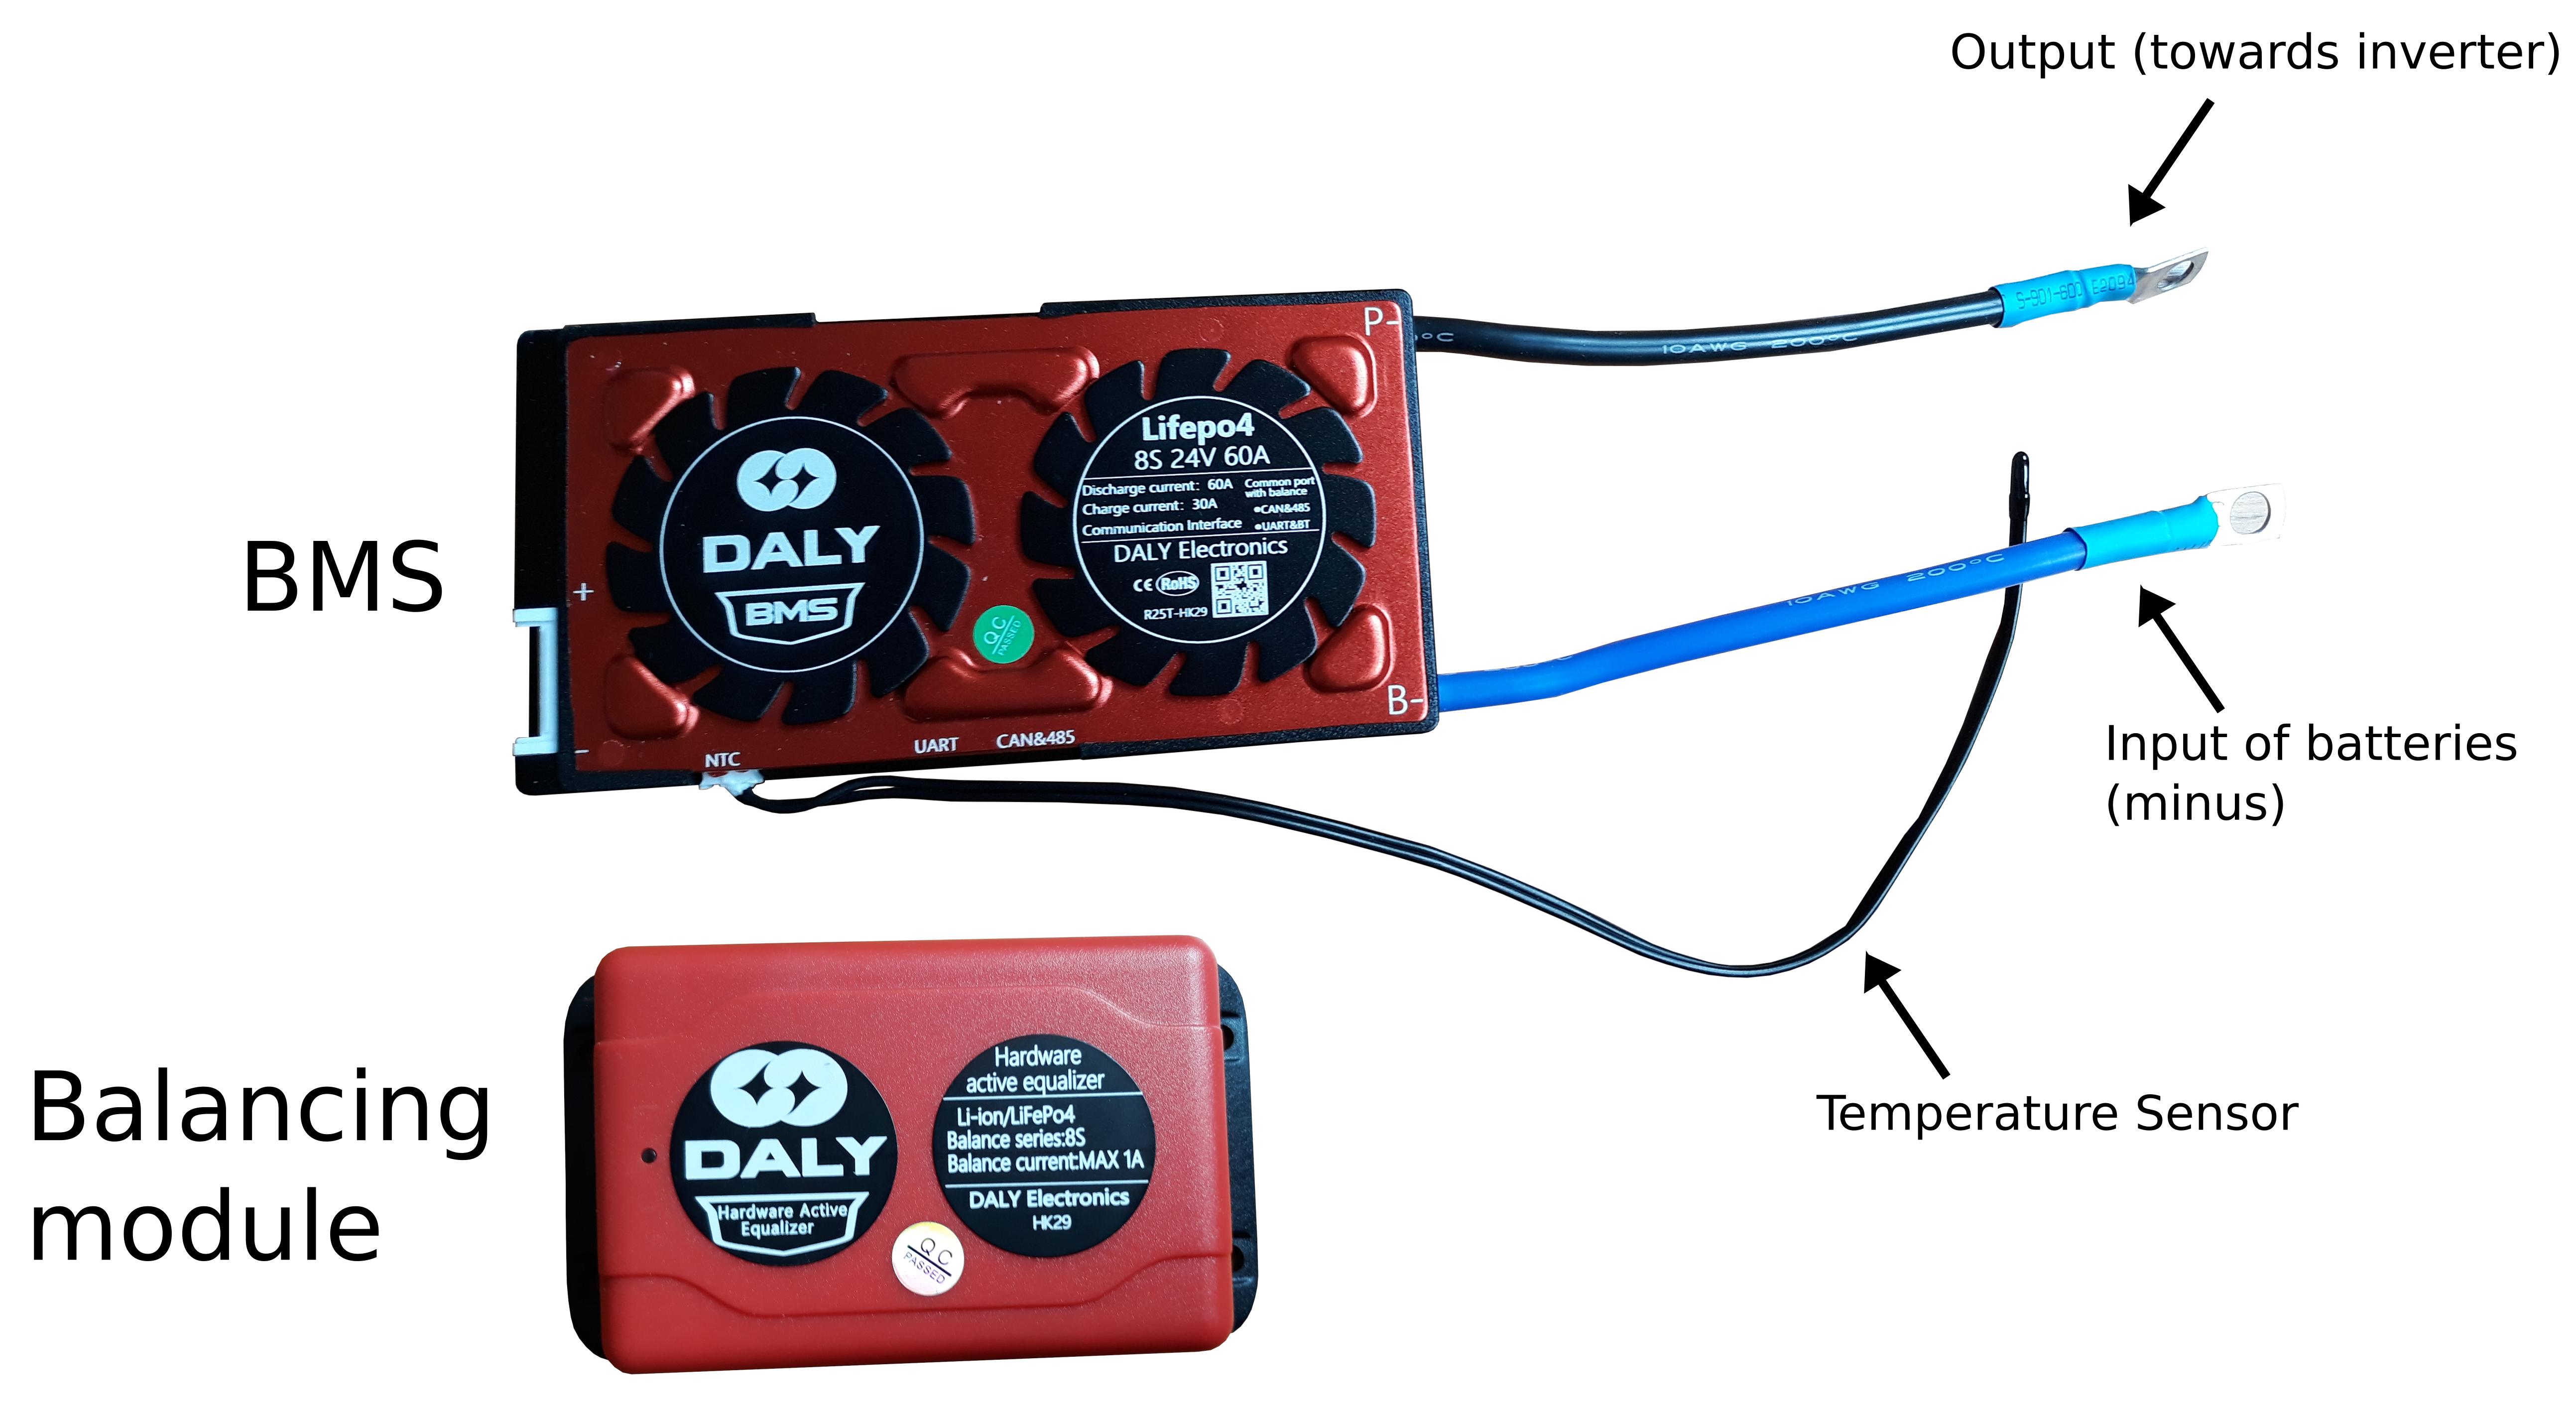
- An active Battery Management System :
Why a BMS ? For Lithium batteries, you'll need to keep the cells voltage within a specified working range. The BMS protects the battery from going out of the limits. Additionally this BMS keeps the cells balanced, in order to use the maximum usable power (the lowest and the highest cells determine the discharge and charge cut-off limits).
An active BMS charges a discharged cell with the charged cells. A passive BMS discharges higher cells so that they have the same voltage than the lower cells.
This BMS is divided in 2 parts. The BMS itself tests the battery voltages, it is able to do passive balancing. The second device is an extension to the BMS, it allows to do active balancing. We can control the main module with a phone, to set it.
On each module, there is a connector connected to the batteries, it is used to measure and balance voltage. There is also a temperature sensor, which has to be pressed on a cell (for safety).
- 8 LiFePO4 batteries of 3,2V (bought on Ali...)

2) Circuit
Here is the circuit to use the Powertank with LiFePO4 :
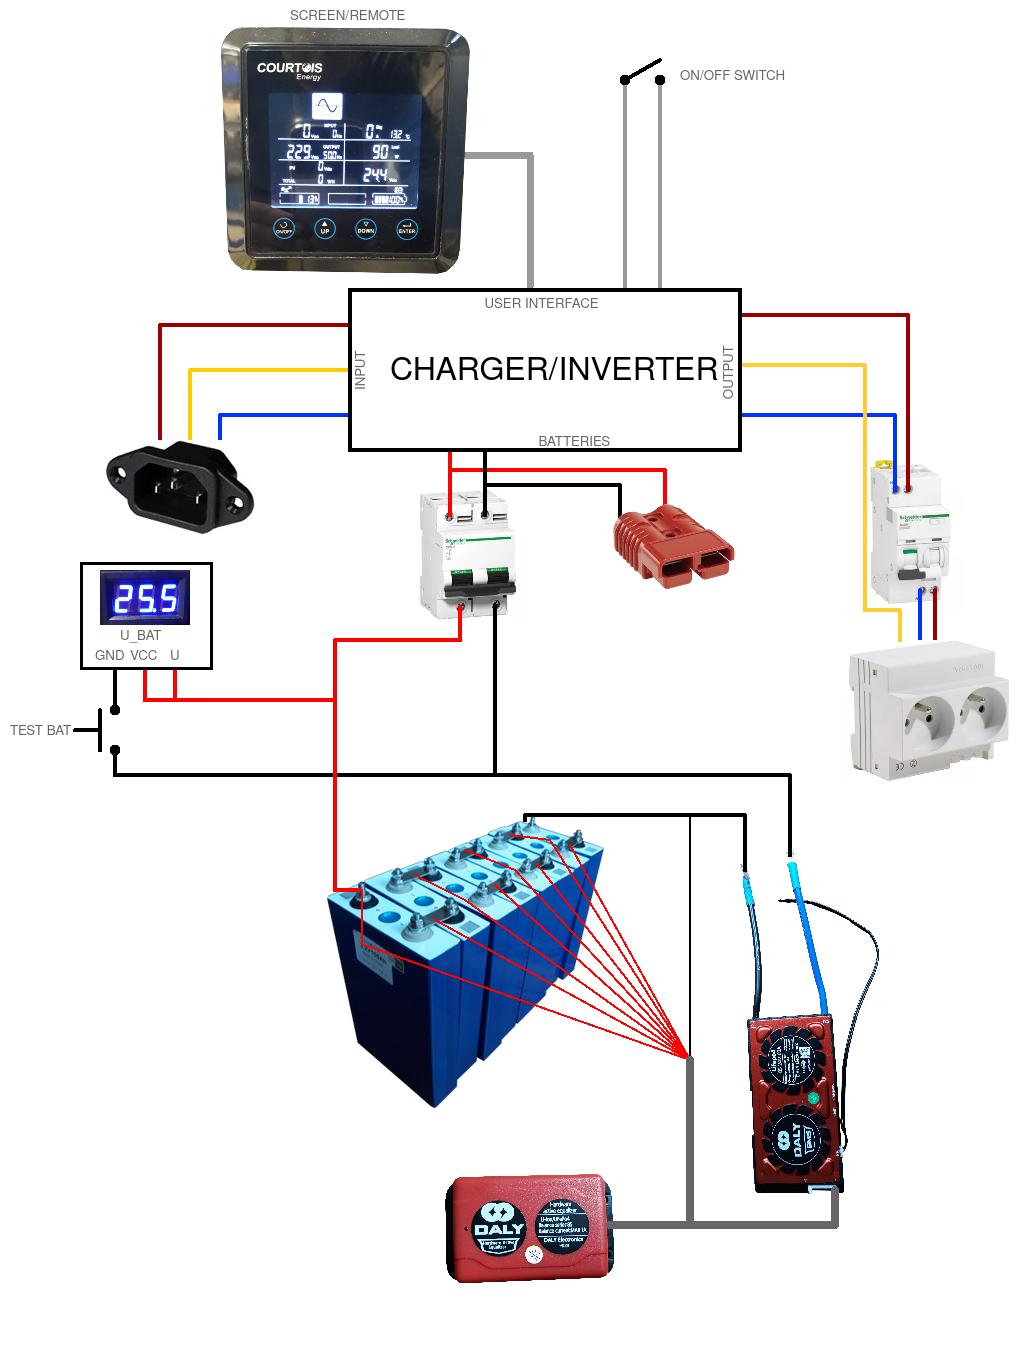
The circuit is quite similar to the first one, but there is some differences :
The BMS module on the right is in series with the batteries, it acts as a switch. The BMS and the active balancing module measure the voltage of each batteries, with the thin diagonal wires and the large grey wire.
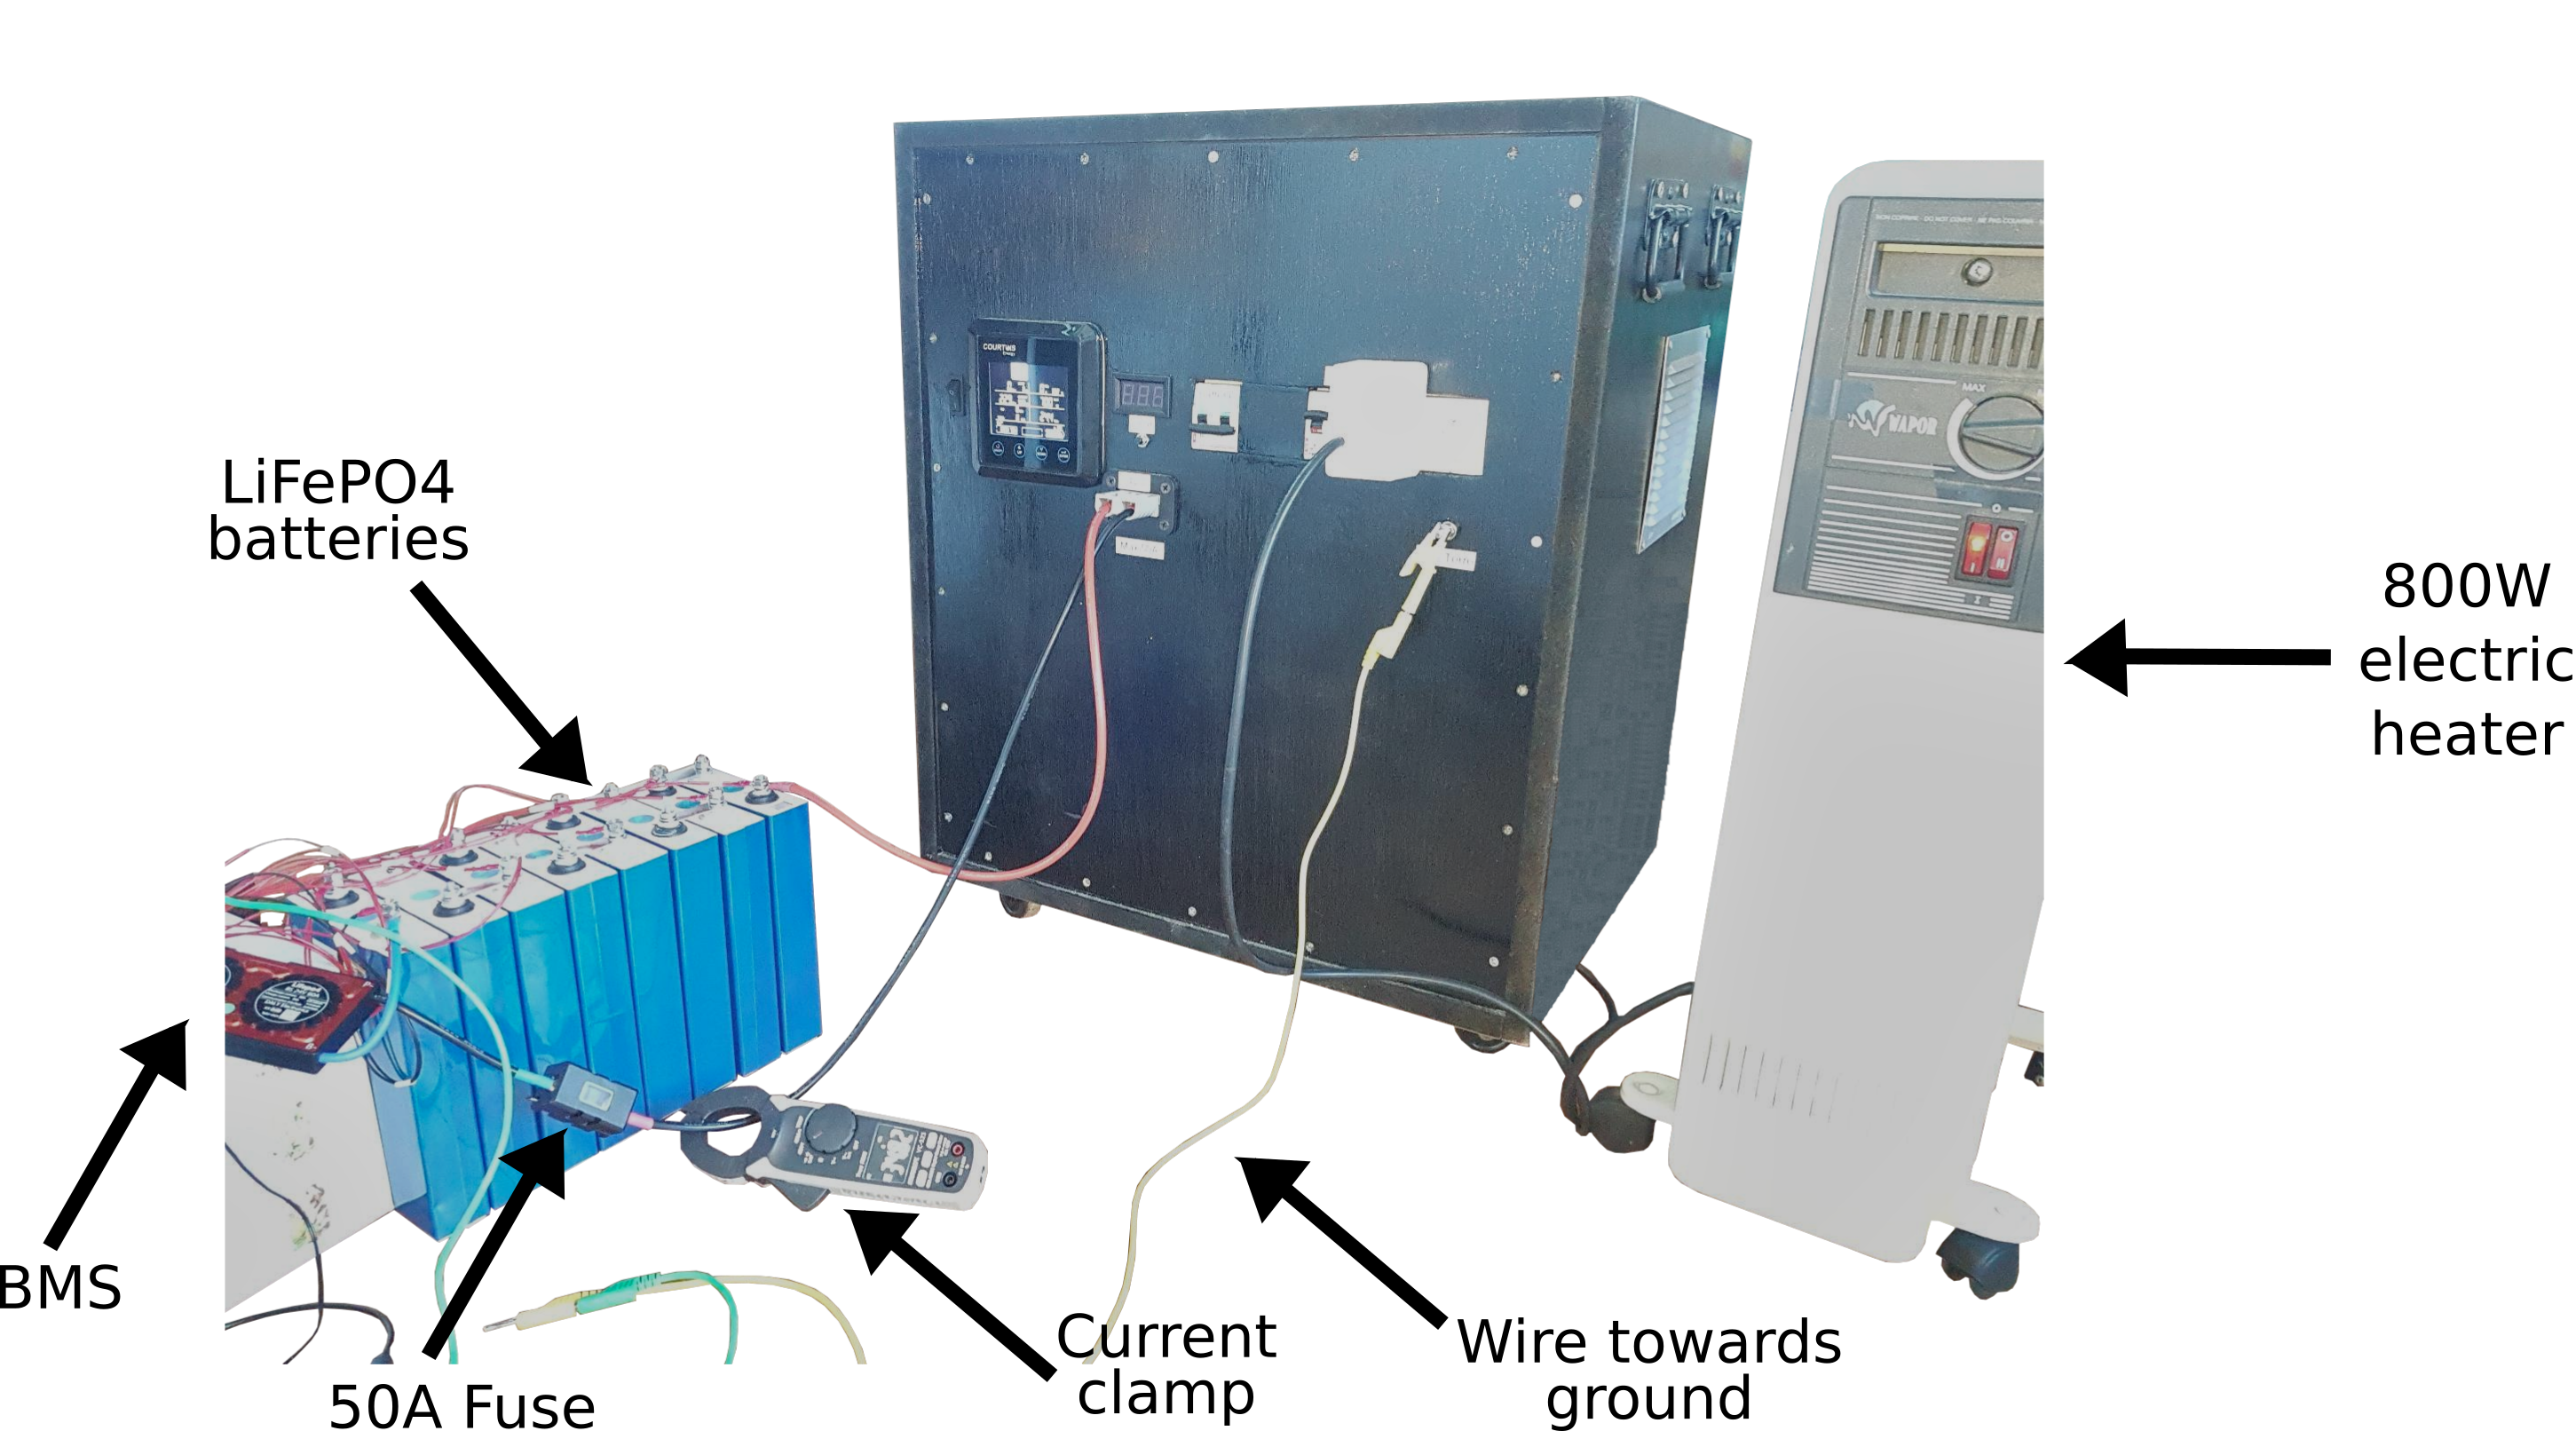
3) Temporary circuit
I personally made only a temporary circuit : I used the DC connector put on the front side.
This input is not protected by a circuit-breaker : everything connected to it must have its own protection !
When you use the high amp connector, make sure that you have disconnected the lead batteries with the circuit-breaker : lithium and lead batteries cannot be operated in bypass, because they do not have the same behaviour.
Conclusion
I am very satisfied about the Powertank ! In the event of a power cut, we can deal with it for several hours, until the mains is back...
I calculated that a Powertank can power a 100W fridge during 13h with lead batteries and during 24h with lithium batteries.
Interesting... We have to keep in mind that it is not a long term solution. For example, I bought a petrol/gas power generator, which can be used to charge batteries in a couple of hours. Using directly it would be noisy and not energetically profitable.
You can also inspire yourself from others projects, for example to add solar panels or wind turbine !
Have fun !
French DIY