Simple Portable Super Nintendo System
by Andre5000 in Design > Game Design
5300 Views, 139 Favorites, 0 Comments
Simple Portable Super Nintendo System
.jpg)
• You love your old and dusty Super Nintendo System?
• You always wanted it to be portable?
• You don't want to modify your SNES?
Here is the solution for you! Take it to your friends, play at the balkony, in the garden ...wherever you like!
(Please note: You will still need a power source)
I really like playing with my SNES. But it's really not that comfortable to be transported. For two years I thought about a portable solution. You find many tutorials online how to form it into a cool portable handheld. But I never really wanted to 'modify' oder 'change' the system. Today I can show you my solution and hope you like it :)! The photos I made back then haven't the best quality and a few might be missing ...but I hope they give you an idea of how it works! Let's start...
Prepare to Get Started


At first we need to get all materials:
- The SNES you love (including controller and your favorite games)
- Suitcase or toolbox (size at least: 45 x 35 x 15 cm)
- Multi outlet (with at least 5 m cable and 3 outlets): example
- Small TV/display with RGB input (must be wall mountable and the RGB input has to point downwards): example
- Screws (must fit in the back of the TV)
- Hook-and-loop tape: example
- Cable tie
- Optional: Stickers, chain of lights, cardboard
Tools we need:
- Hot glue
- Borer
- Measuring tape
Suitcase Preparation


.jpg)
Congratulations! You have anything you need. Now let's work on the next steps!
Part 1:
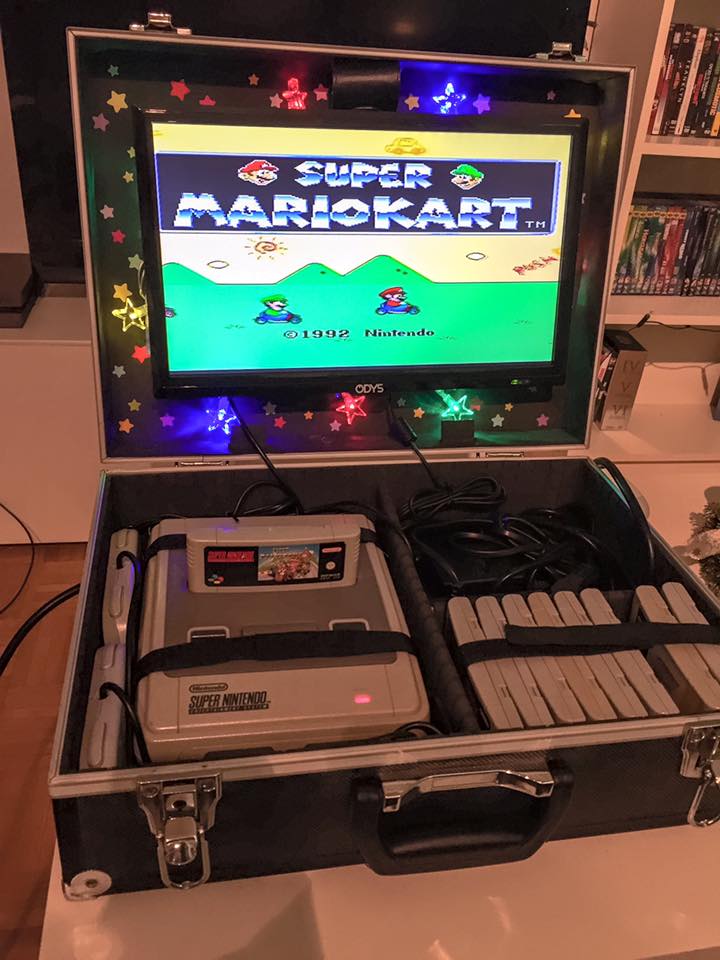
It's time to prepare the suitcase. Think about where you want to place your SNES, store your pads, games and wires. I separated the suitcase in two main parts (you can use cardbord to do that). The left part used to store the SNES with two controllers. The right part stores 9 games and the multi outlet.
Part 2:
We want the SNES and the games to be safe in place. Take your hook-up-loop tape and glue it onto the inside of the suitcase as shown in the pictures. The tape needs to be long enough to tighten the SNES and the games safe in place. Besides you have to glue your cardboard separators into the suitcase to prevent them from moving.
Part 3:
Keep your cables organized! Use cable tie to keep your calbes organized and minimize the amount of space they require (don't tight the cable tie too strong or you damage the cables). I tied the controller cables and power cables of the SNES and TV.
TV/Display Setup


Time to get the TV in place!
This part can be a little tricky. You need to be very precise in order to get the TV correct in place and don't damage the suitcase. It's all about measuring and patience! Hold the TV in place and mark the location on the suitcase where the TV will be mounted with screws. Finally drill the holes. When finished, plug alle needed cables (don't forget the Nintendo RGB cable) into the TV and mount it into the suitcase.
Finalize the Project

You're almost done!
When everything is in place, close all hook-and-loop wires and then your suitcase to see if everything is kept in position. You can put a piece of cardboard inside to prevent the TV from getting scratches while transported if necessary. Open your suitcase, plug your multi outlet into a power source and see if everything works!
Optional:
Decorate your suitcase! Add your favorite style of decoration to give your suitcase a nicer look! I got inspired by Mario Kart's Rainbow Road!
Thank you!
Thanks for reading my first tutorial! I hope you like :)! What do you think? Share your results and thoughts on the project in the comments below! Mamma mia!