Poor Man's Photoshop - Using Powerpoint to Make Invisibilia
by Bitsi in Craft > Digital Graphics
15565 Views, 15 Favorites, 0 Comments
Poor Man's Photoshop - Using Powerpoint to Make Invisibilia
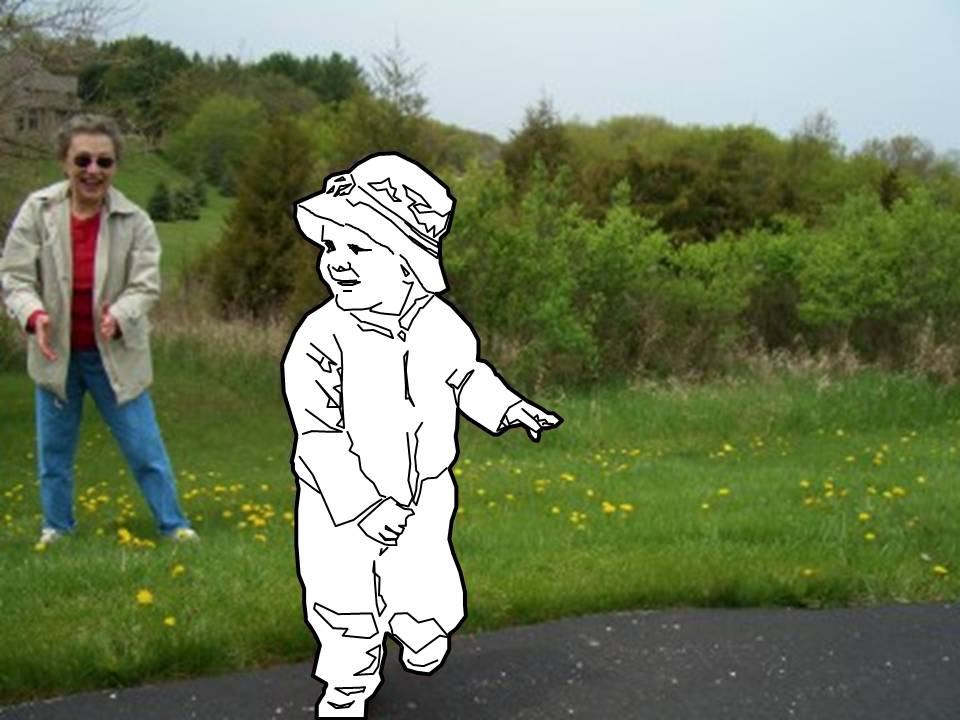
Invisibilia is the cool effect you achieve by replacing people in your photographs with their line drawings.
It's not my idea. This guy has done many, and even written a nice tutorial for you -- which is great if you have photoshop. (tutorial link is at the bottom of his webpage)
As you probably know, Photoshop is expensive if you don't have it, and very dense and hard to learn, if you do have it. It's probably a wonderful tool, but just reading through the tutorial was enough to make me shiver (and not in a nice way).
So, here's a guide to making your very own Invisibilia to print, frame or whatever... using just the drawing tools you can find in an ordinary word processor, or in this case, PowerPoint 2007. (hey, you may know many of these tricks already. But I bet you learn at least one new thing. :-)
Ready? Let's go.
Start PowerPoint
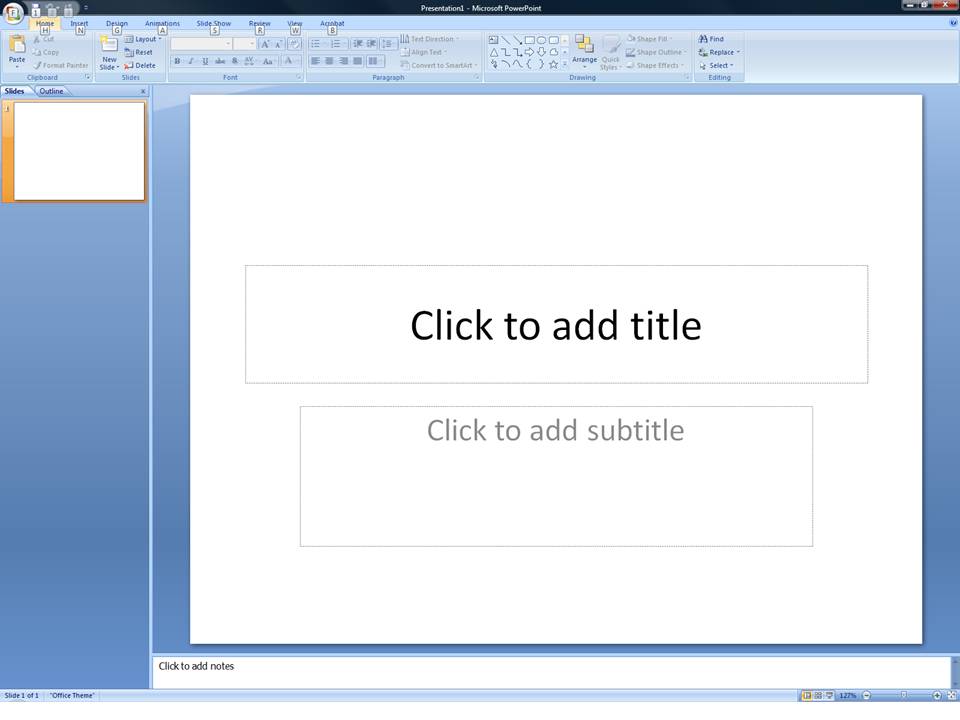
I am using Powerpoint 2007. You can use an earlier version. They will have all of the same tools, but they'll be in different toolbars.
So, open PowerPoint with a blank document. I always immediately click and delete the default text boxes that are provided (so generously!).
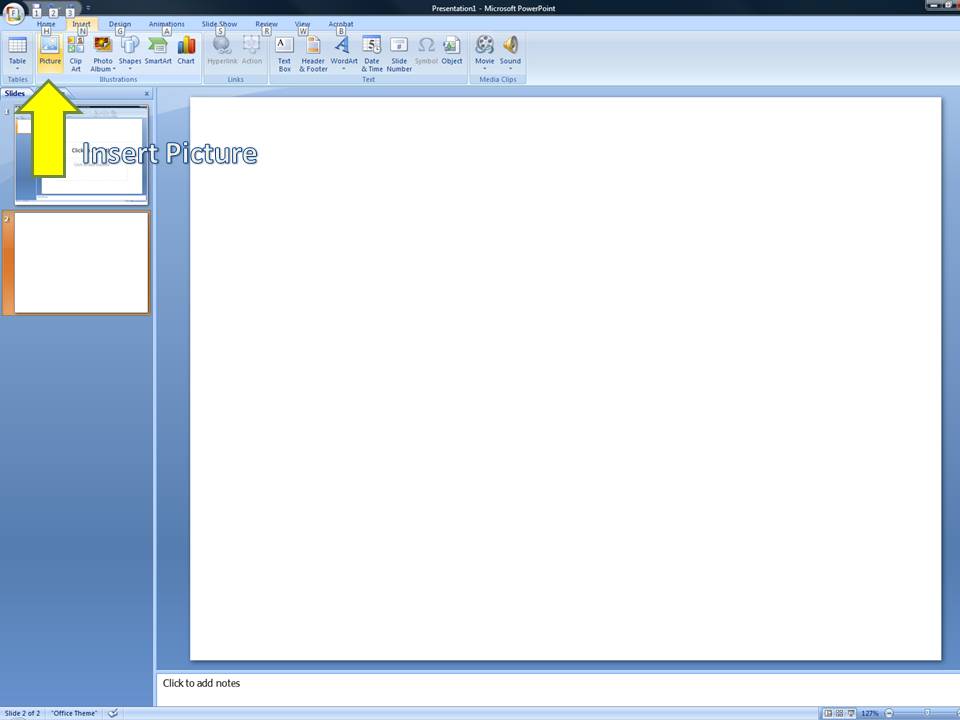
Find the tool for Inserting a Photo.
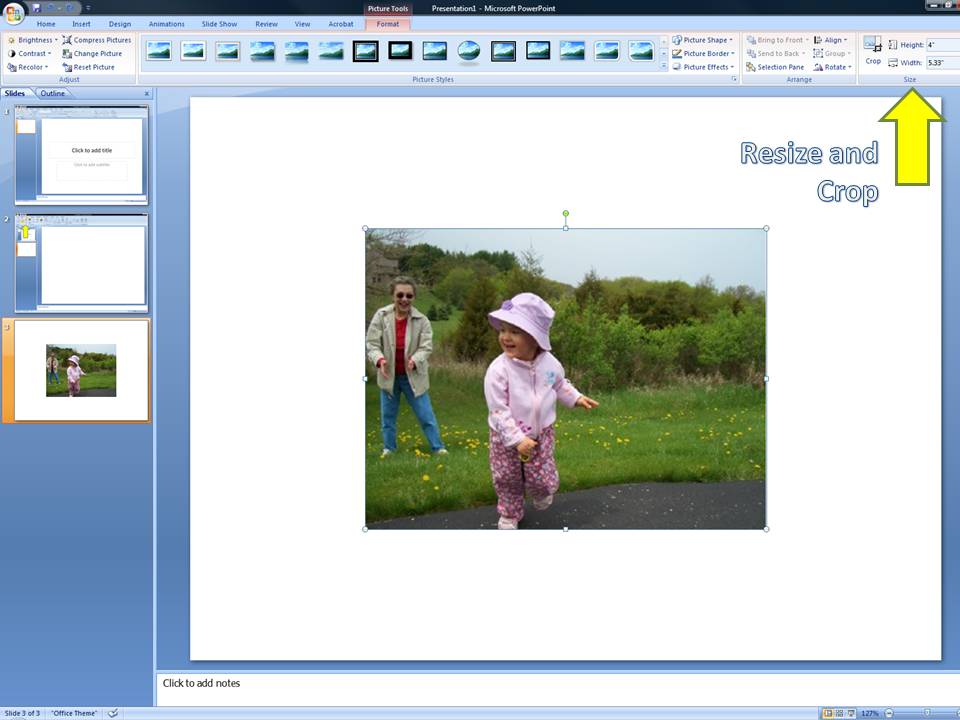
Insert your photo and resize it to fill up the whole "slide". You may also want to do some cropping at this time.
So, open PowerPoint with a blank document. I always immediately click and delete the default text boxes that are provided (so generously!).
Find the tool for Inserting a Photo.
Insert your photo and resize it to fill up the whole "slide". You may also want to do some cropping at this time.
Make a Ghost
I decided to make cute little Hannah a ghost.
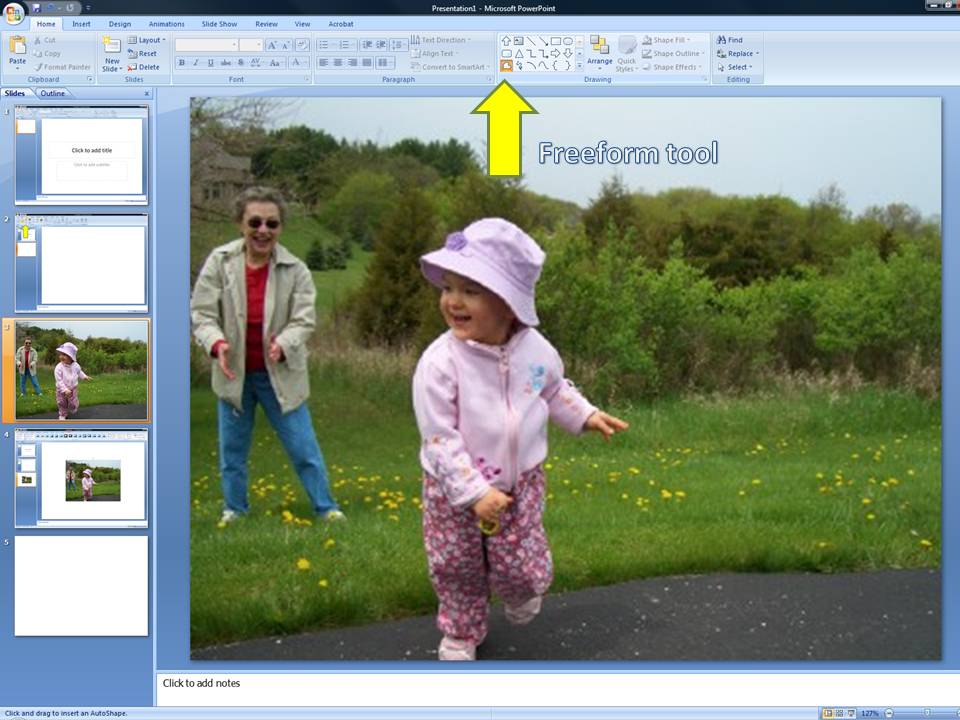
You start by selecting the freeform tool from the Drawing Objects toolbar.
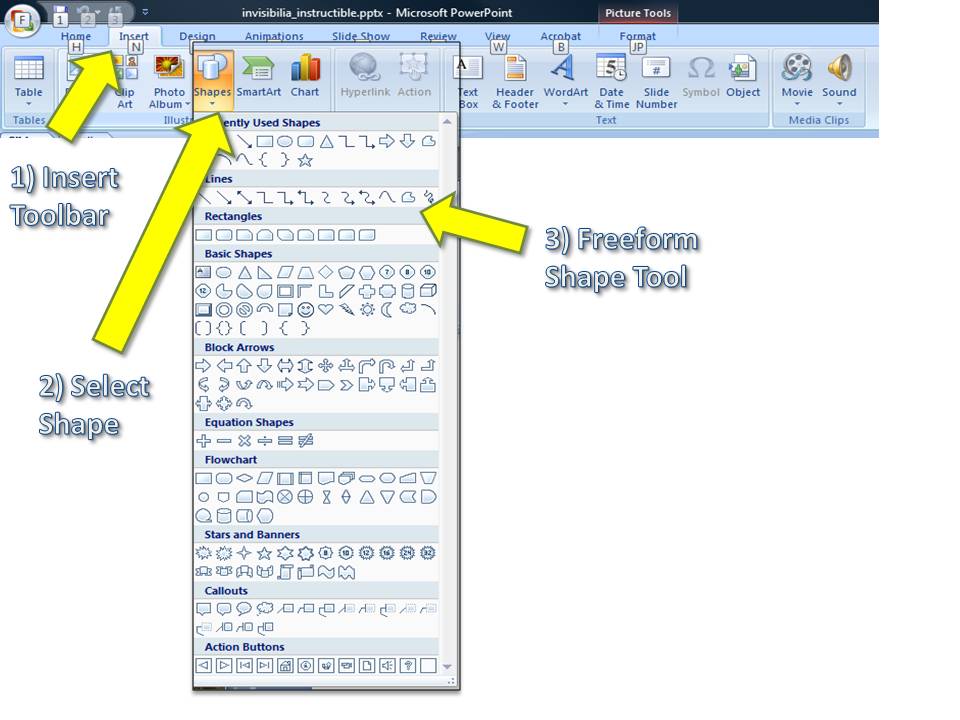
On PowerPoint2007, you can find this tool by
1) Clicking for the Insert toolbar. You'll see a plethora of things that you can insert.
2) Choose the Shapes option
3) Locate the Freeform Shape Tool in the 'Lines' section
...
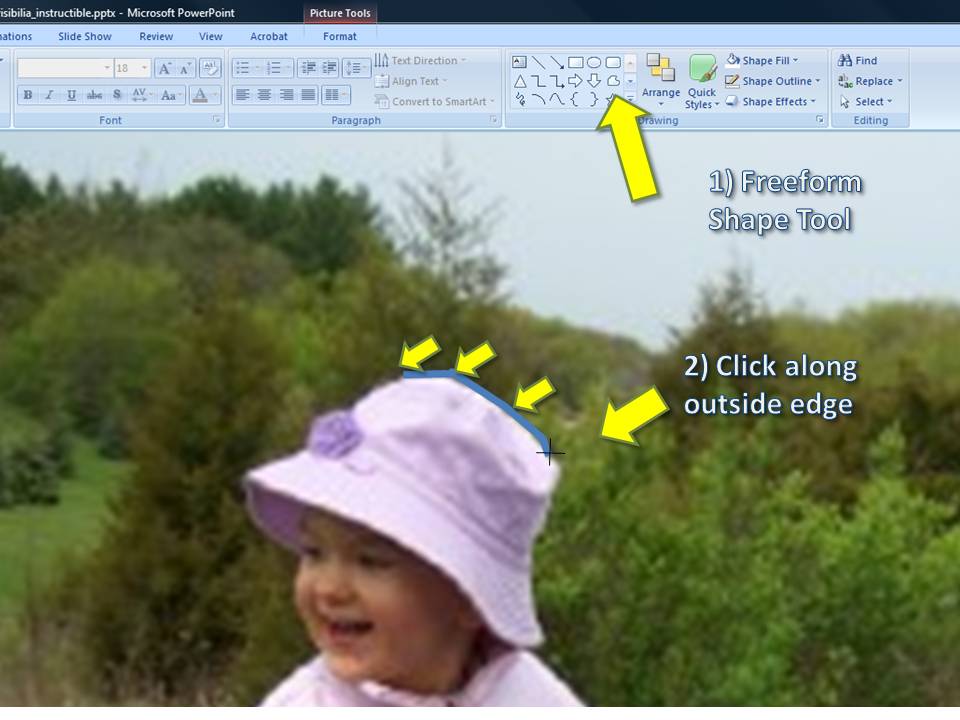
Click around the outside of the image until you have come all the way round. Just click the corners where the outline changes direction. PowerPoint will draw a straight line to connect your points.
Be careful and try to match up the edges as best you can. This is the hardest part for me because I'm so impatient.
If you mess up, don't fret. The next step will show you how to clean up your outline.
...
When you get close to your first point, PowerPoint will decide that you're done and connect the last two points. It will fill in the form and retire the tool.
Make the Outline More Ghostly
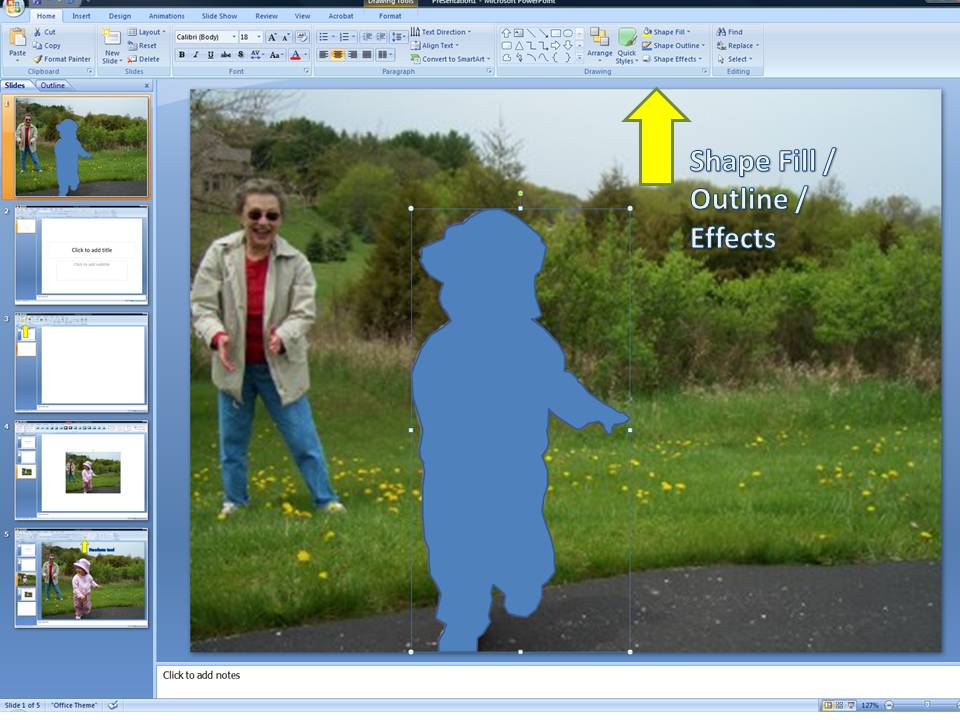
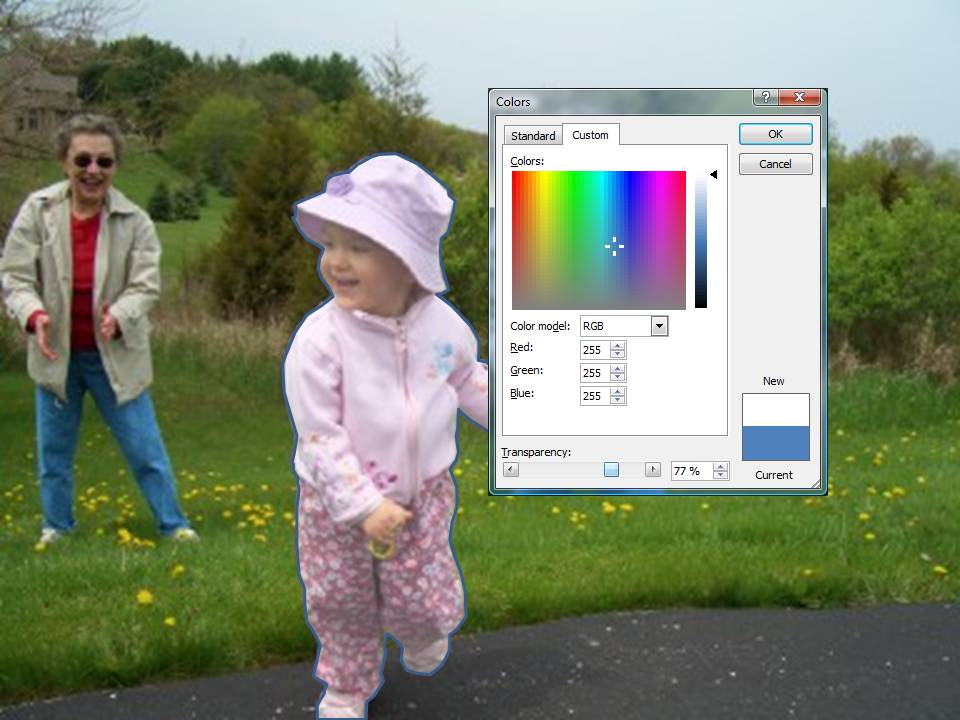
You want to adjust the transparency of the form until you can see the original photo underneath.
You can change the color of the form by using simple Shape tools on PowerPoint 2007
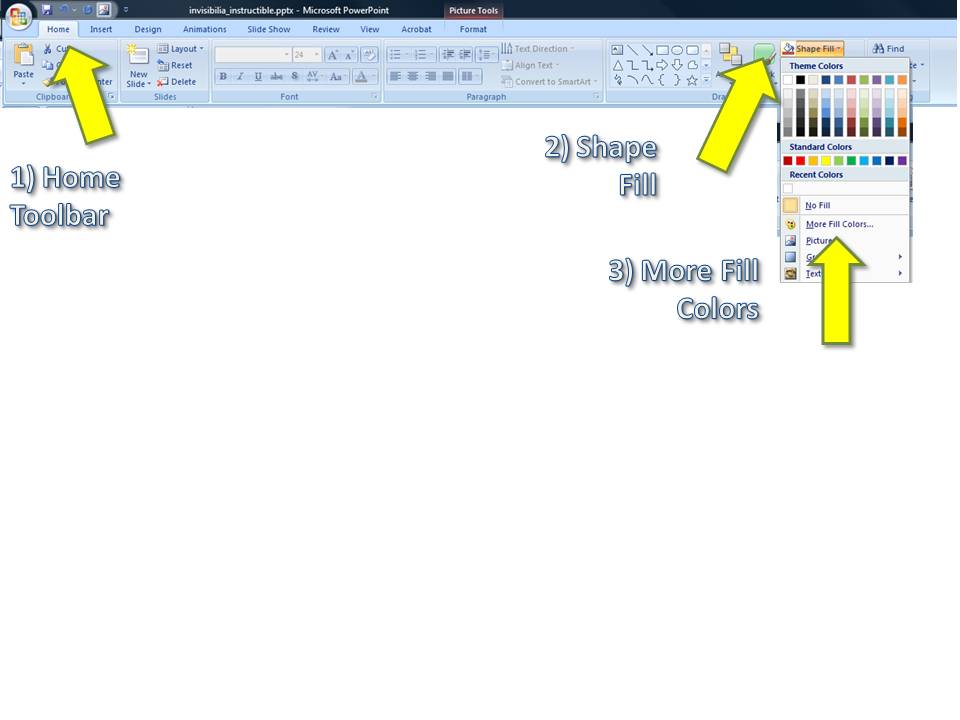
1) Go back to the Home toolbar
2) Click the Shape Fill button
3) Choose More Fill Colors from the dropdown menu and you'll get a popup menu.
...
On the popup menu,
1) Pick the custom tab
2) Slide the Transparency scroll (at the bottom) to the right until it's somewhere between 50% and 75%.
3) Optionally, you may want to lighten up the fill color, by sliding the 'saturation' pointer up.
Make Corrections
Now is a good time to make any corrections to your outline.
Using PowerPoint 2007
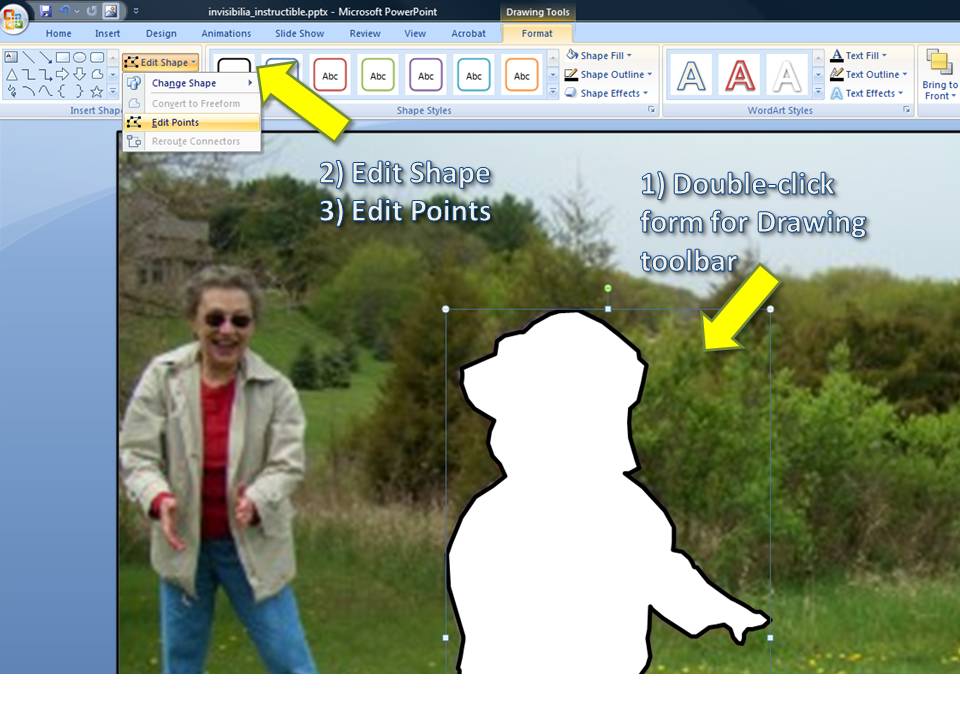
1) Double click on the ghost form to access the Drawing Tools menu
2) Click the Edit Shape button and
3) Choose Edit Points
...
Fix the points with PowerPoint 2007
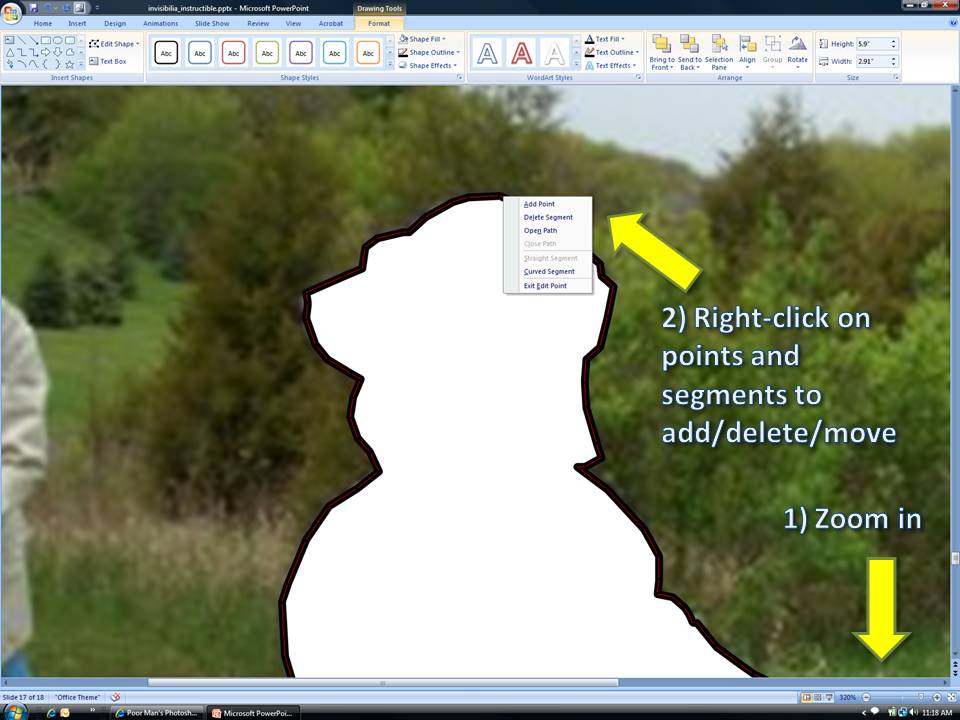
1) If you haven't done so already, zoom in so that you can see the points on the outline.
2) Right-click on the outline
a) If you clicked on a point, you may delete it now
b) If you clicked betwee points (on a segment), you may
i) delete it
ii) Change a curved segment to straight (sometimes the drawing tool will interpret your mouse clicks as mouse drags... then you get unexpected kinks and curves.)
iii) Curve any straight segments to make the outline a little smoother.
I like the chunky straight segments.
Optional - Turn Off Grid Snap
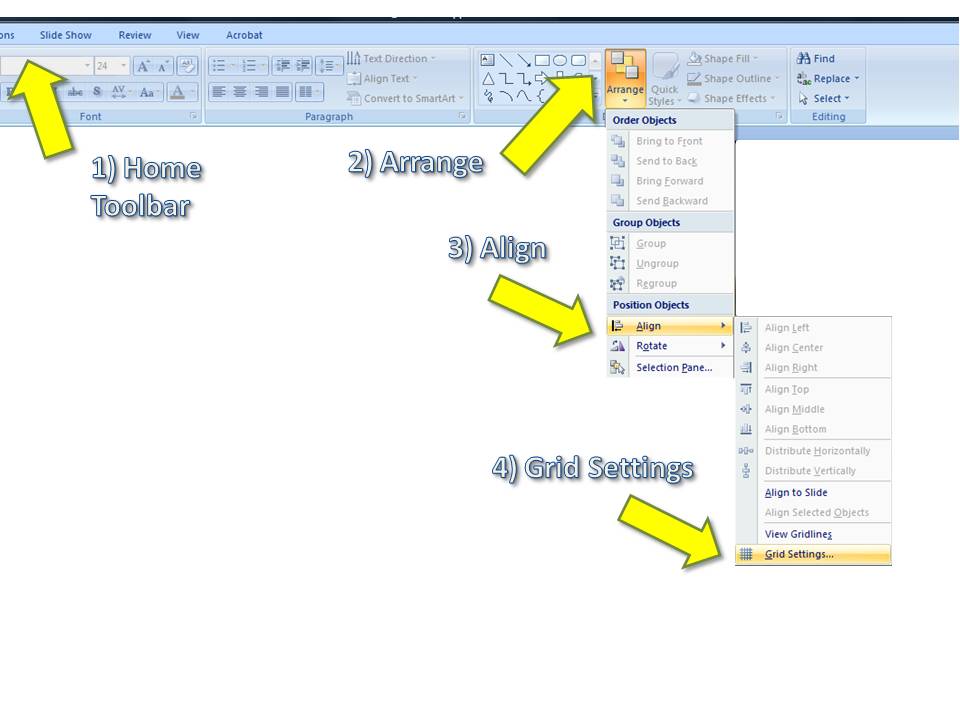
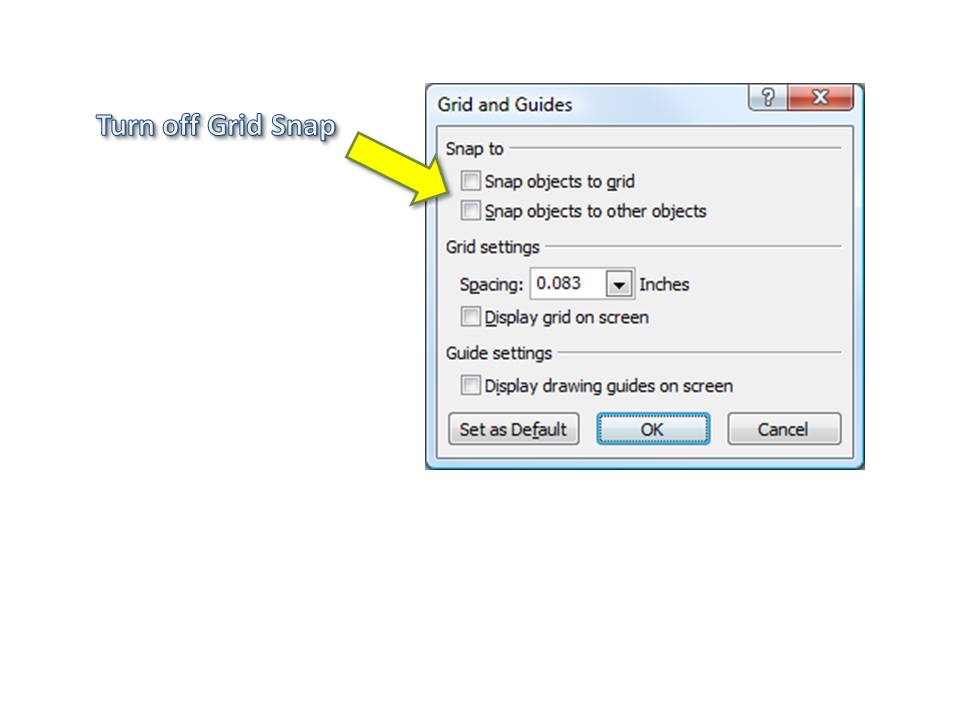
Another option to try at this point, is to turn off the grid-snap. By default, PowerPoint will move all of your carefully aligned mouse-clicks to a grid points close to them. If you want more control, you'll have to turn off the snap-to-grid option.
On PowerPoint 2007,
1) Start from the Home toolbar
2) Click the Arrange button
3) Choose Align from the dropdown menu
4) Select Grid Settings
...
On the popup menu, unselect 'Snap objects to grid'.
On PowerPoint 2007,
1) Start from the Home toolbar
2) Click the Arrange button
3) Choose Align from the dropdown menu
4) Select Grid Settings
...
On the popup menu, unselect 'Snap objects to grid'.
Scribble
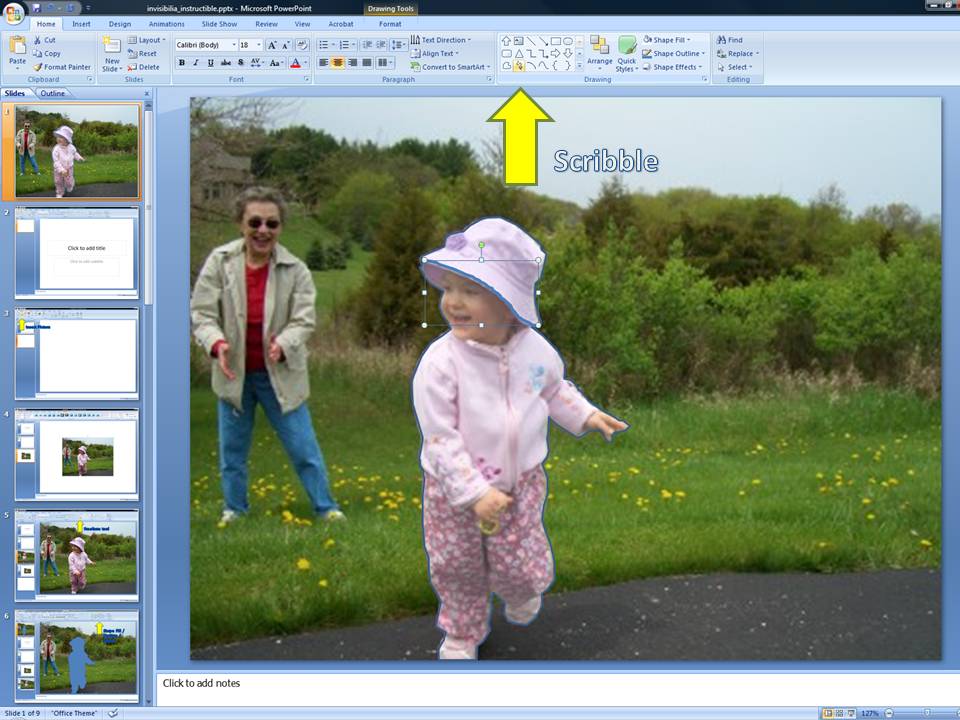
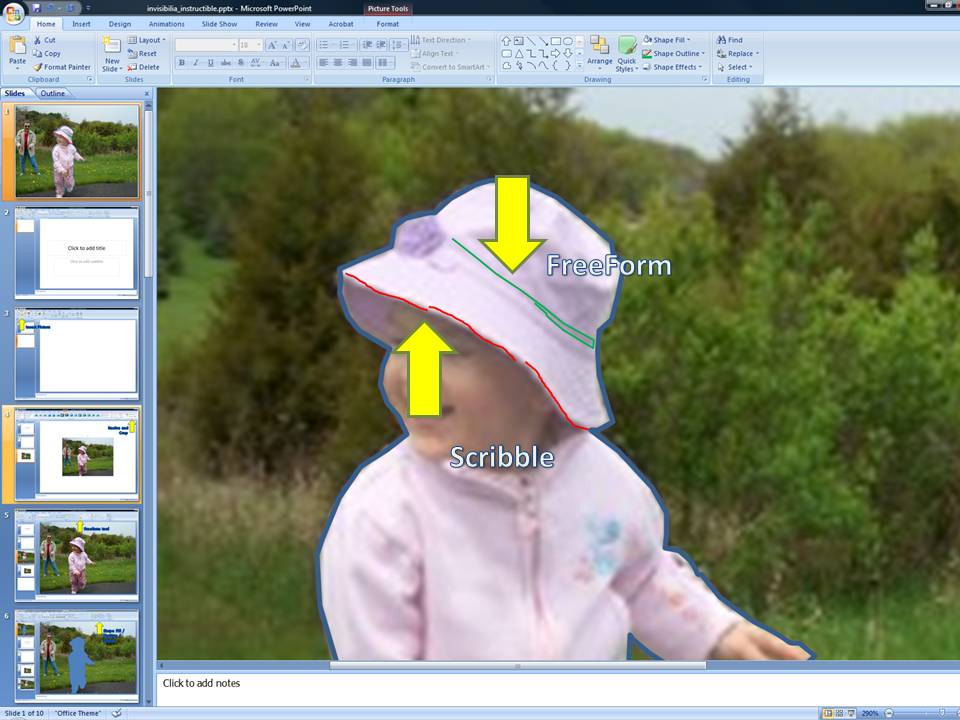
There are a few drawing objects that you can use to make the inside lines. Here I show the difference between 'scribble' and 'freeform'.
On PowerPoint2007, you can find the scribble tool in the same toolbar and menu where you found the freeform tool.
Yes, the freeform tool may also be used for non-closed objects. Actually I prefer it, since my scribbles look like my pen is having a seizure. With the freeform tool, I can click along and let the computer figure out the vector.
Fine Tune Your Drawing
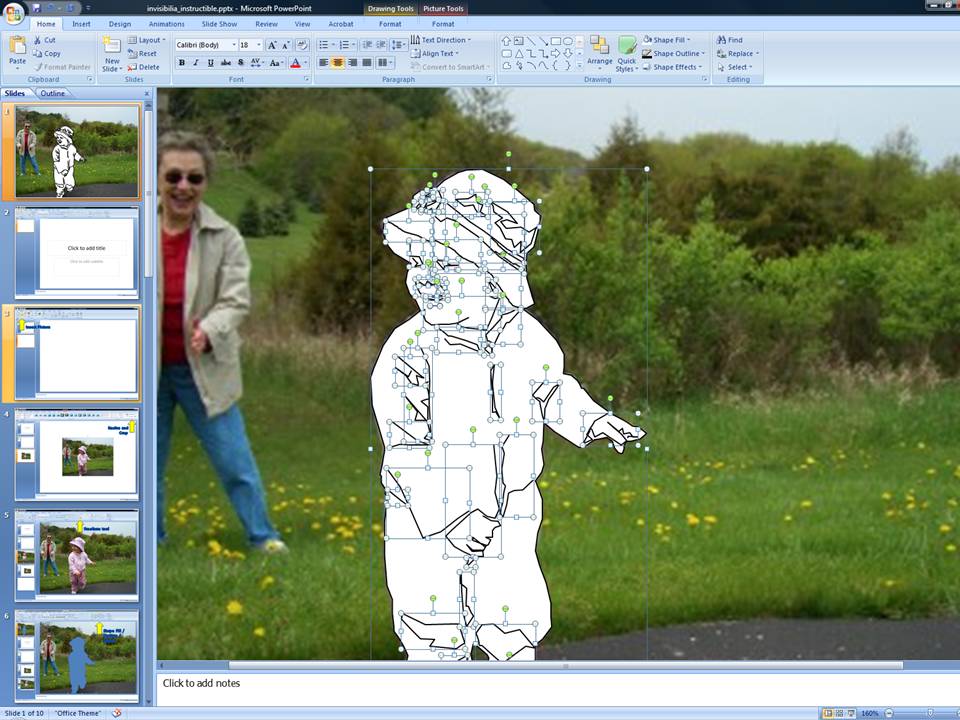
After you've been scribbling for a while, you'll want to check on your progress.
Here, reset the fill and line options to white and black, respectively. (make sure that you don't also select the photo in the background, but if you did, just undo!)
On PowerPoint 2007,
1) Select all by using ctrl-A
2) Unselect the photo in the background by holding the ctrl button down and clicking on it.
Now you have selected all of your new scribbles and forms
3) Use the Shape Fill to set the fill color to white
4) Click on the Shape Outline menu (right under Shape Fill) to see the line options. Make all of the lines the same color and thickness.
Oops, I see that I'm still missing part of a sleeve. And Hannah's eyes look a little too vacant.
Finale!


As a finishing touch, you can change the thickness and color of the lines. I like my outline to be about three times thicker than my inside lines.
I use the Save As option to save this slide as a JPG. (actually, you can see that I did this whole instructible in PowerPoint and saved all of the slides as JPGs :-)
The latest version of PowerPoint also offers lots of cool shading and 3-D options that you may want to try.
I hope you had fun!
** If you liked this Instructible, please vote at the top of the page! Thanks. **