Plant-Watering Device
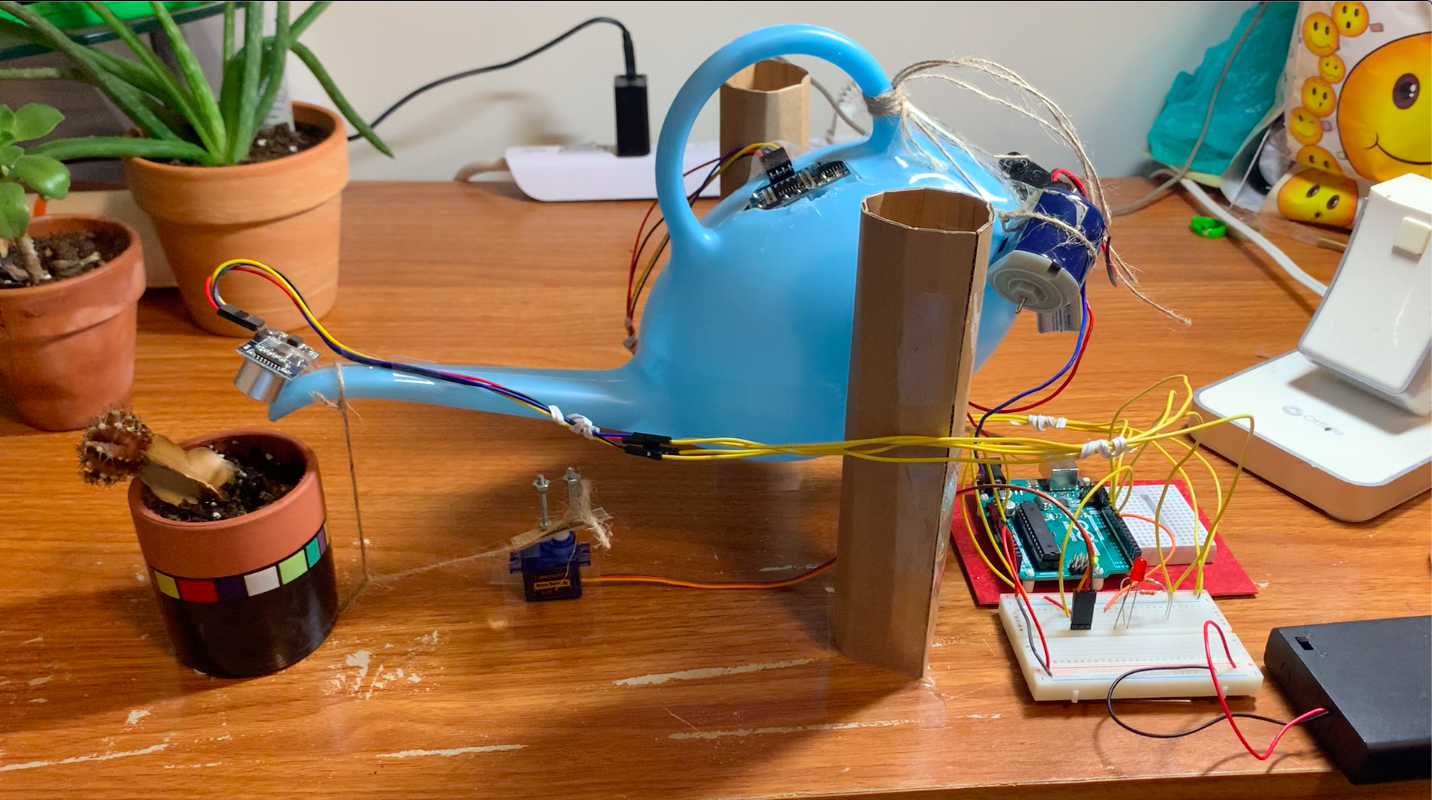
This project is an automated plant-watering device, called the SAP (Save All Plants). It features two inputs in the form of two ultrasonic distance sensors. It has two outputs - a 9g micro servo motor and a red LED. There is a watering pot that is suspended upright in the air by two columns made from 5x7 in slabs of cardboard, and fastened by machine screws and hex nuts. One sensor is attached to the end of the watering pot. It detects the distance the spout of the pot is from the plant. The second sensor sits on the opening of the watering pot, looking into the pot. It measures the water level. The motor sits below the pot. As it rotates counterclockwise, it pulls a string. The string is attached to the spout of the watering pot. It lowers the spout, allowing water to flow out of the pot into the plant. The sensor attached to the spout detects that the distance between the spout and the plant is decreasing, and once the distance reaches less than 5 cm, the motor begins to turn clockwise until it returns to its initial position. The pot is once again upright. The sensor that sits in the watering pot will signal the red LED to turn on when it senses that the water level is more than 5 cm away. This distance of 5 cm between the water level sensor and the water level equates to the amount of water that the watering pot needs in order for the system to work. Lastly, there are weights attached to the back of the watering pot, that counteract the change in center of gravity that the rotation of the pot and the movement of the water within it cause to the structure. These weights allow the pot to return to its upright position when the string is loosened.
Downloads
Assembly Instructions
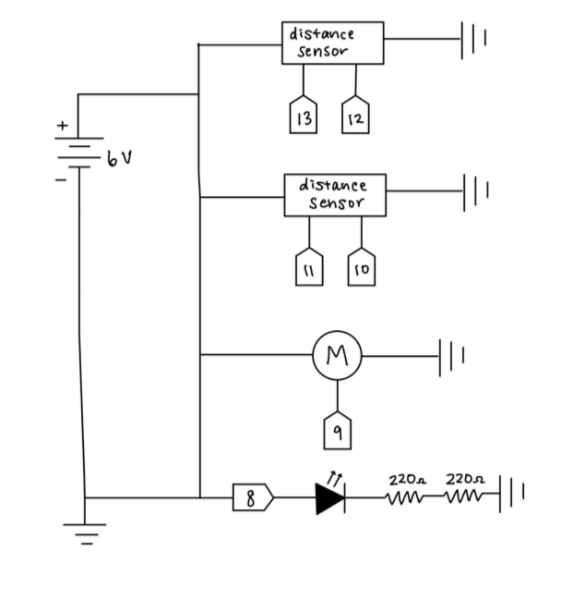
1. Assemble circuit, referring to the circuit diagram.
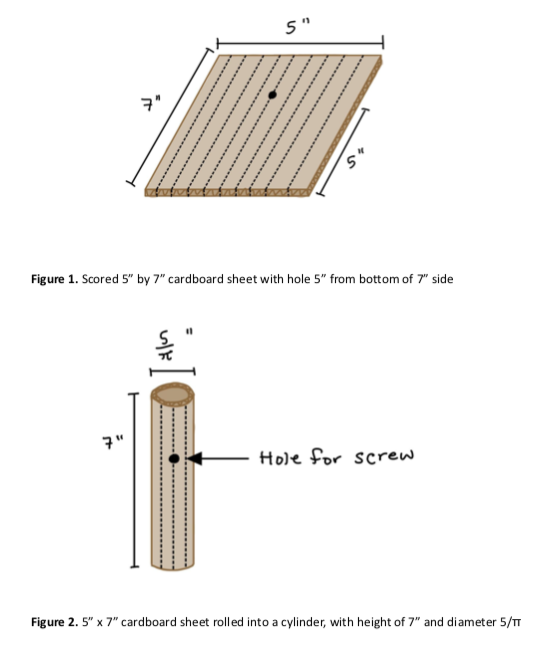
2. Score two 5x7 in cardboard sheets by using scissors to indent (but not cut all the way through) cardboard along its longer side. Use the tip of the scissors to create hole in each sheet 5” from the bottom of the 7” side. See Figure 1 for drawing.
3. Use the tip of the scissors to cut a hole on either side of the watering pot. The holes should be in the center of the sides of the pot, at approximately 3⁄5 of the height of the pot. This step is dependent on the size of the pot used.
4. Check to see whether the ultrasonic distance sensor fits through the opening at the top of the watering pot. If it does not, use scissors to create a wider opening.
5. Take two 4x40 1” length machine screws, and place one in each hole of the watering pot, with the heads of the screws inside of the pot.
6. Take one cardboard sheet, and align the hole made in Step 2 with the end of the screw that is sticking out of one side of the watering pot. Push the cardboard through the end of the screw. Take a hex nut and secure it to the end of the screw.
7. Repeat this step for the other side of the watering pot.
8. Roll each cardboard sheet into a cylinder using the scores made in Step 2. The cylinders will have 5” circumferences. See Figure 2 for drawing. Use tape to join the two ends of the cylinder together. Tape the base of each cylinder to whatever surface you want the device to rest on. I used a desk.
9. Fill the pot up halfway with water.
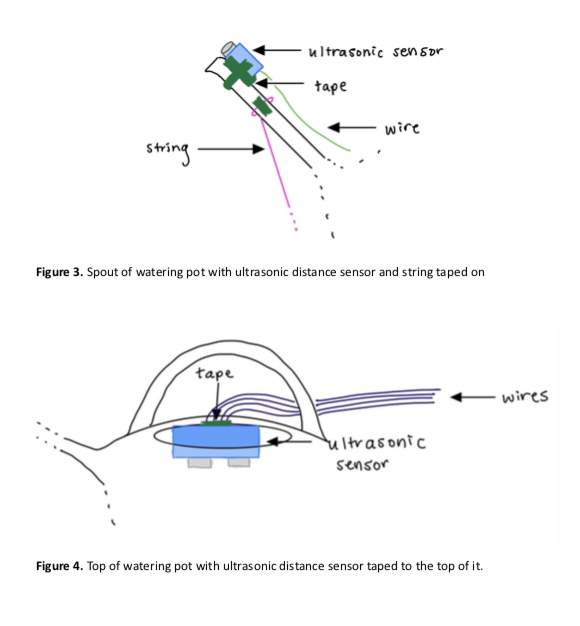
10. Take one of the ultrasonic distance sensors, and use tape to secure it to the spout of the watering pot, with the sensor facing in the same direction that water would flow out of the watering pot. See Figure 3 for drawing.
11. Use tape to secure the other ultrasonic distance sensor to the opening at the top of the watering pot, with the sensor facing down into the pot.
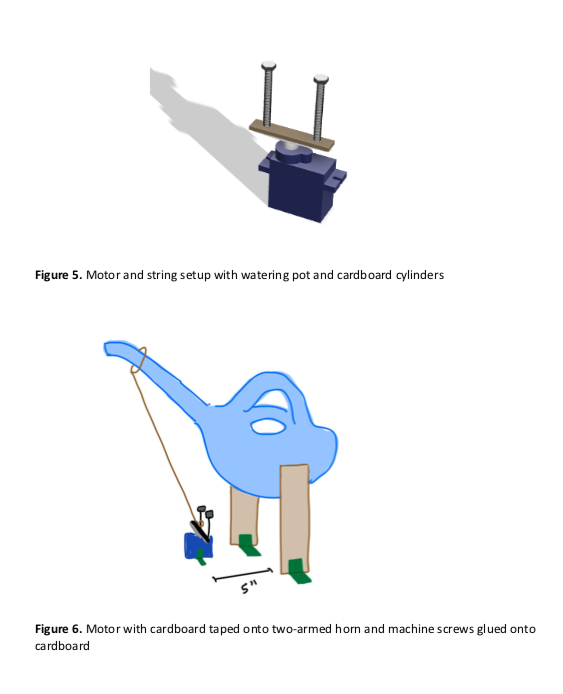
12. Cut a piece of cardboard into a rectangle, approximately the same size as the two-armed horn that comes with the 9g micro servo. Tape the cardboard to the horn, making sure that the connection is secure.
13. Use Krazy Glue to glue the heads of two 4x40 1” length machine screws to the cardboard - one on either arm of the horn. See Figure 5 for drawing. Wait several hours for glue to dry.
14. Cut at least 18” of string. Tie one end of the string to one of the screws that you glued to the horn. Tie the other end of the string to the spout of the watering pot, right behind where the sensor was mounted. Tape the string to the spout. See Figure 3 for drawing.
15. Tape the 9g micro servo to the ground underneath the watering pot.
16. Cut a piece of string to approximately 4”. Wrap this string around the 18” string you made in Step 14. Tape the two ends of the 4” string to the surface you taped the cardboard columns to. The 18” string should now have an “L-shape.” See Figure 6 for drawing.
17. Use string to tie the DC motor and two 9V batteries to the back of the pot, around the handle. Tape down string/weights as needed.
18. Place a plant below the spout of the watering pot, such that the spout will hit the dirt in the plant pot if rotated far enough.
Operation Instructions
Here are the steps for operating the SAP:
1. Upload the code to the Arduino Uno.
2. Turn on the battery pack.
3. Watch as the SAP waters your plants!
If the red LED on the breadboard is lit up, it’s time to refill the watering pot!
1. Remove the sensor that is taped to the top of the watering pot, and place it to the side.
2. Pour water into the pot.
3. Put the sensor back on top of the pot. Make sure it is secured by the tape.
4. If the LED turns off, you have filled the watering pot successfully.
5. If the LED remains on, repeat Steps 1-3.