Plant Care With IOT
The COVID-19 epidemic brought with it a new habit - house plants!
the loneliness of lockdown brought people to find a link with nature using house plants.
Such as many others, we started to grow plants too, to make our house a more pleasant to stay in it for a long time.
Our project is meant to make house plant caring a lot more easy and efficient, with the combination of CPX, Inegromat and Blynk.
We deal with four scenarios:
1. First Scenario: a push notification is sent to your smartphone if the temperature around the plant isn't optimal for them. You can choose how many times a day you want to be notified on this concern.(Step 3)
2. Second Scenario: You can set a watering schedule on google calendar and to be notified from the CPX whenever it's a watering day.(Step 4)
3. Third Scenario: Lighting is very important for plants to grow, the lighting level measured around the plant will always be displayed on the Blynk app.(Step 5)
4. Fourth Scenario: Each plant thrives in different humidity level. For example, plants that are originated in the tropical areas require high levels of humidity and cactuses require low levels of humidity. Using a weather web site, the CPX is updated once a day with the humidity level expected for this day. The daily humidity level will be displayed on the CPX on demand.(Step 6)
Supplies
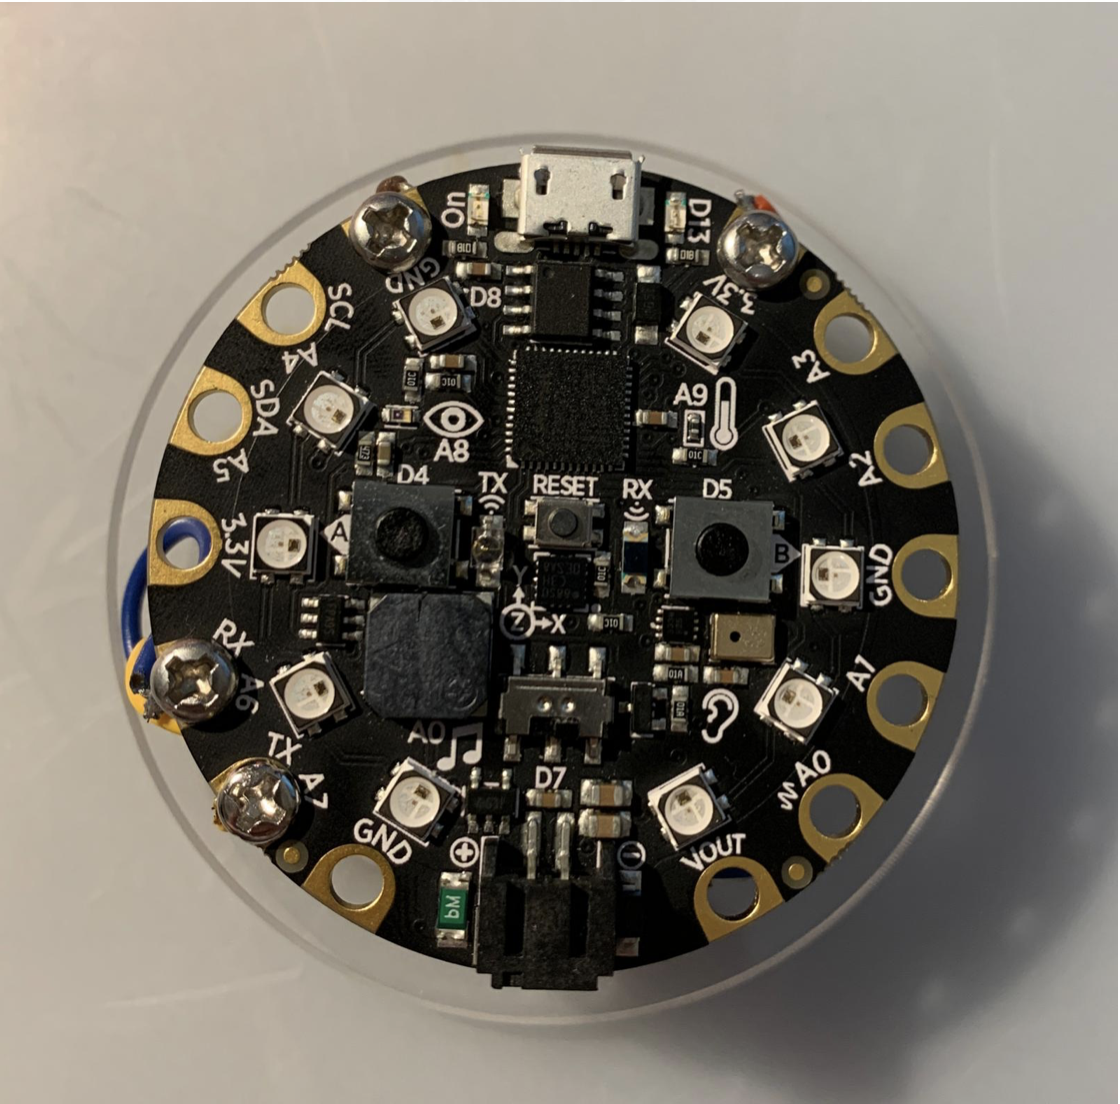
1. Circuit Playground Express Board
2. Blynk Application
3. Access to Inegromat Site.
4. 3 X AAA Batteries
5. Battery Holder
6. Dowland Arduino software
Meet the Technologies

In the project we use 3 technologies that works together in collaboration:
1. CPX :
CPX is a hardware board that has Neo pixels, sensors (temperature sensor, light sensor, sound sensor etc) and buttons.
In this project the role of the CPX is to measure the metrics that is required- light level, temperature level and take actions accordingly, in addition it has another role to show data that we get from the internet using it's Neo pixels.
2. Blynk Application:
Blynk is an IOT platform that interact with the CPX and the internet. The Blynk application knows how to transfer data to and from the CPX and to and from the internet.
In this project the role of the Blynk Application is to show data we measured using the CPX and to be a linking layer between the CPX and integromat. For example: the light level was measured by the CPX is displayed in the Blynk app and according to the temperature that was measured on the CPX, Blynk send Integromat an appropriate message.
3. Integromat Site:
Integromat is an online automation platform, it helps you link two or more applications so one's action affects the action of the other.
In this project the role of the Integromat site is to link between applications and Blynk.
Preparations
Now after we understand the technologies we can start the project.
- Download Arduino software on following link. Using Arduino software you can upload the project's code to the hardware (CPX).
- Download the Blynk application: for Apple on the following link or for Android on the following link.
- Create a new account and login.
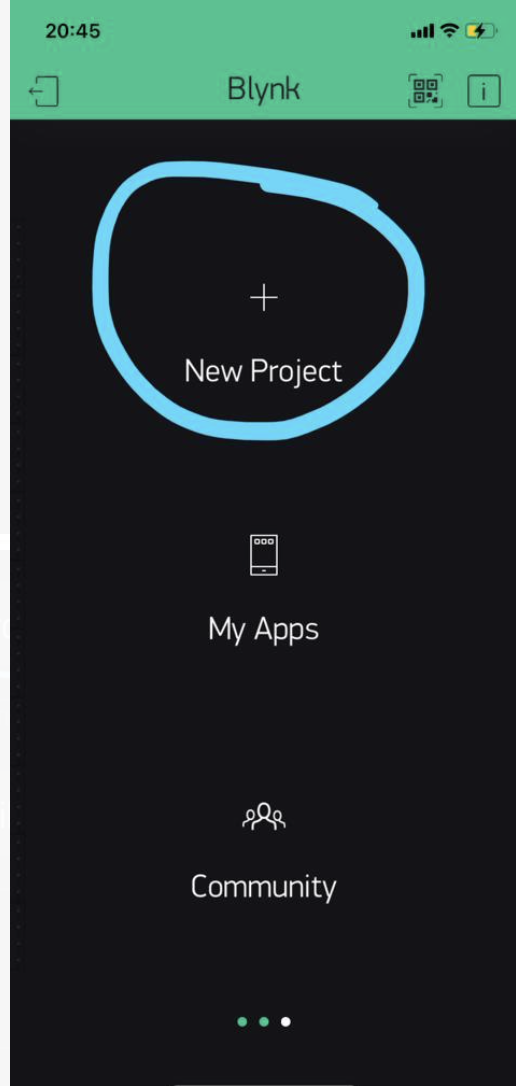
- Create a new project (the first picture from left).
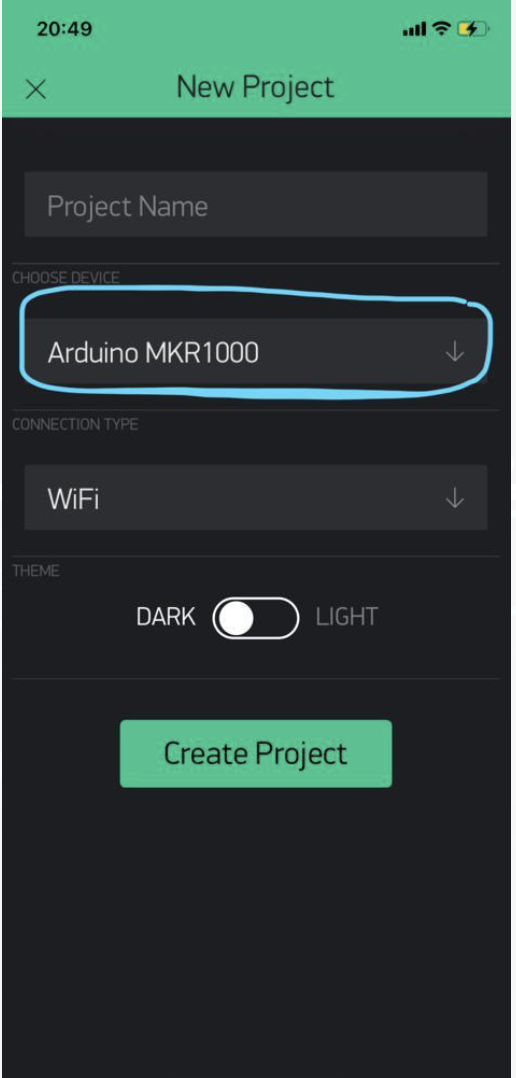
- Name your project and choose device Arduino MKR1000 (the second picture from left).
- Press "Create Project".
- On "Project Settings" you will find an AUTH TOKEN. Copy it, we will use it later.
- Create an account on integromat on the following link.
- Downland the Integromat application in your phone: for Apple on the following link, for Android on the following link.
First Scenario: Measure Temperature
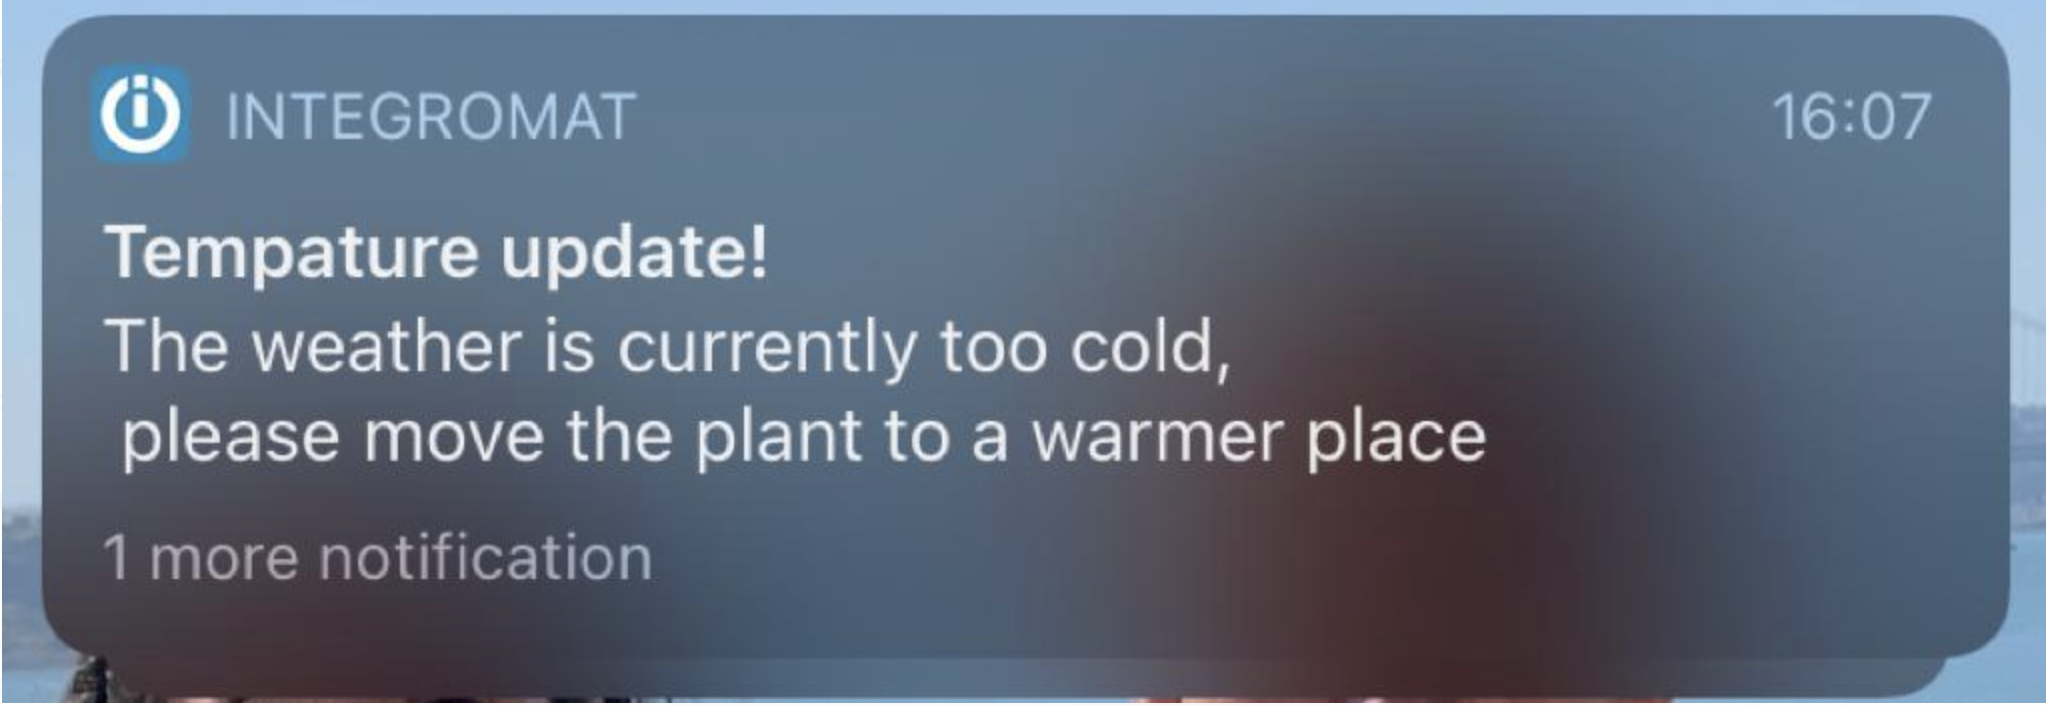
This is how we handle the first scenario of the project:
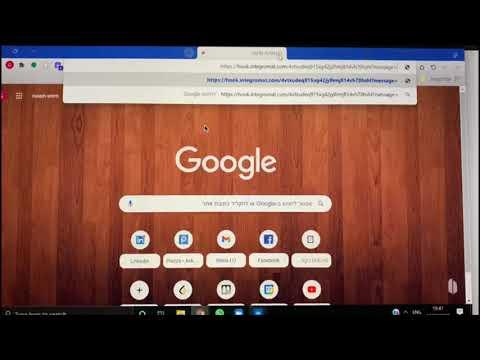
First, we will work on Integromat: follow the attached video by the following steps:
- Create a new scenario on Integromat
- First pick "Webhooks" and choose "custom webhook"
- Press the add button and add a new webhook
- Press "RE-determine data structure"
- Press "copy address to clipboard" and open a new tab on your browser
- Print the address that you copied to the search line and add to it - "?message="message""
- Press enter and wait for an "accepted" message
- Return to integromat, now press on the right half circle on the right of the webhook symbol to add a new module 8. as the new module choose "Apple IOS" or "Android" according to your personal device
- Choose "send a push notification"
- Add a new device (by scanning the QR code presented with the Integromat app - please do it BEFORE you login to the app!)
- Choose your desired title for the push notification and for "body" just choose "message" (this should be possible if you did steps 4-7 right)
- Press the clock symbol on the bottom left side of the screen and choose how often you want to be notified about this concern
- Set scheduling switch to on
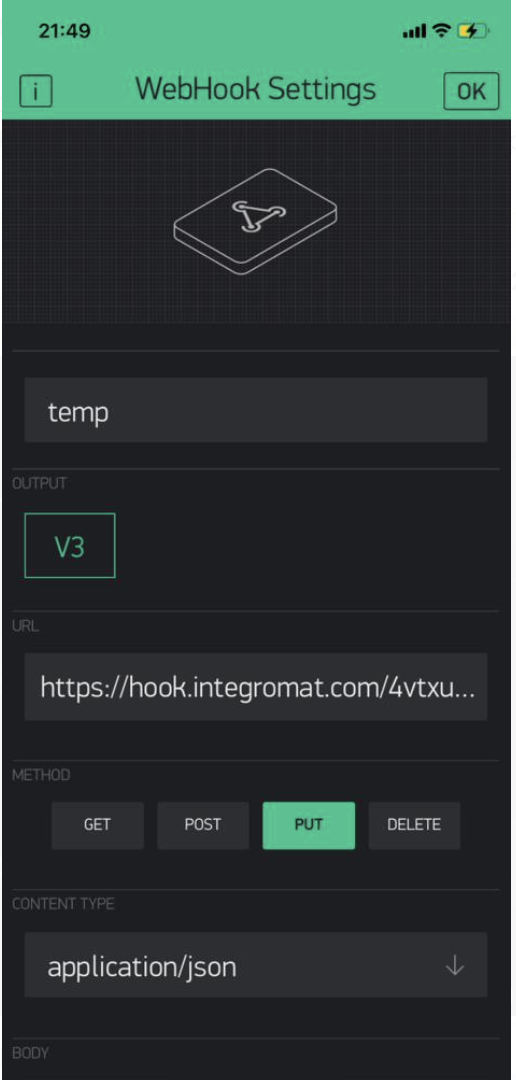
Second, we will work on Blynk: follow the attached photo by the following steps:
- Open the Blynk app and enter to your project the you opened before.
- Add the "webhook" widget on the widget settings
- Choose output as V3 on URL put the same URL as in previous step 6 and replace "message" (second one) with "/pin/" (Example: https://hook.integromat.com/4vtxudeq915xg42jylhmj814vh70hshl?message=/pin/)
Finally, this is how it should look like (the second picture from left).
Second Scenario: Watering Day Via Google Calendar
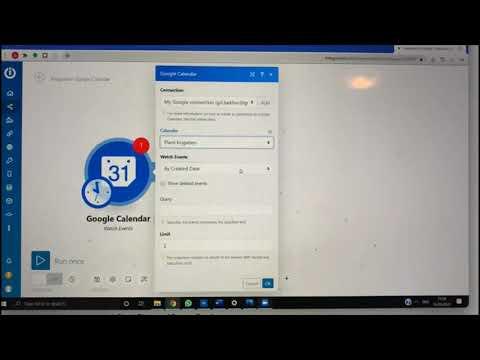
This is how we handle the second scenario of the project:
Follow the attached first video from the left by the following steps:
- Create a new scenario on Integromat
- First pick "Google Calendar" and choose "Watch events"
- Now press on the right half circle on the right of the Google calendar symbol to add a new module
- As the new module choose "HTTP"
- Choose "make a request"
- In the URL line enter the following address: http://188.166.206.43/XXXXXXXXX/update/v1?value=0...
- Instead of the X's that you see in step 6, add your AUTH TOKEN of your Blynk's project.
- Set scheduling switch to on
- Press the clock symbol on the bottom left side of the screen and choose how often you want to be notified about this concern (every day) and choose the time you want to be notified.
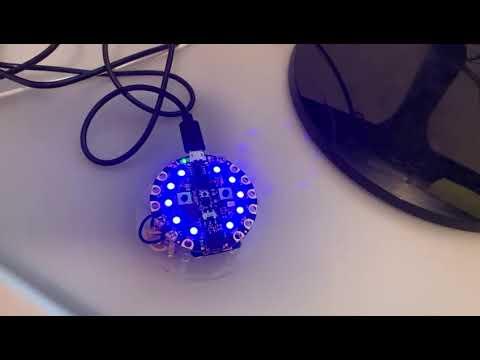
- Now, the CPX will alarm you every watering day on the time you selected that this is the time to water your plants! to turn it off press the left button in the center of the CPX
Finally, this is how it should look like (the second video from left).
Third Scenario: Light Level
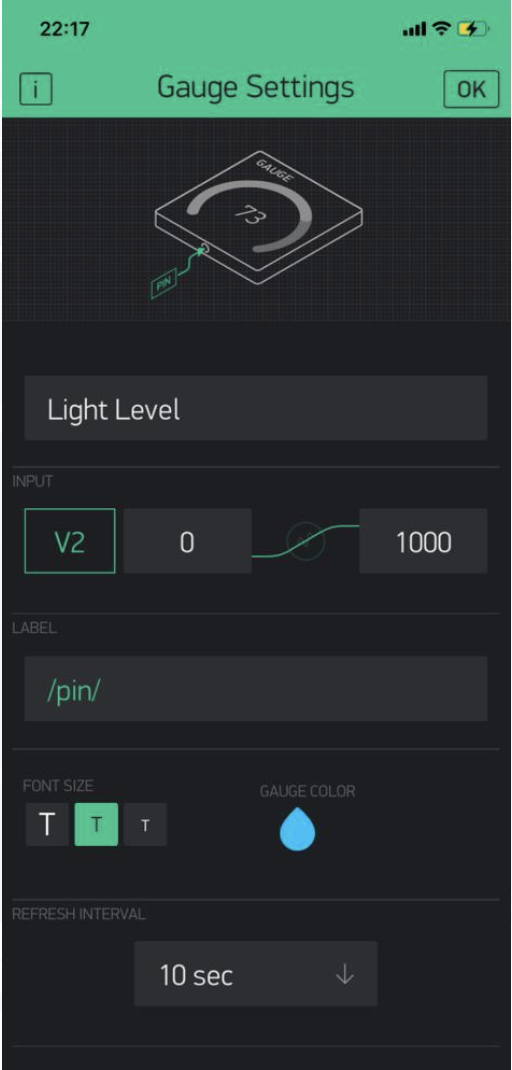
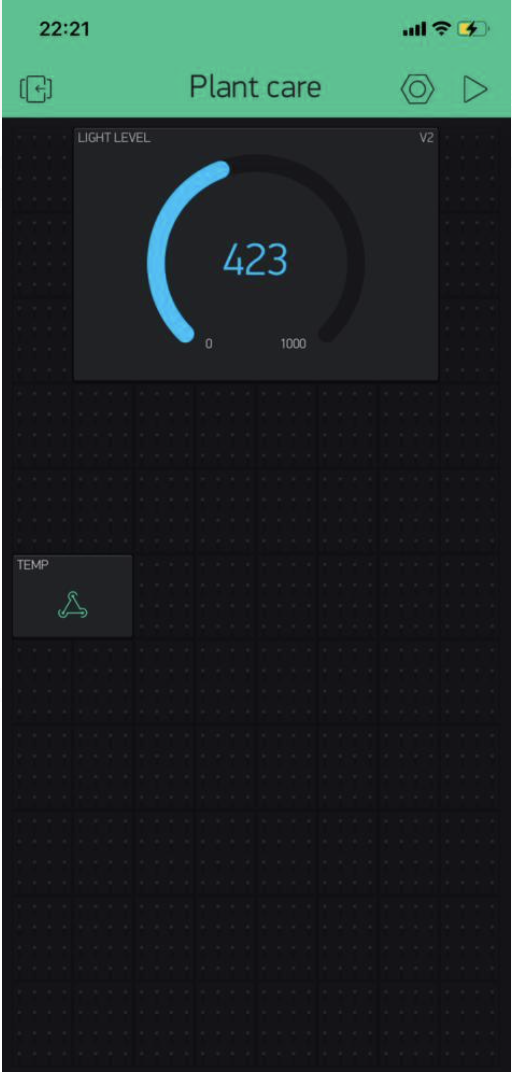
This is how we handle the third scenario of the project:
Follow the attached picture(the first picture from left) by the following steps:
- Open the Blynk app and enter to your project the you opened before.
- Add the "Gauge" widget on the widget setting
- Choose input as virtual pin V2
Set the values to be 0 - 1000
Choose in "Refresh interval" how often you want this data to update (we chose 10 sec)
Now, you can see on your Blynk app what is the light level detected on your CPX at any given time
Finally, this is how it should look like (the second picture from left).
Fourth Scenario: Displaying Humidity in the Plant
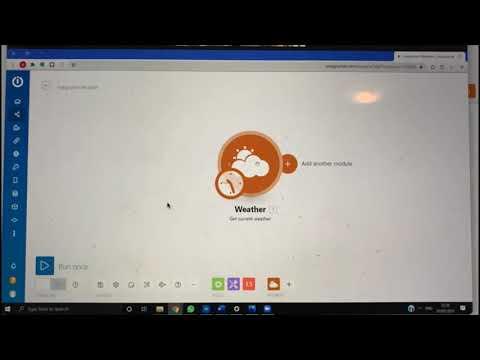
This is how we handle the second scenario of the project:
Follow the attached video(the first video from the left side) by the following steps:
- Create a new scenario on Integromat
- First pick "Weather" and choose "get current weather"
- Enter the city that you live in
- Now press on the right half circle on the right of the Weather symbol to add a new module
- As the new module choose "HTTP"
- In the URL line enter the following address:"http://188.166.206.43/XXXXXXXXX/update/V0?value=" and replace the "XXXXXXXXX" with the AUTH TOKEN of your Blynk app
- Concat the URL from step 6 with the Air Humidity
- Press the clock symbol on the bottom left side of the screen and choose how often you want to be notified about this concern (every day) and choose the time you want this information to be updated
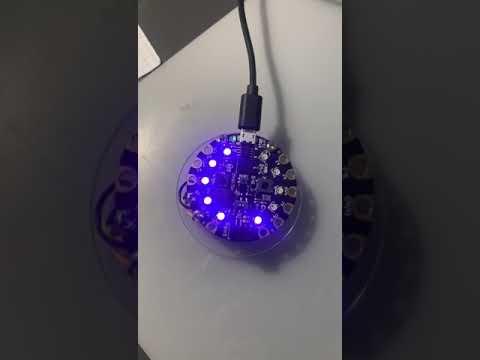
- Now, when you turn on the slide switch on the CPX you'll be presented with the percentage of humidity if the air today
Finally, this is how it should look like. For example:today there’s a 58% humidity that are rounded to 6 Neo pixels (the second video from the left side).
The Code and CPX

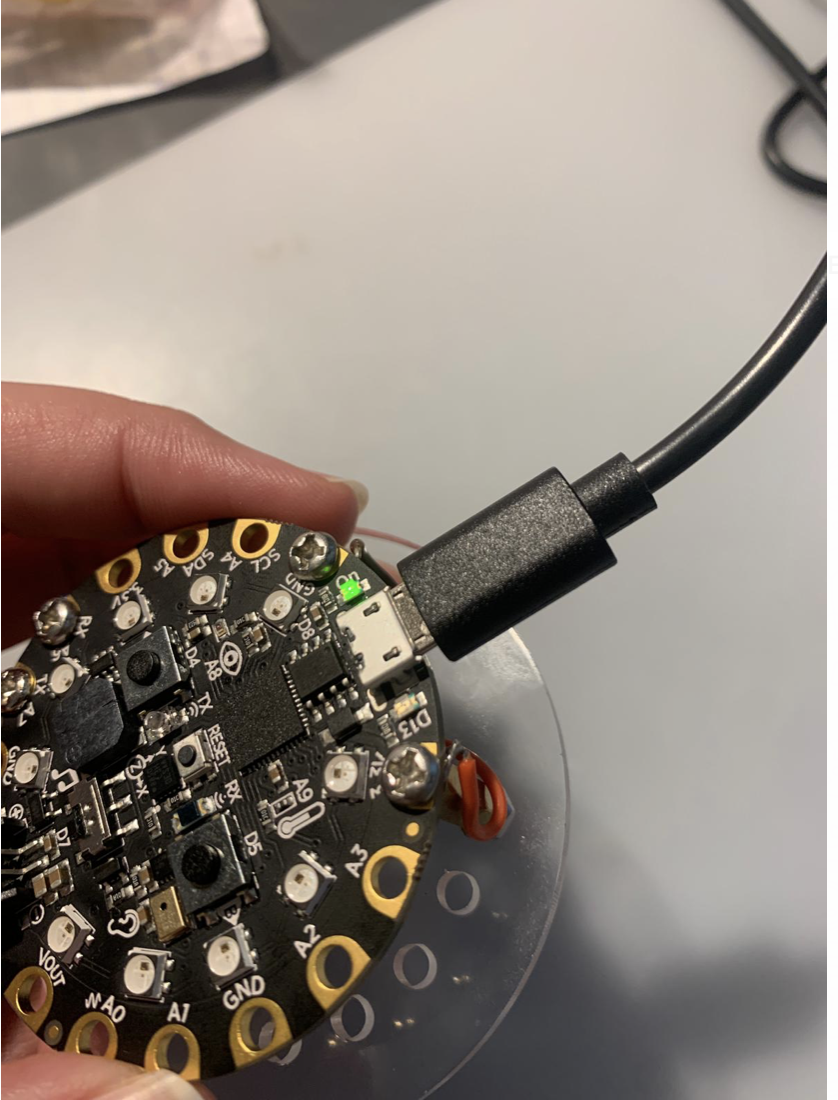

Download the .ino file we attached, create a new folder with the same name of the file and move the file into the folder and just then open this in Arduino.
- Change in the file: AUTH TOKEN, wifi name, wifi password (the first picture from the left).
- Connect the CPX to your computer (the second picture from the left).
- Upload the code to the CPX by pressing the upload button on Arduino(the third picture from the left).
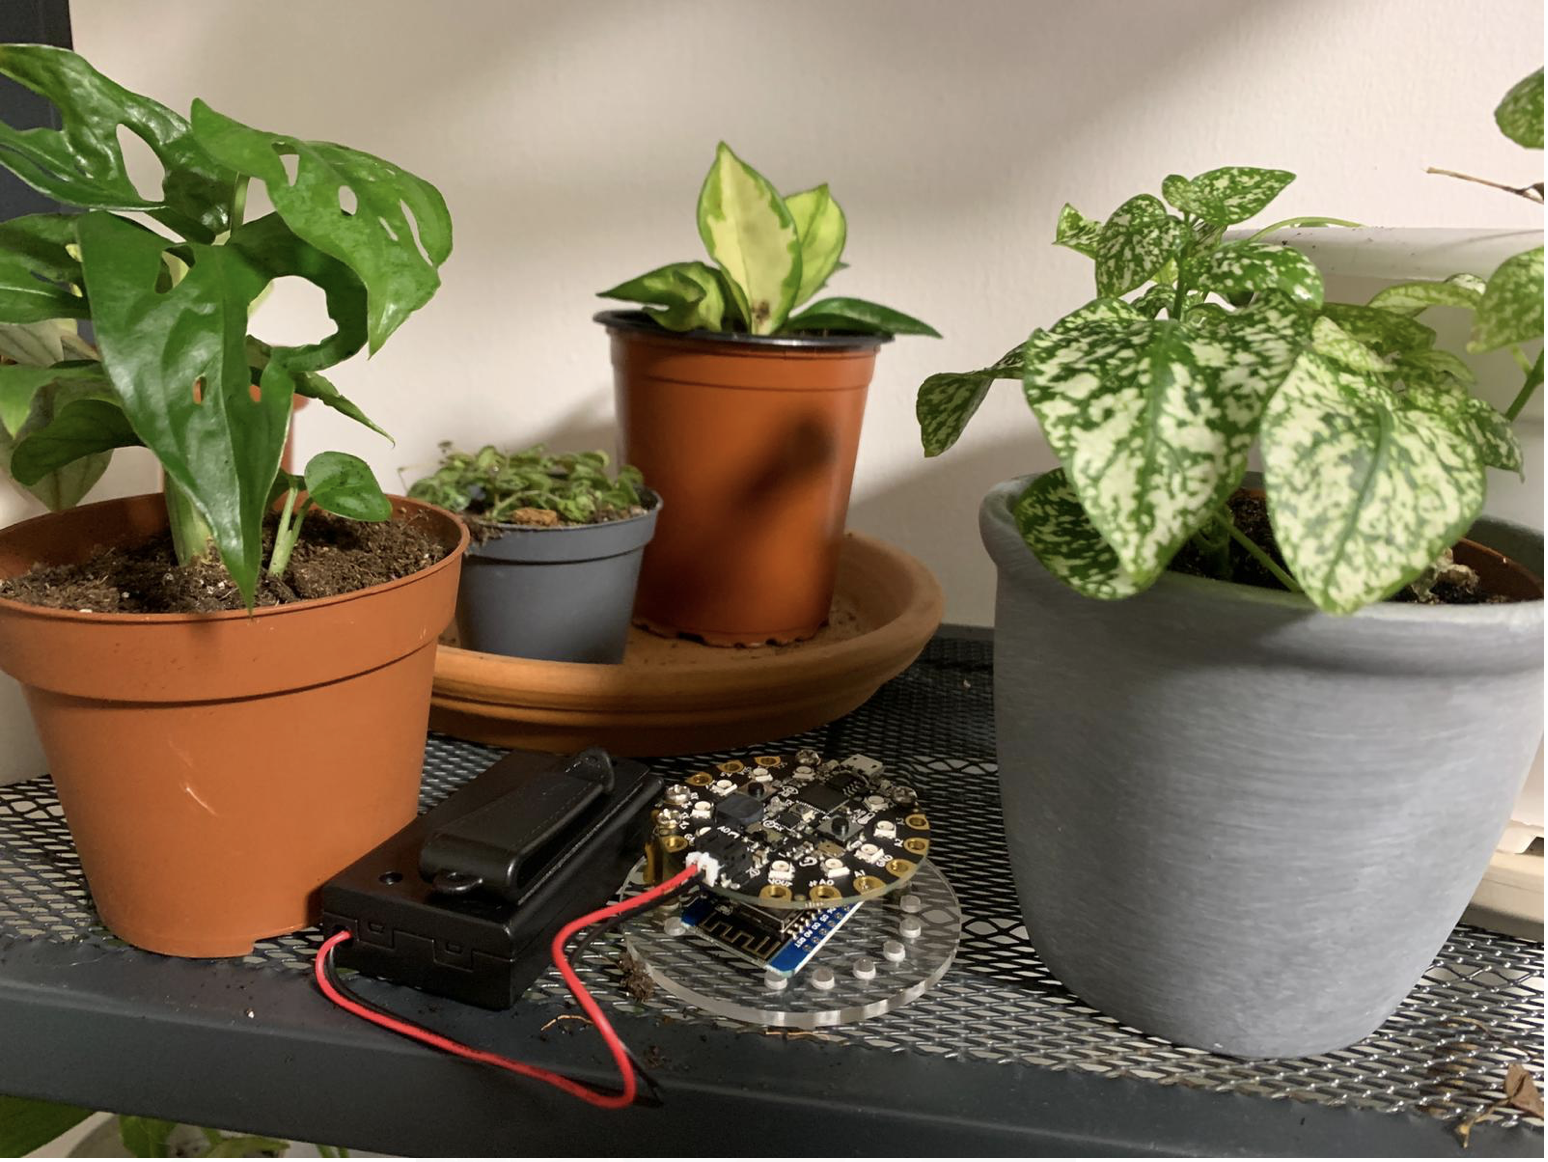
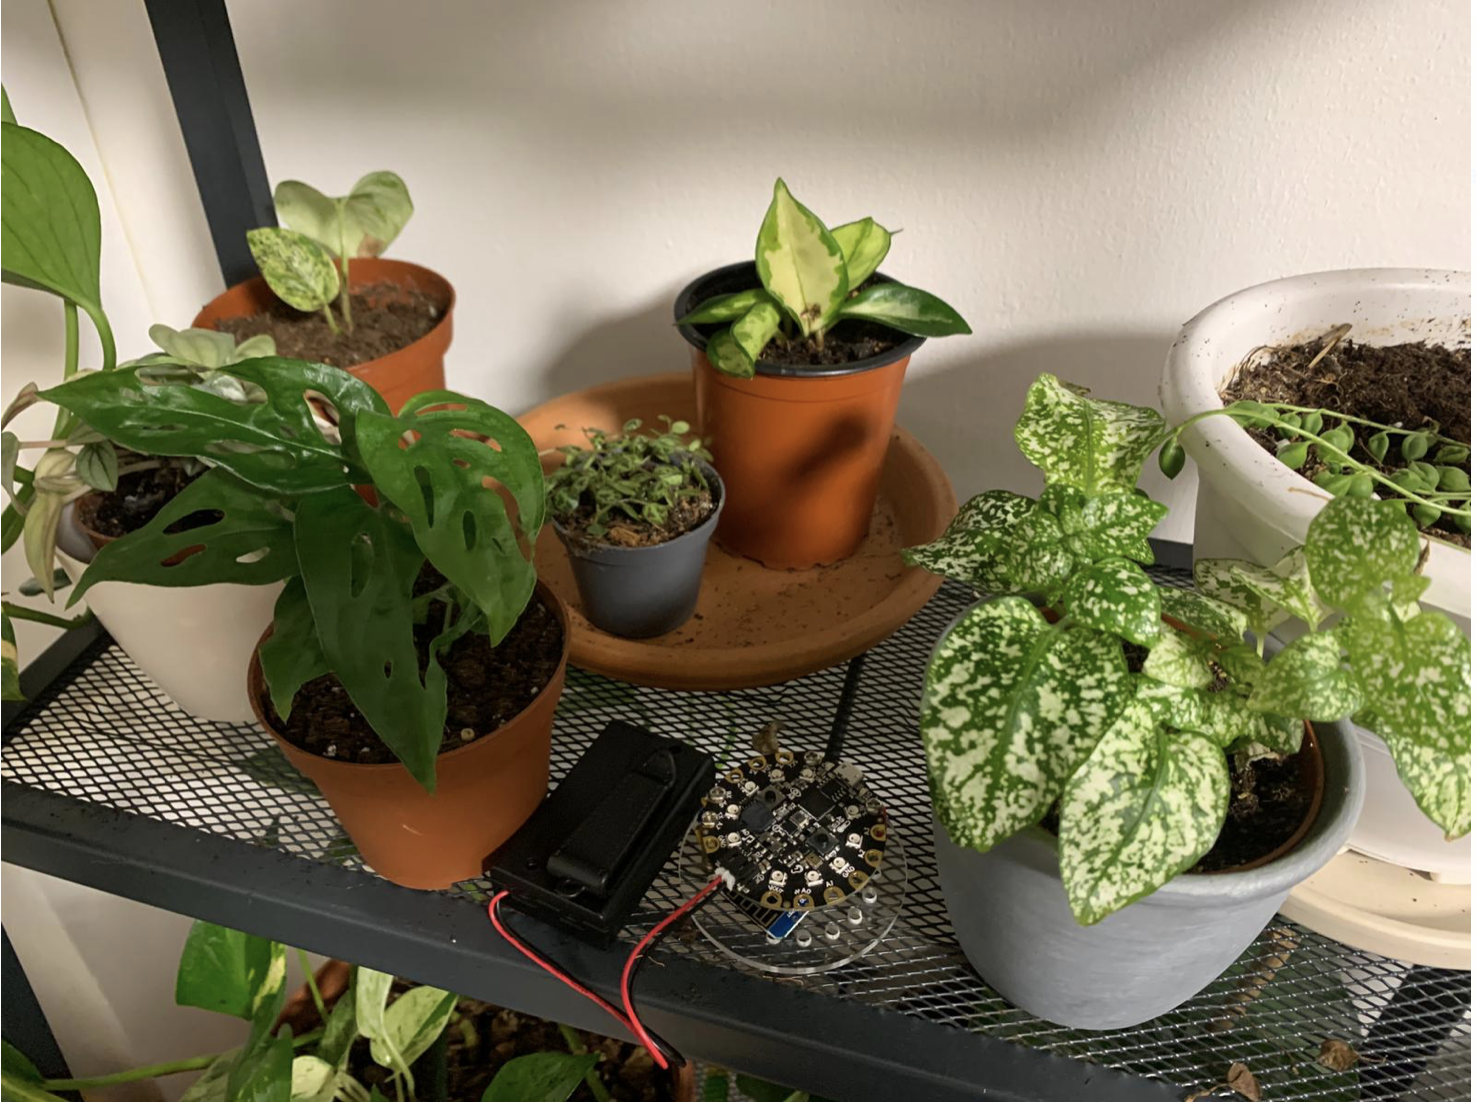
- disconnect the CPX from the computer and connect it to the battery holder(put batteries to the battery holder before).
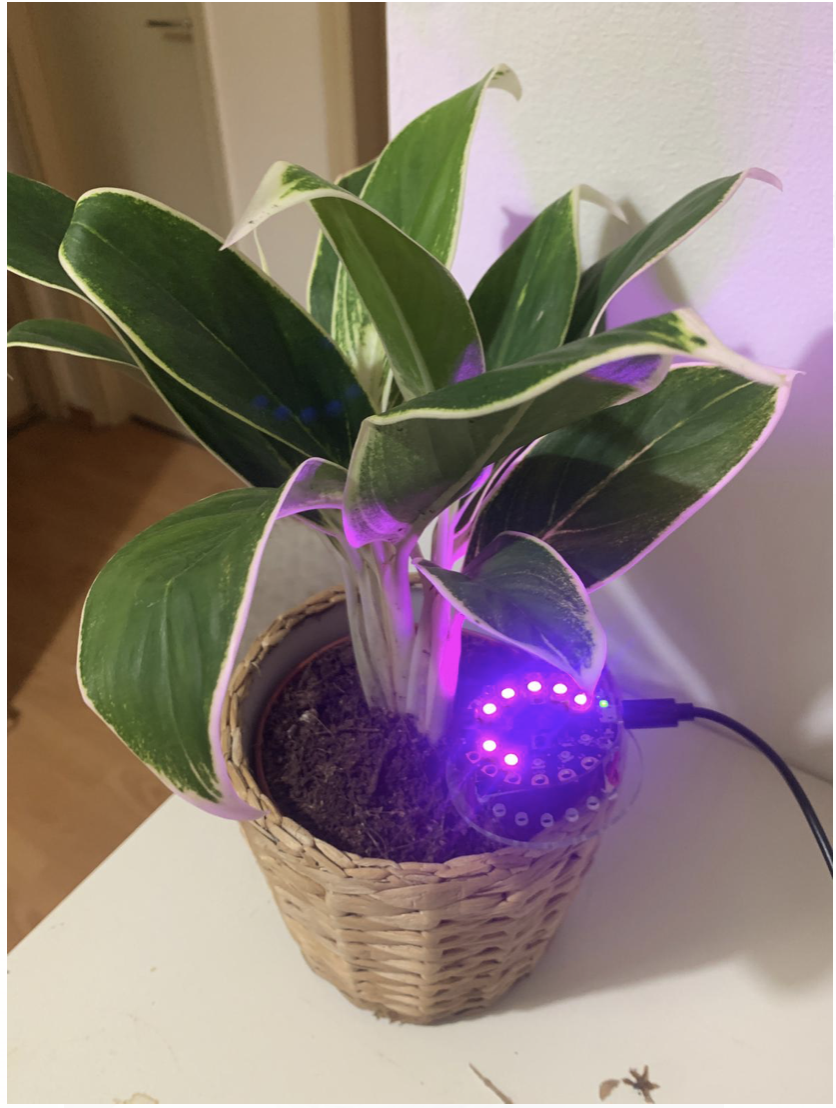
- leave the CPX near one of your plants.
Enjoy :)
Downloads
How to Check That Everything Works?
first, make sure your Blynk app is running (press the "play" button).
How to check that the scenario 1 works?
In the .ino file change the MAXTEMP value to be 0 (assuming the temp at your location in more the 0 Celsius) and on the relevant Integromat scenario press "run once"
Now, you should have recieved a push notification to yourw smartpgone saying it is too hot. If you did, you can restore the value of MAXTEMP to 25.
How to check that the scenario 2 works?
Check that the Gauge wisget on the Blynk app in showing some value
How to check that the scenario 3 works?
On the relevant Integromat scenario press "run once" and turn the slide switch on the CPX.
if the CPX turns on some purple neo-pixels, you are good to go.
How to check that the scenario 4 works?
Add to your google calendar an all-day watering day event for today on the calendar you used on the integromat scenario. then, on the relevant integromat scenario press "run once"
Now the CPX should turn on an alarm with a sound and blue lights.
If any of these tests fails, go through all levels of this Instructable.
That's It!
Now that we understand how to preserve plant's life with CPX, all that is left is to buy plants and grow them in peace of mind.
Enjoy:)