PicoBoy - Raspberry Pi Pico With Wii Remote Control
by thelonelyprogrammer in Circuits > Raspberry Pi
2508 Views, 9 Favorites, 0 Comments
PicoBoy - Raspberry Pi Pico With Wii Remote Control

To port the Arduboy to the Raspberry Pi platform and add a Wii Remote controller
Supplies
Hardware components
- Raspberry Pi Pico×1
- Graphic OLED, 128 x 64×1
- Wii Remote×1Buzzer×1
- LED (generic)×3
- Arduino Micro×1
- Arduboy Compatible×1
Software apps and online services
- Arduino IDE
Story
Arduboy FX is a miniature game system the size of a credit card. Now better than ever pre-installed with over 200 games! Arduboy FX can be reprogrammed and is open source so you can learn to code and create your own games.
Ever since I bought a Raspberry Pi Pico, I'd wanted to use it for a fun and interesting project. Arduino made an announcement that the Arduino IDE has extended its support for the Raspberry Pi RP2040 and the newborn Arduino Nano RP2040 Connect. https://blog.arduino.cc/2021/01/20/welcome-raspberry-pi-to-the-world-of-microcontrollers/
Now let's see how to make our very own Picoboy(Arduboy with Raspberry Pi RP2040).
Getting Started With Raspberry Pi Pico (Content From RPi)

Raspberry Pi Pico is a tiny, fast, and versatile board built using RP2040, a brand new microcontroller chip designed by Raspberry Pi in the UK.
Key features:
• RP2040 microcontroller with 2MByte Flash
• Micro-USB B port for power and data (and for reprogramming the Flash)
• 40 pins - Exposes 26 multi-function 3.3V General Purpose I/O (GPIO), 23 GPIO are digital-only and 3 are ADC capable
• Dual-core cortex M0+ at up to 133MHz
• 264kByte multi-bank high-performance SRAM
• External Quad-SPI Flash with eXecute In Place (XIP) and 16kByte on-chip cache
• High-performance full-crossbar bus fabric
• 30 multi-function General Purpose IO (4 can be used for ADC) ◦ 1.8-3.3V IO Voltage (NOTE Pico IO voltage is fixed at 3.3V)
• 12-bit 500ksps Analogue to Digital Converter (ADC) • Various digital peripherals ◦ 2 × UART, 2 × I2C, 2 × SPI, 16 × PWM channels ◦ 1 × Timer with 4 alarms, 1 × Real-Time Counter • 2 × Programmable IO (PIO) blocks, 8 state machines total ◦ Flexible, user-programmable high-speed IO ◦ Can emulate interfaces such as SD Card and VGA
You can find the Pinout below.
Setting Up the IDE
Here I'll be using the Arduino IDE to program the Raspberry Pi Pico.
Open up the Arduino IDE and go to File->Preferences.
In the dialog that pops up, enter the following URL in the "Additional Boards Manager URLs" field.
https://github.com/earlephilhower/arduino-pico/releases/download/global/package_rp2040_index.json
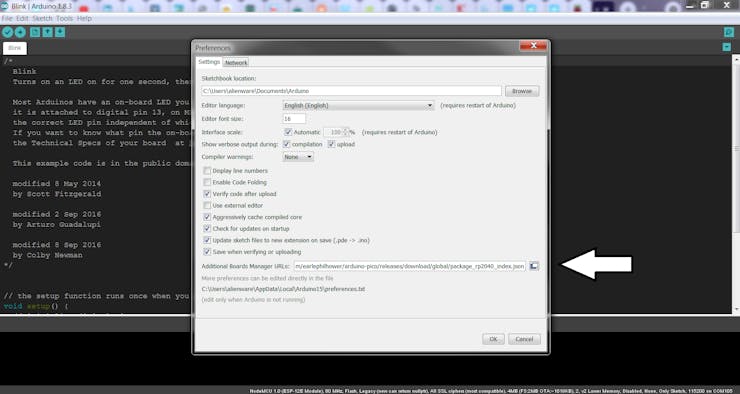
Now click OK. Open the Board Manager from Tools -> Boards -> Board Manager and type pico in the search box and select Install.
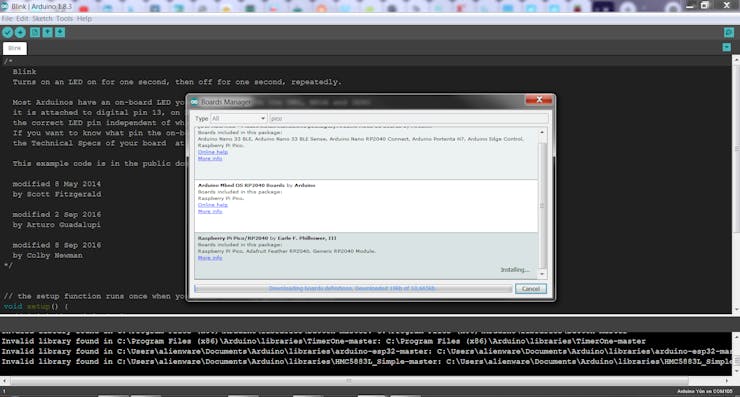
Board installation
Note: It might take few minutes to install and requires an internet connection.
Now, we are ready to upload the first sketch. Press and hold the BOOTSEL button while plugging in the Pico. Select the board to RaspberryPi Pico and then hit the upload button and the code is uploaded.
Here, I'd uploaded the Blink example from the Arduino IDE.
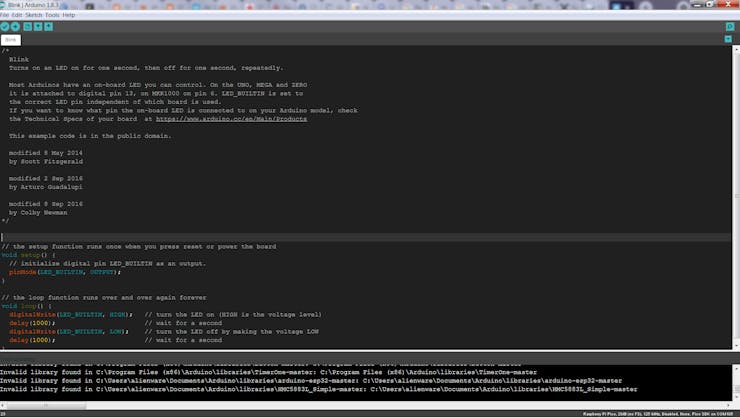
DoneUploading
Block Diagram and Connections
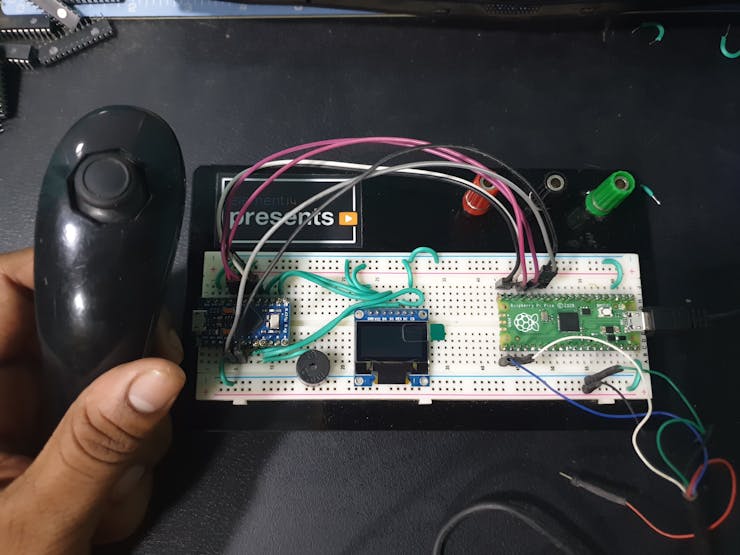
Since the avr architecture is not supported by the Raspberry Pi Pico, we will be using the Arduino micro to implement the Arduboy and the interface will be using the Raspberry Pi.
Source: https://www.arduino.cc/reference/en/libraries/arduboy2/
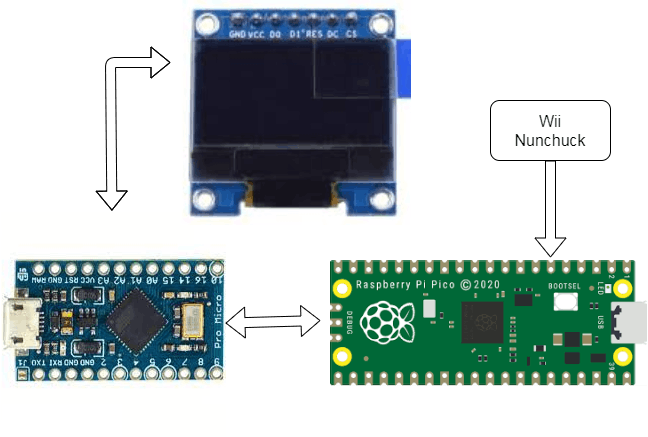
You can find the Block diagram here.
- The OLED is connected to the Arduino Micro and
- The Wii Nunchuck is connected to the Raspberry Pi Pico i2c lines.
- Button Connections are given from Raspberry Pi Pico to Arduino Micro as shown below
OLED -> Arduino Micro
OLED CS - GND
OLED DC - D4
OLED RST - D6
SPI SCK - D15
SPI MOSI - D16
ARDUINO Micro -> Raspberry Pi
BUTTON UP - A0 ->
BUTTON DOWN - A1
BUTTON LEFT - A2
BUTTON RIGHT - A3
BUTTON A - D7
BUTTON B - D8
BUZZER - D5
Code
- Upload the ping pong game to the Arduino Leonardo
- Upload the Wii Remote code to the Raspberry Pi Pico
Wii remote - Python
from nunchuck import nunchuck

from time import sleep

wii = nunchuck()

while True:

  wii.joystick()

  sleep(0.2)
Raspberry Pi Python
from nunchuck import nunchuck

from machine import Pin

import time

b1 = Pin(12, Pin.OUT) #b1

b2 = Pin(13, Pin.OUT) #b2

b3 = Pin(14, Pin.OUT) #b3

b4 = Pin(15, Pin.OUT) #b4

b5 = Pin(10, Pin.OUT) #b5

b6 = Pin(11, Pin.OUT) #b6


wii = nunchuck()

while True:

    if wii.joystick_y() < 100:

        b1.value(0)

    if wii.joystick_y() > 160:

        b2.value(0)


    if wii.joystick_x() < 100:

        b3.value(0)

    if wii.joystick_x() > 160:

        b4.value(0)


    if wii.button_c() == True:

        b5.value(0)


    if wii.button_z() == True:

        b6.value(0)


    sleep(0.2)
Ping-Pong Arduino
    //Balazs Sinko

    //October 10th, 2020

    //Pong game


    #include<Arduboy2.h>

    Arduboy2 arduboy;


    const uint8_t PROGMEM logo[] = {

    64, 25,

    0x00, 0xe0, 0x18, 0x04, 0x06, 0x02, 0x01, 0xc1, 0xa1, 0xe1, 0x01, 0x01, 0x02, 0x06, 0x0c, 0xfe, 0x02, 0x03, 0x01, 0x01, 0x03, 0x02, 0x06, 0x0c, 0x1c, 0x76, 0xc1, 0x01, 0x01, 0x03, 0x0e, 0x3c, 0x70, 0xe0, 0xc0, 0x80, 0x00, 0x00, 0xf0, 0x1e, 0x03, 0x01, 0x01, 0x03, 0x0e, 0xfc, 0x06, 0x02, 0x02, 0x03, 0x01, 0x81, 0x81, 0x81, 0x81, 0x81, 0x81, 0x82, 0xc2, 0xe2, 0xfc, 0xf0, 0xe0, 0x80,

    0xff, 0x00, 0x00, 0x00, 0x00, 0x00, 0x00, 0x00, 0xf0, 0xf0, 0xf0, 0x98, 0x08, 0x0c, 0x06, 0x03, 0x00, 0xf8, 0xfc, 0x7c, 0x38, 0xc0, 0x00, 0x00, 0x00, 0x00, 0xc7, 0x38, 0x00, 0x00, 0x00, 0x00, 0x00, 0x00, 0x01, 0x03, 0x07, 0x0e, 0x0f, 0x00, 0x00, 0x00, 0x00, 0x00, 0xe0, 0x1f, 0x00, 0x00, 0x00, 0x00, 0x7f, 0xc7, 0xc7, 0x87, 0x07, 0x07, 0x0f, 0x0f, 0x1f, 0x17, 0xe7, 0x87, 0x03, 0x01,

    0x01, 0x1f, 0x70, 0xc0, 0xc0, 0xc0, 0xe0, 0xf8, 0xff, 0xff, 0x3f, 0x03, 0x0c, 0x18, 0x30, 0x60, 0x40, 0xc1, 0xc3, 0xc2, 0xc3, 0xc1, 0xc0, 0xe0, 0xf8, 0xfe, 0x61, 0x40, 0x40, 0x40, 0xc0, 0xfe, 0xff, 0xfe, 0xfc, 0xf0, 0x70, 0x20, 0x60, 0xc0, 0xc0, 0xc0, 0xf0, 0xfe, 0xf9, 0xe0, 0x60, 0x20, 0x40, 0x40, 0xc0, 0xc0, 0xc0, 0xc0, 0xc0, 0xc0, 0xe0, 0xe0, 0xf0, 0xfe, 0x7f, 0x7f, 0x3f, 0x1c,

    0x00, 0x00, 0x00, 0x00, 0x00, 0x01, 0x01, 0x01, 0x01, 0x00, 0x00, 0x00, 0x00, 0x00, 0x00, 0x00, 0x00, 0x00, 0x00, 0x01, 0x01, 0x01, 0x01, 0x01, 0x01, 0x00, 0x00, 0x00, 0x00, 0x00, 0x00, 0x01, 0x01, 0x01, 0x00, 0x00, 0x00, 0x00, 0x00, 0x00, 0x01, 0x01, 0x01, 0x01, 0x00, 0x00, 0x00, 0x00, 0x00, 0x00, 0x00, 0x00, 0x00, 0x01, 0x01, 0x01, 0x01, 0x00, 0x00, 0x00, 0x00, 0x00, 0x00, 0x00,

    }; //PONG sprite


    const uint8_t PROGMEM spike[] = {

    5, 4,

    0x08, 0x08, 0x05, 0x02, 0x02,

    }; //spike sprite


    const uint8_t PROGMEM boom[] = {

    8, 8,

    0x66, 0xd1, 0x05, 0x00, 0x80, 0x92, 0xc1, 0x23,

    }; //ball explosion sprite


    int gameState = 0;

    float ballX = 64;           //ball initial X position

    float ballY = 32;           //ball initial Y position

    float gameSpeed = 0.4;      //game speed (on level 1)

    float ballDX = gameSpeed;   //ball speed - X direction

    float ballDY = gameSpeed;   //ball speed - Y direction

    int paddleHeight = 14;      //paddle height (on level 1)

    int playerY = 0;            //player paddle initial Y position

    float computerY = 0;        //computer paddle initial Y position

    int playerScore = 0;        //player initial score

    int computerScore = 0;      //computer initial score

    float factor = 1;           //bounce direction modifier initial value (=1 no change, <1 more flat, >1 more steep)

    int level = 1;              //initial level


    void resetGame(){           //variables set to original at game restart

      ballX = 64;

      ballY = 32;

      playerScore = 0;

      computerScore = 0;

      ballDX = gameSpeed;

      ballDY = gameSpeed;

      factor = 1;

      level = 1;

      paddleHeight = 14;

    }


    void bounceVariation(){                                                                              //ball bounce direction modifier algorythm - just playing with the speed in the Y direction

      factor = 1 + 0.1 * random(-3, 4);                                                                  //random factor (0.7 - 1.3)

      if((abs(ballDY / ballDX)  < 0.8 && factor < 1) || abs((ballDY / ballDX) > 1.25 && factor > 1)){    //if the alignment is too flat or steep and the factor make it worse then it change the factor to make opposite effect

        factor = 1 / factor;

      }

      ballDY = ballDY * factor;                                                                          //apply the factor on the Y direction speed

    }


    void setup() {

      arduboy.begin();

      arduboy.initRandomSeed();

      arduboy.clear();

      arduboy.setFrameRate(60);

      }


    void loop() {

      if (!arduboy.nextFrame()){

        return;

      }

      arduboy.clear();

      arduboy.pollButtons();


      switch (gameState){

        case 0:                                                     //initial display

          Sprites::drawOverwrite(30, 12, logo, 0);                  //PONG logo

          arduboy.setCursor(20, 55);

          arduboy.print("Select level: ");                          //ask level selection

          arduboy.print(level);

          if (arduboy.justPressed(UP_BUTTON) && level < 3){         //up button add +1 level up to 3

            level = level + 1;

          }

          if (arduboy.justPressed(DOWN_BUTTON) && level > 1){       //down button lowers the level

            level = level -1;

          }

          if (arduboy.justPressed(A_BUTTON)){                       //level selection confirmation with A button

            ballDX = ballDX * (1+ 0.5 * (level-1));                 //increase the X direction speed based on selected level (0, 50, 100%)

            ballDY = ballDY * (1+ 0.5 * (level-1));                 //increase the Y direction speed based on selected level (0, 50, 100%)

            paddleHeight = paddleHeight -(level - 1);               //lowers the paddles height based on selected level (0, -1, -2)

            gameState = 1;                                          //switch to game start

          }

          break;


        case 1:                                                     //game display

          //display scoring

          arduboy.setCursor(20, 2);

          arduboy.print(playerScore);

          arduboy.setCursor(101, 2);

          arduboy.print(computerScore);


          //frame drawing

          for (int i = 0; i < 65; i = i +4){

            Sprites::drawOverwrite(0, i, spike, 0);                //spikes arrayed on the left side

            Sprites::drawOverwrite(122, i, spike, 0);              //spikes arrayed on the right side

          }

          arduboy.drawLine (0, 0, 127, 0, WHITE);                  //upper frame

          arduboy.drawLine (0, 63, 127, 63, WHITE);                //bottom frame


          //ball drawing

          arduboy.drawCircle(ballX, ballY, 2, WHITE);                                         //drawing of the ball

          ballX = ballX + ballDX;                                                             //add the X speed to the X position

          ballY = ballY + ballDY;                                                             //add the Y speed to the Y position

          if (ballX <= 7 && playerY < ballY + 2 && playerY + paddleHeight > ballY - 2){       //ball collision detection with the player's paddle

            ballDX = abs(ballDX);                                                             //the ball X direction is changed to positive, so the ball is bounced on the paddle

            bounceVariation();                                                                //calling of the ball bounce direction modifier algorythm

          }

          if (ballX >= 120 && computerY < ballY + 2 && computerY + paddleHeight > ballY -2){  //ball collision detection with the computer's paddle

            ballDX = -abs(ballDX);                                                            //the ball X direction is changed to negative, so the ball is bounced on the paddle

            bounceVariation();                                                                //calling of the ball bounce direction modifier algorythm

          }

          if (ballY <= 3 || ballY >= 60){                                                     //collision detection on the top and the bottom

            ballDY = -ballDY;                                                                 //the ball Y direction inverterted, so the ball is bounced

          }


          //player paddle drawing

          arduboy.drawRect(0, playerY, 5, paddleHeight, WHITE);                               //player paddle is a rectangle

          if (arduboy.pressed(UP_BUTTON) && playerY > 0){                                     //if up button pressed the paddle moves up (until reach 0)

            playerY = playerY - 1;

          }

          if (arduboy.pressed(DOWN_BUTTON) && playerY + paddleHeight < 63){                   //if down button pressed the paddle moves own (until reach the bottom)

            playerY = playerY + 1;

          }


          //computer paddle drawing

          arduboy.drawRect(122, computerY, 5, paddleHeight, WHITE);

          if (ballX > 105 - 15 * (level-1) || random(0, 22)==1){                              //this sets from which X coordinate starts the computer follow the ball (depend on the level: 105, 90, 75), plus add random following factor

           if (computerY > ballY){                                                            //if the ball is higher than the computer's paddle

              computerY = computerY - (1 + 0.25 * (level - 1)) * gameSpeed;                   //the paddle goes higher (follow the ball), the following speed depend on the selected level (100, 125, 150%) and of course on the general gamespeed

            }

            if (computerY + paddleHeight < ballY + 4){                                        //if the ball is lower than the computer's paddle

             computerY = computerY + (1 + 0.25 * (level - 1)) * gameSpeed;                    //the paddle goes lower (follow the ball), the following speed depend on the selected level (100, 125, 150%) and of course on the general gamespeed

            }

          }


          if (ballX < 6){                                                                     //when the ball moves to the left and doesn't bounced on the player's paddle, then it will reach the spikes

            Sprites::drawOverwrite(ballX - 2, ballY - 2, boom, 0);                            //the ball changed to a small explosion drawing

            arduboy.display();

            delay(1000);                                                                      //little pause

            ballX = 64;                                                                       //ball initial position

            ballDX = -ballDX;                                                                 //ball goes to the computer direction

            computerScore = computerScore + 1;                                                //computer gain 1 point

          }


          if (ballX > 121){                                                                   //ball reach the spikes on the computers side

            Sprites::drawOverwrite(ballX - 2, ballY - 2, boom, 0);                            //explosion

            arduboy.display();

            delay(1000);

            ballX = 63;                                                                       //ball initial position

            ballDX = -ballDX;                                                                 //ball goes to the player direction

            playerScore = playerScore + 1;                                                    //player gain 1 point

          }

          if (computerScore == 5){                                                            //if computer reach 5 points

            gameState = 3;                                                                    //call "YOU LOST" display

          }

          if (playerScore == 5){                                                              //if player reach 5 points

            gameState = 2;                                                                    //call "YOU WON" display

          }

          break;


        case 2:                                                                               //"YOU LOST" display

          arduboy.setCursor (random (38, 42), random(22, 26));                                //text in diferent random positions (look like vibrating)

          arduboy.print("YOU WON");

          if (arduboy.justPressed(A_BUTTON)){

            resetGame();

            gameState = 0;                                                                    //A button calls the initial display

          }

          break;


        case 3:                                                                               //"YOU LOST" display

          arduboy.setCursor (random (38, 42), random(22, 26));                                //text in diferent random positions (look like vibrating)

          arduboy.print("YOU LOST");

          if (arduboy.justPressed(A_BUTTON)){

            resetGame();

            gameState = 0;                                                                    //A button calls the initial display

          }

          break;

      }

      arduboy.display();

    }
The End!
If you faced any issues in building this project, feel free to ask me. Please do suggest new projects that you want me to do next.
Share this video if you like.
Happy to have you subscribed: https://www.youtube.com/c/rahulkhanna24june?sub_confirmation=1
Thanks for reading!