Pico Powered Num Pad - Part 4 - RGB LEDS
by tinyboatproductions in Circuits > Computers
1438 Views, 6 Favorites, 0 Comments
Pico Powered Num Pad - Part 4 - RGB LEDS


Hi, Welcome back. This is the fourth part of a series I have been doing about KMK and building a hand wired number pad. In this one I am going to be adding some neopixel LEDS to my number pad to make it look cool.
Disclaimers
If you haven't read parts 1 – 3 I would suggest them as I will assume knowledge of them in this one.
I have also made a video to go along with this that you can check out here.
I would also suggest taking a look at the KMK documentation as it is where I learned all of this. Its pretty good and will have more info if you want to dive deeper.
Adding LEDs should work for all kmk powered boards so this should be applicable even if you aren't using the num pad I am.
Supplies
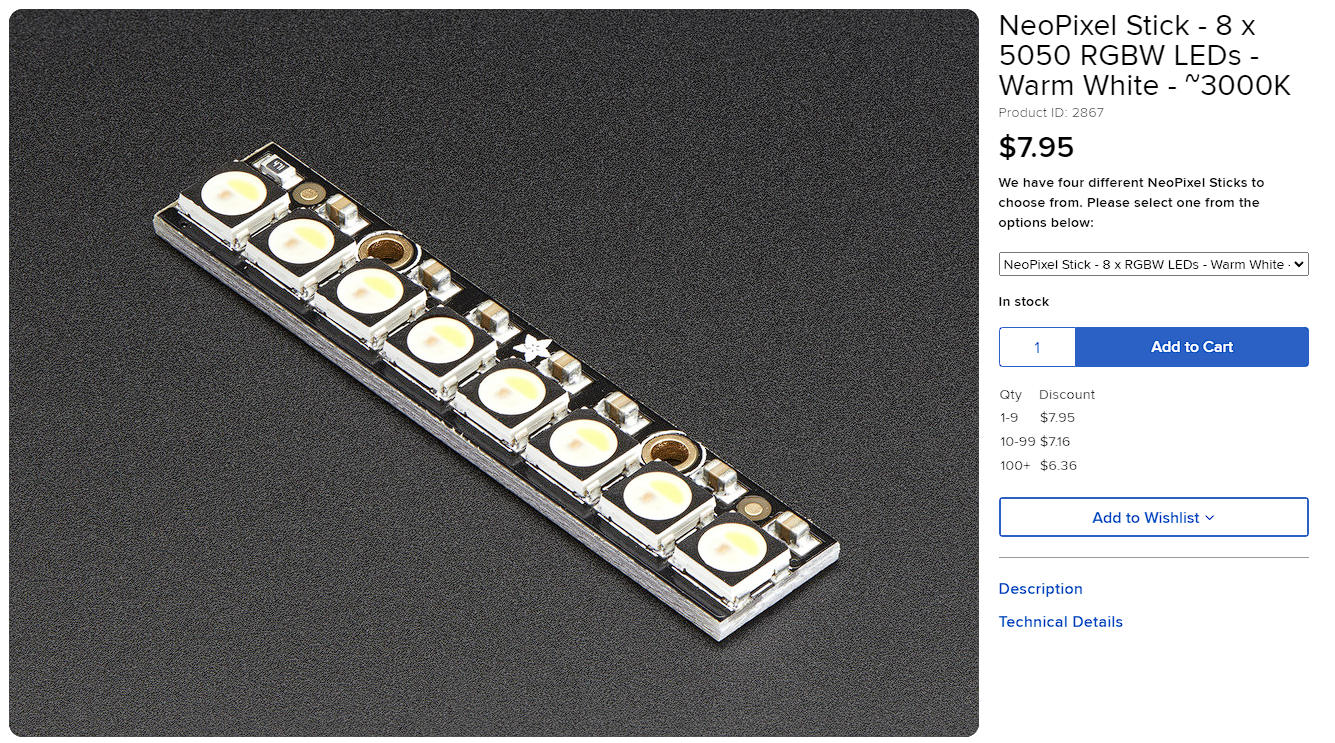
For this you will need some neopixels and some wire.
I am using this 8 pixel RGBW strip from Adafruit and some stranded wire.
Installing the NeoPixels
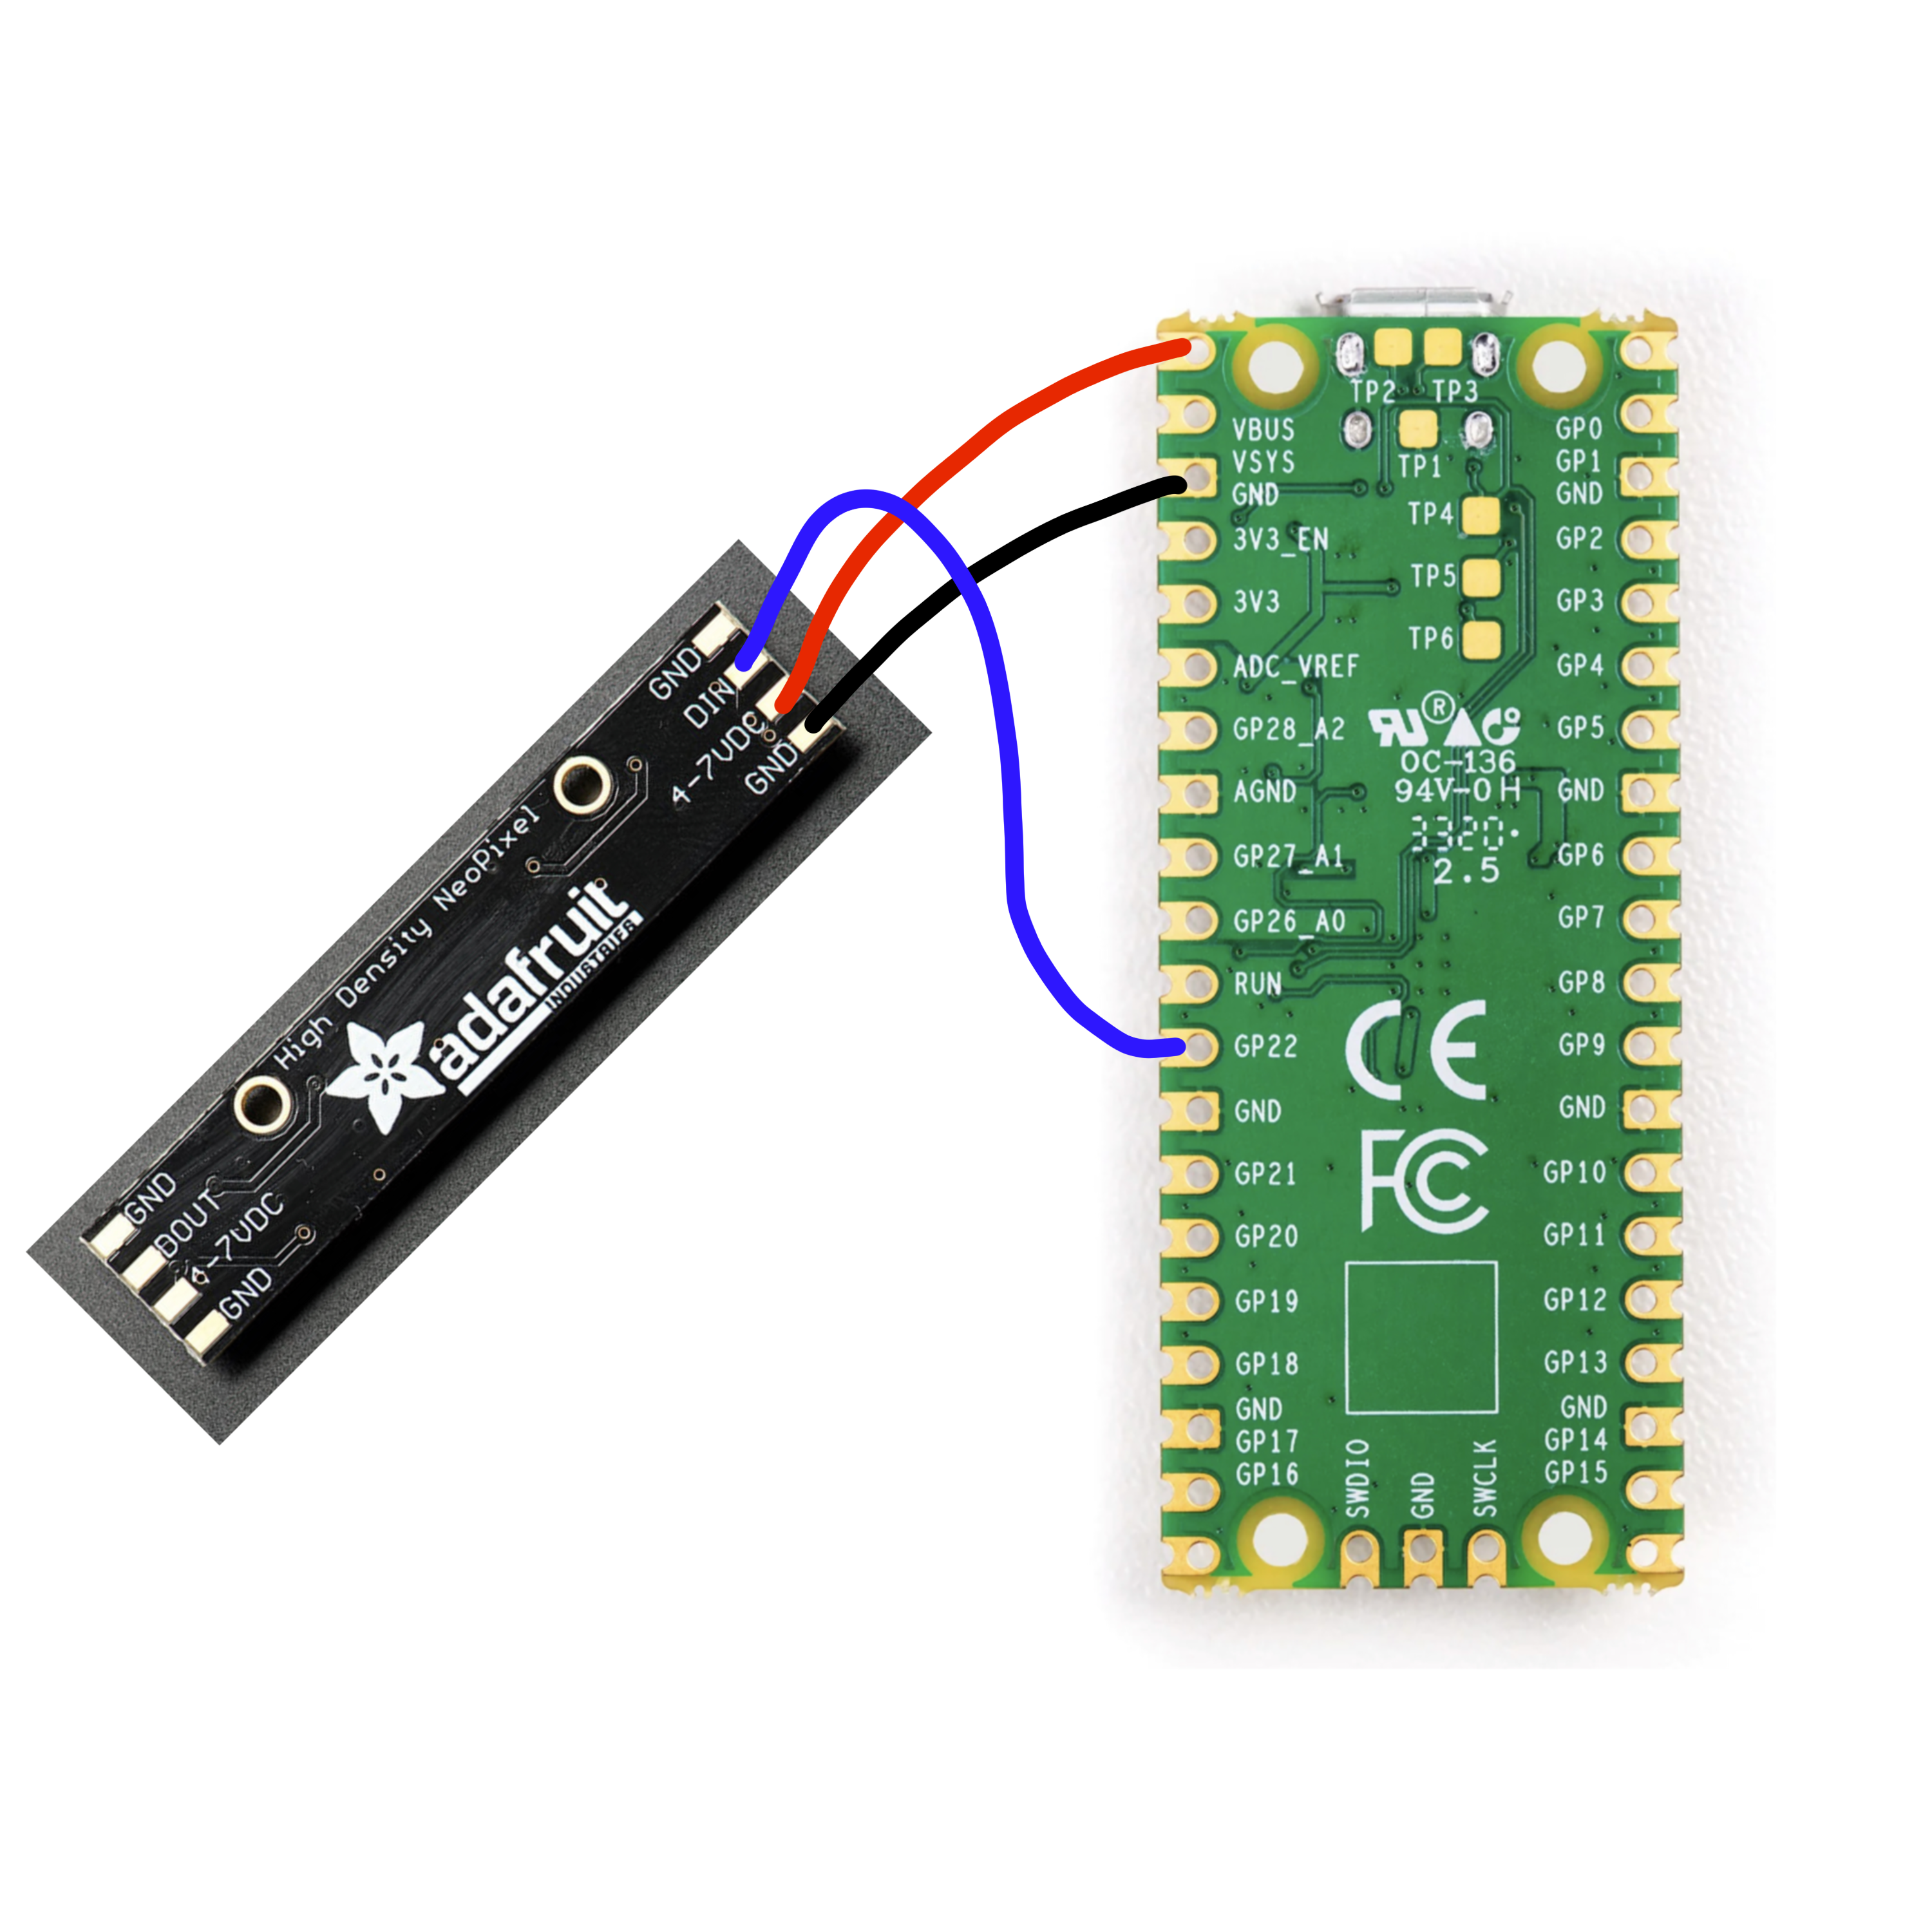
To install the neopixels we just need to solder some jumpers to the pico.
I am soldering the GND to GND, VIN to VBus on the pico, and DIN to pin 22 on the pico.
But any pin you arent using will work for DIN. I just used 22 because it is close by and empty.
To hold them in the case I used a small plastic screw into the base plate. But I think glue would also work.
Needed Files
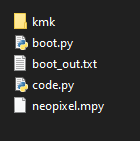
Before we can get into the code we need to add some files to our pico to be able to use the neopixels.
We need the neopixel.mpy file from Adafruit (here). Download the latest version, unzip it, locate the file, (in the lib folder) and copy that file and place it on to the pico in the same folder as the code.py file. Take a look at the screen shot.
Also you should update your KMK version as if you are using RGBW LEDs there is a bug that will keep them from working properly. Just remove your existing KMK folder and replace it with a fresh one from here.
Those are the files we need so lets move into the code.
Setup
If you read part 3 about layers. This is fairly similar.
First we need to import the rgb extension to our keyboard using:
from kmk.extensions.rgb import RGB
This just enables us to use the RGB extension in our code.
Now we need to create our rgb strip in the code using this line:
rgb = RGB(pixel_pin=board.GP22, num_pixels=8,rgb_order=(1,0,2,3))
This line has a few things that you may need to modify. The first is the pixel pin. This is just the pin that we attached our pixels to. I used 22 so I set it to 22.
The next is the number of pixels we have. I am using an 8 pixel stick so I set mine to 8. Set this to the number of pixels or leds you have.
And the final one "rgb_order" is the order of the red, green, and blue leds, in my case I also need to include white. This is required if you are using RGBW leds but if you are using just RGB but getting the wrong colors this can help, you just need to figure our the correct order.
And finally we need to add our rgb to our keyboard using:
keyboard.extensions.append(rgb)
Just like that the code is set; and if you save the file the LEDS should turn on. But we have no way of controlling them on the fly.
Adding Control
So we have the leds working we just need to add a way to control them. Luckily, there are several control commands that are available as key codes that we can add to our num pad.
To add these keycodes I am going to create 2 things, a helper key and a new layer.
I am going to add a new helper key called LED to shift to the LED layer.
LED = KC.LT(2, KC.LSHIFT)
I will add that to my base layer so that I can keep all of my LED keys on their own layer. And for the LED layer I am going to add this layer:
#LAYER 2: LED
   [TRANS,                    TRANS,             TRANS,    TRANS,#RIGHTS
   KC.RGB_MODE_PLAIN,         KC.RGB_TOG,        KC.RGB_ANI, KC.RGB_AND,
   KC.RGB_MODE_BREATHE,       TRANS,             KC.RGB_SAI, KC.RGB_SAD,
   KC.RGB_MODE_RAINBOW,       KC.RGB_MODE_SWIRL, KC.RGB_HUI, KC.RGB_HUD,
   KC.RGB_MODE_BREATHE_RAINBOW,KC.RGB_MODE_KNIGHT, KC.RGB_VAI, KC.RGB_VAD,
   ],
This allows us to chage a lot of the LED settings. Like turning them on and off with TOG, the animation speed with ANI and AND. We can also control the color and brightness using the two right most columns.
The other scattered around like PLAIN and BREATHE are different LED animations. I added them all to this layer so you can check them out.
Full Code
Here is the full code I am currently running so that you can play around with it. Remember to change any pin numbers you need. And if you break it you can always grab a fresh copy from here.
import board

from kmk.kmk_keyboard import KMKKeyboard
from kmk.keys import KC
from kmk.scanners import DiodeOrientation

from kmk.modules.layers import Layers
from kmk.extensions.rgb import RGB

keyboard = KMKKeyboard()

keyboard.col_pins = (board.GP0,board.GP1, board.GP2, board.GP3)  # try D5 on Feather, keeboar
keyboard.row_pins = (board.GP4, board.GP5, board.GP6, board.GP7, board.GP8)  # try D6 on Feather, keeboar
keyboard.diode_orientation = DiodeOrientation.ROW2COL

keyboard.modules.append(Layers())

rgb = RGB(pixel_pin=board.GP22, num_pixels=8,rgb_order=(1,0,2,3))
keyboard.extensions.append(rgb)


#HELPER KEYS
TRANS = KC.TRNS
#RAISE = KC.MO(1)
#RAISE = KC.DF(1)
#BASE = KC.DF(0)
RAISE = KC.LT(1, KC.ESC)
LED = KC.LT(2, KC.LSHIFT)

keyboard.keymap = [
  [#LAYER 0: BASE
   RAISE,   LED,    KC.TAB,   MACROS,
   KC.N7,   KC.N8,   KC.N9,   KC.KP_ASTERISK,
   KC.N4,   KC.N5,   KC.N6,   KC.KP_MINUS,
   KC.N1,   KC.N2,   KC.N3,   KC.KP_SLASH,
   KC.BSPC,  KC.N0,   KC.KP_DOT, KC.KP_ENTER,
  ],
  [#LAYER 1: NAV
   TRANS,    TRANS,   TRANS,    TRANS,#RIGHTS
   KC.HOME,   KC.UP,   KC.PGUP,   TRANS,
   KC.LEFT,   TRANS,   KC.RIGHT,   TRANS,
   KC.END,   KC.DOWN,  KC.PGDN,   TRANS,
   TRANS,    TRANS,   TRANS,    TRANS,
  ],
  #LAYER 2: LED
  [TRANS,                       TRANS,              TRANS,      TRANS,#RIGHTS
  KC.RGB_MODE_PLAIN,            KC.RGB_TOG,         KC.RGB_ANI, KC.RGB_AND,
  KC.RGB_MODE_BREATHE,          TRANS,              KC.RGB_SAI, KC.RGB_SAD,
  KC.RGB_MODE_RAINBOW,          KC.RGB_MODE_SWIRL,  KC.RGB_HUI, KC.RGB_HUD,
  KC.RGB_MODE_BREATHE_RAINBOW,  KC.RGB_MODE_KNIGHT, KC.RGB_VAI, KC.RGB_VAD,
  ],
]

if __name__ == '__main__':
  keyboard.go()
Some More Info
Finally there are a few added settings you can add to your rgb declaration. I have put an alternate here:
rgb = RGB(
    pixel_pin = board.GP22,
    num_pixels = 8,
    rgb_order=(1,0,2,3),
    hue_default = 250, #set the defualt hue, or the color
    sat_default = 255, #set the defualt saturation, or how intense the color is
    val_default = 180, #set the value defualt, or brightness to half
    val_limit = 255,  #set the maximum value, or maximum brightness.
   )
These values go between 0 and 255, go ahead and play around and see what they do. The hue saturation and value can all be changed form the LED layer.
Conclusion
That’s all I have for this.
Please feel free to leave a comment or question. If this helped you check out my other instructables or head over to my YouTube channel and take a look at some of my other projects.
Thanks for reading!