Photoshop: Turn Your Photos Into Pencil Sketches
by SusieQuick in Circuits > Cameras
2653 Views, 19 Favorites, 0 Comments
Photoshop: Turn Your Photos Into Pencil Sketches
![Samuelsons.jpg](/proxy/?url=https://content.instructables.com/FH7/WWOJ/HSE9496R/FH7WWOJHSE9496R.jpg&filename=Samuelsons.jpg)
![final picture.PNG](/proxy/?url=https://content.instructables.com/FNR/C3CR/HSE9496S/FNRC3CRHSE9496S.png&filename=final picture.PNG)
Take any old photograph and make it look like a pencil drawing in a just few easy steps!
![Open picture.png](/proxy/?url=https://content.instructables.com/FB3/QS8S/HSE947R1/FB3QS8SHSE947R1.png&filename=Open picture.png)
Choose a picture and open it in Photoshop.
![Ctrl+J.PNG](/proxy/?url=https://content.instructables.com/FZ1/GJ94/HSE947R8/FZ1GJ94HSE947R8.png&filename=Ctrl+J.PNG)
Press Control+J. This will copy the photo into a new layer.
![Adjust layer easier to see.jpg](/proxy/?url=https://content.instructables.com/FB3/2TDT/HSGFUDZR/FB32TDTHSGFUDZR.jpg&filename=Adjust layer easier to see.jpg)
Click on the Adjust Layer button (it may be right at the bottom of the layer box or at the bottom of the page). Then select "Hue/Saturation" from the pop-up list.
![Hur saturation.PNG](/proxy/?url=https://content.instructables.com/FPS/WXG6/HSE947TR/FPSWXG6HSE947TR.png&filename=Hur saturation.PNG)
![HUESAT.jpg](/proxy/?url=https://content.instructables.com/F8Y/9FP8/HSGFUEXS/F8Y9FP8HSGFUEXS.jpg&filename=HUESAT.jpg)
The Hue/ Saturation dialog box will appear. Reduce saturation to -100 by sliding the arrow to the left.
![layer 1 activate.PNG](/proxy/?url=https://content.instructables.com/FJ3/N8AI/HSE947UH/FJ3N8AIHSE947UH.png&filename=layer 1 activate.PNG)
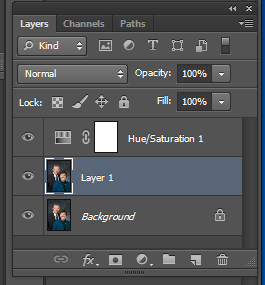
Click layer 1 to activate.
![layer 1 activate2.PNG](/proxy/?url=https://content.instructables.com/F9B/GKHG/HSE947VM/F9BGKHGHSE947VM.png&filename=layer 1 activate2.PNG)
![Color Dodge.PNG](/proxy/?url=https://content.instructables.com/FKM/98OT/HSE947VO/FKM98OTHSE947VO.png&filename=Color Dodge.PNG)
Where it says "Normal" on the layer editor box, click the drop down and select "Color Dodge."
![Ctrl+I.PNG](/proxy/?url=https://content.instructables.com/F0I/4MEM/HSE9480R/F0I4MEMHSE9480R.png&filename=Ctrl+I.PNG)
Press Ctrl + I to invert the picture. Don't freak out if your image disappears and it turns all white; that is what you should expect from this step.
![Filter.fw.png](/proxy/?url=https://content.instructables.com/FB9/UDPZ/HSE948CK/FB9UDPZHSE948CK.png&filename=Filter.fw.png)
![Gaussian blur.PNG](/proxy/?url=https://content.instructables.com/F28/LUZ2/HSE948CQ/F28LUZ2HSE948CQ.png&filename=Gaussian blur.PNG)
Go to the "Filter" tab. Select "Blur" then "Gaussian Blur" from the drop down menu.
![Radius bar.PNG](/proxy/?url=https://content.instructables.com/F9F/T8N8/HSE948EO/F9FT8N8HSE948EO.png&filename=Radius bar.PNG)
Slide the radius bar to your liking. We recommend somewhere around 40 pixels.
![Layer adjustment button 2.PNG](/proxy/?url=https://content.instructables.com/FMK/C4AP/HSE948GF/FMKC4APHSE948GF.png&filename=Layer adjustment button 2.PNG)
Click the layer adjustment button again and select "Levels."
![LEvels.PNG](/proxy/?url=https://content.instructables.com/FZS/C008/HSE948Y9/FZSC008HSE948Y9.png&filename=LEvels.PNG)
The 'Levels' dialog box will open. Slide the arrows to your liking; this time you are in control of three different arrows, so you can just play around with them until you get your preferred look.
![Brush.PNG](/proxy/?url=https://content.instructables.com/FXI/3R3M/HSE9490L/FXI3R3MHSE9490L.png&filename=Brush.PNG)
![opacity.PNG](/proxy/?url=https://content.instructables.com/FMB/PZM0/HSE9490M/FMBPZM0HSE9490M.png&filename=opacity.PNG)
Open the brush tool by clicking on the icon on the left side of your window. Change the Brush Size to large (recommend 400) and hardness to 0 and opacity to 40.
Note: make sure the foreground color is black. You can switch the foreground colors by clicking on the arrow next to the color swatches.
![final picture.PNG](/proxy/?url=https://content.instructables.com/F9X/AD9N/HSE94961/F9XAD9NHSE94961.png&filename=final picture.PNG)
Brush over dark areas to make it look less dense by dragging the brush tool over your image.
And now you have a really cool pencil sketch of your photo!