Phone Timed Lock Box to Combat Procrastination
by gehidalgo in Circuits > Arduino
230 Views, 1 Favorites, 0 Comments
Phone Timed Lock Box to Combat Procrastination

Using a Particle Argon I aimed a way to get rid of procrastination. When I realized a phone is a large cause of procrastination I thought up of an idea, a way to make sure our phones don't get in our way. My project allows you to set a timer and start it with the press of a button. When the button is pressed it moves a servo to it's locked position, and then the timer begins counting down. When the counter reaches 0, the servo moves back to it's unlocked position.
Supplies


- Particle Argon IoT Development Board
- Copper Solder Board
- Breadboard
- Jumper wires (male-male)
- Jumper wires (male-female)
- Seven Segment 4 Digit Display
- Potentiometer
- Button
- Servo motor
Getting the Seven-Segment Display Working

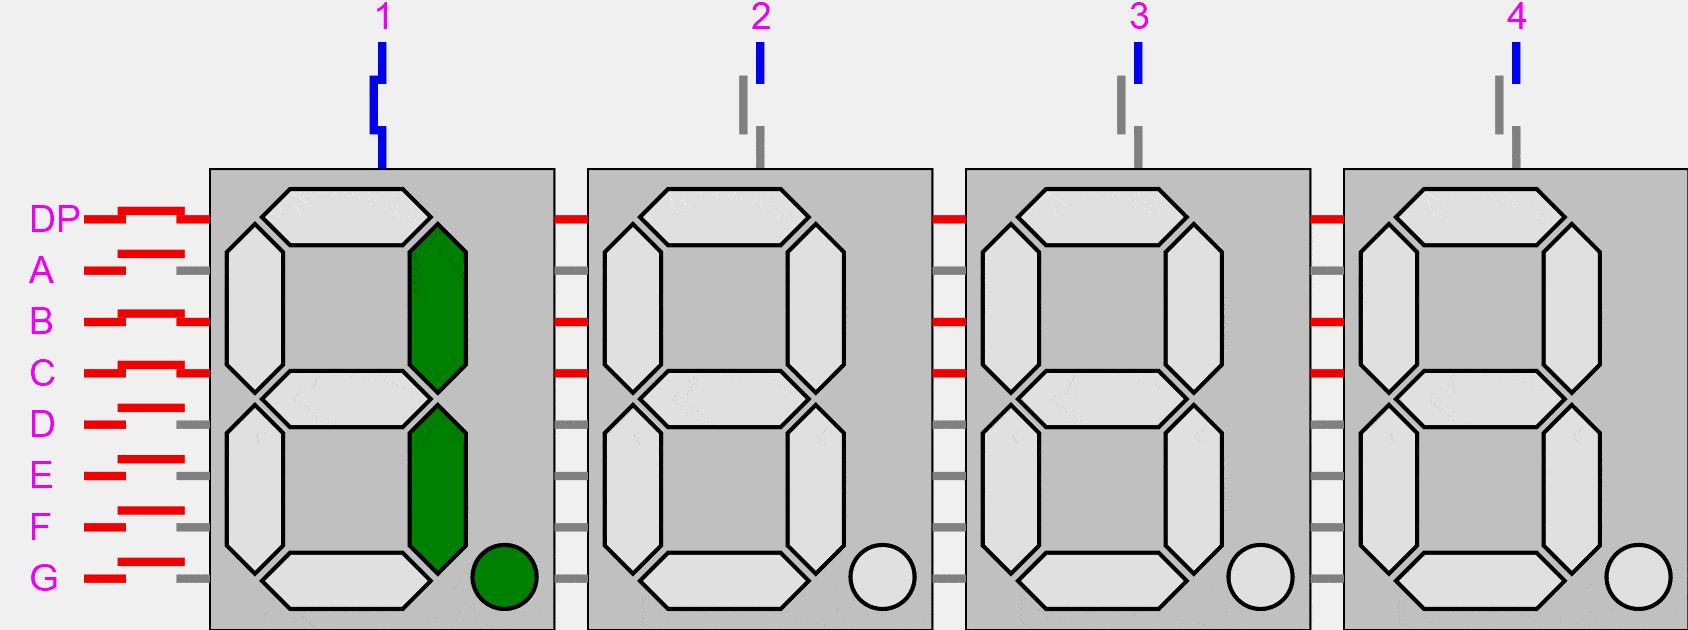

A typical 4-digit 7-segment LED display has 12 pins, with six pins on each side, as shown in the figure.
The pins are used as follows
- 4 to control each digit
- 7 to contol the segments
- 1 to control the Decimal Points
We connect each pin to the Particle Argon using jumper wires, and all the pins work as LED pin-outs. We should then assign an int variable labeled as the pins to the slots you connected each pin to the Argon on the Breadboard.
To allow for a minimal amount of pins, activating the digit and the segment displays the activated segments on all of the activated digits (same with the decimal point). We can get past this if we turn an LED on and off quickly enough, it doesn’t appear to blink but instead can be dimmed to control its brightness. By turning the segments for each digit on long enough, we can display a 4-digit number with each digit potentially different.
This process is made a lot easier with the SevSeg library found in the libraries tab. Include the SevSeg library into your app. In the setup you then use the SevSeg library as shown below putting our variables into arrays and then using them as parameters for the SevSeg class method.
// This #include statement was automatically added by the Particle IDE.
#include <SevSeg.h>
SevSeg sevseg;
int one = A0;
int two = A3;
int three = A4;
int four = 2;

int A = A1;
int B = A5;
int C = 4;
int D = 6;
int E = 7;
int F = A2;
int G = 3;
int DP = 5;


void setup() {
  byte numDigits = 4;
  byte digitPins[] = {one, two, three, four};
  byte segmentPins[] = {A, B, C, D, E, F, G, DP};
  bool resistorsOnSegments = false; // 'false' means resistors are on digit pins
  byte hardwareConfig = COMMON_ANODE;

  sevseg.begin(COMMON_CATHODE, numDigits, digitPins, segmentPins, resistorsOnSegments);
    sevseg.setBrightness(200);
}
This sets up the led display for use, the method that displays the numbers that you want is
sevseg.setNumber(dispSeconds);
sevseg.refreshDisplay(); //the refresh display is necassary to prevent the display from glitching
Due to the displaying of number being the LED display flashing each digit on and off again to give the illusion of separation, delays should not be used as it will disrupt the LED display and cause it to glitch (the led display should be displaying a value constantly).
Creating the Timer
My goals for the countdown timer was to start counting down from a certain value, and the display to be able to display not just seconds, but minutes. To allow the timer to countdown I used millis() and stored the starting milliseconds into a variable, then I cheeked if the current millis() is a 1 seconds difference then it would update the starting millis by adding a second to compare with the new millis and updating the displayed value by subtracting one each second passed. Then, I would need the number displayed to go from '1000', '959. My solution for this was to check if the current displayed value was divisible by 100 (a minute), and then it would subtract 40 and start counting down from the next minute and 59 seconds. Then at the end of the loop I display the display value that has been used.
I put this into a a method which would start when the button is pressed taking in the starting time to count down from and setting that as the starting display time.
void timer(int val)
{
    static unsigned long timer = millis();
    static int dispSeconds = val1;
        if (millis() - timer >= 1000) {
            timer += 1000;
            dispSeconds--;
            }
        if((dispSeconds%100)==0)
         {
         dispSeconds-=40;
         delay(1000);
         }
         sevseg.setNumber(dispSeconds);
         sevseg.refreshDisplay();
    }
}
Servo

The goal for the servo is for it to start a position(unlocked), and then once the countdown timer starts, it moves to another position(locked), and once the countdown timer finishes, it will reach go back to it's starting unlocked position. First you will have to use jumper wires to connect VUSB and GROUND, and a digital slot on the argon.
Once it's connected you will use this line in the setup
myServo.attach(8);
Then in the main loop
myServo.write(10);
Inside the loop in the timer method I put the line
myServo.write(90);
and once the method ends would go back to the position set in the main loop
Controls


The 3-pin potentiometer will be used to set the timer, and the button will be used to start the timer. One end of the potentiometer will be attached with a jumper wire to ground and the other will be to 3V3, the center pin will be attached to an Analog slot on the Argon. The button will be attached to ground and the other end to an input. Then you set and int variable named button equal to the input.
In the main loop, the Argon reads the button and the value coming from the potentiometer. The range I set was 0-100 which will be the seconds. I then had the loop display the values controlled by the potentiometer. I made it so when the button is clicked the lock is true and then runs the method which begins counting down. The code for my main loop is below.
void loop() {
    static bool lock = true;
    int btnState = digitalRead(button);
    val = analogRead(A0);
	val = map(val, 0, 4095, 0, 100);
	sevseg.setNumber(val);
	sevseg.refreshDisplay();
    if(btnState==LOW)
    {
         lock = true;
    }
    else
    lock=false;
    if(lock) //set lock back to false
    timer(val);
    myServo.write(10);
}