Personalize Your IPod Shuffle Using Laser Engraving
by diy_101 in Workshop > Laser Cutting
4449 Views, 7 Favorites, 0 Comments
Personalize Your IPod Shuffle Using Laser Engraving
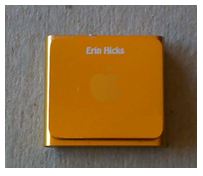
This fun and easy project uses a CO2 laser to personalize an iPod Shuffle. We made it at TechShop and you can too (learn more at http://www.techshop.ws).
Tools Required:
• Laser (we used the Epilog 45W CO2 Helix Laser)
• Text Layout Software (we used CorelDRAW)
• (Optional) Glass or other laser-safe square plates
Materials Required:
• iPod Shuffle
Tools Required:
• Laser (we used the Epilog 45W CO2 Helix Laser)
• Text Layout Software (we used CorelDRAW)
• (Optional) Glass or other laser-safe square plates
Materials Required:
• iPod Shuffle
Load the IPod Shuffle in the Laser and Focus the Laser on the Engraving Surface
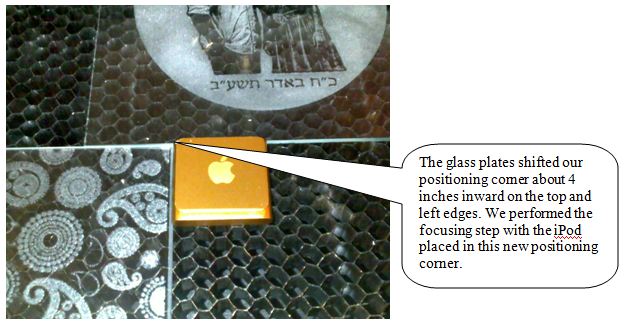
Before you begin the project, make sure to familiarize yourself with the basic operation of your Laser and the general safety precautions recommended by the equipment manufacturer.
If the laser table is flat, the focusing step can theoretically be done with the iPod placed anywhere on the laser tray. We prefer to focus with the iPod placed at or very near the location where it will sit during engraving. The Epilog laser table is also large (24-by-18 inches) compared to the size of the iPod Shuffle, so we wanted to load the iPod away from the default upper-left corner of the table for easier handling and adjustment. We found two square pieces of glass worked great for shifting the positioning corner toward the center of the laser table while still keeping the iPod squarely aligned to that table. If you don’t have square glass pieces, any flat square objects will work equally well; just make sure the material is laser-safe for your machine so you won’t have a problem if the laser beam inadvertently strikes either piece.
If the laser table is flat, the focusing step can theoretically be done with the iPod placed anywhere on the laser tray. We prefer to focus with the iPod placed at or very near the location where it will sit during engraving. The Epilog laser table is also large (24-by-18 inches) compared to the size of the iPod Shuffle, so we wanted to load the iPod away from the default upper-left corner of the table for easier handling and adjustment. We found two square pieces of glass worked great for shifting the positioning corner toward the center of the laser table while still keeping the iPod squarely aligned to that table. If you don’t have square glass pieces, any flat square objects will work equally well; just make sure the material is laser-safe for your machine so you won’t have a problem if the laser beam inadvertently strikes either piece.
Locate and Set the Laser ÂHomeâ Position
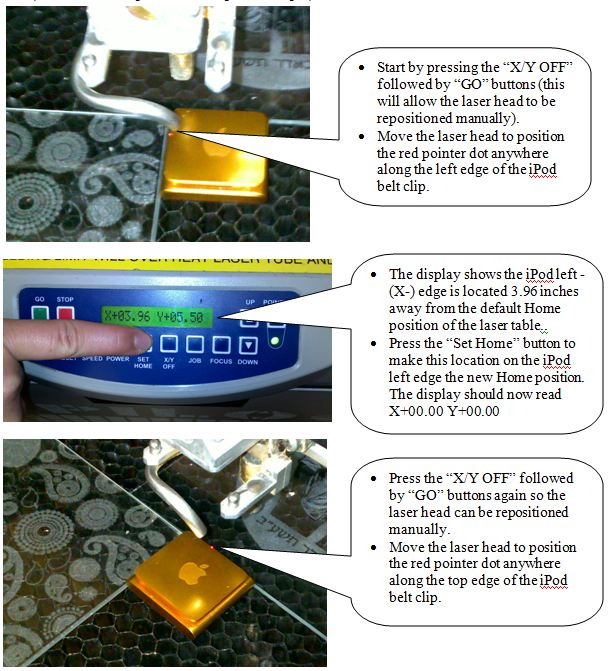
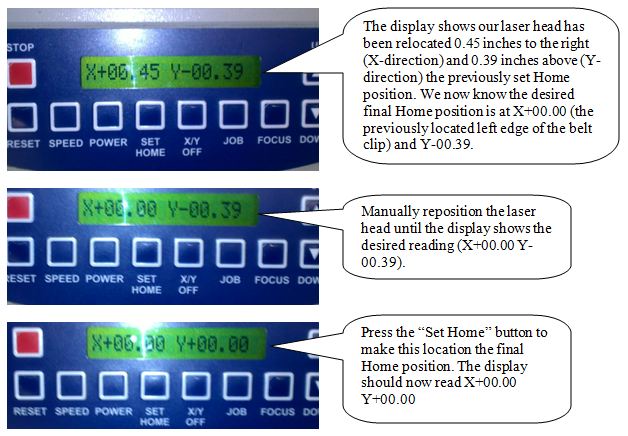
Our goal was to engrave the iPod owner’s name centered above the Apple logo on the belt clip surface. Since the belt clip is slightly smaller than the iPod case and doesn’t have sharp corners to readily define a “Home” (X=0, Y=0) position, we used the Epilog’s laser pointer to locate the top and left edges of the clip independently. The intersection of these two edges defines the desired Home position. As you read the annotations on the following pictures, keep in mind that the X- and Y- display coordinates will depend on the specific location of the iPod on the laser table and the arbitrary edge locations selected with the laser pointer. The numbers aren’t significant; the methodology is. Namely:
a) Locate a point somewhere on the left-edge of the belt clip
b) Set the Home position at the point in step a)
c) Locate a point somewhere on the top edge of the belt clip and note the Y-position on the display
d) Without changing the Y-position found in step c), reposition the laser head until the X-position shows X+00.00
e) Set the Home position to the point in step d)
Determine the Size of the Engraving Area
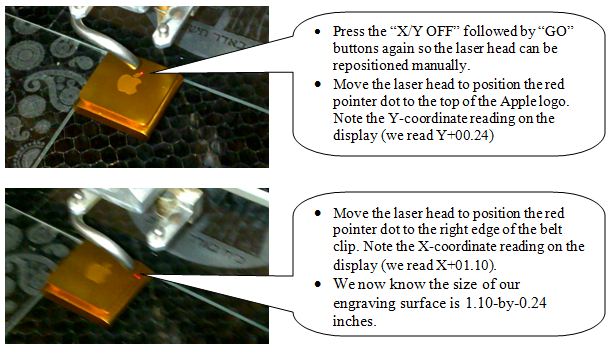
Once the final Home position is set, we can use the Epilog’s laser pointer to measure the size of the engraving area.
Create the Laser Print File
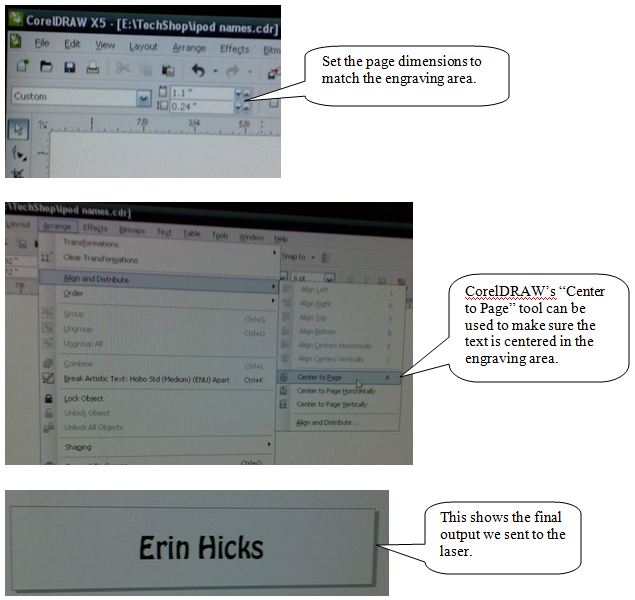
We used CorelDRAW to create a simple text object centered on a page sized to match the dimensions of the engraving area determined in step 3.
Engrave the IPod
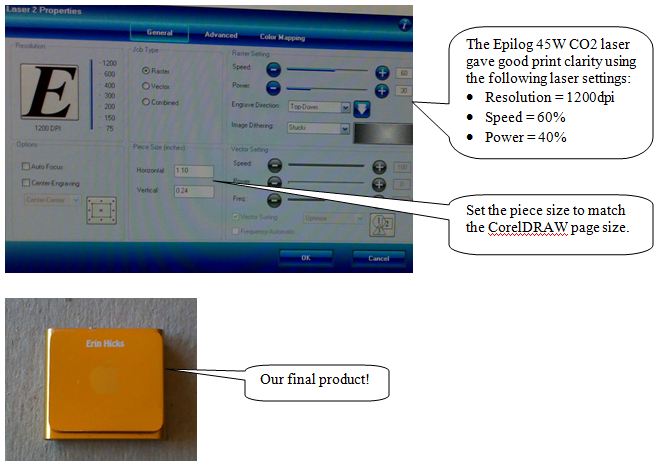
After saving the CorelDRAW file, we printed it to the Epilog laser. The laser settings shown in the following picture gave excellent results on our iPod; however, keep in mind that differences in laser equipment characteristics and variation in iPod surface anodizing will affect the results.