Pens VVG Might Have Turned

I was inspired by a quote from Van Gogh: “What would life be if we had no courage to attempt anything?”
This IBLE is dedicated to my good friend who's daughter just graduated college and I made a pen for her.)
And Jamie and her family the best neighbors in the world and is moving away - maybe this pen can remind her to come back. :-)
Pens Vincent Van Gogh Might Have Turned
If Van Gogh had stood before a lathe, gouge in hand, he would NOT have reached for something plain or predictable. He would have chosen a pen blank that spoke in color with swirls of Blues, thick veins of Yellows, shards of Reds, and flakes of Lavender.
A pen turned by VVG would not whisper; it would shout.
The acrylic blank might have resembled the sky of Starry Night with turbulent blues in a twinkling constellation amidst gilded rings blooming like micro suns, and silver comets streaking through the sky. Or perhaps, a tribute to rows of intertwined lavender in a golden wheat field.
As VVG shaped his pen on the lathe, he’d turn not just a barrel, but a storm of kinetic energy frozen in resin. The shimmer would be less about sparkle and more about emotion ... like something beautiful seen by the flickering light of a candle through eyes filled with tears of joy.
The visual? Not rigid or symmetrical. Rather something organic, with gentle flares and soft curves of color ... more like the trunk of an olive tree than the sterile body of a BIC pen. Van Gogh’s form wouldn’t follow industrial rules... it would follow feeling. It would talk to you while it rests on your desk and hear you when your wrote with it.
He might inscribe something inside the brass tube, invisible to the eye but essential to the object: "Normality is a paved road: It’s comfortable to walk, but no flowers grow on it."
This wouldn’t be a pen for technical drawings. It would be for writing fevered letters and sketching dreams.
When you picked it up, it wouldn’t feel like a tool. It would feel like a pulse. A Van Gogh pen wouldn't just write words ... it would burn emotions in to the souls that read them.
Ok, enough passion, (I just became a grandpa so appease me for my overly emotiveness😊)
See how these pens were made.
Also watch the video to see a 30 foot long ribbon be peeled off!
Supplies


Pen Turning Tools
- Wood Lathe – Any small to mid-size lathe (mini lathes work fine for pens) Jet best and retains resale value when you upgrade.
- Pen Mandrel – To hold the blanks in place (e.g., a mandrel shaft with bushings)
- Bushing Set – Specific to the pen kit you’re using
- Carbide turning tools
- Drill Press or Hand Drill – For drilling the blank
- 7mm Drill Bit (or whatever your pen kit requires)
- Pen Mill / Barrel Trimmer – To square the blank ends flush with the brass tube
- Pen Press or Clamp – For final assembly
- Pull Saw – Cut the pen blank
Supplies
- Pen Kit – Metal components for the pen
- Acrylic blanks or wood blanks these are very nice too (typically 3/4" x 3/4" x 5")
- Adhesives: Thick CA Glue – For gluing brass tubes into blanks
Sanding Supplies
- Wet/Dry Sandpaper: 400, 600, 800, 1000 grit
- Micro-Mesh Pads: Typically 1500 to 12,000 grit
- Water spray bottle – For wet sanding (prevents heat buildup)
Polishing Compounds
- Plastic Polish
- Wood Polish
- Optional: Buffing Wheel and buffing compound
Safety Gear
- Safety Glasses or Face Shield
- Dust Mask or Respirator – Especially important for sanding acrylic
#Amazon Ad links provided above
Prepare the Pen Blank


• Cut the acrylic blank slightly longer than the brass tube insert using a pull saw.
• Drill the center hole with a lathe drill check or drill press (typically 7mm for standard pens).
• Glue the brass tube into the blank with epoxy or thick CA glue (ensure complete coverage).
• After CA cures, trim the ends with a barrel trimmer or sanding jig until flush with the brass tube.
(I didn't show how to make the pen blank - but you can see how here.)
Mount & Turn the Pen Blank on the Lathe


Mount
• Use a pen mandrel with bushings specific to your pen kit.
• Mount the acrylic blanks between the bushings.
• Secure the mandrel in the lathe with the tailstock for support.
Turn
• Turn the lathe speed to 1500 - 2200 RPM.
• Use sharp carbide or high-speed steel tools, preferably a skew or spindle gouge.
• Take light cuts to prevent chipping or melting.
• Turn down to the bushing diameter, Important for ensuring smooth transitions.
The acrylic ribbon that came off the blank was over 30 feet long!!!
Sand, Finish, & Polish the Pen


Wet sanding is key to prevent overheating and to produce a scratch-free surface:
• Apply several coats of then CA glue letting them dry 10 mins between ( I don't like using an accelerator) - then sand starting at 400 grit and go through Micro-Mesh pads up to 12,000 grit.
• Use water to lubricate and cool the blank during sanding.
• Rotate and sand lengthwise between grits to eliminate radial scratches.
Polish the Acrylic
• Use plastic polish or acrylic polish
• Apply with a soft cloth or buffing wheel.
• Buff until you reach a glass-like finish.
Assemble the Pen


• Follow your pen kit's assembly instructions.
• Use a pen press or use the lathe itself like I did and carefully assemble parts.
Admire Your Work (and Let Others Too)

Acrylic pens, when polished properly, look professional and luxurious, on par with high-end commercial pens. The clarity and shine you can achieve with polishing makes the piece look like glass or resin art.
If you enjoy working with your hands, love design and detail, and like the satisfaction of creating something beautiful and functional. You’ll likely love turning acrylic pens.
Want to try this without investing heavily? Many makers start by taking a class at a local woodworking store (like Woodcraft or Rockler) before setting up their own lathe at home. That's what I did and check out my other instructables to see how I progressed. (I'm winning awards now - not just instructables😊)
Now a Van Gogh Lavender Field Inspired Pen


There’s something deeply satisfying about taking a raw, colorful block of acrylic. Starting as a cold and unremarkable square form, this blank can slowly be shaped it into something beautiful, functional, and uniquely created by you - a true one of a kind heirloom. As the lathe spins and your tool meets the blank, ribbons of acrylic peel away, revealing swirls of color and depth that weren’t visible just moments before.
Turning a pen isn’t just a craft, it’s a ritual. From choosing your blank to pressing the final components together, each step offers a hands-on connection to the materials and the process. The rhythm of the lathe, the precision of your cuts, and the gleam that emerges after the final polish. It’s a creative experience that engages both mind and body.
In the follow videos, I'll walk through the entire process of making a high-gloss acrylic pen on a lathe ... from blank preparation all the way to final assembly. Whether you're new to pen turning or looking to refine your technique, this guide will help you turn a simple blank into a small masterpiece you can use, gift, or proudly display.
From Blank to Brilliance — a Detailed Work Thru

1 ▸ Choosing the Blank: The Moment of Possibility
You stroll past the rack of acrylic billets, each one shimmering like a slice of frozen nebula. One catches your eye, a cobalt‑blue swirl shot through with copper ribbons. In that instant, the future pen already exists in your imagination. You cradle the blank in your palm; it’s cool, dense, and full of untapped drama. Into the shop it goes.
2 ▸ Cutting & Drilling: Opening the Gateway
Back at you garage, you mark the blank so the swirl orientation lines up with the pen’s cap and tip, then kiss the saw blade through the acrylic. A sharp “snap” and two equal halves land squarely on the table.
At the drill press, the bit descends like a lunar lander—slow, steady, spiraling a perfect 7 mm channel. You pause every few millimeters to clear chips and keep heat at bay; melted acrylic is the enemy of clean holes so take small bites.
3 ▸ Adhesion: Commitment in Brass
You scuff the brass tubes with sandpaper until they dull to a warm satin, then bathe them in denatured alcohol. Thick CA glue pools along the tube, and you twist it home inside the acrylic. It feels like sliding a sword into a jeweled scabbard. Excess glue froths out the ends; in five minutes the marriage is permanent.
4 ▸ Squaring the Ends: Setting the Stage
The barrel trimmer whirrs. You gently ease it into the blank until steel kisses brass with a crisp click. Now each half is perfectly square and ready for center stage on the mandrel.
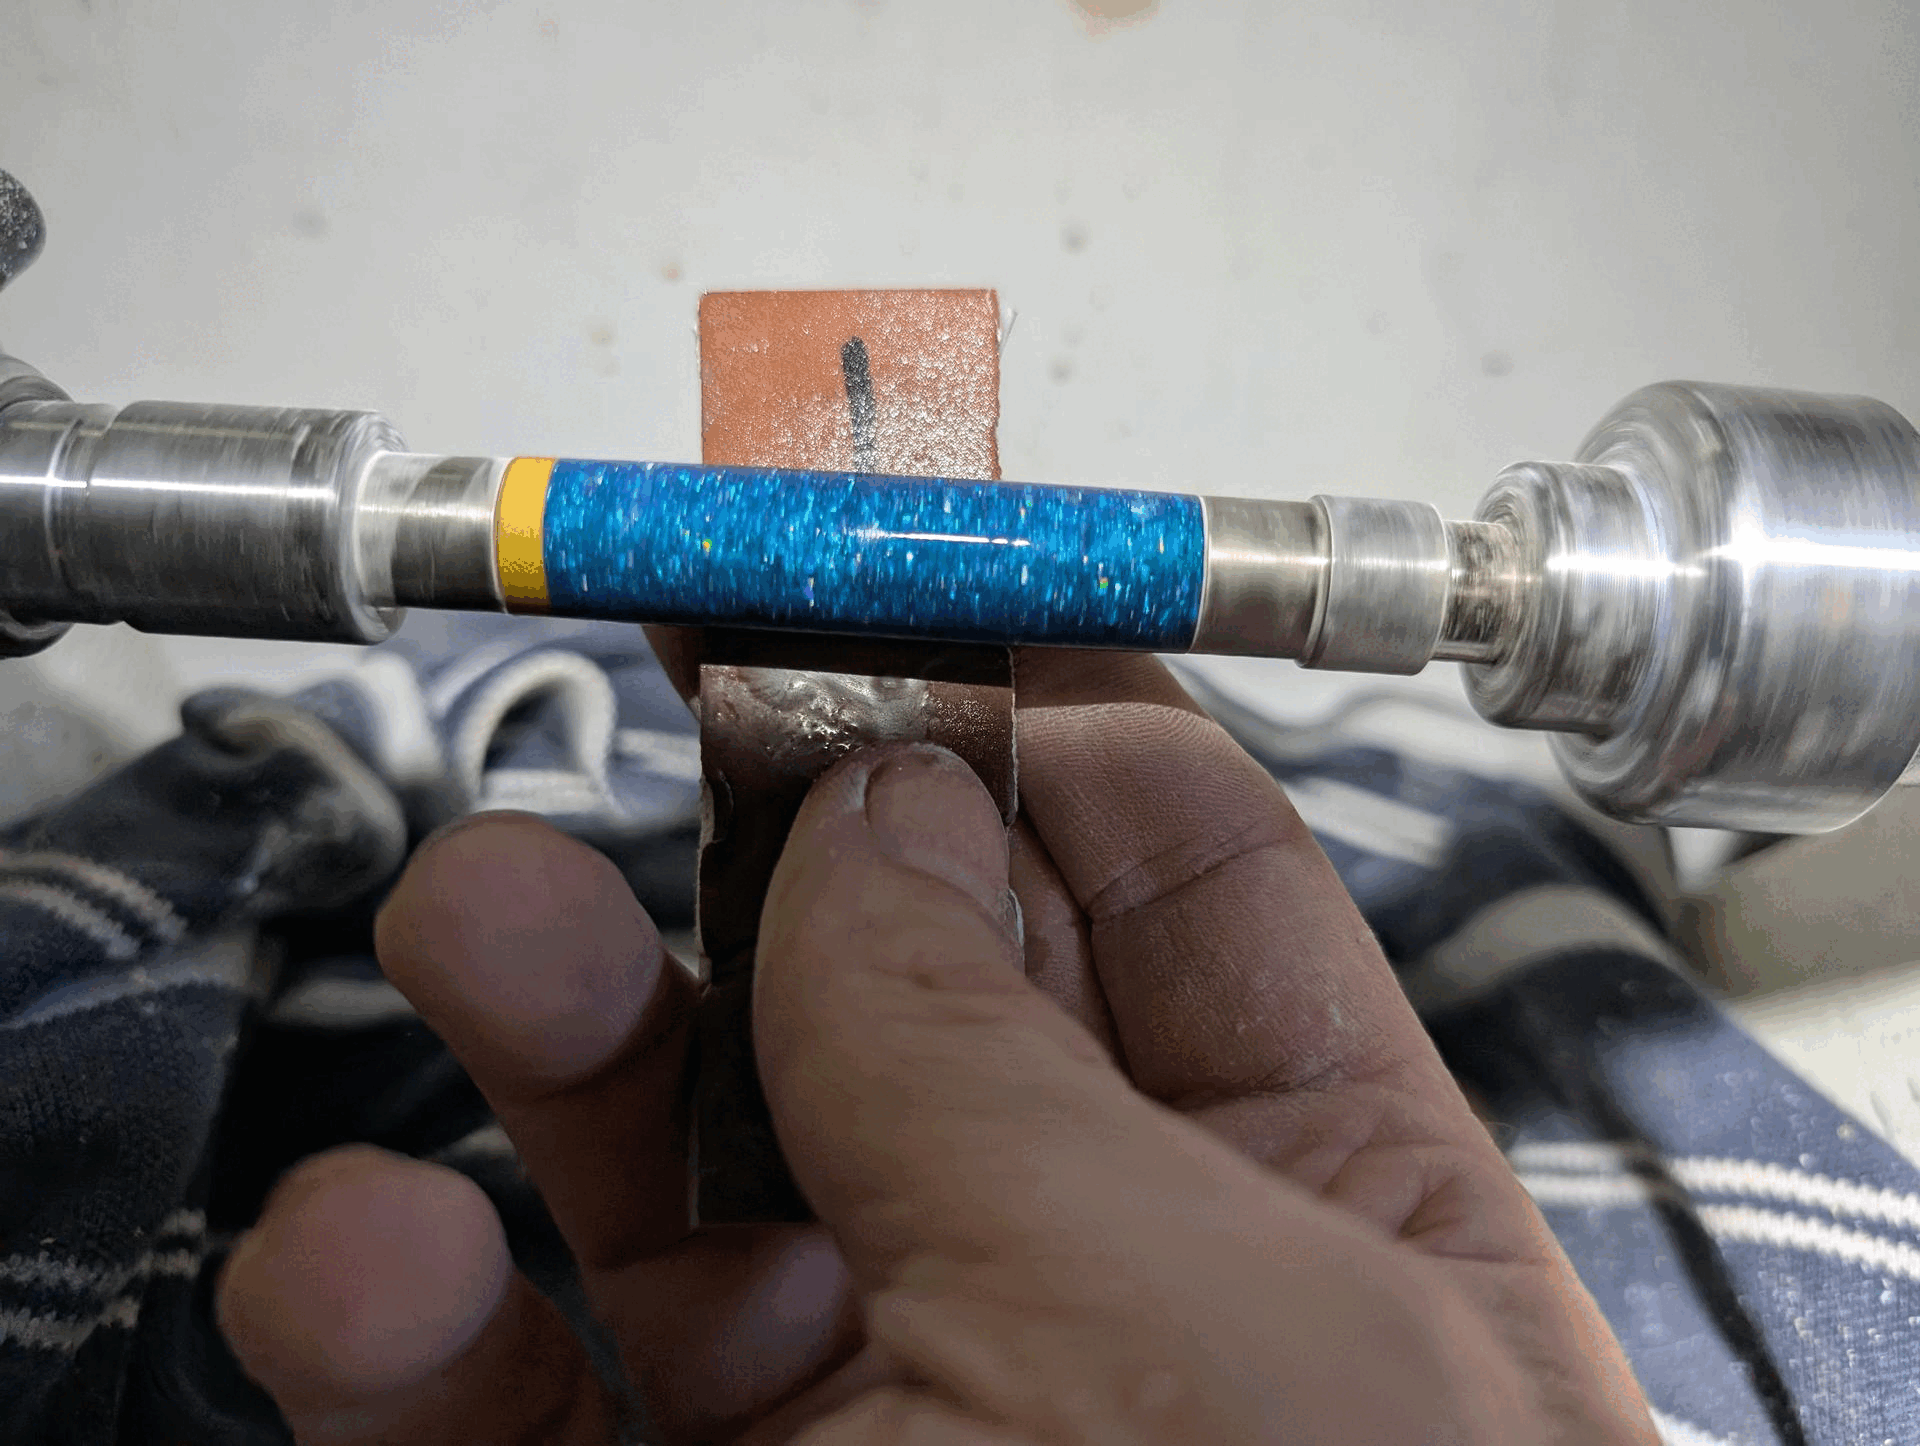
5 ▸ Mounting: The Dance Begins
Bushings, then blank, then bushing are stacked like colorful macarons along the mandrel shaft. You seat the live center against the mandrel’s dimple. A fingertip twist on the tailstock handwheel adds just enough pressure; the acrylic is poised, your lathe a symphony waiting for its downbeat.
6 ▸ Rough Turning: Finding the Form
The lathe spins up to 2,200 RPM. Your carbide rougher grazes the blank, peeling off cellophane‑thin ribbons that curl and shimmer under the shop lights. The square corners round over, then vanish. Soon the blank is a smooth cylinder gliding beneath the cutter, the swirl pattern already blooming.
7 ▸ Refining Cuts: Sculpting with Light
You swap to a freshly honed skew chisel. Feather‑light passes coax the diameter down to the bushings, leaving a surface so clean it almost doesn’t need sanding. You pause, lathe off, and run a finger across the acrylic... it’s glass‑cool and nearly flawless.
8 ▸ Wet‑Sanding: Erasing Every Trace of Tool Steel
A mist of water shrouds the blank as you start at 400‑grit paper, each grit a new chapter in the quest for clarity. You sand laterally for a few seconds, stop the lathe, and hand‑sand lengthwise to chase away spiral scratches. 600, 800, 1000.
Now the Micro‑Mesh pads take over: 1,500 all the way to a heavenly 12,000. Under the shop lights the pen body already gleams like glazed candy, but the finale is yet to come.
9 ▸ Polishing: The Mirror Moment
A drop of plastic polish on a soft cotton pad; the lathe hums at slow speed. You press gently, feeling heat rise and then ebb as the compound does its silent work. After a minute you lift the cloth and there it is: the swirl is no longer inside the acrylic; it feels suspended in air. A final buff on a flannel wheel with white diamond compound turns shine into brilliance.
10 ▸ Assembly: Alchemy of Parts
At the pen press, brass tubes meet gunmetal hardware with the hush of perfect tolerances. You align the sections so the pattern flows uninterrupted across the center band. A twist or a click creates magic as the pen refill emerges, and you inscribe your name on a scrap of paper for the first time like an artist first stroke on a canvas. Smooth, bold ink appears: the pen has come alive.
11 ▸ Finishing Touches: Maker’s Pride
You wipe the pen with a microfiber cloth, turning it slowly under the light. The swirl of colors and shine of metal dances as if lit from within. A faint aroma of acrylic and polish lingers... a reminder of the journey just completed. You set the pen in a velvet box, close the lid, and in the hush that follows, realize you’ve turned a simple blank into a pocket‑sized work of art.
Heirloom Gifts


When you give someone a pen you’ve made with your own hands, you’re not just handing over a writing tool ... you’re offering a piece of your time, your care, and your creativity.
There’s something deeply personal about a handmade item. It doesn’t roll off an assembly line. It wasn’t bought in haste. It was chosen, shaped, polished, and finished with intention. That kind of gift carries a weight beyond its size.
An acrylic pen in particular has a certain magic to it. The colors are often so vivid, so striking, that people instinctively turn it in their hands, watching how the light dances through the layers. It’s functional, yes—but it’s also a conversation piece. It stands out on a desk, tucked into a journal, or resting in a shirt pocket like a quiet symbol of craftsmanship.
And because you’ve made it, there’s a story attached that only you and the recipient may ever know. A handmade pen becomes a small, elegant reminder that they were seen and considered.
It lasts. Unlike flowers or a bottle of wine, a well-made pen stays with them ... years and sometimes for life. It becomes part of their daily rhythm, signing notes, jotting ideas, maybe even starting the first lines of a novel or sketching the blueprint for something big.
And every time they pick it up, they’ll remember: this was made for them.
The Starry Night inspired pen is especially meaningful for me since it was for a good friend of mine who's last name is Cameron (which is the style of the pen kit) and his daughter picked the blank.
I hope you get inspired to try this. If not from this Ible maybe Vincent’s quote can: "Great things are done by a series of small things brought together."
Easiest way to start is to google local wood clubs since many members love to teach and mentor others.
My club makes pens for active and retired military and give to them has holiday gifts as appreciation for their services. We do over 2000 per year.
Now Your "Turn".