Panoramic Photography With Free Software and Cheap Hardware
by stuuf in Circuits > Cameras
13338 Views, 36 Favorites, 0 Comments
Panoramic Photography With Free Software and Cheap Hardware

Panoramic photographs are used to make images of scenes that are too large to fit in a normal camera lens or even too big for the human eye to see at one time. Most well-known panoramas are outdoor landscape shots of geological features or city skylines, but they are useful for taking large pictures inside buildings as well.
Panoramas are almost as old as photography itself. Professional photographers and inventors have been creating extreme wide-angle photos using a variety of methods since the nineteenth century, but until recently these required expensive specialized equipment and processing techniques. Several types of panoramic cameras have been built over the years that expose a large sheet of film by either moving a lens across it or exposing through a fixed lens with a very wide view angle.
More recent innovations in photography include digital cameras and computerized image processing, which have made possible yet another panoramic photography technique: image stitching. Stitched panoramas allow much more flexibility than older panoramic cameras and are well within the budget of any amateur photographer.
A stitched panorama starts off as a series of shot through a standard lens, with the camera in the same location, using the same exposure, but facing in different directions. Computer software then analyzes the separate images to determine which angle each one corresponds to, and finally combines all the images into a single seamless panorama.
Tools Needed

You'll need a few tools for this project. Fortunately they're all either free or easy to find.
The first obvious thing is a digital camera. A good SLR is best of course, but some inexpensive point-and-shoot cameras can be used, with a few considerations:
Modern compact cameras let you easily take well-exposed pictures of any scene by managing the sensor, shutter, and lens settings automatically using built-in light metering. This is great most of the time when you're taking individual shots, but if you take two pictures of the same object from different angles, the brightness, focus, and colors might not be the same. Since panoramas require multiple images from different angles to match up perfectly, you need a camera with a manual aperture/shutter/white balance mode. Some cameras (including some Canon and Olympus models) even have a dedicated panorama mode that locks the exposure settings for a series of shots and have a visual guide for overlapping the pictures.
A tripod, while not strictly necessary, makes taking panoramas much easier, especially for very wide scenes or indoors. A pan-head tripod lets you rotate the camera without changing its position, which is surprisingly hard to do with a hand-held camera (at least if you're not thinking about it) Ball-head tripods, like many miniature portable models, don't work as well, since you can't smoothly spin the camera without it moving up or down.
The software part of this project is handled by a few different programs, all of which are free software and available for most operating systems.
Hugin is the program that manages the entire image stitching process. Most of the actual work is done by other programs, but hugin provides a convenient way to call each of them and usually tells you what to do next if you get lost. (http://hugin.sourceforge.net)
Hugin is based on a set of applications and libraries called Panorama Tools, including the libpano library, and the important programs PToptimizer and PTStitcher. Most of panotools is now open source (http://panotools.sourceforge.net/), except PTStitcher. However, there are two replacement programs available: PTmender, available from the panotools website, and nona, which is included with hugin.
Two more applications are not part of panotools but can be used with hugin to make your panoramas look better:
Autopano (or autopano-sift) automates the first step of panoramas, finding control points that tie pairs of images together. You can do this by hand if you have the patience (and you'll probably want to clean up after autopano to get the best result) There are a few different implementations of autopano available, the latest being autopano-SIFT-C (available at the hugin website)
Enblend is another optional tool for improving the final results of not-so-perfect panoramas. Where two images meet in the stitched image, there will often be visible seams or objects that are in slightly different places. Enblend can replace these seams with smooth transitions. Recent versions of enblend also include a related (using some of the same math) tool called enfuse that uses exposure blending to combine images of the same scene at different exposures to create a single simulated high dynamic range image. (http://enblend.sourceforge.net/)
A general-purpose raster image-editing application is useful for final post processing, cropping, or printing of your panoramas. GIMP is a popular free tool suitable for this (http://www.gimp.org/)
Overview
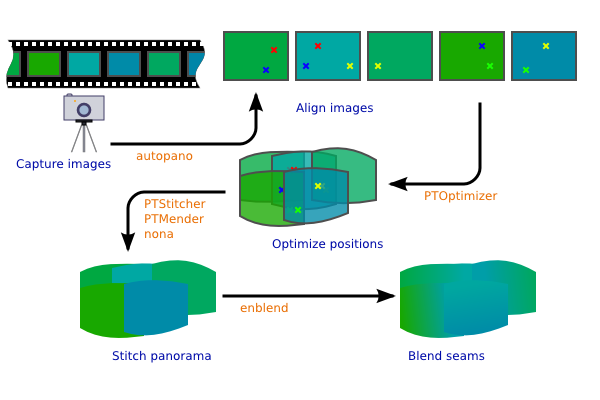
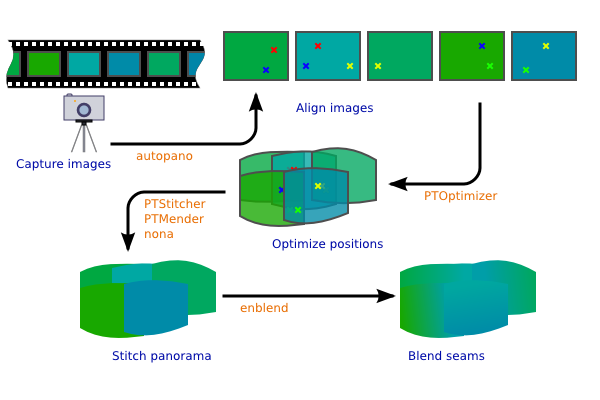
This instructable will cover the following steps for taking panoramas:
1. Taking source photos. All images have to be taken with the camera in the same position and using the same exposure settings (unless you're using exposure blending).
2. Identify control points. Pairs of control points are used to figure out how the images will fit together. Each control point pair identifies either two points in different images that refer to the same point in the scene, or two points in the same image that should be a horizontal or vertical line in the final image. Control points can be placed by hand or automatically using autopano.
3. Optimize the panorama. The PToptimizer program uses the control points to calculate which position (expressed as pitch, roll, and yaw angles) each image corresponds to, as well as how much distortion was introduced by the camera lens.
4. Preview, edit control points, optimize again, GOTO 10. The first result won't be perfect. You may need to add, delete, or move control points, add guides to keep horizontal and vertical structures at the right orientation, select which projection you want to use, or adjust the field of view to include only the parts of your images that you want.
5. Stitch the image. This is where the real work happens. The stitcher program takes the previously calculated image positions and remaps each pixel of the input images from its original projection to where it should be in the final panorama. The output will be either a single merged image or a series of images, each containing pixels from exactly one source image, to be blended later.
6. Blend the stitched images to look more pretty. Some extra processing is usually needed on the stitched output to clean up seams where images don't perfectly meet or other irregularities. Enblend and enfuse are automated tools hugin uses for this step, or you can do it by hand in an image editor like GIMP.
Downloads
Taking Pictures
Grab your digital camera, make sure you have a memory card and a fresh set of batteries, and find a good scene to make a panorama of. Taking panoramas isn't difficult, but there are a few simple things you can do to avoid common mistakes.
Make sure you're using your camera's manual or panorama mode. In order for your images to be stitched together properly, they need to be exposed exactly the same way, so that the every object will appear with the same color and brightness in all images. If you're using manual mode, make sure the sensitivity (ISO), shutter speed, aperture (F stop), white balance, and preferably focus, are the same for every image in your panorama. If your camera has a panorama mode, it should take care of this for you.
Using the flash is generally a bad idea for panoramas, since it will be difficult to get the illumination consistent and natural-looking across the entire set of pictures. If you don't have a lot of available light, then a tripod and slow shutter are your best option.
Most panoramas will have a very large dynamic range from darkness to bright light. In a typical outdoor scene you might have an object in direct sunlight (or the sun itself) on one side of the panorama, and a dark shadowed area 100� away. Camera sensors generally have a fairly narrow dynamic range, so you'll have to make sure the exposure you pick won't create any completely white or completely black areas. The best solution to this problem is to use exposure blending: take two (or more) copies of the entire panorama at different exposures and combine them later into a single image, using only the well-exposed parts of each source image.
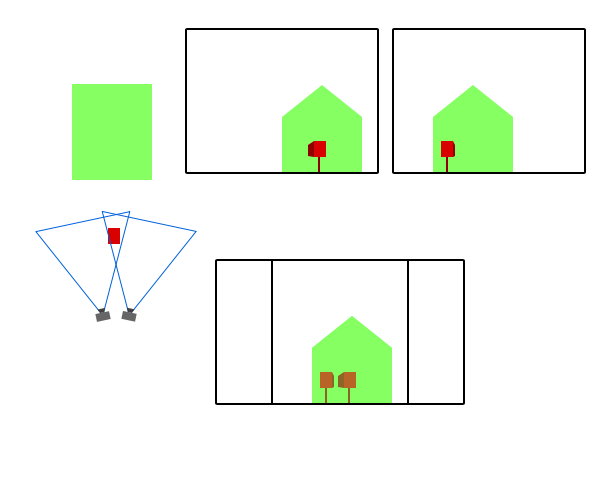
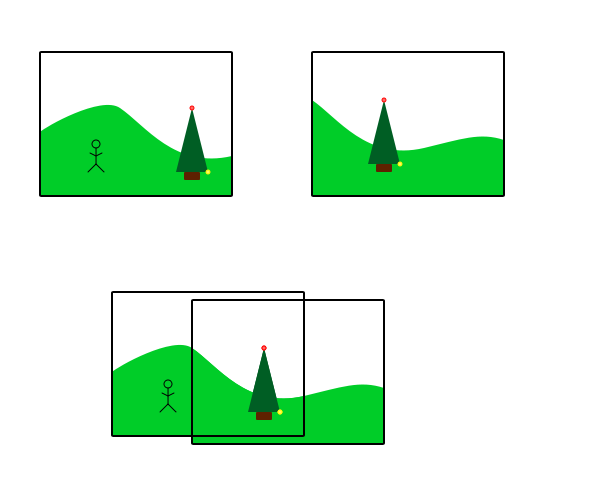
Now that your camera is configured correctly, start at one end of your scene and shoot the first image. Rotate the camera and continue taking pictures until you've captured all of the scene that you want. The rotate part is actually a little trickier than you might think at first: if you move the center of your lens's entrance pupil between shots you'll end up with parallax error. This means that objects in the foreground will shift relative to those in the background. A tripod is the best way to eliminate this, but you can manage without one if you're careful (don't do the obvious thing and hold the camera at arm's length while turn your whole body with your feet in place). See the diagram for an example of parallax.
Each pair of adjacent images needs to have some overlap to be able to find control points. Overlapping between 30% and 50% is usually sufficient, but if part of your scene doesn't have enough recognizable features, you may need to overlap more.
Try to keep the camera level across the entire panorama without moving up or down. If you have a tall structure that won't fit in a single image, take another row of images with the camera pointing up (or down) relative to the first row. Of course, panoramas don't always have to be just wide (in the horizontal dimension), they can be tall and wide (with several vertical steps) or just tall.
Downloads
Control Points
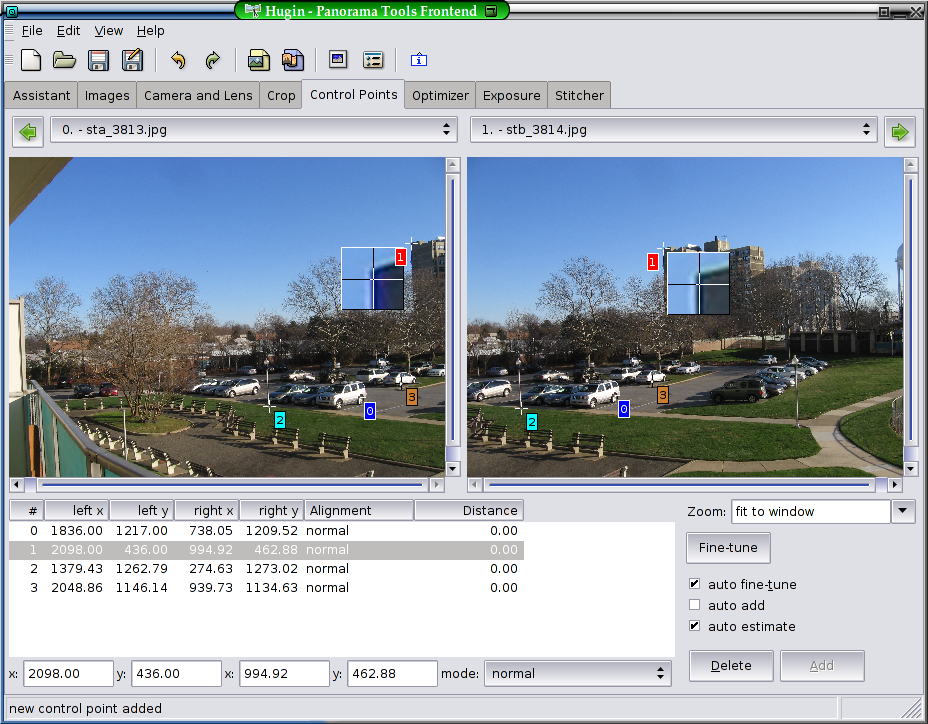
Understanding control points:
Control points are what the optimizer uses to determine the relationships between all the images in your panorama. There are actually two different kinds of control points. Normal control points identify two points in two different images that refer to the same object, and therefore should appear at the same place in the final panorama. Horizontal and vertical line guides identify two points that should be in a straight line, usually from the same image (panoramas will sometimes appear wavy without them). Control points are the main inputs that the optimizer uses to align the images into a complete panorama, and the difference between a good panorama and a bad one depends on the quality of control points you create (and how much time you spend on them).
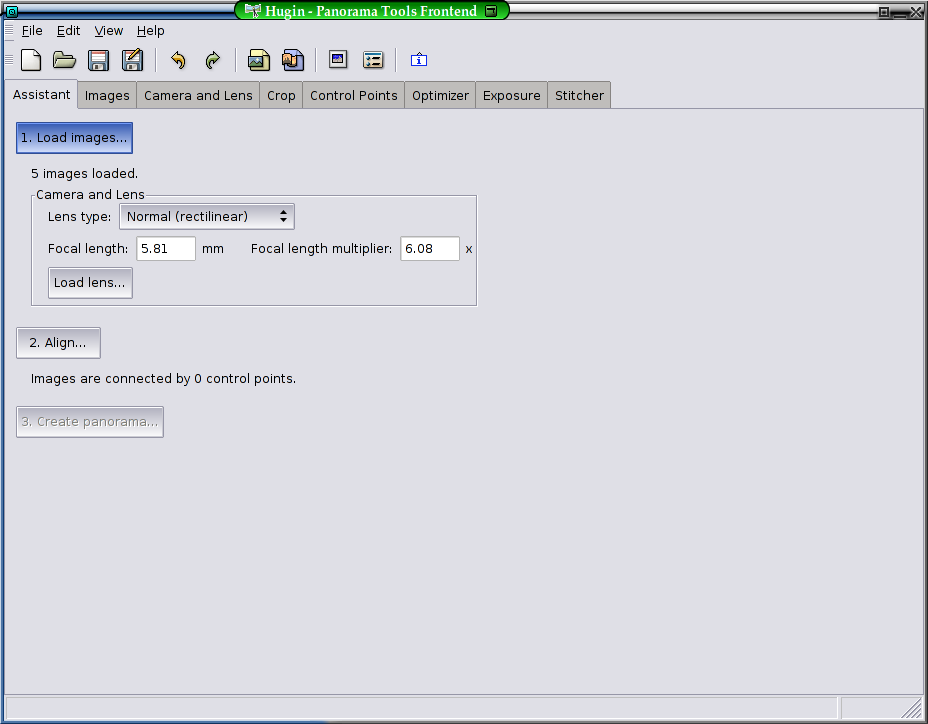
Before you can add control points, you need to add all source images to your project. Use the "Load images" button on hugin's Assistant tab to do this. If you have autopano installed, hugin will probably run it immediately and attempt to optimize the panorama as soon as it finishes and give you a preview of the whole panorama. If you want to add your control points all by hand, turn this option off in hugin's preferences.
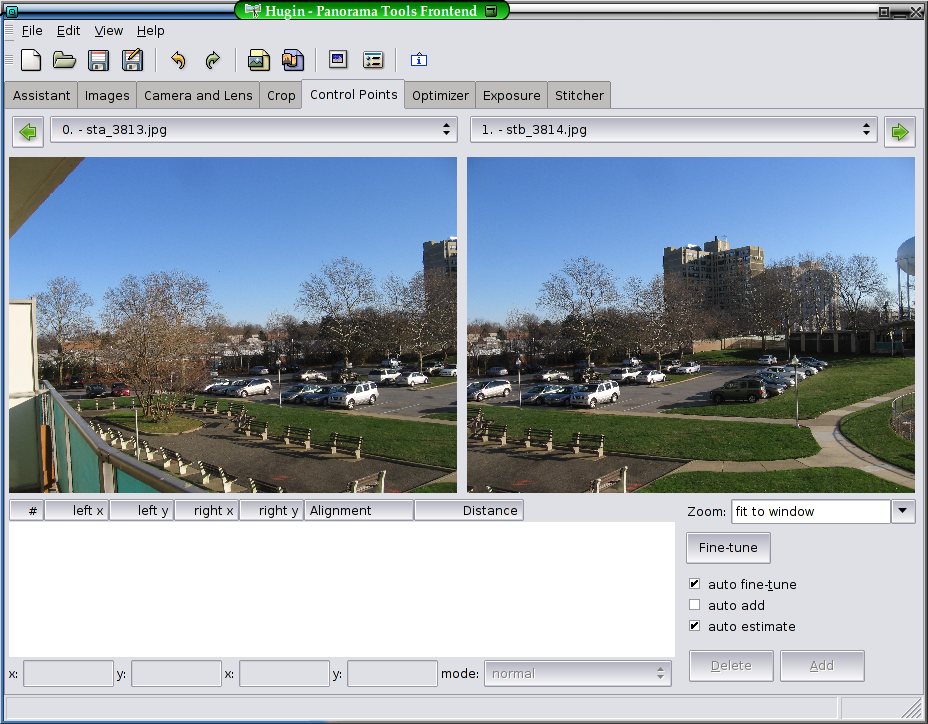
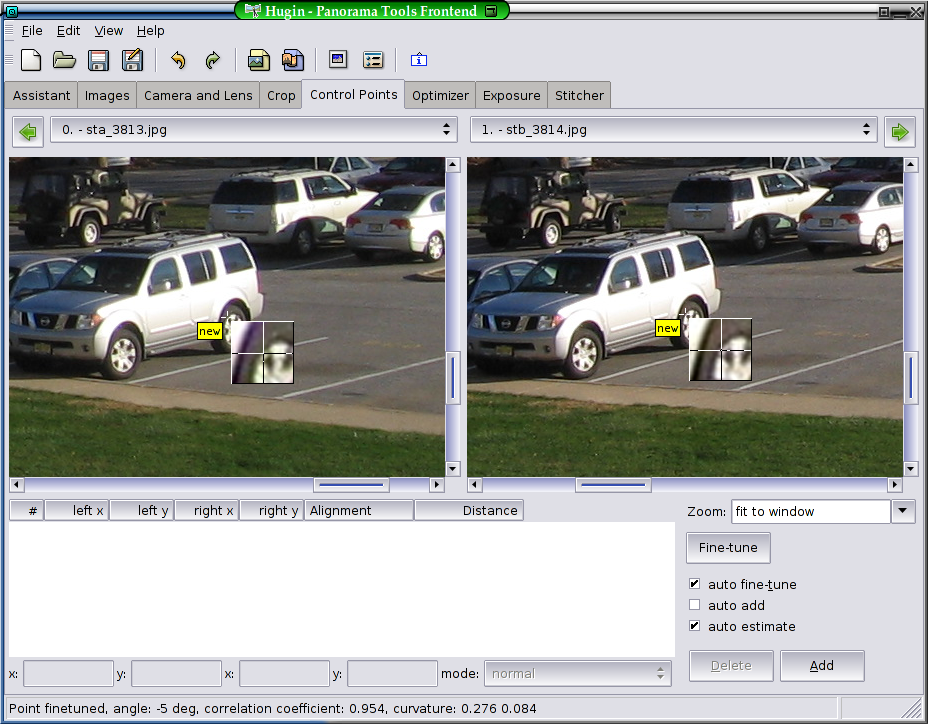
Now switch to the control points tab. This screen shows two images side by side so you can edit the control points that belong to them. Use the menus above the images (or numbered tabs in older versions of hugin) to select the first and second images (0 and 1). Find an recognizable object that appears in both images, preferably something near the background. Click on part of it in the left image. The image window should zoom in all the way showing the area around where you clicked. Then click the same part of the same object in the right image. Hugin will perform a "fine tune" as soon as you click the second image, searching for a point that matches the first image best. You can drag either of the control points to a new position if they're not in the right place. Clicking the fine tune button at any time will snap the right point to the part of the image that's most similar to the left point. Once both points are in the correct place, right-click to save the control point.
To successfully align your panorama, each overlapping pair of images needs to have at least one control point. Usually one isn't enough (since the images can still rotate about the common point), so try to add as many as you can find. If the images have objects in the foreground and background, you won't be able to align both planes if there is any parallax error. Background points usually work better, so add control points only on far away objects if you can see nearby objects in different places in the two images.
To add a horizontal or vertical line guide, select the same image in both windows. Find an object, such as a lamp post, the side of a building, or part of the horizon, that you want to appear as a level horizontal or vertical line in the final image. Place a point in the left window at one end of the line, and a point at the other end in the right window. Fine tune tends to get confused with lines, so you may have to move the points around manually. Right-click to add the control point. The mode menu below the control point list should indicate that it is a vertical or horizontal line. Change it to the correct mode if hugin guessed the direction wrong.
After you have enough control points, you can optimize the panorama to place each image in the right position and get a preview of the final result.
Downloads
Optimize!
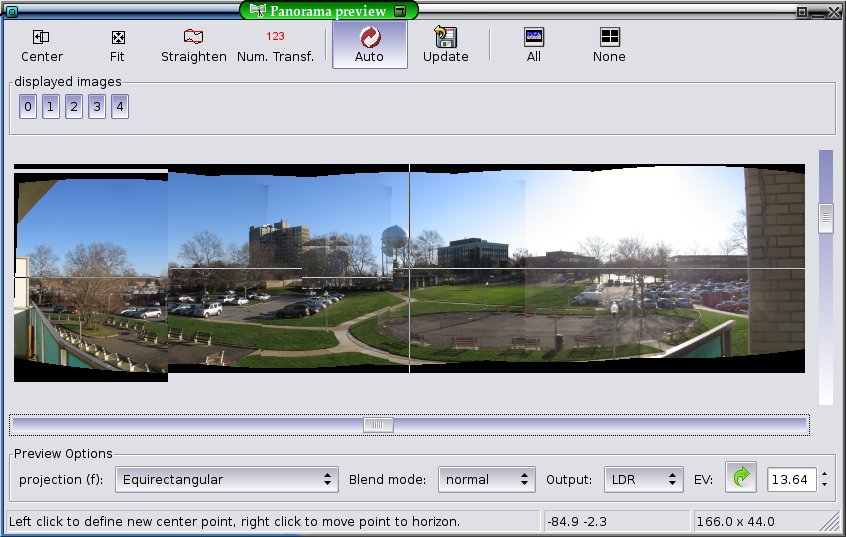
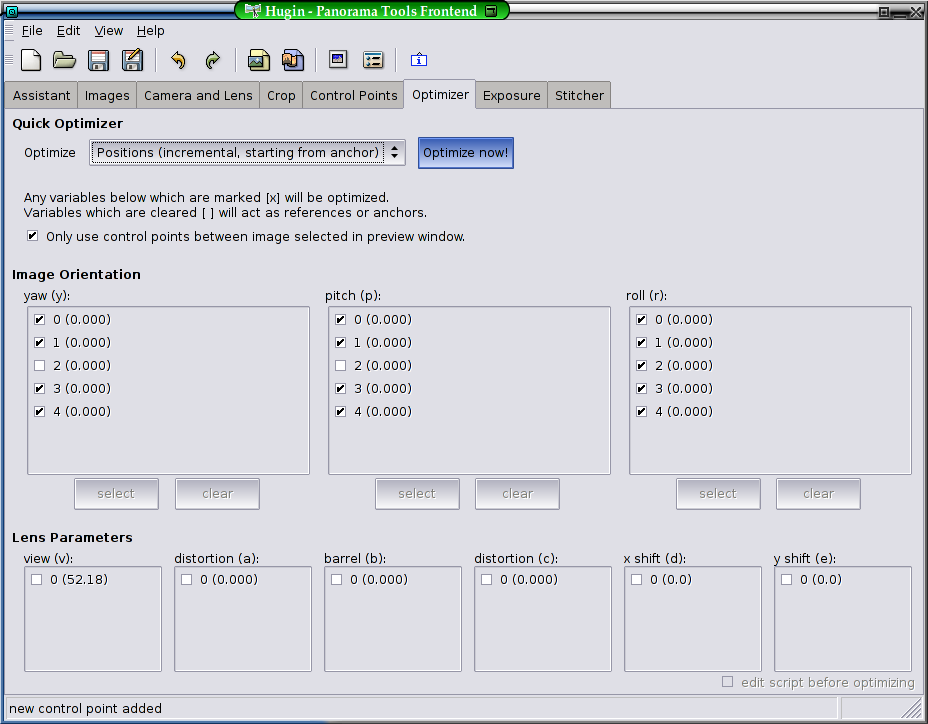
After you've added control points to all your images, the next step is to run PToptimizer to piece your panorama together. It uses the control points you created in the last step to reconstruct the conditions each picture was taken at, including the camera orientation and lens distortion. With this information, the stitcher can remap the source images into a single panorama using any of the supported projections.
Switch to the Optimizer tab of hugin. Click the "Optimize now!" button to run the default optimization mode. This will attempt to find the best position (pitch, roll, and yaw angles) for each image so that all control points line up.
After optimizing your panorama, open the preview window to get an idea of what the result will look like. Look for any places where two images don't seem to match correctly and go back to the control point editor and add or change some points on the affected images. Optimize again and update the preview. Repeat until everything looks as good as you can get it.
If one or more images appear tilted, try to find objects you can use as horizontal and vertical guides and add control points on them. Optimize, update preview.
If your panorama looks good after position optimization, switch to "Positions, view and barrel" mode and optimize again. PToptimizer will try to correct for some of the distortions caused by your camera's lens.
Now it's time to stitch the full resolution output of your panorama (and find more errors that the preview didn't show, edit more control points, optimize again...)
Stitch!
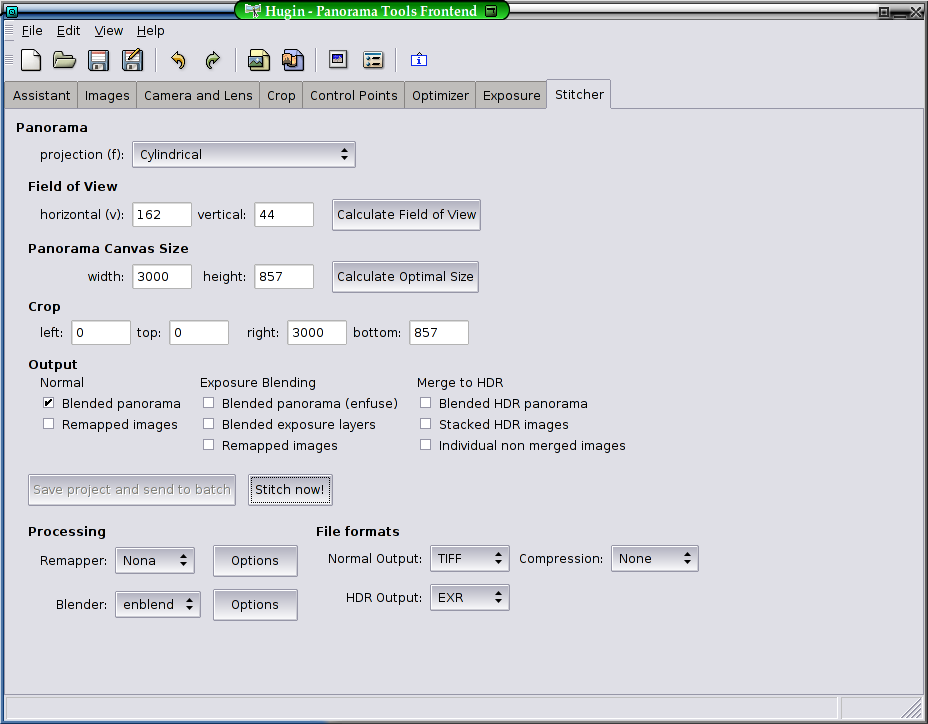

You're finally ready to create your final panoramic image. Switch to the Stitcher tab; I'll explain all the options below.
The first two options are the projection and field of view. Both of these can also be changed from the preview window, where you can see graphically how they affect the panorama.
Hugin can generate images in a number of different projections, and different scenes look best in different projections. The rectilinear projection is the same projection that an ideal normal camera lens produces (and the same as you see with your eyes). Rectilinear projections, by definition, represent straight lines in the scene as straight lines on the image. Rectangular structures like buildings will appear the same way they do in real life, but objects far away from the center of the image will be stretched to much larger than normal. This will usually destroy your image if it's wider than 90� or 100�, so it's best for narrow or tall panoramas.
Wider panoramas look best using either a cylindrical or equirectangular (spherical) projection. Both of these projections avoid distorting horizontal distances away from the center of the image, but will turn horizontal structures above or below the vertical center into arcs and bubbles.
Field of view controls how wide an angle will be shown in the output image. The "Calculate Field of View" button will find the smallest view that includes every image. Anything larger than this just wastes memory, disk space, and processing time, so use the sliders in the preview window to crop your panorama to just the section you need.
Next is the canvas size. This is the size of the final output image, in pixels. The values given by "Calculate Optimal Size" represent the largest size possible without stretching the source images beyond their original sizes. You can use a larger size of course, but you'll just be creating redundant pixels. Larger panoramas take more time to generate, use more memory, and create larger files on your disk, so start small to get an idea of what kind of size your hardware (and patience) can handle.
Hugin can output (actually, instruct other programs to output) many different types of images in different formats from a single panorama project. Most of the time you simply want the "blended panorama," which calls nona to remap your images into the new projection, and uses enblend to smooth out the seams.
Finally, you can pick the format and compression options for the final image.
Once everything is ready, click "Stitch now!" Hugin will prompt for a filename to write the output to, and start crunching your source images into a beautiful panorama. Several windows may appear during the process, talking about laplacian pyramids, exposure layers, blend masks, and whatnot. When everything is finished, you should have a nice big image file in the directory you specified earlier.