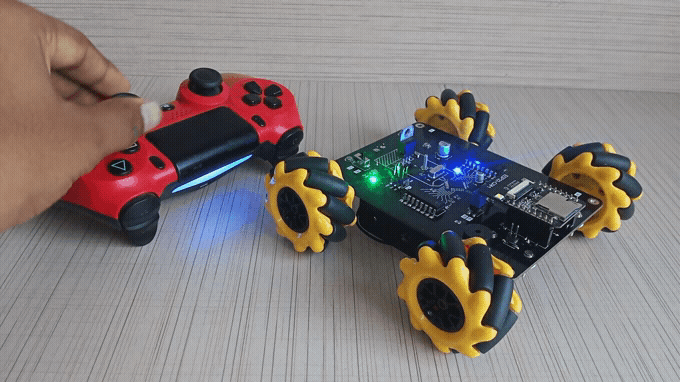
PS4 Controlled Holonomic Drive
by maker_ATOM in Circuits > Robots
16165 Views, 137 Favorites, 0 Comments
PS4 Controlled Holonomic Drive


)
Recently I got know about ESP32’s capabilities to connect with PS4 controller via Bluetooth and found some 48mm mecanum wheels also, so decided to design and build a PS4 Controlled Holonomic Drive equipped with mecanum wheels, cause why not!!
So in this Instructables let’s build a PS4 Controlled Holonomic Drive.
Supplies

Electronics:
4mm Slide switch ------------------------------------ x 1 ---- Link
LM7805 (TO-220) ------------------------------------ x 1
5mm Screw terminal 1x02 ------------------------- x 1
0.47uF (0805) ----------------------------------------- x 2
22pF (0603) -------------------------------------------- x 2
10uF SMD ---------------------------------------------- x 1
100uF SMD -------------------------------------------- x 1
Green led (0805) --------------------------------------x 1
blue led (0805) ---------------------------------------- x 1
L293d (DIP) -------------------------------------------- x 2
Pin headers male THT 1x01 ----------------------- x 8
Pin headers female SMD 1x08 -------------------- x 2
Male pin header SMD 2x06 ------------------------ x 1 ---- Link
2 channel bidirectional logic level converter --- x 1 ---- Link
Atmega328p (TQFP - 32 pin) ---------------------- x 1
ESP32 CAM board ----------------------------------- x 1 ---- Link
16 MHz crystal (SMD - HC49) --------------------- x 1 ---- Link
10k, 30 (0805) ----------------------------------------- x 2
470E resistor (0603) --------------------------------- x 2
100E (0603) -------------------------------------------- x 1
5V passive buzzer ------------------------------------ x 1
Shorting jumper --------------------------------------- x 3 ---- Link
heat sink PI49 ----------------------------------------- x 1 ---- Link
18650 2000mAH Li-ion batteries ----------------- x 1
3S 18650 battery holder ---------------------------- x 1 ---- Link
1000RPM N20 gear motor ------------------------- x 1 ---- Link
Mechanical:
Mecanum wheels 48mm (Left Right pair)------- x 4 ---- Link
3D printed coupling ----------------------------------- x 4
3D printed hood --------------------------------------- x 1
brackets for N20 gear motor ----------------------- x 4
M2x10mm ---------------------------------------------- x 10
M2.5x6mm --------------------------------------------- x 4
M3x6mm ----------------------------------------------- x 4
M2 nuts ------------------------------------------------- x 10
M2.5x5mm inserts ----------------------------------- x 4
Supplies:
3D printer / printing service
Solder Wire
Jumper wires (male female)
Tools:
Solder Iron
Micro USB cable
Plier
Screw Driver (flat head)
Allen key (2.5,3mm)
Arduino Uno (for programming)
Tweezer
Multimeter
A Bit of Theory


Holonomic Drive Train
A holonomic drive is a one in which the controllable degree of freedom are equal to total number of degrees of freedom (DOF). In simpler terms if the robot is supposed to move on ground considering x and y axis along the ground and z axis pointing upwards then the total number of DOF are translation in x and y and rotation about z axis.
If we consider a car as our system and x axis as forward direction then a car can only move in x direction and rotate about z, it won’t be able to move in y direction hence a car is a non-holonomic drive.
To achieve a holonomic drive, we use some special kind of wheels – mecanum wheels. The force vector of mecanum wheel points at an angle of 45 deg from the direction of movement unlike in normal traction wheels where the force vectors points directly in the direction of movement. By arranging mecanum wheels in a specific orientation we can achieve holonomic drive.
PS4 Controller - ESP32
PS4 controller uses Bluetooth to communicate with its console and as ESP32 has Bluetooth build in it we can connect and send data from PS4 to ESP32.
The Idea


The Idea is to it keep the robot simple. A PCB which acts as the chassis to hold all electronics as well as to hold the motors and the battery pack.
Micro-Controller
At first it was decided to use ESP32 cam board to stream a live video as well as to get the control data from PS4 controller but then the streaming idea need to be scrapped because streaming video requires WiFi and PS4 operates on Bluetooth, as ESP32 has only a single antenna, it gets a bit tricky to share a single antenna between two technologies.
Also in ESP32 cam board there weren’t enough pins left for controlling the motors hence decided to go with Atmega328 as the motor controller and both of them will communicate with each other using UART.
Motor and it's Driver
For motors, my all-time favorite N20 gear motors 12V 1000RPM with their mounting brackets driven by L293d in DIP package.
Power House
A 3 cell Li-Ion battery pack with 3S holder making a total of 12V as the power house for the robot.
Chassis
A PCB is generally used as a mounting platform for electronic components but we will use the same to mount our motors, battery pack as well other complementary components.
Design
To design the robot I used Fusion360 by Autodesk.
Awesome PCBs From PCBWay


3D Printing Parts


One issue I faced while designing is that coupling for 48mm mecanum wheels and N20 gear motor were not available so I had to design a custom 3D printable coupling for our robot.
The parts were printed in PLA material with 0.4mm nozzle and 20% infill density.
Soldering Power Components


First we will start soldering our PCB which is the only main thing. We will procced module by module so it becomes easy to debug error if any. All the components can be hand soldered but you can use reflow or hot-air method if you are comfortable with.
First goes the screw terminal which is to be soldered below the PCB, make sure that the openings point towards the battery holder side.
Then the SMD components C1, C2, D1 and R1. Capacitor and resistor don’t have polarity but LEDs do have so check for the polarity of LEDs before soldering. Then comes the polarized capacitor C3.
Most of THT slide switches don’t come with bent legs so we have to bend them purposefully. Use a tweezer to hold and bend the legs. Just make sure the legs don’t make a physical contact with the casing which will short the switch making it useless.
The LM7805 being THT goes straight through and is soldered on the bottom side.
Testing Power Components


To test everything was soldered perfectly, power the PCB with a voltage higher than 7V. I would suggest to use the same Li-Ion pack we will use to power the robot after building.
Power is to be provided through the screw terminal soldered below the PCB. Once powered the LM7805 starts to regulate it providing 5V but it is not yet delivered to the logical units until the slide switch is flipped. The regulation is indeed indicated by the green LED.
You can also be double check by measuring voltage on power pads of ISP connector which are easily accessible using a multimeter, it should give around 5V +- 0.2V.
Its better to test thing at modular stage than to debug the whole project after completion.
Soldering Atmega328p


Soldering atmega by hand is one of the most challenging part of this project.
First add some solder on any one corner pad. Then remelt it and solder the IC. Check if all pins are perfectly aligned over the respective pads. Then solder the remaining pins.
Soldering Complementary Components


First goes the SMD components. R2 is 30K, R3 – 10K, R4 and R6 10k and 470E respectively.
For the SMD crystal don’t add solder on the pad initially but first place the crystal then solder the elongated terminals. If we add solder initially then one side of the crystal rises up and gives a unclean finish.
I did not soldered the resonating capacitors C5 and C6 because I experienced some issues when the capacitors were added, but you surely can experiment with this. And then solder the SMD male pin header to program atmega328 using ISP method.
Testing Atmega328p


//Atmega328p test code
//Toggles led state present at pin 15 (A1) every one second


int led_pin = 15;


void setup()
{
  pinMode(led_pin, OUTPUT);
}


void loop()
{
  digitalWrite(led_pin, HIGH);
  delay(1000);
  digitalWrite(led_pin, LOW);
  delay(1000);
}
Lets test our atmega328 if everything was soldered as it should be. But to program the atmega328 you need to jump to Step number 21. Copy paste and upload the blink sketch. Note the build in led for atmega328 is connected at pin 15 which is PC1 of atmega. Once uploaded the led should stay on for a second and turn off for another second.
Soldering Logic Level Converter


As ESP32 works on 3.3V and atmega328 works on 5V we need someone to handle those voltage translations, and there comes the logic level in handy.
As the module was readily available with its smaller form factor I decided to use the module. The module is intended to be used by soldering pin headers to its terminal ,because most of the area below the PCB is consumed by the battery holder we have to use SMD pin headers. The level shifter we are using has 4 channels in it but we only require 2 of them one for TX and other for RX.
Snap cut the connector from the longer strip with the required number of pins – 4, 2 for data and 2 for power and GND and with the right orientation. Solder both the pin headers strip on the PCB, once soldered place the module over the PCB. Keep a note of the orientation that LV4 and HV4 should be closer to L293d footprint than LV1 and HV1 pins. Once soldered you can cut the extra terminal out using plier or any other tool.
Soldering ESP32


ESP32 is to be installed on the PCB the same way the level shifter is installed, as the ESP32 cam module comes with male pin headers pre soldered we need use female smd pin headers as no part of ESP should protrude below the PCB. This makes the ESP removable and can be easy to debug the system if necessary.
Solder the female pin headers keep the orientation as required. Also solder the SMD pin header J3 which acts as a gateway for communication between ESP32 and Atmega, and to program ESP 32 as well.
Testing ESP32
//ESp32 test code
//Toggles led state present at pin 33 every one second


int led_pin = 33;


void setup()
{
  pinMode(led_pin, OUTPUT);
}


void loop()
{
  digitalWrite(led_pin, HIGH);
  delay(1000);
  digitalWrite(led_pin, LOW);
  delay(1000);
}
As we tested our Atmega after soldering it we can test our ESP32 as well. To program ESP32 you need to jump to step 23. The same blink code is to be uploaded, just need to change the pin number to which the built in led is connected which is pin 33 in case of ESP32 CAM board.
Adding Buzzer


Buzzer acts as a mean to communicate between user and the controller in our case we use it to indicate the battery threshold level of our battery pack. If the battery level drops below a particular level then the buzzer beeps. The buzzer being a passive one, we can set different frequencies as we want.
The buzzer is controlled by a GPIO pin of atmega so we need add a current limiting resistor in series with the buzzer. A 100E resistor works pretty well.
Solder the 100E (R5) resistor and then the buzzer, The pins of buzzer do protrude below the PCB but are between the battery holder and motor so won't be an issue. Check the polarity of the buzzer while soldering.
Testing Buzzer
#define buzzer_pin 5
#define led_pin 15

int battery = 0;

byte led = 1;

void setup()
{
  Serial.begin(115200);

  pinMode(buzzer_pin, OUTPUT);
  pinMode(led_pin , OUTPUT);

  digitalWrite(led_pin , HIGH);
  delay(1500);
  digitalWrite(led_pin , LOW);
  delay(1500);
  digitalWrite(led_pin , HIGH);
  delay(1500);
  digitalWrite(led_pin , LOW);
  delay(1500);
}


void loop()
{
  battery = analogRead(A0);

  Serial.println(battery);

  //voltage on analog pin at threshold which is set at 3.2V each cell = 9.6V overall is equal to
  //9.6 * (30K / (30K + 10K)) considering R1 = 30K and R2 = 10K is 2.42V
  //when voltage drops below 2.42V the buzzer should beep continously
  //the reference voltage given is 3.3V from ESP32 so 3.3V maps to 1023 of ADC and 2.42V maps to
  //1023 * 2.42 / 3.3 = 750

  if (battery < 750)
  {
    beepBuzzer();
  }
  digitalWrite(led_pin, HIGH);
}


void beepBuzzer()
{
  for (;;)
  {
    tone(buzzer_pin, 1700);
    delay(250);
    led = !led;
    digitalWrite(led_pin , led);
    noTone(buzzer_pin);
    delay(250);
    led = !led;
    digitalWrite(led_pin , led);
  }
}
To test the buzzer upload the above test code in atmega328.
In every iteration of the loop the atmega328 checks the voltage of the battery using a voltage divider circuit. Battery voltage (12V) is more than the voltage than can Arduino measure so we have to reduce the voltage which a voltage divider does. Once the data is read using analogRead it is then compared with a equivalent threshold value if it is lower than that it calls a functions which beeps continuously forever.
Soldering L293D


DIP package of L293d is easily available than SMD one but to use a DIP package without having to solder below the PCB we actually need to need to bent the pins of L293d and then solder it on the SMD footprint
The soldering process is same as other SMD components. First put some solder on a single pad, then place the IC and remelt the solder, after fixing one pin of the IC align it perfectly and solder the diagonal pin. This way the IC stays in place. Then solder the remaining pins.
Connector for Motors


The N20 gear are installed on the bottom surface of the PCB using mounting bracket with M2 bolt which straight pass through the PCB. The motor will be connected to the PCB using male pin headers.
Because a single pin header is used it becomes a bit annoying to solder it. First fill the slot with solder. Now place the PCB vertically, you can hold it with a plier. Remelt and insert the pin header into its slot which goes under the PCB. Because we have only a single pin header it might not be soldered straight up right so again remelt the solder and tweak till the header is straight up right.
Now using a plier remove the black spacer as the motor will in close contact with the header to make an electrical contact.
Installing Motors


Before installing and soldering the motor we need to first install the mounting bracket for N20 gear motor, this way the motor will remain intact while soldering.
Place the nut in the slot given for it in the mounting bracket. The brackets are to be installed below the PCB and the longer part of the bracket should point out side the PCB. Slide a M2 bolt through the hole for it in the PCB and align the bracket so that the nut come directly below the bolt now manually turn the bot to temporarily tighten it. Repeat the same procedure for the other bolt. Once both bolt are in place tighten them with a screw driver. After installing the bracket loosen the bolt enough so that the motor slides in. Push the motor so that the terminals of motor make a contact with pin headers we soldered in the last step.
Soldering Motor Connector


After you have installed the motors its time to solder them and connect to the PCB. The distance between the two pin headers is slightly more than the distance between the terminals of the motor. This makes it easier to solder the motor terminals to the pin headers. But before soldering do tighten the bolts of mounting brackets.
Installing Batteries


Once the motors are installed we can now install the battery holder and battery so that we can test the motors and program our robot.
The battery holder is also installed below the PCB using 2 M2 bolts, place the holder below the PCB and insert the bolt from the inside of the holder. The footprint of mounting hole ensures that head as well as nut are at a safe distance from other electronic component.
After installing the holder insert the red wire from the holder into the screw terminal (indicated with a + sign ) and black in other. Now place the batteries inside the holder and flip the switch on the top of the PCB. The green LED should light up.
Testing Motor
/*             M3                                      M1
          |-------|                               |-------|
          |       |                               |       |
          |       |-------------------------------|       |
          |       |                               |       |
          |-------|                               |-------|
                                  |
                                  |
                                  |
                                  |
                                  |
                                  |
                                  |
                                  |
                                  |
                                  |
                                  |
                                  |
             M4                   |                   M2
          |-------|                               |-------|
          |       |               F               |       |
          |       |-------------------------------|       |
          |       |                               |       |
          |-------|                               |-------|
*/


//-------------------------------------------------------------------------------------//


#define m1_pow 6
#define m1_dir 7
#define m1_en 8


#define m2_pow 3
#define m2_dir 2
#define m2_en 4


#define m3_pow 9
#define m3_dir 19
#define m3_en 16


#define m4_pow 10
#define m4_dir 17
#define m4_en 18


#define led 15


byte motor_pow = 50;


//-------------------------------------------------------------------------------------//


void setup()
{
  pinMode(m1_pow, OUTPUT);
  pinMode(m1_dir, OUTPUT);
  pinMode(m1_en, OUTPUT);


  pinMode(m2_pow, OUTPUT);
  pinMode(m2_dir, OUTPUT);
  pinMode(m2_en, OUTPUT);


  pinMode(m3_pow, OUTPUT);
  pinMode(m3_dir, OUTPUT);
  pinMode(m3_en, OUTPUT);


  pinMode(m4_pow, OUTPUT);
  pinMode(m4_dir, OUTPUT);
  pinMode(m4_en, OUTPUT);


  pinMode(led, OUTPUT);


  digitalWrite(m1_en, LOW);
  digitalWrite(m2_en, LOW);
  digitalWrite(m3_en, LOW);
  digitalWrite(m4_en, LOW);
}


//-------------------------------------------------------------------------------------//


void loop()
{
  digitalWrite(m1_en, HIGH);
  M1_test();
  digitalWrite(m1_en, LOW);
  delay(250);


  digitalWrite(m2_en, HIGH);
  M2_test();
  digitalWrite(m2_en, LOW);
  delay(250);


  digitalWrite(m3_en, HIGH);
  M3_test();
  digitalWrite(m3_en, LOW);
  delay(250);


  digitalWrite(m4_en, HIGH);
  M4_test();
  digitalWrite(m4_en, LOW);
  delay(250);


}


//-------------------------------------------------------------------------------------//


void M1_test()
{
  digitalWrite(m1_dir, HIGH);
  analogWrite(m1_pow, 255 - motor_pow);
  delay(1500);
  digitalWrite(m1_dir, LOW);
  analogWrite(m1_pow, motor_pow);
  delay(1500);
}


void M2_test()
{
  digitalWrite(m2_dir, HIGH);
  analogWrite(m2_pow, 255 - motor_pow);
  delay(1500);
  digitalWrite(m2_dir, LOW);
  analogWrite(m2_pow, motor_pow);
  delay(1500);
}


void M3_test()
{
  digitalWrite(m3_dir, HIGH);
  analogWrite(m3_pow, 255 - motor_pow);
  delay(1500);
  digitalWrite(m3_dir, LOW);
  analogWrite(m3_pow, motor_pow);
  delay(1500);
}


void M4_test()
{
  digitalWrite(m4_dir, HIGH);
  analogWrite(m4_pow, 255 - motor_pow);
  delay(1500);
  digitalWrite(m4_dir, LOW);
  analogWrite(m4_pow, motor_pow);
  delay(1500);
}


//-------------------------------------------------------------------------------------//
Lets test our motors as well before we upload our final code in both the microcontrollers. Upload the above code in atmega328 the same way we uploaded code to test the atmega328.
The program first disables all the motors by pulling the enable pin low. In the loop each motor is enabled sequentially powered in one direction at PWM equal to 50 for about 1.5 seconds and then powered in other direction with same PWM and for the same period.
Programming Atmega328p


.png)
/*             M3                                      M1
          |-------|                               |-------|
          |       |                               |       |
          |       |-------------------------------|       |
          |       |                               |       |
          |-------|                               |-------|
                                  |
                                  |
                                  |
                                  |
                                  |
                                  |
                                  |
                                  |
                                  |
                                  |
                                  |
                                  |
             M4                   |                   M2
          |-------|                               |-------|
          |       |               F               |       |
          |       |-------------------------------|       |
          |       |                               |       |
          |-------|                               |-------|
*/


#define m1_pow_pin 6
#define m1_dir_pin 7
#define m1_en_pin 8


#define m2_pow_pin 3
#define m2_dir_pin 2
#define m2_en_pin 4


#define m3_pow_pin 9
#define m3_dir_pin 19
#define m3_en_pin 16


#define m4_pow_pin 10
#define m4_dir_pin 17
#define m4_en_pin 18


#define led_pin 15


#define buzzer_pin 5


int m1_pow = 0;
byte m1_dir = 0;


int m2_pow = 0;
byte m2_dir = 0;


int m3_pow = 0;
byte m3_dir = 0;


int m4_pow = 0;
byte m4_dir = 0;


int x = 0;
int y = 0;
int z = 0; //rotation


byte led = 0;


int battery = 0;


//---------------------------------------------------------------------------------------------------//


void setup()
{
  Serial.begin(115200);


  pinMode(m1_pow_pin, OUTPUT);
  pinMode(m1_dir_pin, OUTPUT);
  pinMode(m1_en_pin, OUTPUT);


  pinMode(m2_pow_pin, OUTPUT);
  pinMode(m2_dir_pin, OUTPUT);
  pinMode(m2_en_pin, OUTPUT);


  pinMode(m3_pow_pin, OUTPUT);
  pinMode(m3_dir_pin, OUTPUT);
  pinMode(m3_en_pin, OUTPUT);


  pinMode(m4_pow_pin, OUTPUT);
  pinMode(m4_dir_pin, OUTPUT);
  pinMode(m4_en_pin, OUTPUT);


  digitalWrite(m1_en_pin, HIGH);
  digitalWrite(m2_en_pin, HIGH);
  digitalWrite(m3_en_pin, HIGH);
  digitalWrite(m4_en_pin, HIGH);


  pinMode(led_pin, OUTPUT);


  pinMode(buzzer_pin, OUTPUT);


  delay(2000); //let everything settle down
}


//---------------------------------------------------------------------------------------------------//


void loop()
{


  readValues();       // Get values from ESP32
  calculateValues();  // Calculate direction and PWM of each motor
  driveMotors();      // Driver each motor


  battery = analogRead(A0);


  //If battery level is below 9.6V shut down the main operation and beep continously
  if (battery < 750)
  {
    beepBuzzer();
  }
}


//---------------------------------------------------------------------------------------------------//


void readValues()
{
  if (Serial.read() == 6)
  {
    x = Serial.parseInt();
    y = Serial.parseInt();
    z = Serial.parseInt();


    led = !led;
    digitalWrite(led_pin, led);
  }
}


//---------------------------------------------------------------------------------------------------//


void calculateValues()
{
  m1_pow = 2 * (y - x - z);
  m2_pow = 2 * (x + y - z);
  m3_pow = 2 * (x + y + z);
  m4_pow = 2 * (y - x + z);


  m1_pow = constrain(m1_pow, -255, 255);
  if (m1_pow > 0)
  {
    m1_dir = 1;
    m1_pow = 255 - m1_pow;
  }
  else
  {
    m1_dir = 0;
    m1_pow = abs(m1_pow);
  }


  m2_pow = constrain(m2_pow, -255, 255);
  if (m2_pow > 0)
  {
    m2_dir = 0;
  }
  else
  {
    m2_dir = 1;
    m2_pow = 255 + m2_pow;
  }


  m3_pow = constrain(m3_pow, -255, 255);
  if (m3_pow > 0)
  {
    m3_dir = 0;
  }
  else
  {
    m3_dir = 1;
    m3_pow = 255 + m3_pow;
  }


  m4_pow = constrain(m4_pow, -255, 255);
  if (m4_pow > 0)
  {
    m4_dir = 1;
    m4_pow = 255 - m4_pow;
  }
  else
  {
    m4_dir = 0;
    m4_pow = abs(m4_pow);
  }
}


//---------------------------------------------------------------------------------------------------//


void driveMotors()
{
  digitalWrite(m1_dir_pin, m1_dir);
  analogWrite(m1_pow_pin, m1_pow);


  digitalWrite(m2_dir_pin, m2_dir);
  analogWrite(m2_pow_pin, m2_pow);


  digitalWrite(m3_dir_pin, m3_dir);
  analogWrite(m3_pow_pin, m3_pow);


  digitalWrite(m4_dir_pin, m4_dir);
  analogWrite(m4_pow_pin, m4_pow);
}


//---------------------------------------------------------------------------------------------------//


void beepBuzzer()
{
  for (;;)
  {
    tone(buzzer_pin, 1700);
    delay(250);
    led = !led;
    digitalWrite(led_pin, led);
    noTone(buzzer_pin);
    delay(250);
    led = !led;
    digitalWrite(led_pin, led);
  }
}


//---------------------------------------------------------------------------------------------------//
There are many ways to program atemga328 chip but we will program it using Arduino Uno as ISP.
First upload the ISP program into Arduino Uno by selecting Arduino Uno as the board and right port. The ISP program can be found in the examples section. Once the program is uploaded now Uno is ready to program our atmega328p.
J16 is the connector on the PCB through which we will program our Atmega.
Connections:
---- Arduino Uno ---- PCB ----
-- 5V 5V --
-- GND GND --
-- 13 SCK --
-- 12 MISO --
-- 11 MOSI --
-- 10 RST --
Once connections are done select board as Arduino Uno and the right comp port, go to Tools and Burn Bootloader this step needs to performed only once. The configurations with which we have setup our atmega328 are no different than Arduino Uno, hence we can program the chip by selecting Uno as our board. Hit the upload button and the atmega will be programmed.
In the setup function it first defines all the pin states and enables all the motors. Then in the loop it first gets the data from ESP32 which is the amount of translation and rotation the robot should travel, once data is received calculateValues() function is called which as the name suggests calculates PWM and direction values for each motor. After calculation each motor is driven using driveMotors function. At the end of the loop the atmega also check the battery voltage and if it less than a threshold it beeps continuously and shut downs the main operation.
MAC Address of PS4

Before we could program ESP32 we first need to know the MAC address of the PS4 being used, so that ESP32 connects to the required PS4 controller.
To do so we need to first install SixaxisPairTool to get the MAC address of PS4 controller.
Plug in PS4 controller to your computer using micro USB port on the controller. Fire up the software and it will detect and display the MAC address of the controller.
Programming ESP32


.png)
#include <PS4Controller.h>


#define led_pin 33


char ack = 6;
int x = 0;
int y = 0;
int z = 0;


long data_rate = 20;
long prev_time = 0;
long current_time = 0;


byte led = 0;


//---------------------------------------------------------------------------------------------------//


void setup()
{
  Serial.begin(115200);
  PS4.begin("43:1f:09:e9:a6:b2");  //MAC address of your PS4
  pinMode(led_pin, OUTPUT);
}


//---------------------------------------------------------------------------------------------------//


void loop()
{
  current_time = millis();


  readValues(); // Get data from PS4


  if (current_time - prev_time > data_rate)
  {
    sendValues(); //Send data to Atmega328
    //printValues(); //Prints data on serial port of debugging


    led = !led;
    digitalWrite(led_pin, led);


    prev_time = current_time;
  }
}


//---------------------------------------------------------------------------------------------------//


void readValues()
{
  x = PS4.LStickX();
  y = PS4.LStickY();
  z = PS4.RStickX(); //rotation
}


//---------------------------------------------------------------------------------------------------//


void sendValues()
{
  Serial.print(ack);
  Serial.println(x);
  Serial.println(y);
  Serial.println(z);
}


//---------------------------------------------------------------------------------------------------//


void printValues()
{
  Serial.print(x);
  Serial.print("\t");
  Serial.print(y);
  Serial.print("\t");
  Serial.println(z);
}


//---------------------------------------------------------------------------------------------------//
Do install this library which reduces our hustle to communicate with PS4 controller.
Copy paste the code in a new .ino or you can even download it from the github repository. Before uploading the code do pass the MAC address of your PS4 controller as a parameter to the PS4.begin(); in setup function.
The code first gets all the data required to calculate from PS4 controller using readValues(); function. After receiving the data it formats it and sends the data to atmega328p using sendValues(); function. The transfer of data happens every 20msec.
To program the ESP32 we will use the same Arduino Uno. But this time we need to remove the atmega328 IC as we wont be programming ESP32 using ISP.
Connect TX of Uno to TX of ESP32 and RX to RX. Power it using 5V of Uno. Do connect the GPIO 0 to GND. You can use the shorting jumper to do so as GND is adjacent to GPIO 0.
Select Board as ESP32 Wrover Module (all ESP32 development boards use one or the other variant of ESP32 module so it should work fine) and upload speed – 115200 and the other parameters as it is, Select the correct COM port and upoad the sketch.
If you are unware how to program ESP32 using Arduino IDE then check this tutorial.
Installing Wheels


N20 gear motor have a D-shaft and so does the coupling. The coupling slides over the shaft of motor and remain intact with the help of friction.
The mecanum wheels get connected to the coupling with a M3 x 6mm bolt. The bolt comes straight through from outside of the wheel and sits in the slot dedicated for it. The slot is specifically made for allen bolts.
First insert the wheel into the coupling and then tighten the bolt using a allen key.
Connecting PS4


Connecting PS4 controller to ESP32 after programming is as simple as just pressing a button once MAC address of PS4 is confirmed but before doing so let’s confirm if our atmega328 and PS4 are communicating effectively.
Before powering up the system install the shorting jumpers on TX and RX connectors. Now power the system and the build-in LED of ESP32 should start to blink about a second after powering up. Once the build-in the LED of ESP32 starts to blink the LED connected to atmega328 should start to blink a second latter. Blinking of LED corresponding to atmega328 indicates that data is being received serially from ESP32. Once serial communication is established simply pressed the PS4 button to connect the controller with ESP32. The LED on the controller should blink for a couple of times and then a constant color should light up indicating stable connection. The color is usually violet.
Adding Heat Sink for 7805


One of the main reason to use a THT package for 7805 is that ESP32 draws a lot of power which eventually heats up the 7805. To dissipate the heat effectively without using much fancy equipment is to use a heat sink.
Heat sinks come in a lot of sizes but the one which I thought would be a good choice is PI49. They simply screw in using a M3 bolt.
Just make sure you don’t accidently short the battery through the pins coming out from screw terminal or else just remove the batteries before installing the heat sink.
The Hood


The hood was initially designed as holding structure for camera of ESP32 but as the idea was scraped it as such serves no purpose other than increasing the aesthetics of the robot.
The hood gets installed using heat inserts and bolts. To install the heat inserts inside the hood use a solder iron.
Let the iron heat. Hold the insert just above the hole with a tweezer and insert the iron in the hole of the insert. Slightly push the insert using the iron. As the heat passes from iron to insert the plastic around the insert melts and the insert sinks into the slot.
After all the inserts are added install the hood using M2.5 bolts which come through the holes situated on the 4 corners of the PCB.
Enjoy
Insert the batteries, turn on the system, connect PS4 controller and you are all set to drive this wonderful build.
Do follow me on Instagram: @maker.atom