PROGRAMMING ESP/NODEMCU WITH ARDUINO IDE
by Mayoogh_Girish in Circuits > Arduino
1888 Views, 6 Favorites, 0 Comments
PROGRAMMING ESP/NODEMCU WITH ARDUINO IDE

Hello everyone, Today I will be showing how to add ESP8266 support package to Arduino IDE. and program the same using Ardunio IDE.
THINGS YOU NEED
VIDEO TUTORIAL

LET'S GET STARTED


Firstly you will need Arduino IDE to be installed in your system. If you don't have it download the latest version from here
Once IDE is installed open it
- FILE > PREFERENCES
- Enter the below link in the Additional Boards Manager and press OK.
http://arduino.esp8266.com/stable/package_esp8266c...
- Now open Boards Manager
Once the installation is completed you are ready to program esp8266 with Arduino IDE.
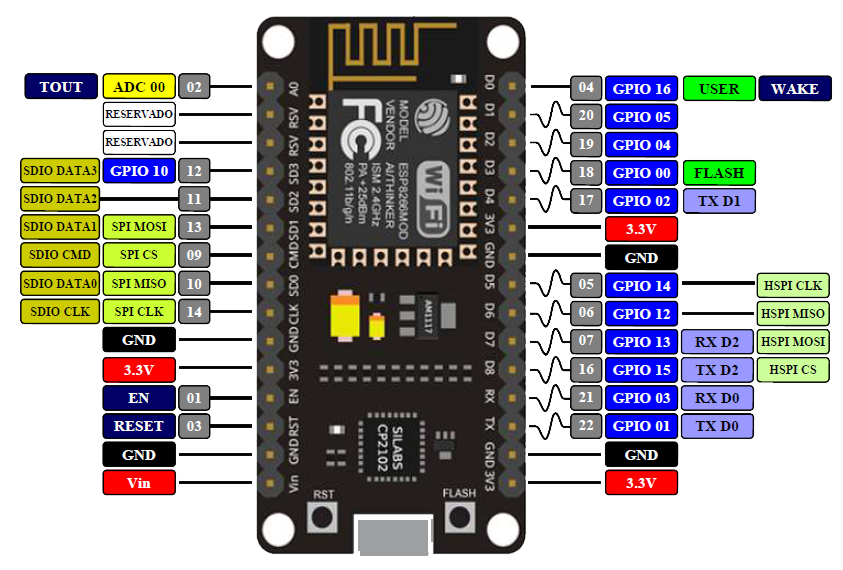
You can see a new list of boards added to boars section of your IDE. Now test the IDE by uploading an example sketch from examples Goto Example > ESP8266 > Blink. Select the corresponding board from the list Here I have used ESP8266 NodeMCU and if you are using other boards/ wifi module. Then select your corresponding boards from the list. NodeMCU has 2 inbuilt LED on it one connected pin 2 and other to pin 16
Here is the pin mapping of NodeMCU