POWER Pi Version 2


.jpeg)


Greetings to everyone, and welcome back.
This is Power Pi, a small, integrated Raspberry Pi PC with a built-in lithium-ion battery pack that allows the Pi to be powered wirelessly.
This is version 2 of the previously built Power Pi project.
In the previous version, there were only two sections: the battery section and the Pi holder. In the new version, we have added a few more sections, which results in a somewhat larger setup than the one previously.
We also included an RGB LED setup in this build, which lights up the entire base and gives the system an RGB-Gamercore look.
A color palette in a Web app can be used to control RGB LEDs.
Because the Raspberry Pi's mounting pins are the same for all versions, our setup, which uses the Pi4 hardware, can run Raspbian with a 4K display or even Emulator OS without any problems. However, it can also be used with Pi1, Pi2, Pi3, and even the new Pi5.
This version includes a powerful DC-DC converter module for powering the Pi and the RGB LED setup, as well as a battery pack on the PCB with three lithium-cell 18650 SMD holders coupled to a 12V Li-ion BMS.
This article is about the whole build process of this project, so let's get started with the build.
Supplies
These were the materials used in this project.
- Custom PCBs (Provided by PCBWAY)
- Raspberry Pi Model 4
- RGB LED Board Project (previously made project)
- 3S BMS Li-ion 12V
- 3.7V, 2600 mAh Li-ion Cells
- 3D-printed parts
- DC-DC buck Converter module
- SMD 0603 LEDs
- SMD m7 Diode
- 1K 0603 Resistor
- Rocker Switch
- M2 Screws
- M3 PCB Standoffs
POWER Pi Version 1


Let us explore the Power Pi that was previously constructed.
The primary component of the previous version was the power management board, which powered the Raspberry Pi board with four 3.7V 18650 Cell holders.
In order to hold the Power management board and Raspberry Pi together, we modeled a base and added a second raspberry pi holding part.
The configuration worked, but it had a few body-related problems that made it less durable overall. Next, there was a problem with the power management circuit, so we built our own battery pack using custom PCBs and installed two of them to power the Raspberry Pi in the updated version.
You can checkout the previous version at below link:
New Version: DESIGN


Given its five-section design, the Power Pi Version 2 is larger than its predecessor. The sections in question are as follows:
TOP Section:
This is the top portion of the model, and it has two main components: the fan assembly part, which draws air into the Power Pi for air circulation, and the handle, which attaches to the outside of the top portion using two M3 bolts from each side.
To keep the Pi cool, a fan holder was added. This holds a standard small DC PC fan from the inside.
It is entirely redundant to add a fan, but if your workload involves more than just running retro emulators, do it in order to keep the Pi operating at its optimal temperature.
Pi Holder:
The Pi holder is the section where we place the raspberry pi.
Because the Pi Holder is open on two sides, users may access all of the Raspberry Pi's I/O ports, including the power, HDMI, and USB ports on one side and all of the Ethernet and USB ports on the other.
In order to hold the Pi's position, we added four screw bosses that elevate the Raspberry Pi a few millimeters off the bottom face, creating a space between the Pi Holder's inside face and the Raspberry Pi's back.
Middle Section:
Between the Pi Holder section and the Battery Holder section, the middle section serves as a separating layer. This component essentially attaches the battery holder and Pi holder together.
Battery Holder Section:
One main function of the battery holder portion is to mount the battery pack PCB in the correct position.
We have modeled. a PCB with an SMD lithium cell holder; this is a PCB-based battery pack.
PCB standoffs are used to stack two PCBs on top of one another in order to increase the capacity of the battery pack.
We additionally mount both PCBs with the battery holder part using these standoffs.
We have slots on one side for adding switches and a DC jack for charging. The switches will be used to turn the Raspberry Pi and LED board on and off.
RGB LED Holder/Base:
This model's base part, the RGB LED holder or base, serves as the solid foundation for the entire structure.
Our design now has an RGB element and a gamer-like appearance thanks to the addition of an RGB circuit inside that lights up the entire base.
The RGB LED Holder/Base will be printed with transparent PLA to diffuse the RGB LEDs placed inside.
The following sets comprised the overall structure of the design.
We used three different PLA colors for each part: marble PLA for the Pi Holder and battery holder, orange PLA for the center area, and transparent PLA for the top section and base.
Furthermore, we have included a few nametags and logos with a cyberpunk theme.
By stopping the print in the middle and switching out the filament for a different color, we were able to print the nametags and logos utilizing double PLA color. We had to do this since we were using Ender 3, but if you are using a multicolor printer, you can bypass this setup completely.
Battery Board


The BMS and the DC Buck Module were the project's two primary components; therefore, we began the electronics design process by creating a schematic for the battery board. A battery management system, or BMS, is used to control or effectively charge and discharge lithium cells while they are in use.
We are utilizing a 15A BMS, which enables a 3-series cell setup, which requires connecting three lithium cells in series with the BMS. This device has a nominal voltage of 11.1V and a maximum voltage of 12.6V.
The battery pack only requires 13 volts to be charged because it has both low- and high-cut features. This is because the cells require a voltage greater than 12.6V to be fully charged; therefore, 13V is sufficient to prevent potential deference.
The battery management system (BMS) controls the cycle of cell charging. If a cell has an uneven voltage, for instance, one cell has 3.5V and the other two have 3.7V, the BMS will stabilize the voltage of each cell and bring them all to the same level, meaning that once the battery is changed, all of the cells will have 4.2V.
Our objective in the PCB design is to mount the BMS on the board, as it has some pads on the bottom and all the components are placed on the top, enabling us to solder it as a module on a circuit and then install the battery pack on a circuit using an SMD 18650 Cell Holder coupled with the BMS.
In order to create a 3S configuration, we added three 18650 cell holders to the schematic and linked them all in series. Next, we connected the GND of each cell to the GND port of the BMS; the 3.7V of the first cell goes to the 3.7V port, the 7.4V of the second cell to the 7.4V port, and the 11.1V of the cell to the BMS 11.1V port.
To obtain the cell output, we use the VCC and GND ports on the BMS. This part is controlled by BMS ICs and quite a few mosfets. When the cell voltage hits a minimal cutoff threshold, which is approximately 2.5V, the mosfets cut the power of the VCC, preventing any device from totally discharging the cells.
In addition to the 12V ports, we also added a few more parts, such as an SMD diode coupled with an LED and a resistor that is connected to a CON2 port, which is used to charge the battery pack. The diode is directly linked to the VCC port and drops the extra voltage that is coming from the CON2 port.
When power is applied to the CON2 port via an LED and resistor, the LED illuminates and functions as a charging indicator when the charger is plugged in.
A DC DC Buck converter module has also been added. It accepts a 12V input and steps it down to a stable 5V/3A for powering the Raspberry Pi.
Following the completion of the project's schematic, we created the board file utilizing the PCB layout from the Cad design, placing the cell holders on the bottom and all SMD components on the top.
PCBWAY Service


After completing the PCB design, we export the Gerber data and send it to PCBWAY for samples.
We placed an order for a yellow Solder mask with white silkscreen board.
After placing the order, the PCBs were received within a week, and the PCB quality was pretty great.
Over the past ten years, PCBWay has distinguished itself by providing outstanding PCB manufacturing and assembly services, becoming a trusted partner for countless engineers and designers worldwide.
Their commitment to quality and customer satisfaction has been unwavering, leading to significant growth and expansion.
You guys can check out PCBWAY If you want great PCB service at an affordable rate.
Battery Board PCB Assembly


- We start the battery board assembly by adding solder paste to each component pad.
- Next, we pick and place all the SMD components in their place using an ESD tweezer.
- We set the PCB on our DIY REFLOW hotplate to heat it up to the temperature at which solder paste melts. Solder paste melts when the PCB reaches the melting temperature, and components are connected to their pads.
- Next, we use a soldering iron to attach the SMD Li-ion Cell Holders from the bottom side.
- At last, we added the Li-ion cells in their holders in the right polarity.
The circuit is now complete.
Battery Board - Adding Switch


During the schematic-making process, we missed adding a break between the 12V and input of the DC-DC Buck converter circuit, which was critical to cutting power going to the Raspberry Pi.
- We used a paper cutter to cut the track going to the DC-DC buck converter and added a switch to connect the cut tracks.
- We carried out this procedure on both battery boards.
Battery Board Dual Assembly


After creating two distinct battery pack boards, we need to connect them together to create a single battery pack setup. This is done by sandwiching the two boards with 45mm-long M3 PCB Standoffs.
- Using four M3 bolts, we first install four standoffs to a single battery board.
- The second board is then mounted using the extended PCB standoffs using four more M3 standoffs.
- The end result will be a battery pack circuit made up of two separate boards connected by PCB standoffs.
Battery Section Assembly


- The battery circuit is now positioned within the battery section part and fastened there with four M3 bolts.
- The switches from both circuits are then unsoldered, and they are attached to the switch slots on the battery section part.
- We reconnect both switches to the circuits.
- In addition, we added a DC barrel jack to the battery section and connected it to the battery board's CON2 charging port using two wires. In order for both battery board circuits to be charged when the charger is plugged in, we additionally connect the CON2 charging ports of both circuits in parallel.
Battery Section Testing


- We use a multimeter to measure the voltage across the CON2 5V port and toggle the switch to check the output voltage of both circuits to make sure everything is operating as it should.
- When the BMS's output was measured, it was 12.1 volts, indicating that the battery needed to be charged.
- Both indicators illuminate when we add the 12V adaptor with the DC barrel jack, indicating that the setup is functional and that both circuits are charging.
Adding the Mid Part With Battery Section


- After assembling the battery section, we placed the midsection on top of it and fastened them both together with four M2 screws.
Raspberry Pi Mounting Holes


The Raspberry Pi comes with mounting holes intended to fit M2.5 bolts; however, since we are using M3 here, we will need to manually widen the holes.
This is a crucial step because failing to do so could harm the Pi or cause small SMD components to fall loose from their pads.
- To enlarge holes, we use an M3-size screwdriver bit. We insert the screwdriver into the holes and rotate it, which enlarges the hole.
Once more, the process is really important, and if you are unfamiliar with it, it is not advised. Additionally, drilling could harm the Pi. Using M2.5 PCB standoffs is the most effective way to accomplish this, especially for Pi. We had to go through this procedure because, in my case, we only had M3 PCB mounts.
- Finally, we inserted four M3 PCB standoffs with Pi mounting holes. These will be utilized in the following stage to secure the Pi to the Pi holder part.
Raspberry Pi Holder Section


- The Raspberry Pi is now positioned in its place on the Pi holder part and is secured using four M3 bolts.
Pi holder section assembly is now complete.
Battery Section and Raspberry Pi Holder Section Assembly


- After assembling the battery section-mid section assembly, we placed the Pi holder on top of it and fastened them together with four M2 screws.
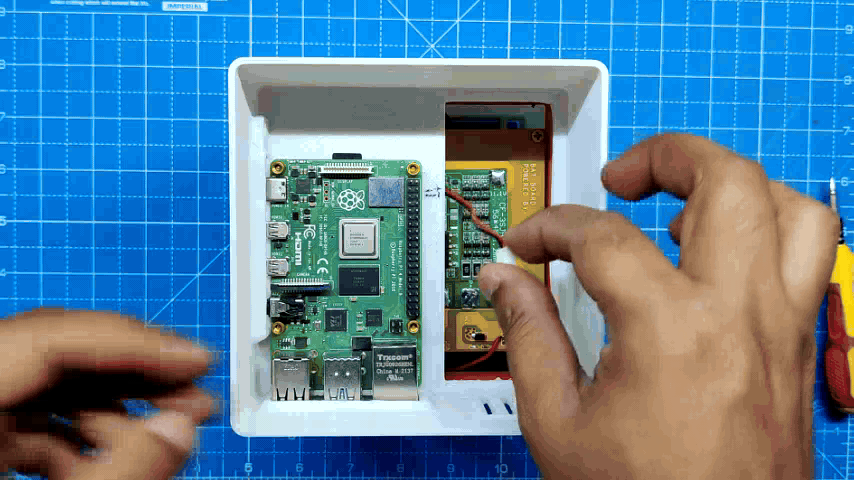
- Additionally, we need to wire a JST connector to the battery board's 5V in order to power the Pi.
- We can power the Pi directly from the battery section by connecting the JST connector to the GPIO 5V and GND terminals of the Pi. This eliminates the need to use the USB C port on the Pi.
Adding Base Section With Battery Section


Next, we linked the lower end of the battery section to the previously built RGB LED board or base.
https://www.instructables.com/RGB-LED-Board-for-Power-Pi-2/
- We begin by connecting the RGB LED board's positive and negative terminals to the 5V and GND terminals on the battery board.
- The base is then positioned in its proper location and fastened there with four M2 screws.
Top Section Assembly


Threaded inserts are required in order to mount the handle in its proper location on the top part.
All sizes of bits for threaded inserts are included in this TS100 TIP Adaptor Kit that we obtained from PCBWAY Giftshop.
We utilize our Hakko soldering iron and the supplied T18-B alternative bit, which we pair with an M3-size bit.
- Subsequently, the threaded insert is picked and positioned over the hole on the top section. The insert is then pushed downward using the soldering iron, causing it to heat up and slide into place.
- As much as possible, keep the temperature set below 180°C and above 100°C.
- The threaded inserts are added to their places, and we repeat the process for the other side of the top section.
- Now that the handle is in the correct spot, we mount it securely using two M3 bolts.
Top Assembly Final


This time, the top section is placed over the Pi holder assembly and fastened in place with four M2 screws.
Final Touches- Adding Name Tags


- Using four M2 screws, we first attached the Power Pi Version 2 nametag to the device.
- The XO name tag is then inserted into the battery section and fastened using M2 screws.
- Finally, we used super glue to attach the Arasaka logo to the Pi Holder body.
Result


Here's the result of this slightly larger but simple build: a functional Raspberry Pi computer with a built-in battery pack and a cyber-like aesthetic.
Since the Raspberry Pi 4 powers this setup, it can manage almost everything we throw at it, including the old games we intend to run on it.
Here's a fun thing: A web application can control the RGB board color, so all we have to do to control lighting is use a Raspberry Pi or any other external device to access the web application by utilizing the ESP8266 IP address.
Check out the previously built RGB LED board project here.
https://www.instructables.com/RGB-LED-Board-for-Power-Pi-2/
The RGB LED Board was a large project on its own, necessitating the creation of a separate build guide, so we created a separate project for it.
Now that the setup is functional, let us test it more by installing an OS and executing a few programs.
Raspbian OS


For every Raspberry Pi test, Raspbian is the go-to OS for testing out the RPIs.
Using the Raspbian 32-bit operating system, we chose the storage device after choosing the Pi 4 model as our model using the Raspberry Pi imager. The whole process took 15 minutes.
In addition to powering the Pi and inserting the SD card, we also installed a wireless keyboard and mouse, which are requirements for running Raspbian.
Following the desktop environment's boot, everything was operating well, and the system did not lag.
I have used Raspbian with the Pi 4 quite a bit, and it just works flawlessly. However, it does cause the processor to get a little hot while browsing, so a cooling fan is recommended.
RetroPie

We're using RetroPie here, which is a popular open-source software package that allows you to turn a Raspberry Pi or similar single-board computer into a retro gaming console. It is designed to emulate a wide range of vintage gaming consoles and platforms, enabling you to play classic games from systems like the NES, SNES, Sega Genesis, PlayStation, and more.
It's worth noting that while RetroPie itself is legal, the legality of downloading and using ROMs (game files) from copyrighted systems is a gray area and may vary depending on your country's laws. It is essential to ensure you have the right to use the game files before adding them to your RetroPie system.
- We begin by connecting a 32 GB microSD card to a computer using an SD Card Reader.
- Retropie can be manually installed by downloading the ISO file from their website, or it can be installed using Raspberry Pi Imager, which is by far the best method for doing so.
- Here, we download and set up the Raspberry Pi Imager.
- The SD card is then inserted into the microSD card converter, which is then connected to the PC.
- The welcome screen will appear on the first boot, followed by the process of mapping game pad keys. After mapping the controller, we arrive at Retropie's home screen, where a list of all the consoles is displayed.
Adding Games


Adding games to RetroPie is simple, we first use a blank pendrive, flash drive/HDD and create a folder named "RetroPie."
We insert the pendrive into the Raspberry Pi USB port, and the pendrive will start to blink, indicating that the computer is creating folders on the drive. After the blinking stops, we can unplug the pendrive.
- We attach the pendrive to the computer once more and access the retropie/roms folder, where we can see all the console's folders. Finally, we paste the rom into the correct console folder.
- As soon as we connect the pendrive to the Raspberry Pi, it begins blinking once more, indicating that the ROMs are being copied into the Pi. Depending on the size of the ROM, this procedure can often take between two minutes and two hours. Once the copying is complete, the pendrive will stop blinking, allowing us to remove it.
- The Pi will be restarted after the ROMs have been copied into it, and the game list will then be updated.
There's a well-documented wiki made by Raspberry Pi about this process and other steps of using Retropie, which you can checkout at the below link.
https://www.raspberrypi.com/tutorials/retropie-raspberry-pi-tutorial/
Pokemon Gold


The first game we ran in retropie was OG Pokémon Gold, which was a classic role-playing game developed by Game Freak and published by Nintendo for the Game Boy Color. Released in Japan in 1999 and internationally in 2000, it is part of the second generation of the Pokémon series, paired with "Pokémon Silver.".
This game was pure GOLD, as it contains two regions, the Johto Region and the Kanto Region, along with an additional 100 new Pokémon to the existing 151, making the total pokedex number 251, and we really have to catch em all to complete the pokedex.
At the end of this game, we battle RED, the previous protagonist from the Pokémon RED game, which was super cool and innovative at the time.
Yes It Can Run DOOM!


Yes, this setup can run Doom. Naturally, the Raspberry Pi 4 Broadcom BCM2711, quad core Cortex-A72 (ARM v8) 64-bit SoC allows it to run Doom.
Here, we are playing the NES port of Doom, and it plays without a hitch.
Tomb Raider for PSX


To make things harder for the Raspberry Pi4, we ran Original Tomb Raider 1 on PSX.
Its a landmark game in the history of 3D action-adventure gaming. Developed by Core Design and published by Eidos Interactive, the game was first released in 1996 and quickly became a cultural phenomenon.
Fun Facts: Lara’s mansion, Croft Manor, featured in the game as a training ground, became a beloved element of the series, often included as a playable location in future games.
Overall, the powerful Raspberry Pi 4 was accountable for this game's smooth operation.
Overall Conclusion


The battery pack allowed the Pi to operate the desktop environment for six hours straight and still had enough power left for two or three more hours when a few games were played on the Retropie emulator.
The primary goal of this project was to power the Pi with its built-in battery board. Although this setup is entirely wireless in terms of connecting external sources, we still need to connect wires for the display. This can be avoided if we add a small display to the setup, but that will be the subject of a future project.
With the addition of a screen, we can turn this configuration into a portable Raspberry Pi system that we can use for a variety of instances in which we need to utilize the Pi without an adapter. The internal power supply allows us to power the unit while we are on the go.
All in all, the project is finished, and the project page has links to download all the files, documents, and other information.
Overall, this project is complete and needs no further revisions.
A special thanks to PCBWAY for supporting this project; visit them to get a wide range of services, including CNC and PCB services.
I will be back with a new project soon.