PID Control for BBQ Bot
by Stephen LEE in Circuits > Raspberry Pi
12373 Views, 92 Favorites, 0 Comments
PID Control for BBQ Bot

Introduction
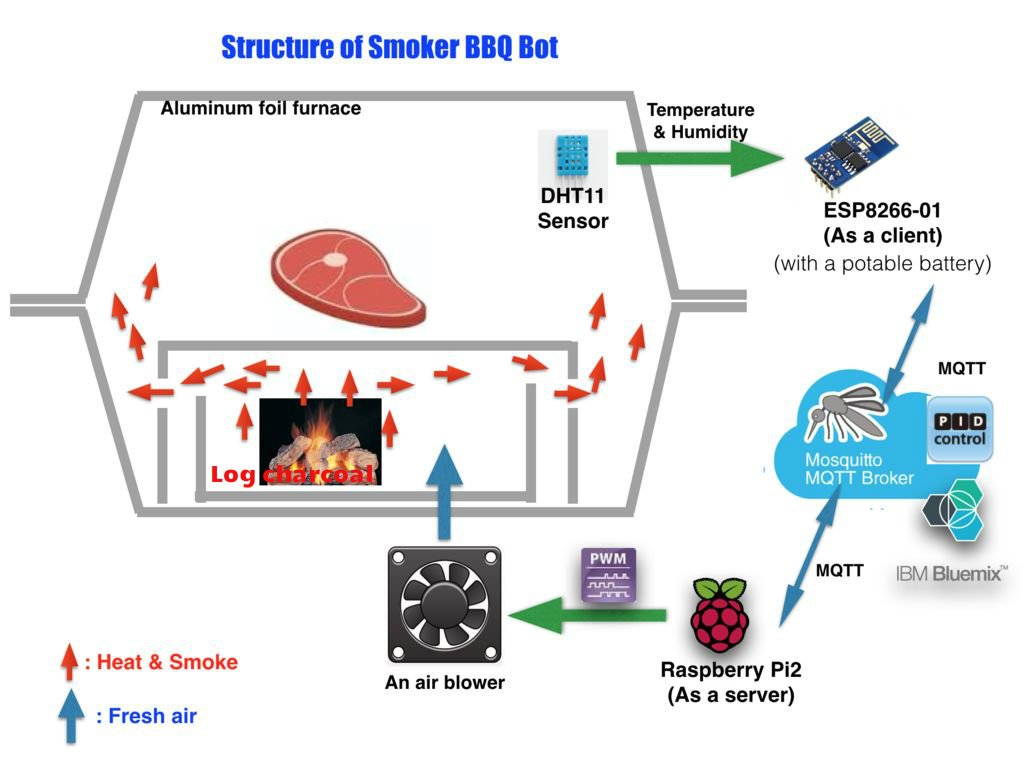
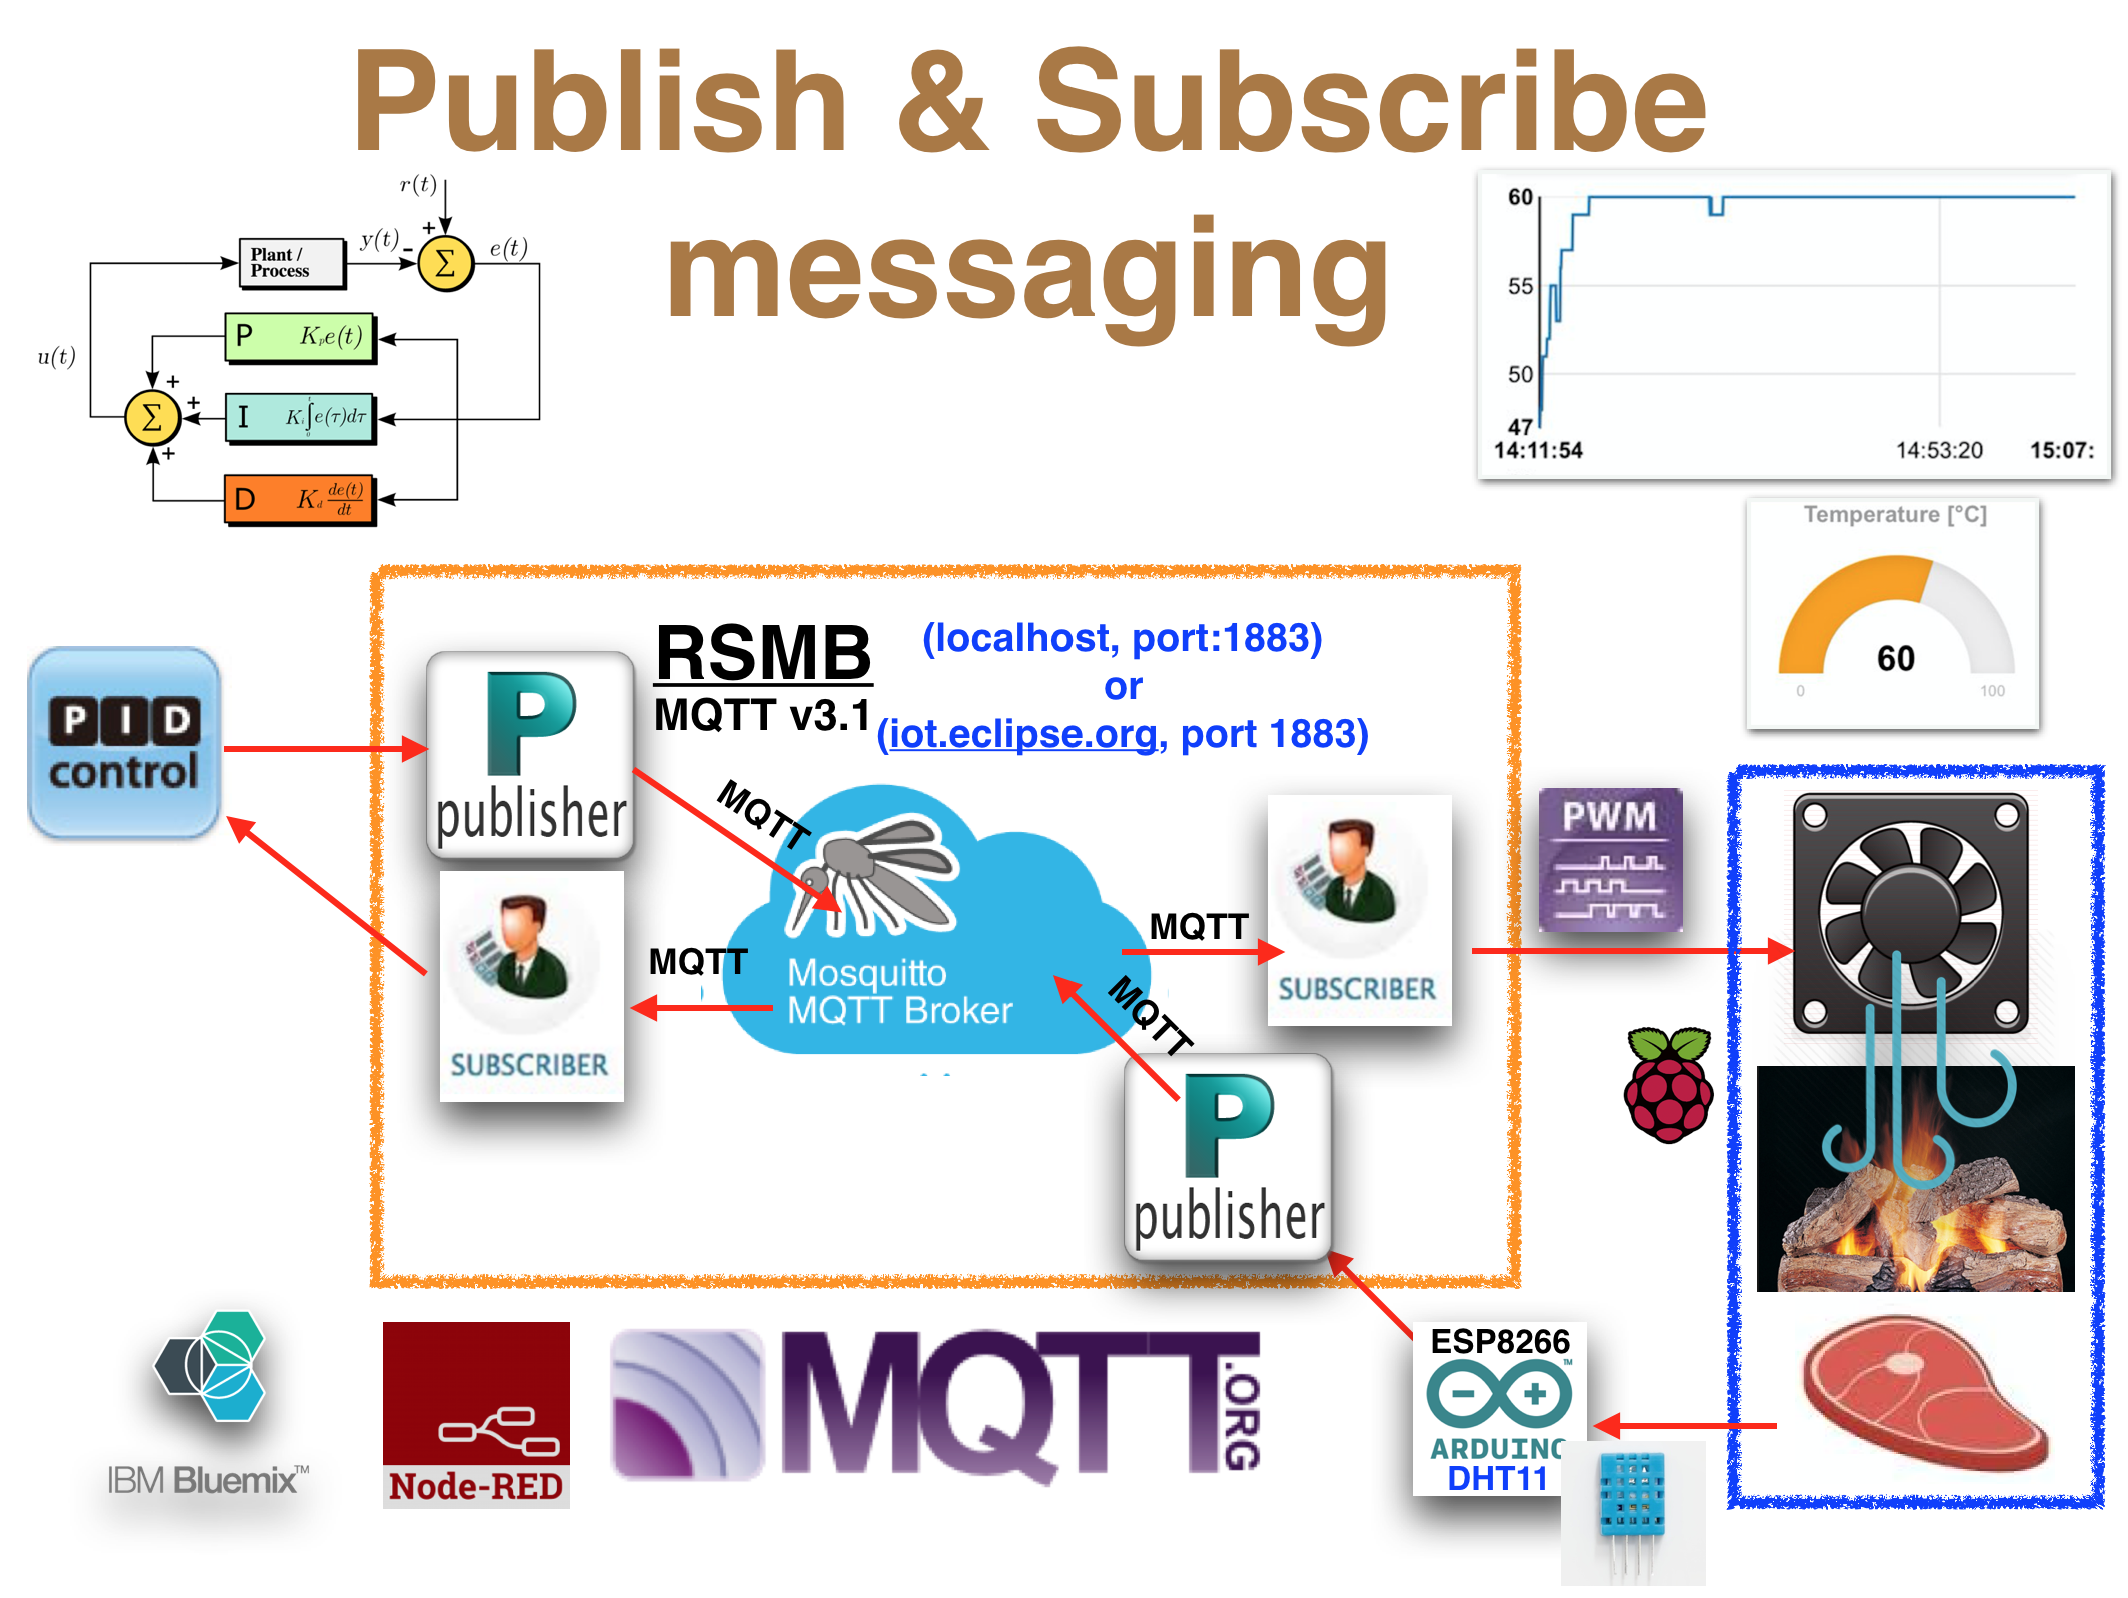
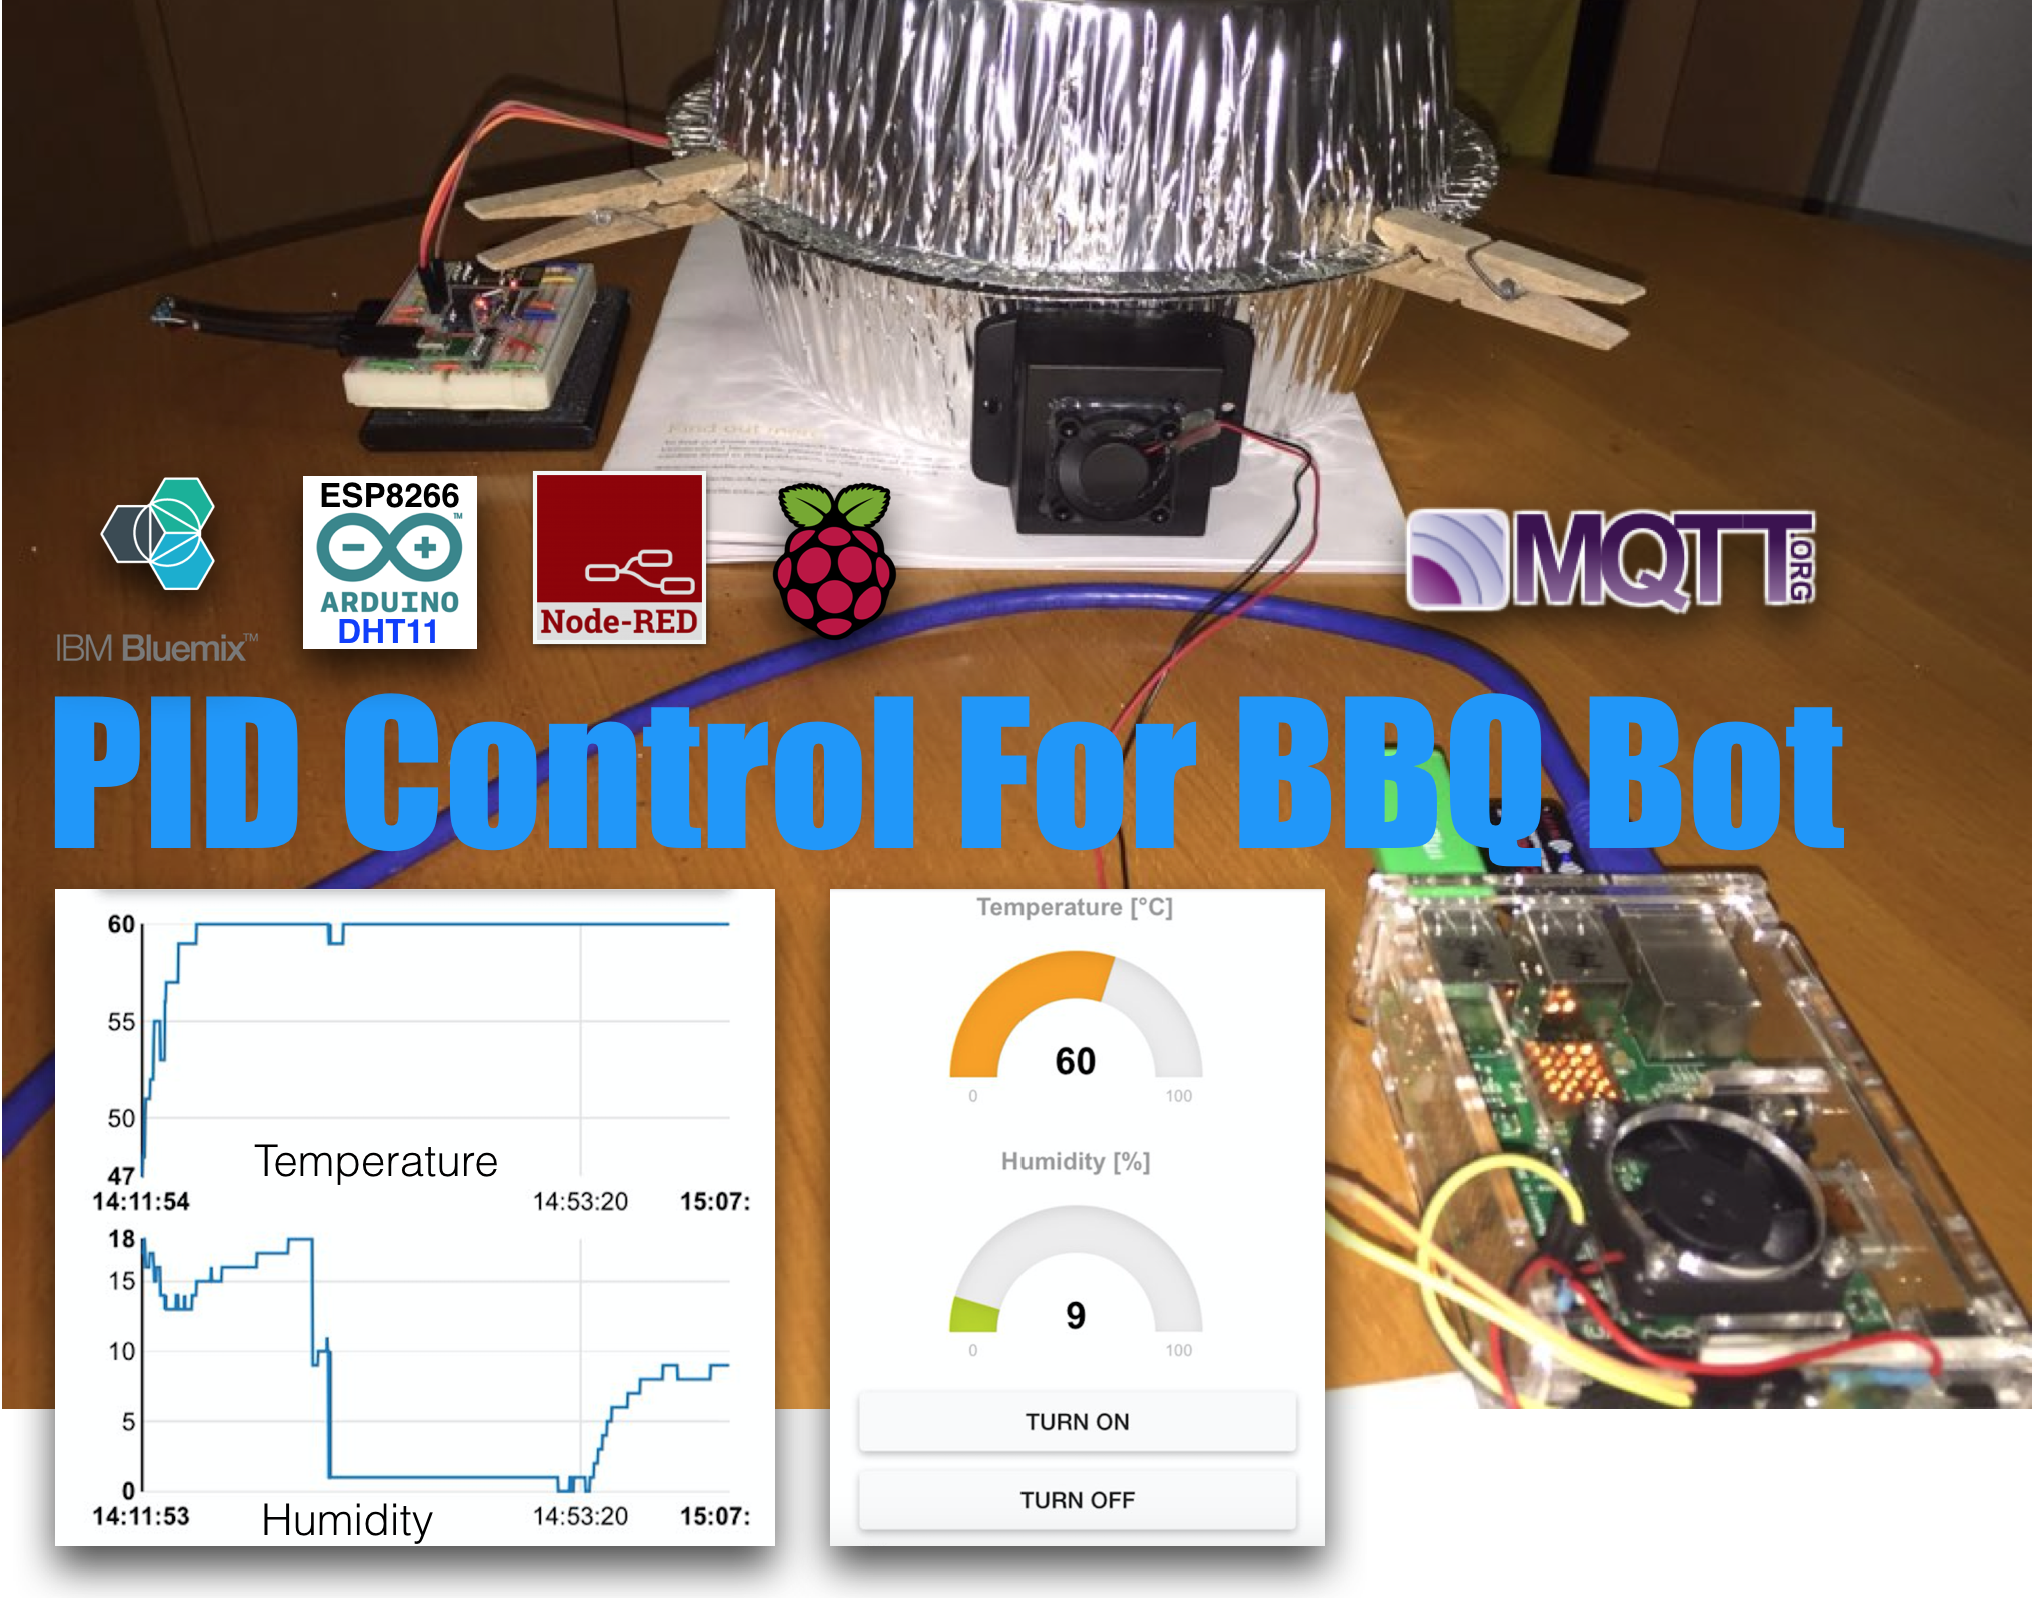
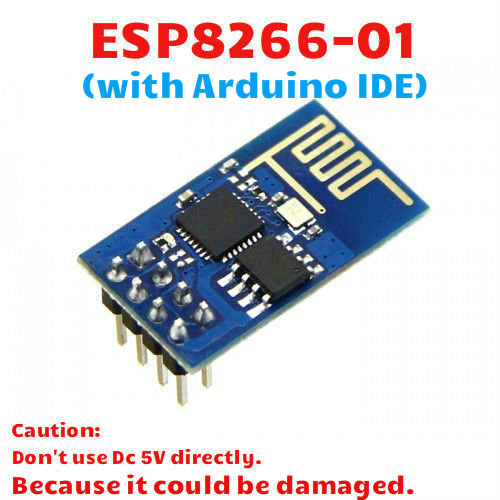
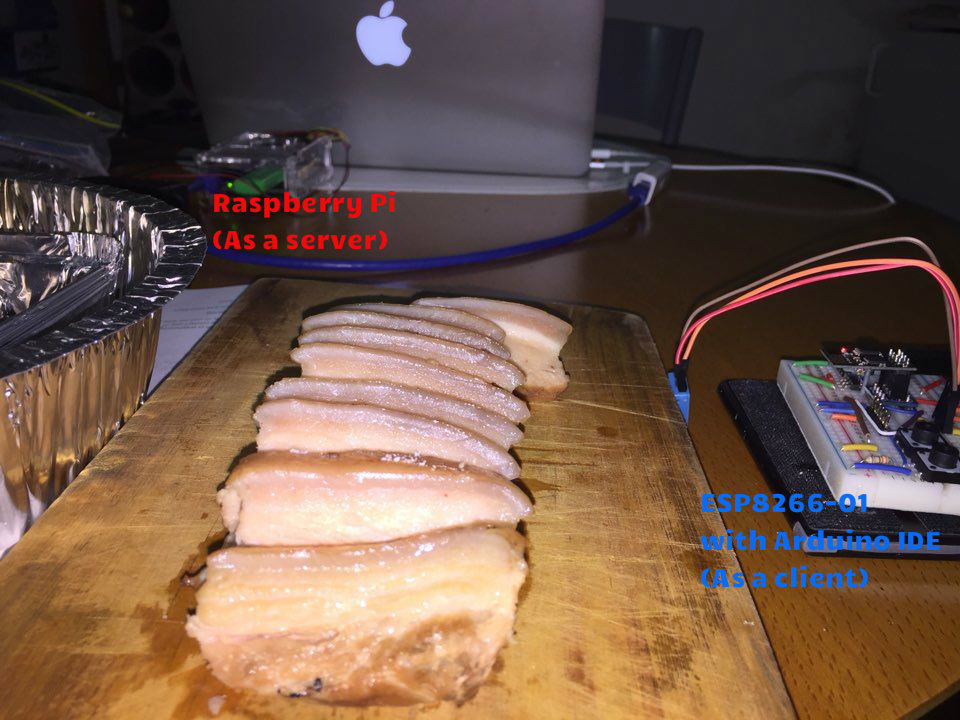
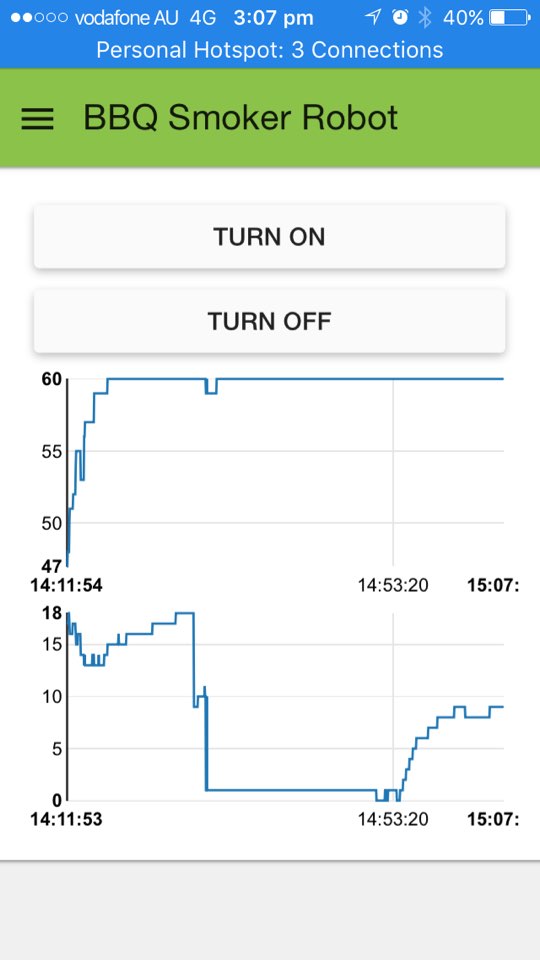
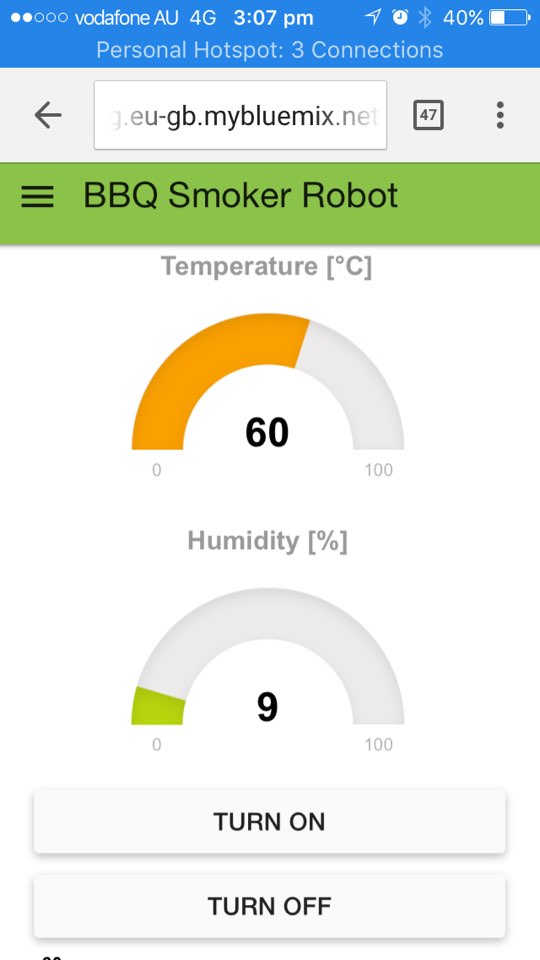
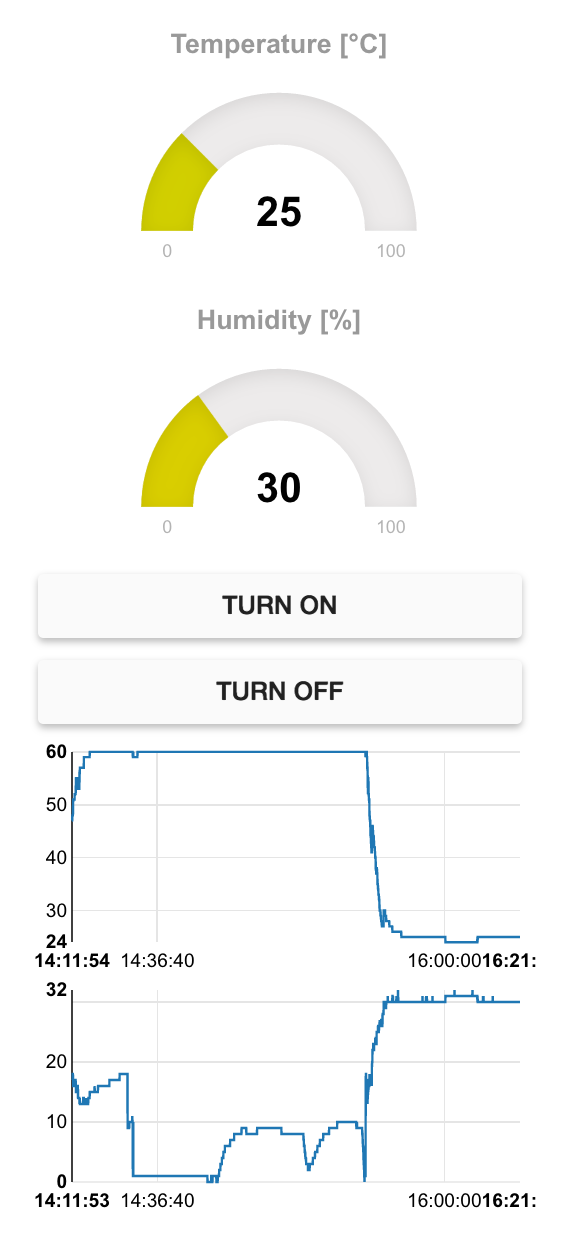
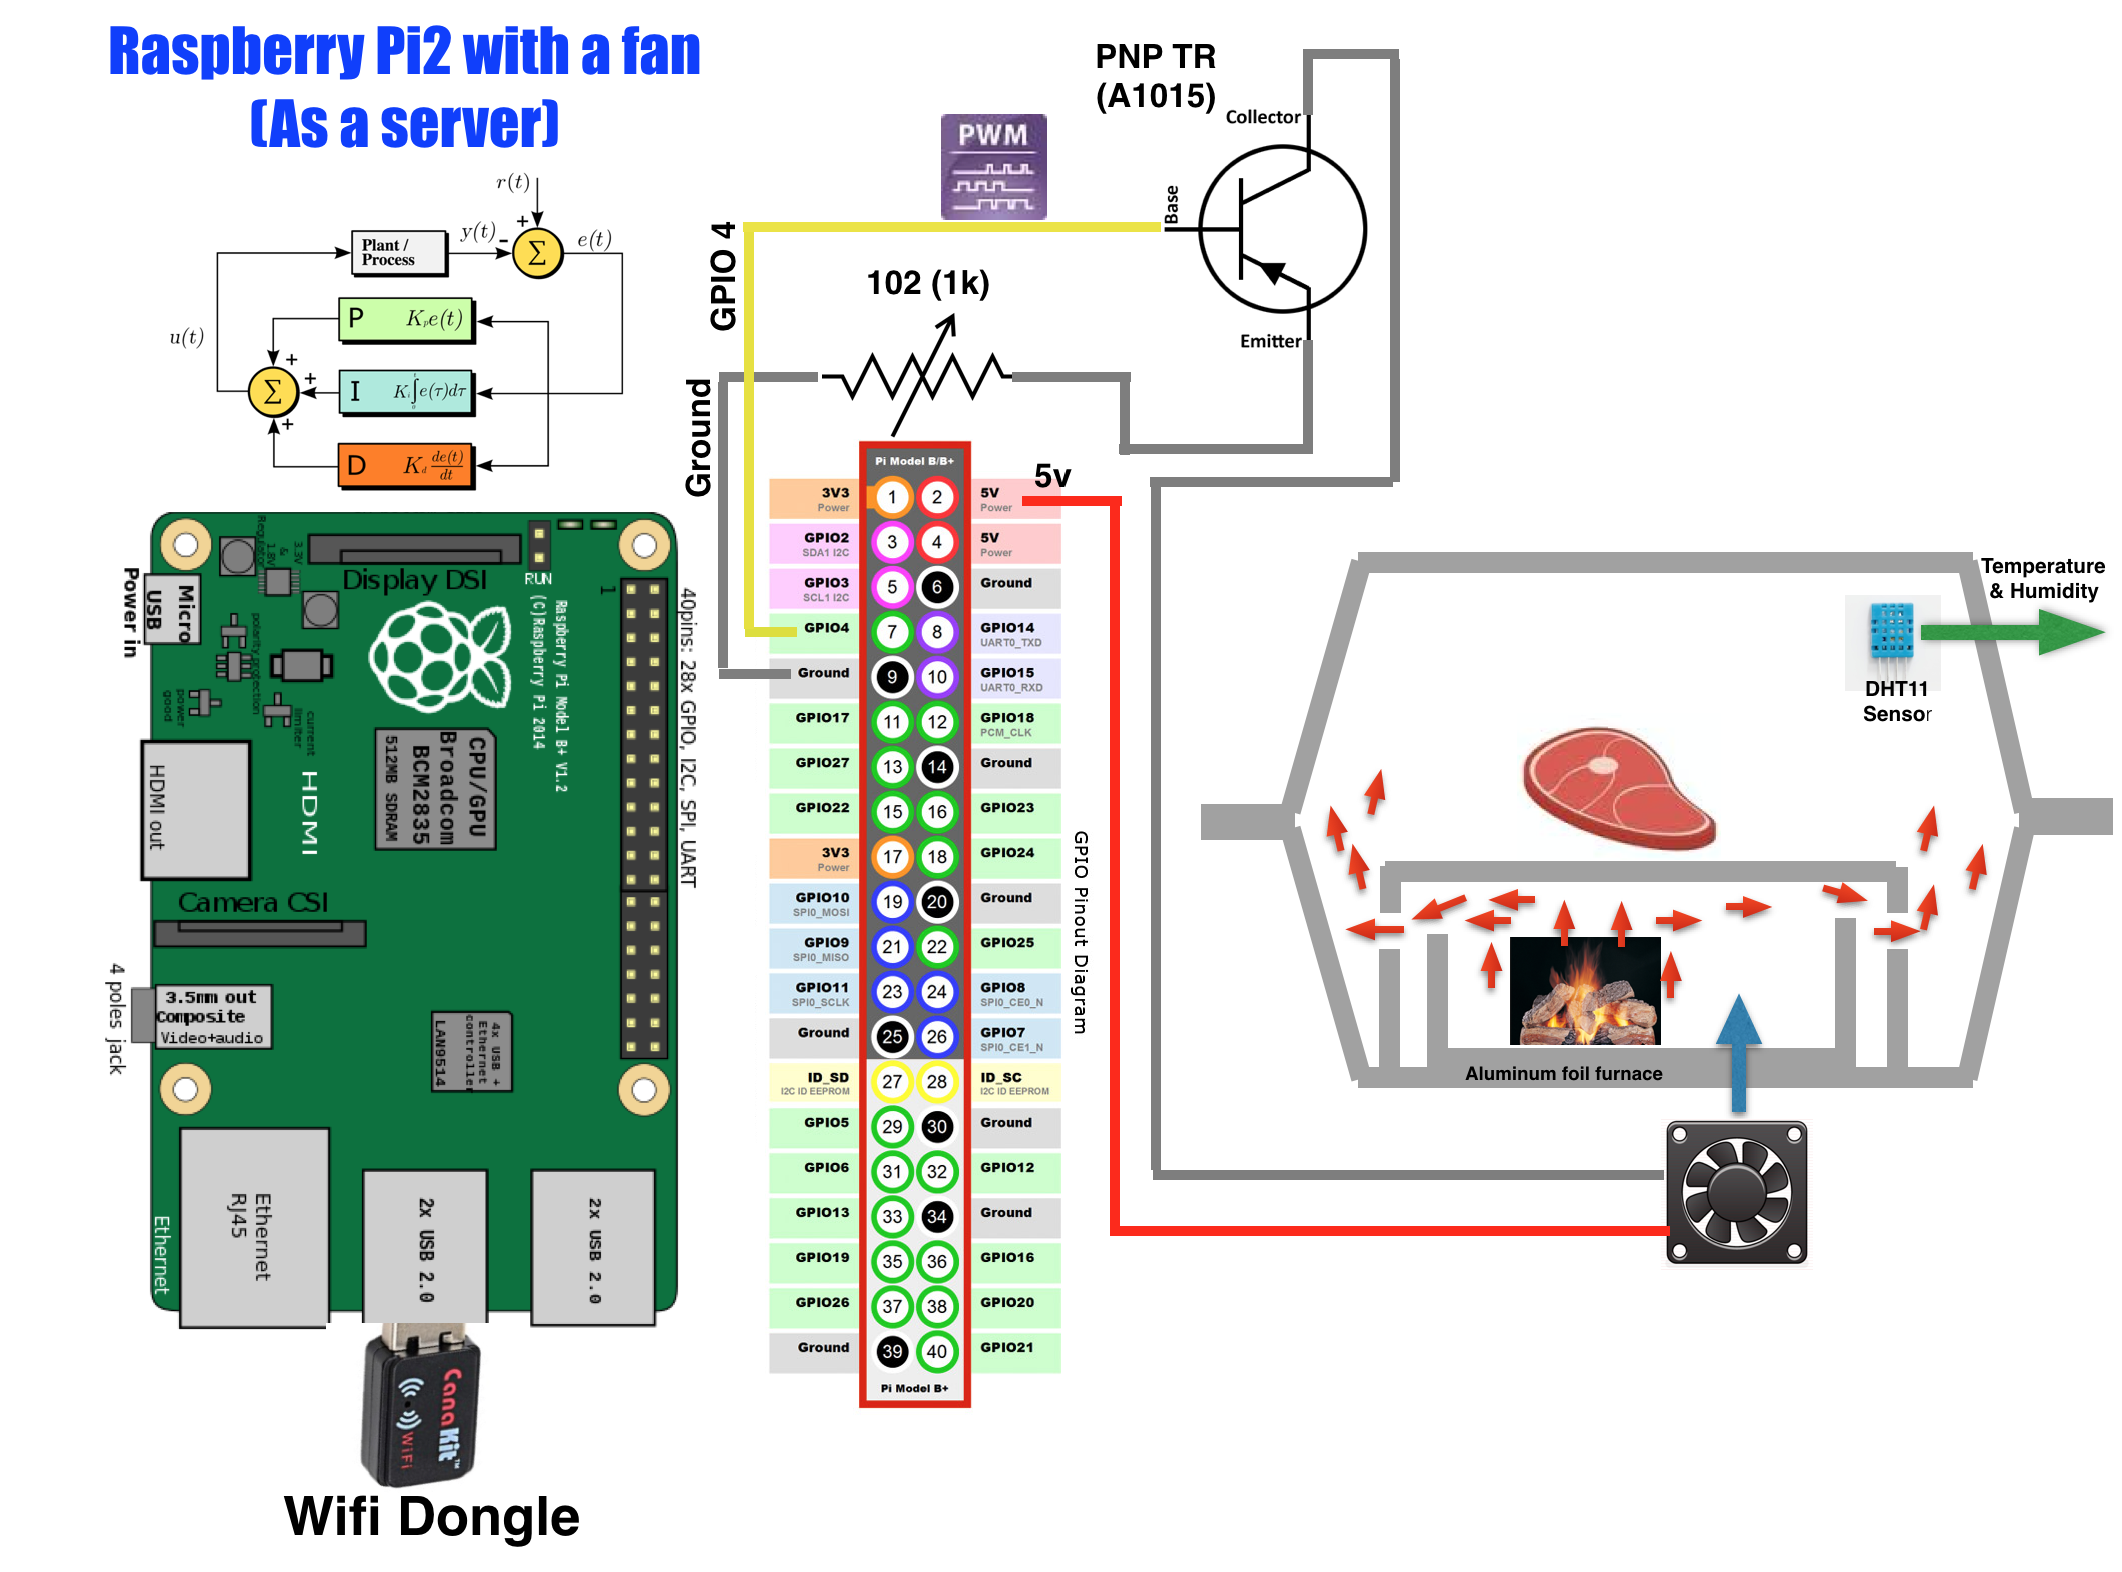
The secret is in the smart BBQ smoker. It could do to turn the finicky art of smoking meat into a controlled, semiautomated science. It uses a node-RED of PID (proportional-integral-derivative) controller , a Raspberry Pi2 with ESP8266-01, and a fan to regulate its own temperature & humidity, automatically producing an ideal slow-and-low burn. The science of smoke indirect heat cooks the brisket “slow and low,” providing enzymes the optimal amount of time to turn tough collagen into melt-in-your-mouth gelatin. Wood adds flavor during the first few hours: Its lignins denature as it burns, releasing tasty smoky compounds.
MQTT(Message Queueing Telemetry Transport) is a Machine-To-Machine(M2M) or Internet of Things (IoT) connectivity protocol that was designed to be extremely lightweight and useful when low battery power consumption and low network bandwidth is at a premium. It was invented in 1999 by Dr. Andy Stanford-Clark and Arlen Nipper and is now an Oasis Standard.
https://www.oasis-open.org/news/announcements/mqtt-version-3-1-1-becomes-an-oasis-standard
- How to tune PID gains of Node-RED with MQTT on Raspberry Pi
https://www.instructables.com/id/PID-Control-for-CPU-Temperature-of-Raspberry-Pi/
- How to make a client of ESP8266-01 by Arduino IDE (By knolleary)
https://github.com/knolleary/pubsubclient
- How to use the Bluemix platform (Docs)
https://console.ng.bluemix.net/docs/
- ESP Chips(8266,32,8285,8095) Docs
Table of Contents
Step 0: Introduction
Step 1: Table of Contents
Step 2: Bill of Materials
Step 3: Programming ESP8266-01 with DHT11 Sensor on Arduino IDE
Step 4: Programming NodeRED on Raspberry Pi2
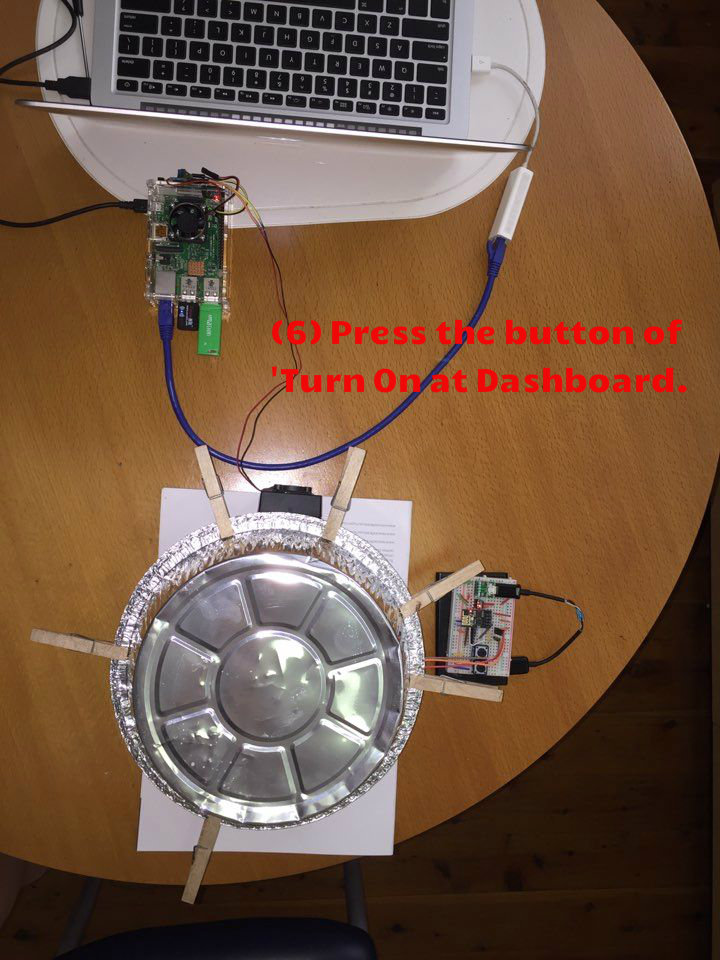
Step 5: Setting up aluminum foil furnace with a circuited fan with Raspberry Pi
Step 6: Setting up MQTT v3.1 on Raspberry Pi2
Step 7: Checking your NodeRED codes with MQTT on Raspberry Pi2
Step 8: Adding & Setting up PID node, Dashboard on Raspberry Pi2
Step 9: Using a dashboard for PID control
Step 10: Tuning PID controller
Step 11: Download list
Step 12: List of references
Step 13: Version note
Bill of Materials
- Raspberry Pi3 Kit X 1ea
- Pi-1,2,3 are Possible.
- Installation guide
- Download image files
- Installing VNC : You can connect Raspberry Pi2 with Macbook Pro or Windows.
- ESP8266-01 X 1ea
- ESP8266 Total Set X 1ea
- AMS1117 board X 1ea
- Raspberry Pi's box with Fan X 1ea
- PNP A1015 Transistor X 1ea
- Adjustable resistor(102) X 1ea
- Jumper wires(1m) X 1ea
- Wifi dongle X 1ea
- Description
- If you have Pi-3, it's unnecessary.
- Android smartphone's portable battery X 1ea
- Aluminum foil dish X 4ea
- Nod-RED software X 1ea
- Free open source
- Use the version pre-installed in Raspbian Jessie image since November 2015
- Installation guide
- MQTT v3.1 software X 1ea
- Free open source
- Installation guide includes at the Step
- Places to buy from?
- Element14
- Adafruit
- DigiKey
- Sparkfun
- eBay
- Amazon
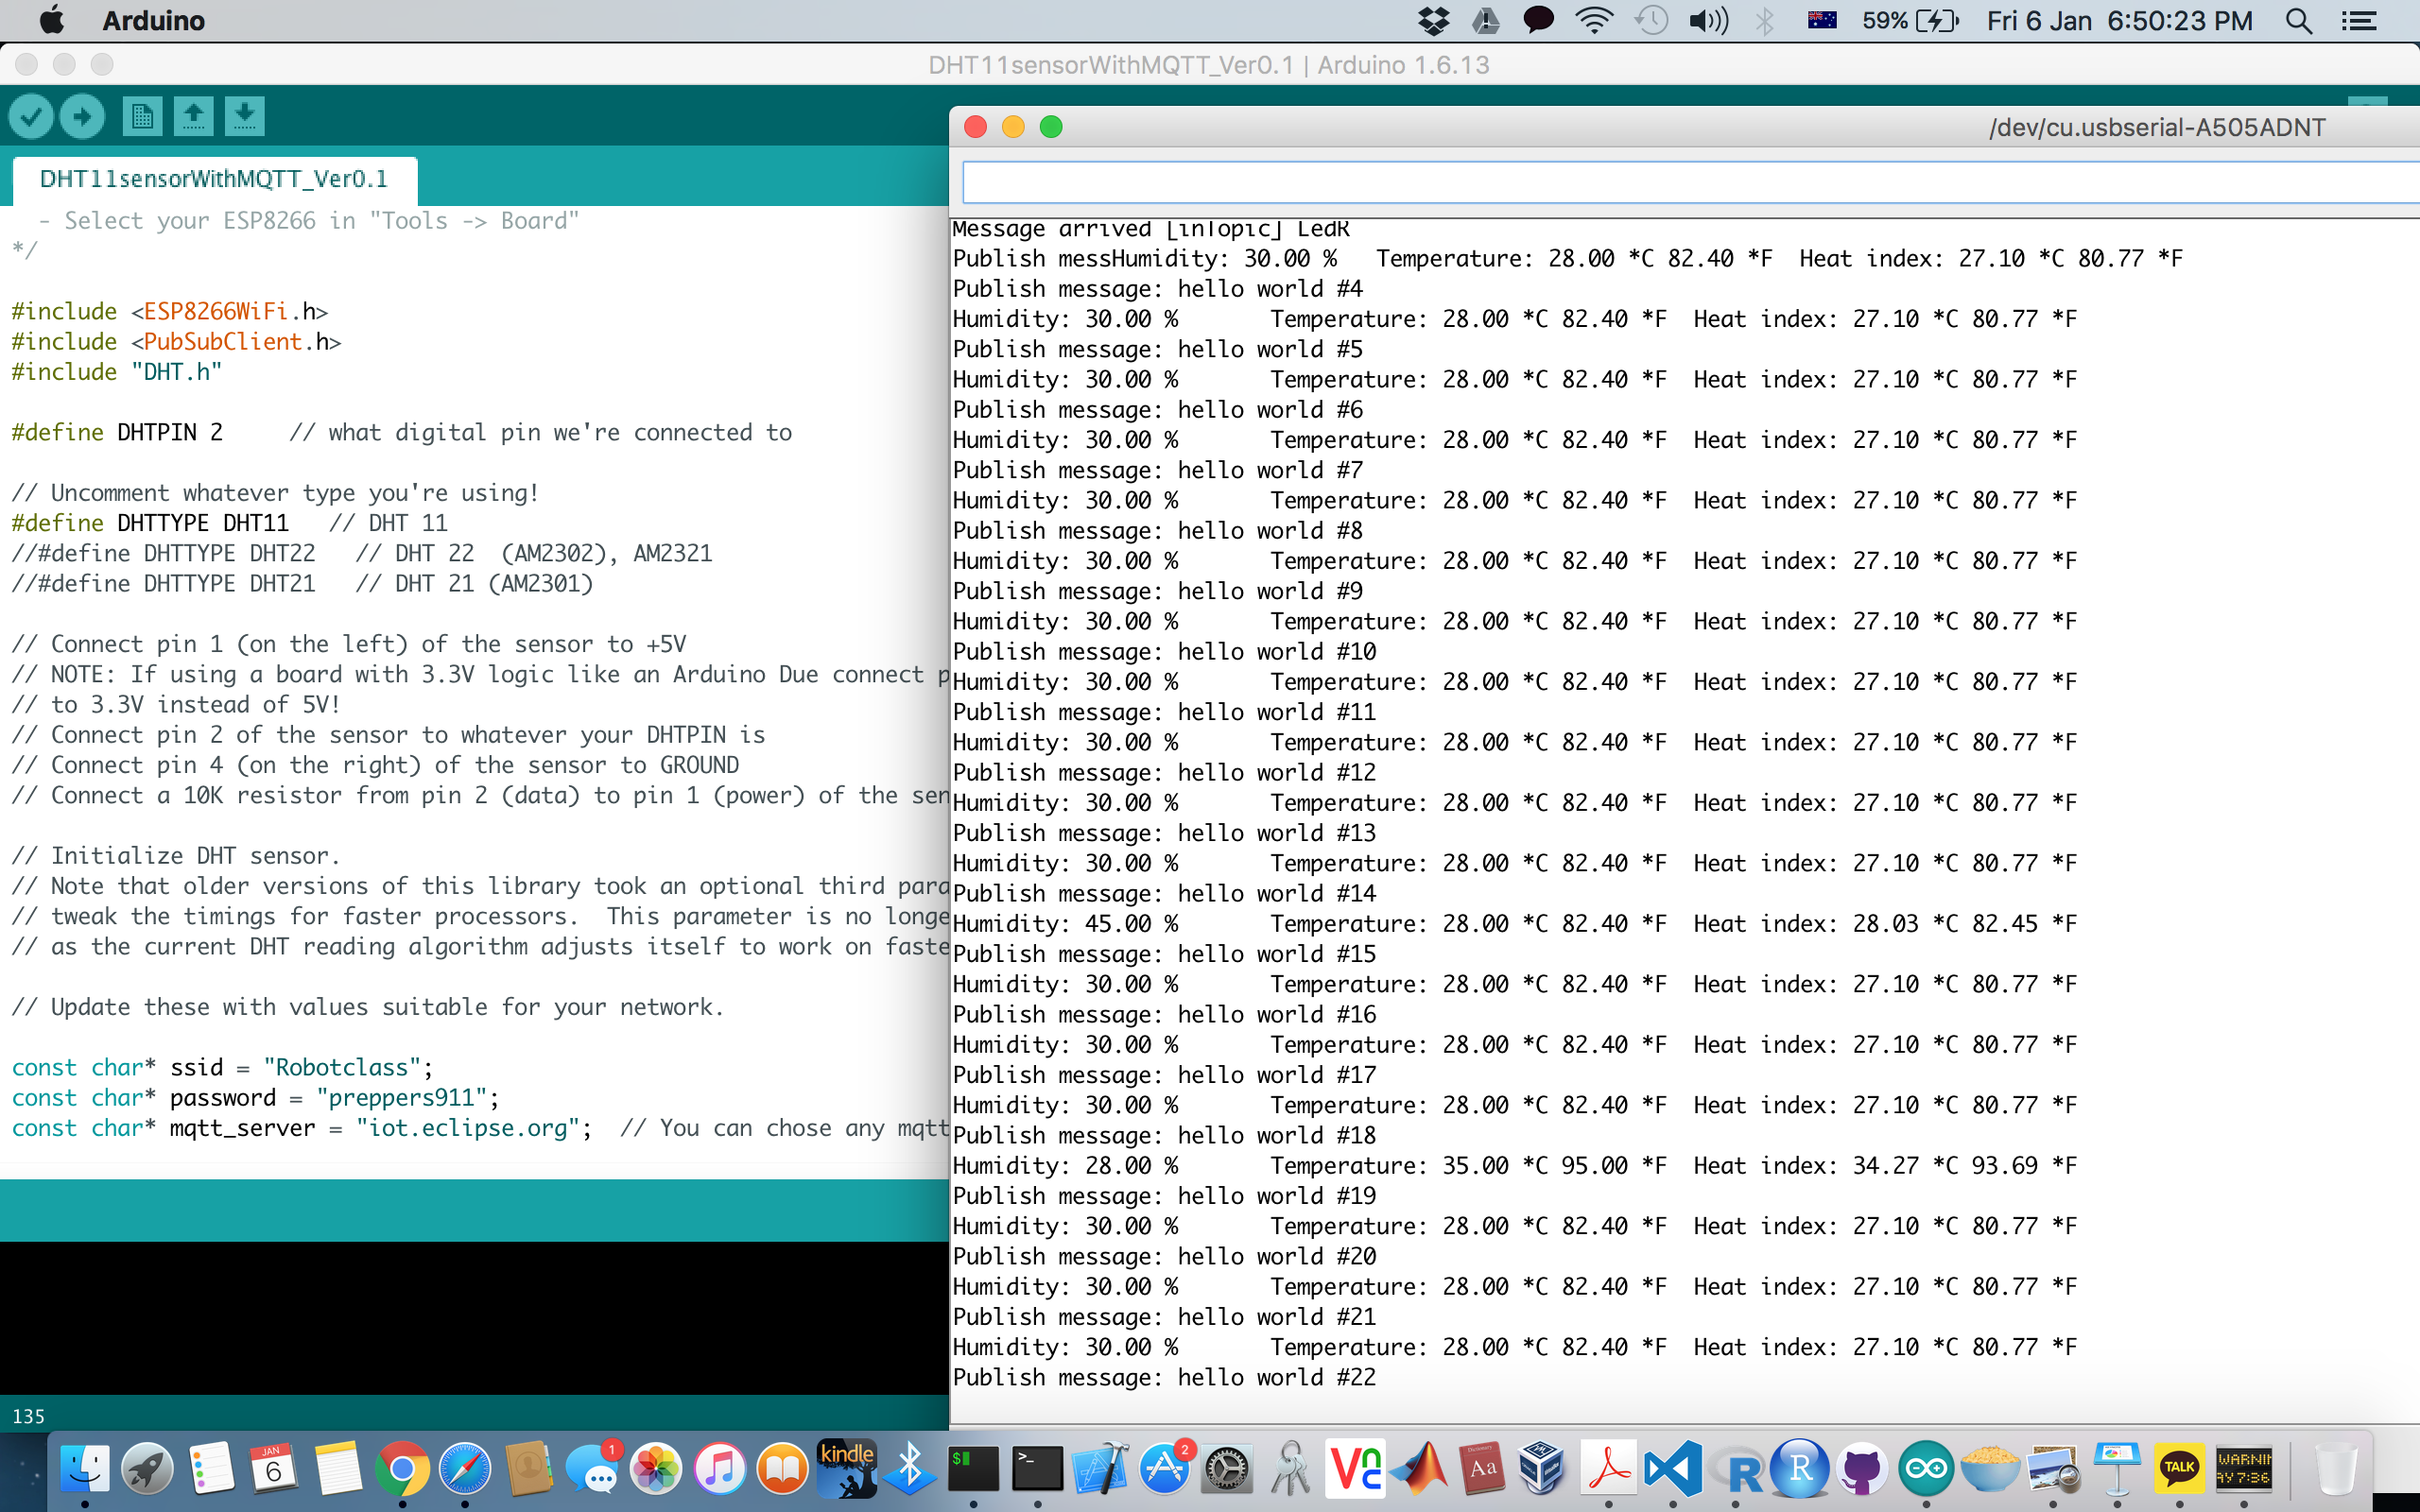
Programming ESP8266-01 With DHT11 Sensor on Arduino IDE
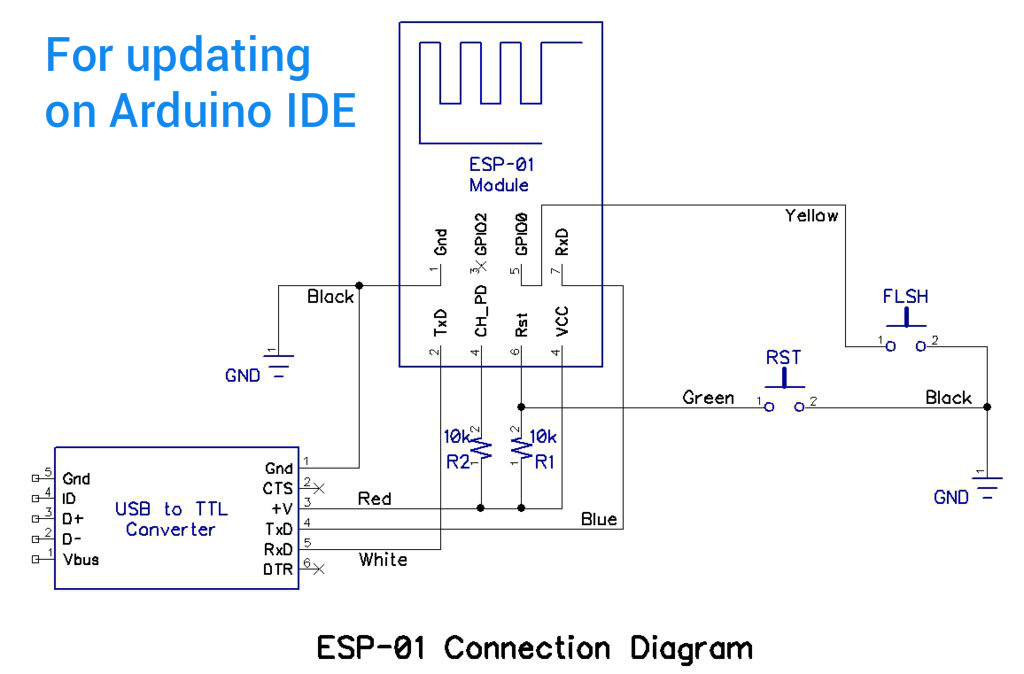
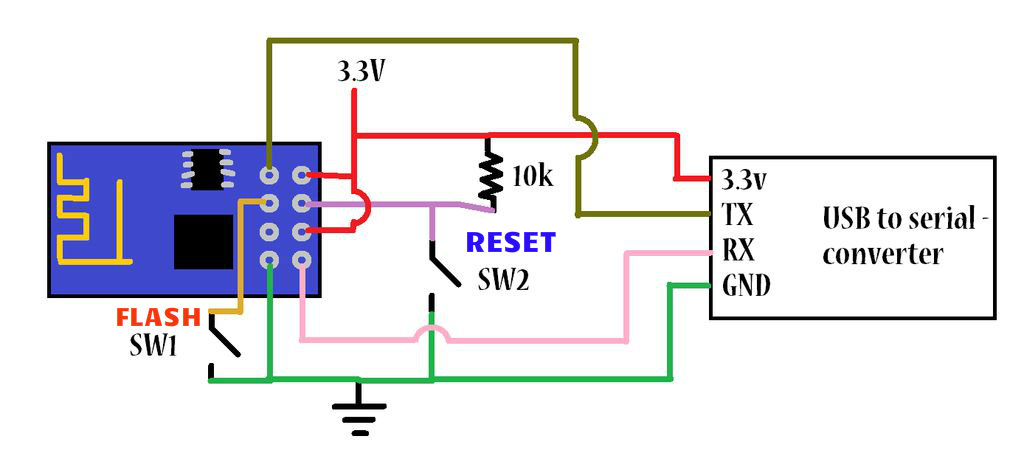
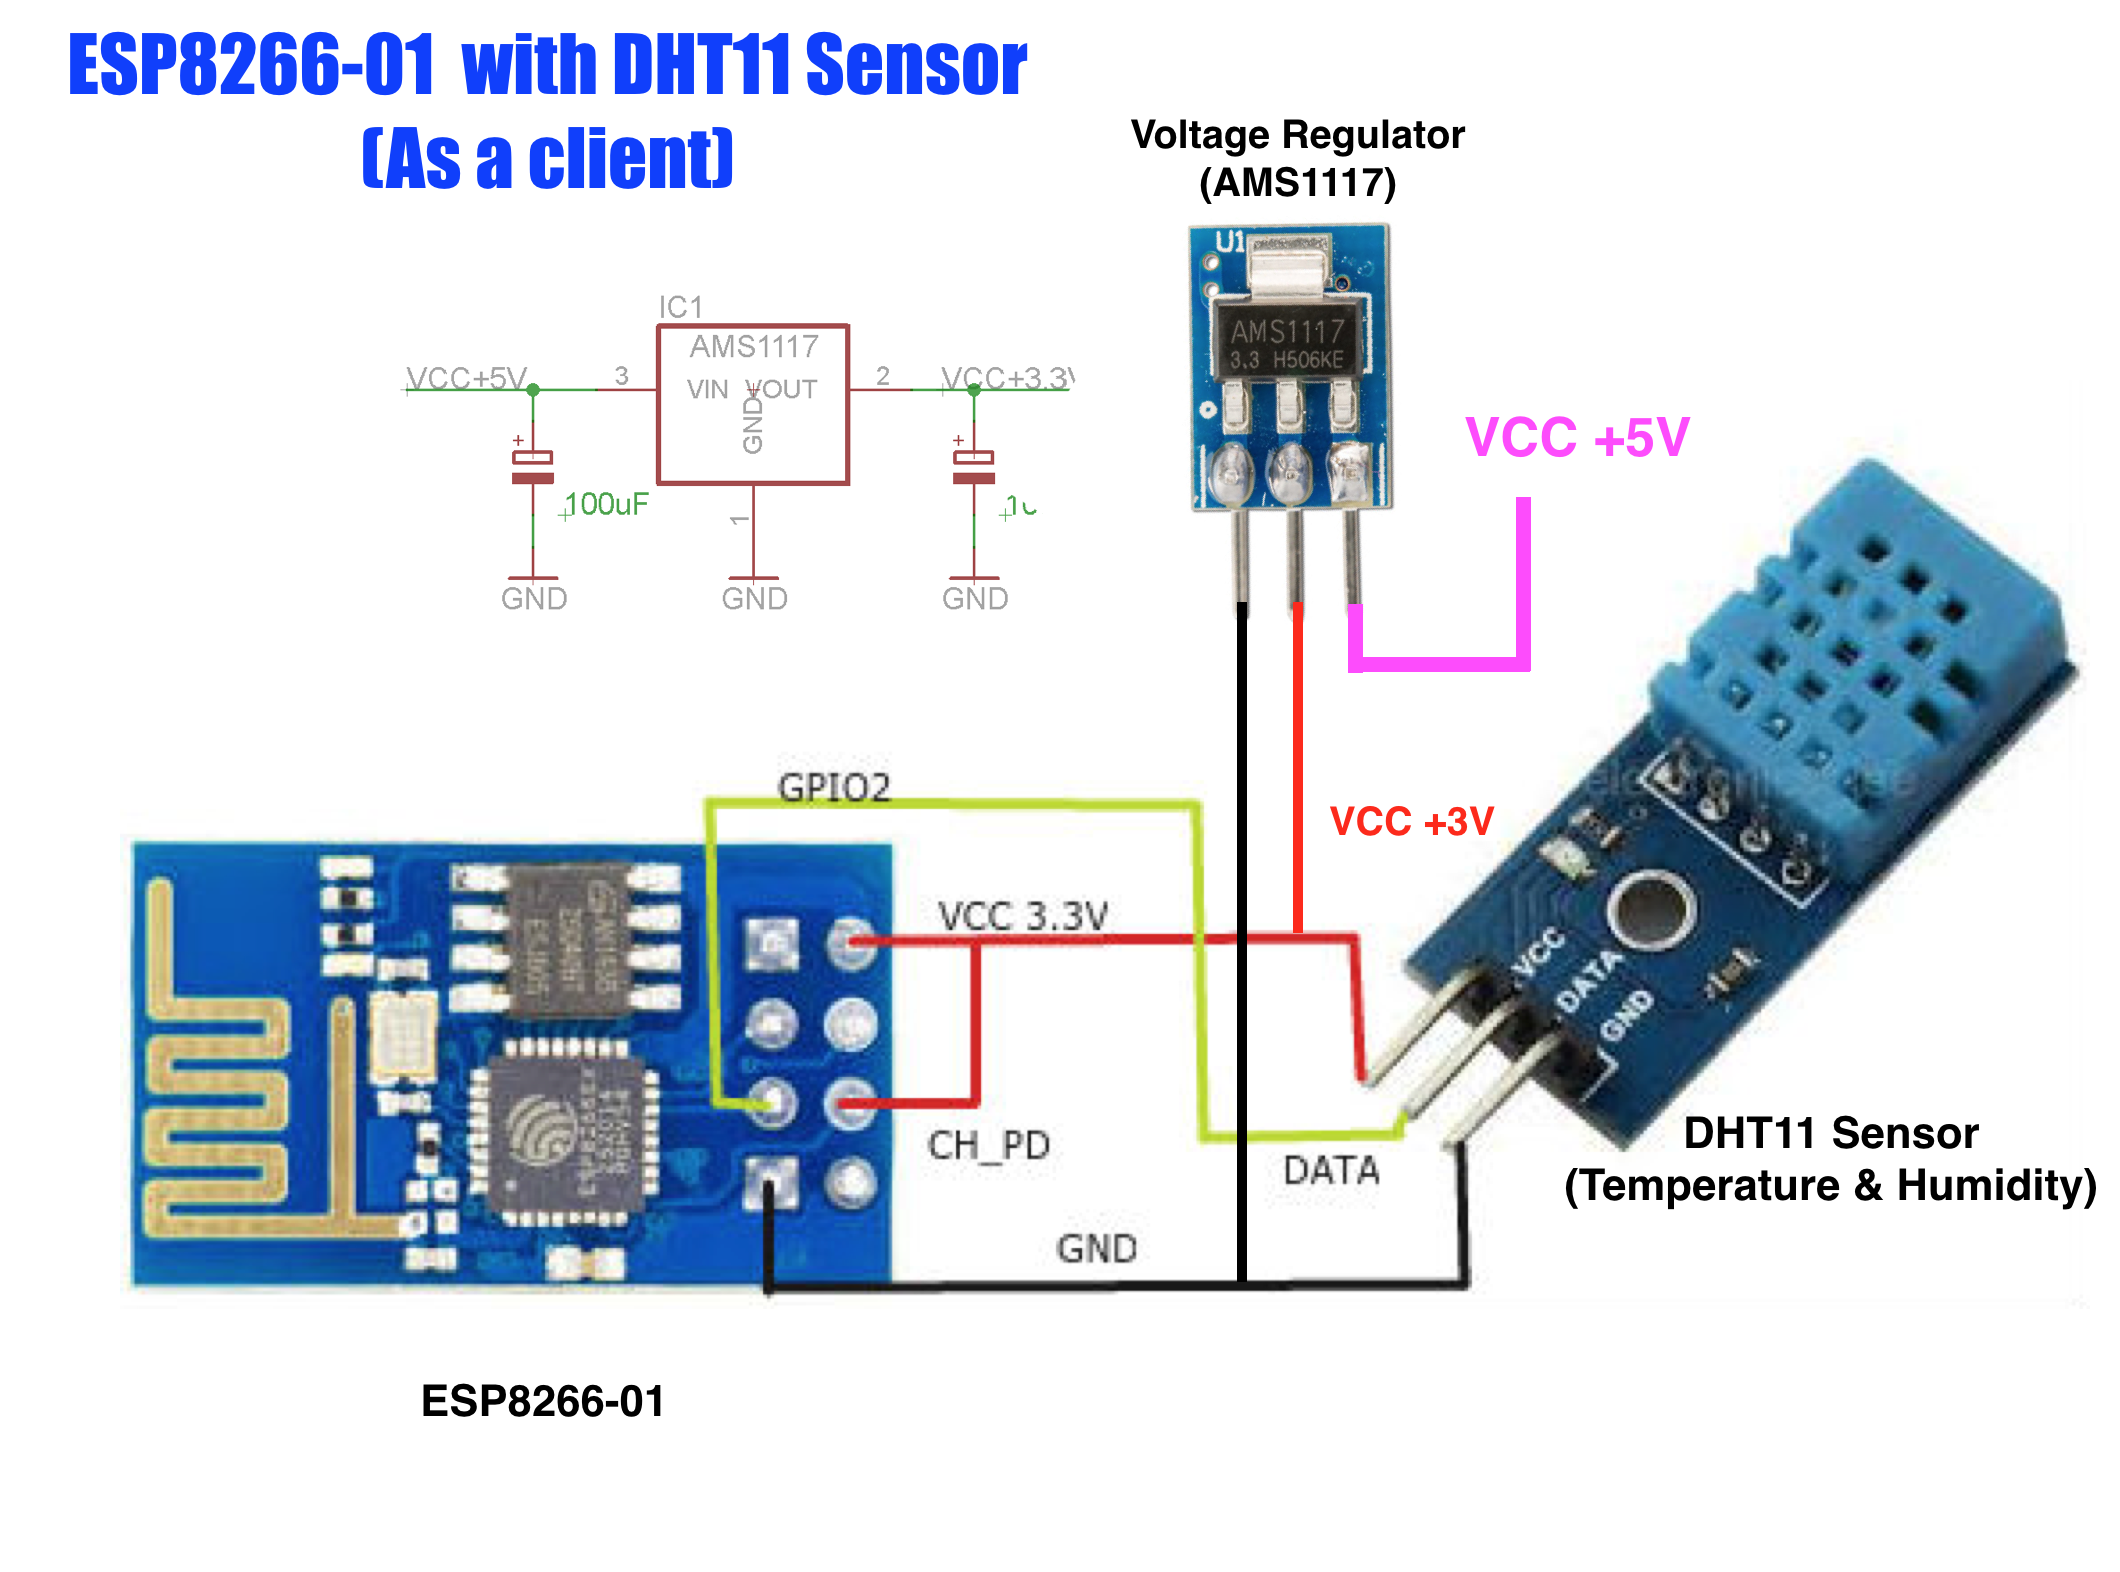
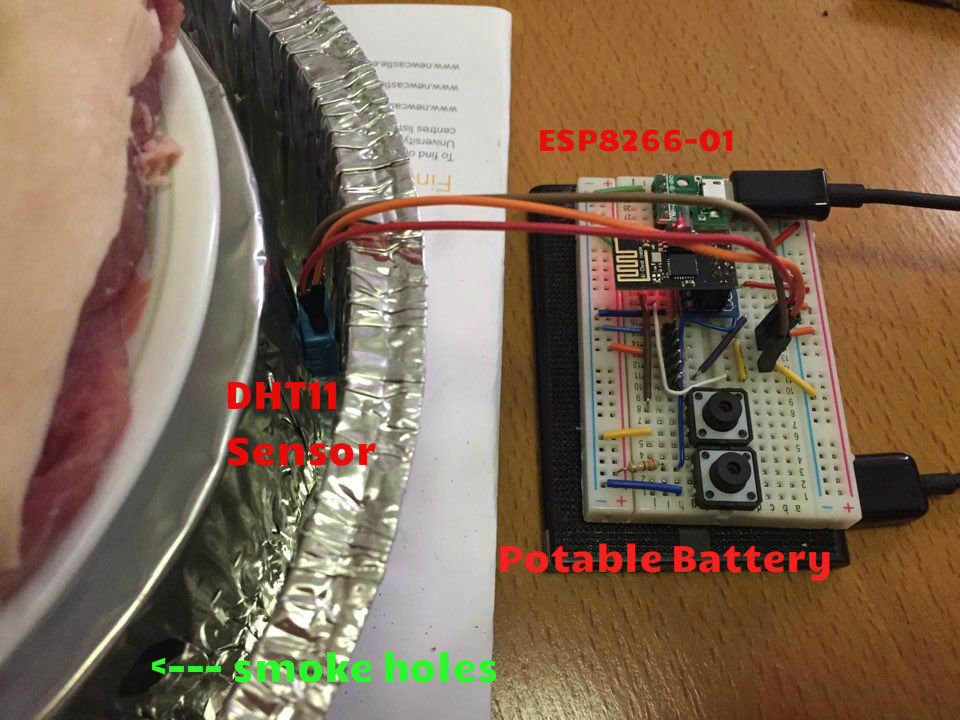
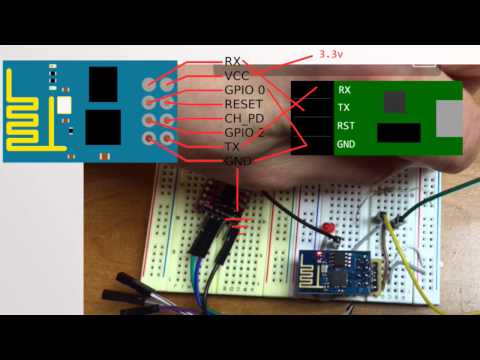
Reference: Arduino Client for MQTT By knolleary
https://github.com/knolleary/pubsubclient
I used a little bit from the pubsubclient's code.
Downloads
Programming NodeRED on Raspberry Pi2
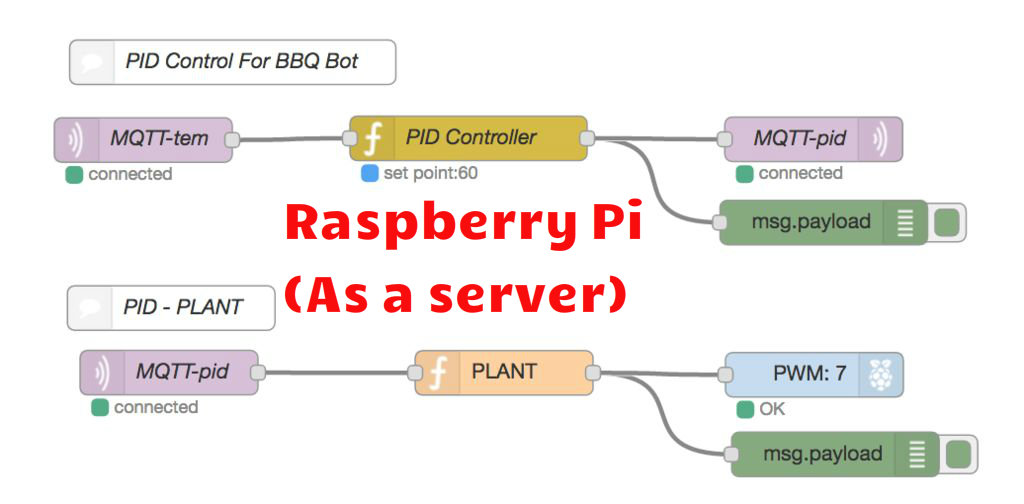
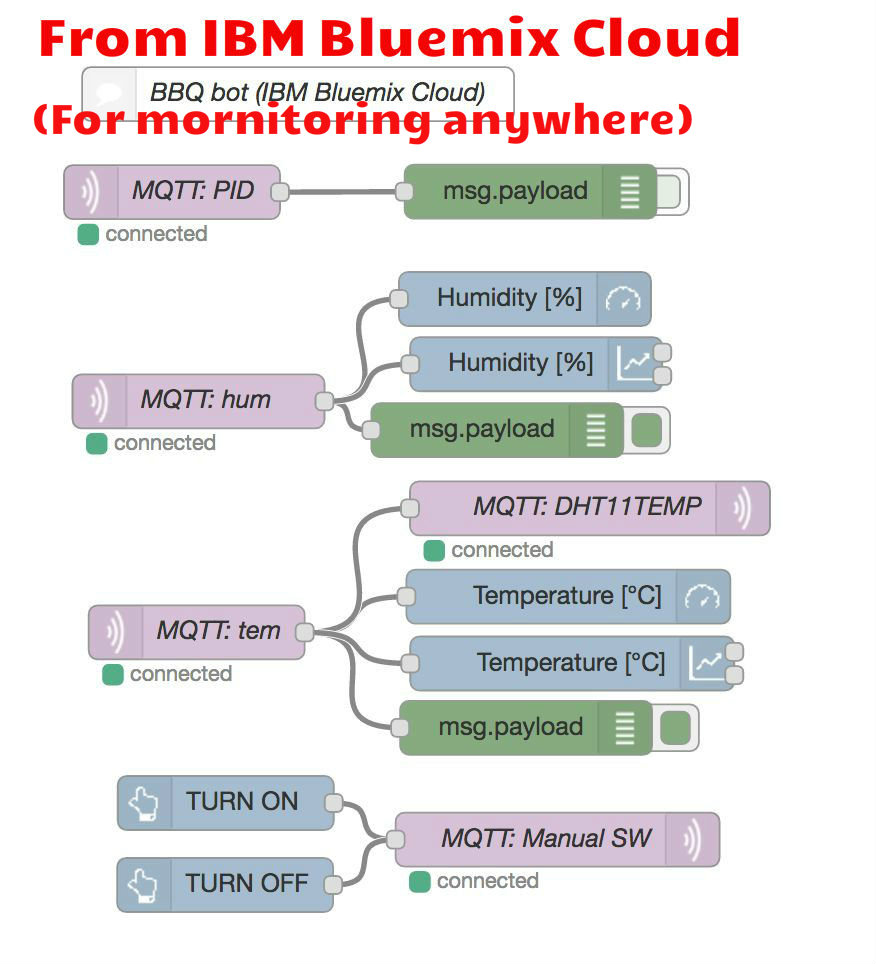
How to start Node-RED on web-browser.
(1) Write down command shown below to a terminal window.
node-red-start
(2) You can find an IP address as below. 'Once Node-RED has started, point a browser at http://169.254.170.40:1880' (It depends on your IP address)
(3) Open your web browser.
(4) Copy the IP address and paste on web-browser.
(5) It will display a visual editor of Node-RED on web-browser.
(6) You can start coding with visual editor on web-browser.
(7) Try dragging & dropping any node from the left-hand side to right-hand side. It's really easy to code. ( You can conveniently use the visual editor offline as well as online. ) Download the '__ver0.1.txt' file. (1) Click the number (1) at the right-hand side corner shown in NodeRED on web-browser. (2) Click the Import button on the drop down menu. (3) Open the Clipboard shown in the above 1st picture. (4) Lastly, paste the given JSON format text of '____ver0.1.txt' in Import nodes editor.
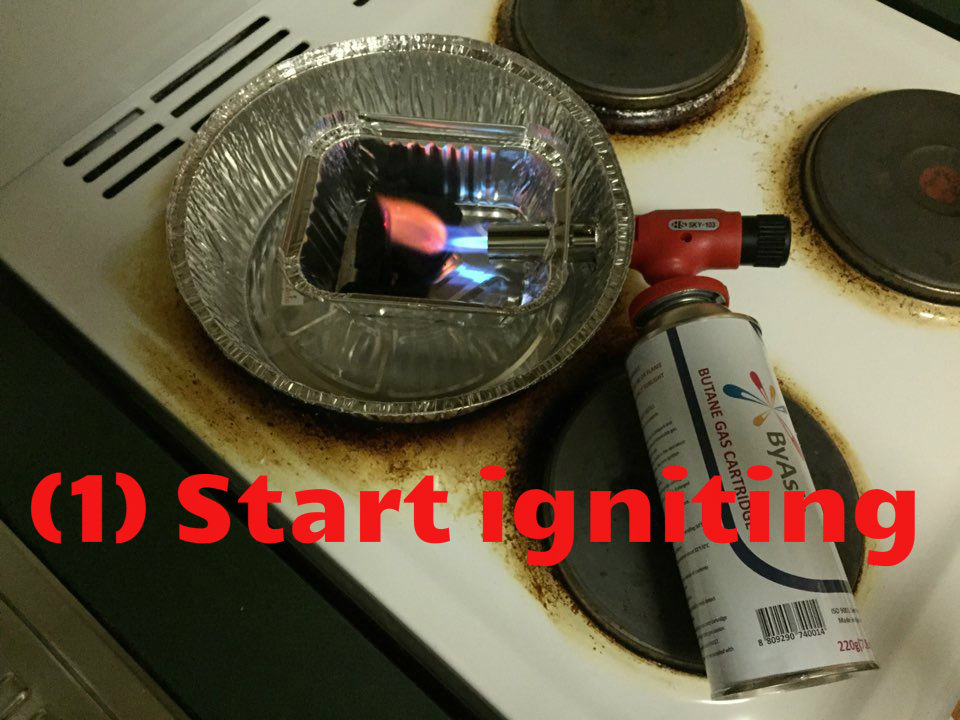
Setting Up Aluminum Foil Furnace With a Circuited Fan With Raspberry Pi
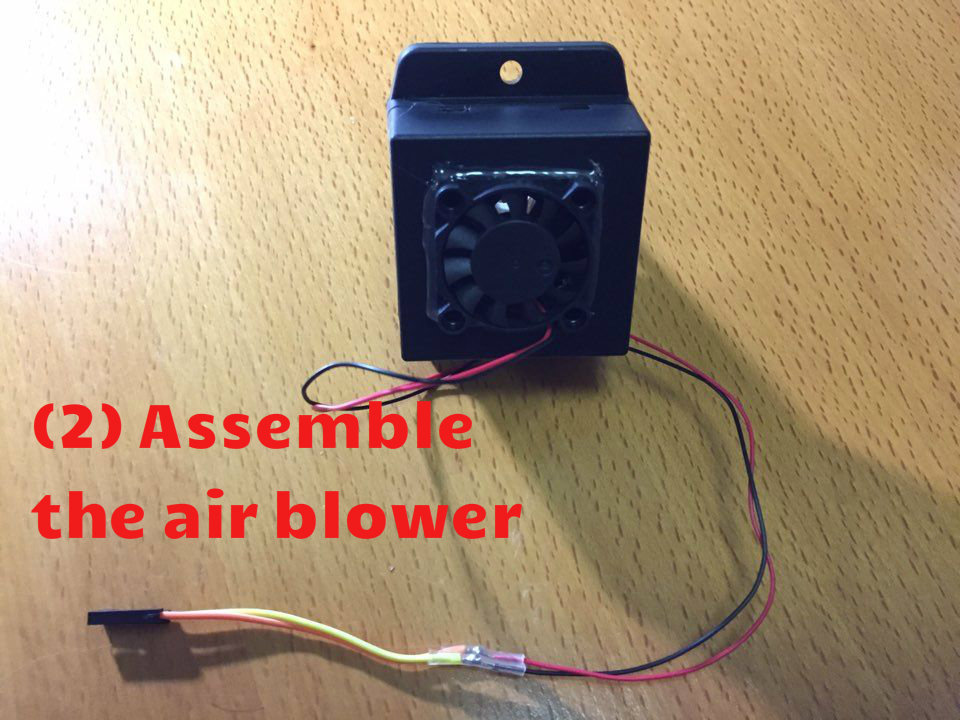
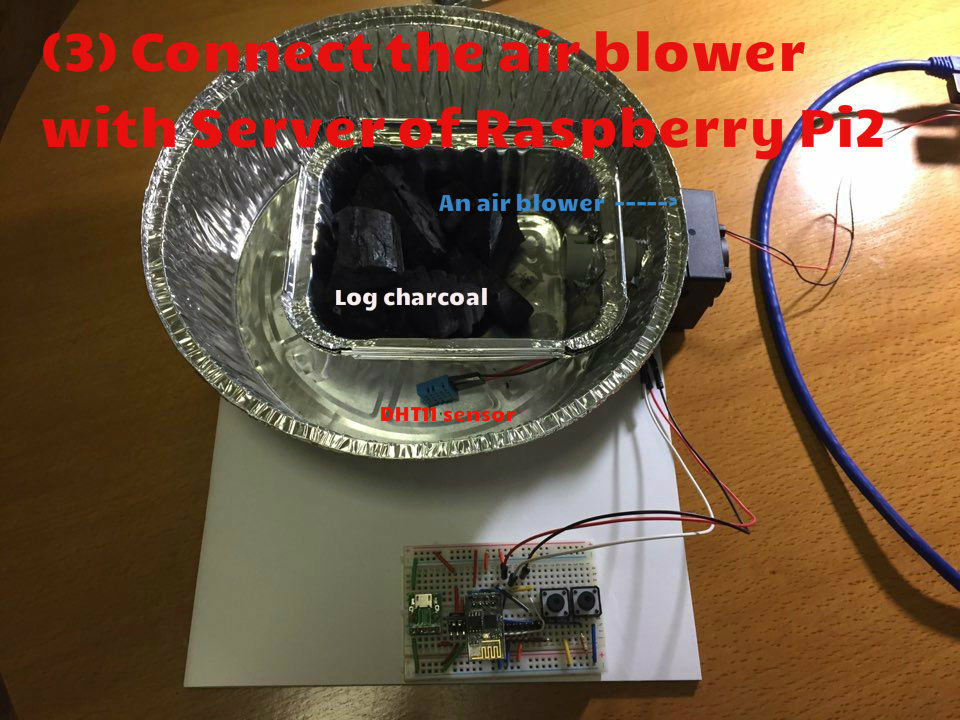
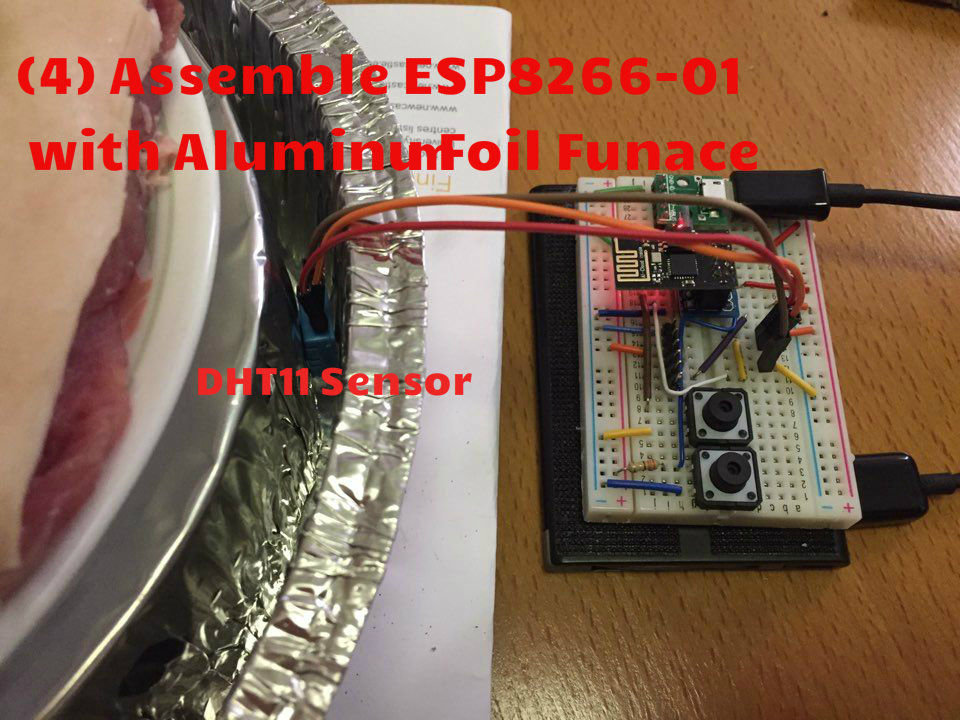
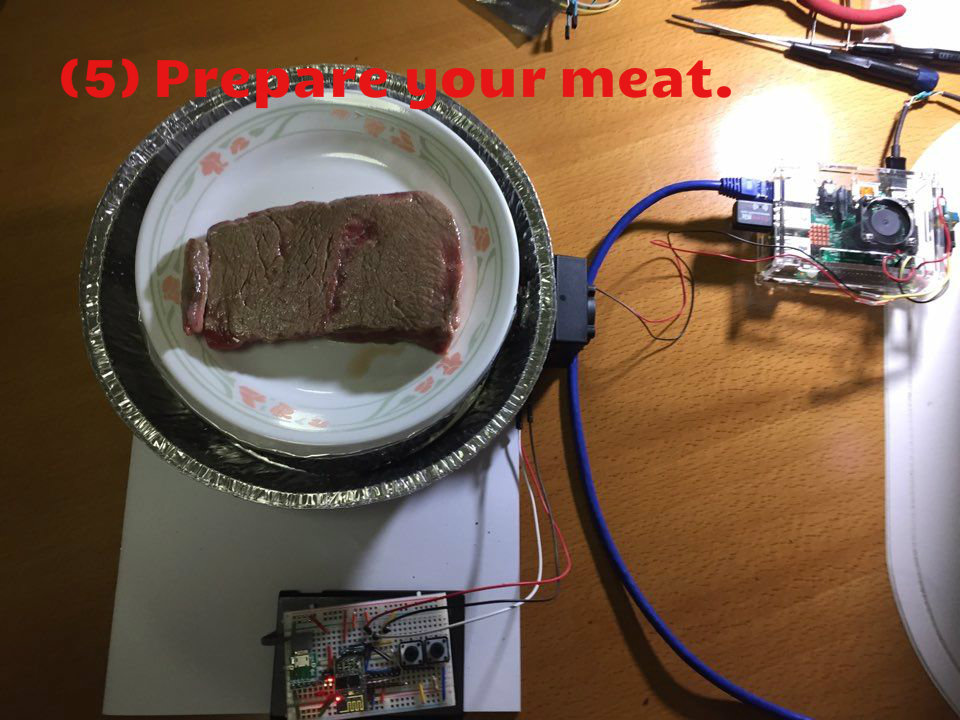

Setting Up MQTT V3.1 on Raspberry Pi2
There are two options such as using eclipse paho, installing a mosquitto sever. Also, you can use (1) option instead of (2) opption.
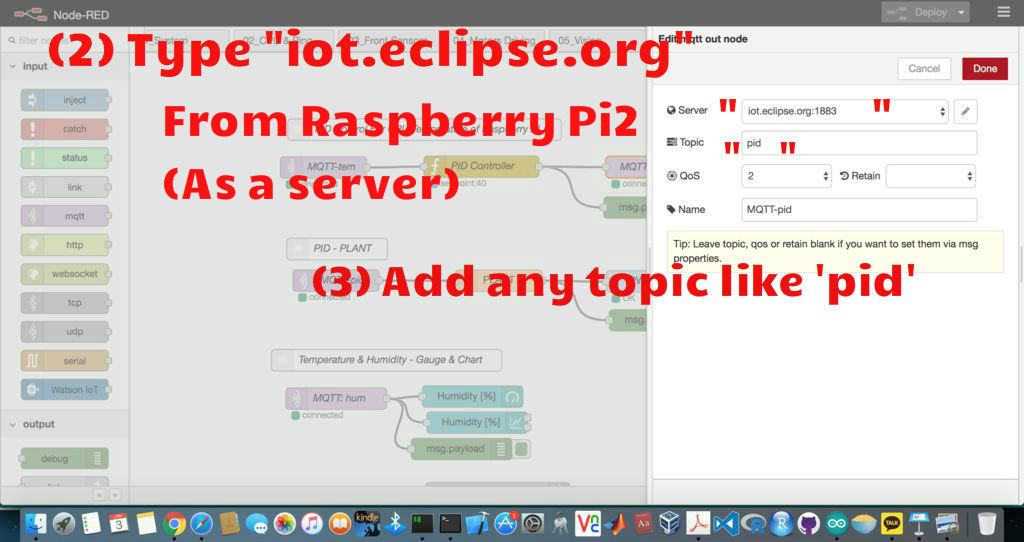
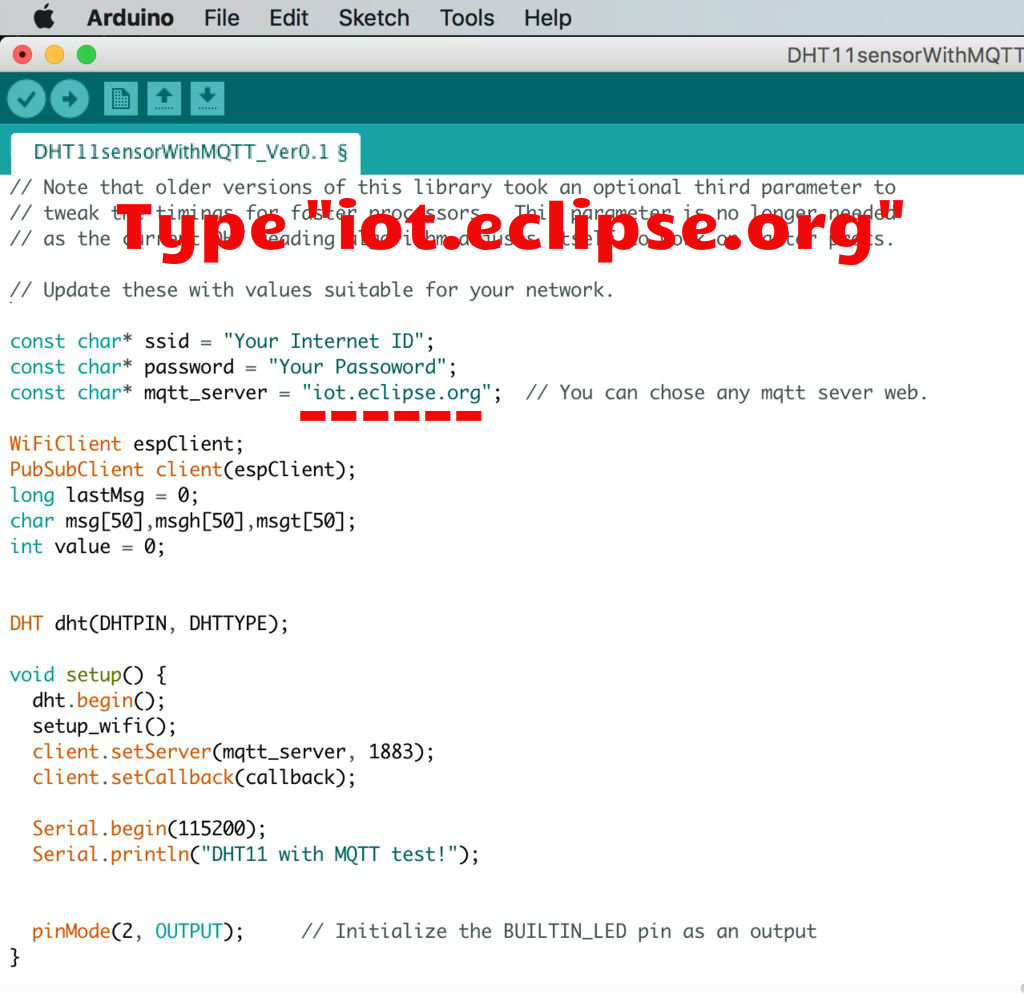
(1) Using "iot.eclipse.org".
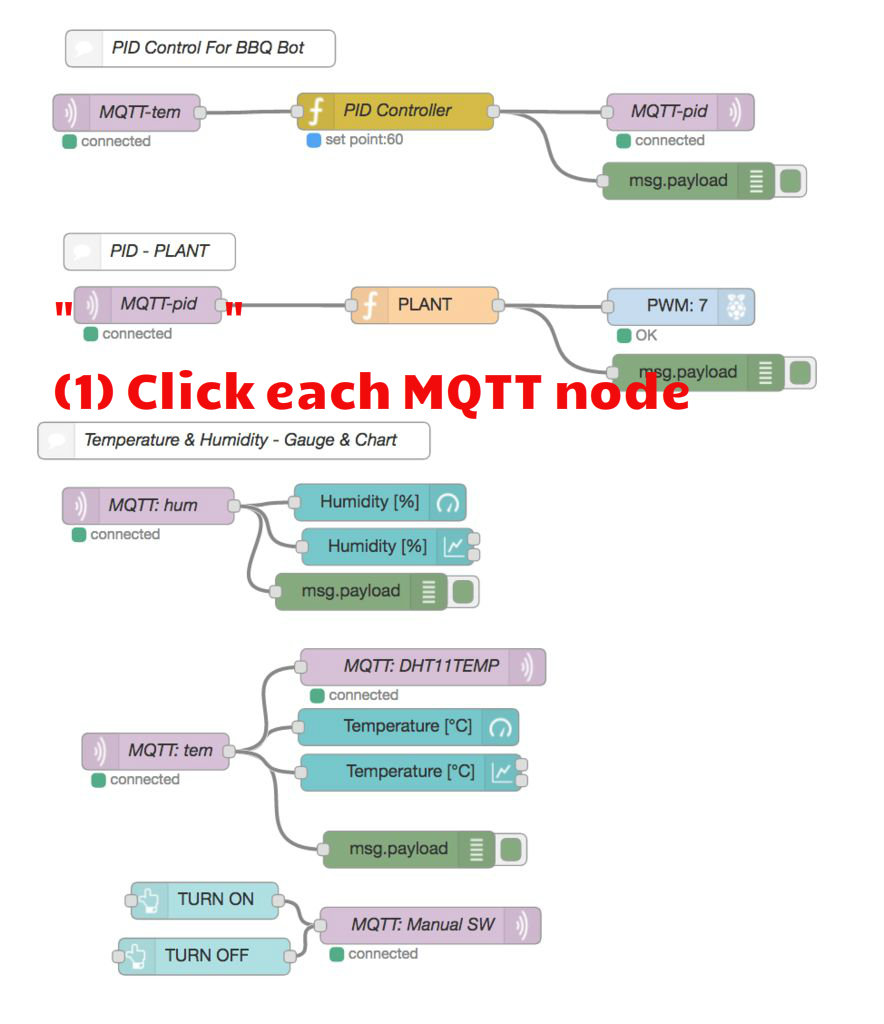
Click each MQTT node and Type it.
iot.eclipse.org
(2) Setting up MQTT v3.1 on Raspberry Pi2
This message broker(Mosquitto) is supported by MQTT v3.1 and it is easily installed on the Raspberry Pi and somewhat less easy to configure. Next we step through installing and configuring the Mosquitto broker. We are going to install & test the MQTT “mosquitto” on terminal window. Click that.
https://www.instructables.com/id/PID-Control-for-CPU-Temperature-of-Raspberry-Pi/
Checking Your NodeRED Codes With MQTT on Raspberry Pi2
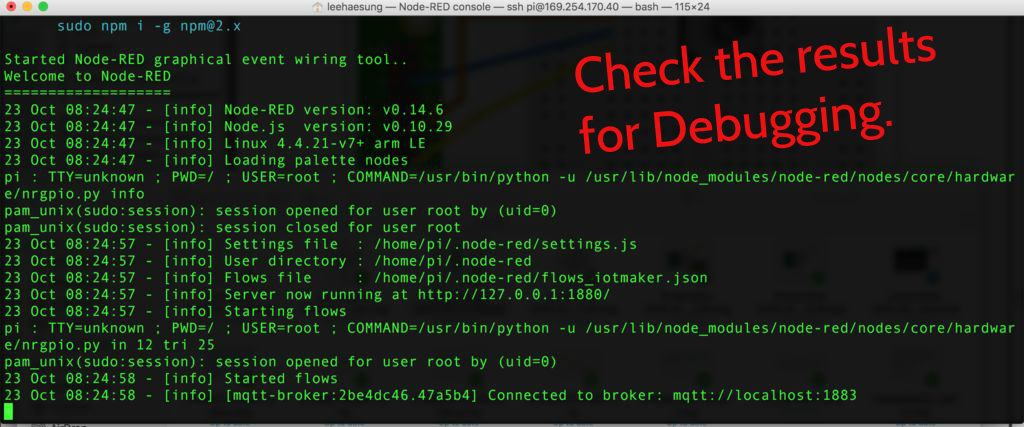
When you will use the JSON format of the '_____ver0.1.txt' on Node-RED, it's automatically set up & coded each data. I have already set up the each data in each node.
(1) Click each node.
(2) Check information inside each node has been prefilled.
(3) Please don't change the set data. (The above can be customized for more advanced users.)
Adding & Setting Up PID Node, Dashboard on Raspberry Pi2

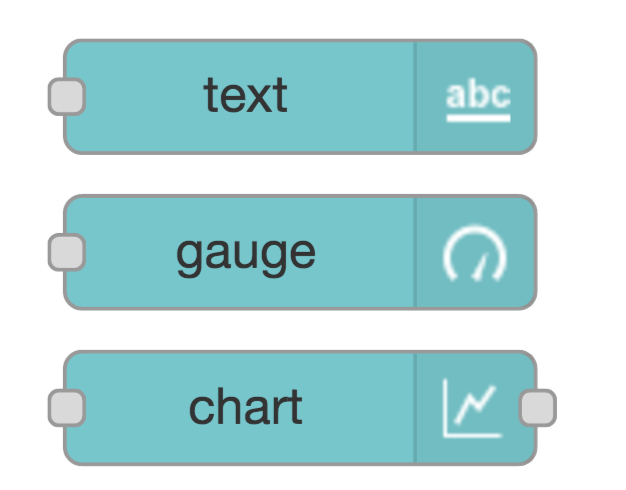

Searching the Nodes
Node-RED comes with a core set of useful nodes, but there are a growing number of additional nodes available for installing from both the Node-RED project as well as the wider community. You can search for available nodes in the Node-RED library or on the npm repository .
- For example, we are going to search 'node-red-node-pidcontrol' at the npm web. Click here .
- Then, we are going to install npm package, node-red-node-pidcontrol, node-red-dashboard on Raspberry Pi.
To add additional nodes you must first install the npm tool, as it is not included in the default installation. The following commands install npm and then upgrade it to the latest 2.x version.
sudo apt-get update
sudo apt-get install npm
sudo npm install -g npm@2.x
hash -r
cd /home/pi/.node-red
- For example, 'npm install node-red-{example node name}'
- Copy the 'npm install node-red-node-pidcontrol' from the npm web. Paste it on a terminal window.
- Ex: node-red-dashboard, and node-red-node-pidcontrol
npm install node-red-node-pidcontrol node-red-dashboard
You will need to restart Node-RED for it to pick-up the new nodes.
node-red-stop
node-red-start
Close your web browser and reopen the web browser.
Using a Dashboard for PID Control
The dashboard is a visual UI tool like gauge, chart. There is a basic tutorial of a Node-RED dashboard using node-red-dashboard. http://developers.sensetecnic.com/article/a-node-red-dashboard-using-node-red-contrib-ui/
Tuning PID Controller
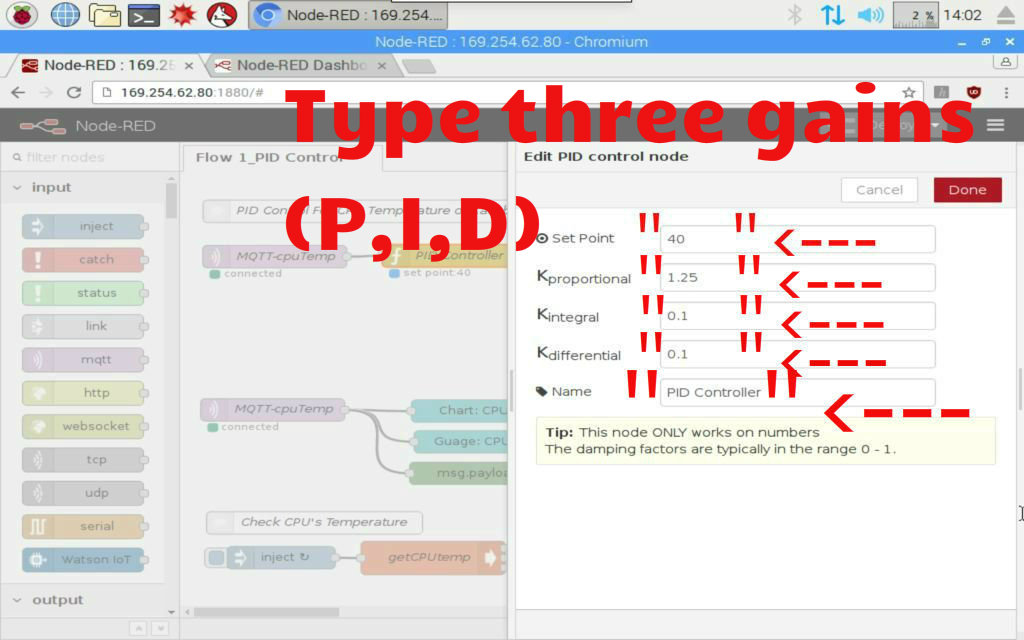
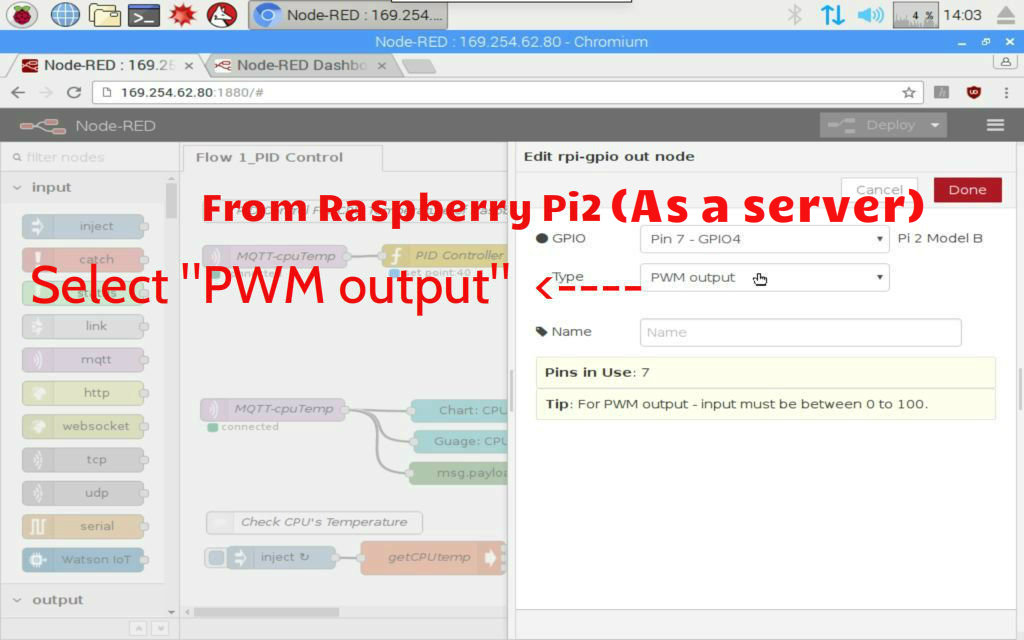
https://www.instructables.com/id/PID-Control-for-CPU-Temperature-of-Raspberry-Pi/
My instructable could be really helpful to tune the PID gains for your system.
This is big job to adjust the pid gains. Use my source(node red) from the Download List.
Download List
List of References
- A developer's guide to the Internet of Things (IoT) by IBM
- Experiment with DHT11 and Arduino
- MQTT.org: Version 3.1.1 becomes an OASIS Standard
- MQTT.org: Documentation
- Eclipse Paho
- What is Really Small Message Broker(RSMB)? (IBM)
- http://stanford-clark.com/
- The House That Twitters - Andy Stanford-Clark
- Node-RED.org: Documentation
- Node-RED: Running on Raspberry Pi
- Node-RED: Writing Functions
- JavaScript Reserved Words
- Node-RED: Node-RED Library
- RUN KIT: PID controller
- GitHub: A node advanced PID controller based on the Arduino PID library (index.js By wilberforce)
- GitHub: Node.js PID controller By wilberforce
- GitHub: node-red-nodes/function/PID/pidcontrol.js By dceejay
- Excel PID simulator
- PID Tutorial
- Automating my fan based off of the CPU temperature
- PID Controller Wikipedia
- Automatically tune PID controller gains
- PID Controller Tuning in Simulink
- Modern Control Engineering Fifth Edition Katsuhiko Ogata
- Automatic Control Systems 9th Edition BENJAMIN C. KUO
- Modern Control Systems 12th Edtion Richard C. Dorf
- ESP Chips(8266, 32, 8085, 8095) Docs
- Arduino Client for MQTT By knolleary
Version Note
-----------------------------------------------
Version rules
VerX.Y
- X: Changed
- Y: Added
(Ex 01) file__Ver0.2 : added something
(Ex 02) file__Ver1.0 : changed something
-----------------------------------------------
- RapsberryPiServer_PID_Control_For_BBQ_Bot_ver0.2.txt : improved PID tuning (25 Dec 2016)
- RapsberryPiServer_PID_Control_For_BBQ_Bot_ver0.3.txt : added UI dashboard (20 Jan 2017)