OverEngineered Photo Frame RGB Light
by Arnov Sharma in Circuits > Art
1380 Views, 14 Favorites, 0 Comments
OverEngineered Photo Frame RGB Light
.gif)
.gif)


Greetings.
This is the Overengineered Photo Franme RGB Light, which was built from the ground up using PCBs and 3D-printed parts.
The goal here was to build a RGB spot light to enhance the already incredible Dragon Ball-themed photo frame of Vegeta by adding a custom LED spotlight, as this remarkable piece deserved the perfect lighting to showcase its awesomeness.
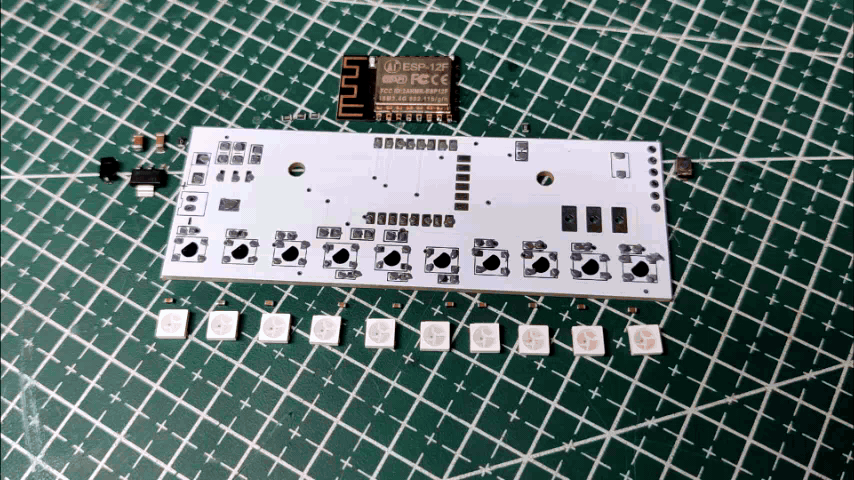
The ESP12F Minimal configuration is connected to 10 RGB LEDs and an AMS1117 voltage regulator on one of the two circuits that make up this overengineered RGB spot light or photo frame light.
A second circuit powers the ESP12F and LED board using a battery board with a lithium cell and a power management IC that generates constant 5V and 1A.
These two boards are each mounted on a unique 3D-printed body that is attached to the top of the picture frame.
The entire Instructables is about how this spot light was made and how it works, so let's get started.
Supplies
These were the materials used in this built-
- ESP12F Module
- Cistom PCBs
- AMS1117
- 10k Resistors
- WS2812 LEDs
- 100nf Capacitors
- Li-ion Cell
- Li-ion cell holder smd
- 3D Printed parts
- threaded insterts
- TP4333
- NODEMCU
3D Design
.gif)
.gif)
The photo frame is first modeled in Fusion 360 before the model is made on one of its sides. Making a stationary part that would remain stationary was the entire point of this project. A moving part will be attached to the stationary part using nuts and bolts.
The ESP12F and LED circuits will be located in the moving section, while the battery board circuit will be in the stationary component.
Three pieces in total were exported and 3D printed using brown PLA at a layer height of 0.2mm and a 0.4mm nozzle.
PCB Design


The ESP-LED board and battery board are the two PCBs that make up the majority of the PCB design.
A simple ESP12F setup with a few resistors connected to GPIO15, EN, Reset, and GPIO0, as well as an AMS1117 3.3V setup that reduces the voltage coming from the battery board from 5V to 3.3V, are also included in the ESP-LED board. These setups are necessary for ESP to function.
Each WS2812 LED has its own 100 nF CAP attached to the LED's GND and VCC pins, and they are all connected in parallel and powered by the battery board's 5 volt input.
An TP433 power bank IC, which is part of the battery board, converts the 3.7V of the Li-ion cell to a continuous 5V and 1A for powering the lights and ESP setup.
Both boards' dimensions were taken from a Cad file that Fusion360 exported as a DWG file, which was then transformed into a board outline in PCB Cad software.
The finished boards were sent to Seeed Studio for samples.
Seeed Fusion Service
.gif)

After finalizing the PCB and generating its Gerber data, I sent it to SEEED STUDIO for samples.
I ordered the battery board in a black solder mask with white silkscreen and the ESP LED board in a white solder mask with black silkscreen.
PCBs were received in a week, and their quality was super good considering the rate, which was also pretty low.
Seeed Fusion PCB Service offers one-stop prototyping for PCB manufacture and PCB assembly, and as a result, they produce superior quality PCBs and fast turnkey PCBAs within 7 working days.
PCB Quality of this MIDI BOX PCB WAS SUPER!
Seeed Studio Fusion PCB Assembly Service takes care of the entire fabrication process, from Seeed Studio Fusion Agile manufacturing and Hardware Customization to parts sourcing, assembly, and testing services, so you can be sure that they are getting a quality product.
After gauging market interest and verifying a working prototype, Seeed Propagate Service can help you bring the product to market with professional guidance and a strong network of connections.
Next is the PCB assembly process.
ESP8266 Board Assembly Process
.gif)
.gif)
.gif)
- The first step in getting the ESP12F and LED board ready is adding solder paste one by one to each component pad.
- Next, we pick and place each component in its place using an esd tweezer.
- The board is placed on a reflow hotplate, which heats it from underneath until the solder paste melts. When solder paste reaches that temperature, it melts, transferring solder to component pads.
- Next, we prepare the battery board.
Battery Board Assembly Process
.gif)
.gif)
.gif)
.gif)
- Similar to the ESP-LED board assembly, we begin by applying solder paste to each component pad individually using a solder paste dispensing syringe.
- Next, we pick and place all the components in their proper places using ESD tweezers.
- Following the pick-and-place process, we place this board on the reflow hotplate.
- After that, we place the USB port in its place and use a soldering iron to solder its pads.
- The board assembly is now complete.
Power Source
.gif)
.gif)
.gif)
The entire system is powered by a 3.7V 2900mAh 18650 lithium-ion battery; the TP4333 on this board offers constant 5V/1A for powering XYZ items, in this example an ESP board and RGB Lights.
With a multimeter with the voltage measurement feature selected, we measure the board output.
The onboard lithium-ion battery is then charged by connecting a 5V charger to the Micro USB connection, and after the indicator light begins to blink, indicating that the board is operational, we can proceed to the next stage, which is to program the ESP board and then put everything together.
Programming the ESP8266 With NODEMCU
.gif)
You might not be aware that any ESP board can be programmed using the NODEMCU Board.
By taking a NODEMCU board and connecting a jumper with its GND Pin and EN Pin, which puts the onboard ESP8266 of the NODEMCU into sleep mode, we may utilize the NODEMCU to program the external ESP12F module.
This enables us to connect an external ESP Board to NODEMCU; so essentially, we are turning off the ESP board on the NODEMCU and connecting a second ESP Board to a few of its pins.
You can read the article below for additional information about this process.
Code
#include <Adafruit_NeoPixel.h>
//Hacked from the original Adafruit library demo

#define PIN 14  //my control pin

// Parameter 1 = number of pixels in strip
// Parameter 2 = pin number (most are valid)
// Parameter 3 = pixel type flags, add together as needed:
//   NEO_KHZ800  800 KHz bitstream (most NeoPixel products w/WS2812 LEDs)
//   NEO_KHZ400  400 KHz (classic 'v1' (not v2) FLORA pixels, WS2811 drivers)
//   NEO_GRB     Pixels are wired for GRB bitstream (most NeoPixel products)
//   NEO_RGB     Pixels are wired for RGB bitstream (v1 FLORA pixels, not v2)
Adafruit_NeoPixel strip = Adafruit_NeoPixel(10, PIN, NEO_GRB + NEO_KHZ800);


void setup() {
  strip.begin();
  strip.show(); // Initialize all pixels to 'off'
}

void loop() {
  //Start out with a purple color
  colorWipe(strip.Color(102, 0, 102), 1); // purple

  //Throb read and then fade out
  PlasmaPulse(100);
}

// Fill the dots one after the other with a color
void colorWipe(uint32_t c, uint8_t wait) {
  for(uint16_t i=0; i<strip.numPixels(); i++) {
      strip.setPixelColor(i, c);
      strip.show();
      delay(wait);
  }
}

void PlasmaPulse(uint8_t wait) {
  uint16_t i, j;
  uint8_t brightness = 255;


  for(i=0; i<strip.numPixels(); i++) {
    strip.setPixelColor(i, strip.Color(255, 255, 255));
  }
  strip.show();
  delay(wait);
  //Adjust 60 and 90 to the starting and ending colors you want to fade between.
  for(j=170; j>=135; --j) {
    for(i=0; i<strip.numPixels(); i++) {
      strip.setPixelColor(i, Wheel((i+j) & 255));
    }
    strip.show();
    brightness -= 6;
    strip.setBrightness(brightness);
    delay(wait);
  }


  for(j=135; j<1170; j++) {
    for(i=0; i<strip.numPixels(); i++) {
      strip.setPixelColor(i, Wheel((i+j) & 255));
    }
    strip.show();
    brightness += 6;
    strip.setBrightness(brightness);
    delay(wait);
  }

  for(i=0; i<strip.numPixels(); i++) {
    strip.setPixelColor(i, strip.Color(255, 255, 255));
  }
  strip.show();
  delay(wait);


}

// Input a value 0 to 255 to get a color value.
// The colours are a transition r - g - b - back to r.
uint32_t Wheel(byte WheelPos) {
  if(WheelPos < 85) {
   return strip.Color(WheelPos * 3, 255 - WheelPos * 3, 0);
  } else if(WheelPos < 170) {
   WheelPos -= 85;
   return strip.Color(255 - WheelPos * 3, 0, WheelPos * 3);
  } else {
   WheelPos -= 170;
   return strip.Color(0, WheelPos * 3, 255 - WheelPos * 3);
  }
}
3D Printed Parts and Threaded Inserts
.gif)
.gif)
.gif)
.gif)
The model was printed with a 0.4mm nozzle and 0.2mm layer height using brown PLA with a 20% infill to give the parts strength.
Using a soldering iron that has been turned down to 150°C, we add two M3 threaded inserts to the base body. This will heat up the insert and somewhat melt the plastic, fixing it in place.
We carry out this process on both sides before moving on to the last stage of assembly.
Final Assembly
.gif)
.gif)

.gif)
.gif)
- Using two M2 screws, we first attach two 3D-printed lever pieces to the ESP-LED PCB to begin the final assembly.
- With two M3 bolts, we next attach the main body and the ESP-LED board assembly.
- We then add the battery board on top of base body using two M2 screws
- Finally, we use a CON2 wire harness port to link the IN and GND ports on the ESP-LED board to the 5V and GND ports on the battery board.
- Assembly is now finally complete.
RESULT
.gif)
.gif)
.gif)
.gif)
The job is finished once we place the setup on the upper side of the photo frame.
The finished product of this build is an over-engineered RGB spot light that was hand-made from scratch. The nicest aspect about this setup is that it is wire-free and can work for a few days, which is fantastic.
It improves the vegita photo frame's appearance, and I'm satisfied with the results.
The entire process is simple to complete, and I've included all the necessary files in the article. Please leave a comment if you need further assistance.
This is it for today, folks.
Thanks Seeed Studio for supporting this project, you guys can check them out if you need great PCB and stencil service for less cost and great quality.
And I'll be back with a new project pretty soon!