Opencv and Python Installation for Windows / Mac
by BhaskarP6 in Circuits > Computers
3028 Views, 2 Favorites, 0 Comments
Opencv and Python Installation for Windows / Mac
OpenCV is an open source computer vision library which is very popular for performing basic image processing tasks such as blurring, image blending, enhancing image as well as video quality, thresholding etc. In addition to image processing, it provides various pre-trained deep learning models which can be directly used to solve simple tasks at hand. The programmers have to download and load the model using OpenCV instructions in order to do the task of inference on their own dataset.
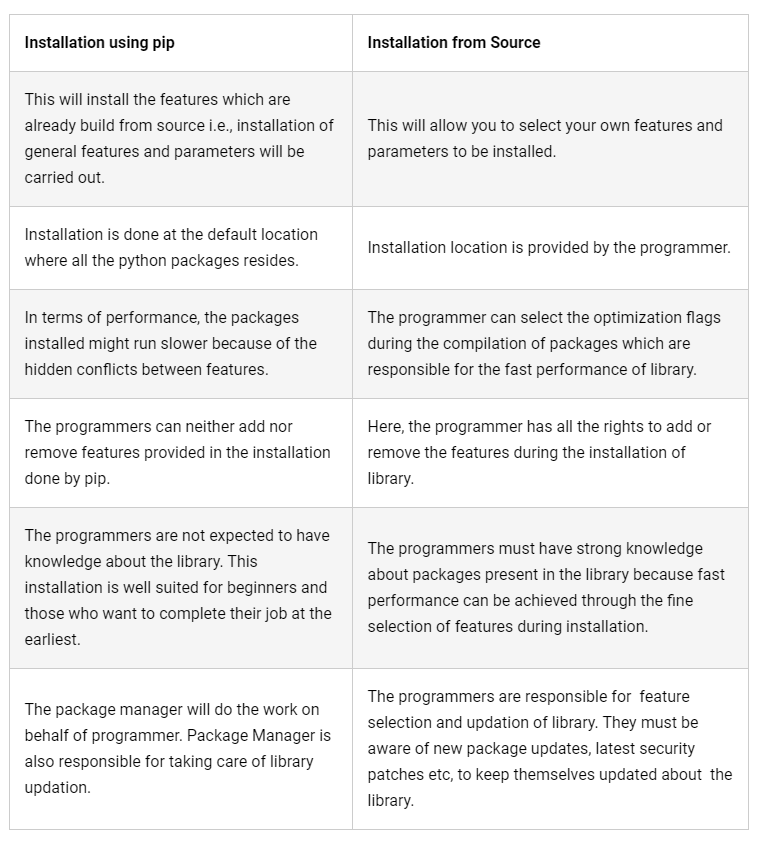
Firstly, you need to install OpenCV library in your system prior to using it for your own dataset. At this stage, there can be two pathways of installing OpenCV in your system namely – (a) Using pip (b) Source Installation. pip is the package manager which is used to install the packages written in python. The difference between installing a python package from source and through pip are given in the table:
Download OpenCV
Click on the below link to redirect to the latest release web page of OpenCV.
for windows: https://sourceforge.net/projects/opencvlibrary/fil...
for MAC: https://sourceforge.net/projects/opencvlibrary/fil...
Download OpenCV-contrib
As you can see in the image above, Click on Sources button to download OpenCV – 4.1.0 archive files into your system. Once the download is complete, unzip the files at your desired location. For illustration purpose, I am going to create a folder named as ‘opencv’ in my Desktop and I will unzip the downloaded archive inside the same folder.
In order to download OpenCV_contrib you must open the command line tool and clone the repository by executing the following command:
for windows: https://github.com/opencv/opencv_contrib
then click on Clone / Download
for Mac: git clone https://github.com/opencv/opencv_contrib.git
Python Installation
Python doesn’t come prepackaged with Windows /mac, but that doesn’t mean Windows/mac users won’t find the flexible programming language useful. It’s not quite a simple as installing the newest version however, so let’s make sure you get the right tools for the task at hand.
First released in 1991, Python is a popular high-level programming language used for general purpose programming. Thanks to a design philosophy that emphasizes readability it has long been a favorite of hobby coders and serious programmers alike. Not only is it an easy language (comparatively speaking, that is) to pick up but you’ll find thousands of projects online that require you have Python installed to use the program.
Which Version Do You Need?
Unfortunately, there was a significant update to Python several years ago that created a big split between Python versions. This can make things a bit confusing to newcomers, but don’t worry. We’ll walk you through installing both major versions.
When you visit the Python for Windows download page, you’ll immediately see the division. Right at the top, square and center, the repository asks if you want the latest release of Python 2 or Python 3 (2.7.13 and 3.6.1, respectively, as of this tutorial).
for Mac users: https://www.python.org/downloads/mac-osx/
Pip Command Installation
After the python installation
go to this url: https://bootstrap.pypa.io/get-pip.py
Now open terminal / command prompt : type python get-pip.py