Omnidirectional Display / Digital Zoetrope

by tootarU in Circuits > Arduino

86 Views, 3 Favorites, 0 Comments

Omnidirectional Display / Digital Zoetrope

2NycElw.jpeg
Demonstration 3

Inspired by a YouTube video of an "Andotrope", this project shows you how to build your own digital zoetrope using inexpensive parts. When the motor spins the display visible through a narrow slit, our eyes merge the rapid sequence of images into one continuous image. The ESP32C3 drives the 160×128 TFT display with a looped animation while the cheap 5V motor rotates the assembly. With most of the structural parts 3D‑printed, this project is both accessible and customizable.

Supplies

B47N363.jpeg

Electronics & Mechanical Components

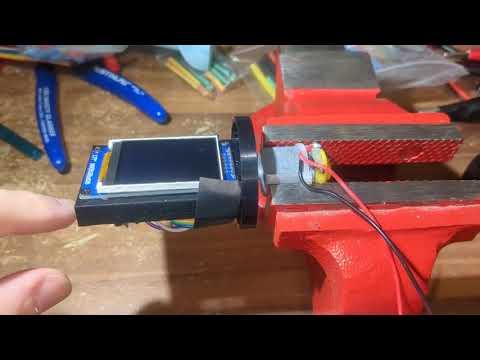
  1. ESP32C3 Supermini Module
  2. 160×128 TFT Display
  3. Small LiPo Battery
  4. 5V DC Motor

Tools

  1. Soldering iron and solder
  2. Wire cutters/strippers
  3. 3D printer (or access to one)
  4. Computer with Arduino IDE installed

3D Printing the Parts

Print the parts using your preferred filament. Once printed, clean them up and test-fit the parts to ensure everything aligns correctly.

Wiring and Code

lug8bTE.jpeg
Screenshot 2025-02-11 011411.png

ESP32C3 and Display Setup:

  1. Connect the necessary wires between the ESP32C3 and the TFT display.
  2. Connect the LiPo battery to the ESP32C3 power input (using appropriate battery connectors and, if necessary, a voltage regulator).

Upload this sketch to the ESP32C3

#include <WiFi.h>
#include <WebServer.h>
#include <SPIFFS.h>
#include <PNGdec.h>
#include <Adafruit_GFX.h>
#include <Adafruit_ST7735.h>
#include <SPI.h>

// TFT Pins
#define TFT_CS 3
#define TFT_RST 7
#define TFT_DC 9

Adafruit_ST7735 tft = Adafruit_ST7735(TFT_CS, TFT_DC, TFT_RST);

// WiFi Settings
const char *ssid = "ESP32C3-Display";
const char *password = "password123";

WebServer server(80);
PNG png;
File pngFile;
File outFile;

// PNG Callbacks
static void *pngOpen(const char *filename, int32_t *size) {
pngFile = SPIFFS.open(filename, "r");
if (!pngFile) return nullptr;
*size = pngFile.size();
return &pngFile;
}

static void pngClose(void *handle) {
if (pngFile) pngFile.close();
}

static int32_t pngRead(PNGFILE *png, uint8_t *buffer, int32_t length) {
File *file = (File *)png->fHandle;
return file->read(buffer, length);
}

static int32_t pngSeek(PNGFILE *png, int32_t position) {
File *file = (File *)png->fHandle;
return file->seek(position);
}

// Draw callback for PNG decoding
void pngDraw(PNGDRAW *pDraw) {
uint16_t lineBuffer[128];
png.getLineAsRGB565(pDraw, lineBuffer, PNG_RGB565_LITTLE_ENDIAN, 0xffffffff);
outFile.write((uint8_t *)lineBuffer, 128 * sizeof(uint16_t));
}

void setup() {
Serial.begin(115200);
// Initialize SPIFFS
if (!SPIFFS.begin(true)) {
Serial.println("SPIFFS Mount Failed");
return;
}
// Initialize TFT
tft.initR(INITR_BLACKTAB);
tft.fillScreen(ST77XX_BLACK);
tft.setRotation(2);
Serial.println("TFT Initialized");

// Start WiFi AP
WiFi.softAP(ssid, password);
Serial.print("AP IP: ");
Serial.println(WiFi.softAPIP());

// Set up web server routes
server.on("/", HTTP_GET, serveHomePage);
server.on("/upload", HTTP_POST, handleUploadResponse, handleFileUpload);
server.begin();
}

void loop() {
server.handleClient();
}

void serveHomePage() {
String html = R"(
<html>
<body>
<h1>ESP32C3 Image Upload</h1>
<form method='post' enctype='multipart/form-data' action='/upload'>
<input type='file' name='image' accept='.png'>
<input type='submit' value='Upload'>
</form>
</body>
</html>)";
server.send(200, "text/html", html);
}

void handleFileUpload() {
HTTPUpload& upload = server.upload();
static File uploadFile;
if (upload.status == UPLOAD_FILE_START) {
if (SPIFFS.exists("/upload.png")) SPIFFS.remove("/upload.png");
uploadFile = SPIFFS.open("/upload.png", "w");
} else if (upload.status == UPLOAD_FILE_WRITE) {
if (uploadFile) uploadFile.write(upload.buf, upload.currentSize);
} else if (upload.status == UPLOAD_FILE_END) {
if (uploadFile) {
uploadFile.close();
processImage();
}
}
}

void processImage() {
int rc = png.open("/upload.png", pngOpen, pngClose, pngRead, pngSeek, pngDraw);
if (rc != PNG_SUCCESS) {
Serial.println("PNG open failed");
return;
}

if (png.getWidth() != 128 || png.getHeight() != 128) {
Serial.println("Invalid dimensions (must be 128x128)");
png.close();
return;
}

outFile = SPIFFS.open("/image.rgb565", "w");
if (!outFile) {
Serial.println("Failed to create output file");
png.close();
return;
}

rc = png.decode(nullptr, 0);
outFile.close();
png.close();
SPIFFS.remove("/upload.png");
if (rc == PNG_SUCCESS) {
Serial.println("Image converted successfully");
displayImage();
} else {
Serial.println("Decode failed");
}
}

void handleUploadResponse() {
server.send(200, "text/plain", "File uploaded and processed");
}

void displayImage() {
File file = SPIFFS.open("/image.rgb565", "r");
if (!file) {
Serial.println("Failed to open image file");
return;
}

for (int y = 0; y < 128; y++) {
for (int x = 0; x < 128; x++) {
uint16_t color;
if (file.readBytes((char *)&color, sizeof(color)) == sizeof(color)) {
tft.fillRect(x, y, 1, 1, color);
}
}
}
file.close();
Serial.println("Image displayed on TFT");
}

Assemble the Parts

0jN5TeN.jpeg
UsWtajV.jpeg
tUnjiD4.jpeg
Ku4JMAb.jpeg
SUR9vpF.jpeg
Example of an unbalanced screen
Example of a balanced screen

Assemble the Rotating Rart:

When assembling the spinning part I recommend trying to balance it. That will reduce the amount of vibrations.

Mount the Motor:

Secure the 5V motor onto your 3D‑printed motor mount. Ensure it is fixed and aligned so that its shaft will drive the rotating hub smoothly.

Attach the Rotating Hub:

Mount the rotating hub onto the motor shaft. This hub will serve as the base for the display.

Attach the Slit Cylinder

Connect to WiFi and Upload an Image

Screenshot 2025-02-11 000936.png
Screenshot 2025-02-11 001003.png

The ESP32C3 should create a WiFi point that you can connect to.

Name: ESP32C3-Display

Password: password123

After you are connected to the display WiFi type "192.168.4.1" into your browser.

There you can upload a 128x128 .png file. the current code only works with png files that are exactly big enough. You can find some on 7tv.app/emotes?s=1 to get started.

Power the Motor

After powering the motor, the display should be working.

Finish

Demonstration 1