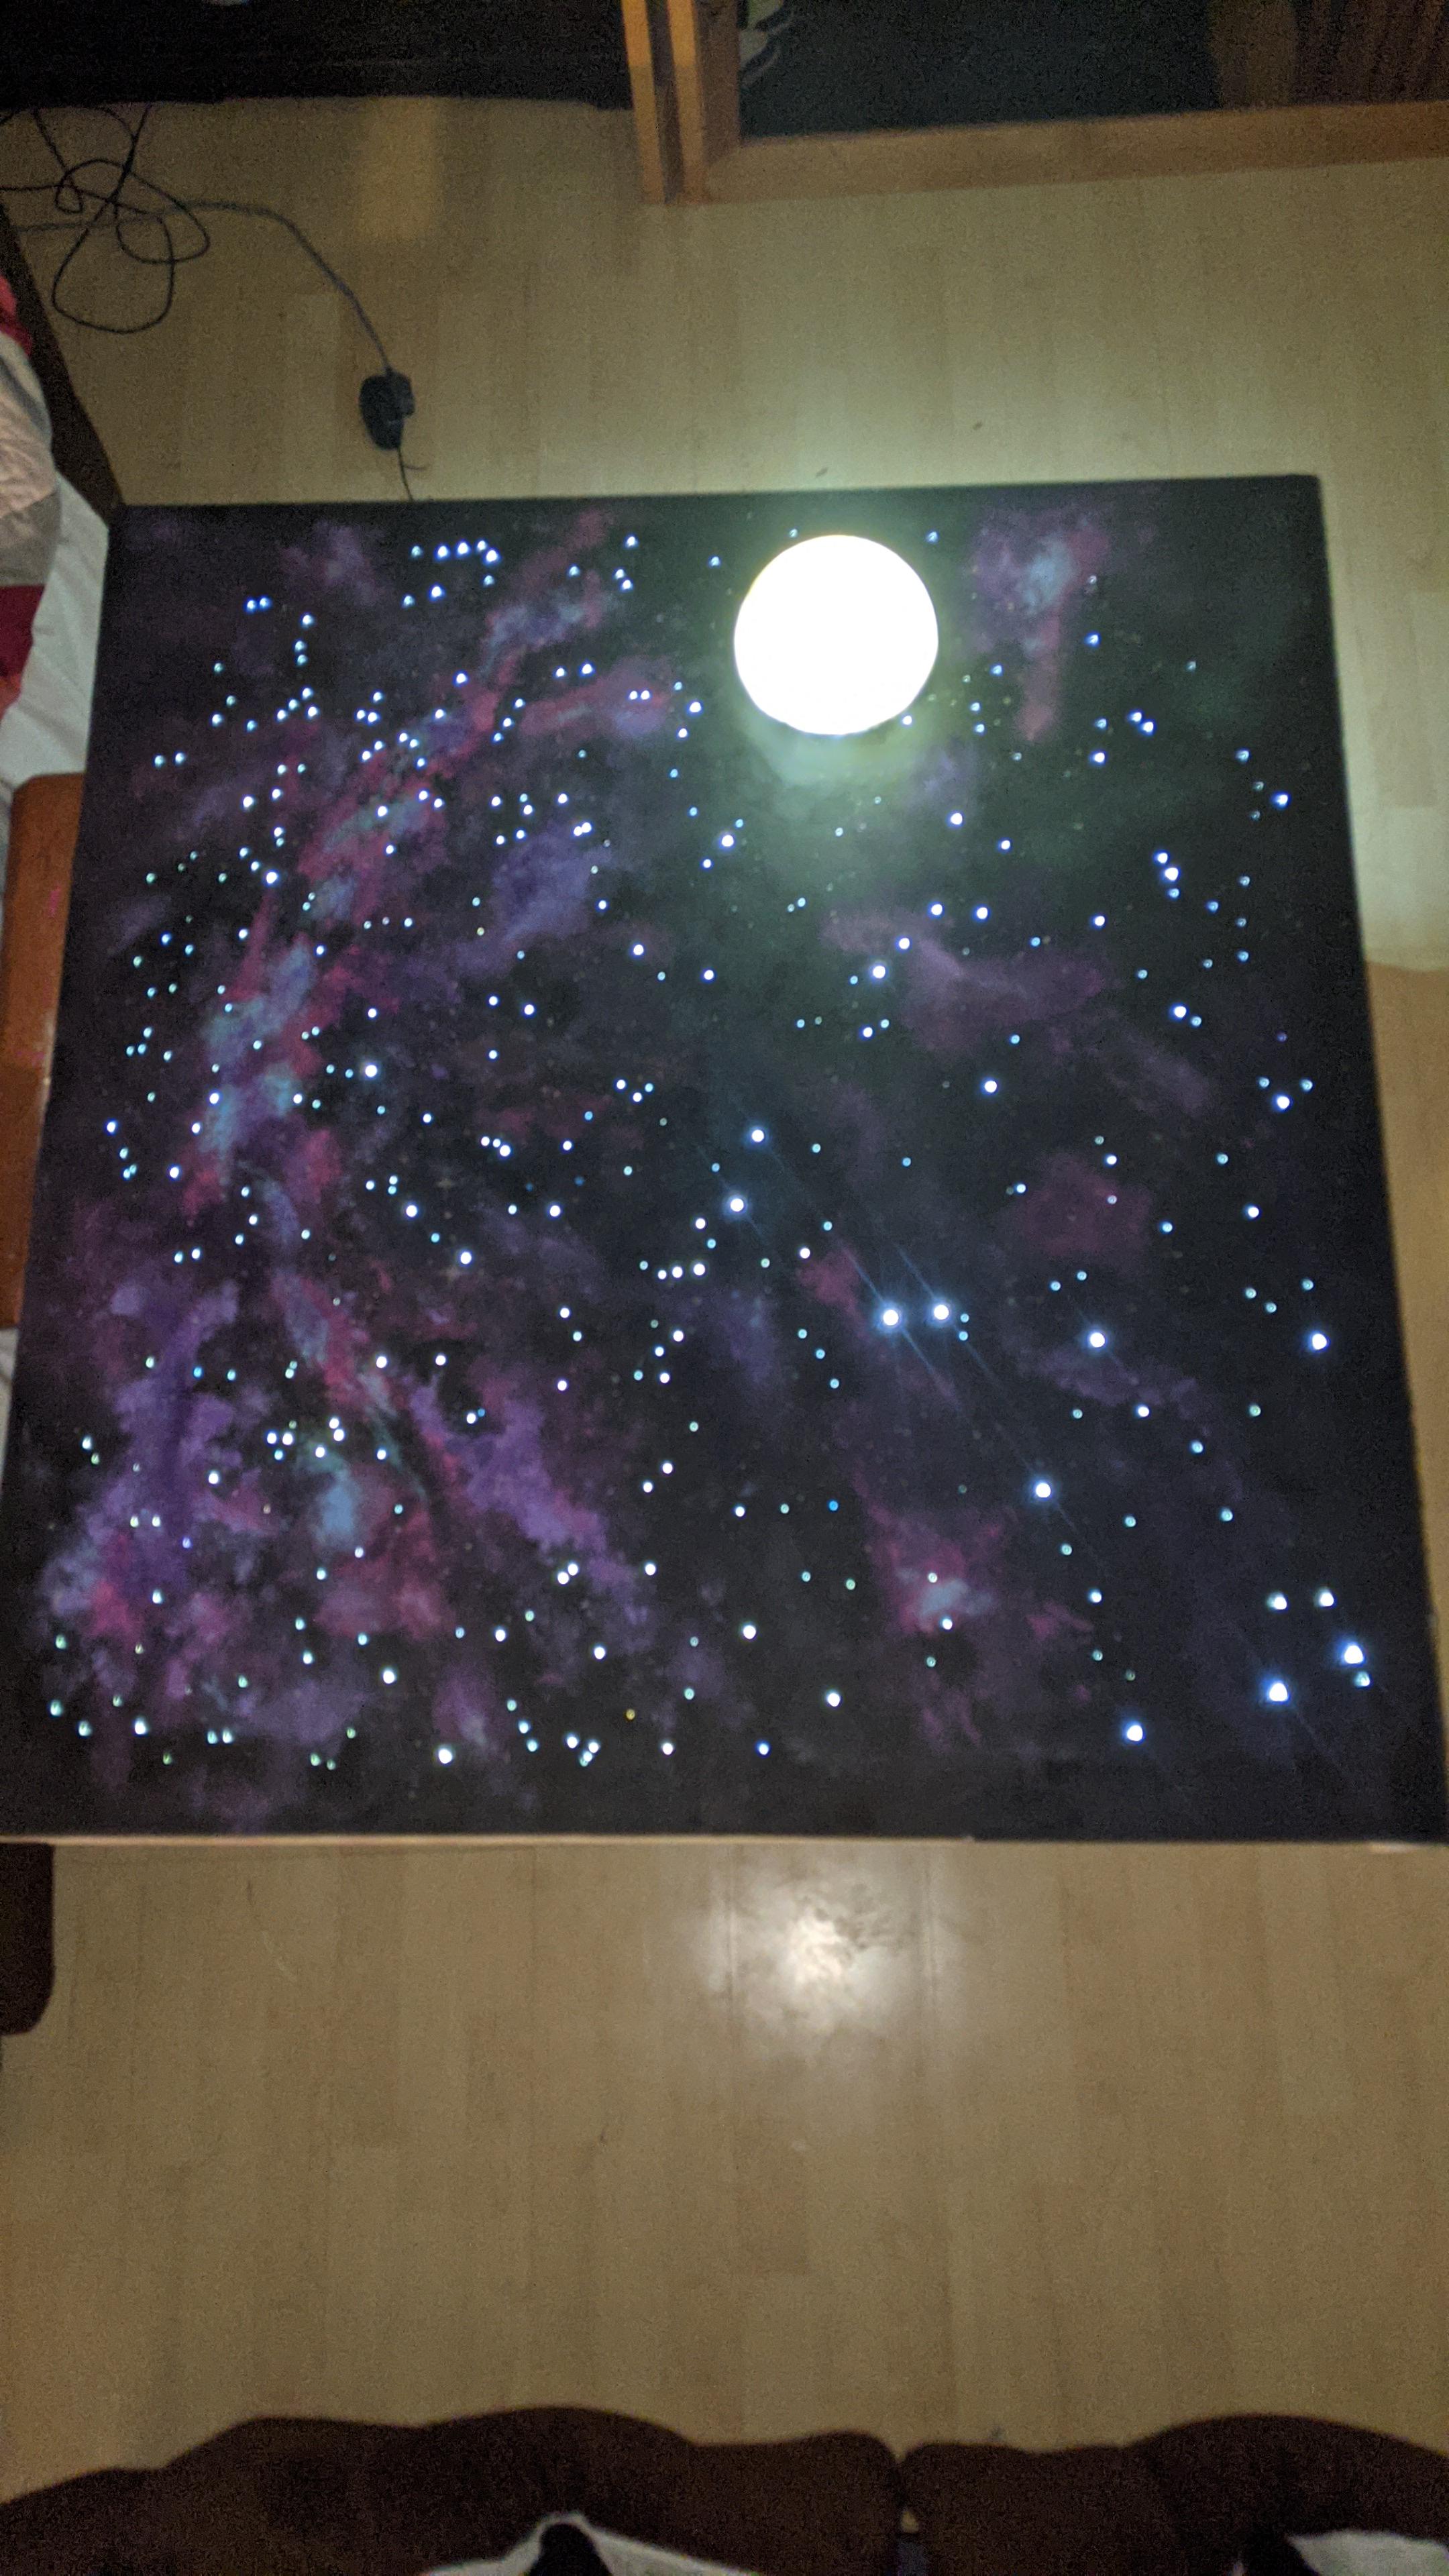
Night Sky
Ever wanted to have a starry night sky to fall asleep to with the moon shinning ? Here is how I made it.
This project was done for my daughter, and she helped along the way.
Here is the break down of the main steps:
- Print 3D Parts
- Build the Starry Ceiling
- Electronic
- Software
- Paint the ceiling
- Mounting the night-sky to the ceiling
Let's see what you will need.
Supplies
Links are not affiliated, they are provided as informational only.
For the physical night sky
The sizes/amount will depend on what you do, here it is based on a 4x4ft night sky.
- fiber optic 0.75mm diameter, 500m cheaper on aliexpress (the length will also depend on the quantity of stars you want)
- hot glue
- timber 2"x4", length: 2x 8ft
- drywall, size: 4x4ft
- baseboard: 3x 6ft
- 8x 90 angle brackets Example Homedepot
- screws
- paint (your choice of color)
- 16x 5mmx2mm round magnets https://www.amazon.ca/gp/product/B08H1N2HRJ
- 3d printed parts
Electronic
- 1x ESP32, I used this one: https://www.amazon.ca/gp/product/B07NPHFBM4
- 2x TIP120
- 6x 5.6Ω resistors
- 2x 2.2kΩ resistors
- 1x 220Ω resistor
- one push button
- 1x 220µF capacitor. You probably can go as low as 100µF if you want.
- prototype board (5x7cm), something like: https://www.amazon.ca/gp/product/B07TFZRDLH
- Female DC Power Jack Socket Connector, not the one I used, but similar: https://www.amazon.ca/gp/product/B011HFLKI2
- DC 5V 3A(3000mA) Power Adapter: https://www.amazon.ca/gp/product/B07DQR919Y
- pins male and female connectors, something like : https://www.amazon.ca/gp/product/B075XJHV5P
Software & Tools
- your favorite MCU IDE
- 3D printer
- Saw
- Drill
Print 3D Parts

For this project I took the great 3D moon from : moononournation I used the 7inch version and split it in half to keep the visible face. Then I created a mounting and a shadow cast system for it.
I also created an optional box to mount it the EPS32 in with cable management. But you can create your own with wood or other material.
You will find all the files here: https://www.thingiverse.com/thing:4761600
Printing
Moon: setting infill to 100% in white filament. No support needed.
The rest can be printed in any color you like. No need for high precision. No support required except for the servo arm.
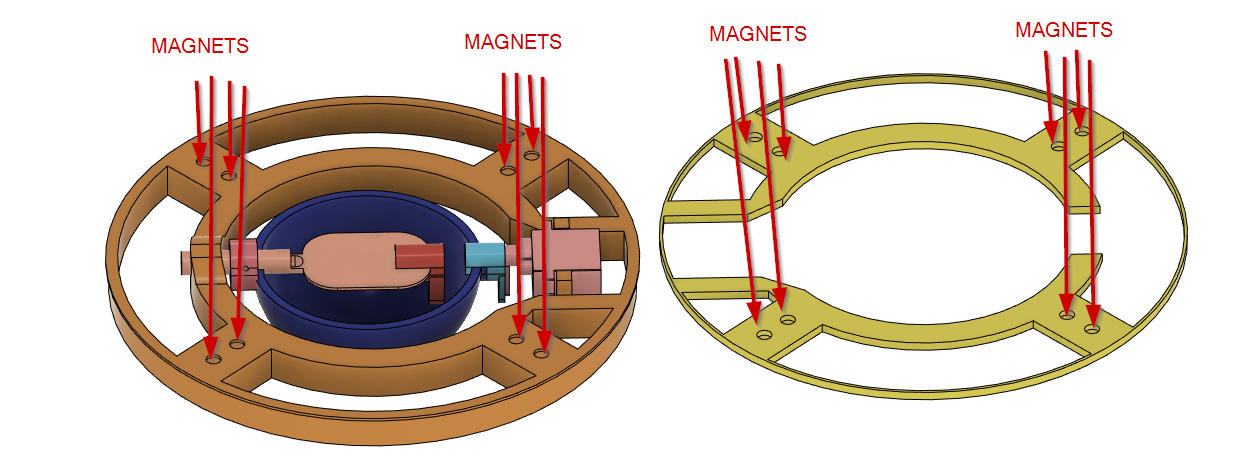
For the moon you will see in my pictures I used a version with smaller magnets, I realized that it was not strong enough, so I changed it to accept 5mm magnets instead.
Assembly
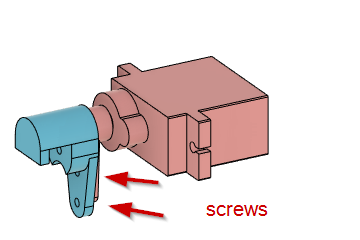
- Screw the servo arm (there are 2 sizes, the thin should be fine). Make sure the screws are inserted from the side of the servo if you want to be able to unscrew it later.(image 1)
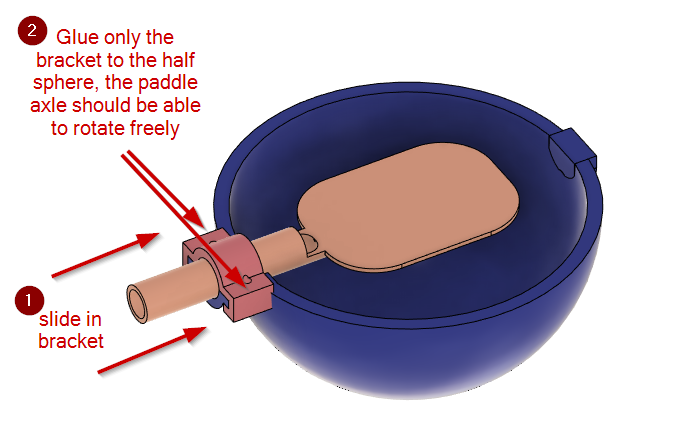
CAUTION: make sure the servo is at position 0 and once place in the base the half sphere is not behind the leds. Also pay attention that the servo axle is off to one side, so you'll have to make sure it's in the correct position when you place it in later on. - Place the light paddle on the half sphere and slide in the bracket. Make sure you put glue only on the bracket and sphere. None should go on the light paddle so it can turn freely. (image 2)
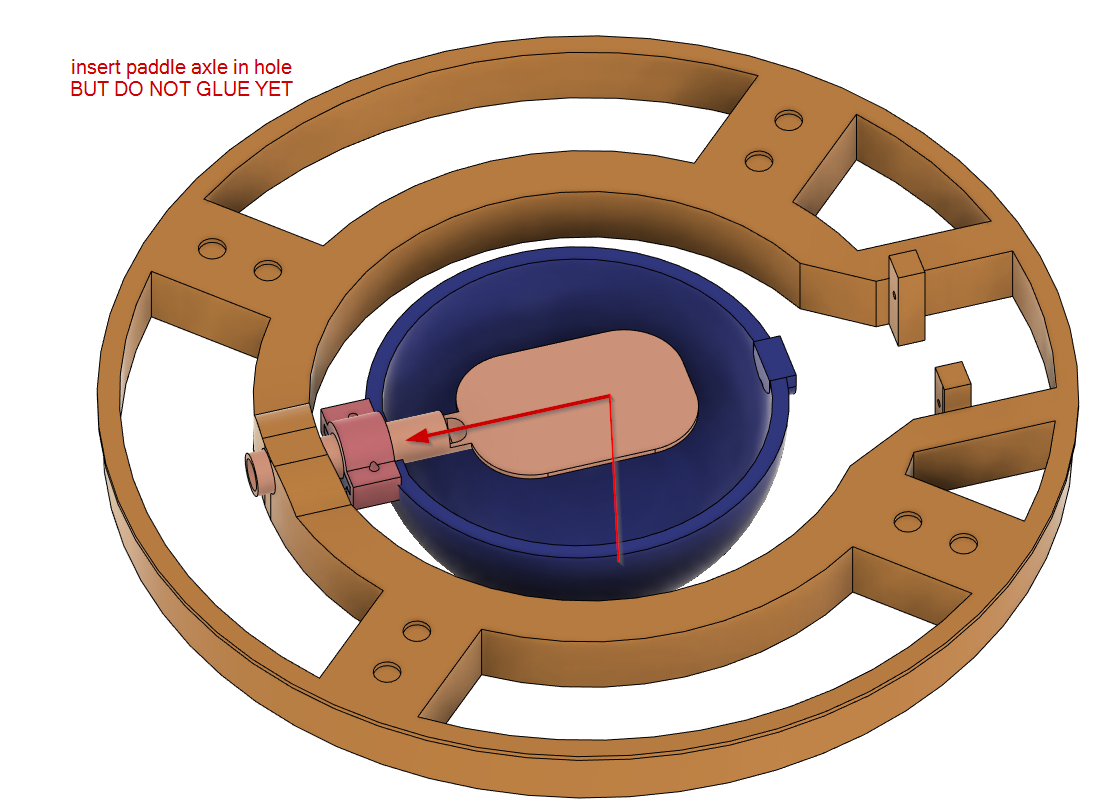
- slide in the light paddle in the base, do NOT glue anything at this stage (image3)
- insert the servo in place in the base (again the servo axle is off on one side), making sure the half-sphere will fit in the servo arm screw in the servo motor and add glue between the servo arm and sphere.
- now you can glue the light paddle where it meets with the base. Careful to not place glue at the bracket level.
- finally glue in 5x2mm round magnets on the base and moon-support. Pay attention to magnet polarity ! I find it easier to mark magnet polarity side first prior to gluing.
For the moon itself, wait until further down the project before gluing it to the moon-support. It will give you the chance to give it proper orientation.
For the box, we will get to it at the end after the electronic part.
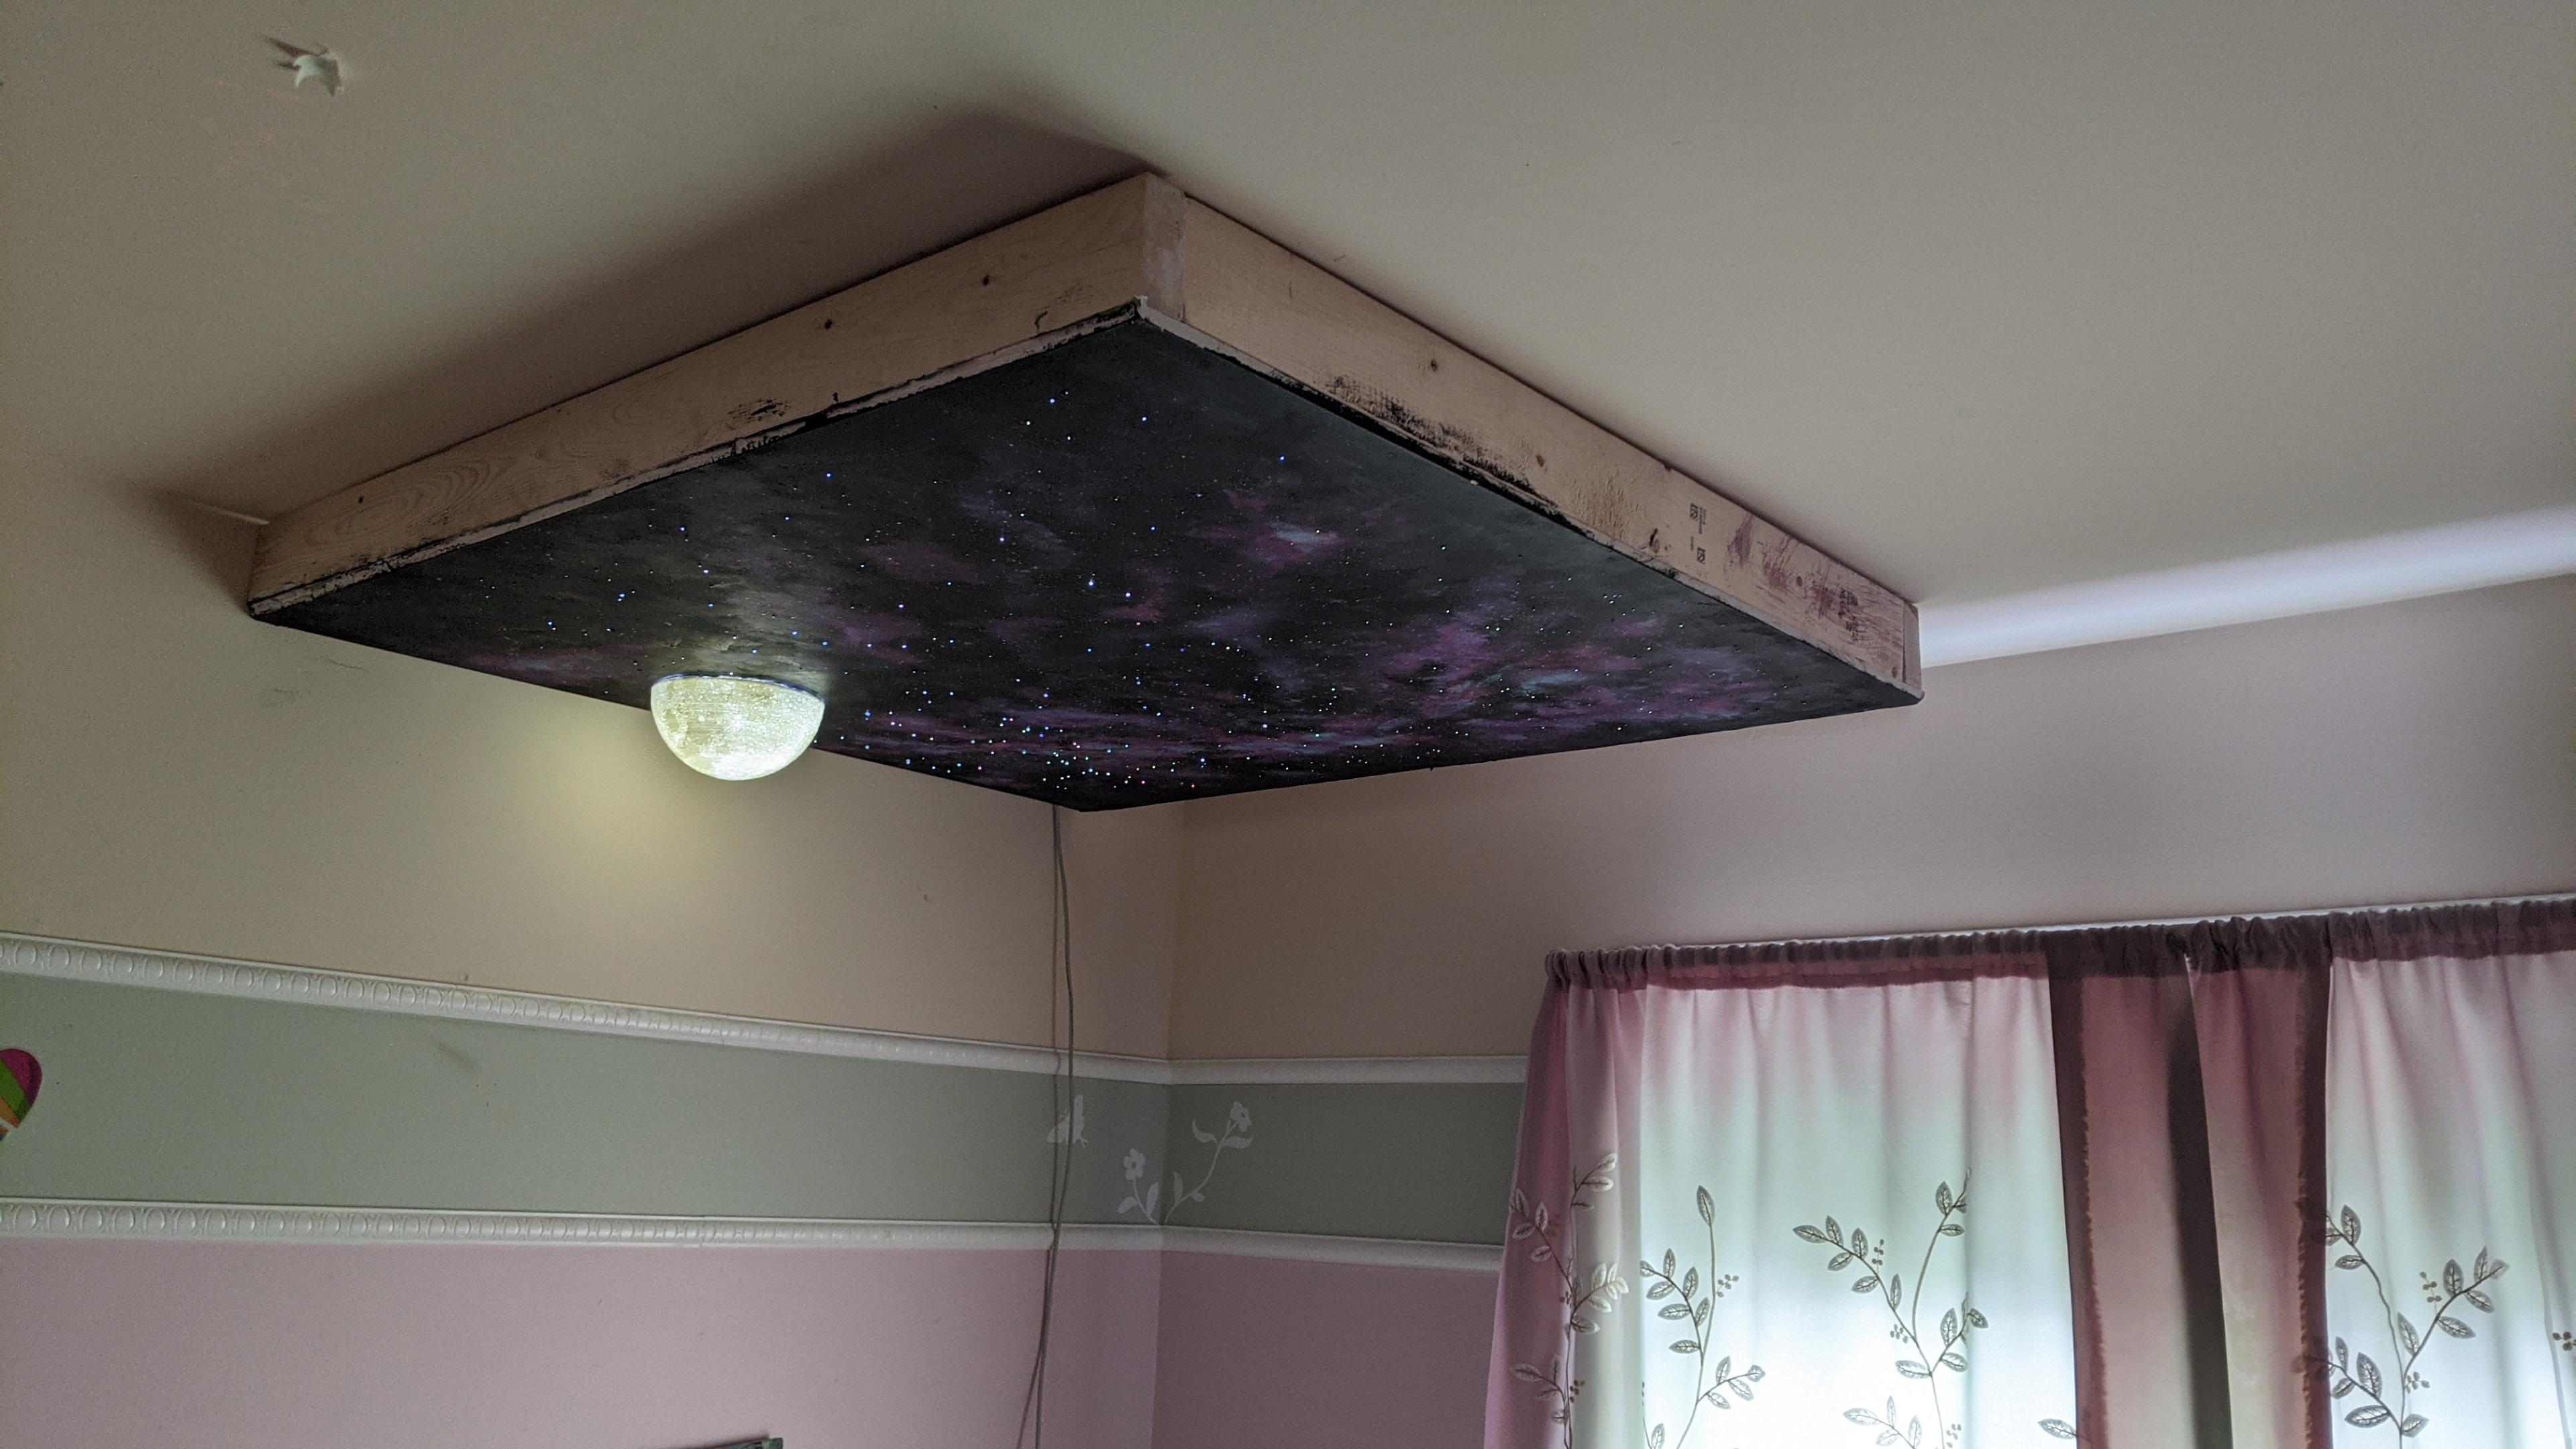
Build the Starry Ceiling
Building the frame
I dont have pictures of the ceiling frame building but it a simple box of 2x4 inch held by square angle brackets and the plywood is applied to it and held with drywall screws.
Getting the stars you want
You can just go ahead and do some random holes... but I wanted something special for my daughter... it's actually the exact stars the night of her birth day for our location.
Alas there was no moon that night, so later down the project we chose a spot she liked and didn't hide too many stars. So how did we do that ?
Get the stars
On the following site you can get a stars at a given date and time and export it to SVG. Its UI is not great, but it gets the job done and that's important.
https://in-the-sky.org/skymap2.php
Select these options:
- make sure you are in the wheel view.
- in the location select the location you want (top right).
- click on show side bar to reveal date options (top right but left of the location box)
- select the date and time you want.
- in the Limiting magnitude select Medium for now.
- in the bottom section
- display, check: stars, planets deep sky
- constellations, uncheck: Stick figures and boundaries
- show, check: Galactic plane, this is optional more on that later (at the painting stage).
- then click on export SVG, we will save this SVG as intermediate-sky-view.svg
- now change the Limiting magnitude to Bright for now
- then click on export SVG, we will save this SVG as bright-sky-view.svg
Prepare the stars
Don't jump to the printer just yet. We will do some changes first. We want to get the bright stars in one color and the medium ones in another color. This will help us define which are brighter for our ceiling, we will use this later in the project.
- Open intermediate-sky-view.svg in inkscape or your prefered vectorial editor
- do not resize anything for now.
- ungroup the vector until you are able to get to the stars/planets only.
- when you do pick a color, for instance cyan. do it for both fill and border.
- then group back everything together.
- import bright-sky-view.svg into inkscape project.
- ungroup this one until you are able to select the background and remove it.
- then you can group it back up.
- Now you will superpose the two vector until the bright one is perfectly on top of the medium one.
- once done, group everything together
- change the page to the size of your ceiling, in my case it was 6ftx6ft. Bear in mind that the frame has about 2 inches thick of wood, so no starts can fit there.
- resize proportionally the vector to fit in the page (ceiling size) as you want it to be.
- In my case I wanted the North of the sky to really point to the North of her room.
- Now export to PDF (inkscape is not great at printing on multiple pages a large vector)
In Adobe PDF you will be able to print on multiple pages and refine the settings that best meet your printer needs.
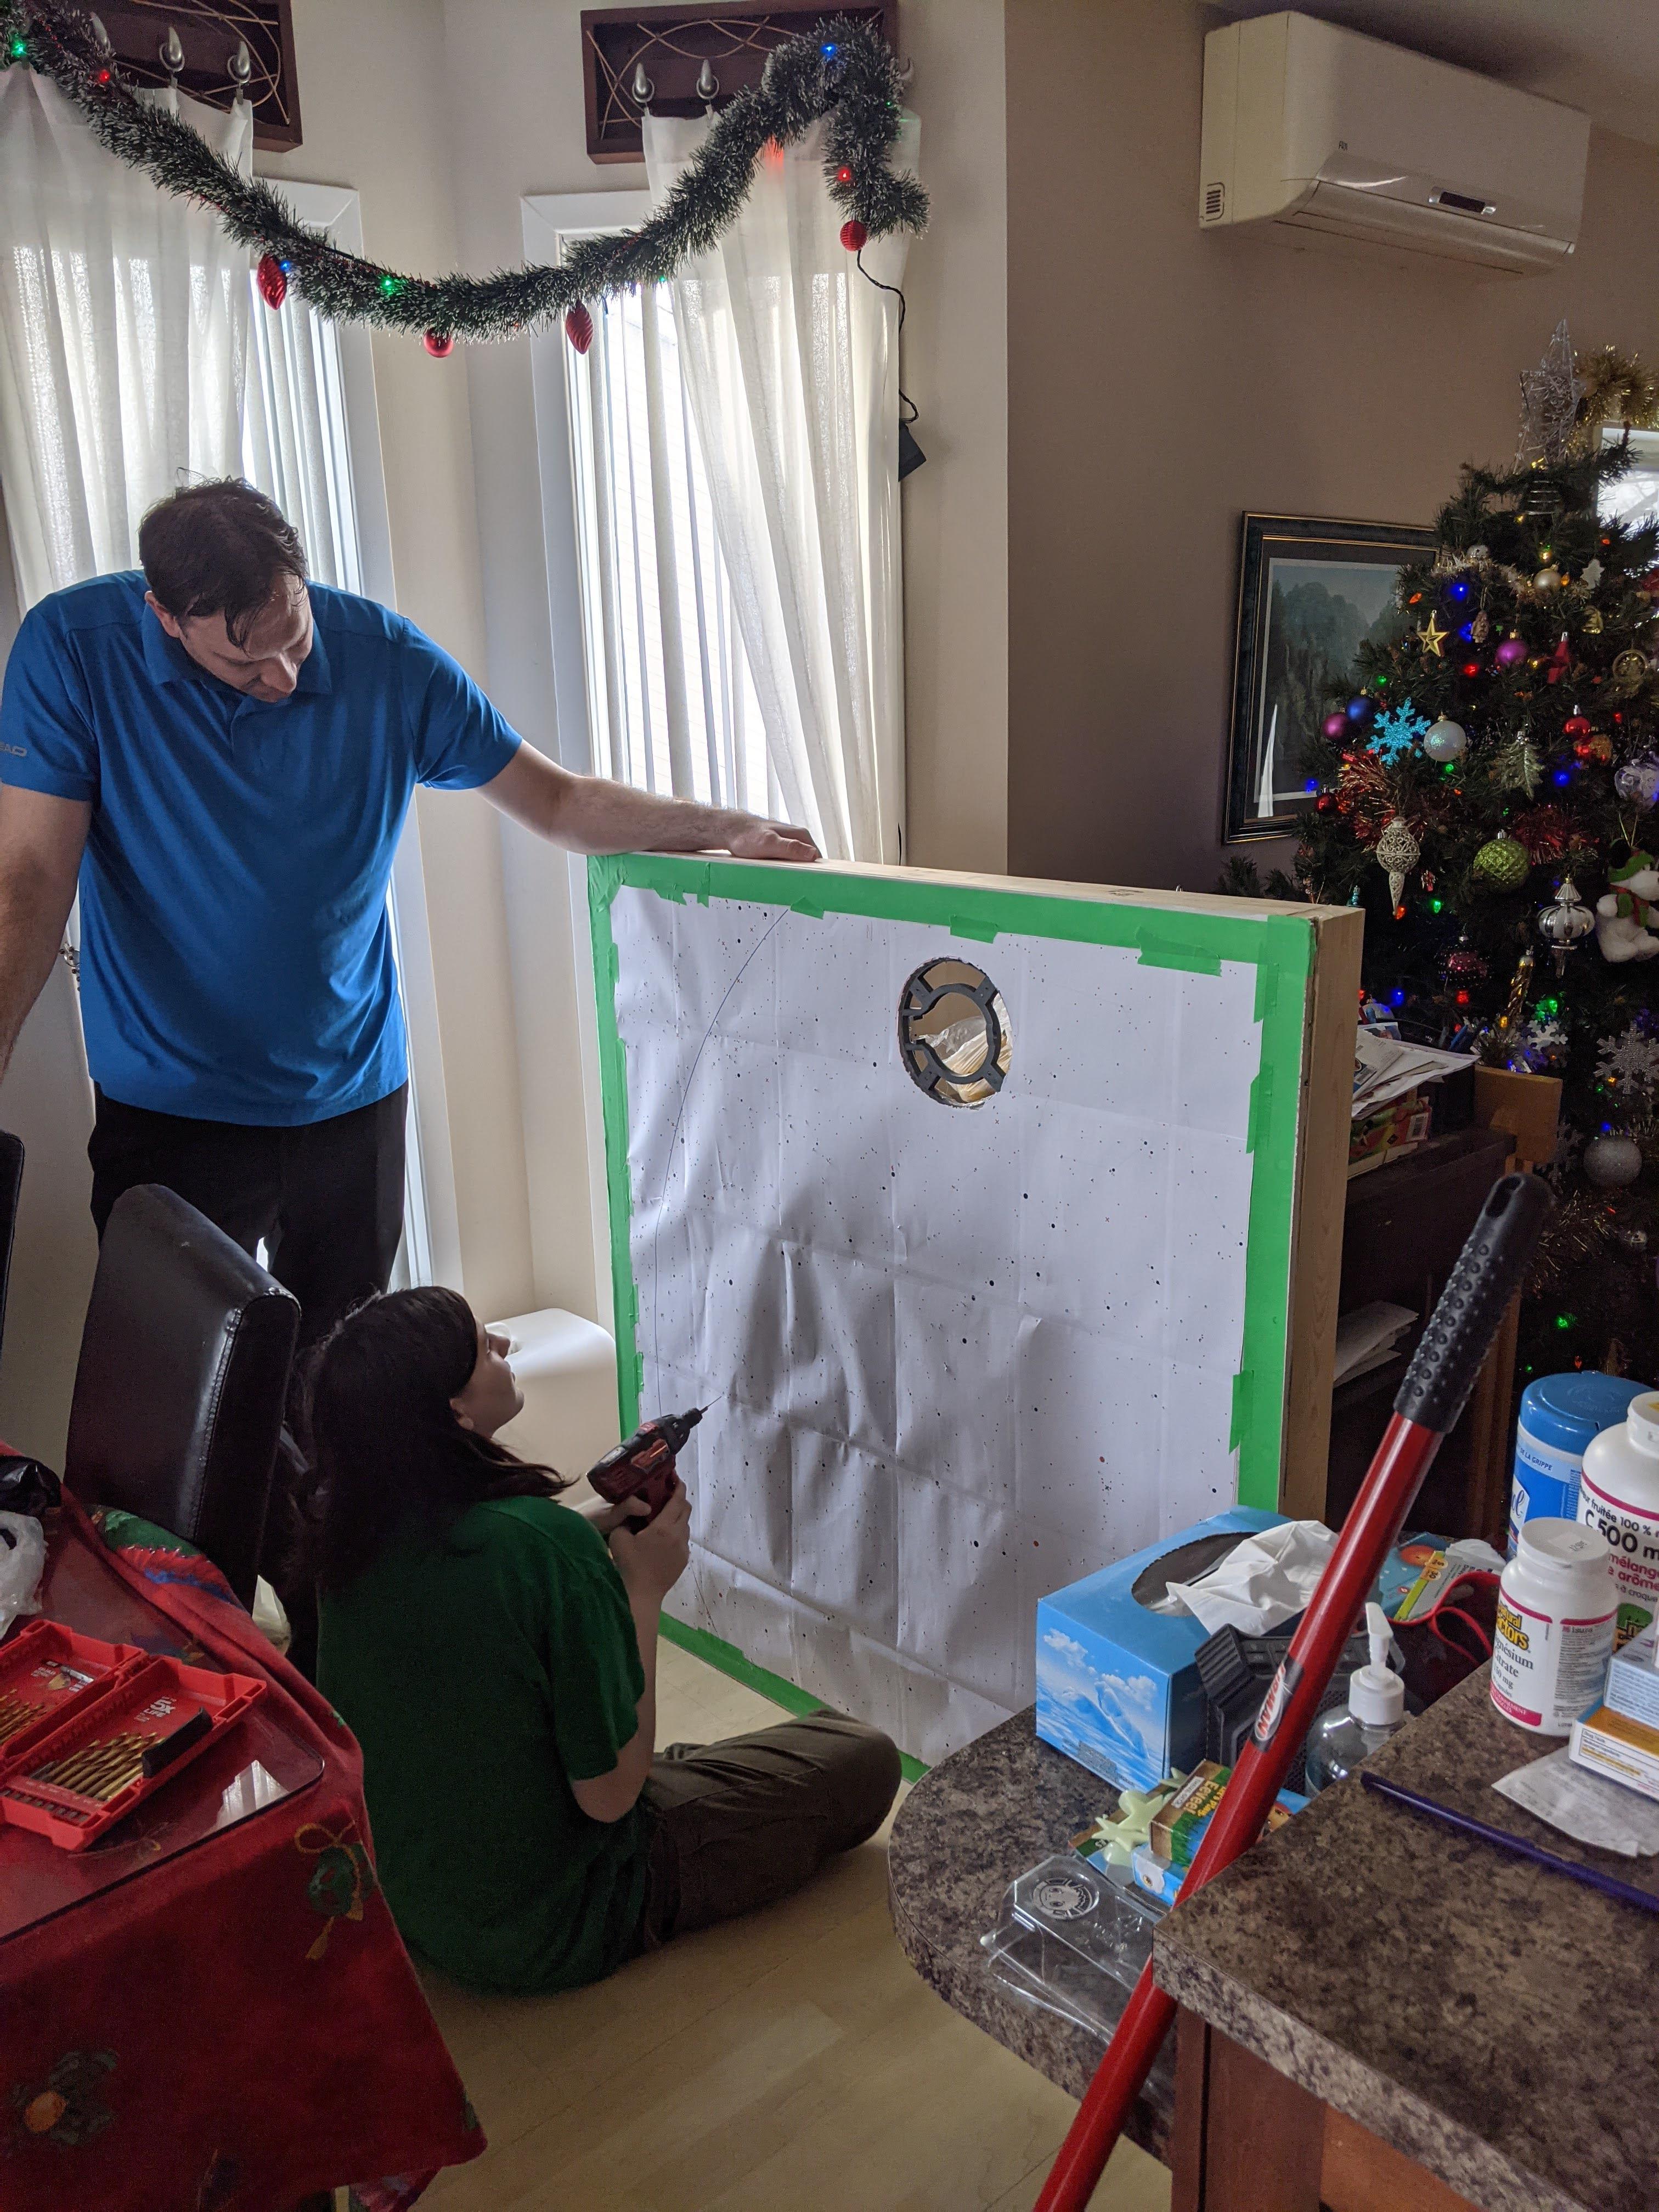
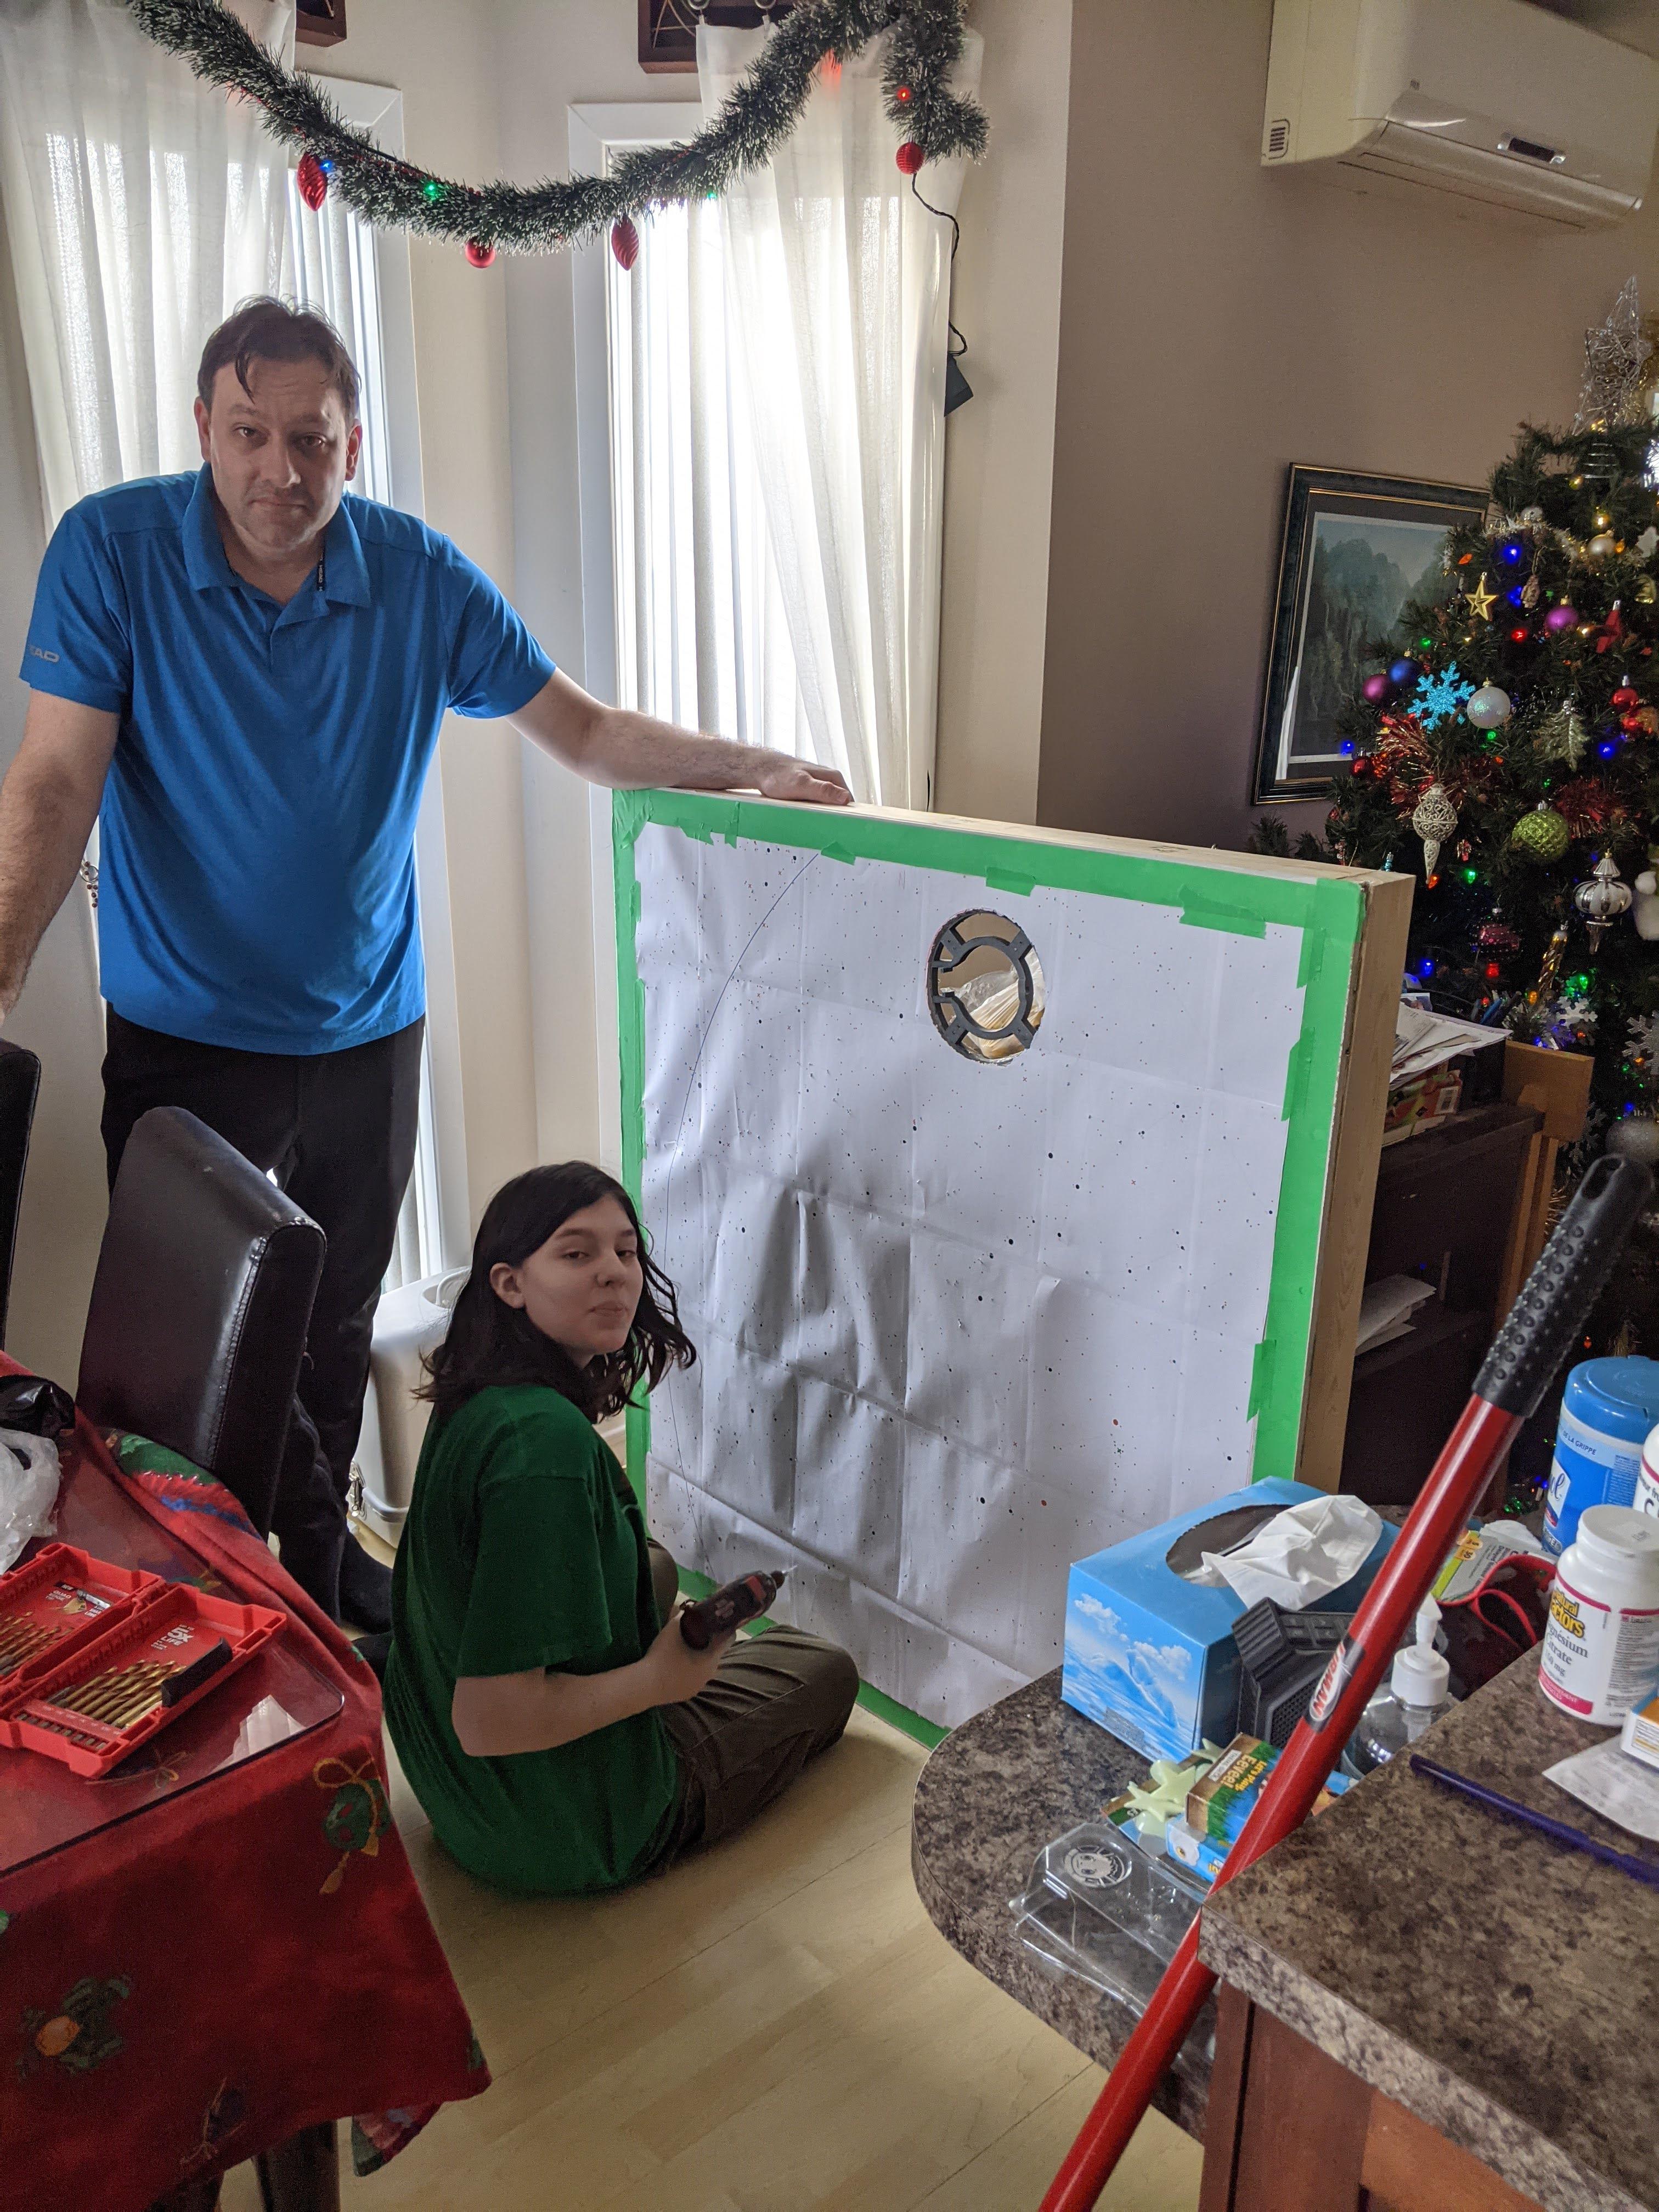
Drill holes
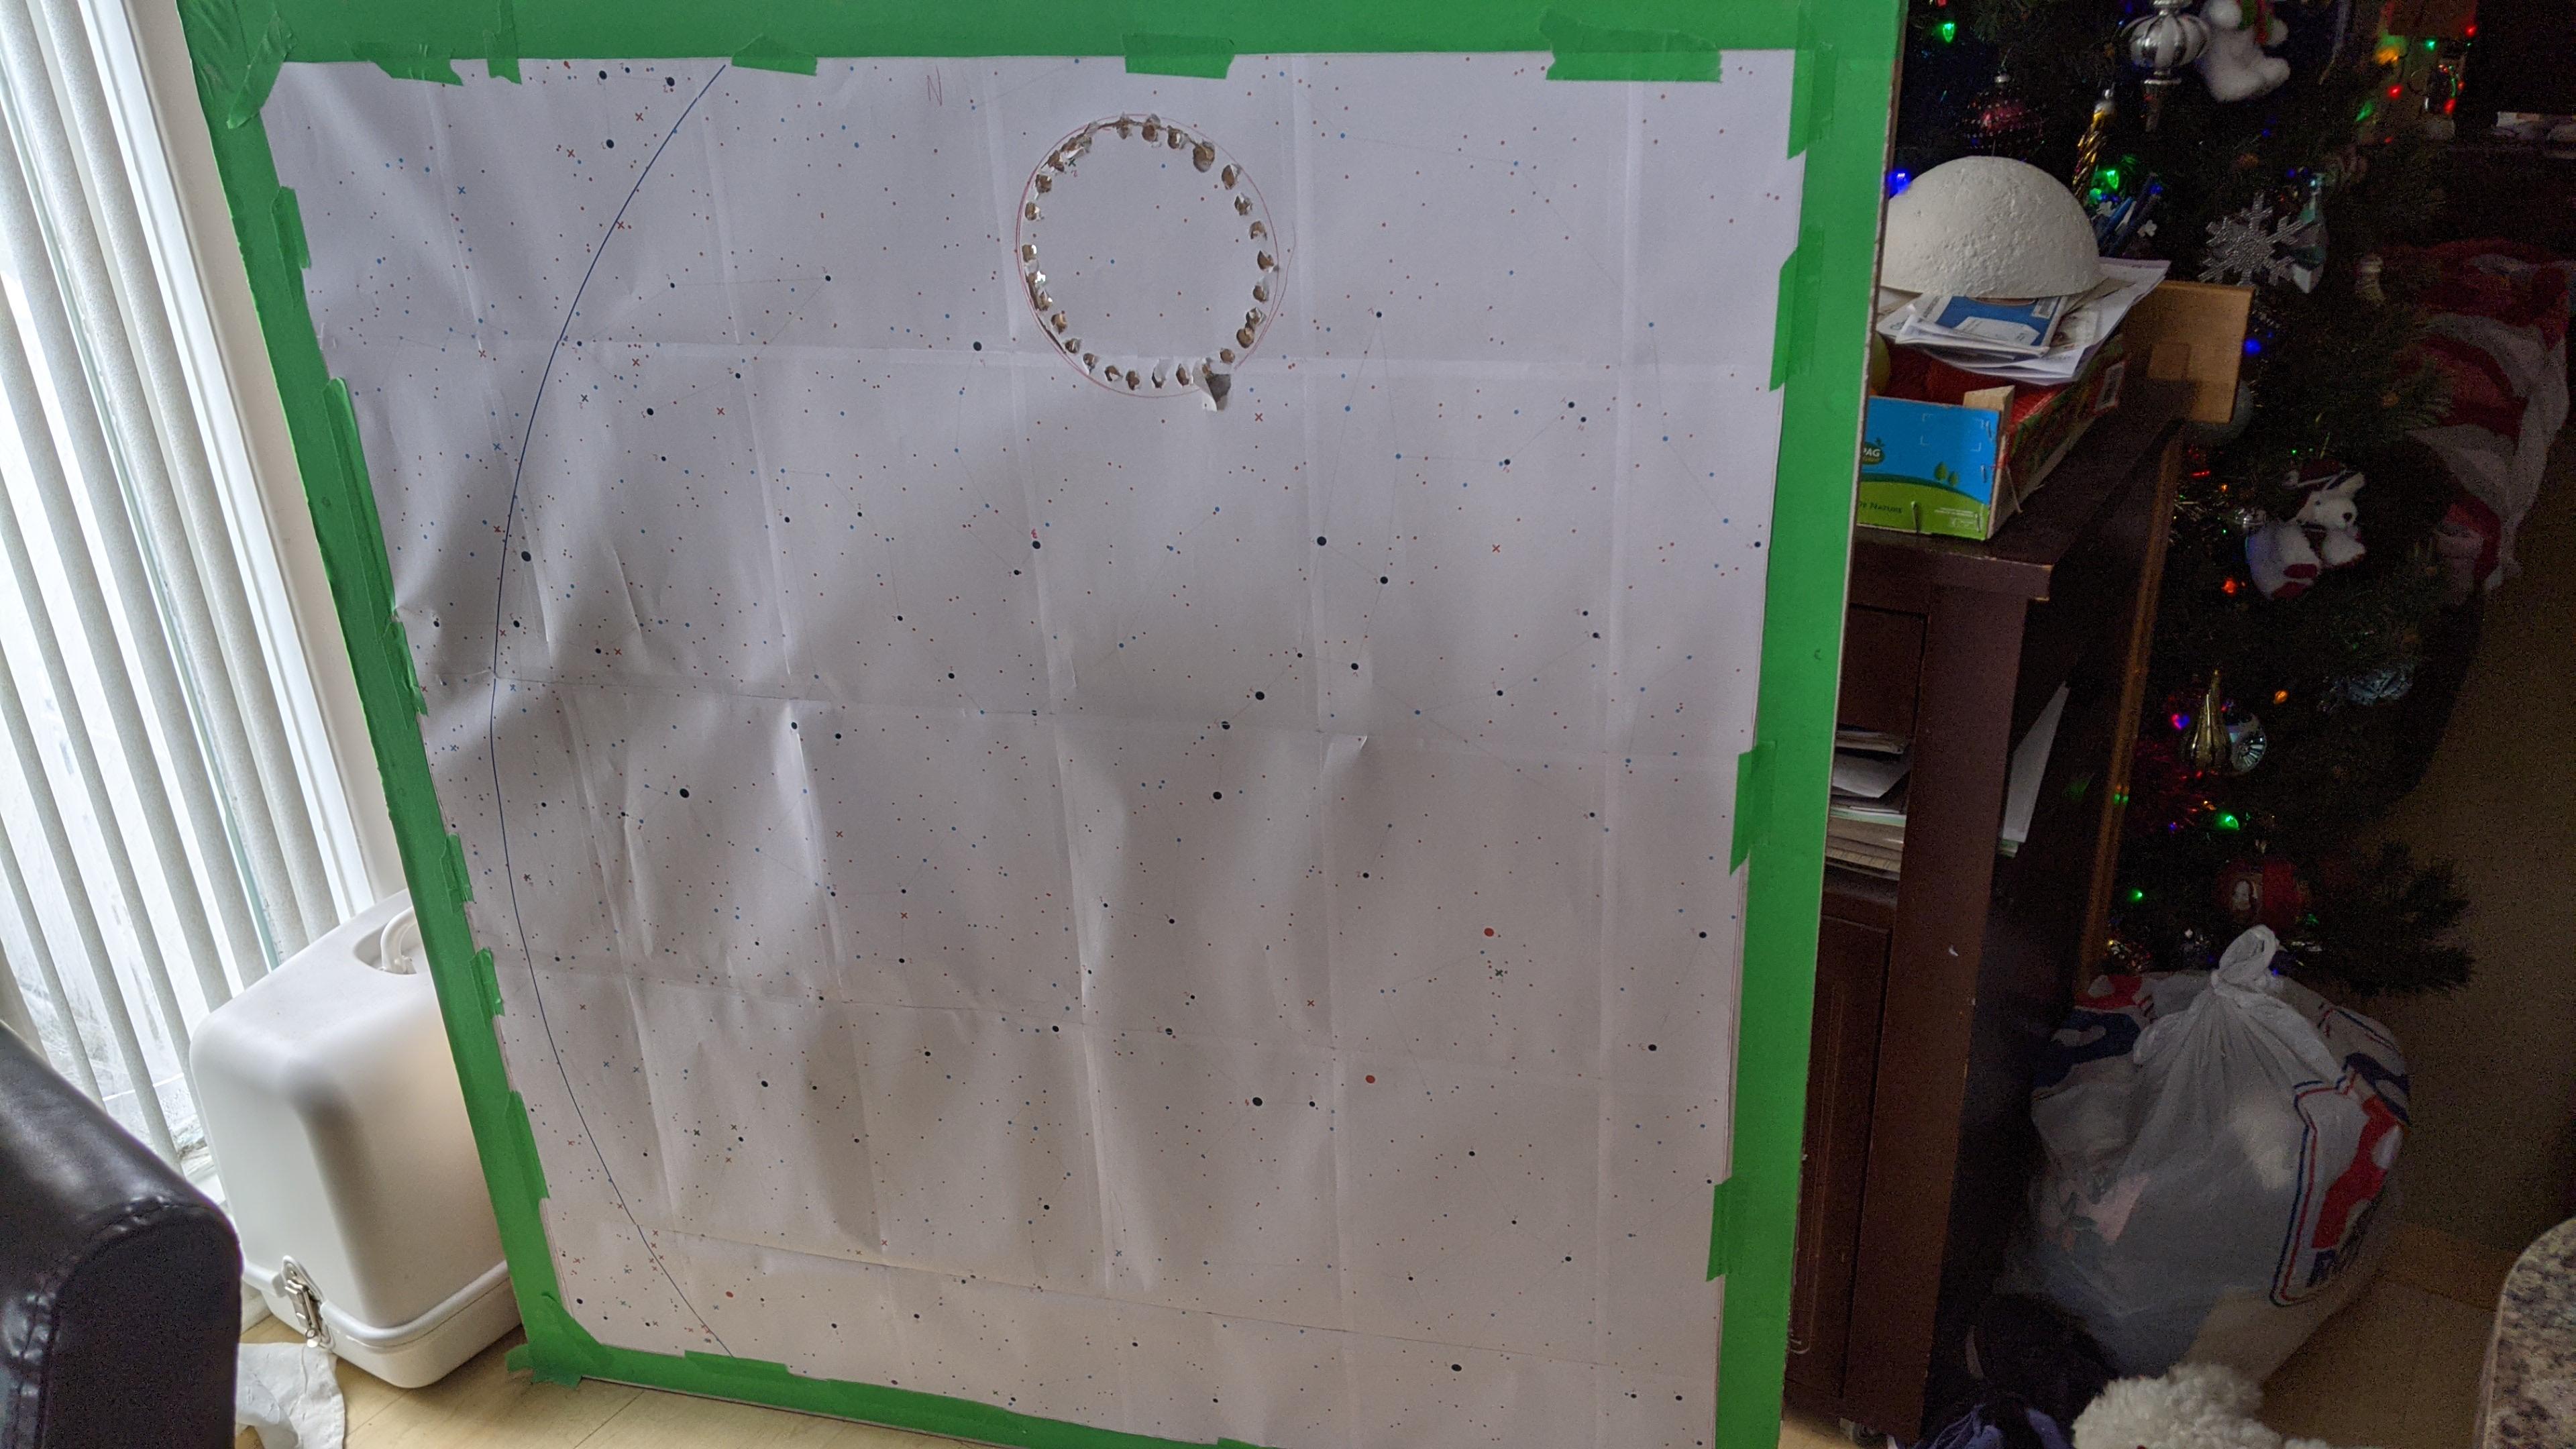
- Print and assemble the sky chart
- Place it on the drywall using the painter's tape.
- If your sky does not have a moon position, select the place where you want to place the moon. Use the base to draw a circle where you want it. Then cut the drywall out.
- among the bright stars you will see different diameters. I gave them a scale from 4-2 corresponding to the number of fiber optic I will want per hole.
- Start drilling all the #4 stars.
- Then go to the back and mark all these with a square. I found later that shape are easier to spot then numbers ;)
- Then do #3 stars, mark them in the back with a triangle
- Then do #2 stars and mark them with a cross in the back.
- Then finally do all the medium stars. I did not mark them in the back since, the holes where obvious enough.
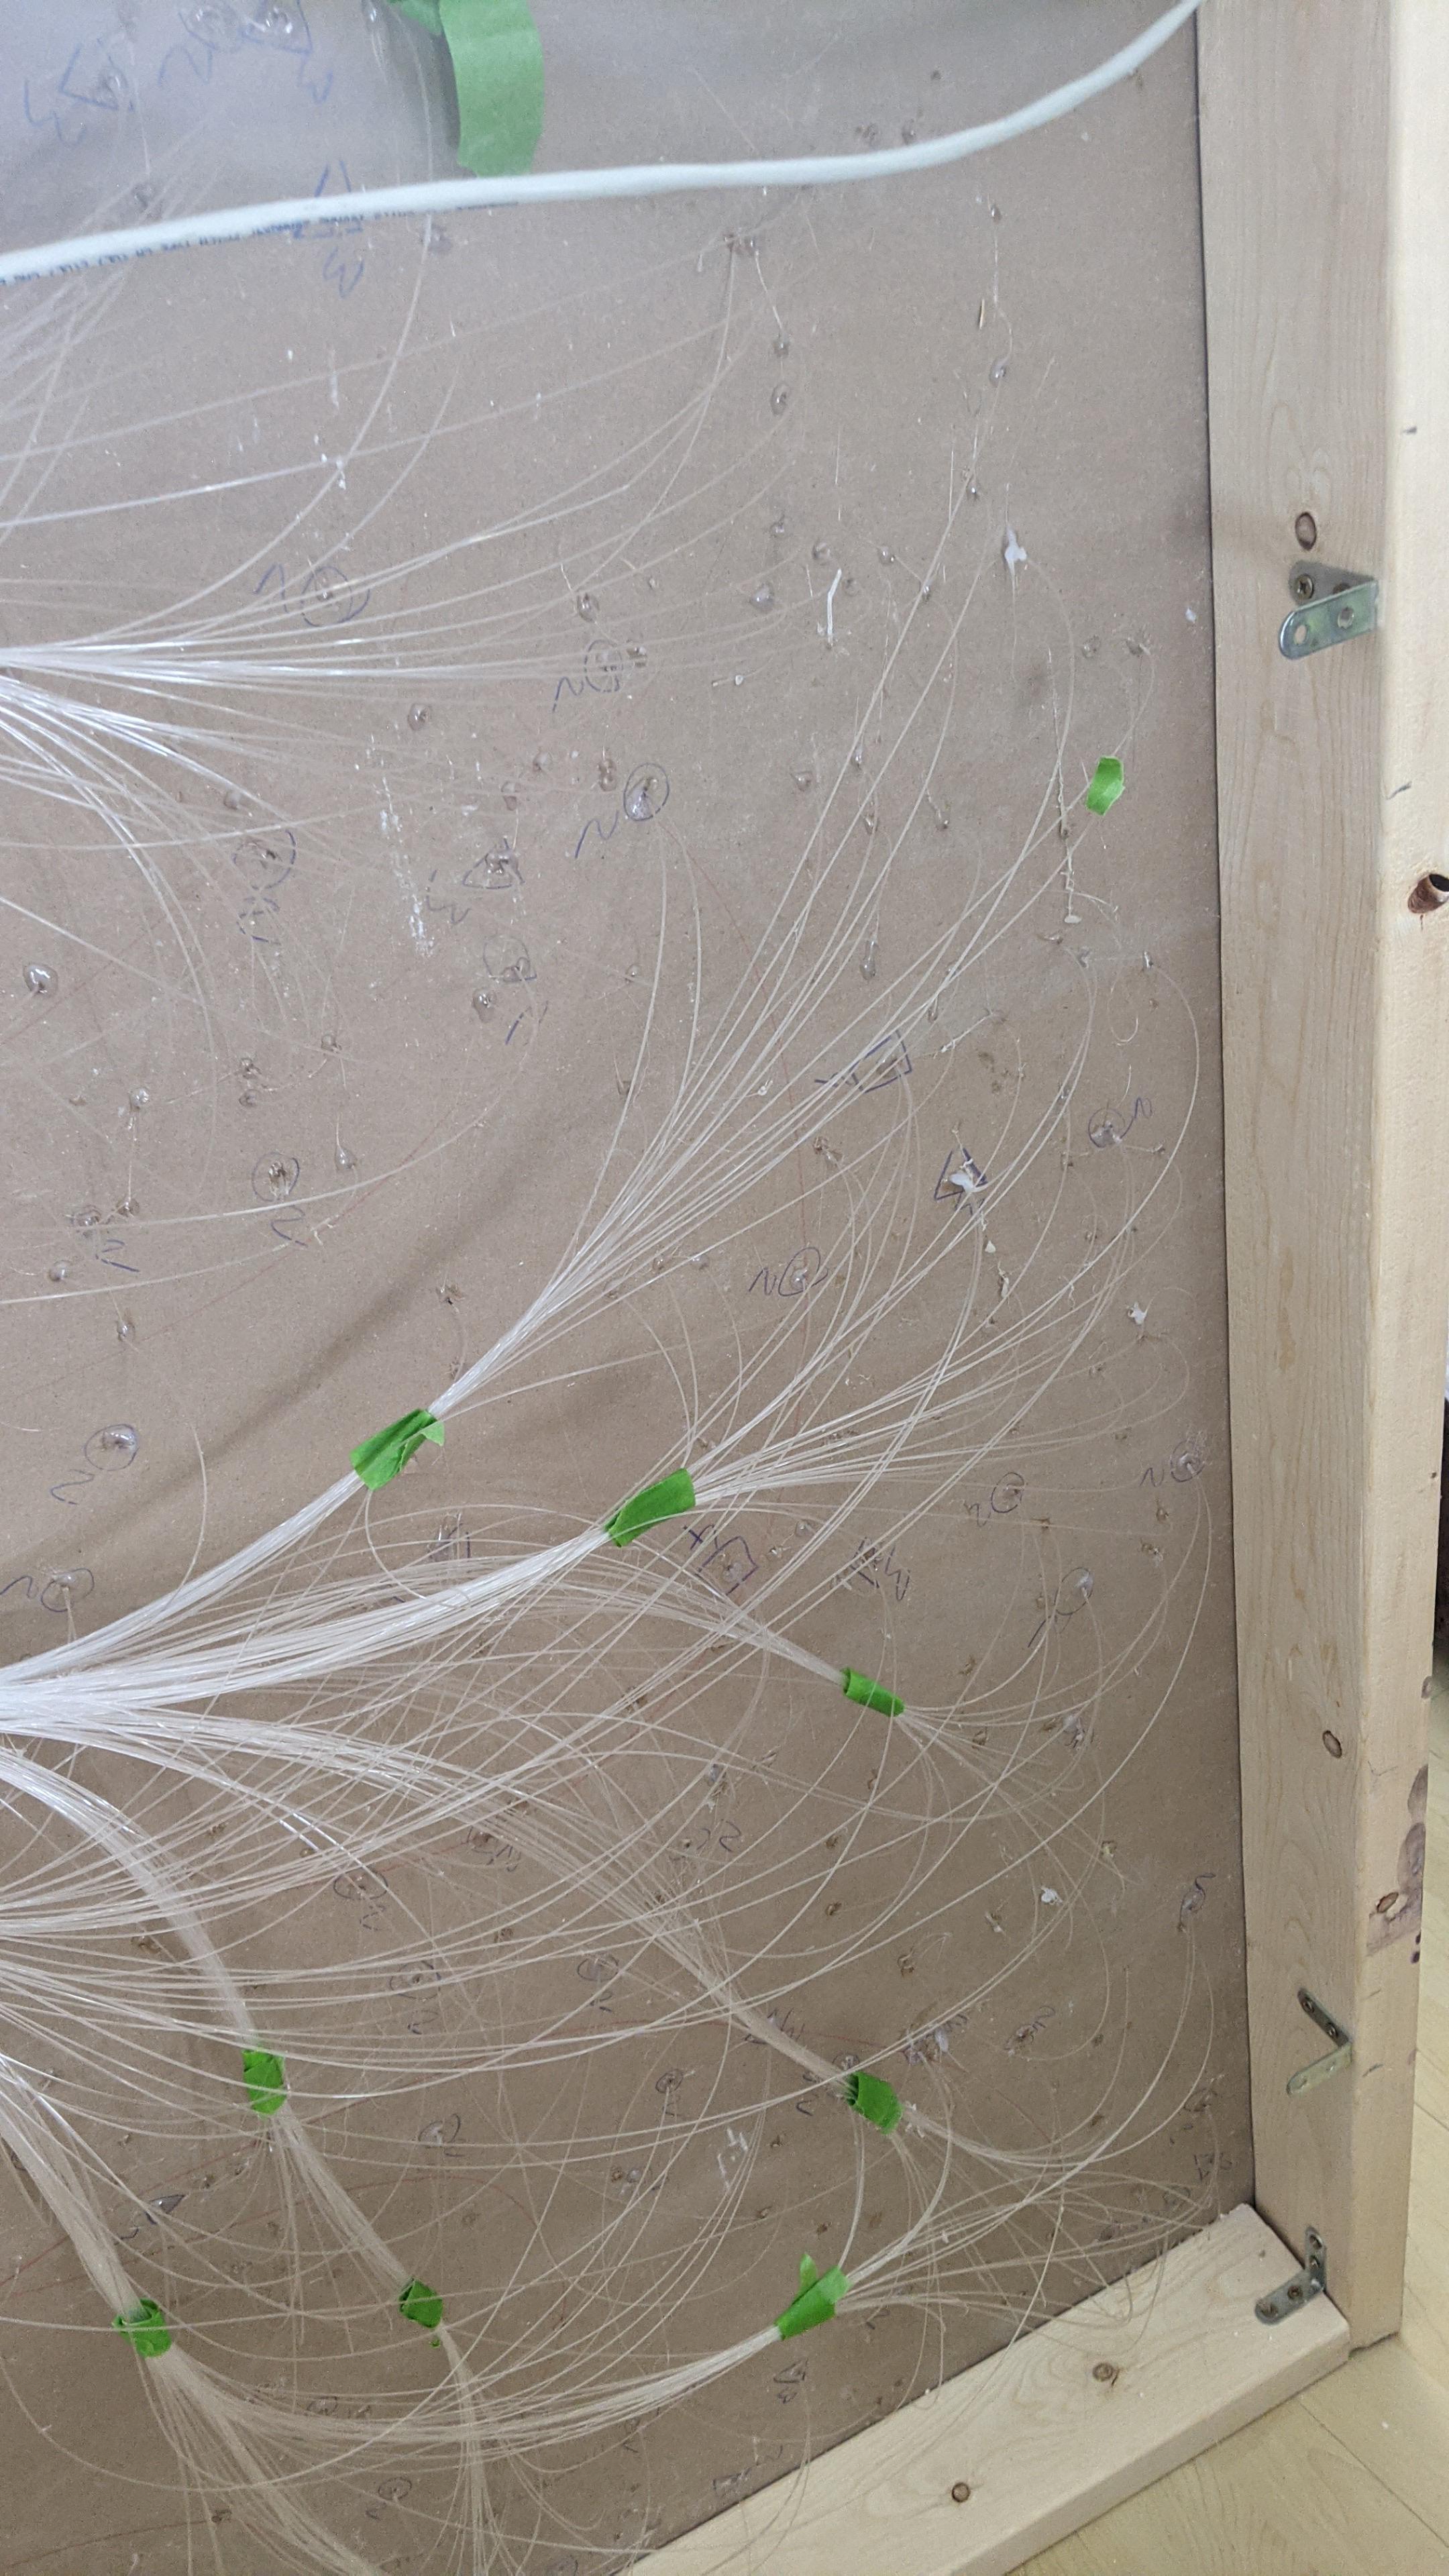
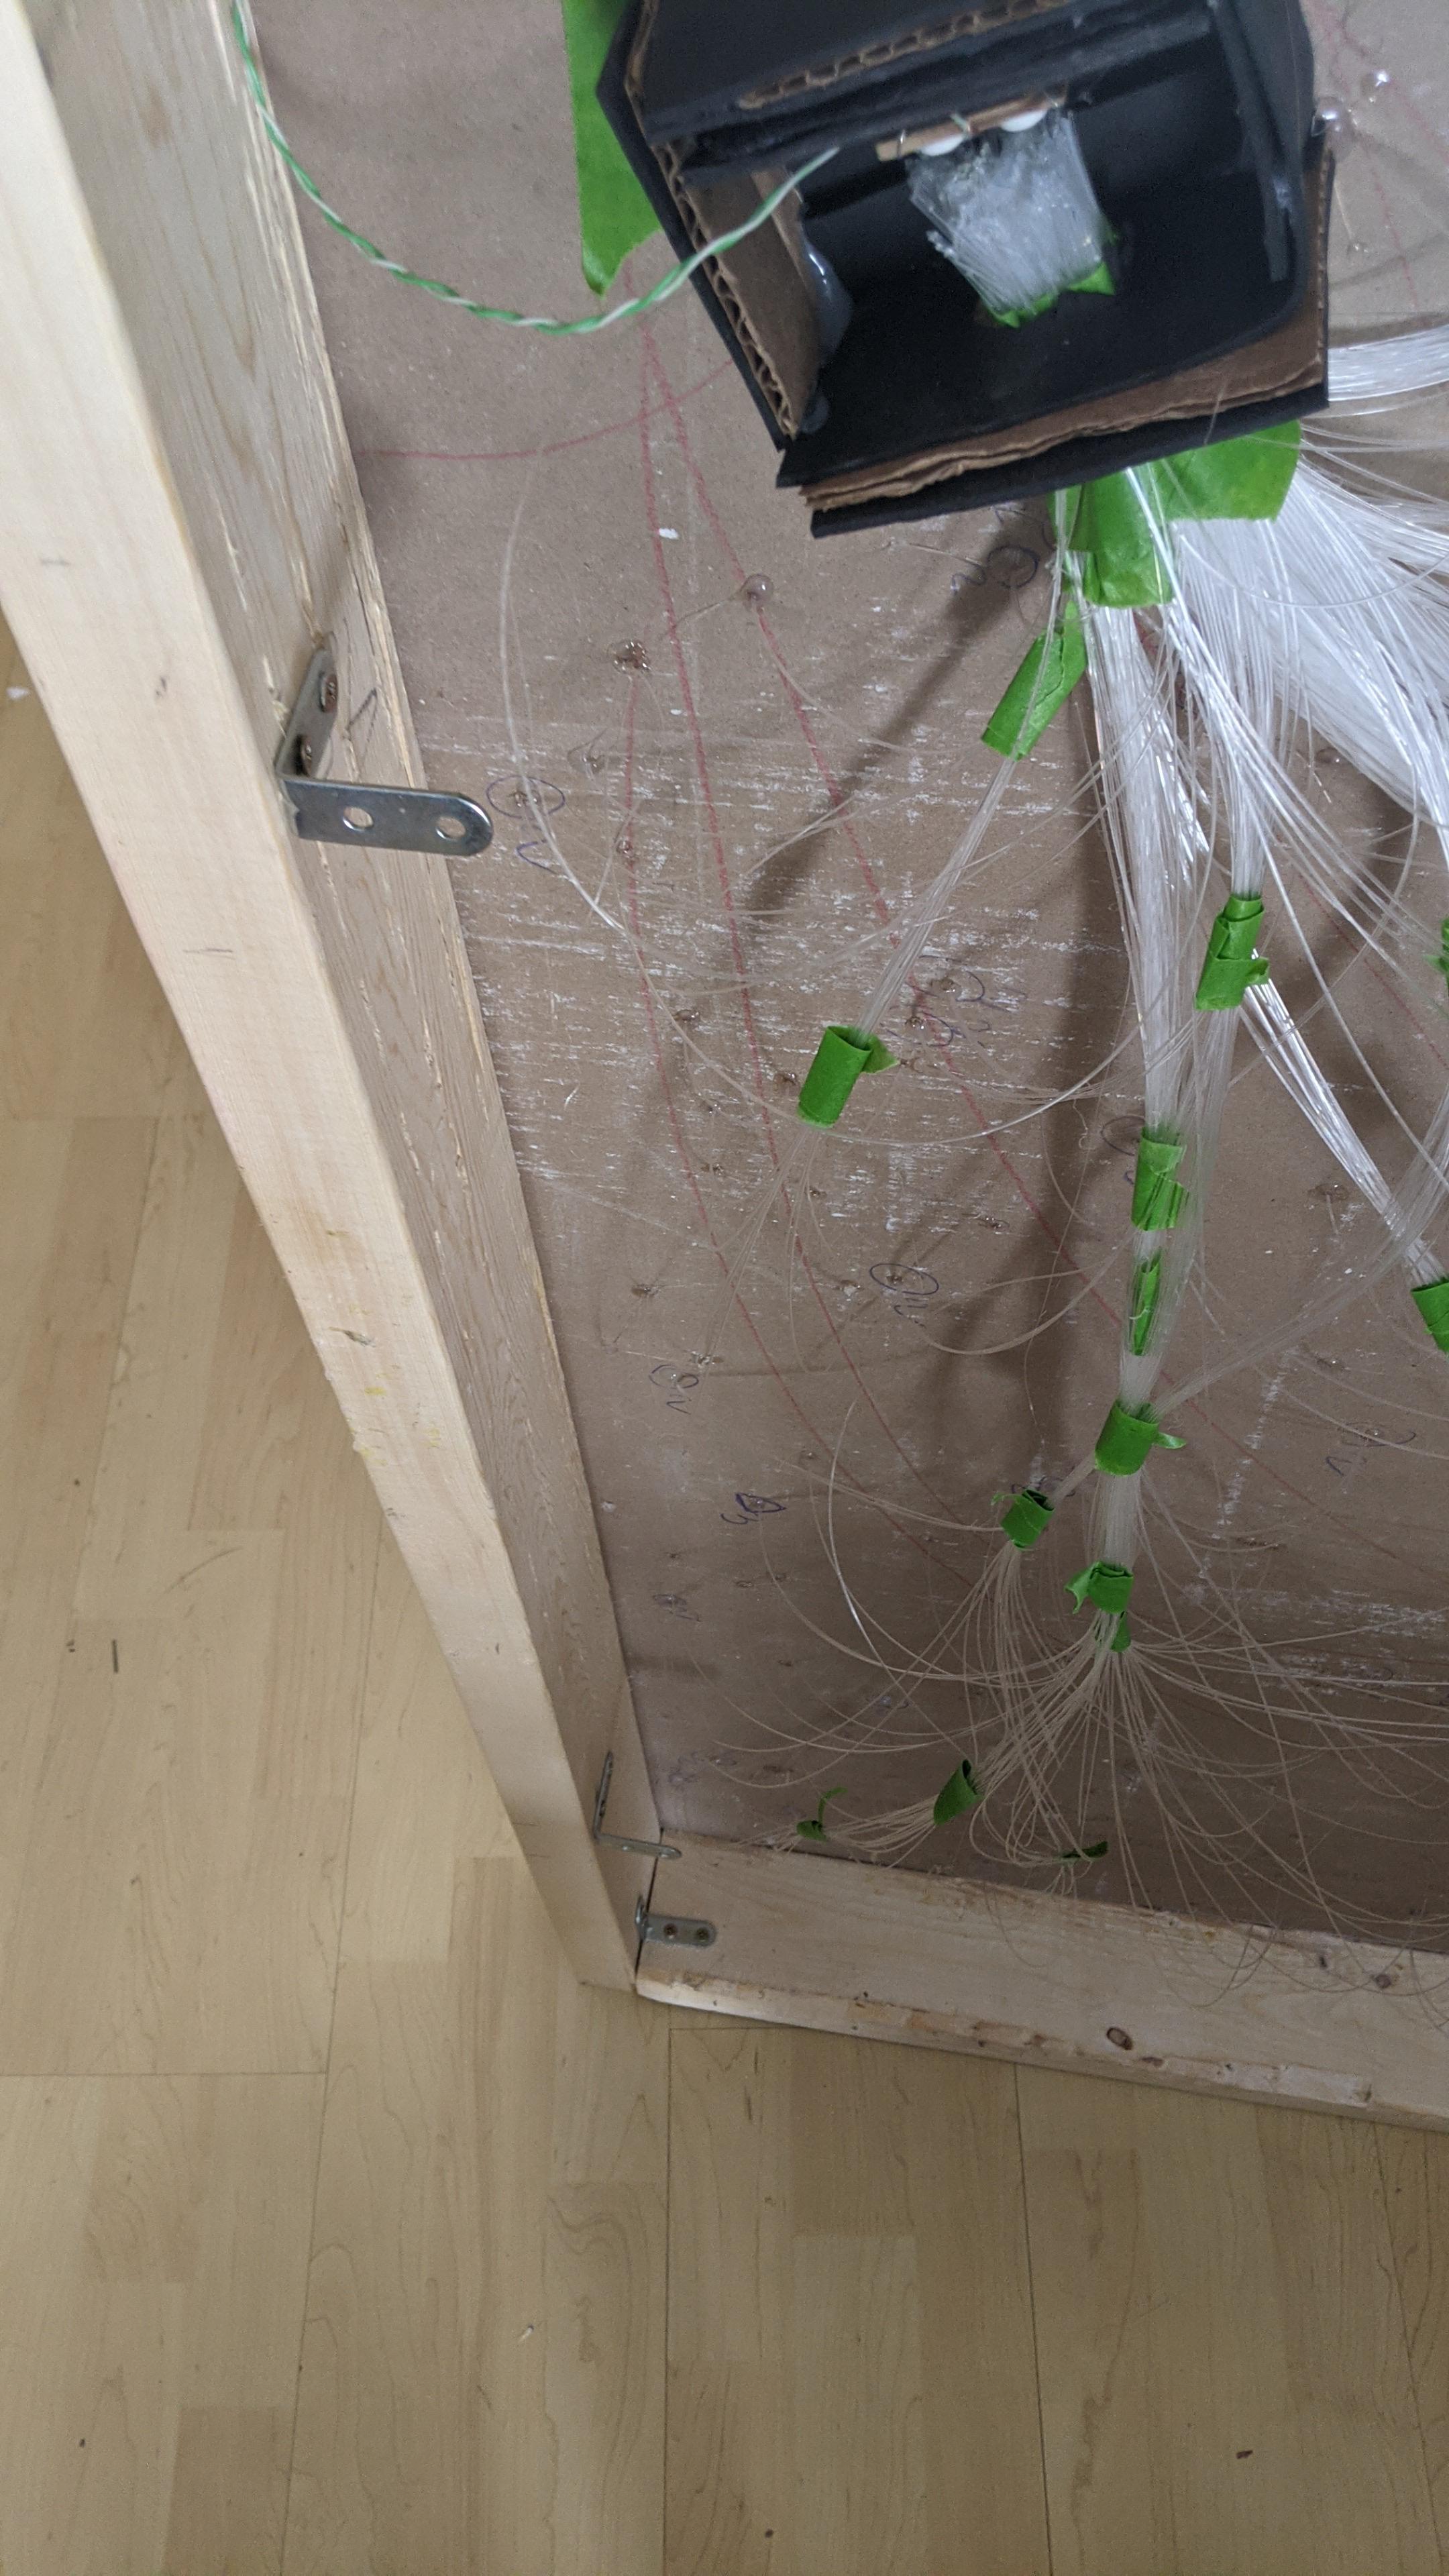
Pass fiber optics
- Lay the ceiling so the back is facing up. you will need to keep the front with spare space so the fiber optic can protrude. I placed it on 4 chairs since the border has no stars.
- first spot a place with as less stars as possible, you will need place to join al the fiber optics together and place LEDs within a box that will contain the light.
- once located start with the furthest stars.
- you will place as many fiber optics per hole as per the star brightness. A good tip is to do a dry test before placing glue.
- place some hot glue above the hole, let it cool little to avoid melting the fiber
- then pass the fiber optic
Install the moon base
- the 3d printed moon base assembled should now fit nicely in the hole you made for it.
- Oriente it according to how you want the shadow to act.
- Once in place use hot-glue to fix it. You can also add some drywall mud to hide the gaps, you want to avoid any light to shine through unwanted holes.
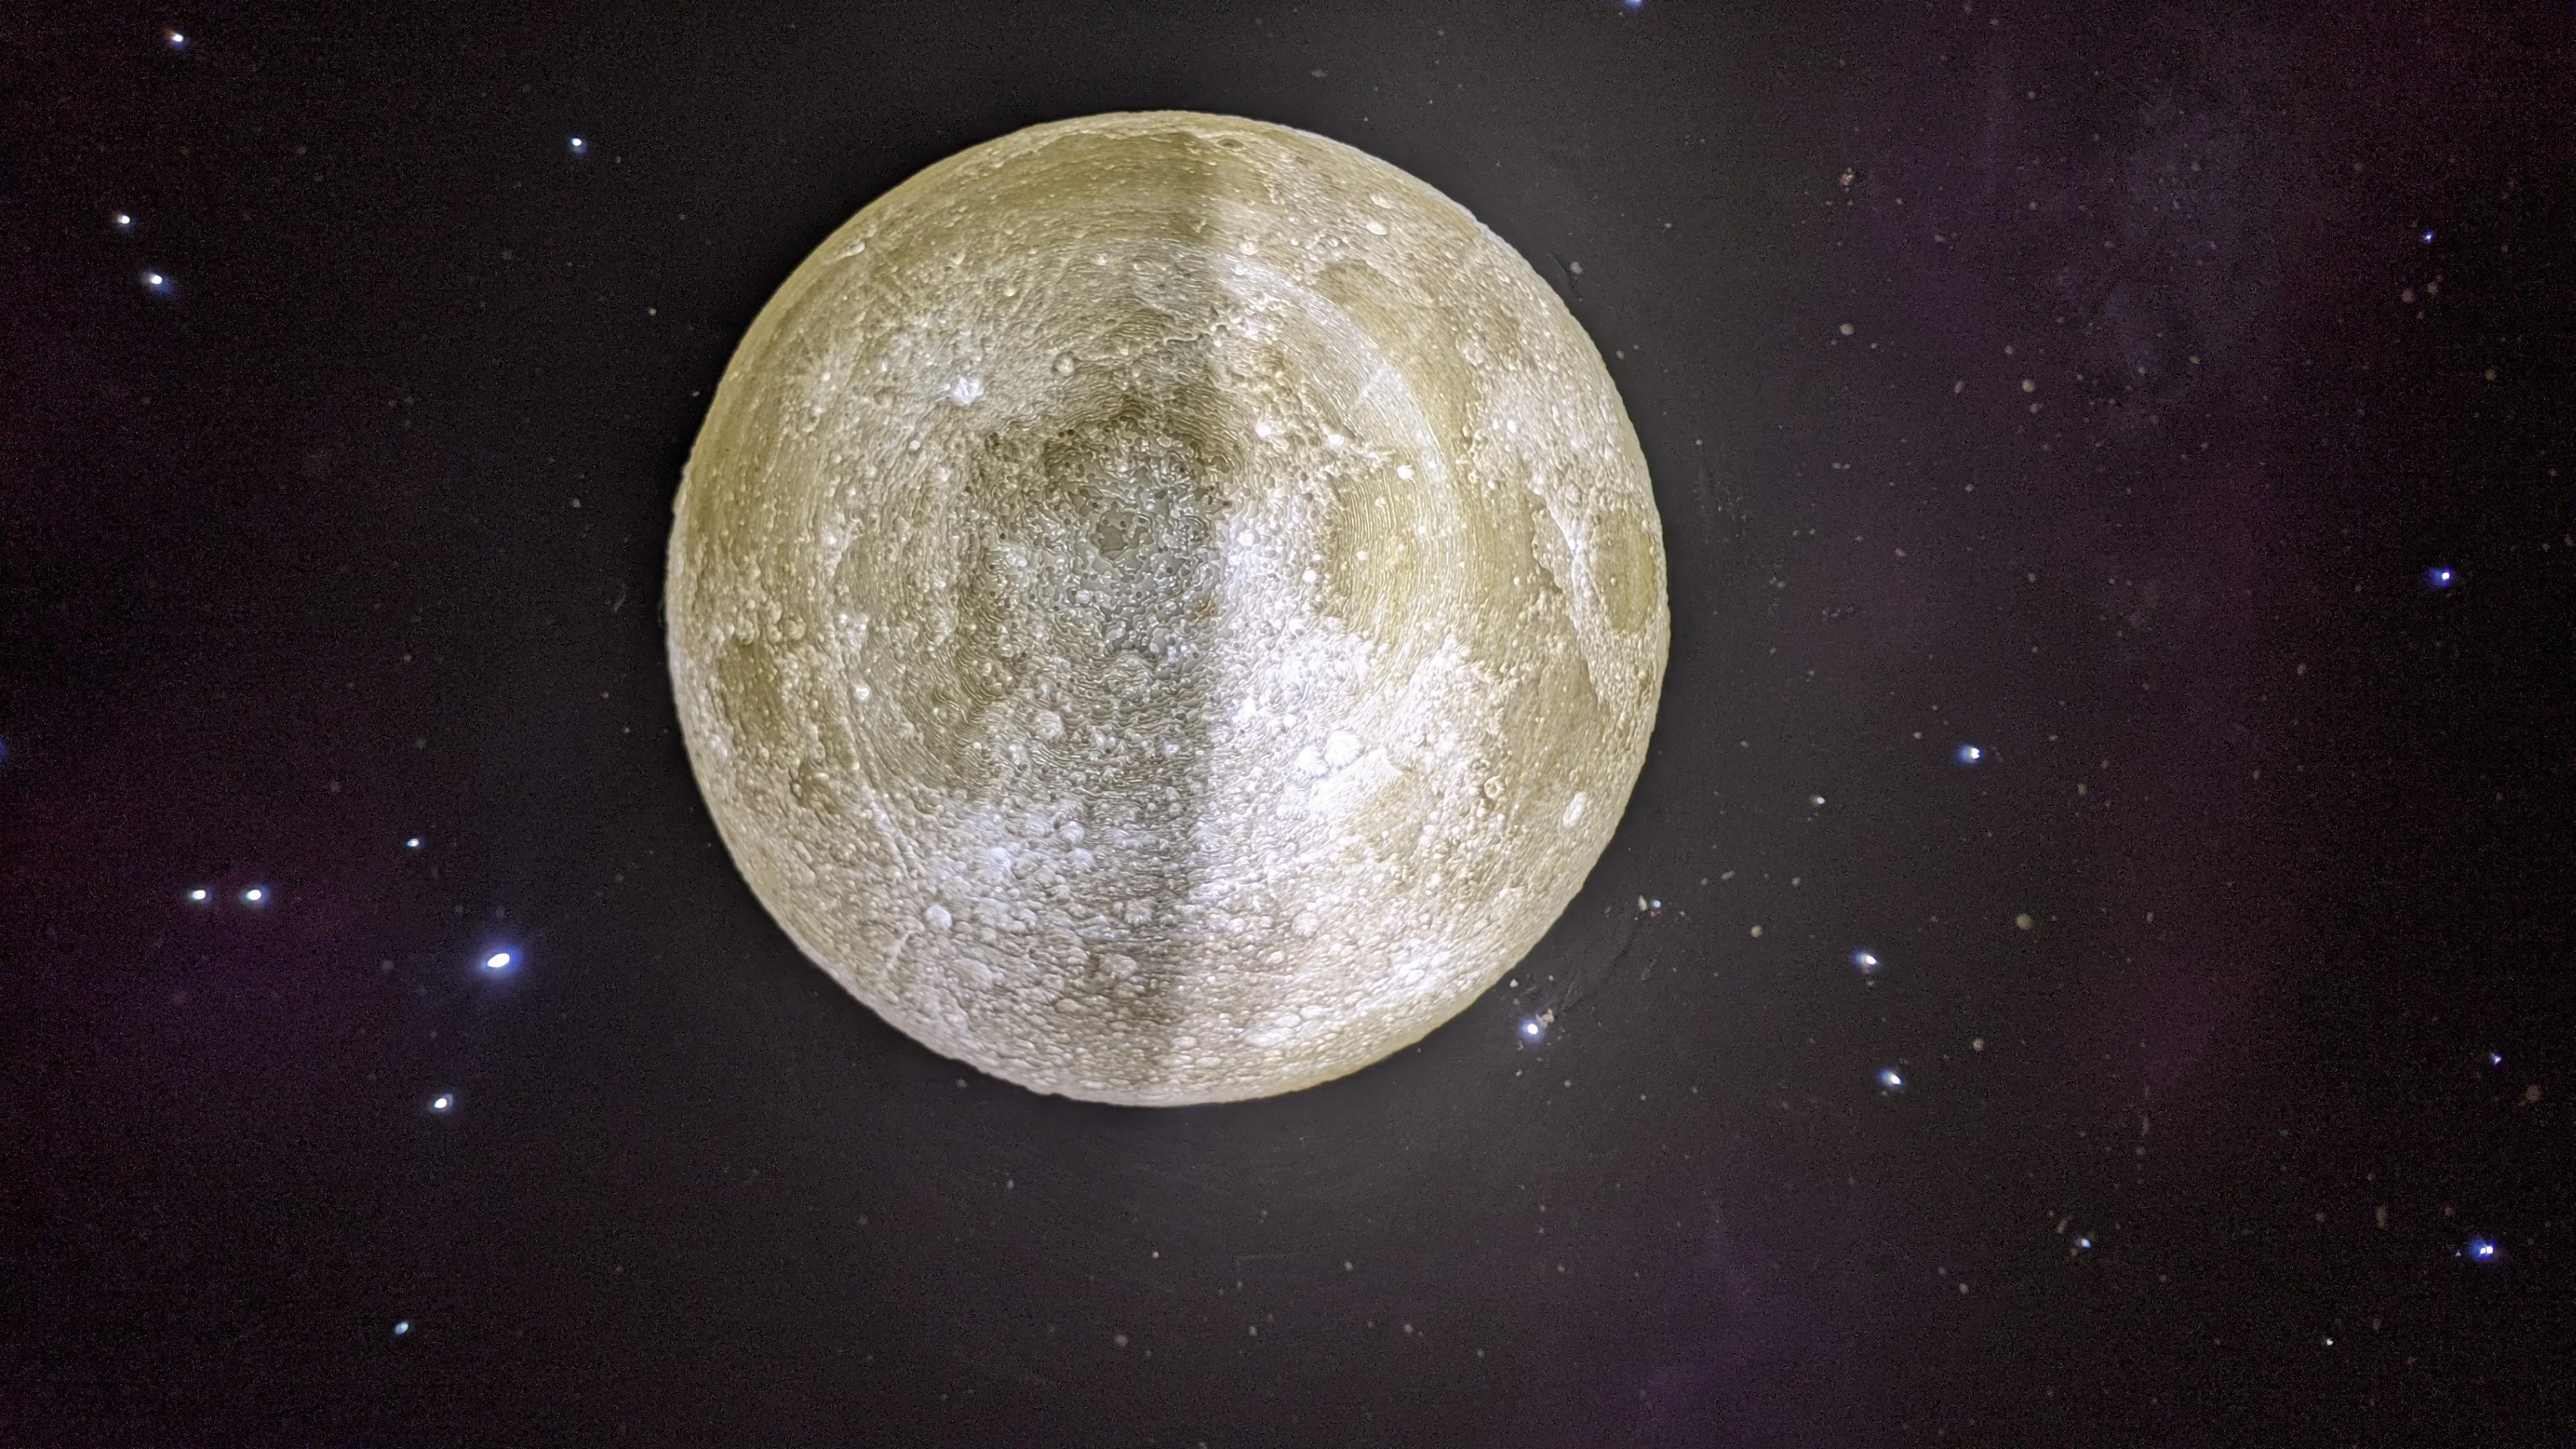
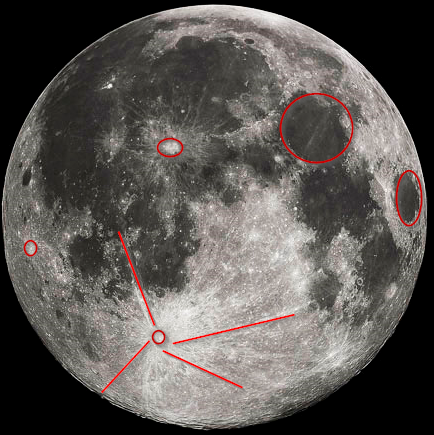
- Place the moon-support in place and place the moon half-sphere and turn it until it gets to the desired orientation. You will see the moon has a crater with lines stretching from it and some plains (see image).
- Once happy, remove the moon with he support together (make sure the support did not move, using tape can help) and super-glue them together.
- Now you should be able to easily place and remove the moon from the base as needed.
Electronic

.jpg)


The button (& 220Ω resistor) is optional. In my case I don't let my daughter sleep with her phone, so the button lets her manually turn on and off the main features without it if she needs to.
General assembly and Wiring
There are two main parts:
- what goes in the night-sky ceiling: Illustrated by the two top breadboards in the schema
- what goes in a box next to the bed: illustrated by the big breadboard in the schema
- then a network cable to connect the two: 8 colored threads in 1 easy cable :)
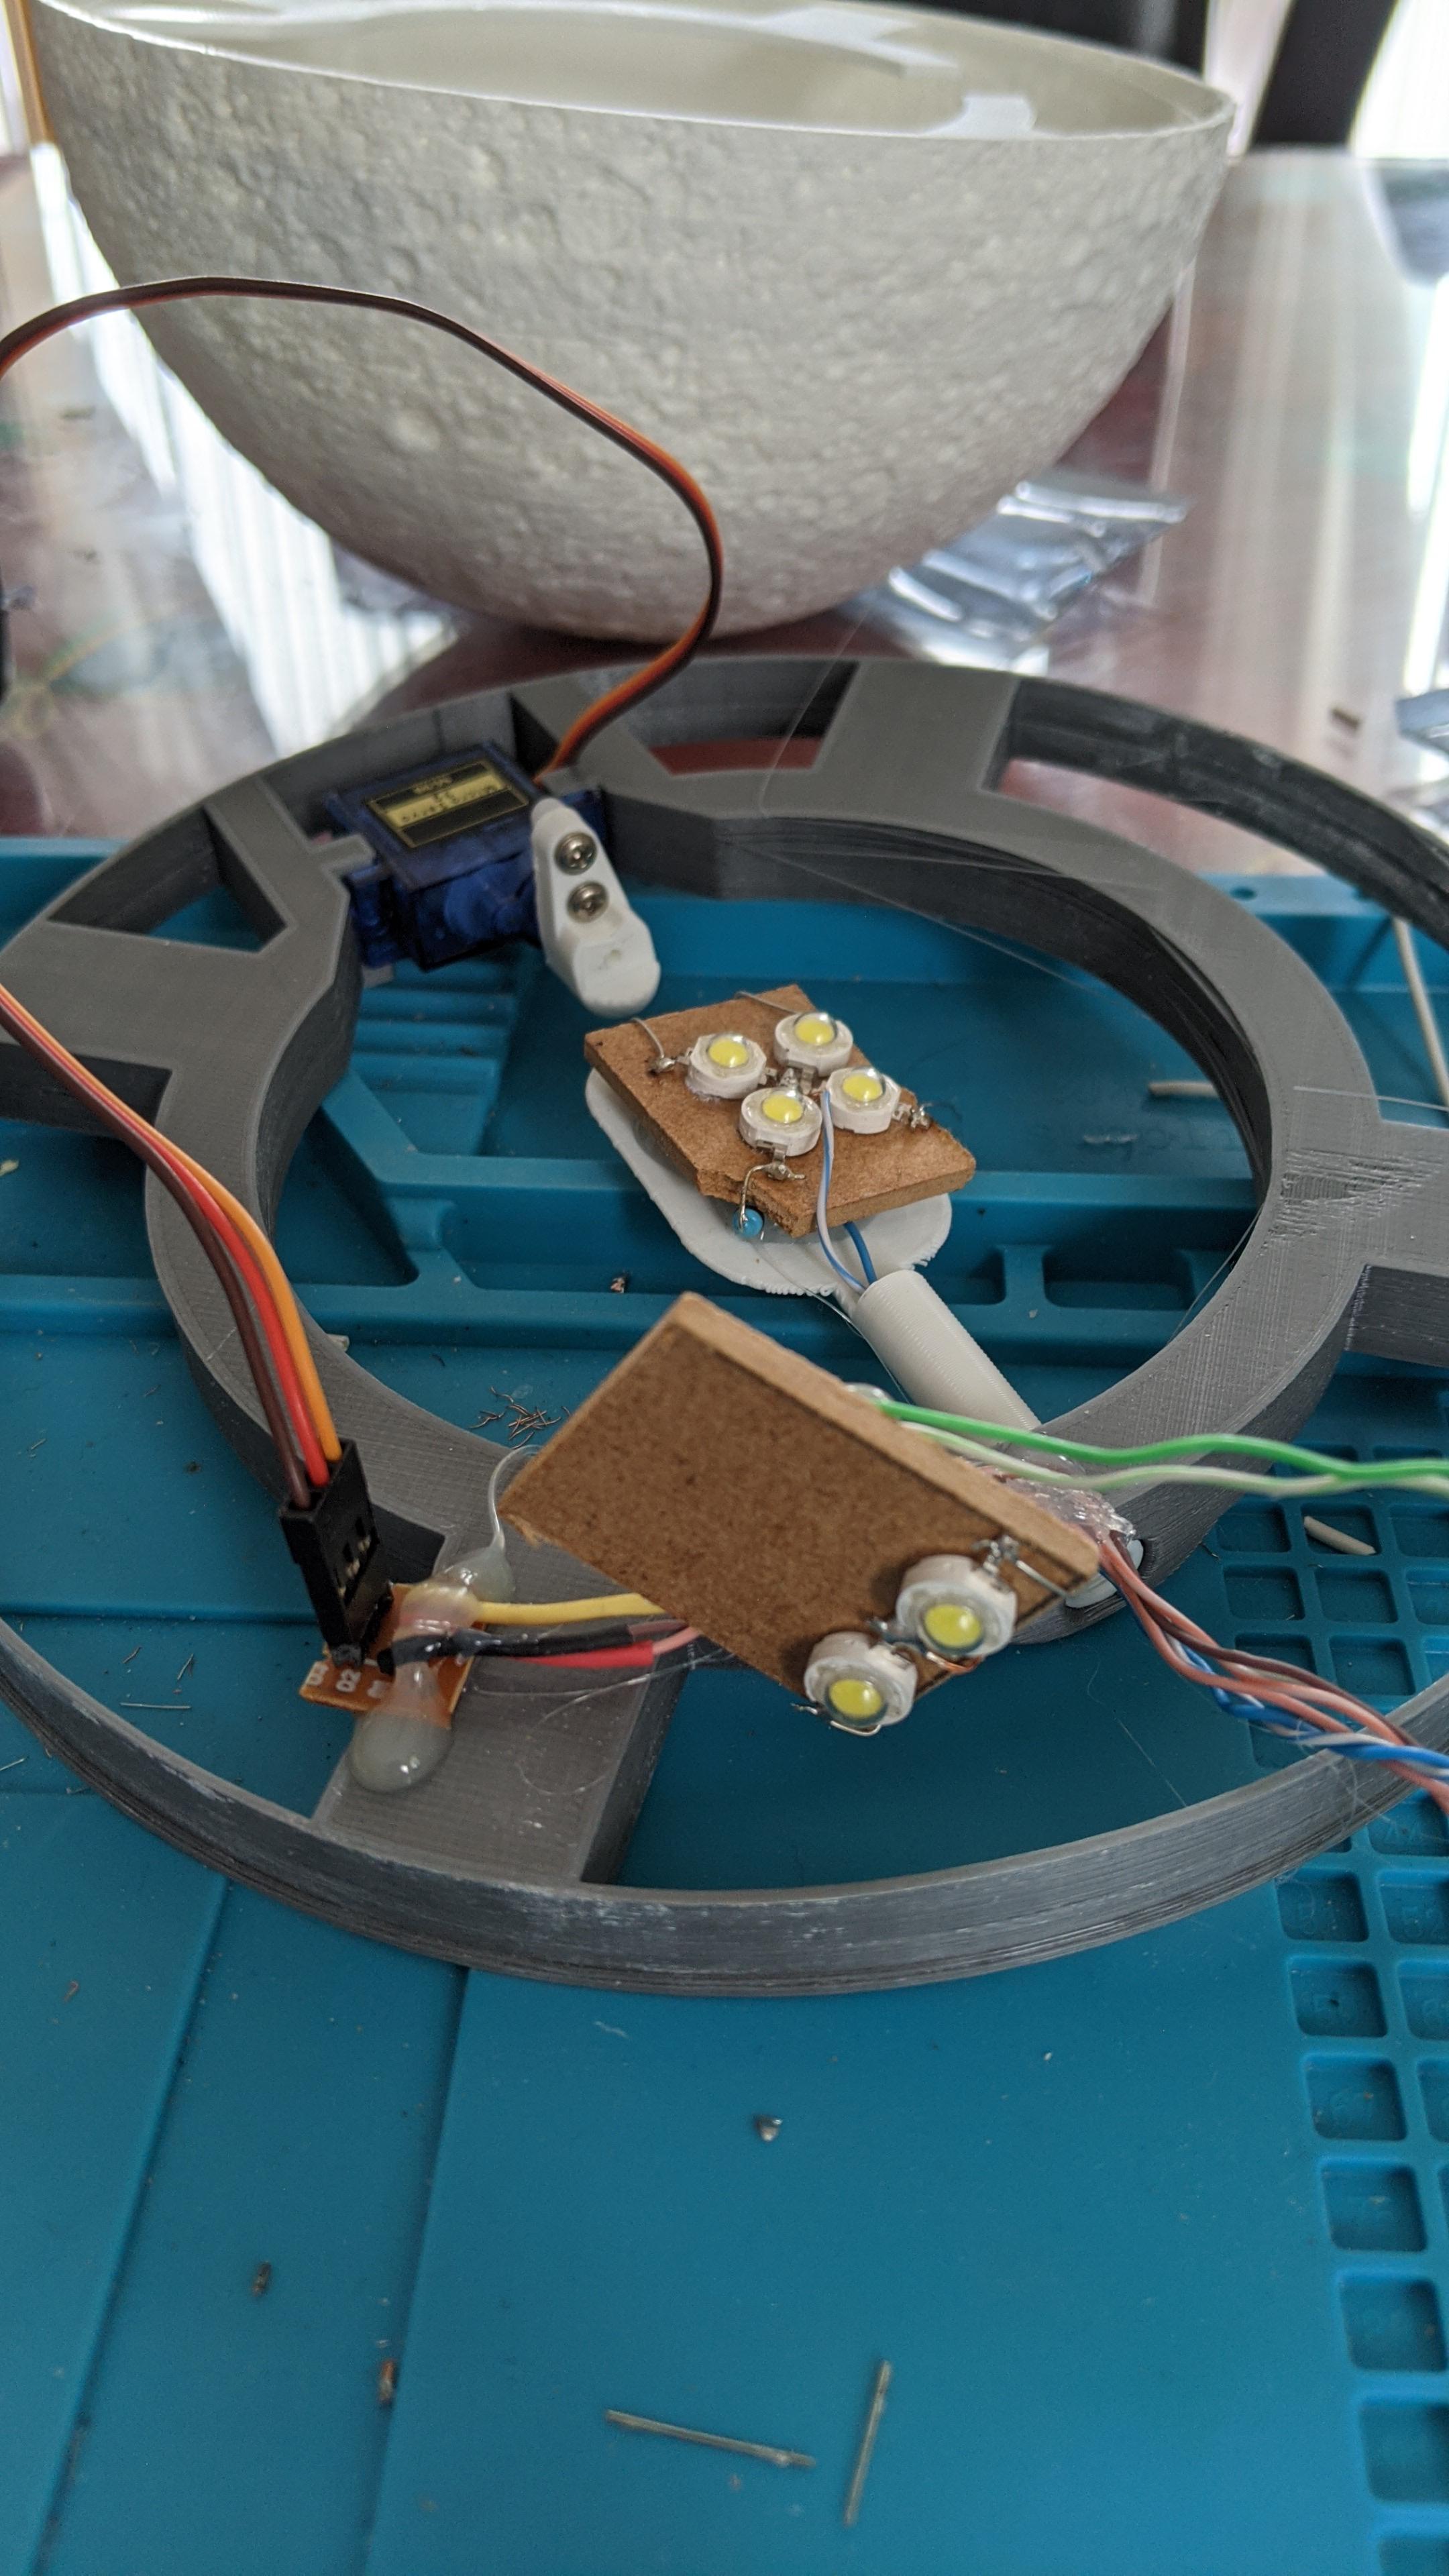
The night-sky ceiling parts
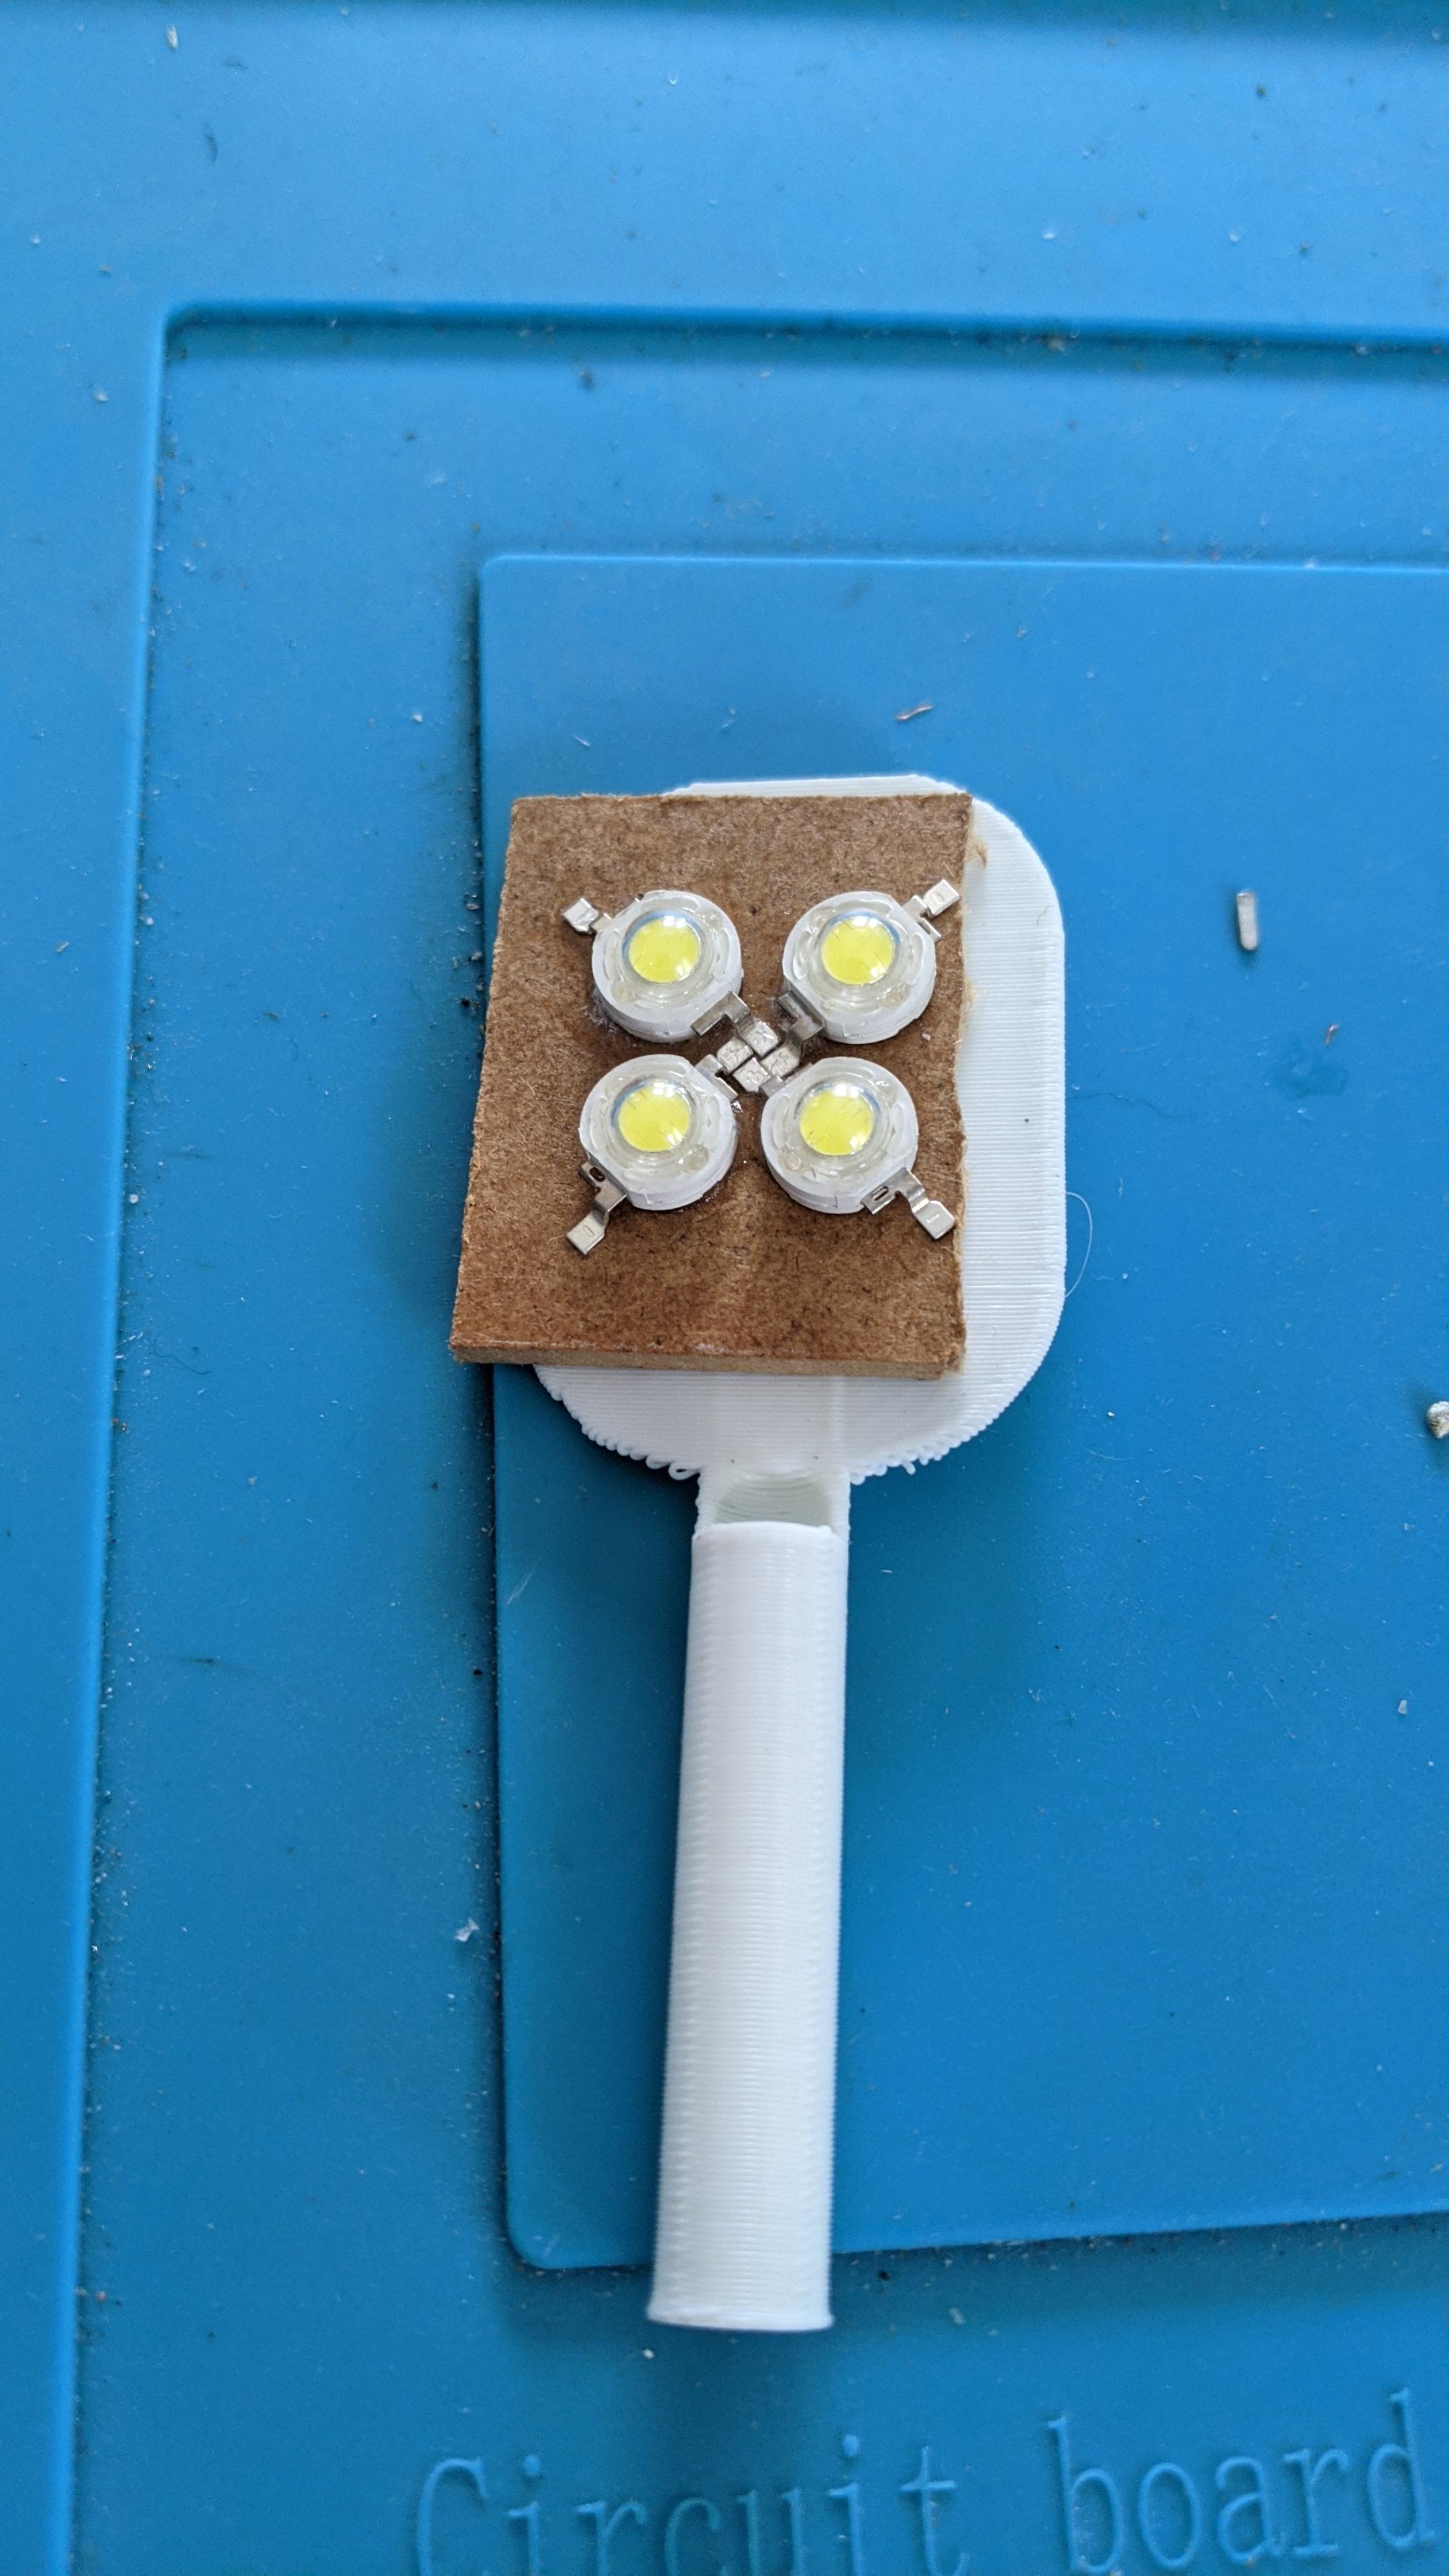
I super glued the LEDs on two small boards, I did not use hot glue in case they become hot and fall off.
- 2 leds go on one board for the stars
- 4 go on another board for the moon.
The resistors are placed in the back of the board.
For the moon LEDs make sure to pass the wire through the paddle tube prior to soldering to the cable. Then you can hot glue the board with the LEDs on the paddle. I avoided gluing the LEDs directly on the paddle due to heat and PLA low heat resistance.
Everything is connect to the network cable. I could have used only one thread for the power, but I wanted to keep some freedom to change light/servo power in the future, so I have each wired individually. Feel free to use only one.
The other end of the network cable receives 8 female pins soldered to it.
The box for the bed table
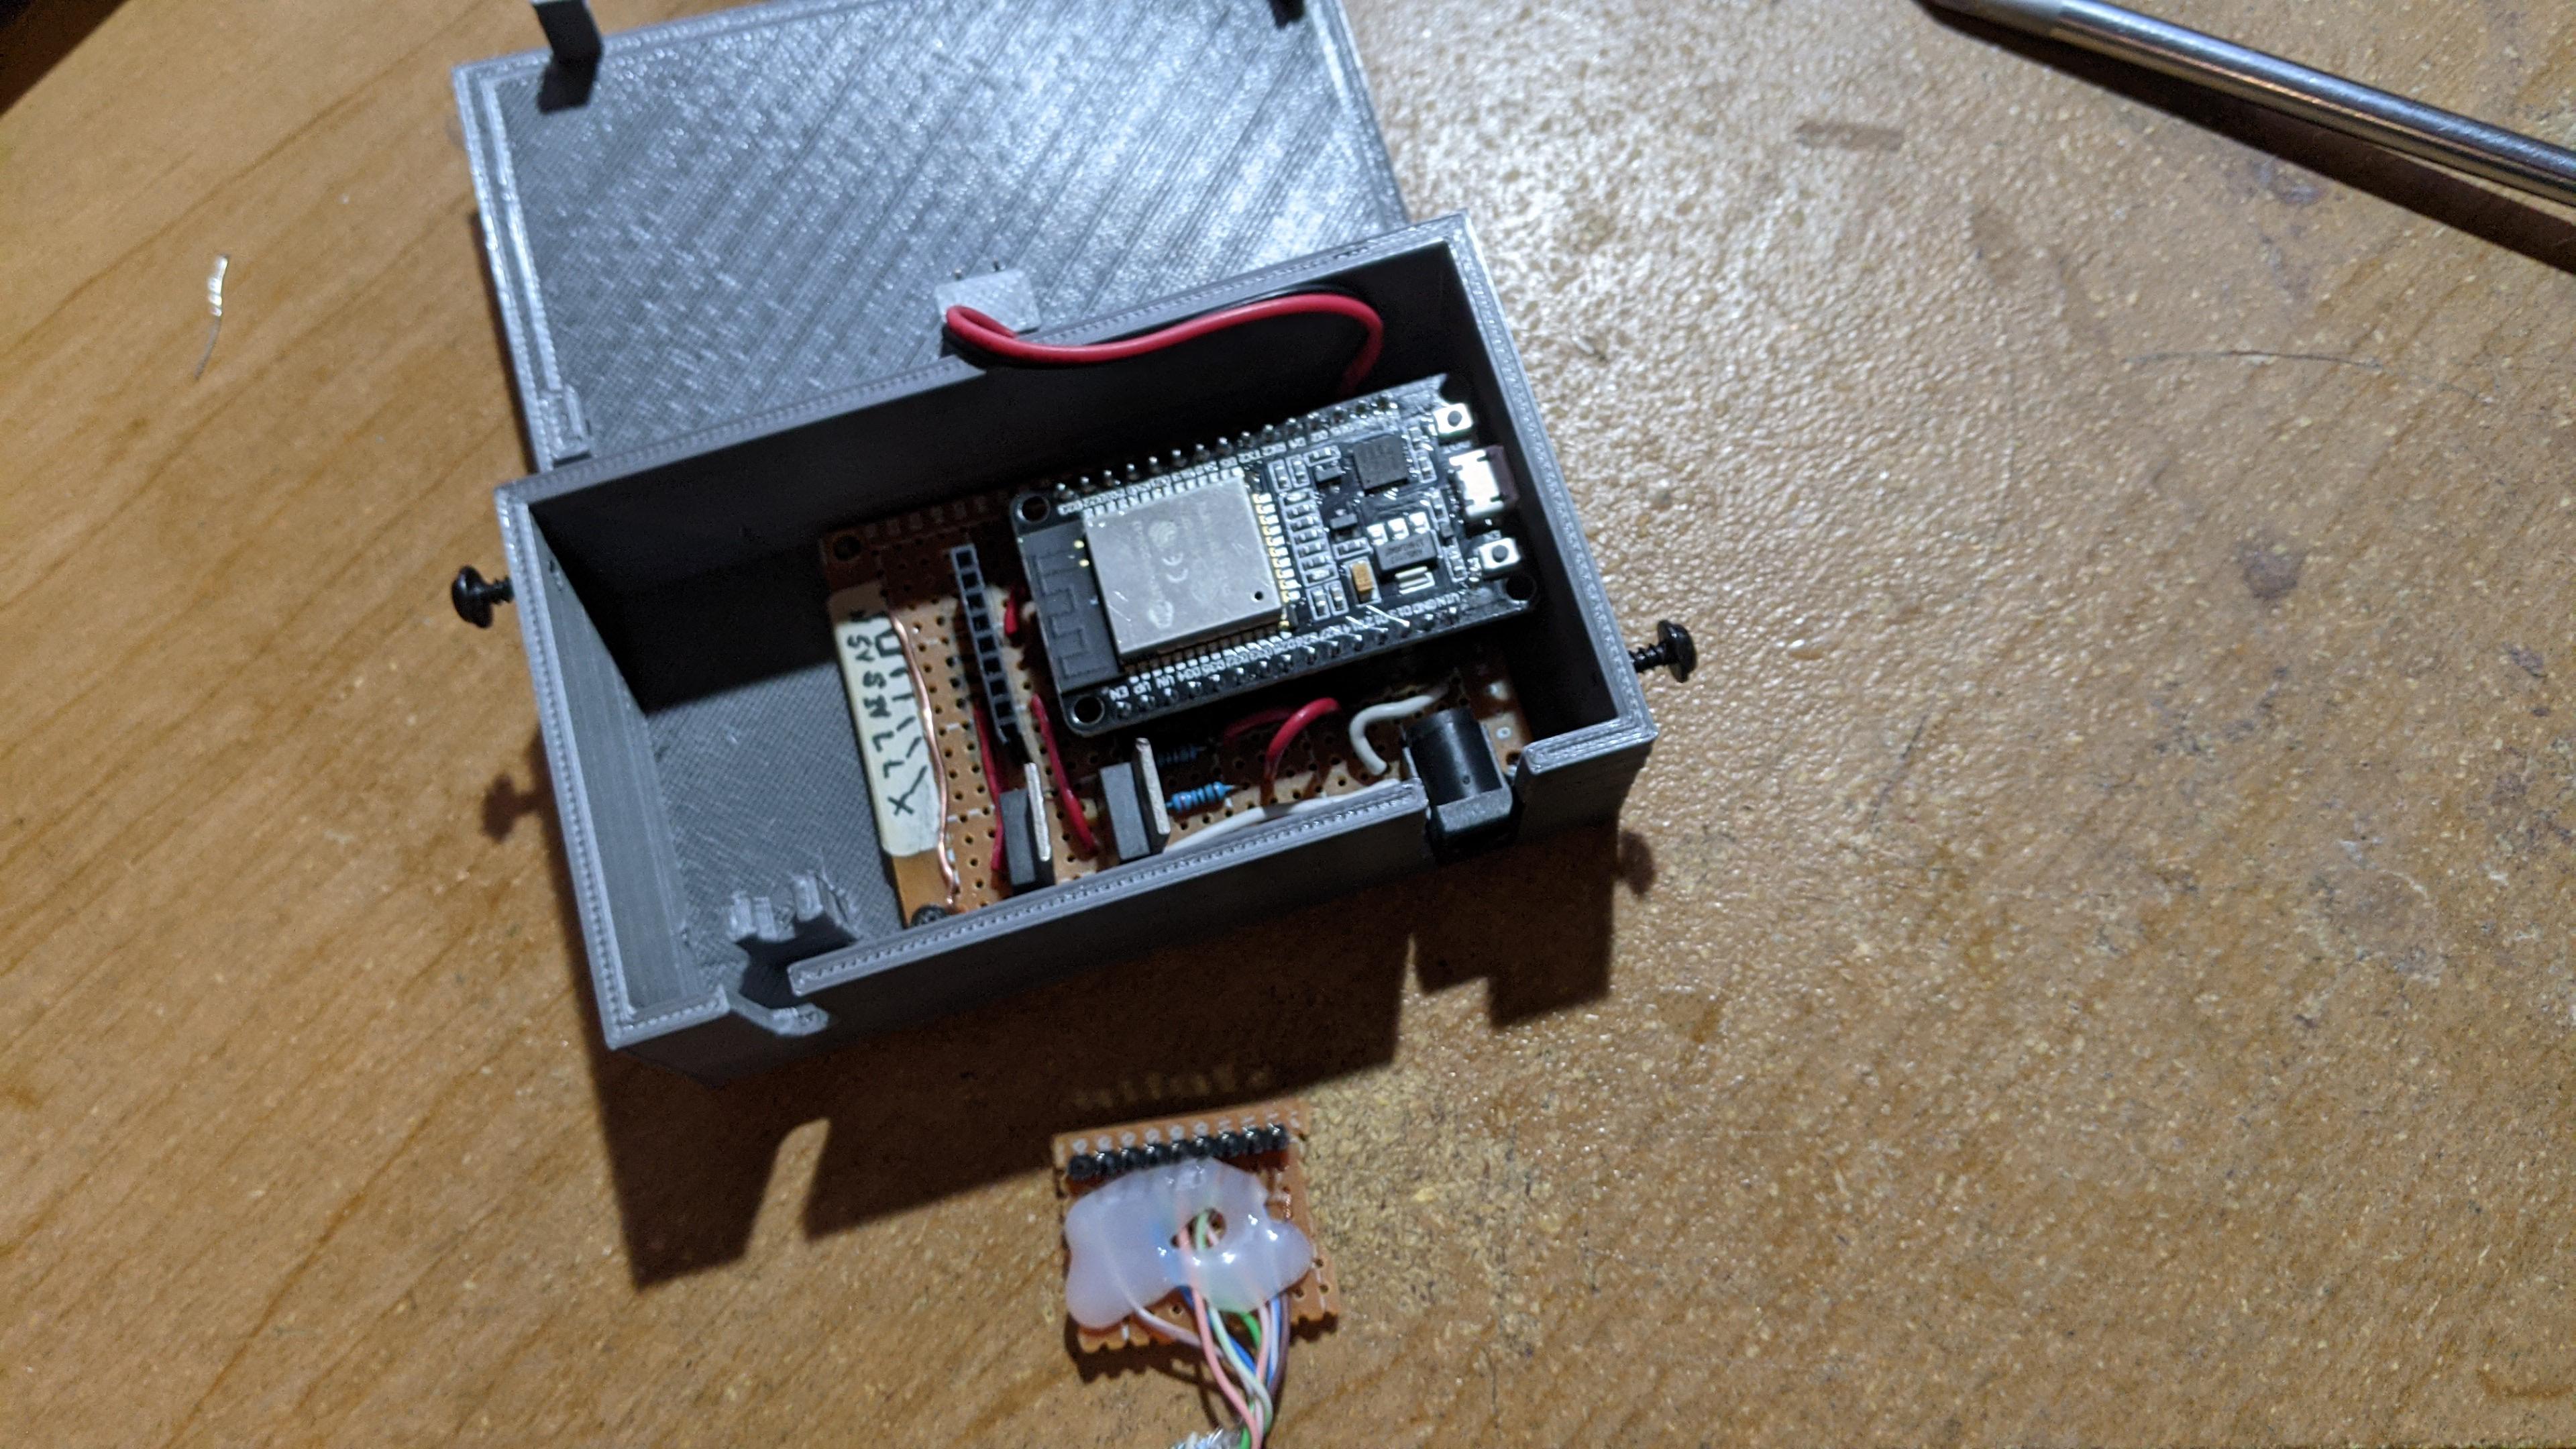
I soldered everything on the prototype board but the ESP and button. I used females pins on the prototype board in order to easily remove the ESP32 if needed.
Similarly I soldered all the outputs for the Night-sky ceiling to male pins to easily connect and disconnect the box from the network cable. By doing this make sure you identify which cable connects where to avoid any problems.
The button is soldered to a cable to give enough room to open the box lid.
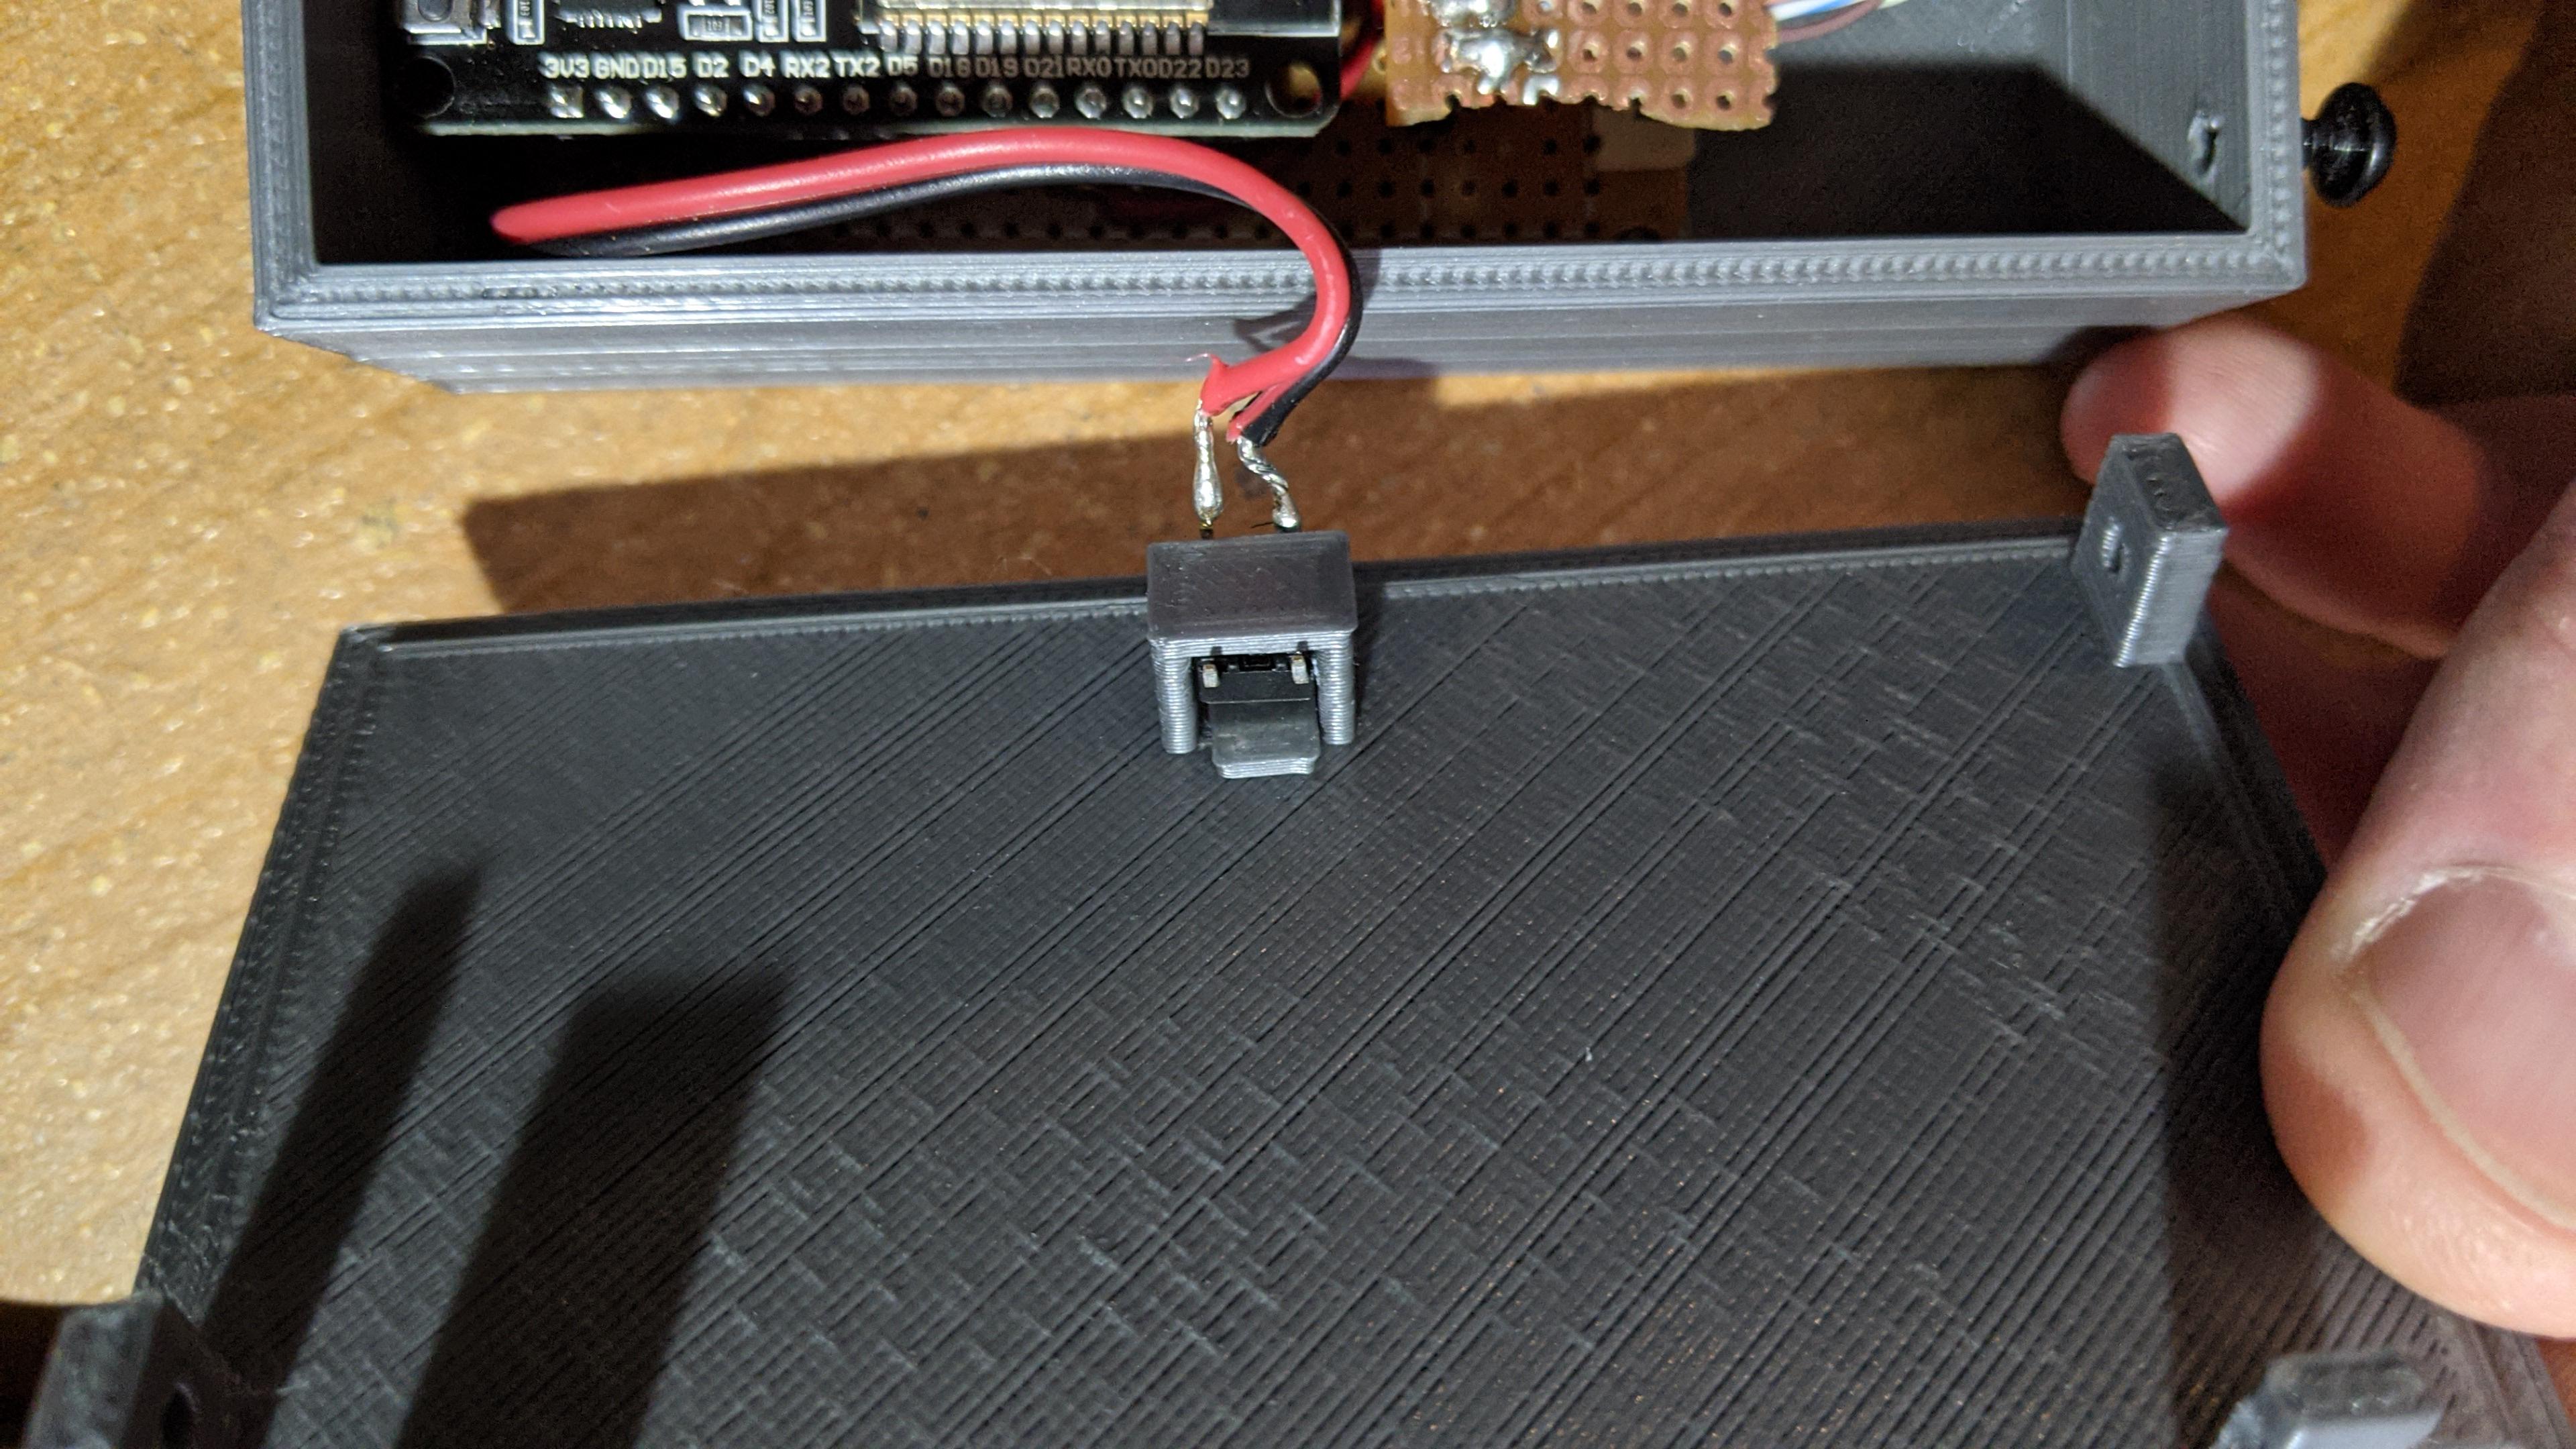
For the power socket I was able to cut two holes of the prototype board to fit in it's large pins.
If you have printed the box, you should be able to screw the prototype board to it and enclose everything properly with USB and power port in the right position.
Software
This is done using arduino IDE, but can easily be done on other platform as well.
Managers
If it's your first time using ESP32 follow this guideline to install the required things: https://randomnerdtutorials.com/installing-the-esp...
Also you will need the File System Manager for ESP32. Installation guide can be found here: https://randomnerdtutorials.com/install-esp32-file...
Libraries
You will need to add the following libraries.
From the library manager search and install the following libraries:
- ezTime : https://github.com/ropg/ezTime
- ESP32Servo: https://madhephaestus.github.io/ESP32Servo/annota...
For these libraries, at the time of writting, you will need to download them and manually add them
- ESPAsyncWebServer: https://github.com/me-no-dev/ESPAsyncWebServer
- AsyncTCP : https://github.com/me-no-dev/AsyncTCP
For manual installation:
- Unzip both .zip folders into the Arduino IDE installation libraries folder
- Rename folder from ESPAsyncWebServer-master to ESPAsyncWebServer
-
Rename folder from AsyncTCP-master to AsyncTCP
-
If your IDE is running, restart it
Setting up the code
- Download the code from : https://github.com/idefy/night-sky
- The installation is described in more details on the github page.
- Open the project in Arduino IDE
- Edit the ssid and password to match your wifi settings
- Edit tzlocale to match your timezone
- Change GPIOs as needed if you used different ones.
Running the code
- Use the tool>ESP32 Sketch data upload to upload the needed data
- Compile and run the code
- If you haven't mapped the ESP32 to a static IP, then use the monitor to see the IP address
- Open the IP address in your browser
Servo Warning
I've had a lot of issues when the servo is powered directly from ESP32 when pluged in the computer.
It is recommended you test the servo when it is powered via the 5v power supply and not the USB entry.
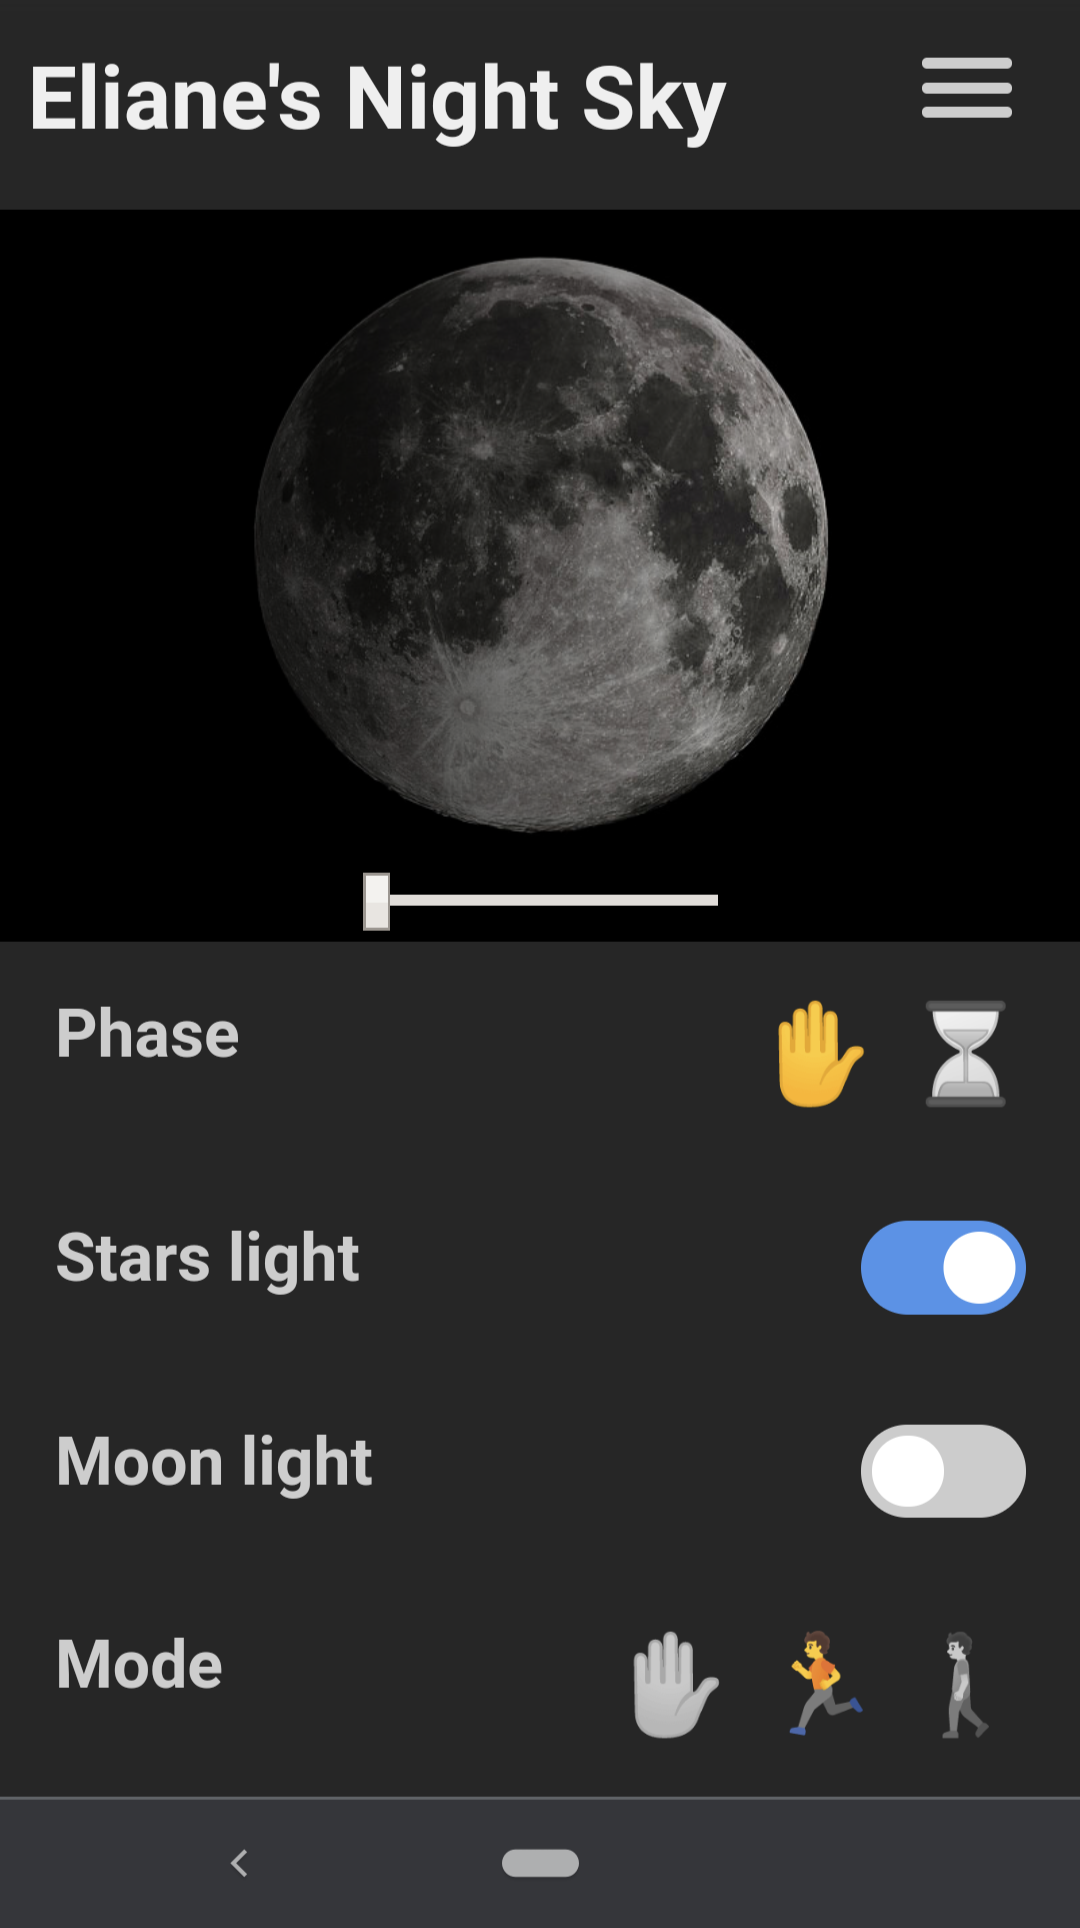
The UI
The UI was done quickly to work on chrome and Android chrome, so it may not be perfectly compatible yet. Will try to improve it later. ;)
The main menu allows to turn on and off the moon and stars lights. The moon phase can be switch to manual mode if wanted.
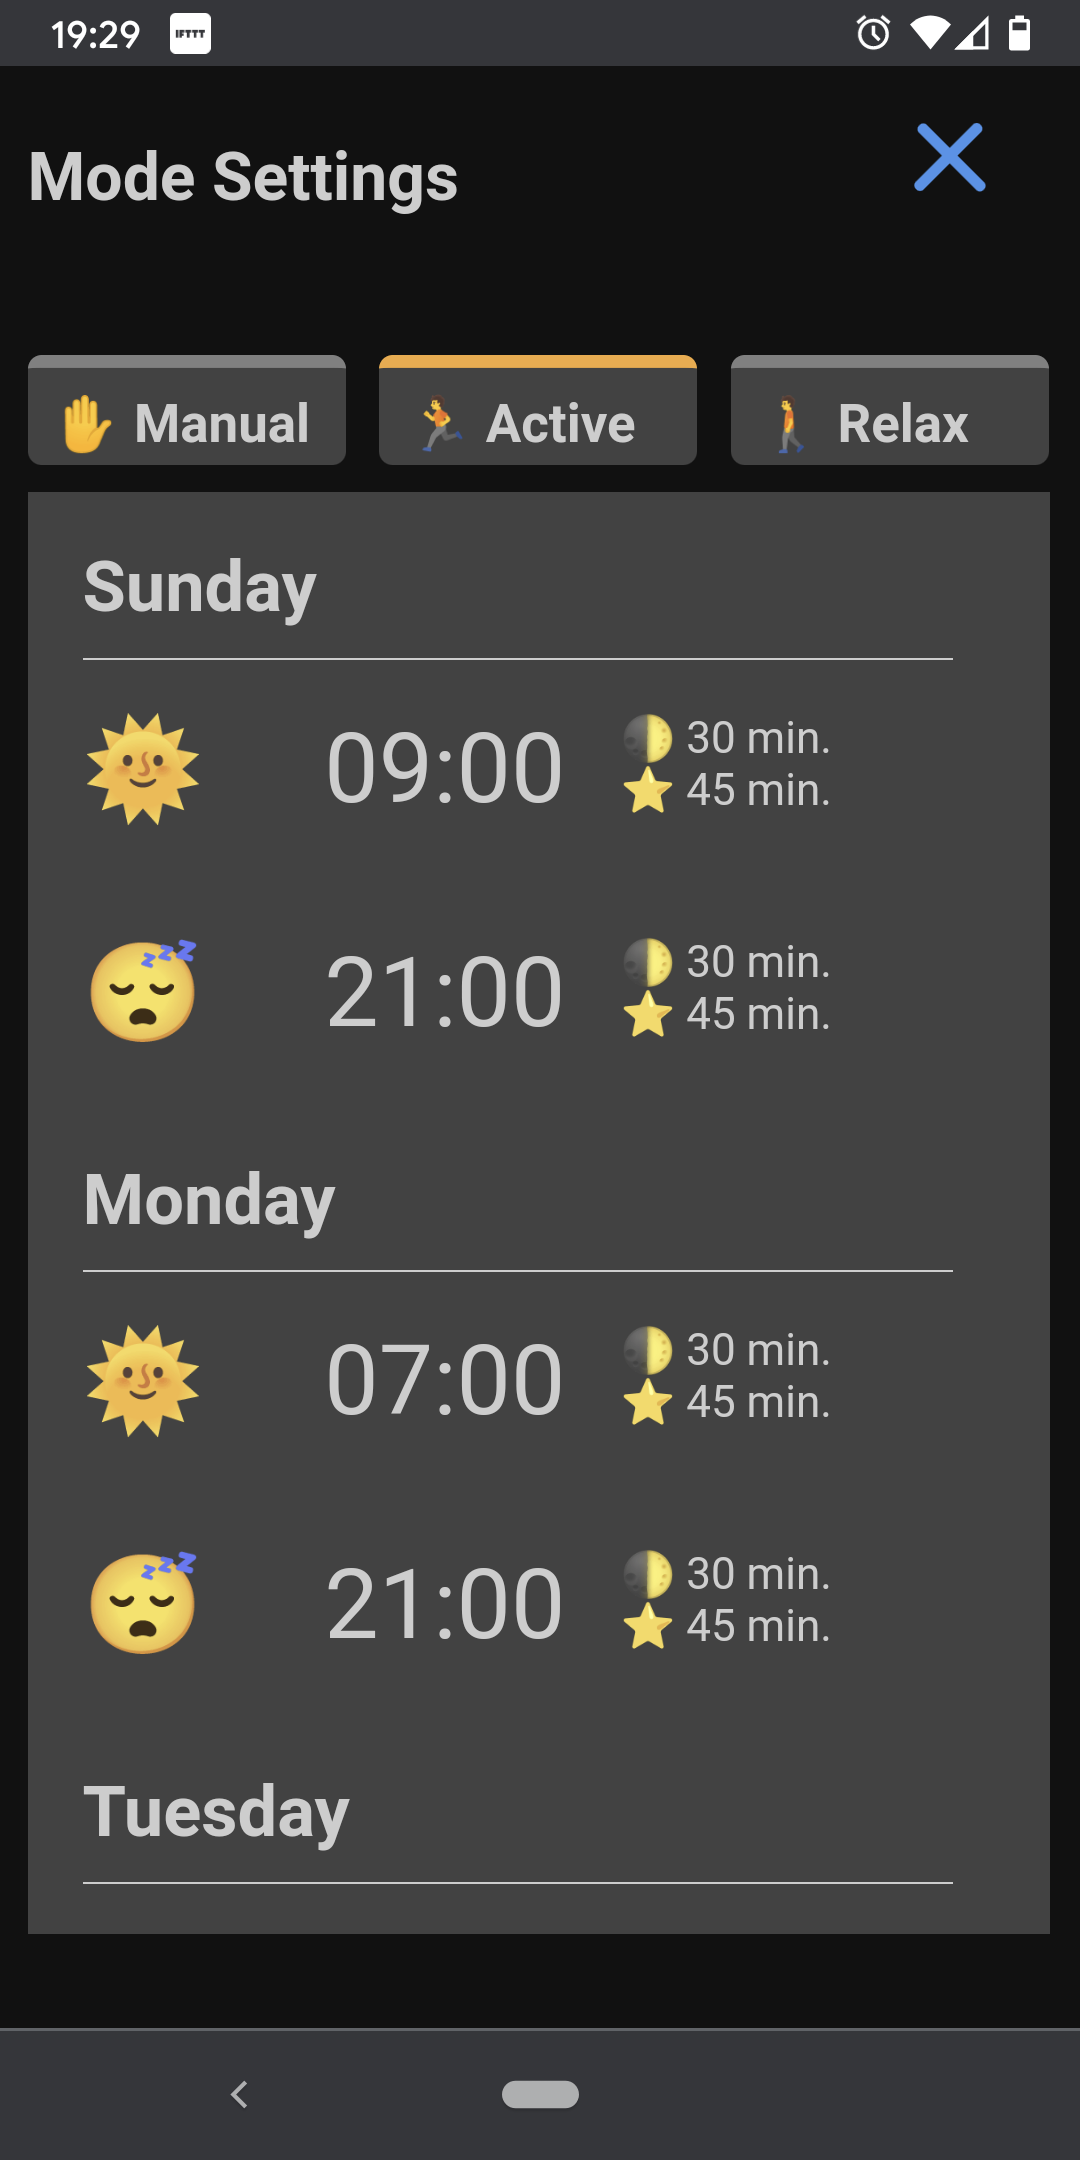
There is also a schedule mode:
- manual: does nothing by itself ;)
- active: for the working weeks
- relax: for those vacations weeks :)
In the setting you can set the default time the moon and stars will turn off.
The active and relax tabs allows you to set up the wake and sleep times of each day of the week for the two modes.
You can also turn off the wake or sleep trigger of a day by clicking on the sun or moon respectively.
The Box Button
A short press (500ms) on the button will cycle through the following modes:
- stars: off, moon: off
- stars: on, moon: off
- stars: on, moon: on
- stars: off, moon: on
A long press(1s) on the button will cycle through the moon phase opened at these angles:
- 0
- 90
- 180
Paint the Ceiling
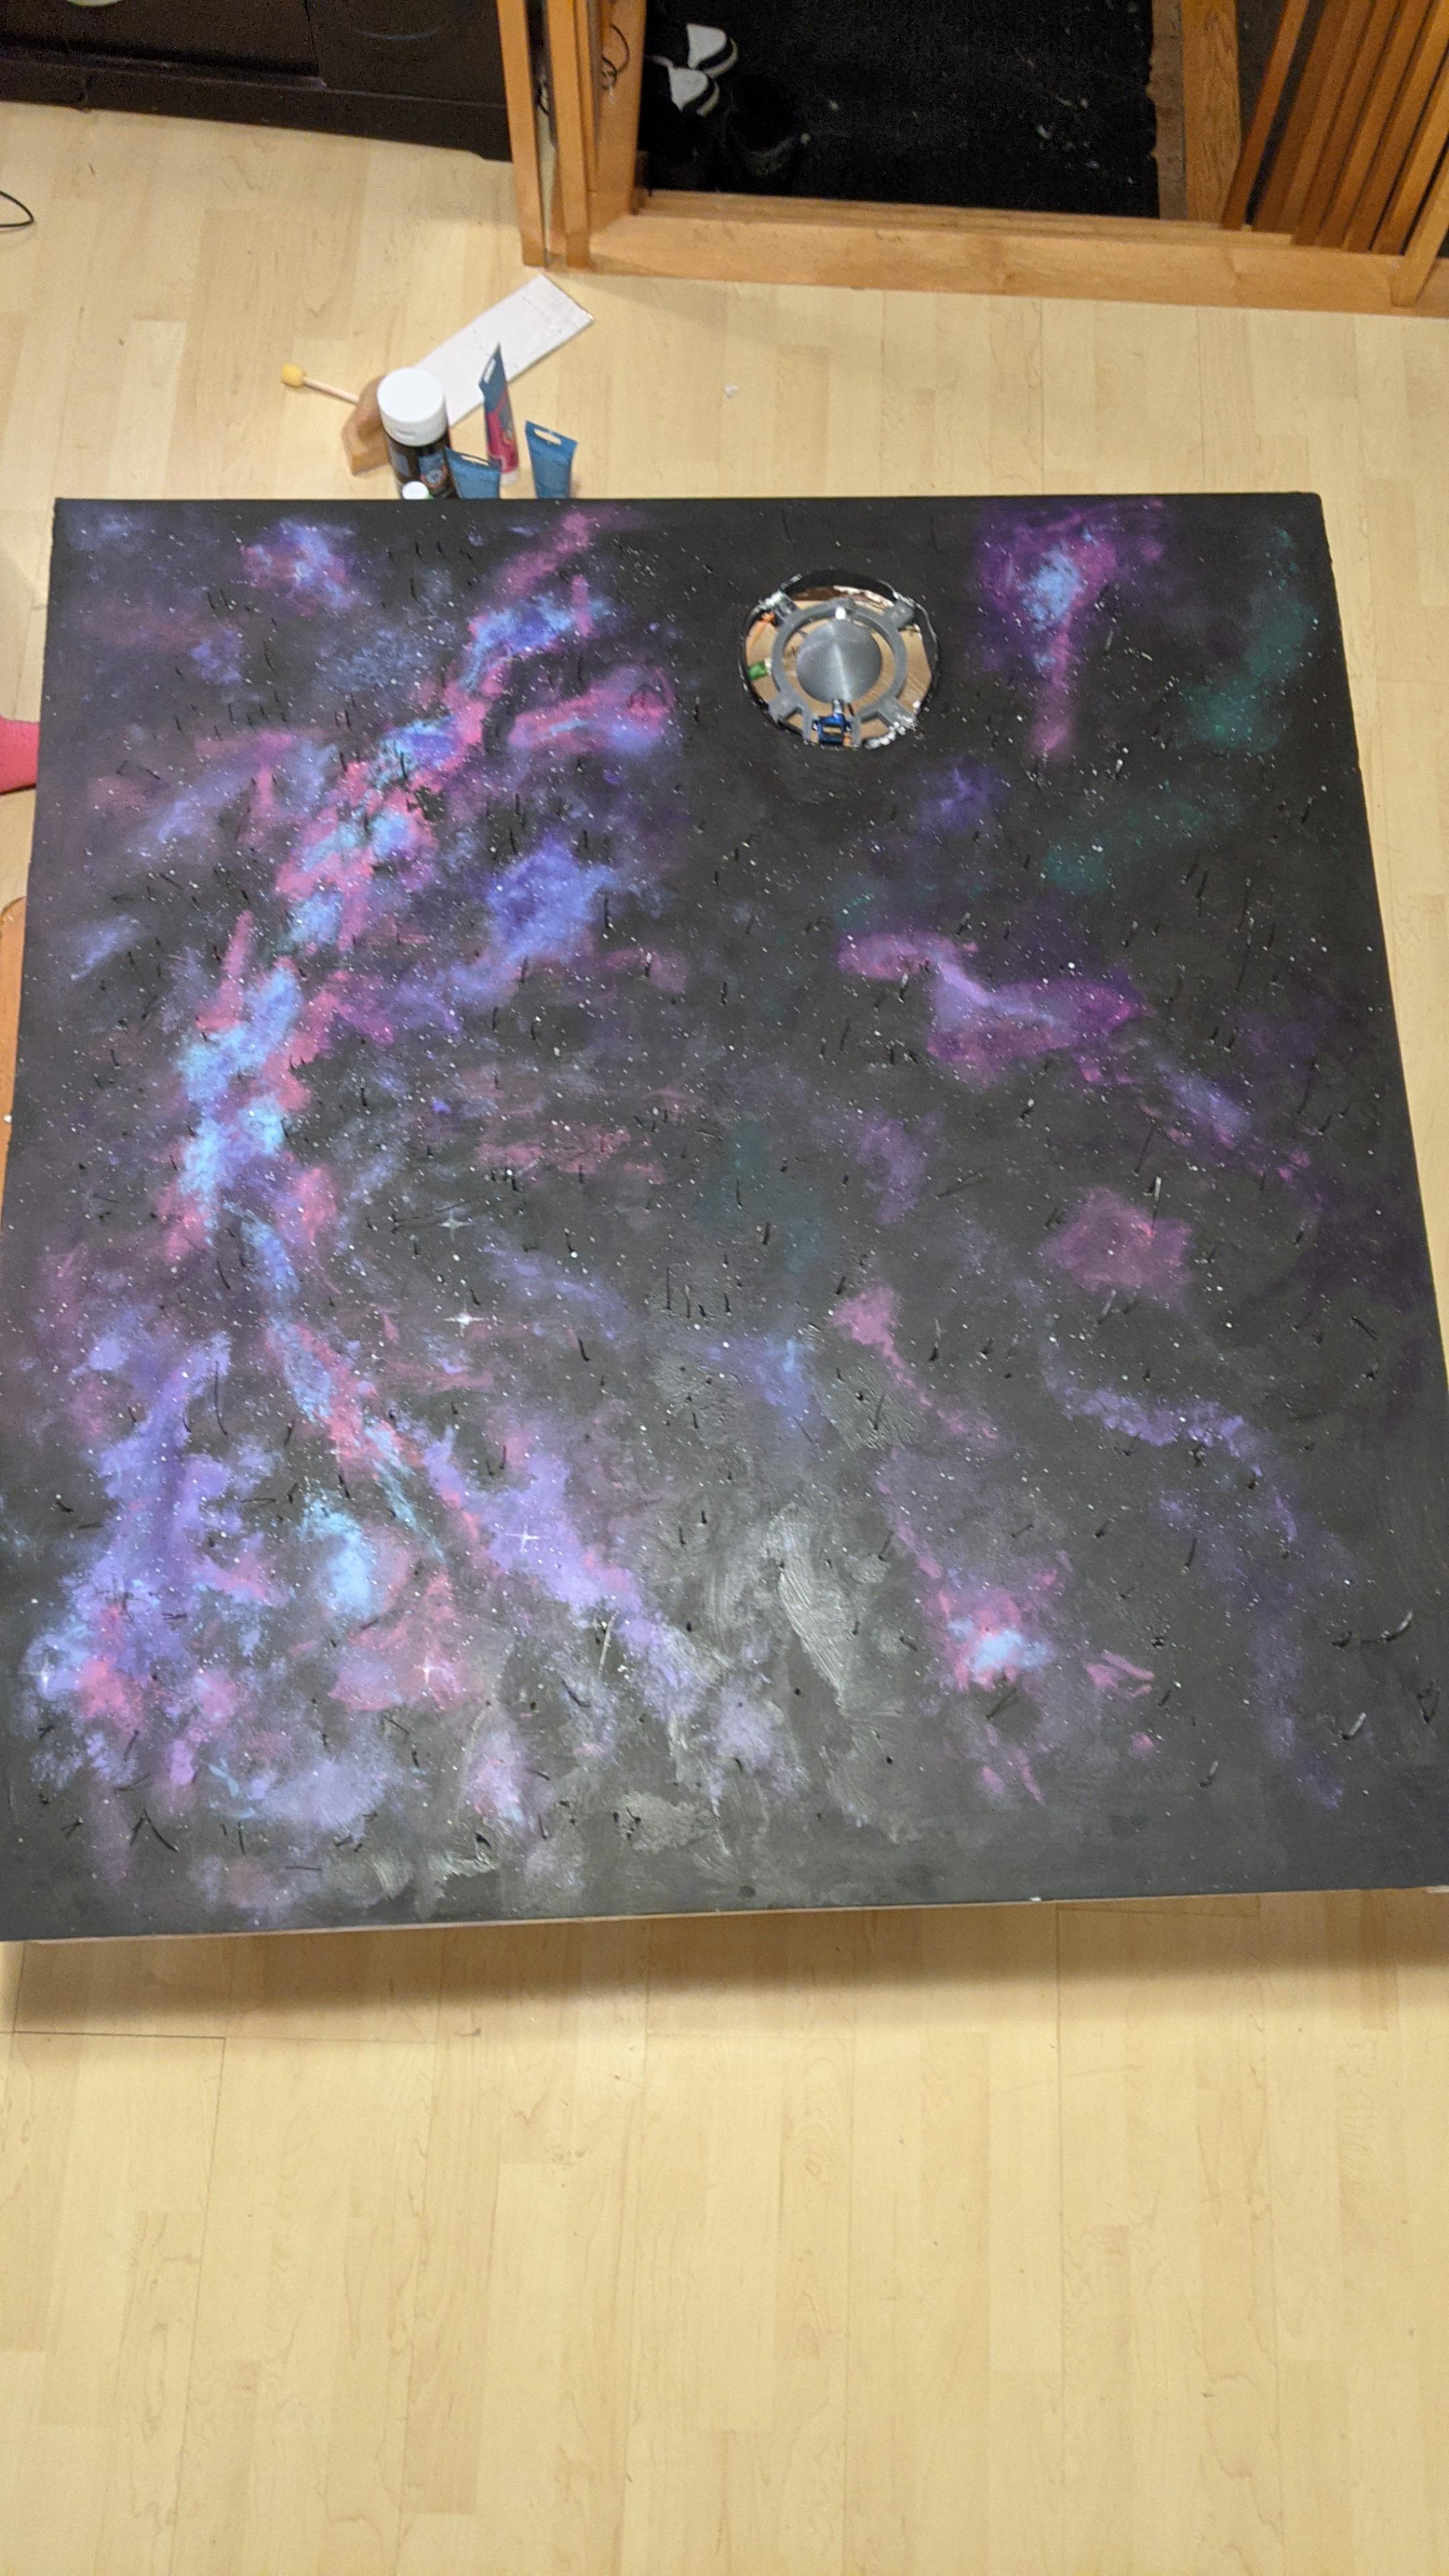
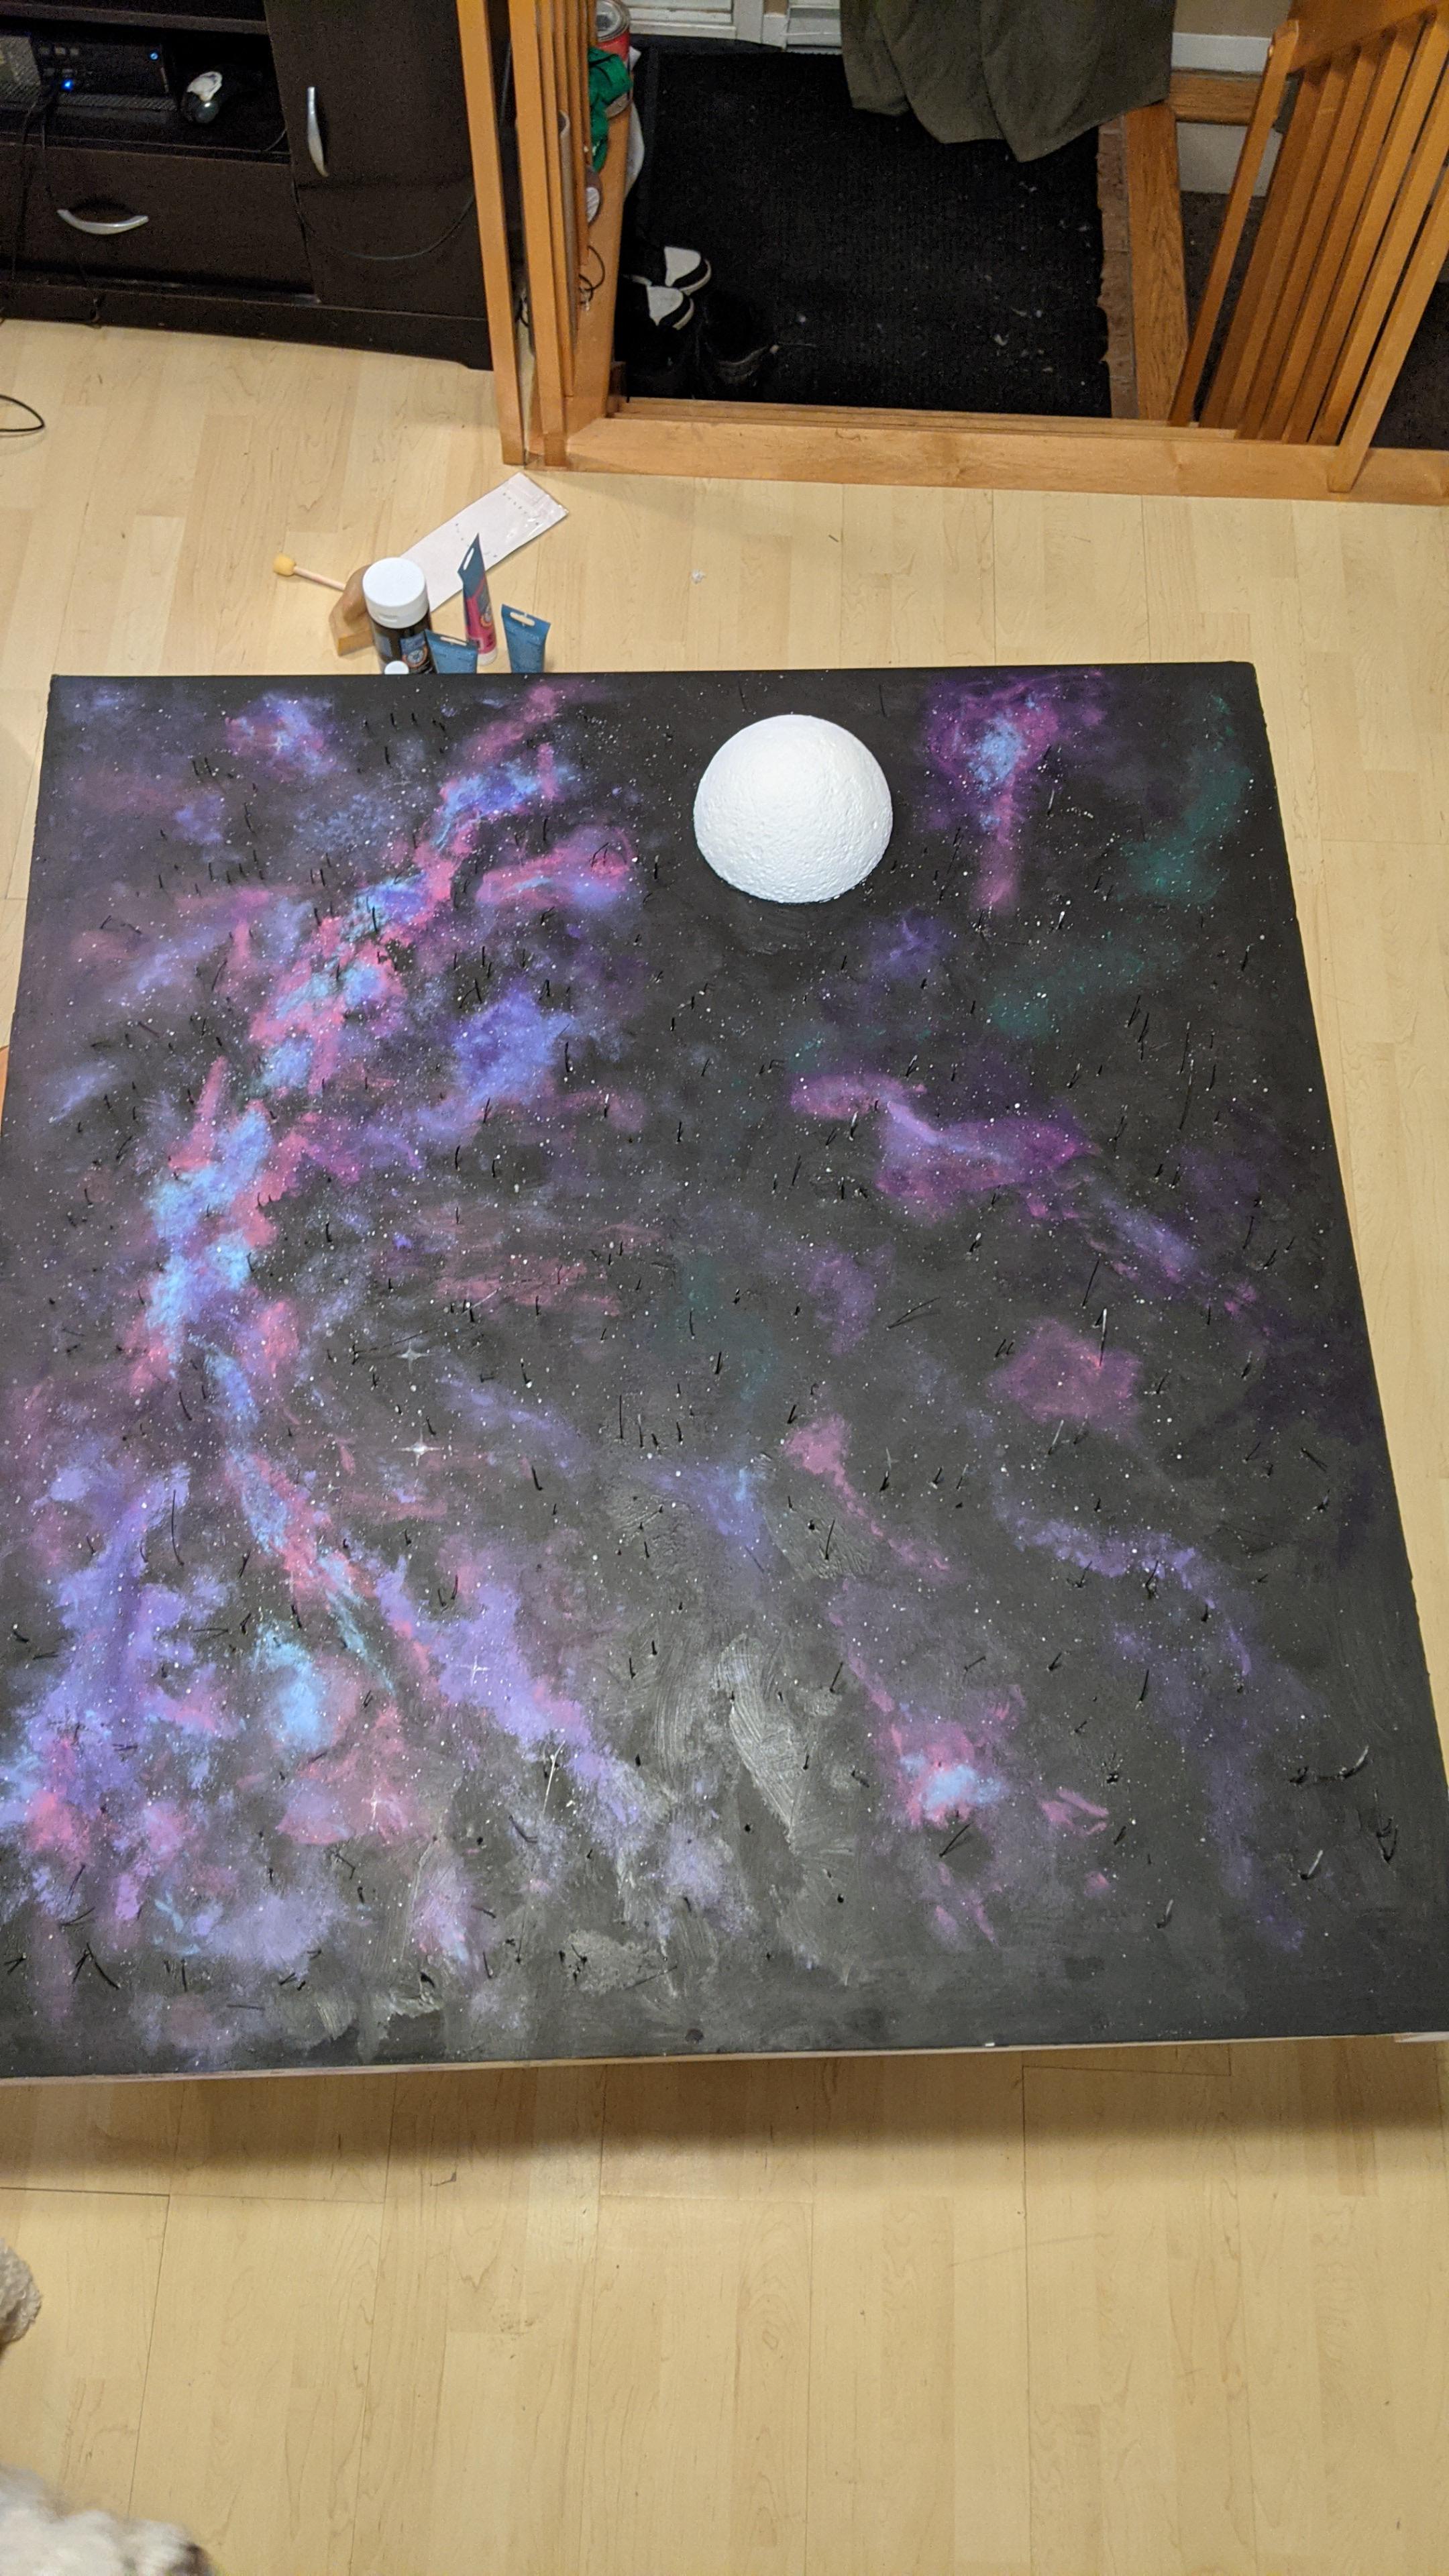

Before painting make sure all fiber optics are protruding, if they broke you can sometimes reheat the hot glue and push it a little more.
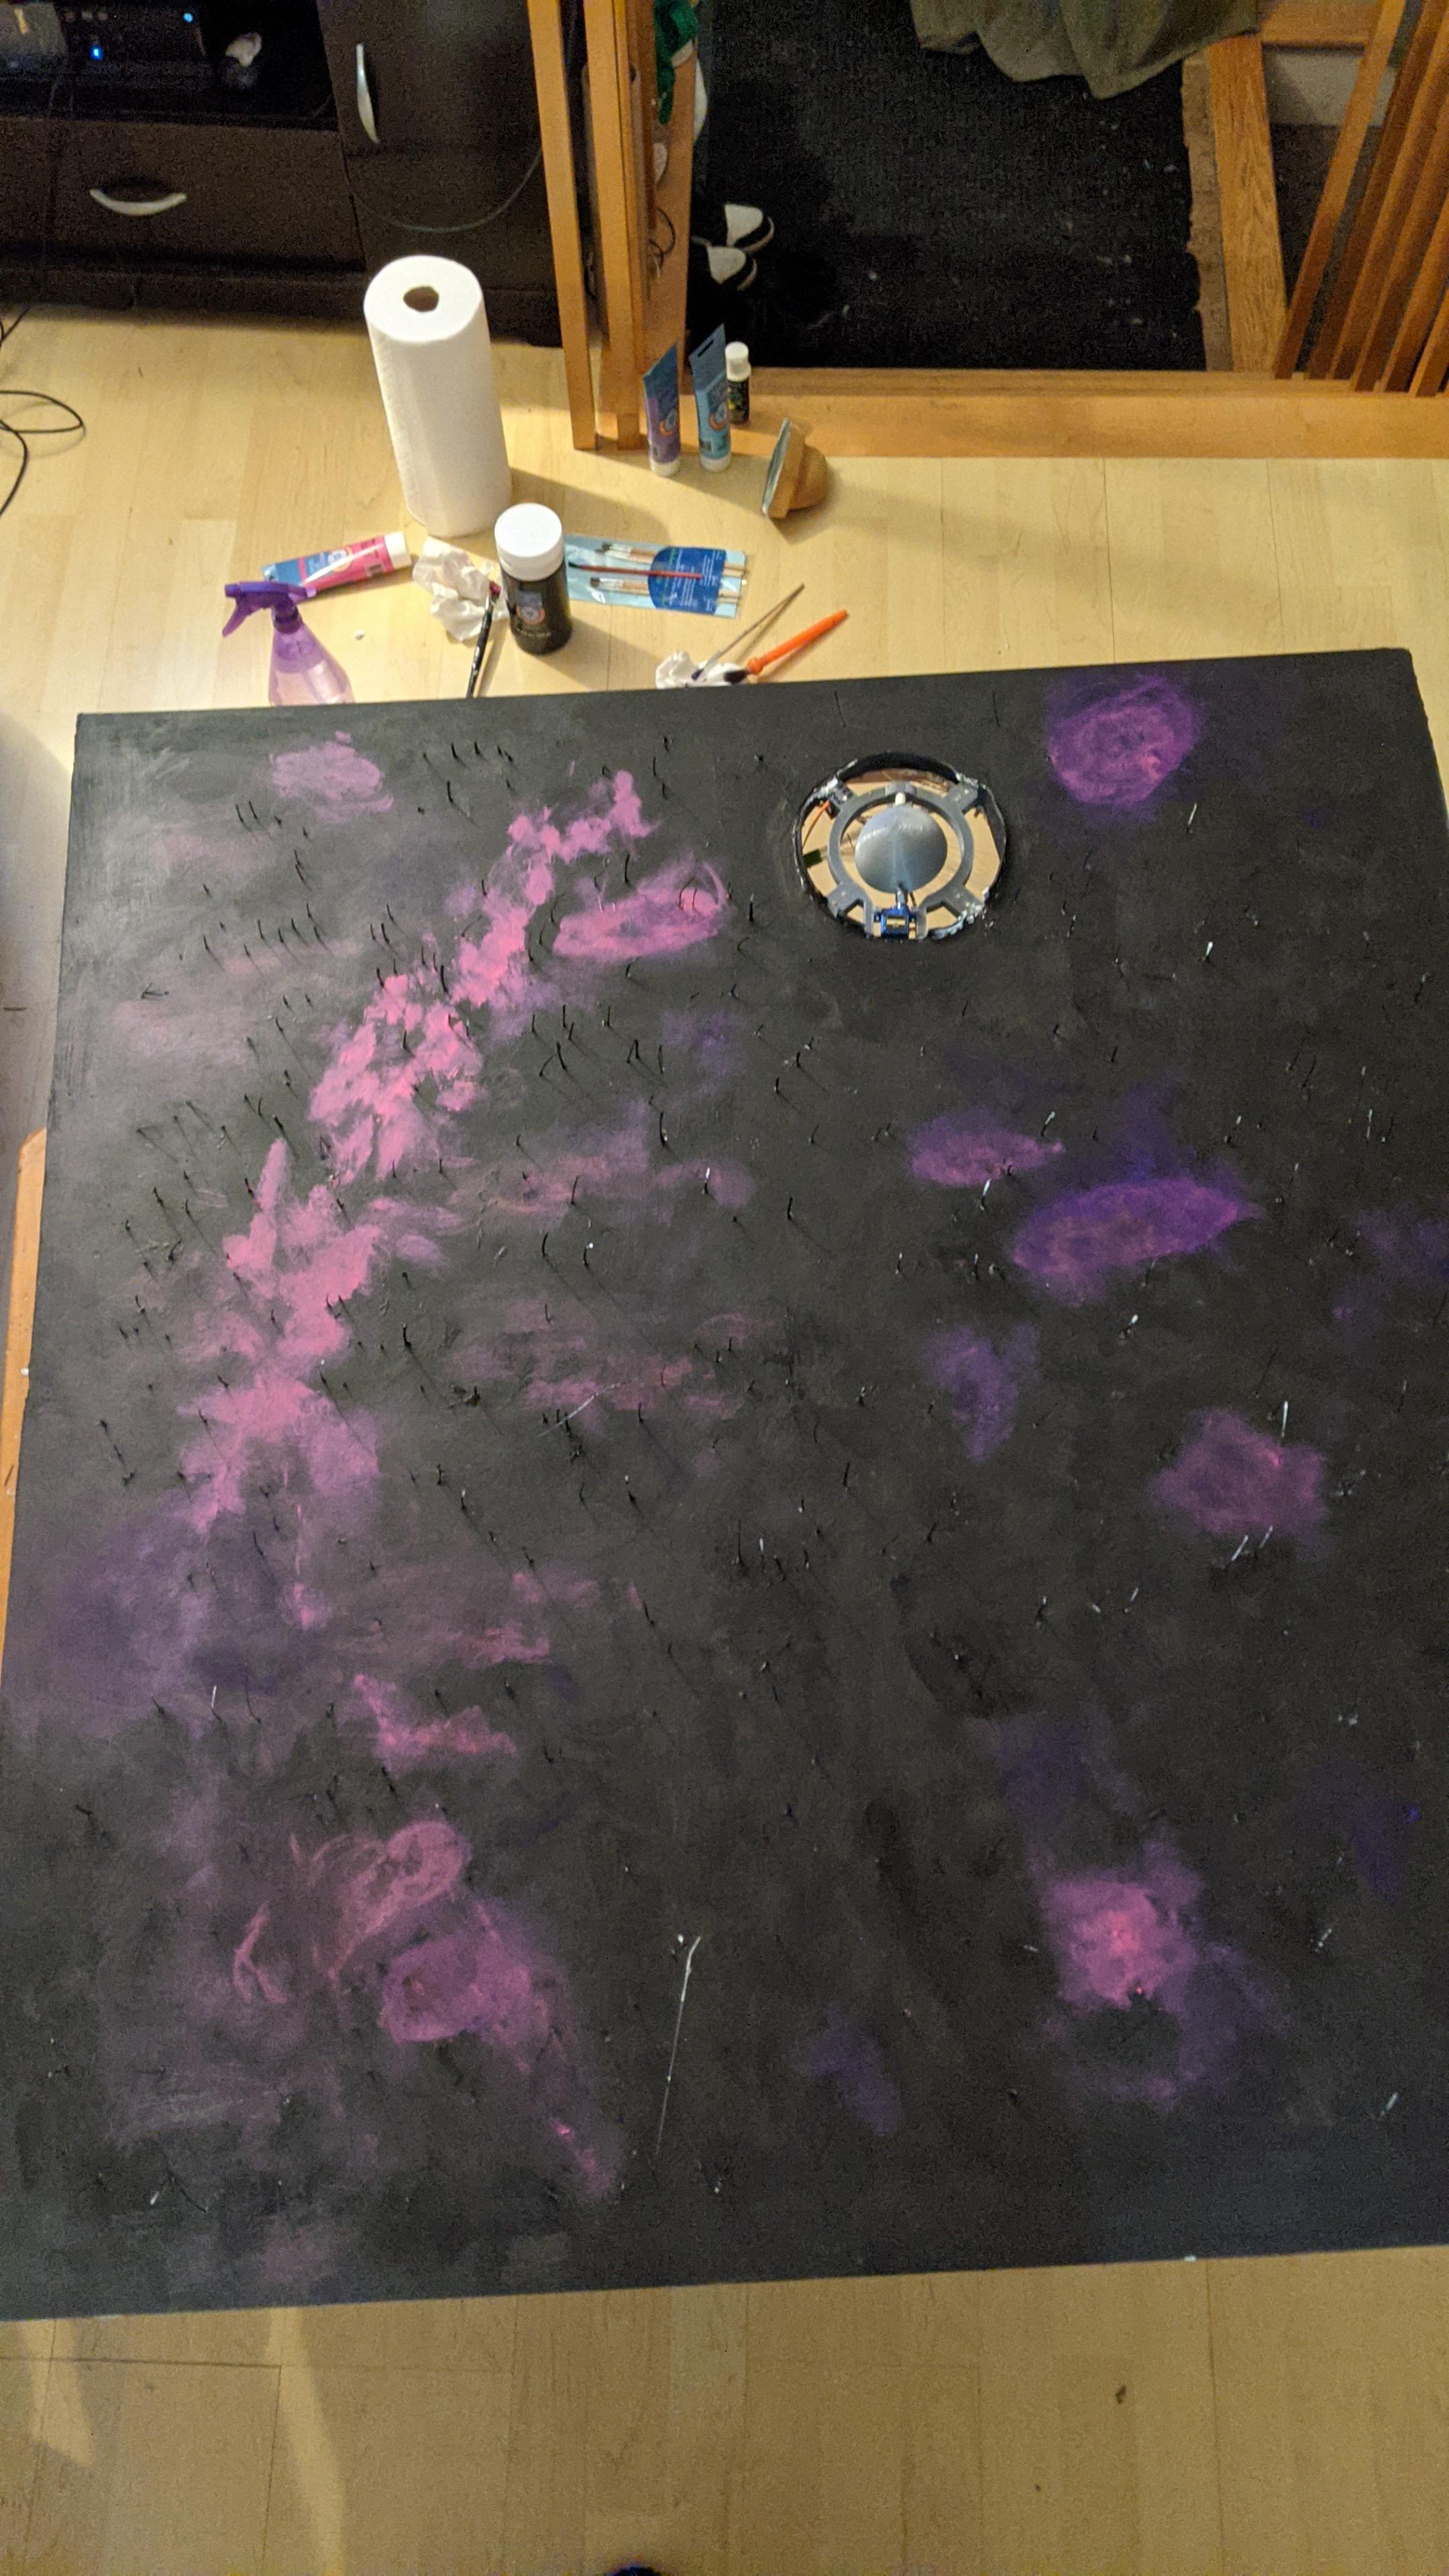
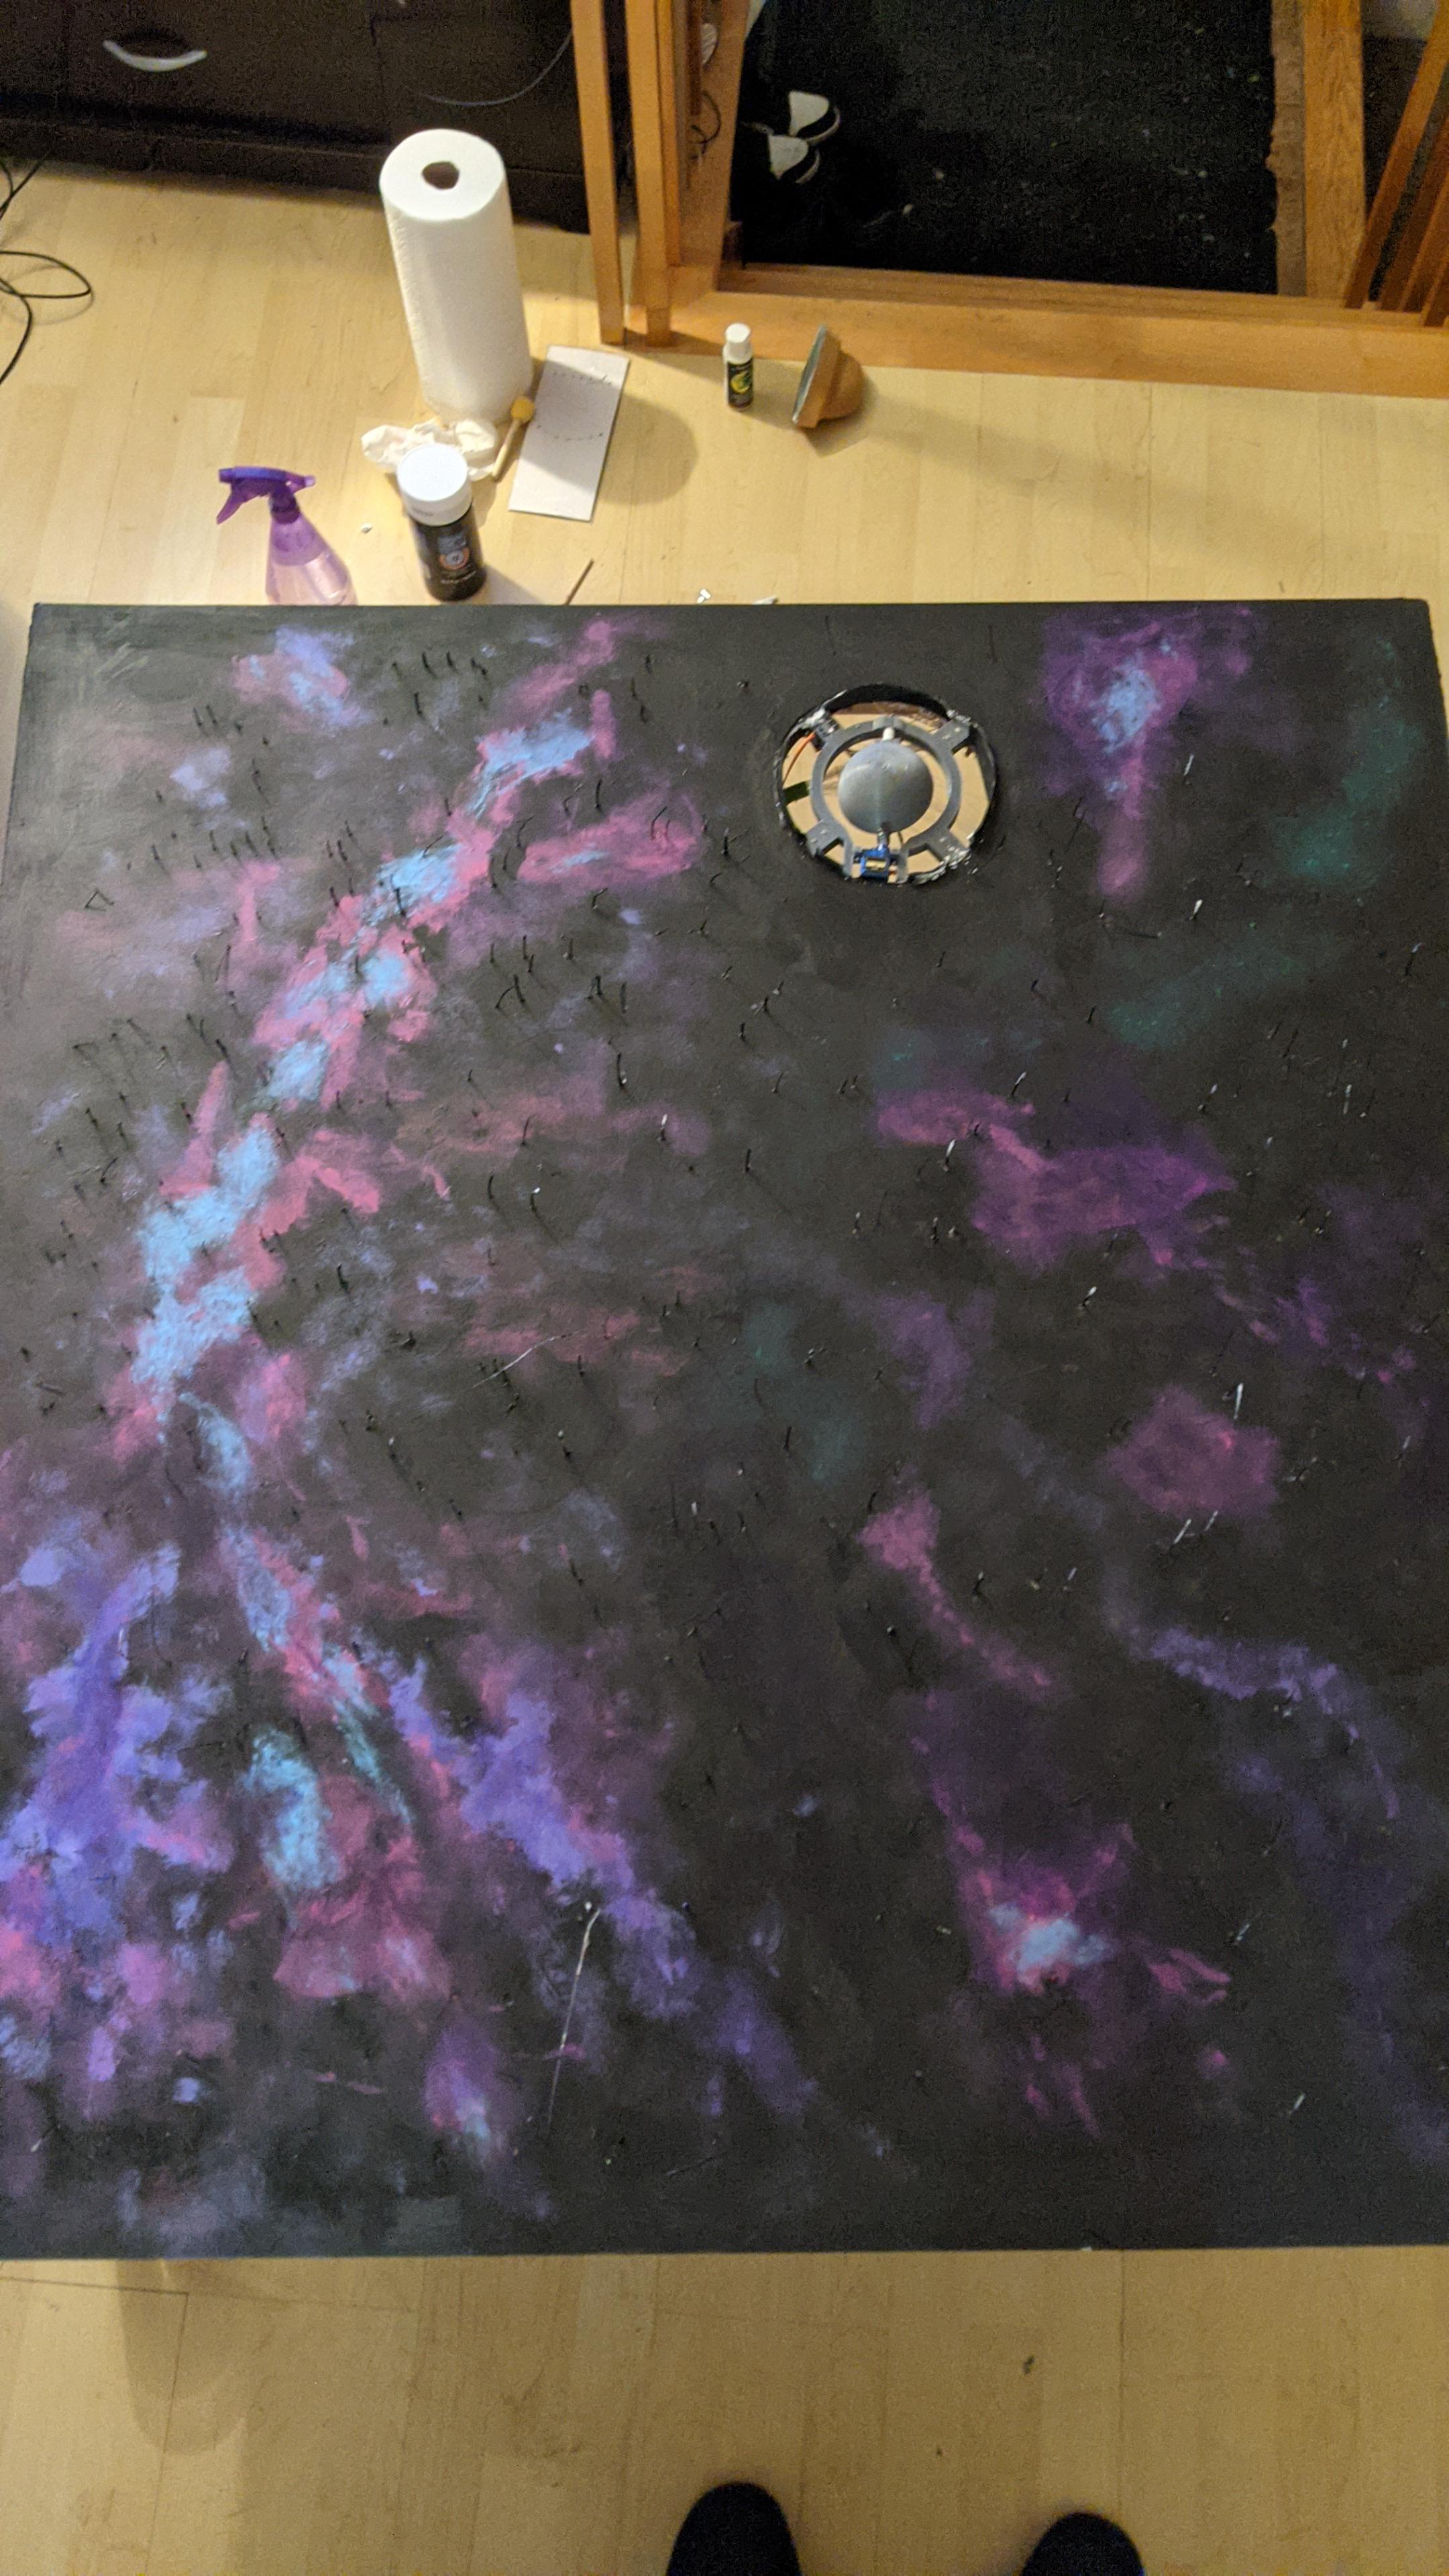
Color is really up to you. You could paint it white to fit in with the exist room ceiling or black. We decided to go for a galaxy painting... This is where having the milky way line on the printed star chart helped us create it to be more 'accurate'.
- we painted first black
- kept the paint wet
- and added some bright colors of blue, purple, magenta, cyan & a little bit of green
- then blurred them into the black
- then repeated that several times blurring less every time and focusing on some areas and leaving out more and more of the ceiling untouched.
- once we had build up enough to our liking we used an old brush to sprinkle glow in the dark paint to make stars that will be visible when the LEDs are not on.
Once paint is dry, then you can finally cut the protruding fiber optics flush.
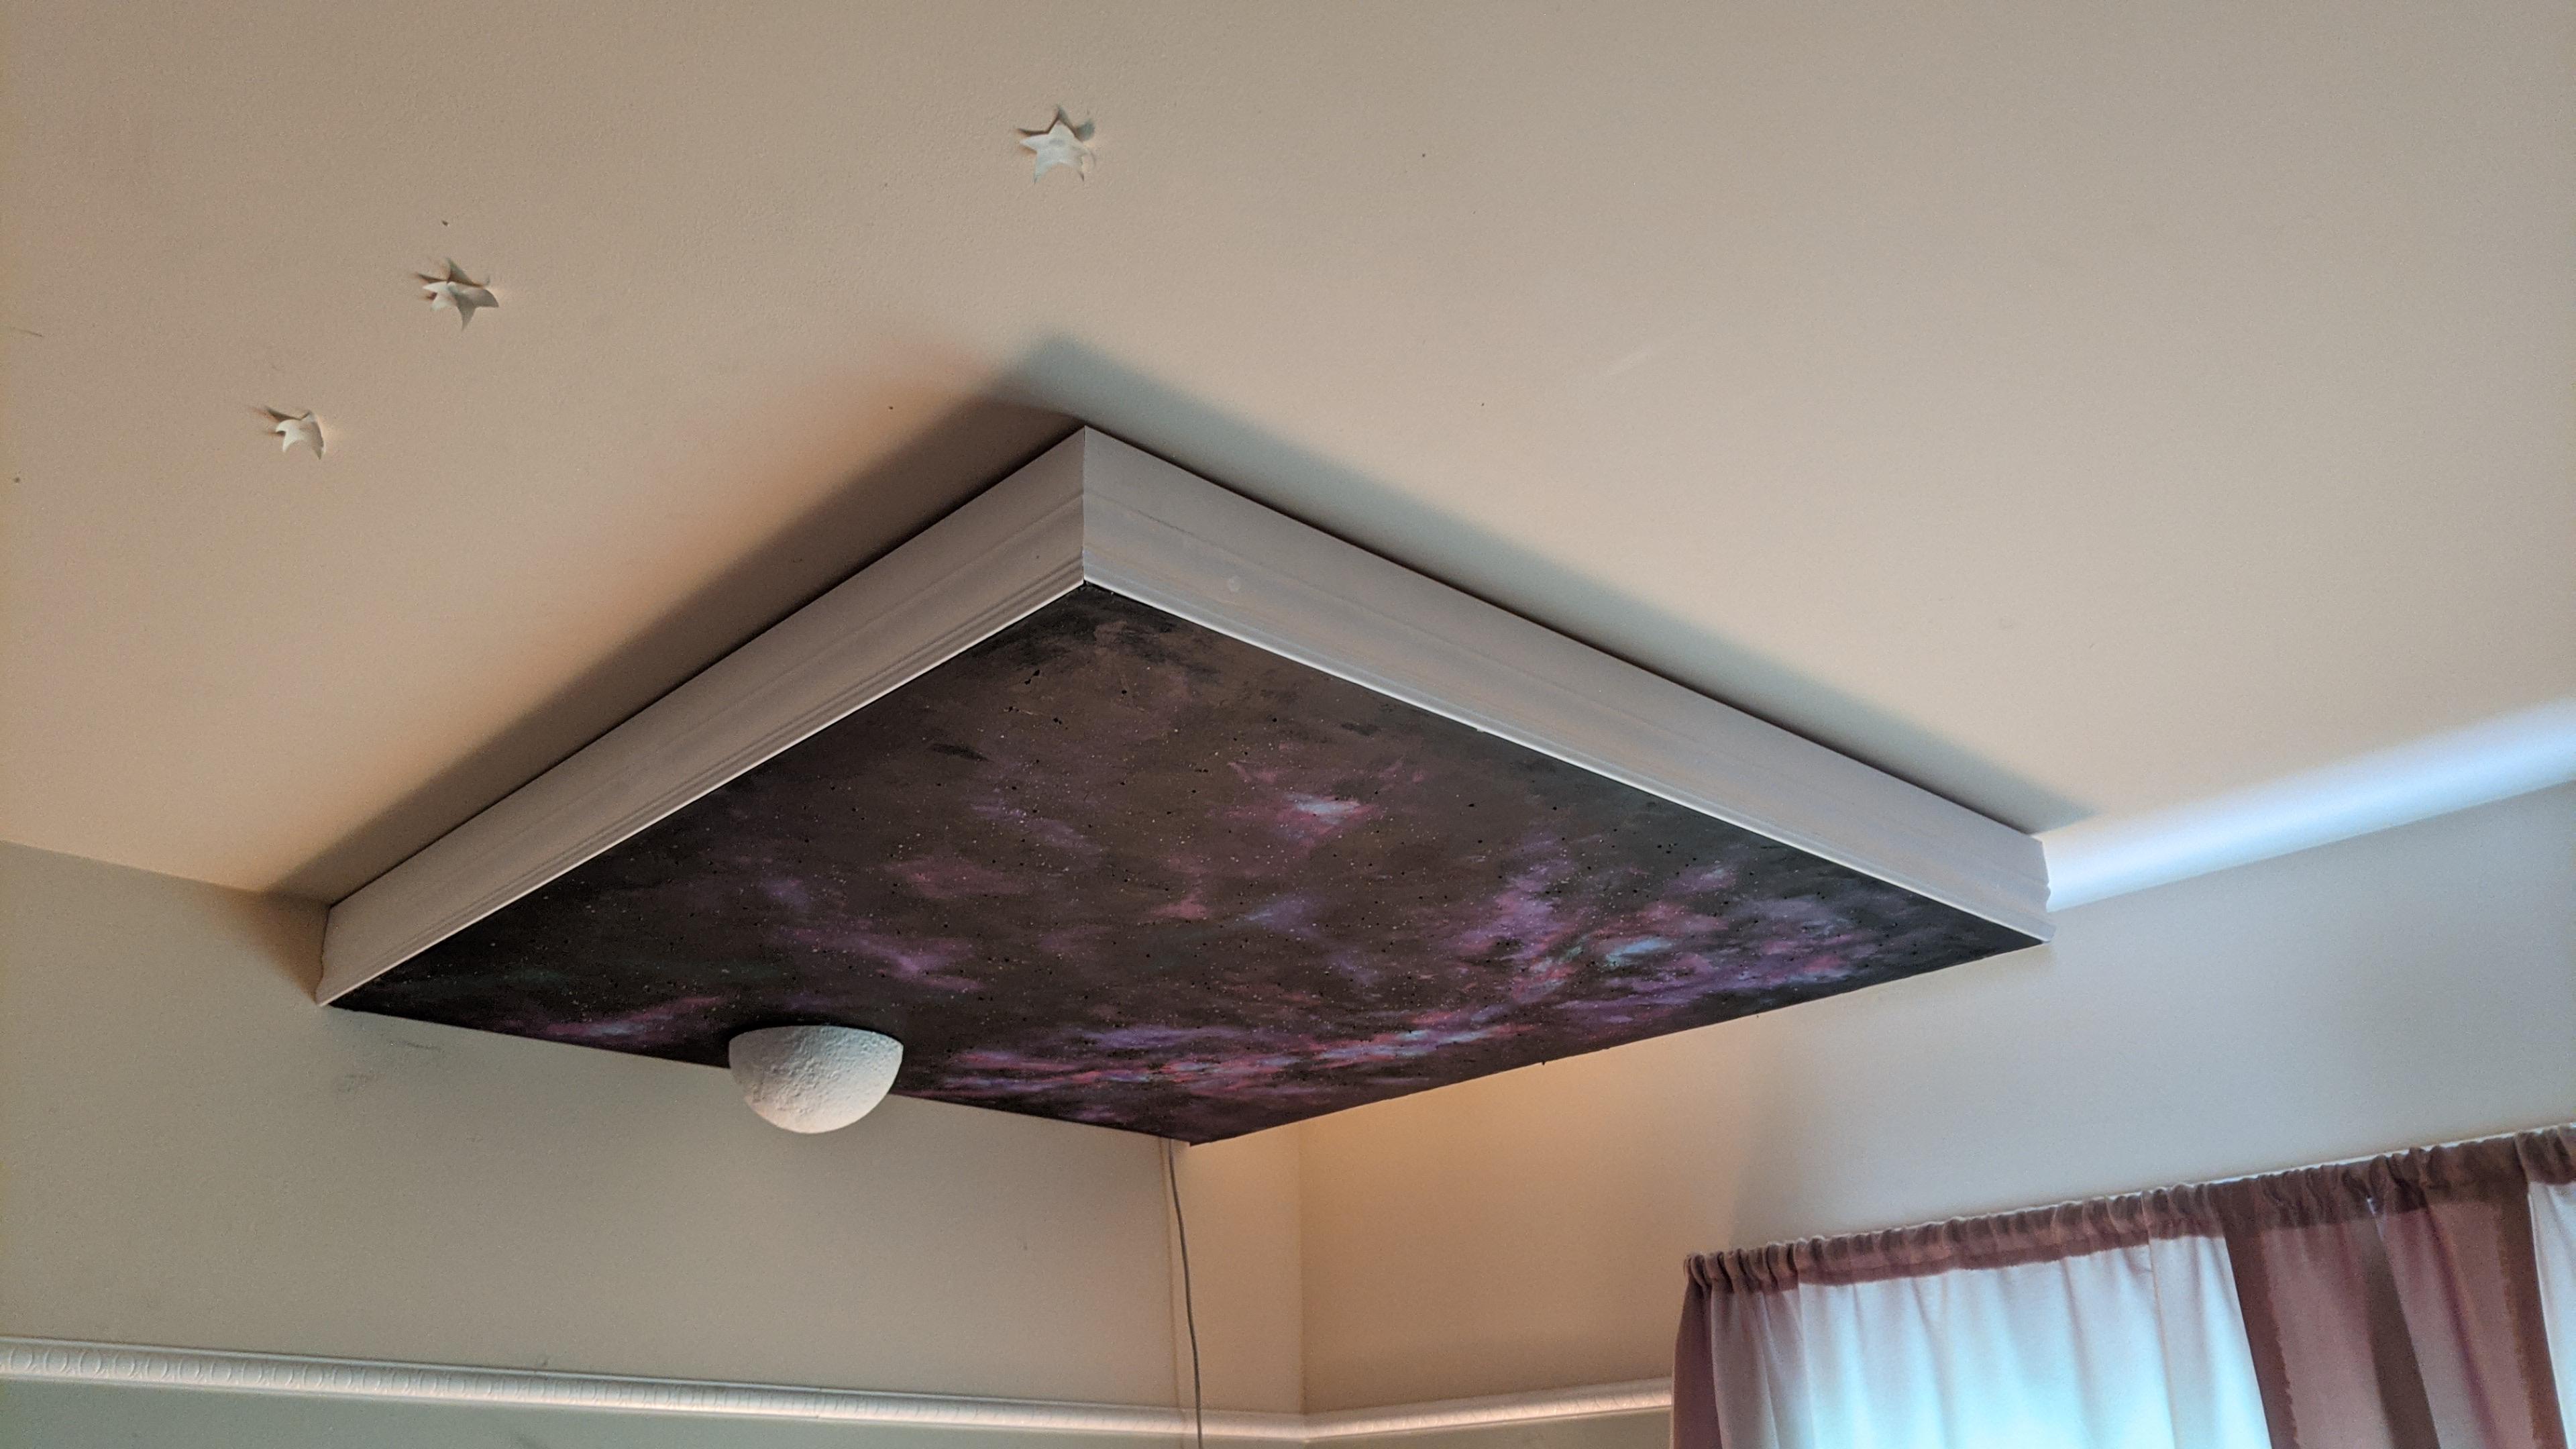
Mounting the Night-sky to the Ceiling
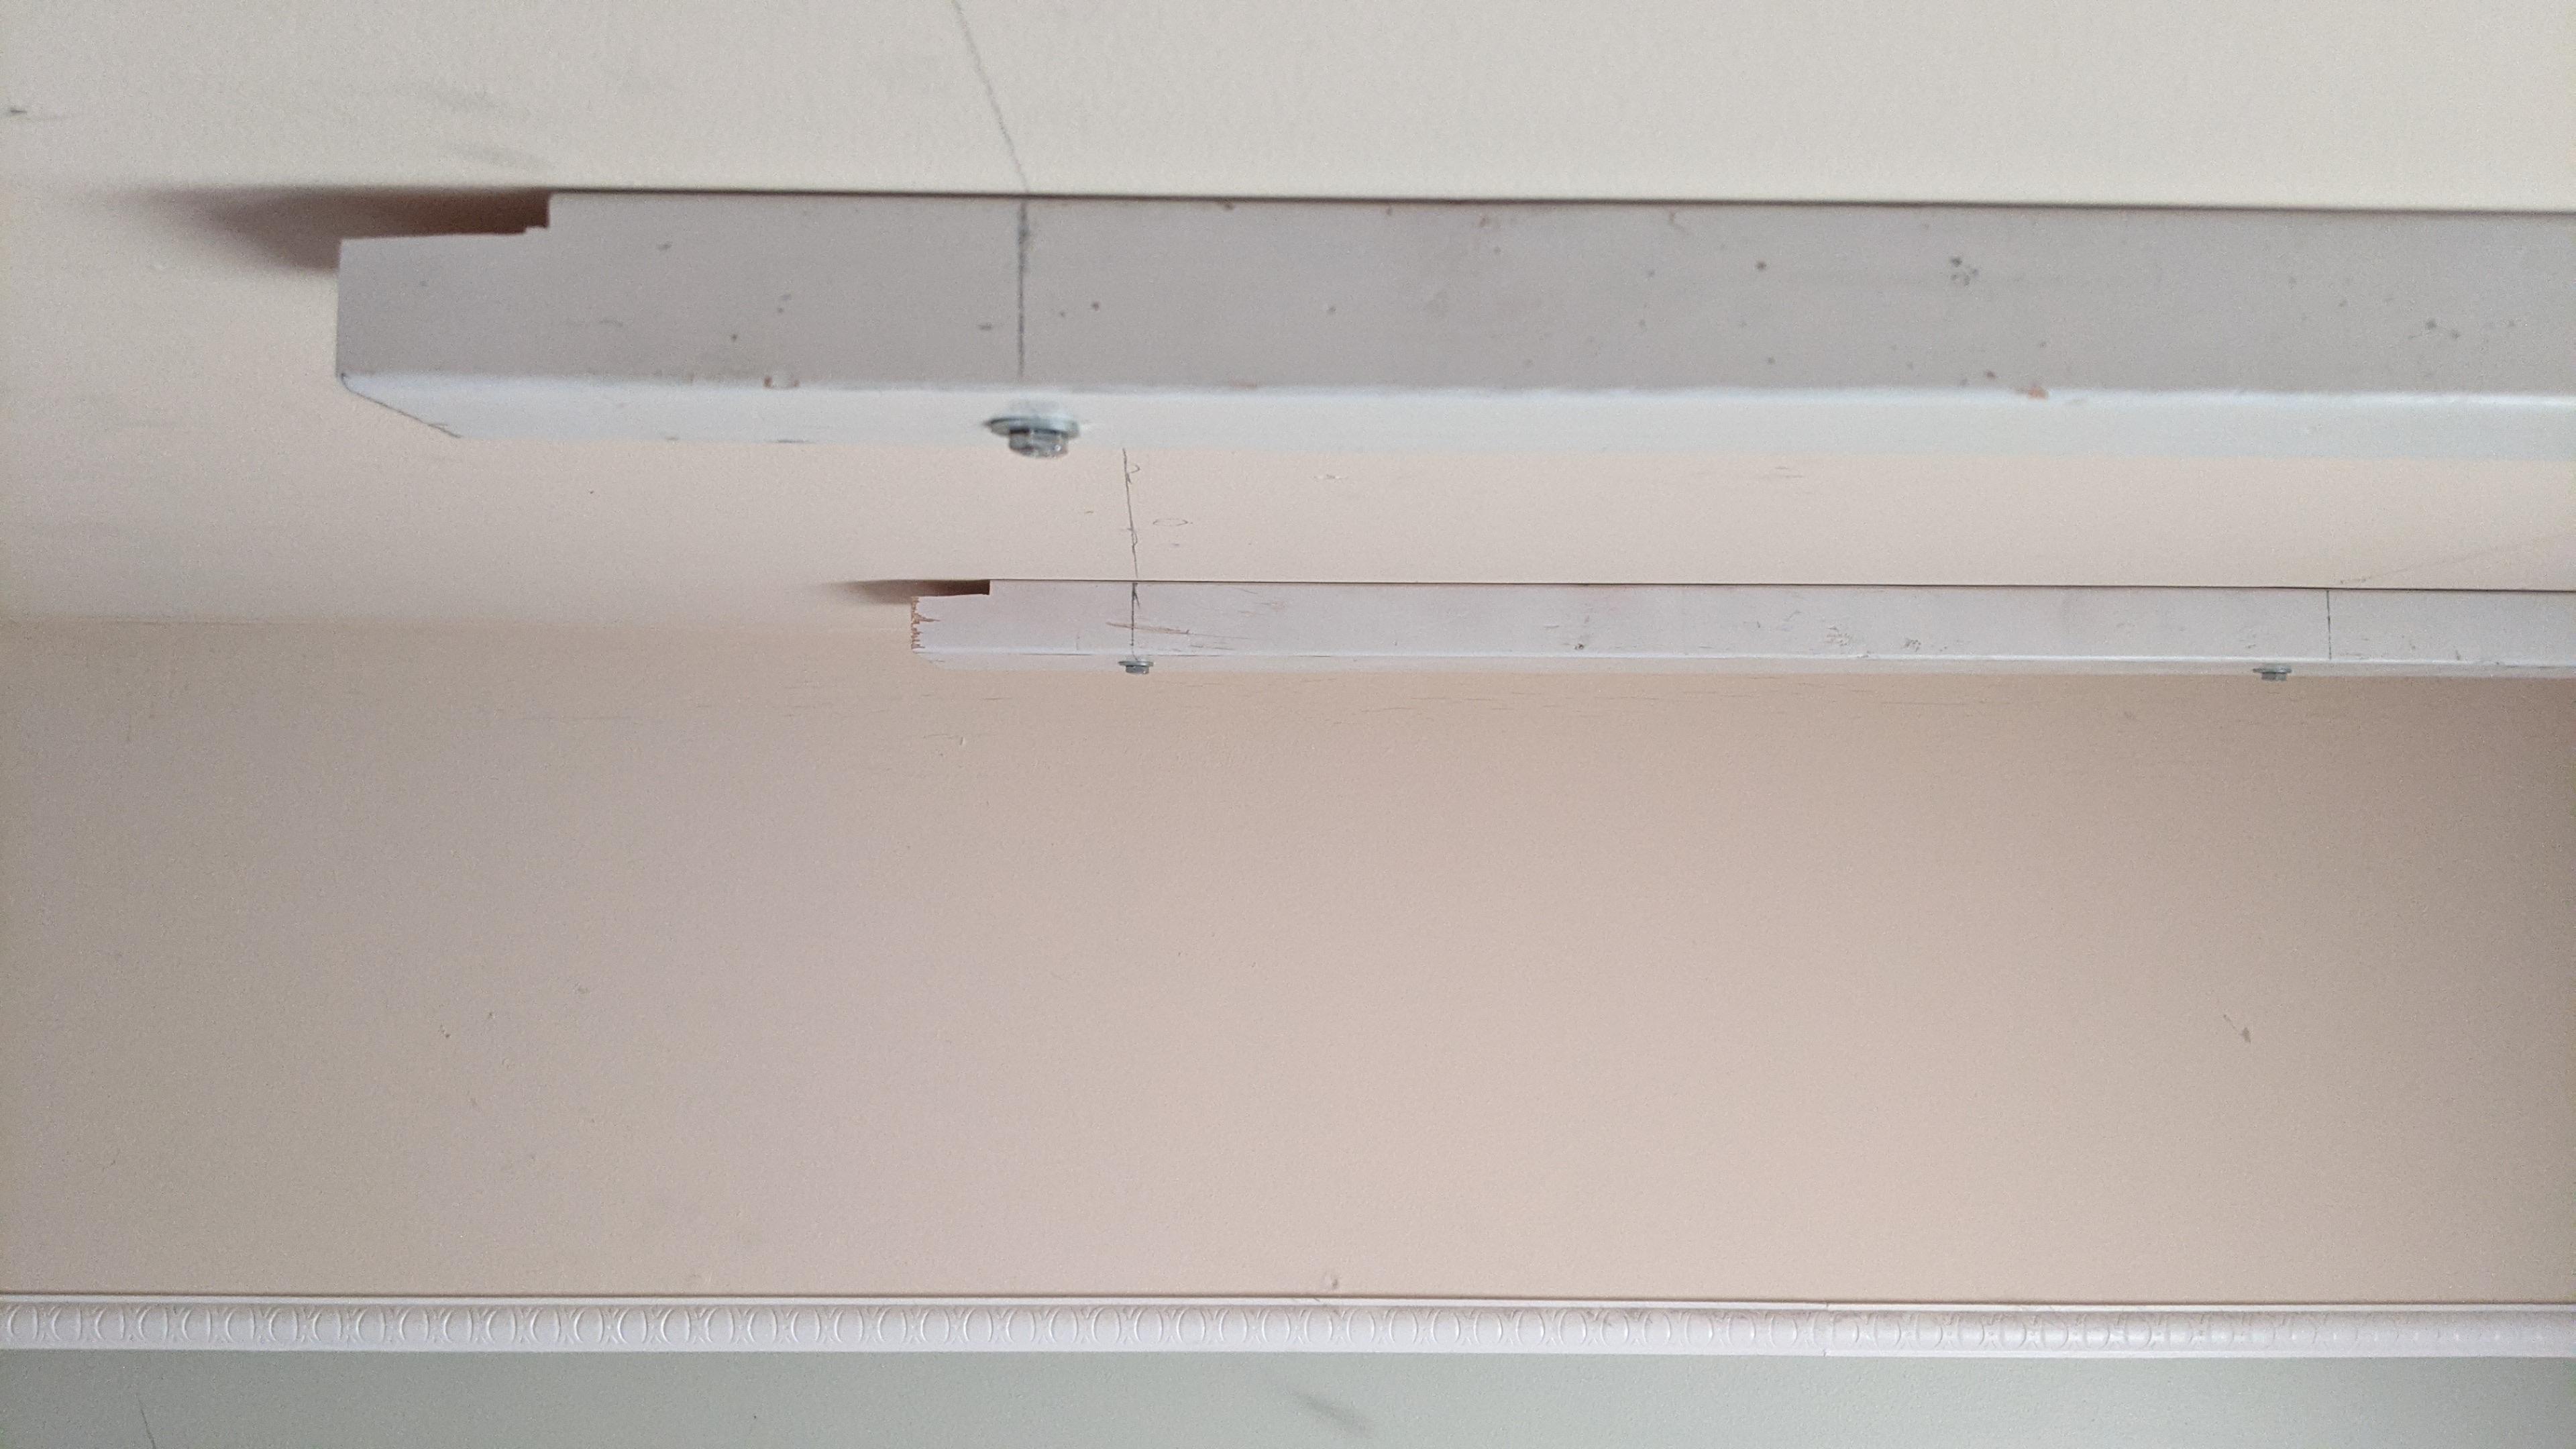
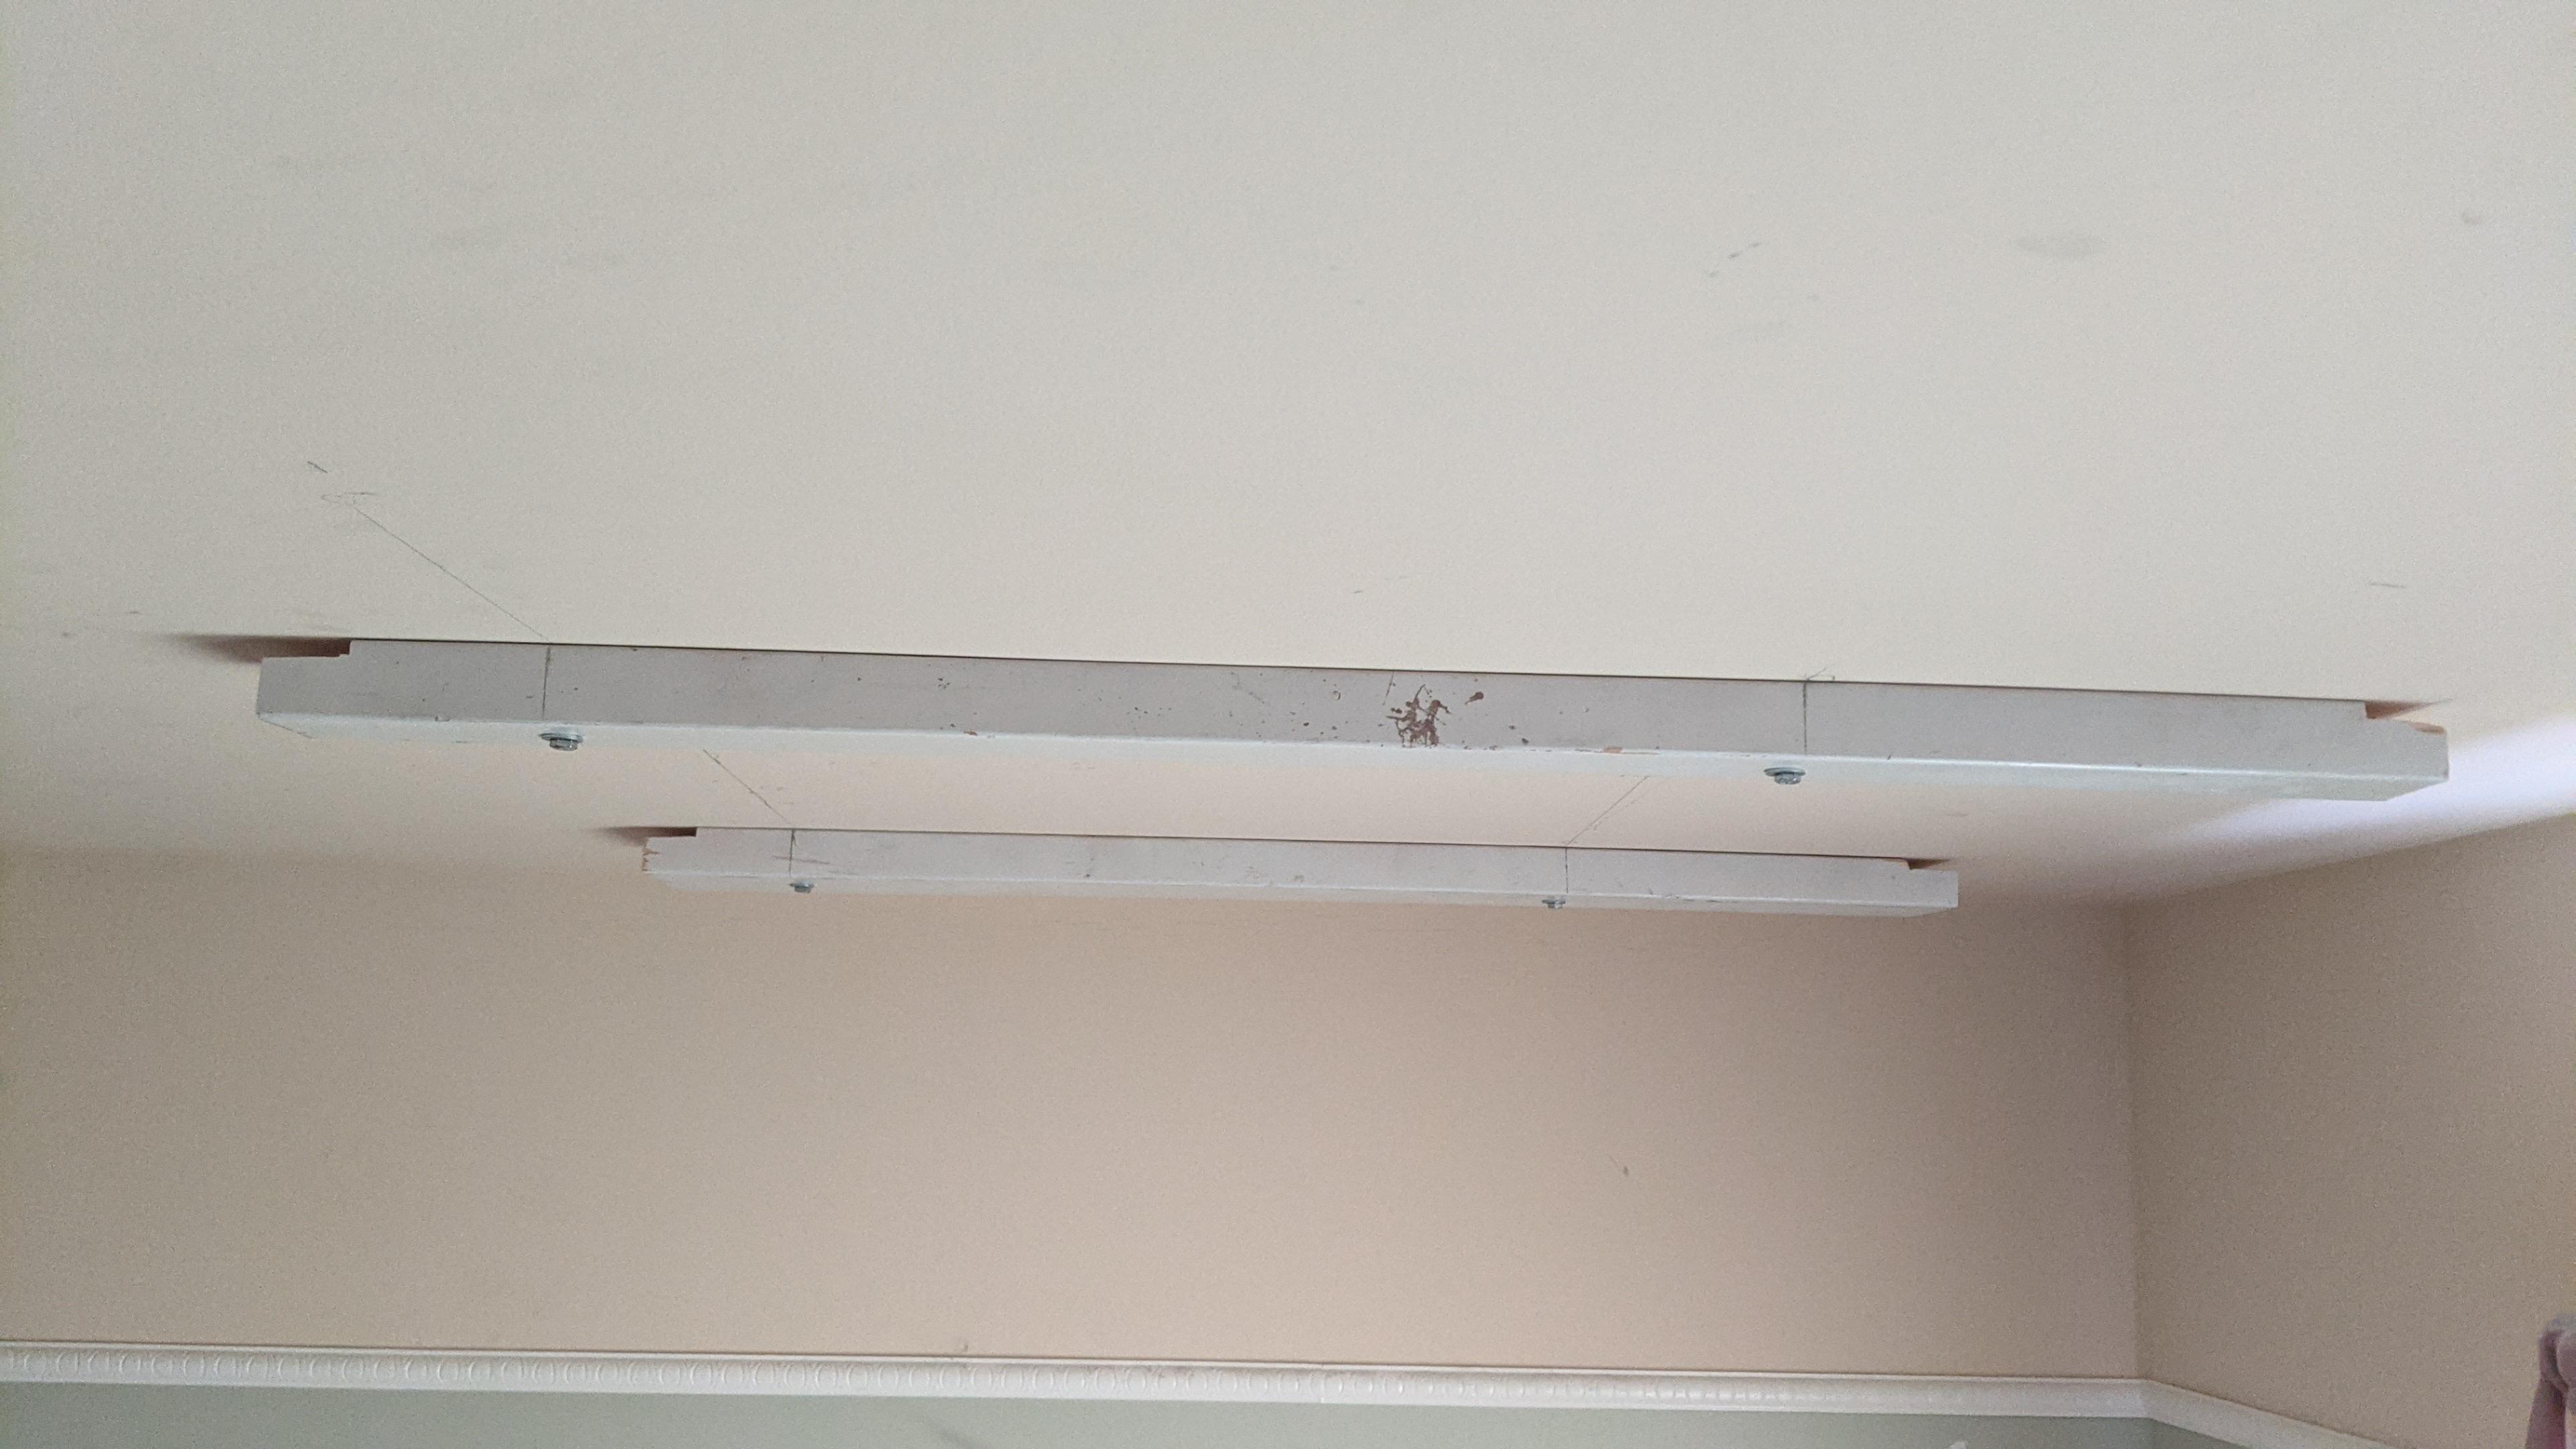
- Mesure the inner width of the ceiling box.
- Cut 2 2x4 of this width
- Make notches on each side about 7mm high and 5cm deep. (see picture)
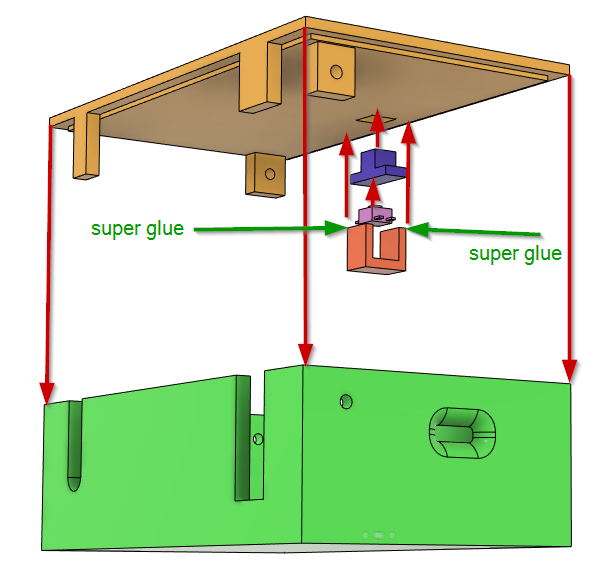
- Find the studs in your ceiling.
- Attach the 2x4 using long structure screws into the studs in the ceilling. Make sure the notches are facing the ceiling (see picture)
- Attach 4 corner brackets on the ceiling box where the 2x4 will be at.
- With 2 persons slide the ceiling box in place, make sure the corner brackets are well suported by the 2x4.
- For increased security screw a long screw on one side making sure it goes into the 2x4 that are attached to the ceiling.
- Add the baseboard around it.
- hide the cable properly (still need to do that).
Enjoy
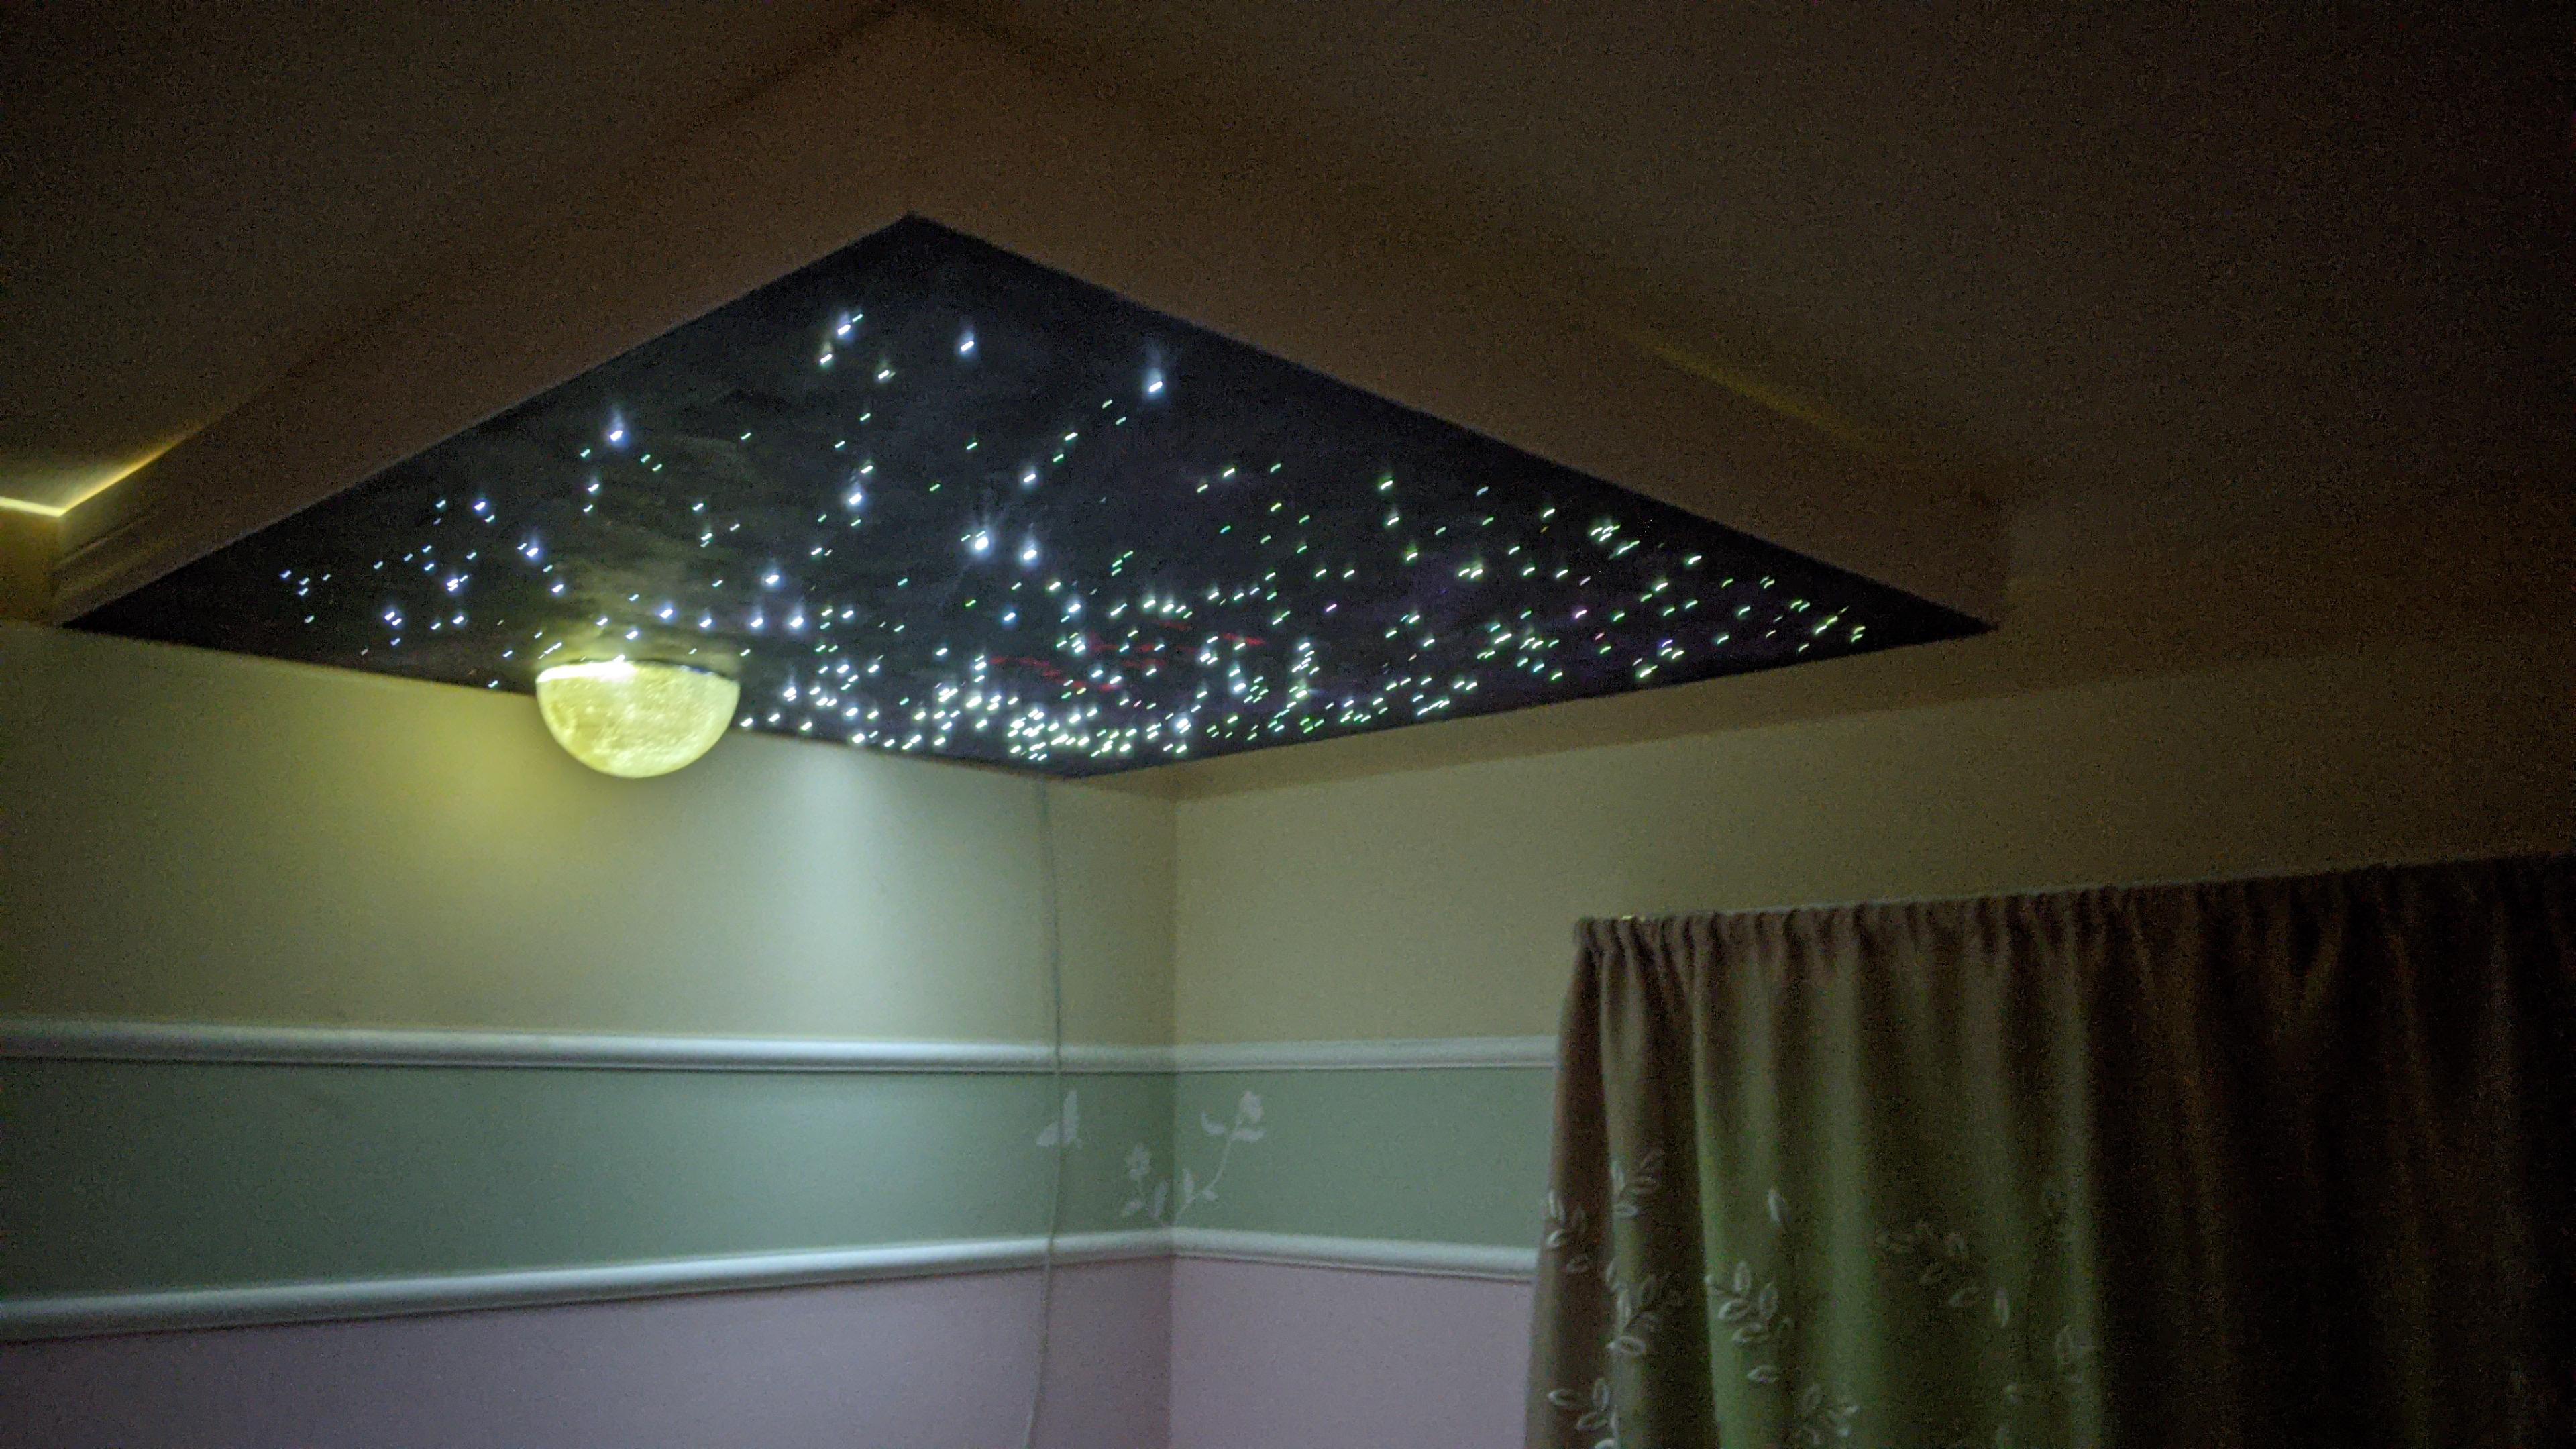
Plug it in and enjoy ! You're done !
My daughter spent the entire afternoon with her curtain closed and the night sky turned on :)