NEO-7M U-BLOX GPS Module Experiment
by Trevor Lee in Circuits > Arduino
7821 Views, 2 Favorites, 0 Comments
NEO-7M U-BLOX GPS Module Experiment


Experiment with NEO-7M U-BLOX GPS Module, showing the fixed location on your mobile phone, with DumbDisplay and TomTom Map.
Setup Arduino IDE

In order to be able to compile and run the sketch shown here, you will first need to install the DumbDisplay Arduino library.
Open your Arduino IDE; go to the menu item Tools | Manage Libraries, and type "dumbdisplay" in the search box there.
Connection

- Connect TXD pin of NEO-7M to pin 5 of Arduino UNO.
- Connect RXD pin of NEO-7M to pin 6 of Arduino UNO.
- Connect VCC pin of NEO-7M to 5V of Arduino UNO.
- Connect GND pin of NEO-7M to GND of Arduino UNO.
- PPS pin of NEO-7M is not used.
To read data off NEO-7M, all needed is UART. In fact, you can connect NEO-7M to your mobile phone, and use a "serial monitor" app, like DumbDisplay Android app, to see the data coming out from the attached NEO-7M, like:

Notice that all you need is to connect NEO-7M to your mobile phone. NEO-7M is powered by your phone. No Arduino UNO is needed.
However, for this experiment, Arduino UNO is needed -- NEO-7M is connected to Arduino UNO, and Arduino UNO is connected to your mobile phone.
The Sketch
Although here Arduino UNO is the microcontroller board used, I believe the sketch will work for other types of boards, of cause, with some adaptions.
The sketch is not very complicated; it simply gets GPS location, and show it with TomTom Map realized in your mobile phone via DumbDisplay Android app.
One reminder: Using of TomTom map requires an API key; please refer here. For simplicity of your setup for this experiment, the sketch will use a "default API key" of DumbDisplay Android app, which of cause have limited access to the service. Feel free to get your own API key, and modify the sketch where the API key should go in the sketch.
#include <SoftwareSerial.h>
#include "dumbdisplay.h"
#include "gpssignal.h" // code for reading GPS signal from NEO-7M U-BLOX module ... not very intresting
#define NEO_RX 6   // RX pin of NEO-7M U-BLOX
#define NEO_TX 5   // TX pin of NEO-7M U-BLOX
SoftwareSerial gpsSerial(NEO_TX, NEO_RX);
GpsSignalReader gpsSignalReader(gpsSerial);
// create the DumbDisplay object; assuming USB connection with 115200 baud
DumbDisplay dumbdisplay(new DDInputOutput(115200));
// declares several layers for the UI
GraphicalDDLayer* graphical;    // for showing the UTC time and position fixed, according to the readings of the GPS module
TerminalDDLayer* terminal;      // for showing trace of reading data from the GPS module
TomTomMapDDLayer *tomtommap;    // for showing the location fixed, on a TomTom map
long startMillis;  // the "time" the sketch starts running
long lastMillis;   // the "time" "waiting progress" (a dot) is printed
void setup() {
 startMillis = millis();
 lastMillis = startMillis;
  // it appears that it is better to explicityly make connection to DD app first
 dumbdisplay.connect();
  // the default UART baud rate for communicating with NEO-7M is 9600
 gpsSerial.begin(9600);
  // create the layers, as described above
 graphical = dumbdisplay.createGraphicalLayer(250, 30);
 graphical->setTextFont("DL::Ubuntu Mono");  // DL::Ubuntu Mono ==> specify that the downloadable Google font Ubuntu Monto should be used
 graphical->border(3, "black");
 graphical->padding(3);
 graphical->penColor("blue");
 graphical->backgroundColor("white");
 terminal = dumbdisplay.createTerminalLayer(600, 800);
 terminal->border(5, "blue");
 terminal->padding(5);
 tomtommap = dumbdisplay.createTomTomMapLayer("", 600, 800);  // *** a TomTom map api key is required; here, "" is used for demo purpose
 tomtommap->border(5, "blue");
 tomtommap->padding(5);
 tomtommap->visible(false);  // initially hidden
  // 'pin' the layers one by one vertically
  //  note that tomtommap is not visible initially
 dumbdisplay.configAutoPin(DD_AP_VERT);
}
bool waited = false;  // a flag indicating that the sketch waited for GPS readings
bool mapVisible = false;
GpsSignal gpsSignal;  // a structure for receiving GPS readings
void loop() {
 long nowMillis = millis();
 if ((nowMillis - lastMillis) > 2000) {
    // if it has been 2000 milli-seconds since last print "waiting progress" (a dot), print it again
 terminal->print(".");
 waited = true;
 lastMillis = nowMillis;
  }
 if (gpsSignalReader.readOnce(gpsSignal)) {  // try read GPS data once
    // read GPS data
 if (waited) {
      // waited before (i.e. dots printed before), terminate the dots
 terminal->println();
 waited = false;
    }
    // print out the GPS info read
 terminal->print("- utc: ");  // UTC time
 terminal->print(gpsSignal.utc_time);
 terminal->print(" ... ");
 if (gpsSignal.position_fixed) {
      // if position fixed, print the latitute / longitude / altitude of the position
 terminal->print("position fixed -- ");
 terminal->print("lat:");
 terminal->print(gpsSignal.latitude);
 terminal->print(" long:");
 terminal->print(gpsSignal.longitude);
 terminal->print(" alt:");
 terminal->print(gpsSignal.altitude);
    } else {
      // position not yet fixed
 terminal->print("position NOT fixed");
    }
 terminal->println();
    // print out the UTC time, and position fixed to the graphical layer
 graphical->clear();
 graphical->setCursor(0, 0);
 graphical->println("UTC -- " + String(gpsSignal.utc_time));
 graphical->print("LOC -- ");
 if (gpsSignal.position_fixed) {
 graphical->println("LAT:" + String(gpsSignal.latitude, 4) + " / LONG:" + String(gpsSignal.longitude, 4));
    } else {
 graphical->print("not fixed");
    }
 if (gpsSignal.position_fixed) {
      // if position fixed, show the location on the TomTom map
 tomtommap->zoomTo(gpsSignal.latitude, gpsSignal.longitude);
    }
 if (((nowMillis - startMillis) > 20000) && gpsSignal.position_fixed) {
 if (!mapVisible) {
        // hide terminal, and make tomtommap visible ... notice the "20000 millis from start" requirement
 terminal->visible(false);
 tomtommap->visible(true);
 mapVisible = true;
      }
    }
 lastMillis = nowMillis;
  }
}
You may have noticed:
- The sketch doesn't use any library for reading data from the GPS module. Instead, my own coding (simply read fixed position) defined in gpssignal.h is used. You can review and download that INCLUDE file here.
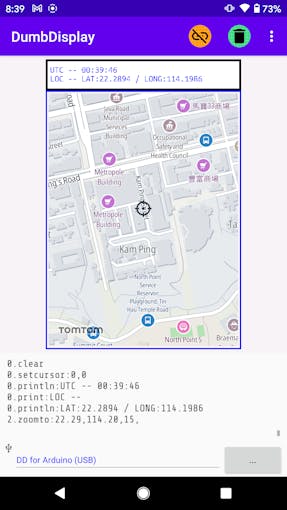
- Before using TomTom map to "zoom" to the fixed position, a "terminal" is used to log the [fix-position] data read from the GPS module. Only when postion is fix, then TomTom map is switched to to show the location.
- The GPS module is capable of determining the current UTC time. In fact, this UTC time is also displayed
- A reminder -- Arduino IDE requires that the sketch (ddgpsmap.ino), as well as the INCLUDE file (ggpssignal.h) be in a folder with the same name as the sketch (ddgpsmap).
Upload the Sketch and Run It
Other than connecting your Arduino UNO to NEO-7M, you will need to prepare two more addition things:
- You will need to be able to attach your Arduino UNO to your Android phone. To do this, you will need an OTG adaptor, which allows you to plug your Arduino UNO to your phone via the usual USB cable.
- You will certainly need to install the DumbDisplay Android app.
After uploading the sketch, re-plug the USB cable to your phone via an OTG adaptor. Then, open the DumbDisplay Android app on your phone, and make connection.
Since the GPS module is supposed to work outdoor, you better bring your setup outdoor for a test. With OTG connection to your Android phone, not only you can see the result on your mobile phone, your Arduino UNO setup will be powered by your mobile phone as well. Is't it neat?
The Demo

For for higher resolution demo, you may want to watch the YouTube video -- Arduino UNO NEO-7M U-BLOX GPS Module Experiment, with DumbDisplay and TomTom Map
Enjoy!
Peace be with you. Jesus loves you. May God bless you!