Myth Accurate Mjolnir
![download.png](/proxy/?url=https://content.instructables.com/F56/V1GF/M0XVHEW7/F56V1GFM0XVHEW7.png&filename=download.png)
![images.jpg](/proxy/?url=https://content.instructables.com/FWG/W8WE/M0ZAVJN3/FWGW8WEM0ZAVJN3.jpg&filename=images.jpg)
Lets say that you need a Norse mythology accurate Mjolnir prop or piece of detail for you costume. But all of the things available have been created not myth accurate. What do you do? Why not create your own prop with simple 3D printing in Tinkercad
Supplies
![Screenshot 2024-09-12 083235.png](/proxy/?url=https://content.instructables.com/F5I/M043/M0XVHF17/F5IM043M0XVHF17.png&filename=Screenshot 2024-09-12 083235.png)
First, you will need to get onto your chrome book and sign into tinkercad so you can begin. Then you will need the shapes shown in the over head image.
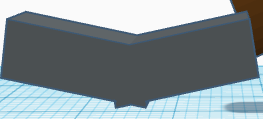
Hamer Head
![Screenshot 2024-09-12 084122.png](/proxy/?url=https://content.instructables.com/F67/2NK9/M0XVHFWE/F672NK9M0XVHFWE.png&filename=Screenshot 2024-09-12 084122.png)
![Screenshot 2024-09-12 084303.png](/proxy/?url=https://content.instructables.com/FX2/MSQG/M0XVHFWK/FX2MSQGM0XVHFWK.png&filename=Screenshot 2024-09-12 084303.png)
First you will need the hammer head. To do that, you will need a 2 1/2in by 3/4in rectangle for the bottom and a 2 1/2in by 1/2in triangle. Then group them
Hammer Handle
![Screenshot 2024-09-12 084824.png](/proxy/?url=https://content.instructables.com/FOF/X0R5/M0XVHG8U/FOFX0R5M0XVHG8U.png&filename=Screenshot 2024-09-12 084824.png)
![Screenshot 2024-09-12 084850.png](/proxy/?url=https://content.instructables.com/FQN/4V86/M0XVHG8V/FQN4V86M0XVHG8V.png&filename=Screenshot 2024-09-12 084850.png)
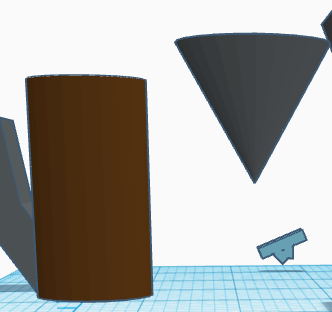
Next you will need to put together a 7/8in by 1 5/8in cylinder and a 1 1/8in by 1in cone. You will then put the cone 3/4in in the cylinder. Will will then group them together.
Connect Handle to Head
![Screenshot 2024-09-12 085104.png](/proxy/?url=https://content.instructables.com/FU3/TNMT/M0XVHGEM/FU3TNMTM0XVHGEM.png&filename=Screenshot 2024-09-12 085104.png)
You will then connect the Handle to the Head. If you want, you can stop here.
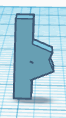
Pommel
![Screenshot 2024-09-12 085446.png](/proxy/?url=https://content.instructables.com/FQ8/RKND/M0XVHGMX/FQ8RKNDM0XVHGMX.png&filename=Screenshot 2024-09-12 085446.png)
![Screenshot 2024-09-12 085520.png](/proxy/?url=https://content.instructables.com/F5S/FLPY/M0XVHGMY/F5SFLPYM0XVHGMY.png&filename=Screenshot 2024-09-12 085520.png)
![Screenshot 2024-09-12 085528.png](/proxy/?url=https://content.instructables.com/FOI/DEUZ/M0XVHGNU/FOIDEUZM0XVHGNU.png&filename=Screenshot 2024-09-12 085528.png)
You will then make two 1.1in by 0.5in rectangles. You will then tilt them at opposite angles and group them.
Add Pommel to Handle
![Screenshot 2024-09-12 085736.png](/proxy/?url=https://content.instructables.com/FDG/C40D/M0XVHGTX/FDGC40DM0XVHGTX.png&filename=Screenshot 2024-09-12 085736.png)
You will then add the pommel to the rest of the Hammer
Create Runes of Thor
![Screenshot 2024-09-12 090139.png](/proxy/?url=https://content.instructables.com/FDN/09J5/M0XVHHGF/FDN09J5M0XVHHGF.png&filename=Screenshot 2024-09-12 090139.png)
![Screenshot 2024-09-12 090214.png](/proxy/?url=https://content.instructables.com/FTB/PAOF/M0XVHHH3/FTBPAOFM0XVHHH3.png&filename=Screenshot 2024-09-12 090214.png)
![Screenshot 2024-09-12 090226.png](/proxy/?url=https://content.instructables.com/F1G/B1BR/M0XVHHH4/F1GB1BRM0XVHHH4.png&filename=Screenshot 2024-09-12 090226.png)
You will then take a 1/8in by 5/8in rectangle and and two 1/8in by 1/4in rectangles. You will then Put the first rectangle vertical and tilt the smaller two so they for a triangle in the middle of the first. Then you copy and past the rune you had just made.
Put the Runes Onto the Hammer
![Screenshot 2024-09-12 090421.png](/proxy/?url=https://content.instructables.com/FO8/SDRB/M0ZAVI65/FO8SDRBM0ZAVI65.png&filename=Screenshot 2024-09-12 090421.png)
![Screenshot 2024-09-12 090428.png](/proxy/?url=https://content.instructables.com/FXJ/0I2Z/M0ZAVI76/FXJ0I2ZM0ZAVI76.png&filename=Screenshot 2024-09-12 090428.png)
Then Put the Runes onto the Hammer you have made.
End
![Screenshot 2024-09-12 090745.png](/proxy/?url=https://content.instructables.com/FFX/W3WK/M0ZAVJ9M/FFXW3WKM0ZAVJ9M.png&filename=Screenshot 2024-09-12 090745.png)
![Screenshot 2024-09-12 090852.png](/proxy/?url=https://content.instructables.com/F1K/AWVH/M0ZAVJAY/F1KAWVHM0ZAVJAY.png&filename=Screenshot 2024-09-12 090852.png)
Congratulation. You just have to print out the product.