My First Own IOS App - Gas by Numbers - a Gas Mileage Calculator
5885 Views, 19 Favorites, 0 Comments
My First Own IOS App - Gas by Numbers - a Gas Mileage Calculator
I bought my first iPad 2 years ago. A year later I bought an iPad2 and a little later an iPod touch as my “iPad to go” (it’s just more pocketable).
Having downloaded about 70 apps over time (free and paid apps), I found that some apps are doing exactly what I want, some overfulfill my needs and some just didn’t work as I expected.
But, after 2 years of app consumption, I finally got the idea that I wanted to have apps exactly how I wanted them. So I decided that I want to program an app.
So I challenged my self – as a personal DIY-Project – to learn iPhone programming.
This instructable will show off my finished app “Gas By Numbers” (a gas calculator), it’s functions, how to use it, and how I became an “app-developer” from scratch.
My gas calculator follows the steps I undertake when I fill up my car. First I note down the mileage, then I start refilling my car and already note the gas price while refilling. Finally, I enter the amount of gas I refilled right after hanging up the nozzle of the pump. While I go in to pay my bill, I already know my gas mileage.
The first bullet points will show how to use the app itself (always headed off as App-Step X). Below I will comment on some programming features needed or additional thoughts that went into programming the specific UIView (always headed off with Programming).
I have quoted the “app-developer” because this is my first app and there’s so much more I can learn from here.
To complement this instructable, I especially tweaked my app so I can offer a free download on iTunes with "free Gas By Numbers".
In the free version I have stripped off the data collecting part of my gas calculator, and the calculation of the gas consumption and cost of the daily commute. So the free app actually resembles the program how I initially wanted it to be just for my own use.
Link to the free app:
http://itunes.apple.com/us/app/free-gas-by-numbers-gas-mileage/id550854967?mt=8
Link to the paid app:
http://itunes.apple.com/us/app/gas-by-numbers/id531541048?mt=8
All the other stuff within the paid version came later to mind as I was thinking about distributing my app via iTunes (think about localizing an app for different countries, adding functions that may be interesting for potential users, etc.).
The last step will tell you what you need to start programming for iPhone and some (hopefully useful) hints and tips to start learning programming.
Entering the Driven Distance
App-Step 1:
Programming:
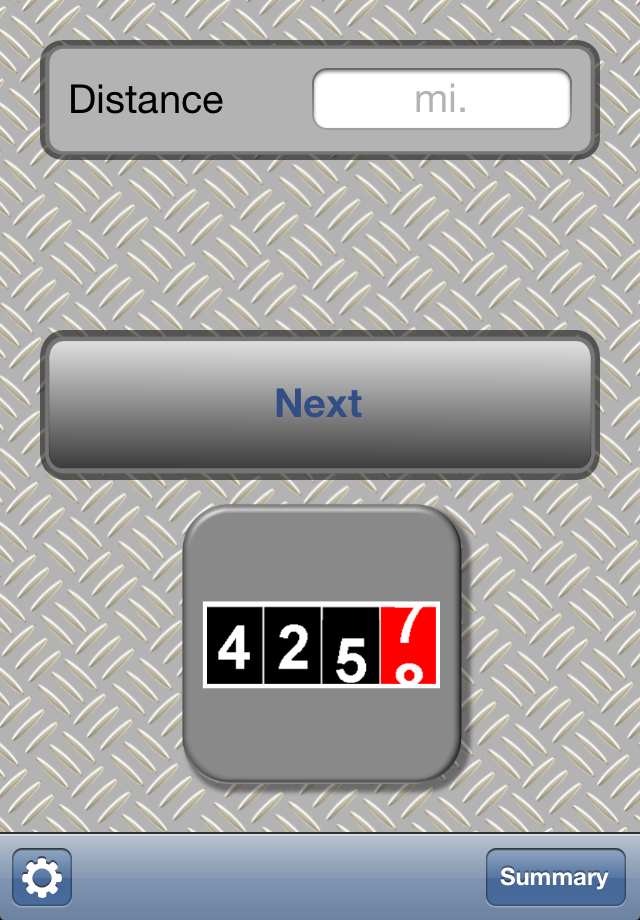
- In the first view, tap the text box to pull up the on screen keyboard and enter the number of miles driven since you last refilled your gas tank.
- After filling in your driven miles, hit the next button to get to the next screen.
Programming:
- All visible windows a user will see are called UIViews. You can put all your code into the UIViews class.
- First I wanted to add all user input fields on the first UIView (maybe even the results of the gas mileage calculation). But I soon found out that the space on a UIView is very restricted and that the User-Interface (UI) will be much too crowded as to be a pleasure to use for a user.
- The problem I encountered first was, that I didn't know how to hand over the inserted mileage to the next UIView. So I needed some temporary storage for that data. The rescue to this problem if you want to store small chunks of data is to use the so called NSUserDefaults in Xcode.
- To ensure that the user entered a valid number in the distance text box, I had to check the number after it was inserted. All keyboard input is represented as a NSString in Xcode. So the program doesn't even know it's a number. To ensure the user didn't enter a number with two colons, for example, I casted the string into the so called NSNumber format. This way, you can error check the input.
- To ensure the user cannot enter letters instead of numbers, you can specify to only show a number pad within the code.
- NSNumber will also take the locale settings into account, making sure a european user has a colon as decimal separator while the US separator is a point.
- If the error check results in an error, a so called UIAlertView is programmed. This is a nifty little line of code, where you specify the header of a pop-up message, the message itself and some OK, Cancel or "Take action" buttons.
Entering the Amount of Gas Refilled and the Gas Price
App-Step 2:
Programming:
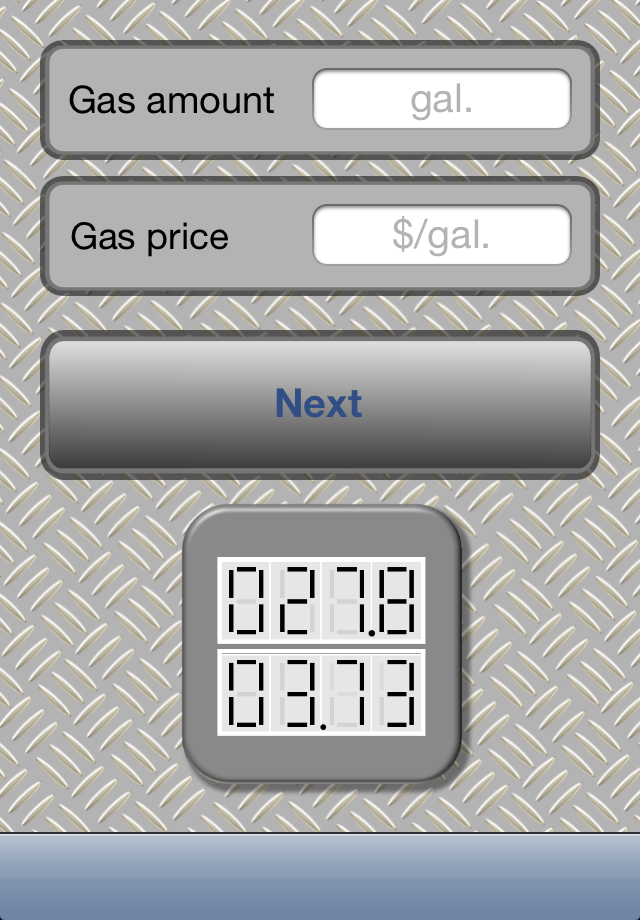
- In the second view, tap the text box right beside the label "Gas amount". Enter the amount of gas you have refilled at the gas station.
- Entering the gas price works the same way, although this step is optional.
- If no gas price was entered, a pop-up will ask you if you really want to skip this step or if you want to go back and enter the gas price.
Programming:
- The visible part of the User-Interface can be set up with a part of XCode called Interface builder. It's like a graphics editor where you layout the different user interface elements. It's a great way to get your first app started without much fuzz. The worst part is when you actually have to link the elements to your code.
- Images and Labels: the words "Gas amount" and "Gas price" are UILabels. To just display that text, place a label on the UIView, edit the text and you're done. Should you want to dynamically change the text later, you still have to define properties in the UIView's header file and link the labels to those properties within your code.
- The little gray help texts (gal., $/gal.) are actually help descriptions you can set up in interface builder. Once you want to create different texts for different countries (so called localization of your app), you need create properties for the text boxes to display different strings, depending on the phone's country settings. You can also just make localized versions of your visible user interface, but I found it easier to just use the properties and have to create different strings rather than having to enter different text into all those text box help descriptions.
- The text boxes need to be linked to the header file of the UIView anyway, because tapping a text box will perform the action of pulling up the on screen keyboard.
- Tapping the Next button writes the values from the text boxes to the NSUserdefaults so that all input values are then available to calculate your MPG within the next UIView. The tapping action will also call the next UIView to appear.
Reviewing Your Gas Mileage
App-Step 3:
Programming:
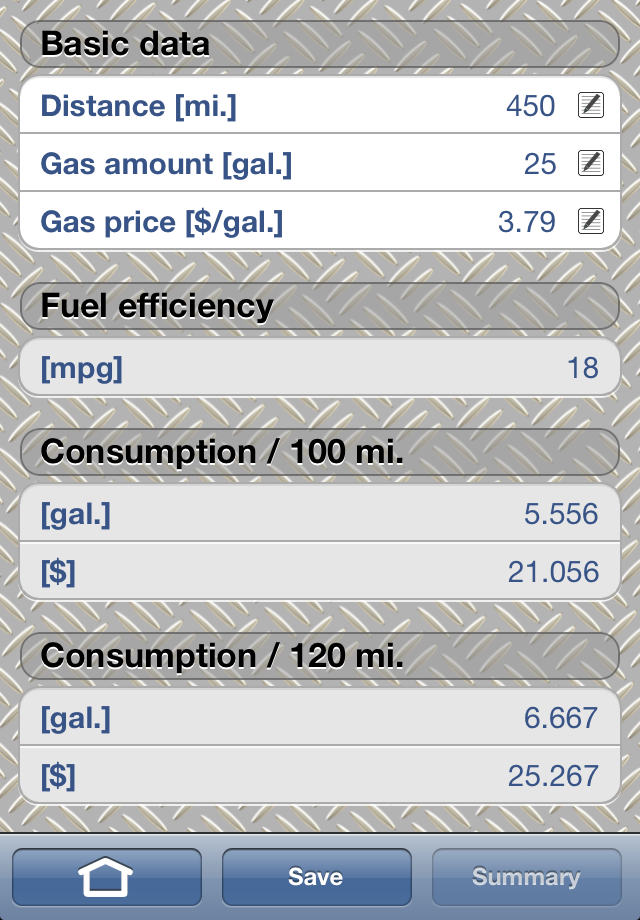
- Review the data you entered in the Basic data table. Should you find an error within the values you entered, you can tap any of them to bring up a pop-up to change any value.
- Fuel efficiency is the value for miles per gallon, calculated from your input.
- Consumption / 100 mi. shows how many gallons of gas you need to travel 100 miles and what you have to pay for those 100 miles.
- Consumption / Commute shows how many gallons of gas you need for your daily commute. This feature is not available in the free app. In the image, a value of 120 is shown, which is my daily trip to and home from work.
- In the free version of my app, saving your data and reviewing older data summaries is not available.
Programming:
- All consumption data is being calculated when the UIView gets loaded. Sometimes things have to happen when the view is laying out subviews, or once it's appearing, etc. So there are different options. And sometimes it took me all evening to find out that a feature didn't work properly because I tried performing an action/function/method in the wrong section of code :-)
- The picture shows a so called UITableView. You can have just one big list of items, or program it the way I have to show different sections. The first time I did a table view in XCode, it was quite confusing. It sometimes still is, but it's getting easier with every new table view programmed.
- A real big challenge was to hide the section of the table showing your daily commute.
- The save button invokes a pop-up asking if you want to save the data you just entered with the current date or an older date. If you select "Other date" within the pop up, the pop-up's button will call a new so called modal UIView for entering a different date than the current date.
- Once the save command within the app's code gets called, all data that was written to the NSUserDefaults is casted as NSNumbers and saved within a file that gets set up the first time data is being saved. This file can later be exported as tab delimited text file for further processing with Excel or Pages.
Further Features of the Full Version
App-Step:
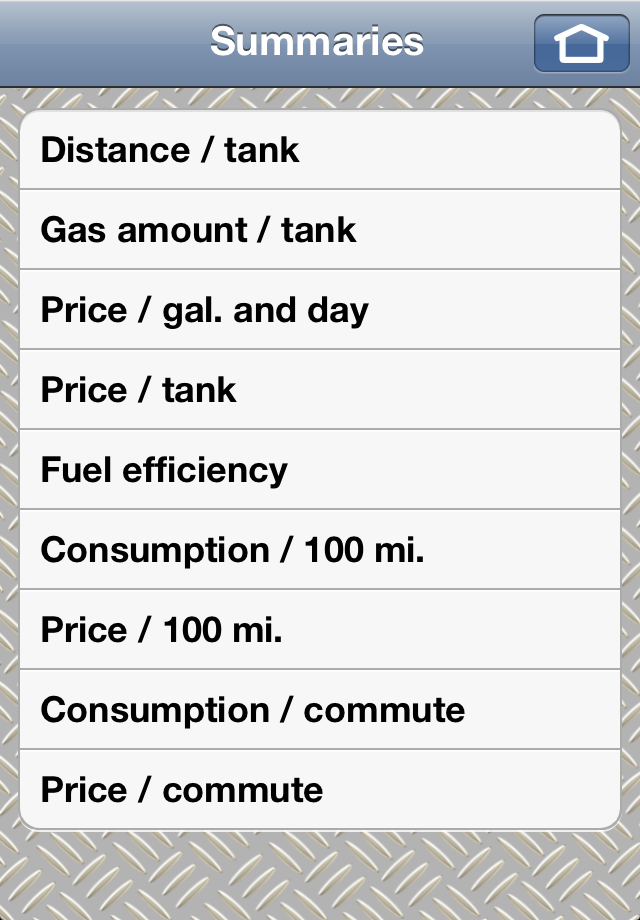
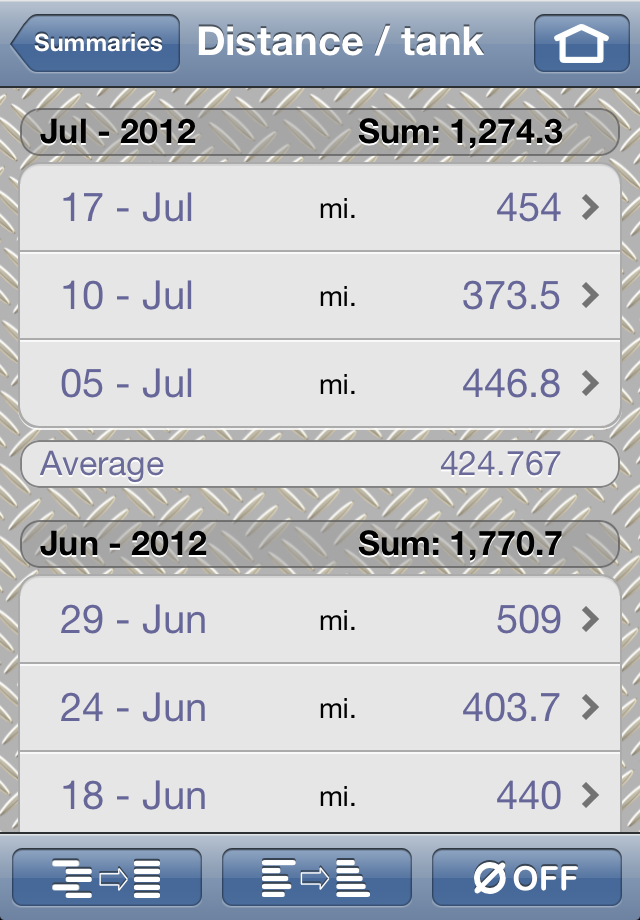
- The full version allows to save your gas mileage data for later review directly on your iPhone or iPod.
- In a UITableView, I try to make all possible data available which can be calculated through the basic input values, including the date.
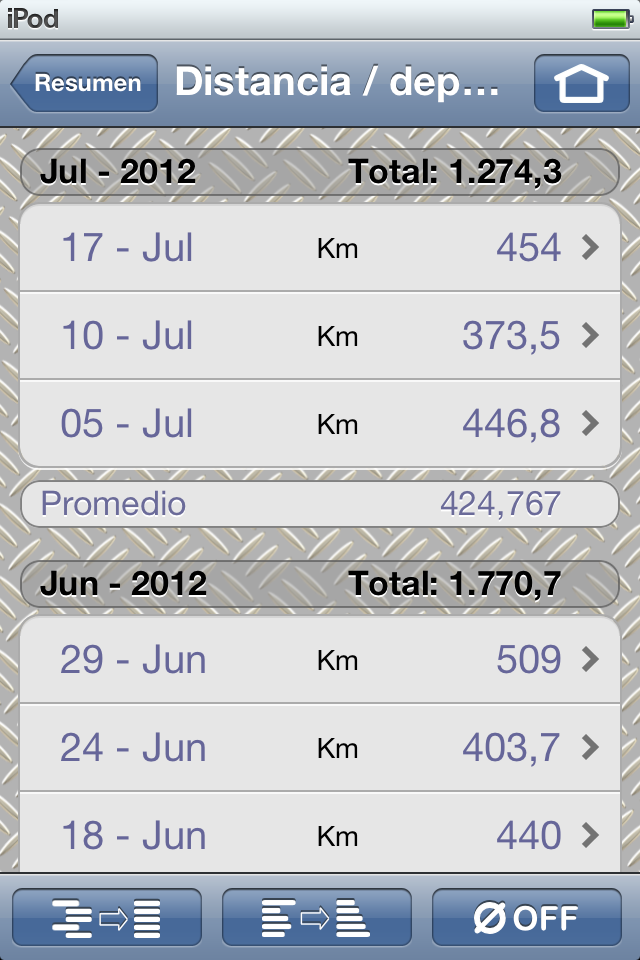
- If a summary gets selected, a list of all previously data is being displayed with the option to group the data monthly, to show totals where suitable (e.g. total gas cost per month), total average or monthly averages. To select those options, every summary has three buttons at the bottom of the summary UIViews. The first one will group all data by month. The second button will sort all data ascending or descending, depending on whether smaller or bigger values are good. The "good" values are supposed to be at the top of the lists. The third button will show the average values (if data is grouped by month, you get monthly averages, if it's not grouped, you get the average out of all values).
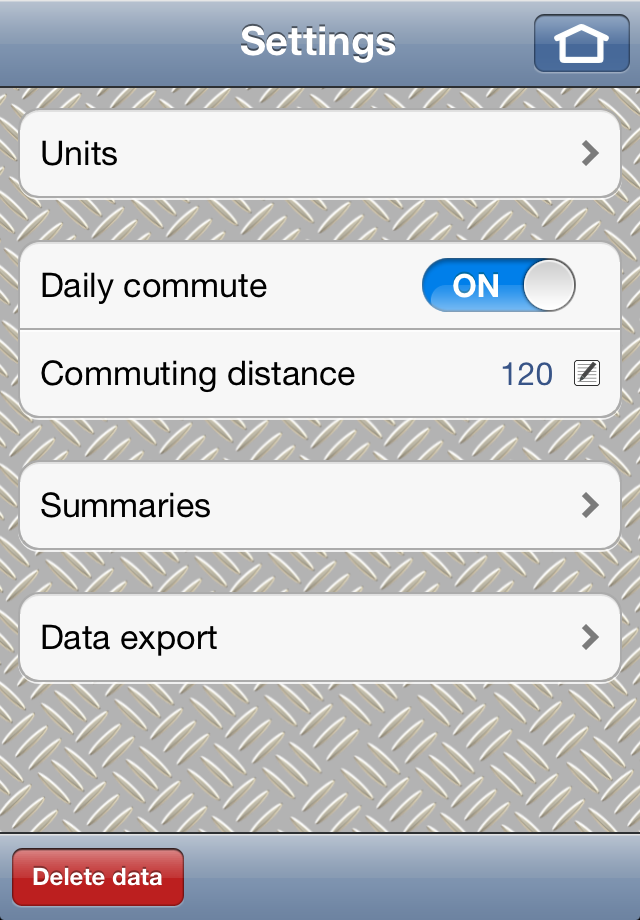
- In the settings UIView, Units for US or Metric units are available. The daily commute value can be set and you can also set the preferences for displaying your data in summaries (e.g. whether or not you want to see your data grouped monthly)
- Units are hard coded within my app. The app checks your local settings to see if your iDevice is set to metric or US units, but you can still set the other from this menu.
- Currency symbols are taken from the iDevice settings. This way, in combination with the units, you always see the appropriate units for where you live. In the US, you have $/gallon, I have €/km. This is really handy, so even if you don't plan on localizing your app for different countries, set up units and currency with NSLocalized versions.
- Icons! Use easy to understand icons. Even if you have to put more effort into creating your app, take the time to draw your icons (don't just take them from the internet due to copyright issues). Translating your app gets much easier if you don't have to translate every button inscription. Whenever possible, try finding a good icon instead of using text.
Final Words
If you want to start programming for iOS you need:
Bare bones:
(This allows to learn programming and simulating your app on your Mac)
(This allows to put your app on your iDevice for testing and for distribution via iTunes)
Learning to program takes quite some time. I started programming last October. I learned the basics until last January and started programming my app since then. I released my app in June. So it took me about 6-8 months to get where I'm today.
If you like to learn using a book, first get a book you can work with (depends on your preferences) and then try to get the version of XCode that was used for the book. Would I have known this front up, I could have shortened my learning time by around 2 months. Being a husband, father and full time employee, the time to learn something new is restricted. I need very calm surroundings, so my learning took place between about 10pm and 1am (when every one else was already asleep), whenever I felt I was up to the task (about 2-5 times per week).
What was really frustrating first was, that most books I came across were not written for the version of XCode I ran on my MacBook. So specific example code from the books didn't work with my machine. Also, at the time I started learning, XCode introduced ARC (Automatic reference counting), which takes most of the "keeping track of the objects you create" away from you. So I learned a lot of stuff that's good to know, but stuff that wasn't really necessary to get started.
The best thing in my opinion is, to just get started and then learn something new every day as you go along.
I hope I could give some insight into iPhone programming and that I could encourage you to start learning something new if you stumbled over this instructable.
Bare bones:
(This allows to learn programming and simulating your app on your Mac)
- A Mac PC
- XCode (available for free as a Mac app)
- Free Apple developer account
(This allows to put your app on your iDevice for testing and for distribution via iTunes)
- Paid Apple developer account
Learning to program takes quite some time. I started programming last October. I learned the basics until last January and started programming my app since then. I released my app in June. So it took me about 6-8 months to get where I'm today.
If you like to learn using a book, first get a book you can work with (depends on your preferences) and then try to get the version of XCode that was used for the book. Would I have known this front up, I could have shortened my learning time by around 2 months. Being a husband, father and full time employee, the time to learn something new is restricted. I need very calm surroundings, so my learning took place between about 10pm and 1am (when every one else was already asleep), whenever I felt I was up to the task (about 2-5 times per week).
What was really frustrating first was, that most books I came across were not written for the version of XCode I ran on my MacBook. So specific example code from the books didn't work with my machine. Also, at the time I started learning, XCode introduced ARC (Automatic reference counting), which takes most of the "keeping track of the objects you create" away from you. So I learned a lot of stuff that's good to know, but stuff that wasn't really necessary to get started.
The best thing in my opinion is, to just get started and then learn something new every day as you go along.
I hope I could give some insight into iPhone programming and that I could encourage you to start learning something new if you stumbled over this instructable.