My Roommate Steals My Break - IoT RUDE Goldberg Machine
by asafgdm in Circuits > Arduino
171 Views, 1 Favorites, 0 Comments
My Roommate Steals My Break - IoT RUDE Goldberg Machine


Welcome to our Instructables project, where we'll guide you through the creation of an ingenious Rube Goldberg machine with an Internet of Things (IoT) twist. Have you ever experienced that moment when all you want to do is lie down, watch some TV, and relax, only to have your roommate's TV turn on right at that moment? We've been there too! That's why we came up with the perfect solution: the "My Roommate Steals My Break" Rube Goldberg Machine IoT project.
In this project, we'll show you how to build a system that synchronizes two roommates' activities using the Circuit Playground Express board, Arduino IDE, Blynk, and Make.com. Imagine this scenario: you've been studying all day, and you finally decide to shout, "I need a break!" Little do you know, your Adafruit Circuit Playground Express is about to come to your rescue.
As you speak those magical words, the Circuit Playground Express senses your need for a break. It immediately recognizes your request and sets off a chain of events that will leave your roommate in awe. Their TV turns on, signaling their own break time. But that's not all—the adventure is just beginning! Keep reading to discover how this Rube Goldberg machine, powered by IoT technology, adds a touch of playfulness and intrigue to your living space.
Now let's dive into the step-by-step instructions and build your very own "My Roommate Steals My Break" Rube Goldberg machine!
Supplies

Hardware Components:
- 2 Adafruit Circuit Playground Express boards
- ESP8266 ESP-12E CH340G
- Micro USB Cable
- 2 Battery cartridge + 6 AAA batteries
- Internet Access
- TV and TV remote
- A PC
- Speaker
- Aux cable
- 2 Crocodile Clips
Accounts used:
Software Components:
- Arduino IDE
Don't Forget:
Make the following connections from the ESP8266 to the CPX:
- ESP8266: GND -> CPX: GND
- ESP8266: VCC -> CPX: VCC
- ESP8266: RX -> CPX: TX(A7)
- ESP8266: TX-> CPX: RX(A6)
Setting Up Circuit Playground Express and Arduino IDE
1. Connect the Circuit Playground Express to your computer using a USB cable.
2. Install the Arduino IDE on your computer (available for Windows, macOS, and Linux).
3. Open Arduino IDE and go to "File" > "Preferences."
4. Install relevant drivers to your Arduino IDE.
5. Click "OK" to save the preferences.
6. Go to "Tools" > "Board" > "Boards Manager".
7. Search for "Adafruit SAMD Boards" and click "Install" to add support for Circuit Playground Express.

8. Once installed, select "Adafruit Circuit Playground Express" as the board under the "Tools" menu and choose the relevant Port.

Creating Blynk App Interface
1. Go to Blynk and create an account if you don't have one already.
2. Once logged in, navigate to the "Templates" section.
3. Click on "Create New Template" and give it a name (we named it "Rube G Machine CPX 1").
- Choose "Hardware" as "Arduino" and "Connection Type" as "Wi-Fi."
- Add a description that best fits your project.

4. As you'll need 2 Circuit Playground Express (CPX) boards for this project, create another template and modify the name and description (we named it "Rube G Machine CPX 2").
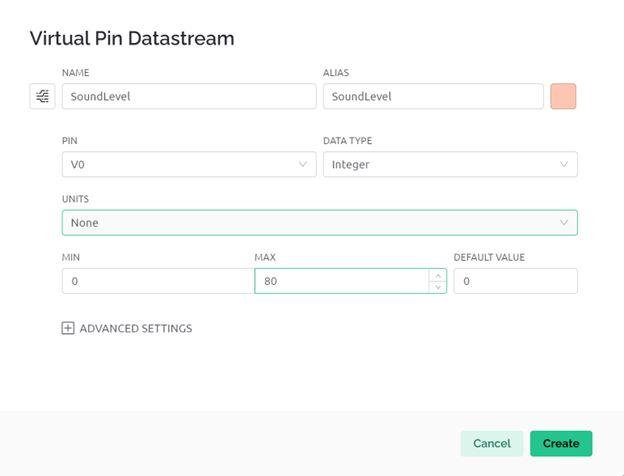
5. Create Virtual Pins:
- In the "Rube G Machine CPX 1" template, go to "Datastreams" and click on "New Data Stream" and then "Virtual Pin."
i. Create a virtual pin named "soundLevel" with a value range from 0 to 80 and a data type of 'Integer'.
ii. Create another virtual pin named "lightSound" with a value range from 0 to 1 and a data type of 'Integer'.
- Similarly, for the "Rube G Machine CPX 2" template:
i. Create a virtual pin named "TV_Remote" with a value range from 0 to 1 and a data type of 'Integer'.
ii. Create another virtual pin named "Connect" that has a data type of 'String'.

6. Set up the Dashboard for Testing Purposes:

- In the "Rube G Machine CPX 1" template, use a label widget for "soundLevel" and a switch widget for "lightSound".

- In the "Rube G Machine CPX 2" template, use a label widget for "Connect" and a switch widget for "TV_Remote".
7. Set up the Devices:
- Go to the "Search" section and click on "New Device".

- Choose "From Template" and select the template you just created ("Rube G Machine CPX 1" or "Rube G Machine CPX 2").

- Create two devices, one for each template.
- Copy the generated code snippets for each device and store them safely for later use.

Make sure to follow the upcoming steps for further instructions on integrating the Circuit Playground Express boards and Blynk app.
Creating Make.com Interface
1. Go to Make.com and create an account if you don't have one already.
2. Click on "Create New Scenario." Since we have two Circuit Playground Express (CPX) boards, we'll need to create two scenarios, one for each board.

3. For CPX 1 Scenario:
Create 3 modules:
a) Webhook as the trigger, and choose the "Custom Webhook" option.

- Set up the webhook by clicking "Add Webhook" and giving it a name (e.g., CPX1-webhook), then click "Save."

- Click on "Copy Address to Clipboard" and open a new tab. Paste the link along with the query '?soundLevel=1'. You should see the word "accepted" printed.

b) Google Calendar module, choose "Create an Event."

- Connect your Google account.
- Choose "Quickly" for the "Create an Event" field and select the calendar you want to mark as offline. Set the event to "Offline."
c) HTTP module, choose "Make a Request."
- For the HTTP request, we want to send the calendar ID to the second CPX board so it has the ability to edit the calendar event we created.
- For the URL, use https://{server_address}/external/api/update, and choose the server address based on the region closest to you:
- Frankfurt: https://fra1.blynk.cloud/
- London: https://lon1.blynk.cloud/
- New York: https://ny3.blynk.cloud/
- Singapore: https://sgp1.blynk.cloud/
- Bangalore: https://blr1.blynk.cloud/

- Click "Add New Query String" and set the Name to "token" and the value to the Blynk token of your CPX 2 device (from Step 2).
- Create another query string and set the Name to V1 (or the virtual pin you set for "Connect" in the CPX 2 Blynk template), and the value as the "event ID" from the Google Calendar module.
4. For CPX 2 Scenario:
Create 7 modules:
a. Start with the Webhook module, similar to Step 3a, but this time use the query "?connected=1"
- Return to Blynk and create a second Webhook for CPX 2. Choose the CPX 2 device and set the datastream to 'connect' (V1) or the designated virtual pin it is connected to.
- Edit the query parameters and set the "Key" to "connect" and the "Value" to "device_pinValue".
b. Create another Google Calendar module and follow the steps from Step 3b. However, make sure it is connected to your roommate's Google account instead of your own.
c. Add the "RSS Feed" module. Click on "Retrieve RSS Feed Items" and enter the URL: "https://www.moviefone.com/feeds/what-to-watch.rss".

d. Include the Telegram module and follow Step 5 to set it up.

e. Using the "Tools" module, add a "Sleep" to add a delay of 15 seconds. We added this to increase the suspense for roommate 2.

f. Add the HTTP Request module. Follow the same steps as in Step 3c, but this time use V0 (or the designated virtual pin for 'tvRemote') and set the value to 1.
g. Add another Google Calendar module, but this time select "Update Event". Connect it to your Google account.
- For the eventId, use the value of "connected" from the webhook in the first module.
- Change the event name to 'Online'.
h. Finally, add another HTTP Request module. Use the same URL as before, but modify the query strings:
- Set the first Name as 'token' and the Value as the Blynk token of your CPX 1.
- Set the second Name as Vx (where x is the number of the virtual pin for 'lightSound' on the CPX 1 Blynk board) and the Value as '1'.

By following these steps, you will create the necessary modules to handle events and actions within the CPX 2 scenario of your Rube Goldberg machine.
And hopefully, it'll look something like this!

Setting Up the Infrared Send
Before integrating your Rube Goldberg machine with your TV, you need to identify the specific infrared signal that turns on your TV.
To find the infrared signal used to turn on your TV, follow these steps:
1. Download the attached "Infrared_Read.ino" file.
2. Open the "Infrared_Read.ino" file in your Arduino IDE.
3. Connect your Circuit Playground Express (CPX) to your computer.
4. Upload the code to your CPX by clicking the Upload button in the Arduino IDE.
5. Open the Serial Monitor in the Arduino IDE.
6. Take your TV remote control and position it in front of the CPX.
7. Press the power-on button on your TV remote control.
8. In the Serial Monitor, you will see a line of text printed.
9. Copy the line you see in the Serial Monitor. This line contains the infrared signal value.
10.Use this value in to be able to send the same infrared signal through your CPX. (Use the attached "Infrared_Send.ino" file as an example.
By following these steps, you can capture the infrared signal used to turn on your TV and use it in your Rube Goldberg machine project.
Setting Up Your Telegram Bot
In this step, we will create your very own bot that sends you the latest move suggestions!
1. Sign up for Telegram and create your own account.
2. Start a chat with "BotFather" and send the following message "/newbot".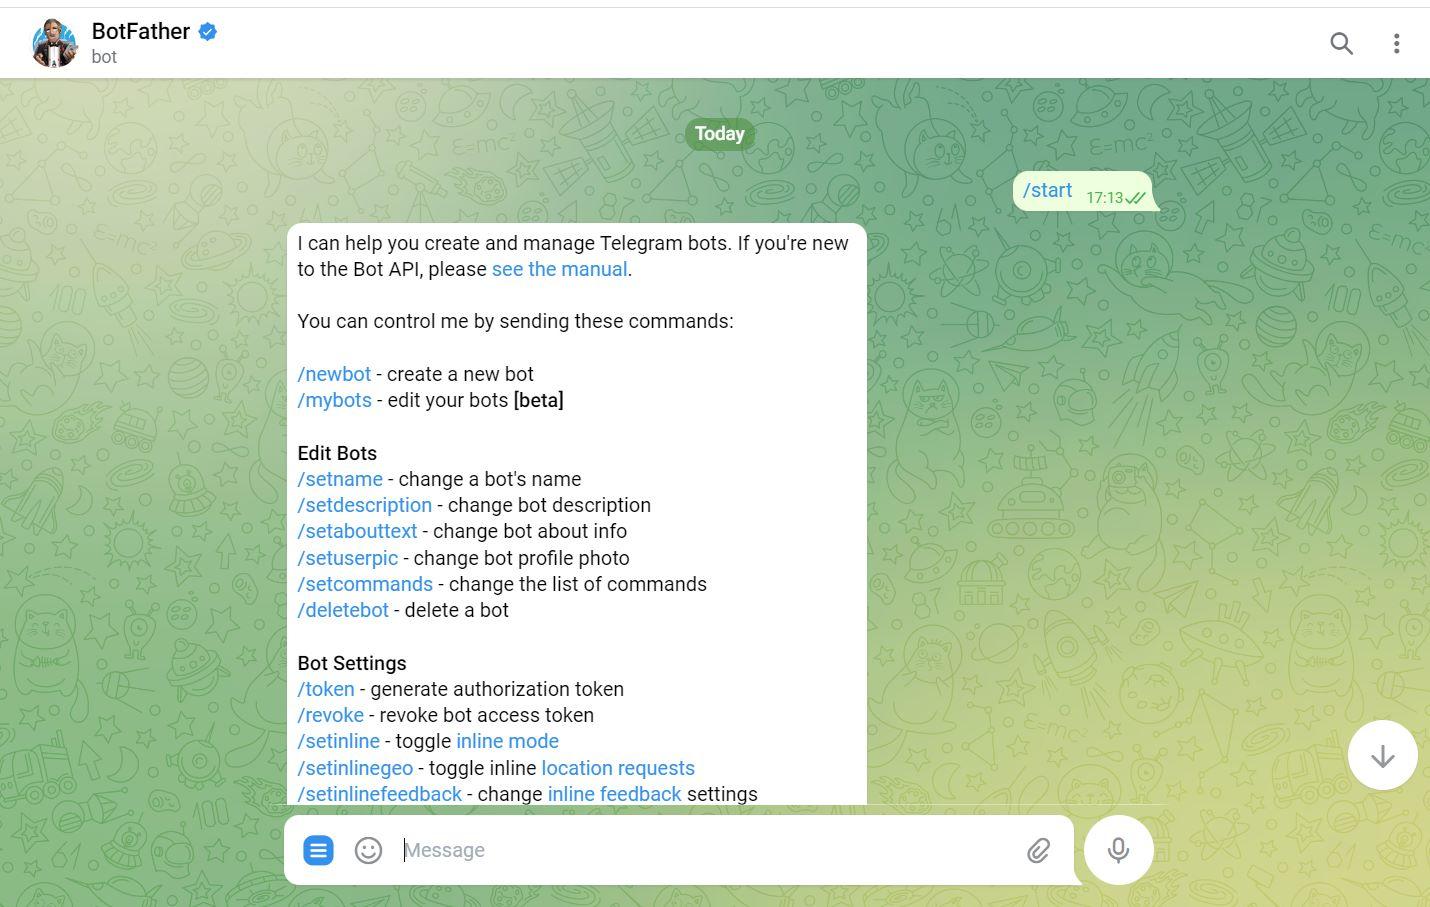
3. "BotFather" will ask you to name your new bot and to choose a username for it.
4. Copy the given HTTP API.

5. Create a new Telegram group and add your friends, and of course, your new bot.
6. Give the bot admin privileges.
7. Go back to your Make scenario and select a new empty module.
8. Select "Telegram Bot" and then choose "Send a Text Message or Reply".
9. In the window that just opened up, click on "Add" and under the "Token" field paste the HTTP API you copied from Step 4.
10.In the "Chat ID" field, check the newly created channel's ID in the format of "@channelusername" and add it.
11.In the "Text" field, you can personalise your bot's message!
Don't forget to save your changes!
Woo! You completed your scenario!
Configuring and Uploading Software to the Circuit Playground Express (CPX)
To configure and upload software to your Circuit Playground Express (CPX) boards, follow these steps:
1. Connect your CPX1 to your computer using a USB cable. Ensure that the CPX is properly connected and detected by your computer.
2. Download the files "CPXMRSMB_1", "light.h", and "beeper.h" (provided below) and save it to a new folder named "CPXMRSMB_1" in your Arduino directory.
3. Launch the Arduino IDE on your computer.
4. In the Arduino IDE, click on "File" and select "Sketchbook" > "CPXMRSMB_1" to open the files from the downloaded folder.
5. Open the appropriate file from the folder and locate the sections where you need to add your specific configurations. This may include adding your Blynk Token, Template_ID, Template_Name for CPX1, as well as the Wi-Fi credentials (SSID and password) for your network.
6. Before uploading the code to the CPX1, ensure that the correct board and port are selected in the Arduino IDE. Go to the "Tools" menu and choose "Board." Select "Adafruit Circuit Playground" as the board type. Then, navigate to "Tools" > "Port" and select the appropriate port to which your CPX1 is connected.
7. Once the board and port settings are configured, click on the "Upload" button in the Arduino IDE. The code will be compiled and uploaded to the CPX1. Monitor the progress in the status bar at the bottom of the Arduino IDE.
8. Wait for the upload process to complete successfully. You will see a "Done uploading" message in the Arduino IDE, indicating that the code has been successfully uploaded to the CPX1.
9. Disconnect the CPX1 from your computer.
10. Repeat the same steps for CPX2 by connecting it to your computer using a USB cable and following the instructions provided in the file "CPXMRSMB_2". Download the file, save it in your Arduino directory, configure the code with your specific settings, select the correct board and port, upload the code, and disconnect the CPX2 from your computer.
Congrats! By following these steps, you will be able to configure and upload the necessary software to your Circuit Playground Express (CPX) boards, ensuring they are ready to execute the desired functions and contribute to the overall operation of your Rube Goldberg machine project.
Setting Up Your Speaker
Here are the steps for amplifying your CPX sound:
1. Connect one crocodile clip to the ground and another to the A0 analog pin
2. Connect the ends of both crocodile clips to one end of your aux cable and connect the other end to your portable speaker.

3. Turn your speaker on and you are all set!
Congrats!

You've reached the end of our RUDE Goldberg Machine instructable!
Hopefully now you can set up your own machine and steal your roommates break.
We hope you'll enjoy it!