Motion Trigger Circuit With and Without Microcontroller
by Arnov Sharma in Circuits > Arduino
2428 Views, 25 Favorites, 0 Comments
Motion Trigger Circuit With and Without Microcontroller

.gif)
.gif)

Greetings
Here's a tutorial on how to use an HC-SR505 PIR Module with and without a microcontroller to drive XYZ Load when any motion is detected.
This Tutorial contains three different types of setups that we can use to prepare a Motion Detection Based Project like an automatic Hallway Light or Motion Detection Security System Etc.
Let's get started.
Supplies
Following are the materials used in this built-
- PIR HC-SR505 Module
- Attiny13A
- TTGO T Display Board
- LEDs
- Jumper Wires
- BC547
- Breadboard
- USB Micro Port Breakout board
HC-SR505


HC-SR505 is a PIR Sensor that picks up infrared radiation emitted by the body and then outputs a signal based on the motion of a body.
You see, as we move, our body emits more and more infrared radiation that is picked up by this sensor.
Following are its electrical parameters and features-
- Operating Voltage Range: DC4.5-20V
- Static current:<60uA
- Output level: High 3.3V / Low 0V
- Trigger: repeatable trigger
- Delay time: Default 8S + -30% (can be customized range of a few tenths - tens of minutes)
- PCB Dimensions: 10 * 23mm
- Induction angle:<100 degree cone angle
- Induction distance: 3 meters
- Working temperature: -20 - +80 degrees
- Sensor Lens Dimensions: Diameter: 10mm
PCBWAY GIFTSHOP
.gif)

As for sourcing the HC-SR505, I got it from PCBWAY's Giftshop.
Aside from PCB Services, PCBWAY also has a dedicated components store.
PCBWAY GIFTSHOP is an online marketplace from where we can source all the major electronics stuff, like Arduino boards, Raspberry Pi boards, Modules, sensors, etc.
PCBWAY have this system that lets us purchase anything from their gift shop through beans, Beans are like a redeemable currency or coupons that we get by placing an order on PCBWAY or by sharing your projects in the community to get beans.
Check PCBWAY out for getting great PCB service from here- https://www.pcbway.com/
First Setup- Basic One

.gif)
.gif)
.gif)
To Prepare the first Setup, we provide VCC and GND of this module with 5V.
We add an LED's VCC Pin on the signal Pin of this module and connect the GND of the LED with the GND of the Module.
This will be the first and most basic Setup we can prepare with this module.
Just by standing near this sensor, It turns ON the LED, LED will stay ON for 8 seconds and then turn OFF, if we are near the 3M Radius of this module, the LED will turn ON again.
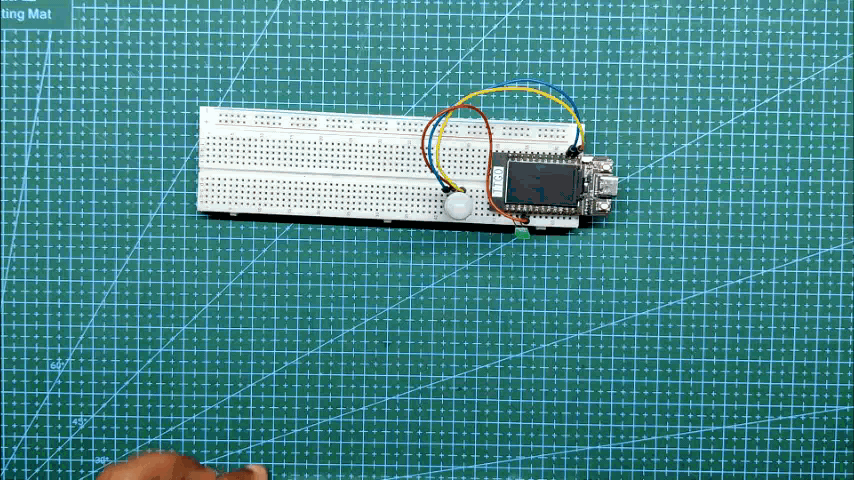
With Microcontroller TTGO T Display


Here's the second setup that uses a TTGO T Display board to Turn ON and OFF an LED and also display a message when motion is detected on its onboard RGB Display.
Preparing TTGO Board for Arduino IDE


We first have to install board files for ESP32 by putting this link in the preferences of the Arduino IDE Settings and then installing the boards through the board manager.
Installing TFT_eSPI Library and Making Changes in User Setup


We then move on to the next step which is to install the TFT_eSPI Library that enables us to use the display onboard.
- Next, we go to C:\Users\ACER\Documents\Arduino\libraries\TFT_eSPI and make changes in the User Setup.h by replacing it with User setup for TTGO T Display.
- The default one is set for ILI9430 Display and we change it for TTGO T Display by adding // in front of ILI9430 User setup and removing // in front of TTGO T Display.
Connections - Wiring

next, we connect everything by following the attached wiring diagram image.
- VCC of PIR to 5V of TTGO
- GND to GND
- Signal Pin of PIR to D22
- LED's VCC to D21
- LED GND to GND
Sketch for TTGO

Here's the code we use.
#define sensor 22
#define LED 21
#include <TFT_eSPI.h> // Graphics and font library for ST7735 driver chip
#include <SPI.h>
#define TFT_GREY 0x5AEB // New color

TFT_eSPI tft = TFT_eSPI();  // Invoke library, pins defined in User_Setup.h

void setup()
{
  Serial.begin(9600);
  pinMode(sensor, INPUT);
  pinMode(LED, OUTPUT);
  digitalWrite(sensor, LOW);
  digitalWrite(LED, LOW);
  tft.init();
  tft.setRotation(1);
}
void loop()
{
  tft.fillScreen(TFT_GREY);
  tft.setCursor(4, 10, 2);
  tft.setTextColor(TFT_BLACK,TFT_GREY);
  tft.setTextSize(2);

  if (digitalRead(sensor)) {
    tft.println("Motion Detected");
    digitalWrite(LED, HIGH);
  }
  else {
    tft.setCursor(4, 10, 2);
    tft.setTextColor(TFT_BLACK,TFT_GREY);
    tft.setTextSize(2);
    tft.println("No Movement");
    digitalWrite(LED, LOW);
  }
  delay(50);

}
It uses TFT_eSPI Library to display a message on the onboard RGB Display as soon as the board receives the signal from PIR Module, also the board triggers an LED depending on the signal received.
Working
.gif)
.gif)
Attiny85 Standalone Setup
.gif)
.gif)
Attiny85 is an AVR MCU that has 8 KB ISP Flash memory, 512B EEPROM, and 512B SRAM which is enough for driving a load with PIR Sensor as its sketch is small in size so it would be an overkill to use an ESP32 Device in this project.
Connections - Wiring

We connect everything by following the attached wiring diagram image.
- VCC of PIR to VCC of Attiny
- GND to GND
- Signal Pin of PIR to D0 of Attiny
- LED's VCC to D1 of Attiny
- LED GND to GND
- USB Micro Breakout's VCC to VCC of Attiny
- USB Micro Breakout's GND to GND of Attiny
Sketch for Attiny

Here's the code I used for flashing the attiny85.
#define sensor 0
#define LED 1

void setup()
{

  pinMode(sensor, INPUT);
  pinMode(LED, OUTPUT);
  digitalWrite(sensor, LOW);
  digitalWrite(LED, LOW);

}
void loop()
{
  if (digitalRead(sensor)) {
    digitalWrite(LED, HIGH);
  }
  else {
    digitalWrite(LED, LOW);
  }
  delay(50);
}
The sensor is connected with the D0 pin and the LED is connected with the D1 Pin.
When the Sensor picks any motion, it sends a signal to D0 and MCU triggers D1 Pin that turns ON the LED.
Result
.gif)
Here's the result of the Attiny85 Setup.
Pros of using this setup are its size and form factor, it can be easily used in a custom board and it's minimal, we don't need any other components to properly run it which is a plus point of using this small MCU in a lighting-related project that I'm already working on.
Without Microcontroller With Transistor
.gif)
Here's the third setup that is similar to the first one, the only difference here is an additional NPN Transistor that drives a load by changing the state of the transistor's base through the PIR Signal Pin.
Connection- Wiring

We connect an NPN transistor with the PIR setup by connecting a load with it through the collector and connecting its base with the signal pin of the PIR Module.
Here, the BC547 Transistor is Setup in the "transistor as switch" configuration that is commonly used to turn ON-OFF XYZ stuff like LEDs, Relays, etc.
RESULT
.gif)
.gif)
Here's the result, the setup is working and the loads are working properly.
Similarly, we can add a Mosfet in place of a Transistor to drive bigger loads like a motor or high power led, even relays.
Conclusion


PIR works with all three setups but the best one would be the attiny85 setup as we can control the ON Timing and even add three more loads as three I/O Pins are vacant.
As for the TTGO T Display board, using it was fun because of the display but it's not ideal for implementation in a small lighting-related project because of its big size and overkill for such a low level.
A simple setup with NPN Transistor also worked but there was an issue of uncontrollable timing of the load which can be controlled only if we add another OP Amp setup with it that can control the output's duration.
By utilizing the Attiny85 and a transistor, I will prepare an automatic hallway light board that will turn ON-OFF and an AC light through a relay.
Stay tuned for the next project!
DM me or leave a comment if you need any help regarding this project.
Thanks PCBWAY for supporting this project, you guys can check them out if you need great PCB Service for less cost.
Peace out.