Mood Speaker- a Powerful Speaker for Mood Music to Be Played Based on the Ambient Temperature
by Tristan Balanger in Circuits > Raspberry Pi
682 Views, 1 Favorites, 0 Comments
Mood Speaker- a Powerful Speaker for Mood Music to Be Played Based on the Ambient Temperature
Hey there!
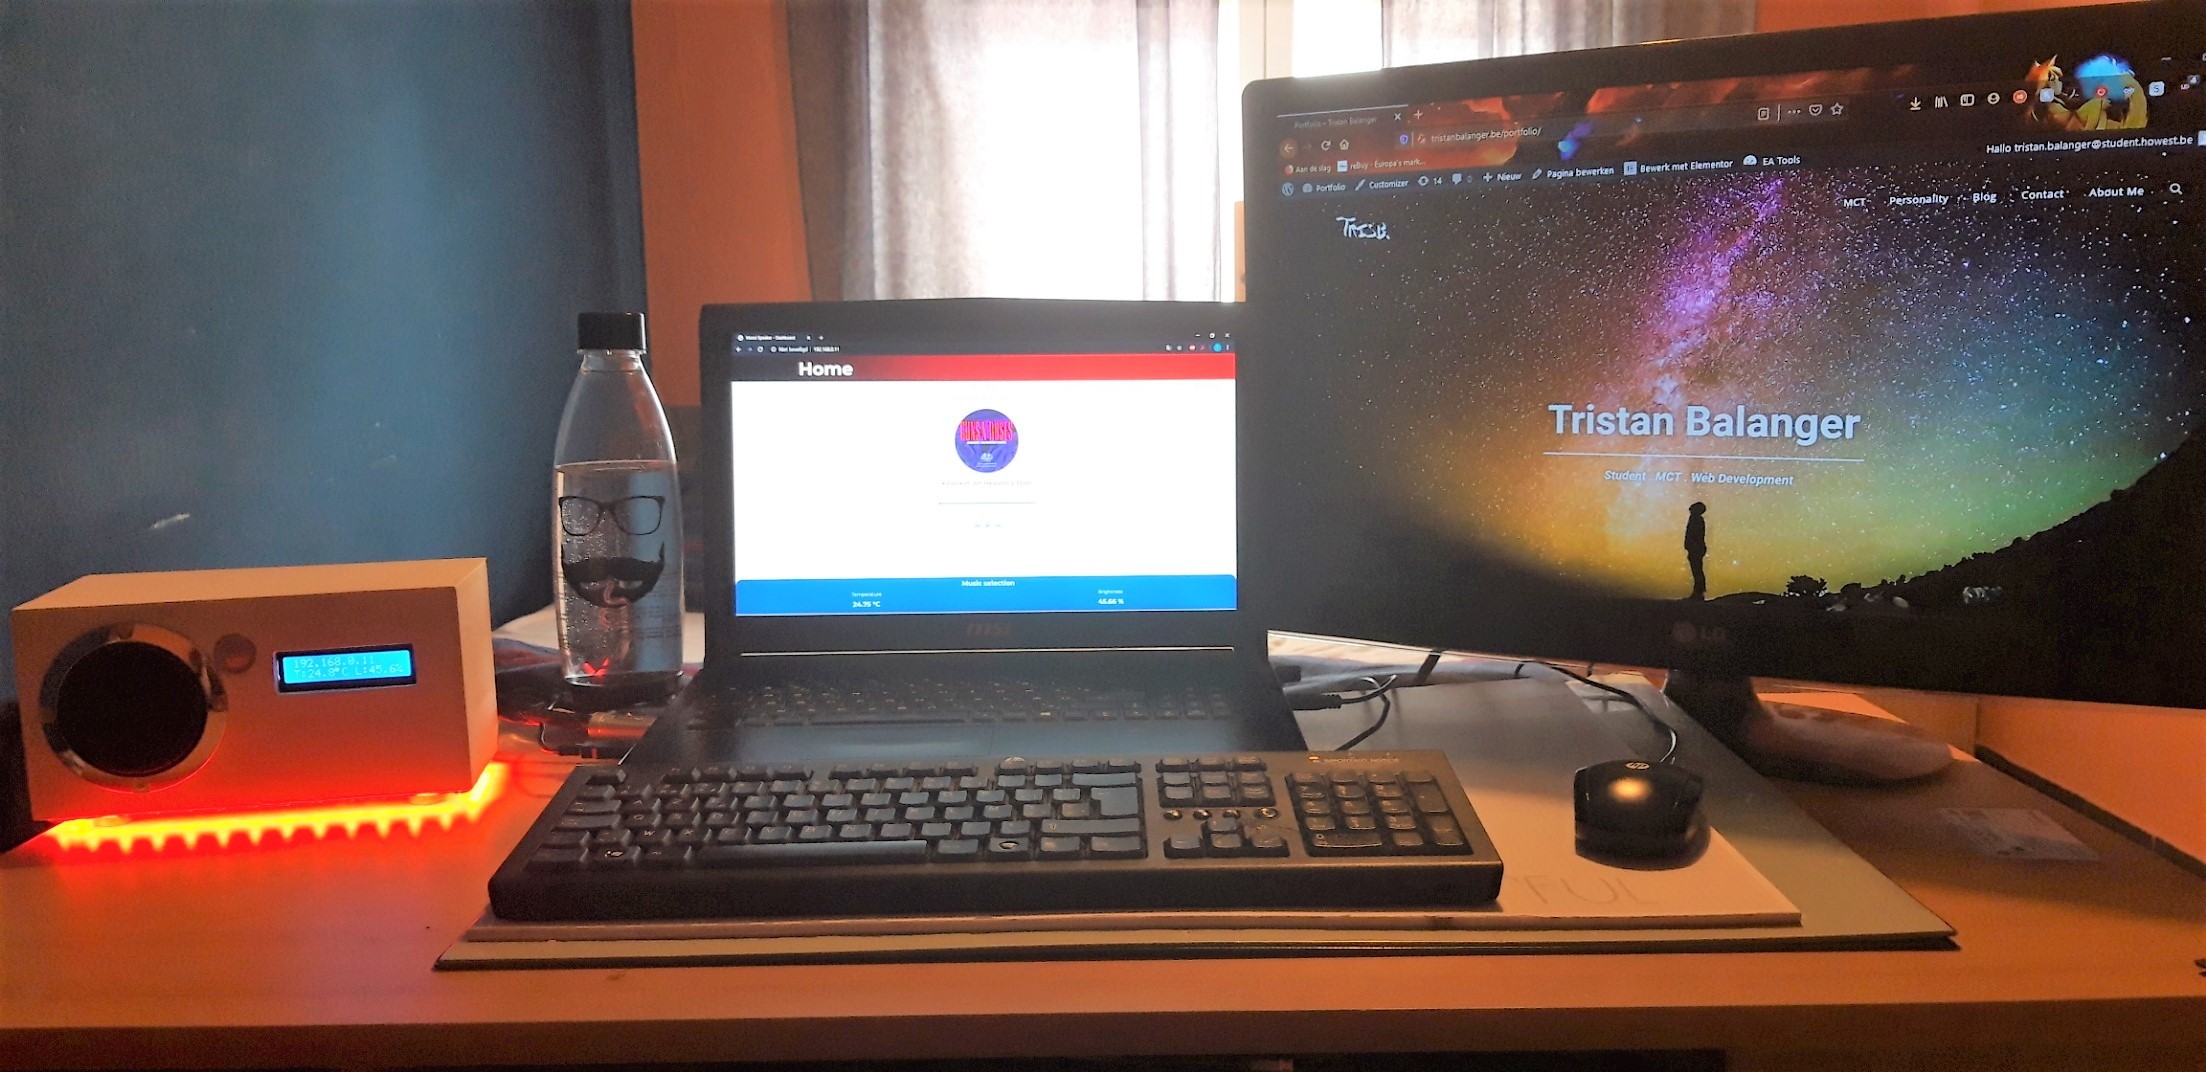
For my school project at MCT Howest Kortrijk, I made a Mood Speaker this is a smart Bluetooth speaker device with different sensors, an LCD and WS2812b ledstrip included.The speaker plays background music based on the temperature but can also be used as a regular bluetooth speaker. Everything runs on the Raspberry Pi (Database, Webserver, Backend).
So this instructable is an step by step process of how I realized this project in 3 weeks. So if you guys want to recreate my project you can follow guide
This instructable is my first one that I wrote so if there are any queastions, I'll Try to answer them as quicky as i can!
Supplies
Raspberry Pi 3B & 16GB SD Card
My whole project runs on my Raspberry Pi 3B with a configured image, which I will explain in a later step (Step 4: Setup Raspberry Pi)
LCD Display 16x2
I used a basic LCD Display to print my temperature, brightness and IP address.
Datasheet: https://www.engineersgarage.com/electronic-compon...
DS18B20 Temperature Sensor
The DS18B20 is a one-wire sensor that measures the temperature, manufactured by Maxim Integrated. There are 2 sorts of DS18B20 sensors, the component only (Which I used) and the waterproof version, which is much bigger, but that’s not what I needed for my project, so I used the component only. The sensor can measure the temperature in a range of -55°C to +125°C (-67°F to +257°F) and it has an accuracy of 0.5°C from -10°C to +85°C. It also has a programmable resolution from 9 bits to 12 bits.
Datasheet: https://datasheets.maximintegrated.com/en/ds/DS18...
MCP3008
To read the data from my LDR and PIR-sensor I used an MCP3008, which is an 8 channel 10 bit analog to digital convertor with the SPI interface and is pretty easy to program.
Datasheet: https://components101.com/ics/mcp3008-adc-pinout-...
PIR motion sensor
To detect when there is someone entering and leaving my room, I used an passive infrared sensor bacause they are easy to use and are small.
Datasheet: https://cdn-learn.adafruit.com/downloads/pdf/pir-...
LDR
I used a photoresistor or LDR (Light Decreasing Resistance, or light-dependent resistor) to detect the brightness level of the room its in. And to also turn my Ledstrip on when its to dark.
Speaker – 3”Diameter – 4 Ohm 3 Watt
This is the speaker cone I chose after calculating the Voltage and Amperes it would need and this was a perfect fit for my Raspberry Pi project, manufactured by Adafruit.
Overview: https://www.adafruit.com/product/1314
MAX98357 I2S Class-D Mono Amplifier
This is the amplifier that comes with the speaker, not only is it an amplifier, it’s also a I2S digital to analog converter, so it’s also a perfect fit for my speaker & audio system.
Overview: https://learn.adafruit.com/adafruit-max98357-i2s-class-d-mono-amp/overview
Datasheet: https://cdn-shop.adafruit.com/product-files/3006/...
Arduino Uno
The Arduino Uno is an open-source microcontroller board based on the Microchip ATmega328P microcontroller, manufactured by Arduino.cc. The Uno board has 14 Digital pins, 6 analog pins and is fully programmable with the Arduino IDE software
Overview: https://store.arduino.cc/arduino-uno-rev3
Levelshifter
This is a small board which takes care of the communication between the Arduino Uno and the Raspberry Pi and the different voltages, Arduino: 5V & Raspberry Pi: 3.3V. This is needed because the ledstrip is connected to the Arduino and runs on there, while all the other stuff runs on the Raspberry Pi.
WS2812B - Ledstrip
This is a ledstrip with 60 RGB leds (you can buy longer strips with more RGB leds, if you want to). Which is in my case connected to the Arduino Uno, but can also be connected to many other devices and is really simple to use.
Datasheet: https://cdn-shop.adafruit.com/datasheets/WS2812B....
GPIO T-Part, 1 Breadboard and lots of jumperwires
To connect everything I needed breadboards and jumperwires, I didn't use the GPIO T-part but you can use it to clearly know which bin goes where.
Downloads
Schematic and Wiring
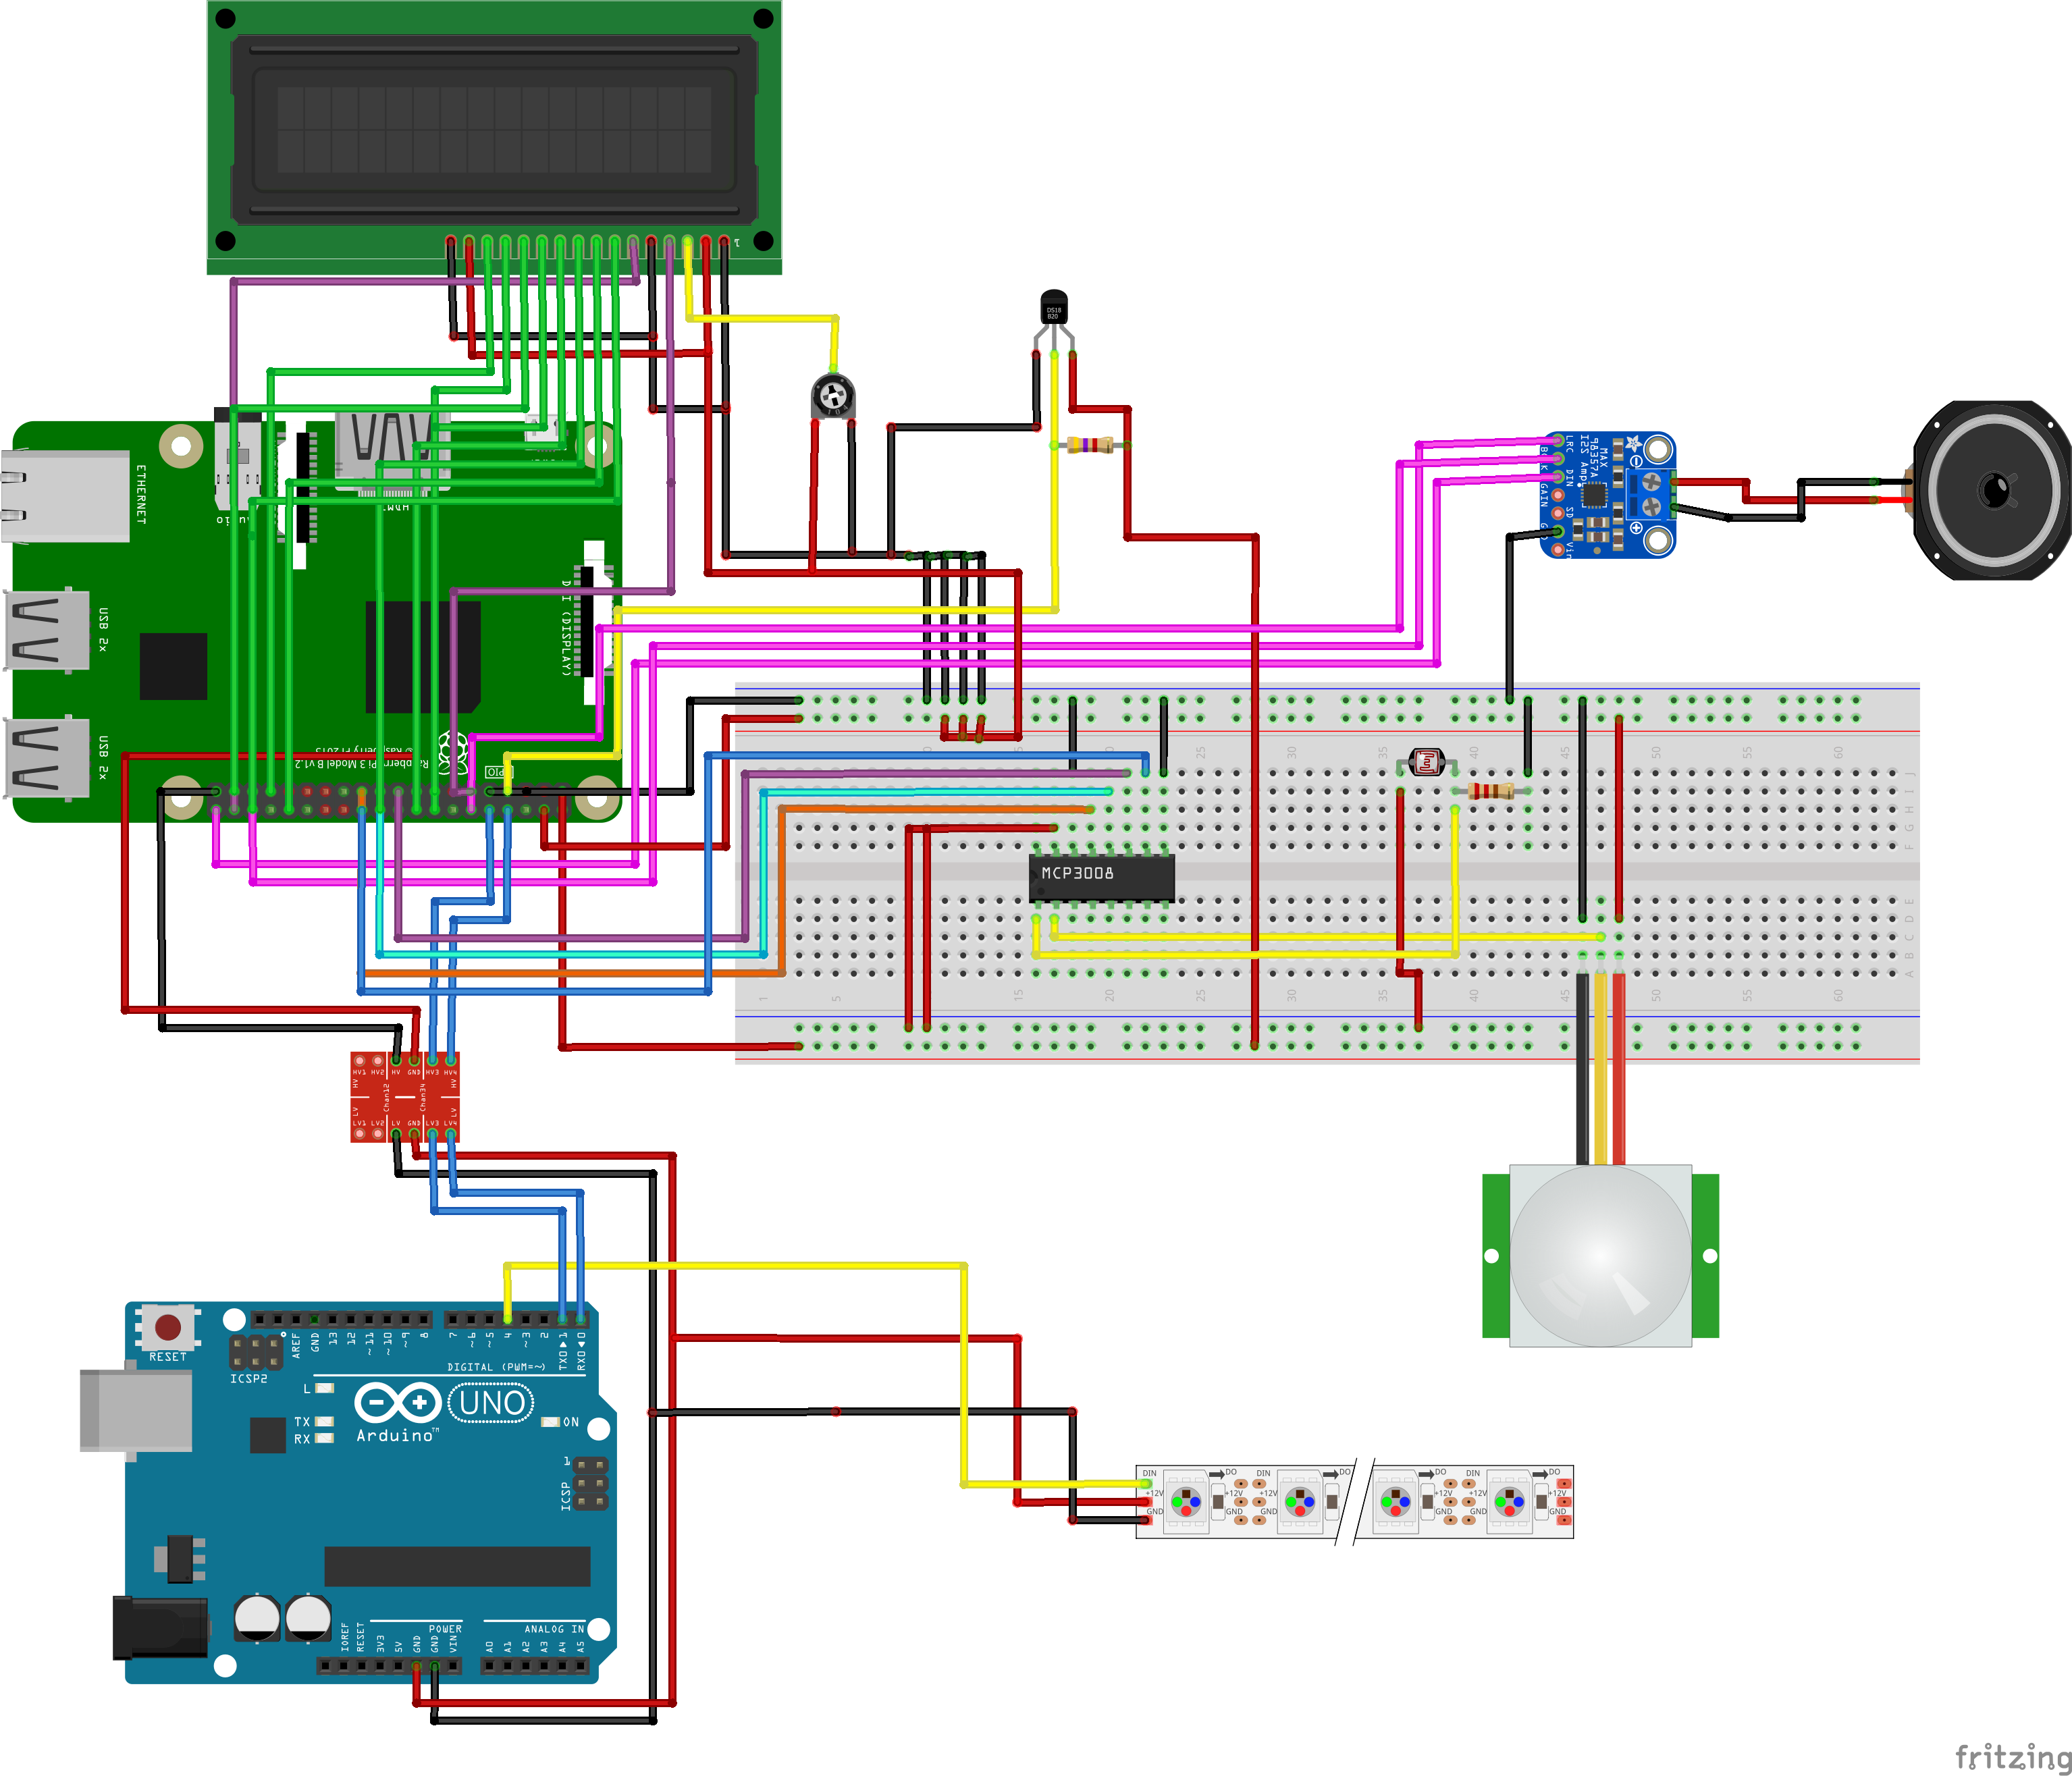
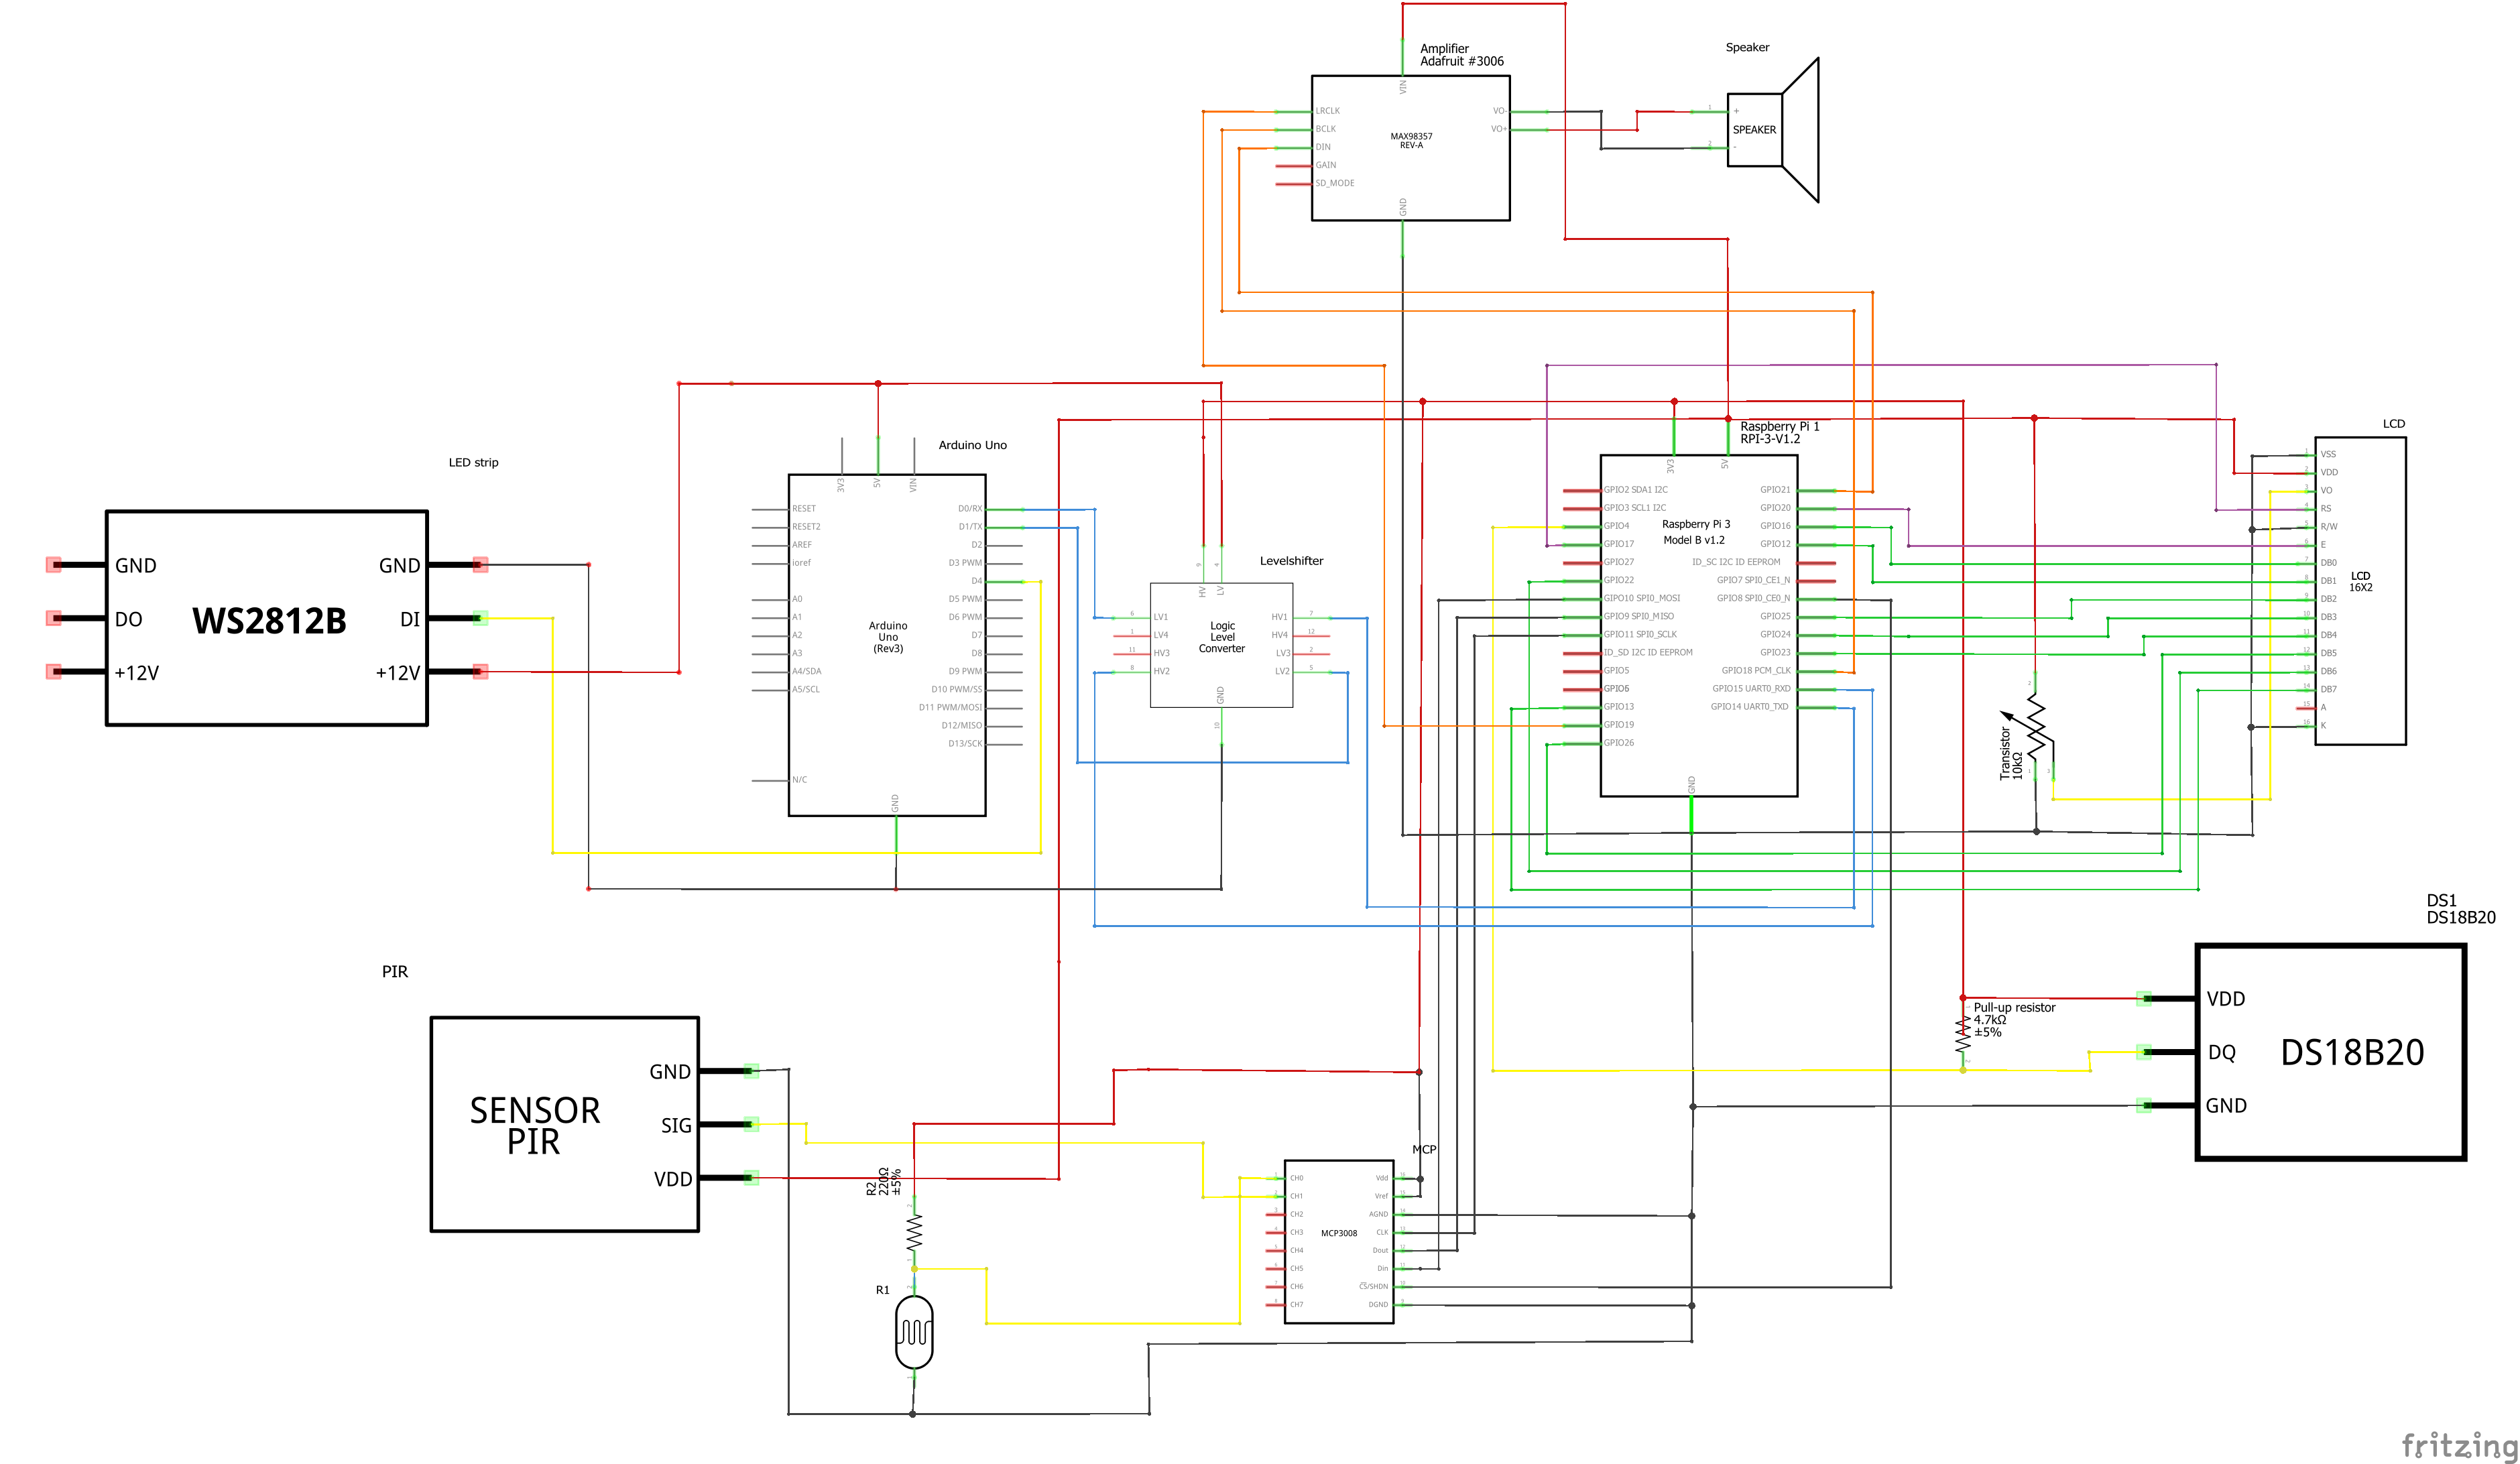
For making my schematic I used Fritzing, it's a program you can install which allows you to create a schematic really easy in different kinds of views.I used the breadboard and schematic view.
Download Fritzing: http://fritzing.org/
Make sure everything is connected correctly. I used colors to make it a bit clearer to know where to connect the wires. In my case i used different colors for the wires
Database Design
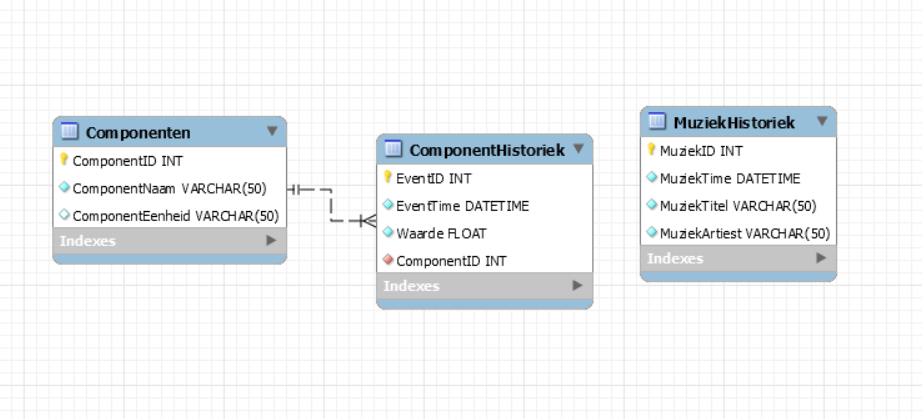
We are collecting a lot of data from the 3 sensors (Temperature from DS18B20, Brightness from LDR and Status from PIR-sensor). So its best to keep all this data in a database. I'll explain in a later step how to configure the database (Step 5 : Forward Engineering Our Database to the RPi!) But first the design or ERD (Entity Relationship Diagram) has to be made. Mine was normalised with 3NF that's why we split the components and the history of the components into another table. We use the Music database to keep track of the songs that have been listened to.
Overall this is a really basic and easy database design to further work with.
Setup Raspberry Pi
So now that we have some basics of the project done. Let's get started with setting up the Raspberry Pi!
Part 1: Configuring the SD Card
1) Download the Required Software and Files
You need to download 2 software and 1 OS i.e. Raspbian for this complete process.
1st software: The first software is Win32 Disk Imager.
https://sourceforge.net/projects/win32diskimager/
2nd software: Second software is SD Card Formatter.
https://www.sdcard.org/downloads/formatter_4/
Raspbian OS: This is the Main operating system of the Pi.
https://www.raspberrypi.org/downloads/raspberry-pi-os/
Extract all files to the desktop.
2) Get the SD Card and the Card Reader
Get a minimum 8GB class 10 SD card with a card reader. Insert that card into the card reader and plug that to the USB port.
3) Format the SD Card
Open SD Card Formatter and select the drive.
Click on format and don't alter any other options.
When formatting is completed, click on OK.
4) Write the OS on the SD Card
Open win32diskimager.
Browse the .img file of Raspbian OS that was extracted from the downloaded file.
Click on open and then click on Write.
If any warning pops up then ignore those by clicking OK. Wait for the write to be completed and it may take some minutes. So be patient.
5) Once this is done, we are ready to make some final adjustments before putting the image into our RPi.
Go to your SD card's directory, search for the file named 'cmdline.txt' and open it.
Now add 'ip=169.254.10.1' on the same one line.
Save the file.
Create a file named 'ssh' without extension or content.(easiest way is to create a txt file and remove the .txt afterwards)
Now that everything is installed on the SD card you can SAFELY eject it from your computer and put it into the Raspberry Pi WITHOUT connecting the power. Once the SD card is into the RPI, connect a LAN cable from your computer to the RPi LAN port, once this is connected you can connect the power to the RPi.
Part 2 : Configuring the RPi
Putty
Now we want to configure our Raspberry Pi, this is done through Putty.
Putty software: https://www.putty.org/
Once downloaded, open up Putty and insert the IP '169.254.10.1' and Port '22' and connection type: SSH.
Now we can finally open our command line interface and login with the starter login information -> User: pi & Password: raspberry. (Its recommend to change it as quickly as possible. Here is a guide how: https://www.raspberrypi.org/documentation/linux/u...)
Raspi-config
We will have to enable different interfaces and to do that we first have to typ following code:
sudo raspi-config
The things we need to enable are in the interfacing section. We need to enable following interfaces:
- One-wire
- Serial
- I2C
- SPI
That was everything we needed to do with raspi-config
Adding your WIFI
First, you have to be root for the following command to become root
sudo -i
Once you're root, use the following command: (Replace SSID with your network name and password with your network password)
wpa_passphrase "ssid" "password" >> /etc/wpa_supplicant/wpa_supplicant.conf
In case you did something wrong, you can check, update or delete this network by just entering the following command:
nano /etc/wpa_supplicant/wpa_supplicant.conf
So after we entered our network, let's enter the WPA client interface
wpa_cli
Select your interface
interface wlan0
Reload the file
reconfigure
And finally you can see if you are connected well:
ip a
Part 3 : Updating the RPi + installing software
Now that we are connected to the internet, updating the already installed packages would be a smart move, so let's do that first before installing other packages.
sudo apt-get update
sudo apt-get upgrade
After updating the RPi we will have to install following software:
MariaDB Database
sudo apt-get install mariadb-server
Apache2 Webserver
sudo apt install apache2
Python
update-alternatives --install /usr/bin/python python /usr/bin/python3.7 1 <br>update-alternatives --install /usr/bin/python python /usr/bin/python3 2
Python package
You will have to install all these packages to make the backend work perfectly:
- Flask
- Flask-Cors
- Flask-MySql
- Flask-SocketIO
- PyMySQL Requests
- Python-socketio
- RPi.GPIO
- Gevent
- Gevent-websocket
Speaker library
For using the speaker with the amplifier we will have to install a library for it
<p>curl -sS <a href="https://raw.githubusercontent.com/adafruit/Raspberry-Pi-Installer-Scripts/master/i2samp.
sh" rel="nofollow"> <a href="https://raw.githubusercontent.com/adafruit/Raspbe...</a">  https://raw.githubusercontent.com/adafruit/Raspbe...>> | bash</p>
Step 4: Reboot
After everything has been installed we will have to reboot the pi to make sure everything works correctly
sudo reboot
Setting Up the Database to the RPi!
.jpg)
Now that we have installed everything we needed, let's put our Database we designed on our Raspberry Pi!
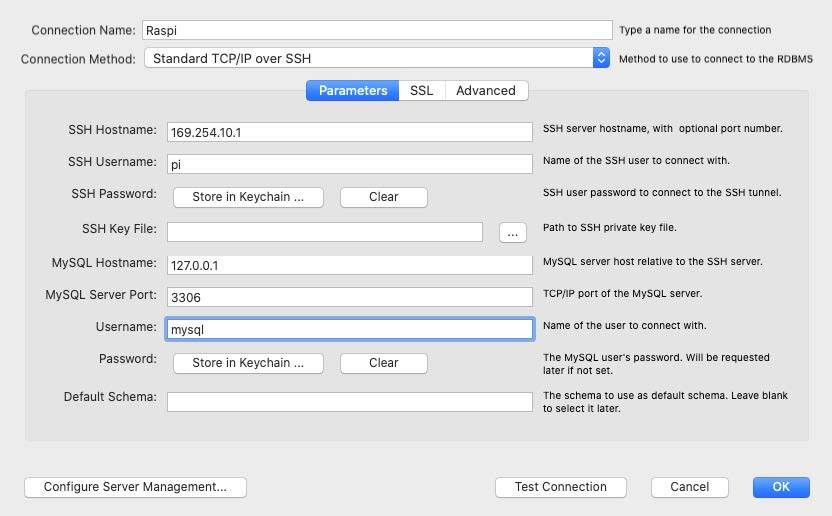
For setting up the database we will have to connect MySql and RPi. For that we will open MySQLWorkbench and make a new connection. When looking at the image you'll have to change to change the info to yours.
If you haven't change anything yet you can use for SSH pi and raspberry, for MySQL mysql and mysql.
When something isn't clear you can also follow this tutorial: https://pimylifeup.com/raspberry-pi-mysql/
To export your database it should be easier using PHPmyAdmin because you can get alot of errors doing it with MySql
Configuring Bluetooth on Our RPi
We are creating a Mood speaker, that we can also use with our own music so this is easier when the RPi is
conected to bluetooth I followed a tutorial for it that you can find here:
https://scribles.net/streaming-bluetooth-audio-fr...
I wrote everything down here aswell for everyone that want to recreate it
- Removing the already running bluealsa.
sudo rm /var/run/bluealsa/*
- Add A2DP profile Sink role.
sudo bluealsa -p a2dp-sink &
- Open up the bluetooth interface and power your bluetooth on.
bluetoothctl <br>power on
- Set up a pairing agent.
agent on <br>default-agent <br>
- Make your RPi discoverable
discoverable on
- Now from your bluetooth device, search for the RPi and connect with it.
- Confirm the pairing on both devices, type 'yes' in your putty.
- Authorize A2DP service, type 'yes' again.
- Once this is done, we can trust our device, so we do not have to go all through this every time we want to connect
trust XX:XX:XX:XX:XX:XX (Your bluetooth mac address from our source device)
- If you want your RPi to keep on being discoverable, that's your own choice, but I prefer to turn it off again, so that people can't try to connect with your box.
discoverable off
- Then we can exit our bluetooth interface
exit
- And finally our audio routing: our source device forwarding to our RPi
bluealsa-aplay 00:00:00:00:00:00
Now our device is connected to our Raspberry with bluetooth and you should be able to test it by playing any media for example Spotify, etc.
Writing the Complete Backend
So now the setup is done, we can finally begin writing our backend program!
I used Visual Studio Code for my whole backend, you just need to make sure your Visual Studio project is connected to your Raspberry Pi, this means your LAN cabel has to be connected to your RPi and to make an SSH connection. (info on how to create a remote connection can be found here: https://code.visualstudio.com/docs/remote/ssh)
I used my own classes and these are also all included in my GitHub.
In my backend file I used different classes, so everything can be used separately and so that my main code isnt a mess with all the differents threads. I used threading to run all the different classes at once. And at the bottom you got all the routes so we can easily get data in our frontend.
Writing the Frontend (HTML, CSS & JavaScript)
Now that the backend is done, we can start writing the full front-end.
HTML and CSS was pretty hard for me i did my best to make it mobile first because I can connect to it with bluetooth to change the songs with Spotify. So it would be easier to control from a mobile dashboard
You can design your dashboard in any way you want to, i'll just leave my code and design here, you can do whatever you like!
And Javascript wasn't easier for me, worked with a few GET's from my backend routes, tons of event listeners and some socketio structures to get the data from my sensors.
Building My Case and Putting It All Together
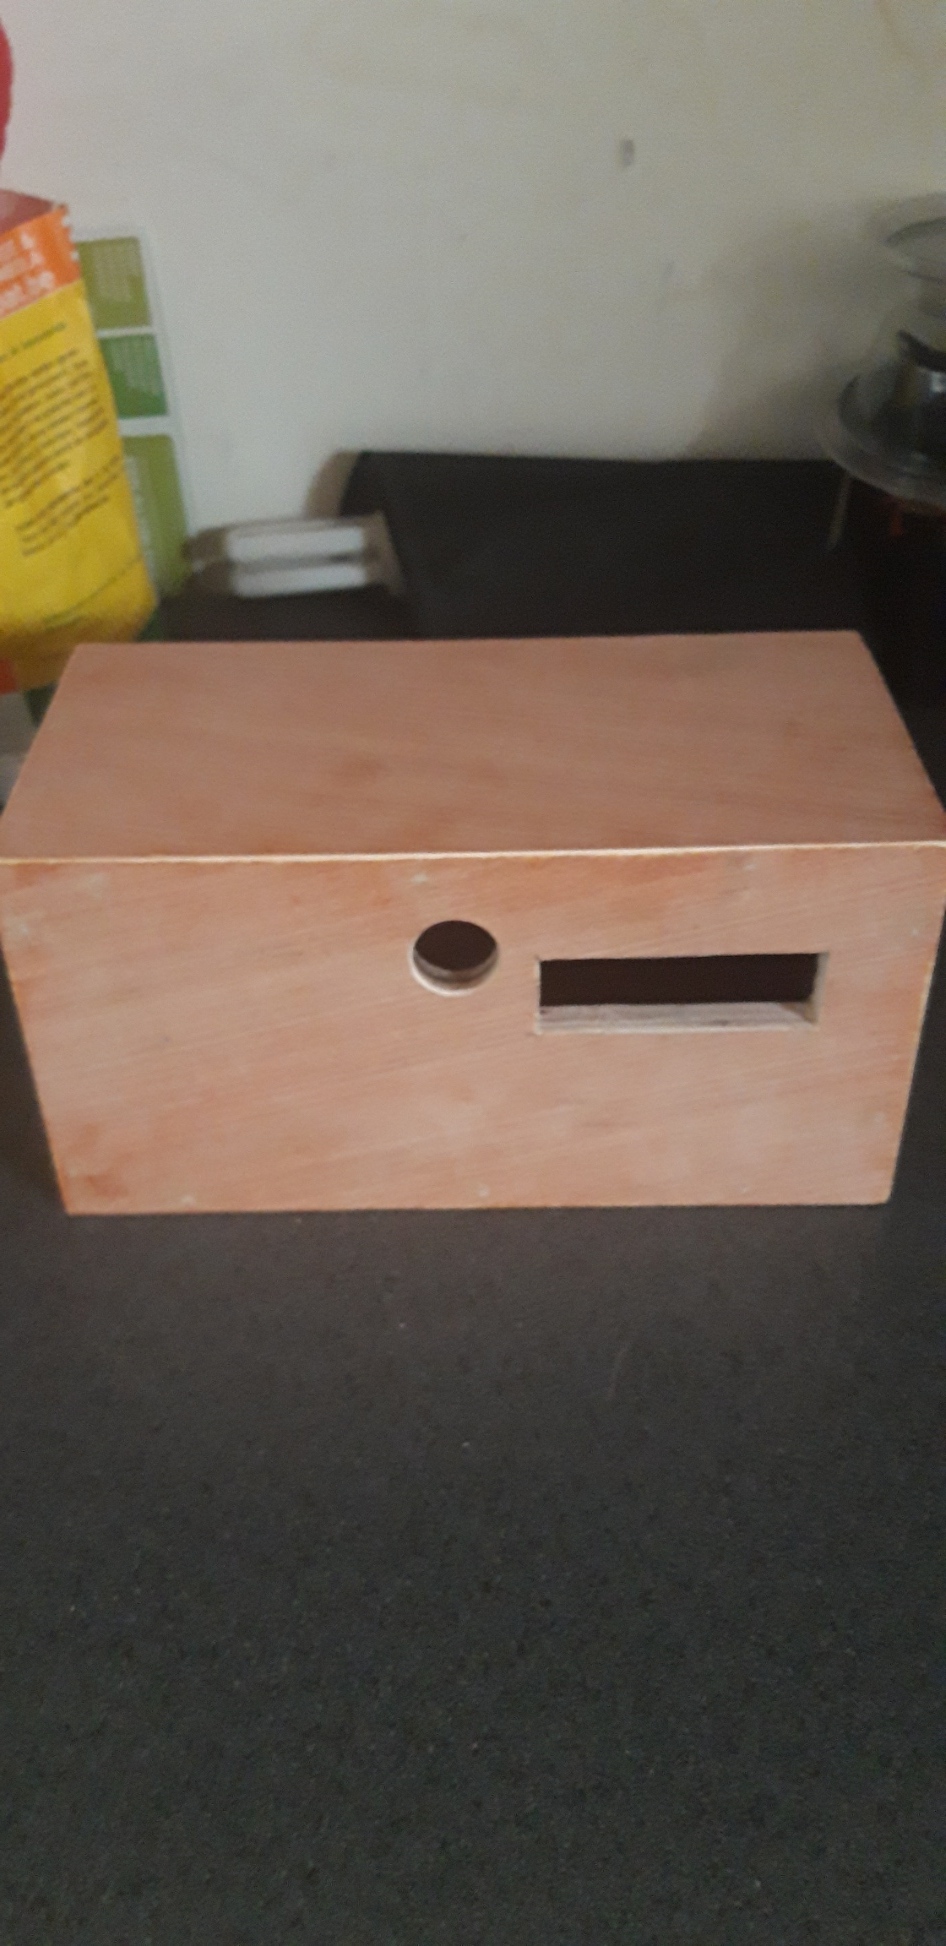
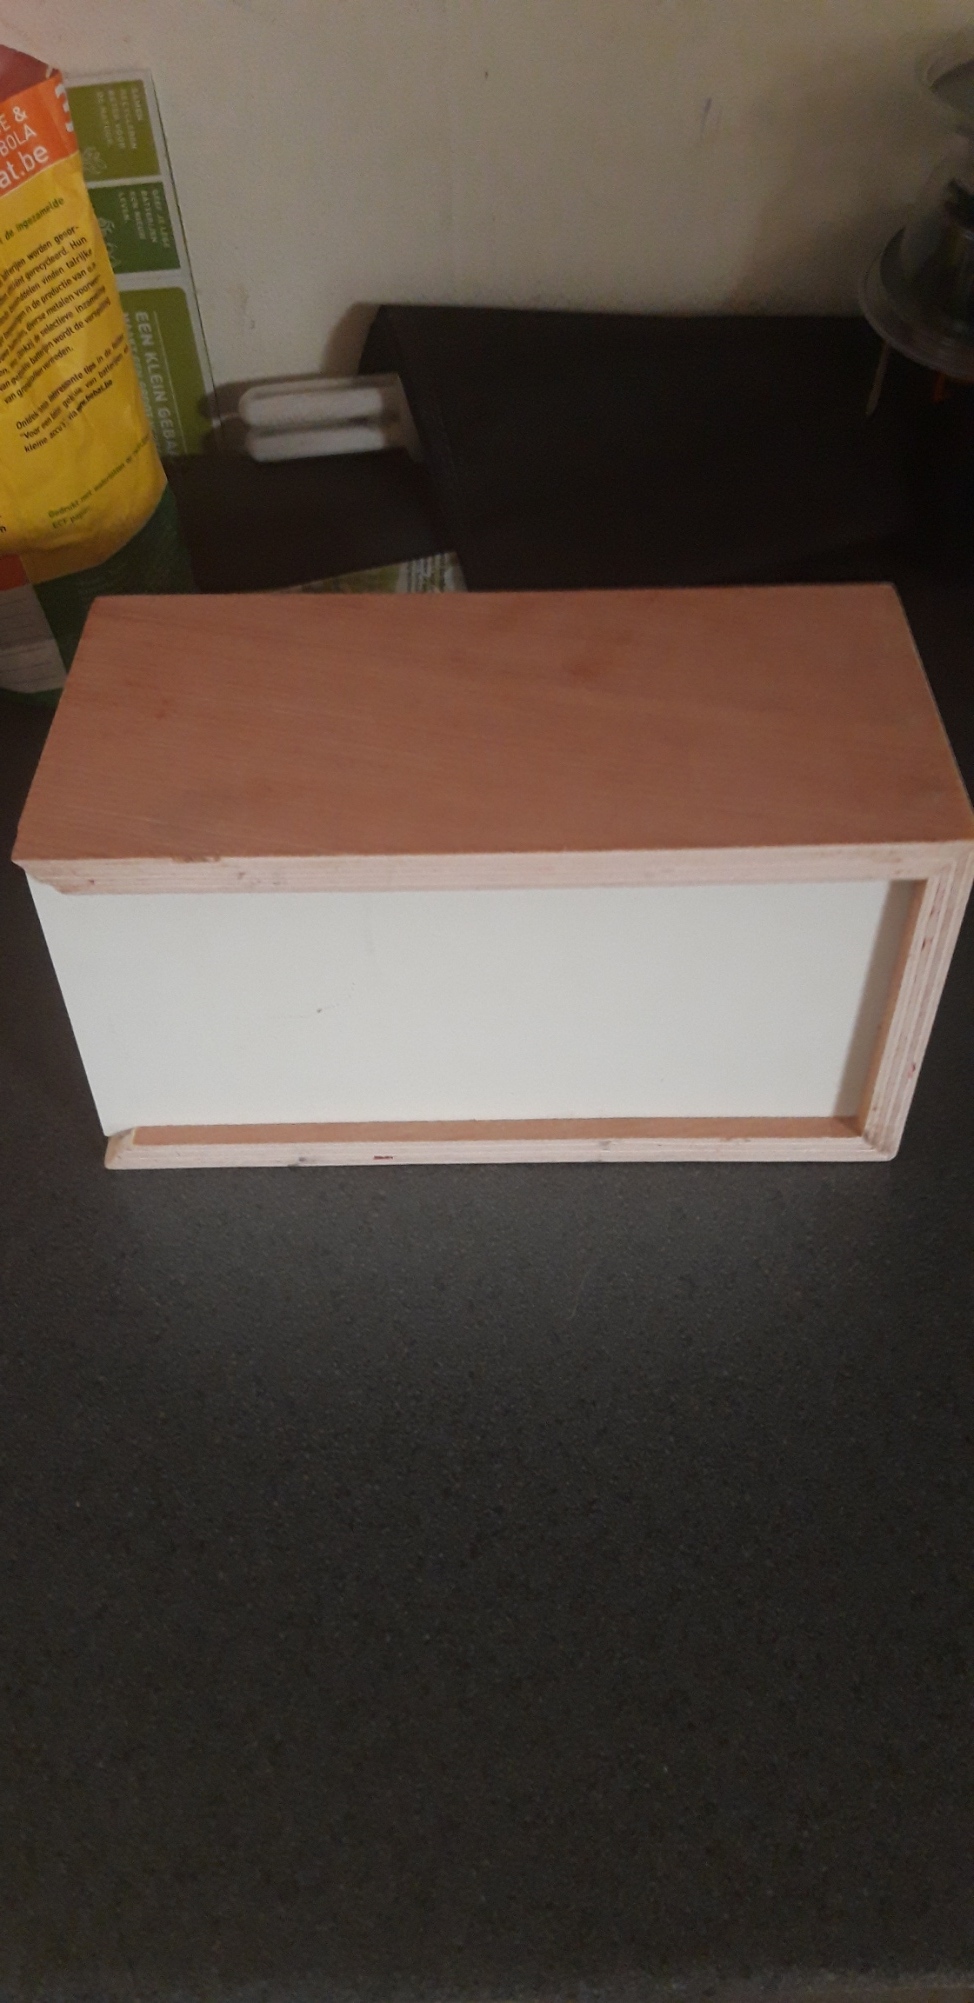
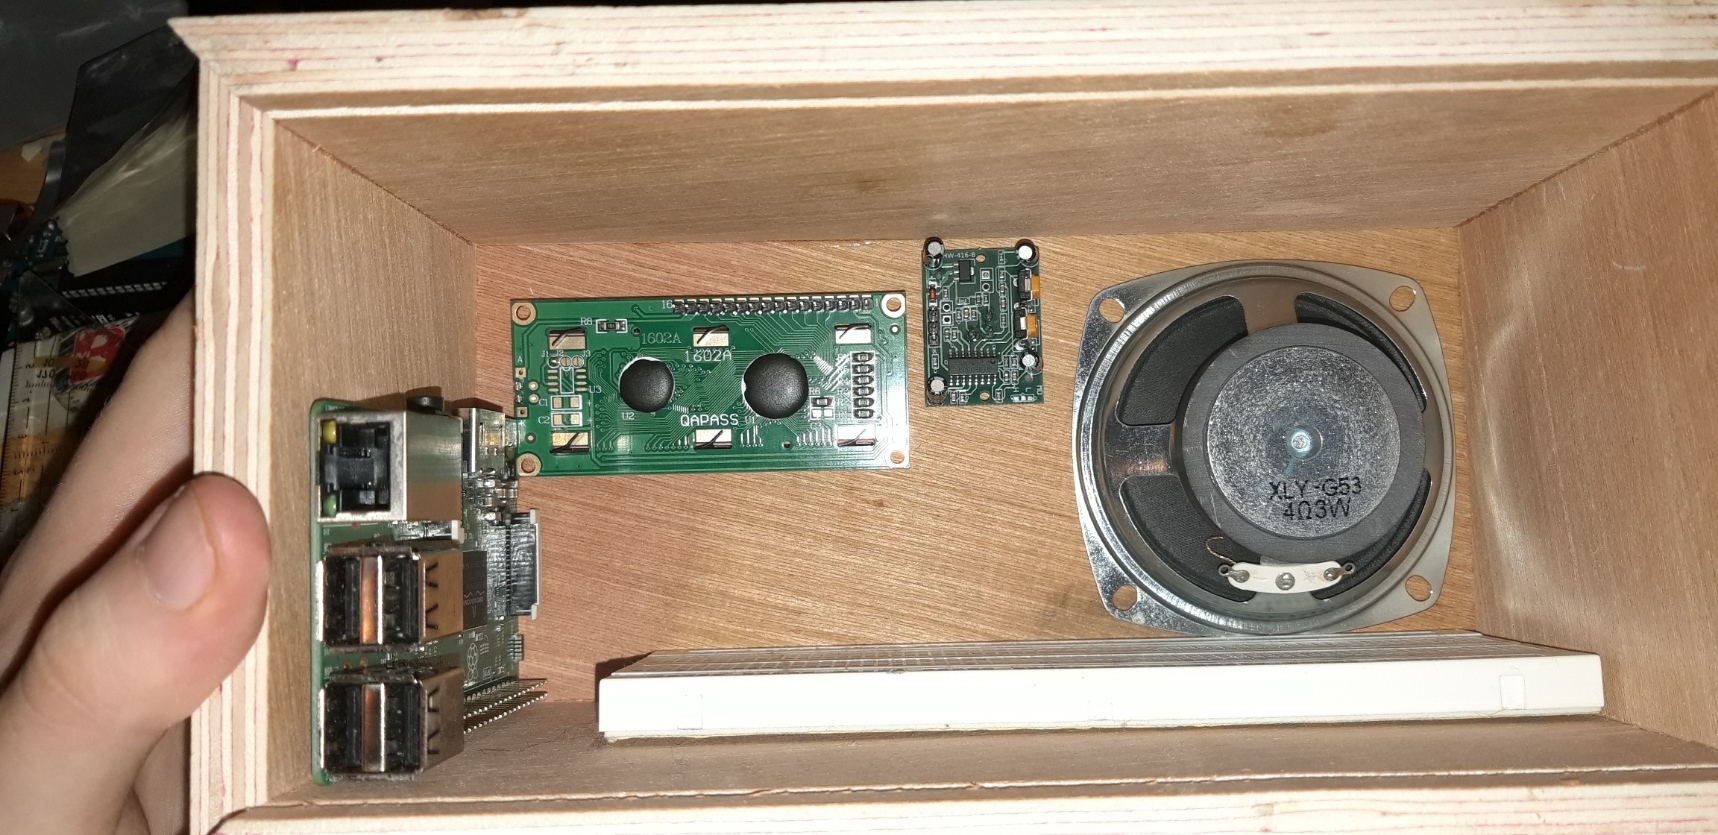
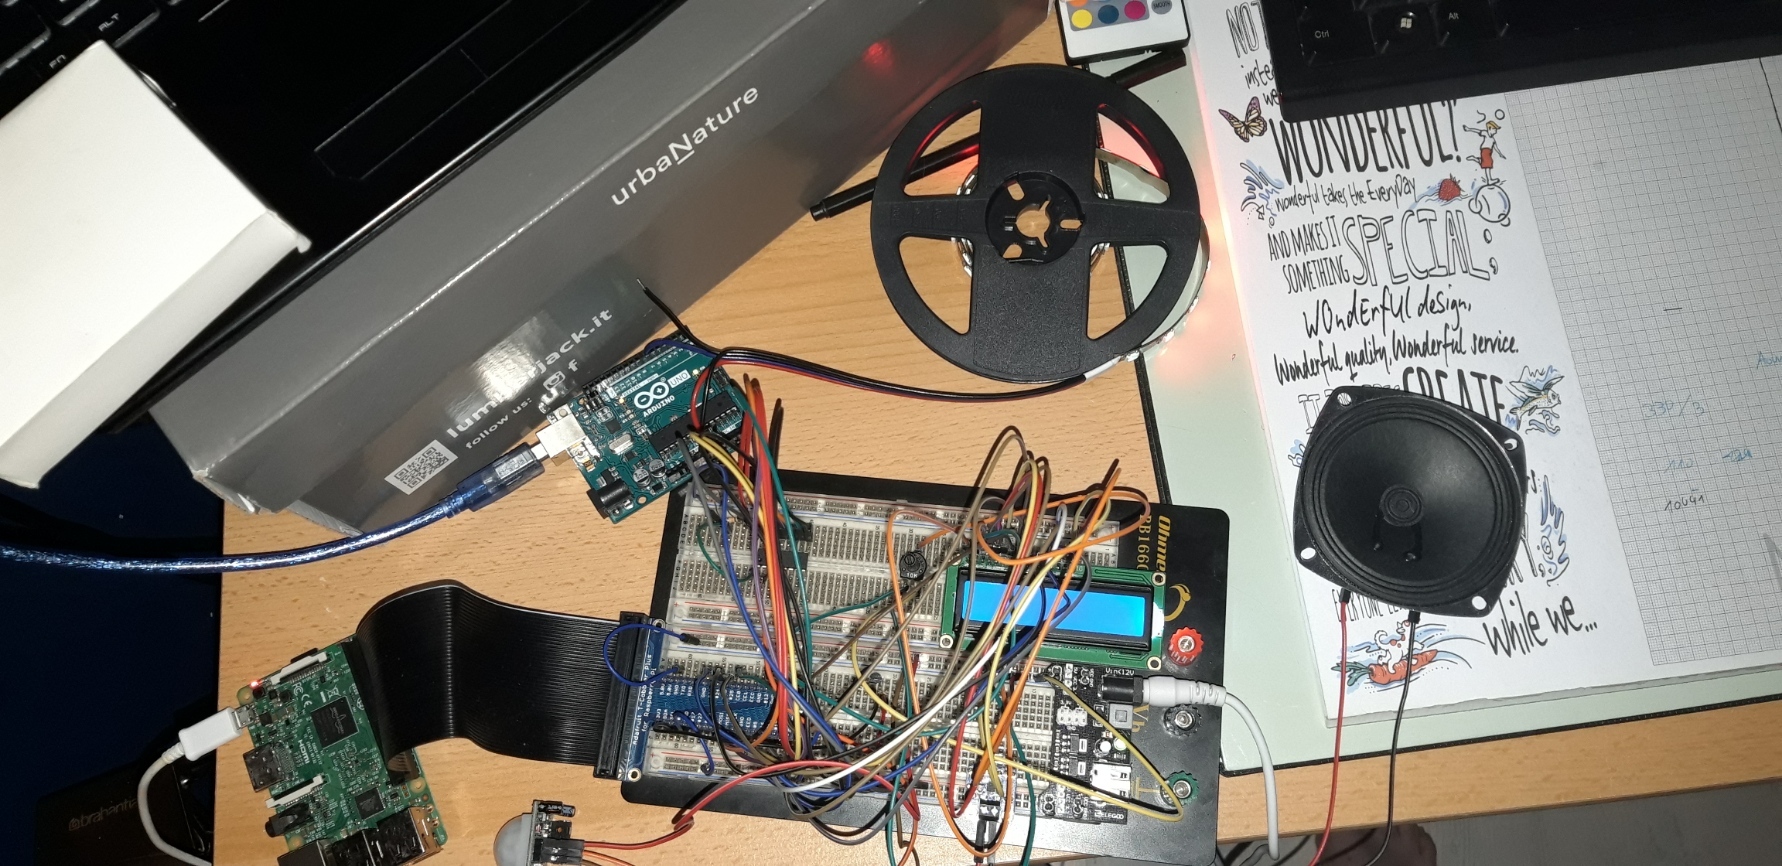
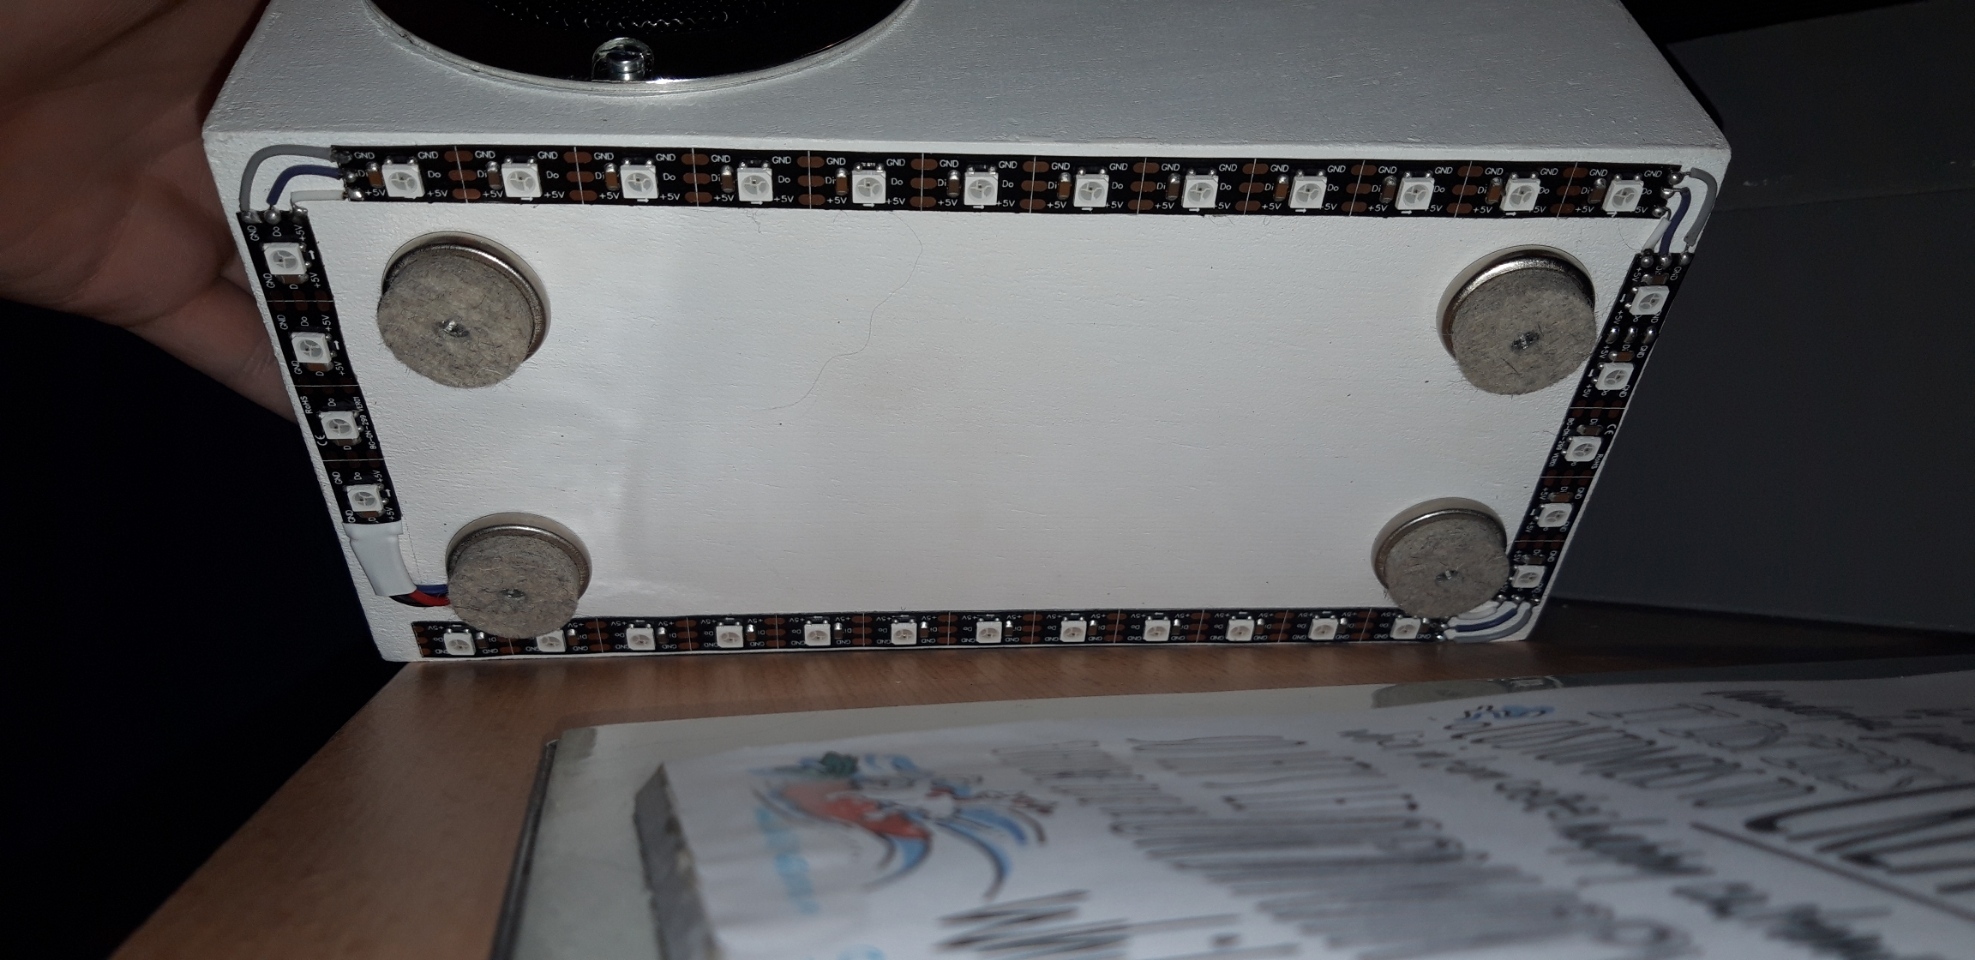
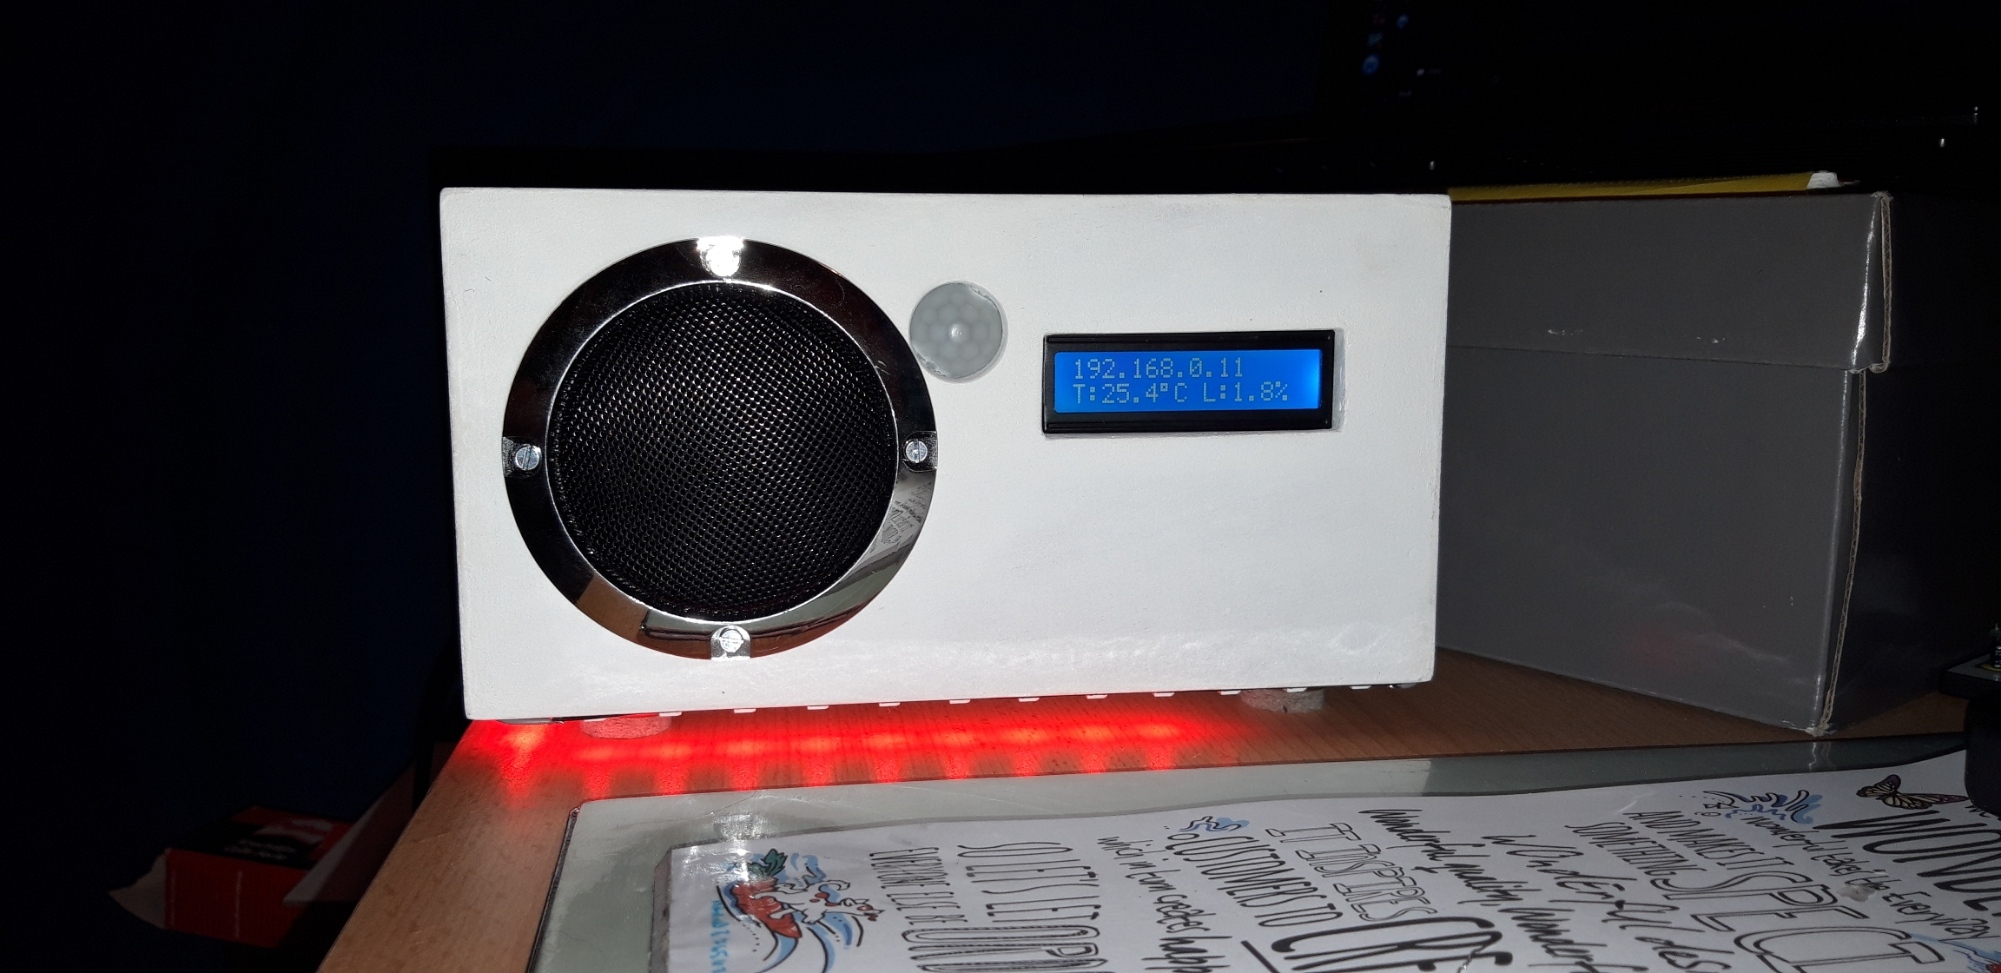
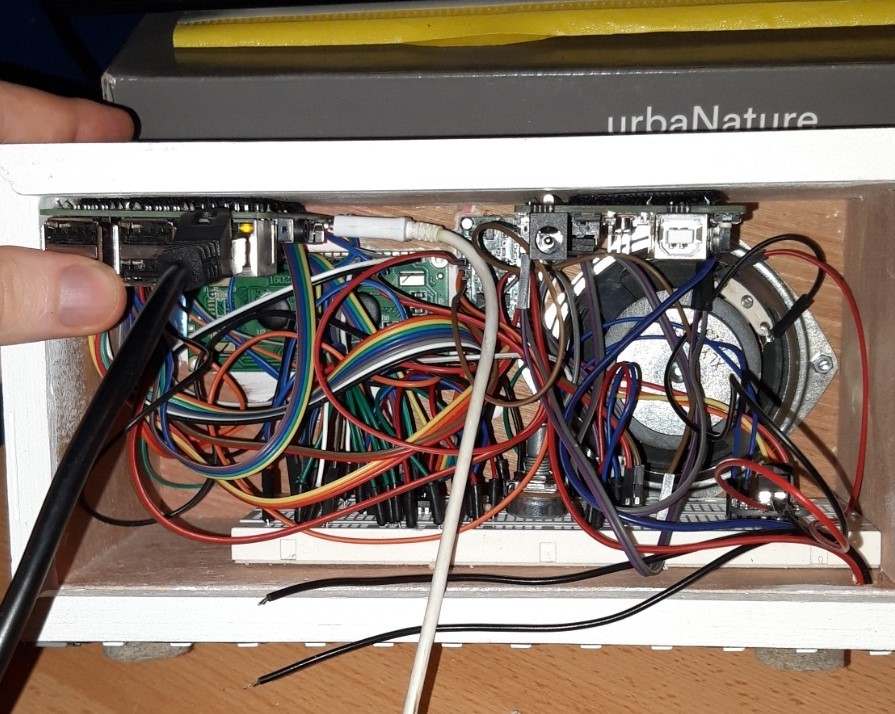
I first started sketching of how I wanted the case to look, something important was that it had to be big enough for everything to fit in, since we got a big circuit to put in the case but had to stay compact so that it didn't take alot of space
I made the case out of wood, I think it is the easiest to work with when you don't have that much experience with building cases and you also have a lot of things you can do with it.
I started from an old plank I had laying around and just started sawing the wood. Once I had my basic case, I just had to drill holes in it (a lot on the front of the case, as you can see on the pictures and put some nails in it, it's a really basic case, but it looks pretty cool and fits perfect. I also decided to paint it white to make it look good.
And once the case was done, it was time to put it all together, as you can see on the last picture! It is kinda a mess inside the box, but everything works and I did not have that much more space, so I advice you to maybe create a bigger case if you are recreating my project.