Mini Retro TV Thermo Hygrometer - the Cutest Way to Read Your Room
by rsappiawf in Workshop > 3D Printing
2538 Views, 26 Favorites, 0 Comments
Mini Retro TV Thermo Hygrometer - the Cutest Way to Read Your Room


This small weekend build turned into one of my favorite little desk accessories:
a miniature Retro TV that displays temperature and humidity using one of those inexpensive sensor modules you can grab on Amazon (usually 2 units for around 5€).
The whole thing is designed to be easy to print, easy to assemble, and fun to display.
No wiring, no coding, no soldering — just print the parts, pop the module inside, secure with four screws, glue the front plate, and enjoy the nostalgia.
About the 3D Design
The entire model was designed in Onshape, with a strong focus on modularity.
Both the front plate and the viewport were intentionally created as separate, swappable components, so you can easily customize the look later on.
Want a different bezel style? A tinted window? A more “toy-like” front plate or a clean minimal one?
All of that can be redesigned or replaced without touching the main body.
This makes the Retro TV not just a fun little gadget, but also a tiny platform for creative variations.

Supplies
Hardware:
- 1× Temperature + Humidity module
- (Amazon) Mini Digital Thermometer Hygrometer
- (AliExpress) 1 Pc Digital LCD Thermometer Hygrometer Indoor Room
- 4× M2×8mm screws
- A small drop of Loctite (or any cyanoacrylate) for the front plate and viewport
Tools:
- 3D printer
- Small screwdriver
- Tweezers (optional)
Files:
Print the Parts
.gif)
All parts are optimized for clean overhangs and crisp details.
The 3MF includes tuned settings for:
- 0.16 layer height
- PLA
Print time is around 2–3 hours depending on your printer.
Tip: For maximum “retro TV” charm, print the body in beige/cream and the front plate in dark gray or black.
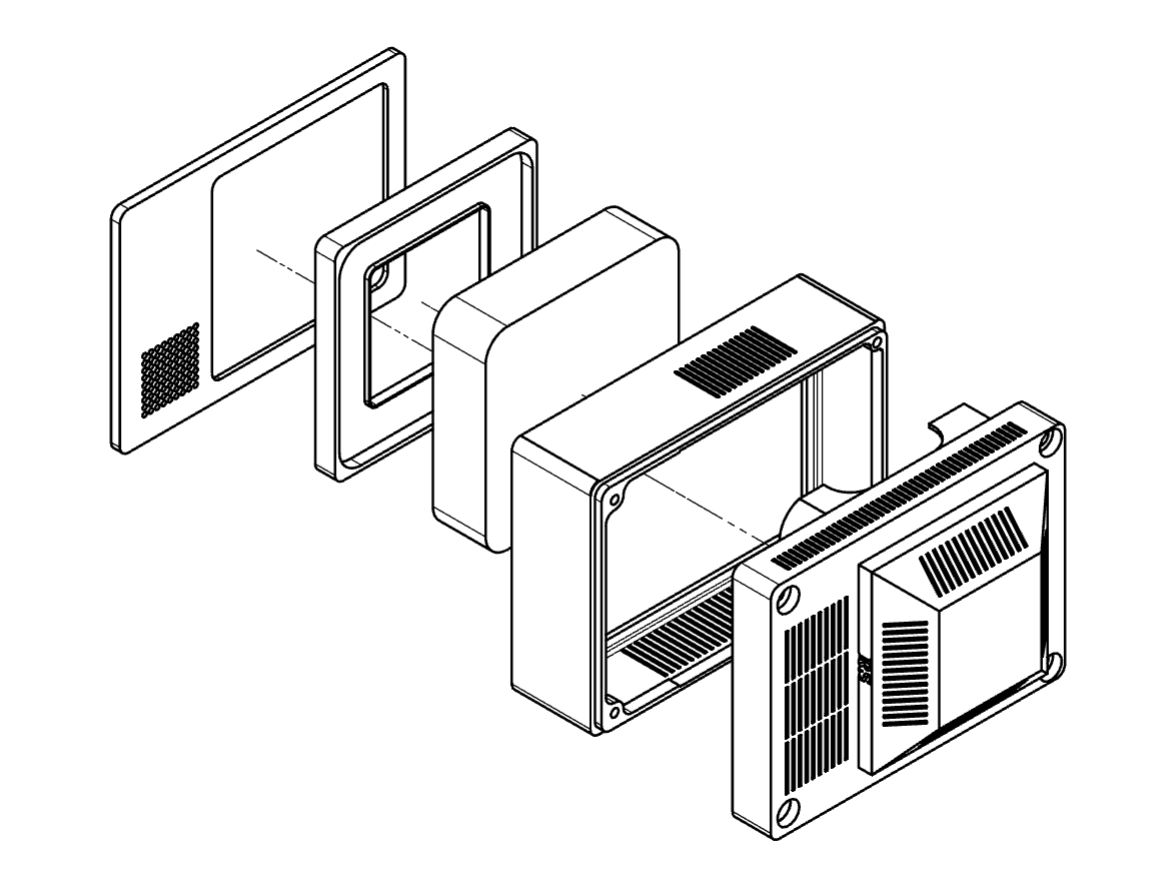
Insert the Module and Screw Everything Together


Slide the module into the back cavity.
Align it with the internal supports and secure the back using four M2×8 screws.
The fit is intentionally snug so it won’t rattle.
Glue the Front Plate & Viewport


Add a tiny amount of Loctite around the inner lip of the TV frame.
Press the front plate into place and hold it for a few seconds.
Do the same with the small viewport window.
A single drop is enough — don’t overdo it or you may fog the plastic.
Enjoy Your Mini Retro TV
That’s it.
You now have a fully working Retro TV Thermo-Hygrometer for your desk, workshop, kitchen, or nightstand.
It’s one of those objects that immediately sparks conversation — “Wait, is that a tiny TV?” — and it’s surprisingly useful too.
Final Thoughts

This was meant to be a quick weekend project, but it turned out to be a super charming little build that’s easy for anyone to make.
If you print one, I’d love to see your version!
Happy printing — and enjoy your tiny Retro TV!