Mini Picture Frame
![Screenshot 2022-12-02 7.18.20 PM.png](/proxy/?url=https://content.instructables.com/FXJ/6OZ9/LB6IO1ZN/FXJ6OZ9LB6IO1ZN.png&filename=Screenshot 2022-12-02 7.18.20 PM.png)
I decided to make this because it could be useful for displaying small photos and/or polaroids.
Supplies
![Screenshot 2022-12-02 6.38.55 PM.png](/proxy/?url=https://content.instructables.com/FWK/8IDB/LB6IO206/FWK8IDBLB6IO206.png&filename=Screenshot 2022-12-02 6.38.55 PM.png)
I used onshape to make this part.
Frame Sketch
![Screenshot 2022-12-02 7.02.35 PM.png](/proxy/?url=https://content.instructables.com/FYL/NXBT/LB6IO216/FYLNXBTLB6IO216.png&filename=Screenshot 2022-12-02 7.02.35 PM.png)
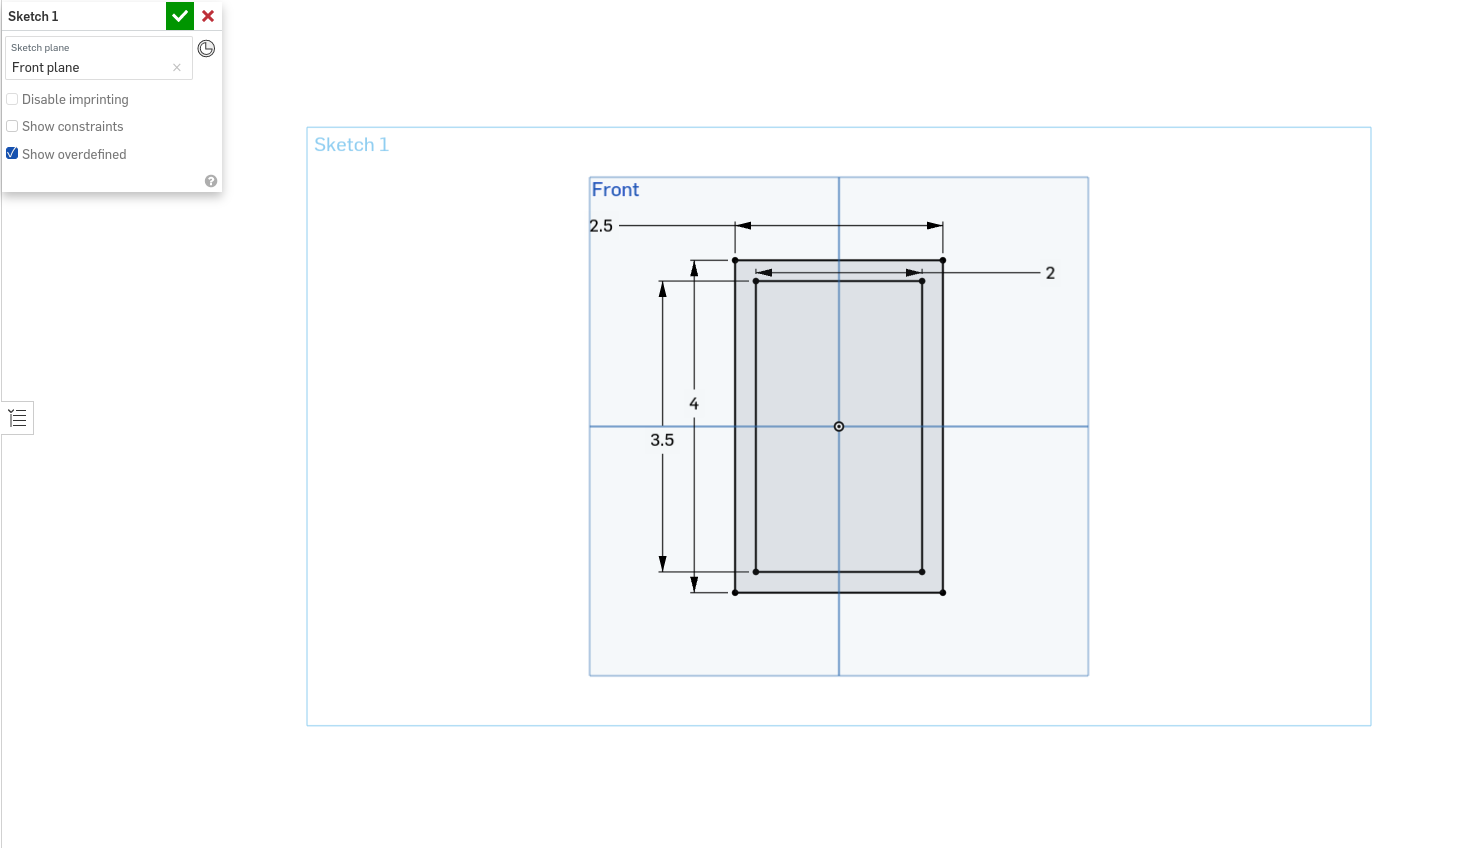
First, make a sketch on the front plane. Draw two center point rectangles, one inside the other. The outer rectangle has the dimensions 4 x 2.5 inches. The inner rectangle has the dimensions 3.5 x 2 inches.
Frame Extrude
![Screenshot 2022-12-02 7.03.09 PM.png](/proxy/?url=https://content.instructables.com/FMV/MNZ5/LB6IO24T/FMVMNZ5LB6IO24T.png&filename=Screenshot 2022-12-02 7.03.09 PM.png)
Next, extrude the outer rectangle with a depth of 0.5 inches (forward).
Back Sketch
![Screenshot 2022-12-02 7.03.49 PM.png](/proxy/?url=https://content.instructables.com/FIR/STQY/LB6IO285/FIRSTQYLB6IO285.png&filename=Screenshot 2022-12-02 7.03.49 PM.png)
After that, make the back of the frame by drawing a 4 x 2.5 inch rectangle that lines up with the edges of the existing frame.
Back Extrude
![Screenshot 2022-12-02 7.05.11 PM.png](/proxy/?url=https://content.instructables.com/FNP/3UNX/LB6IO2GL/FNP3UNXLB6IO2GL.png&filename=Screenshot 2022-12-02 7.05.11 PM.png)
To finalize the back of the frame, extrude it backwards 0.1 inches.
Groove Sketch
![Screenshot 2022-12-02 7.16.01 PM.png](/proxy/?url=https://content.instructables.com/FWD/UMXH/LB6IO2L4/FWDUMXHLB6IO2L4.png&filename=Screenshot 2022-12-02 7.16.01 PM.png)
![Screenshot 2022-12-02 7.33.21 PM.png](/proxy/?url=https://content.instructables.com/FWH/8JPE/LB6IO2TD/FWH8JPELB6IO2TD.png&filename=Screenshot 2022-12-02 7.33.21 PM.png)
To make the groove where you can place the photo, draw a center point rectangle on the top plane, that is 2.2 inches long (1.1 inches on both sides of the origin). It has a width of 0.1 inches and is 0.05 inches away from the back of the frame.
Groove Extrude Remove
![Screenshot 2022-12-02 7.16.38 PM.png](/proxy/?url=https://content.instructables.com/F1V/10PR/LB6IO3N9/F1V10PRLB6IO3N9.png&filename=Screenshot 2022-12-02 7.16.38 PM.png)
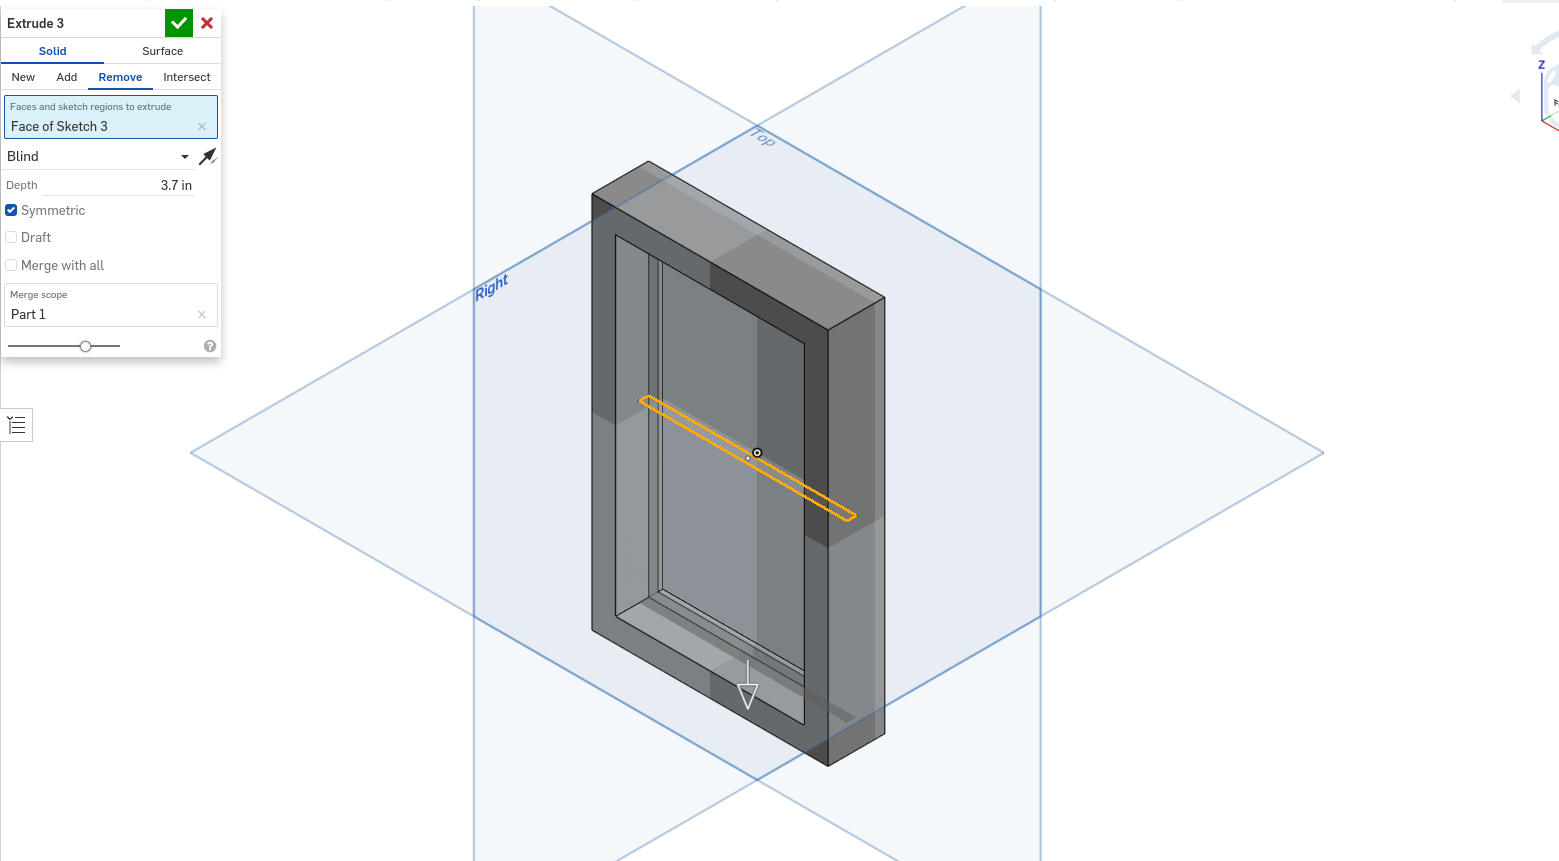
To finalize the groove, extrude remove it symmetrically 3.7 inches.
Fillet
![Screenshot 2022-12-02 7.17.04 PM.png](/proxy/?url=https://content.instructables.com/F4X/JNCO/LB6IO4D0/F4XJNCOLB6IO4D0.png&filename=Screenshot 2022-12-02 7.17.04 PM.png)
The final step is to add a 0.25 inch fillet to the front edges of the frame, making it more decorative.