Mini-Organ With Customizable Chord Presets
by Merijn in Circuits > Arduino
674 Views, 2 Favorites, 0 Comments
Mini-Organ With Customizable Chord Presets

.jpeg)

This is my first Instructable, and for that matter my first Arduino project at all. I wanted to make something cool that you can play with to create nice music. With this Mini-Organ you will be able to easily play beautiful music. It has seven preset chords that you can switch between using a potentiometer and has two other knobs to regulate vibrato. The organ is also very customisable, as you can change the preset chords in the code using a long list of predefined tones. Or add your own if the ones you need aren't there yet!
Supplies
Components:
- Arduino Uno (V3)
- 4 rotary potentiometers
- 5 capacitive touch sensors (TTP223B)
- speaker
- 3 270 Ohm resistors
- 4 Ceramic Capacitors
- PAM8403 6W amplifier (or any other type of amplifier that works with your speaker)
- A whole bunch of wires
Casing:
- 4 mm MDF
- 3 mm (black) Acrylic
- 4 black screws
- A laser cutter
and most importantly: The 'Mozzi' library
Prototyping
.jpeg)

I started this project by creating a prototype on a breadboard. With 3 sensors, the Mozzi library and an audio jack input, I managed to create a small piano. It took a lot of time to figure out the best ways to use the Mozzi library, as it is very impressive but complicated. Over a period of about a week, I managed to figure out how to use vibrato with Mozzi and created a system for using preset chords.
The Hardware

The circuit seems quite complex because of the many wires, but its actually quite straightforward. You link up all the capacitive sensors to 5V and ground. The middle pin goes to a Digital port which you then connect to a key in your code. The potentiometers except the volume one are all connected to 5V and ground as well with their middle pin hooked up to Analog ports.
The volume potentiometer is simply connected to ground and through all the capacitators to Digital port 9. This is important as this is the port that the final sound will come from when using Mozzi. The middle pin of the volume knob is attached to your amplifier.
Finally you also connect the speaker to the amplifier. Because we are using mono audio, it doesn't matter to which side you connect it. When using an audio jack port, you will connect both left and right to the same pin as well.
The Software
The code for this project is quite lengthy. Below you find the code, with comments to explain the various blocks.
#include <MozziGuts.h>
#include <Oscil.h> // oscillator template
#include <tables/triangle_hermes_2048_int8.h> // table for oscillator


#define CONTROL_RATE 128 // This determines the frequency at which the UpdateControl function is called.


// Here you define the amount of keys you wil use and how many notes(voices) you would like to play simultaniously(POLY).


#define MAX_POLY 5
#define MAX_KEYS 5
#define OSC_NUM_CELLS TRIANGLE_HERMES_2048_NUM_CELLS
#define WAVE_DATA TRIANGLE_HERMES_2048_DATA


#define NONE 255


//Here we create 3 different structs which will allow us to attach multiple parameters to our voices, keys and vibrato.
//This will keep the variable management nice and clean as everything key related will be together in one package.


struct Voice {
  Oscil<OSC_NUM_CELLS, AUDIO_RATE> osc;
  byte usedByKey = NONE;
  float freq;
};


Voice voices[MAX_POLY]; // We create an array of all voices so we can easily loop through them later.


struct Vibrato {
  Oscil <OSC_NUM_CELLS, CONTROL_RATE> osc;
  float vibDepth;
  float vibFreq;
};


Vibrato vib;


int oldPitch;


struct Key {
  int port;
  char currState = false;
  byte usesVoice = NONE;
  float freq;
};


Key keys[MAX_KEYS]; // We also create an array of all keys so we can easily loop through them later.


//This is a list of Tones with their respective frequencies.


#define g3 196.00
#define a3 220
#define ab3 233.08
#define b3 246.94
#define c4 261.63
#define cd4 277.18
#define de4 311.13
#define e4 329.63
#define f4 349.23
#define fg4 369.99
#define g4 392.00
#define ga4 415.30
#define a4 440
#define ab4 466.16
#define b4 493.88
#define c5 523.25
#define cd5 554.37
#define d5 587.33
#define de5 622.25
#define e5 659.25
#define f5 698.46
#define fg5 739.99
#define g5 783.99
#define ga5 830.61
#define a5 880.00
#define ab5 932.33
#define b5 987.77


// Whenever a key is released, all its corresponding parameters and those of its previous voice, will be set to zero.


void handleKeyUp(unsigned int k) {
  voices[keys[k].usesVoice].osc.setFreq(0.00f);
  voices[keys[k].usesVoice].usedByKey = NONE;
  voices[keys[k].usesVoice].freq = 0.00f;
  keys[k].usesVoice = NONE;
};


// Whenever a key is pressed, a new unused voice will be linked to it.


void handleKeyDown(unsigned int k) {
  for (unsigned int i = 0; i < MAX_POLY; i++) {
    if (voices[i].usedByKey == NONE) {
      voices[i].osc.setFreq(keys[k].freq);
      voices[i].freq = keys[k].freq;
      voices[i].usedByKey = k;
      keys[k].usesVoice = i;
      break;
    }
  }
}


// The moment the tuning knob reaches a new value, this series of if-statements is going to apply the correct chord to the organ. The pressed key will also be set to NONE in order to simulate as if the key was released for 1/128th of a second. By doing this, the previous chord will not continue playing when selecting a new one.


void handleTuningChange(byte newTuning) {
  for (byte i = 0; i < MAX_POLY; i++) {
    voices[i].usedByKey = NONE;
  }
  for (byte i = 0; i < MAX_KEYS; i++) {
    keys[i].currState = false;
    keys[i].usesVoice = NONE;
  }
  if (newTuning == 0) {
    setChord1();
  }
  if (newTuning == 1) {
    setChord2();
  }
  if (newTuning == 2) {
    setChord3();
  }
  if (newTuning == 3) {
    setChord4();
  }
  if (newTuning == 4) {
    setChord5();
  }
  if (newTuning == 5) {
    setChord6();
  }
  if (newTuning == 6) {
    setChord7();
  }
};


// This is a custom function which allows to read analog ports using Mozzi's special AnalogRead. It also allows for some other parameters like having a stable zero and setting the resolution.


int merinosoAnalogRead(byte port, int res = 1024, bool firmZero = false) {
  long readVal = mozziAnalogRead(port);


  if (firmZero) {
    if (readVal < 5) {
      readVal = 0;
    }
  }


  if (res != 1024) {
    readVal = (long) (readVal * res) >> 10;
  }


  return readVal;
};


// The readKeys function will check wether a button is pressed or released. It is called in the update control, so this function happens 128 times a second.


void readKeys() {
  char keyState;
  bool anyNotePlaying = false;


  int vibratoPot = merinosoAnalogRead(A0);


  for (unsigned int i = 0; i < MAX_KEYS; i++) {
    keyState = digitalRead(keys[i].port);
    if (keyState != keys[i].currState) {
      if (keyState == HIGH) {
        handleKeyDown(i);
      } else {
        handleKeyUp(i);
      };
      keys[i].currState = keyState;
    }
  };


  for (unsigned int i = 0; i < MAX_POLY; i++) {
    if (voices[i].usedByKey != NONE) {
      anyNotePlaying = true;
      break;
    }
  }
  if (anyNotePlaying) {
    vib.vibDepth = (float)(vibratoPot / 2048.0f); // In this case, the value from the vibratoPot will be devided by 2048 to give us a value between 0 and 0.5, as the resolution from the pot is 1024.
  } else {
    vib.vibDepth = 0;
  }
}


void setup() {


  for (unsigned int i = 0; i < MAX_POLY; i++) {
    voices[i].osc.setTable(WAVE_DATA);
  }


  startMozzi(CONTROL_RATE);


  vib.osc.setTable(TRIANGLE_HERMES_2048_DATA); // Here we set the waveform that we will be using.


  pinMode(2, INPUT);
  pinMode(4, INPUT);
  pinMode(5, INPUT);
  pinMode(6, INPUT);
  pinMode(7, INPUT);
  pinMode(A0, INPUT);
  pinMode(A1, INPUT);
  pinMode(A2, INPUT);


  // This is where each key gets linked to a port from the arduino.


  keys[0].port = 7;
  keys[0].freq = g4;
  keys[1].port = 6;
  keys[1].freq = ab4;
  keys[2].port = 5;
  keys[2].freq = d5;
  keys[3].port = 4;
  keys[3].freq = f5;
  keys[4].port = 2;
  keys[4].freq = a5;


  oldPitch = 7;


}


void updateControl() {


  // The updateControl is where everything related to the keys and potmeters is handled. readKeys is called to deal with key input, and the chord selection and vibrato frequency is read and converted.


  readKeys();


  int newPitch;


  int vibFreqPot = merinosoAnalogRead(A1);
  vib.vibFreq = vibFreqPot / 100.0f;
  vib.osc.setFreq(vib.vibFreq);


  float vibs = vib.vibDepth * vib.osc.next();


  for (byte i = 0; i < MAX_POLY; i++) {
    if (voices[i].usedByKey != NONE) {
      voices[i].osc.setFreq(voices[i].freq + vibs);
    }
  }


  int pitchPot = merinosoAnalogRead(A2, 7);
  newPitch = pitchPot;


  if (oldPitch != newPitch) {
    oldPitch = newPitch;
    handleTuningChange(newPitch);
  }
}


// This is a list of the seven chords that can be preset for the pitchPot. Each key can be exchanged for another from the list earlier in the code.


void setChord1() {
  keys[0].freq = ga4;
  keys[1].freq = b4;
  keys[2].freq = de5;
  keys[3].freq = fg5;
  keys[4].freq = b5;
}


void setChord2() {
  keys[0].freq = cd4;
  keys[1].freq = e4;
  keys[2].freq = ga4;
  keys[3].freq = b4;
  keys[4].freq = e5;
}


void setChord3() {
  keys[0].freq = ga4;
  keys[1].freq = ab4;
  keys[2].freq = cd5;
  keys[3].freq = e5;
  keys[4].freq = ab5;
}


void setChord4() {
  keys[0].freq = fg4;
  keys[1].freq = ab4;
  keys[2].freq = b4;
  keys[3].freq = de5;
  keys[4].freq = fg5;
}


void setChord5() {
  keys[0].freq = e4;
  keys[1].freq = ga4;
  keys[2].freq = b4;
  keys[3].freq = de5;
  keys[4].freq = ga5;
}


void setChord6() {
  keys[0].freq = cd4;
  keys[1].freq = ga4;
  keys[2].freq = ab4;
  keys[3].freq = cd5;
  keys[4].freq = e5;
}


void setChord7() {
  keys[0].freq = de4;
  keys[1].freq = ab4;
  keys[2].freq = cd5;
  keys[3].freq = de5;
  keys[4].freq = g5;
}


AudioOutput_t updateAudio() {


  // updateAudio has a few lines of code necessary for Mozzi to produce audio.


  long currentSample = 0;


  for (byte i = 0; i < MAX_POLY; i++) {
    if (voices[i].usedByKey != NONE) {
      currentSample += (long) voices[i].osc.next();
    }
  }
  return (AudioOutput_t) (currentSample) >> 3;
  // Here we shift the output a number of Bits, because otherwise the audio will be very distorted.
  //The amount of Bits that need to be shifted depends on the amount of voices you use.
}


void loop() {
  audioHook(); // required here
}
To give you a quick overview. In the beginning of the code you declare structs for the keys and voices (things that actually produce sound). The amount of voices you have decides how many tones you can play at the same time. The structs are very useful because they are small object which can have many parameters. By making an array of all keys and all voices, we will be able to easily loop through them when linking a voice to a key. Mozzi has a few special functions. In the updateControl function we put a function called readKeys which will loop through all keys to see if they are pressed or not. If a button is pressed for the first time, an unused voice will be assigned to it. The moment a key is released, both the key and the voice that was attached to it will be cleared of any values. In the updateControl, we also put code for the potentiometers.
In beginning of the code there is a long list of defined tones with their corresponding frequencies. Instead of variables we use defines which reduces the computing power needed while the Arduino is running. Halfway through the code, there is a section of functions which contain the preset chords. To implement your own chords, you just have to switch the current tones with ones from the long list. You can always add new tones if the ones you need aren't there.
The Casing

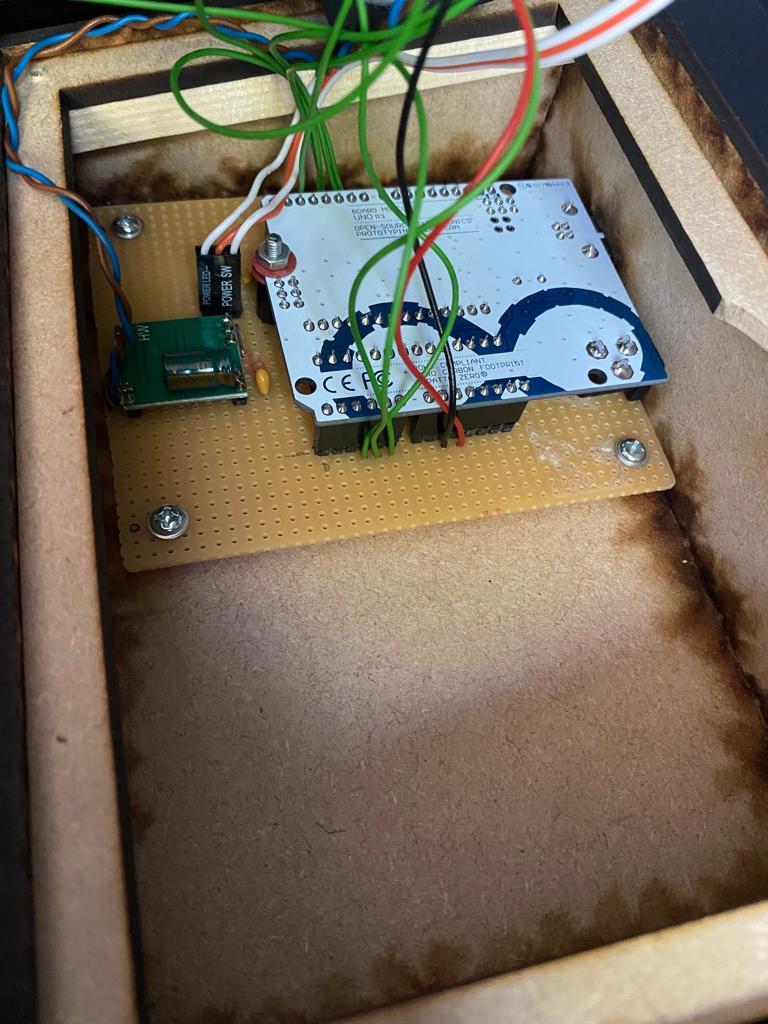.jpeg)
The casing for the organ is pretty simple without any moving parts. Because the capacitive sensors go through a lot of materials, I glued them to the bottom of 3mm Acrylic plating. This looks and feels very nice because it will almost feel like touch-screen. The rest of the box is lasercut from 4mm thick MDF. I added a slight slant to the box to make it look more interesting. The arduino is screwed to the floor of the box while a perfectly measured hole in the side creates a nice looking opening to supply power to the USB port of the Arduino. The speaker is also glued to the roof of the box in which I cut a circular roster to allow sound to pass through. The potentiometers are attached through small 7mm holes. The final product also has 4 anti-slip pads on the bottom to prevent the organ from sliding.
Reflection
In my opinion this was a very successful first project. I think it looks very clean and functions just as it is supposed to. The main improvement lies within the code in my opinion. Currently, the code is quite messy and disorganized. Also, the systems for swapping chords and the long list of tones need to be reworked to look and function easier and better. But overall, I am quite proud of this Mini-Organ!