Mini Catan: a Compact and Portable Magnetic Board Game
by jkenow1 in Workshop > 3D Printing
1215 Views, 12 Favorites, 0 Comments
Mini Catan: a Compact and Portable Magnetic Board Game


I embarked on this project to create a portable version of the Catan board game, designed for play on the go. My goal was to have a game board with drawers to hold pieces that I could bring to restaurants or parks without the risk of bumping the table and disrupting the game. When I discovered the "Big and Small" contest, I had just started this project and thought it would be a great opportunity to create my first instructable project.
Planning and Design
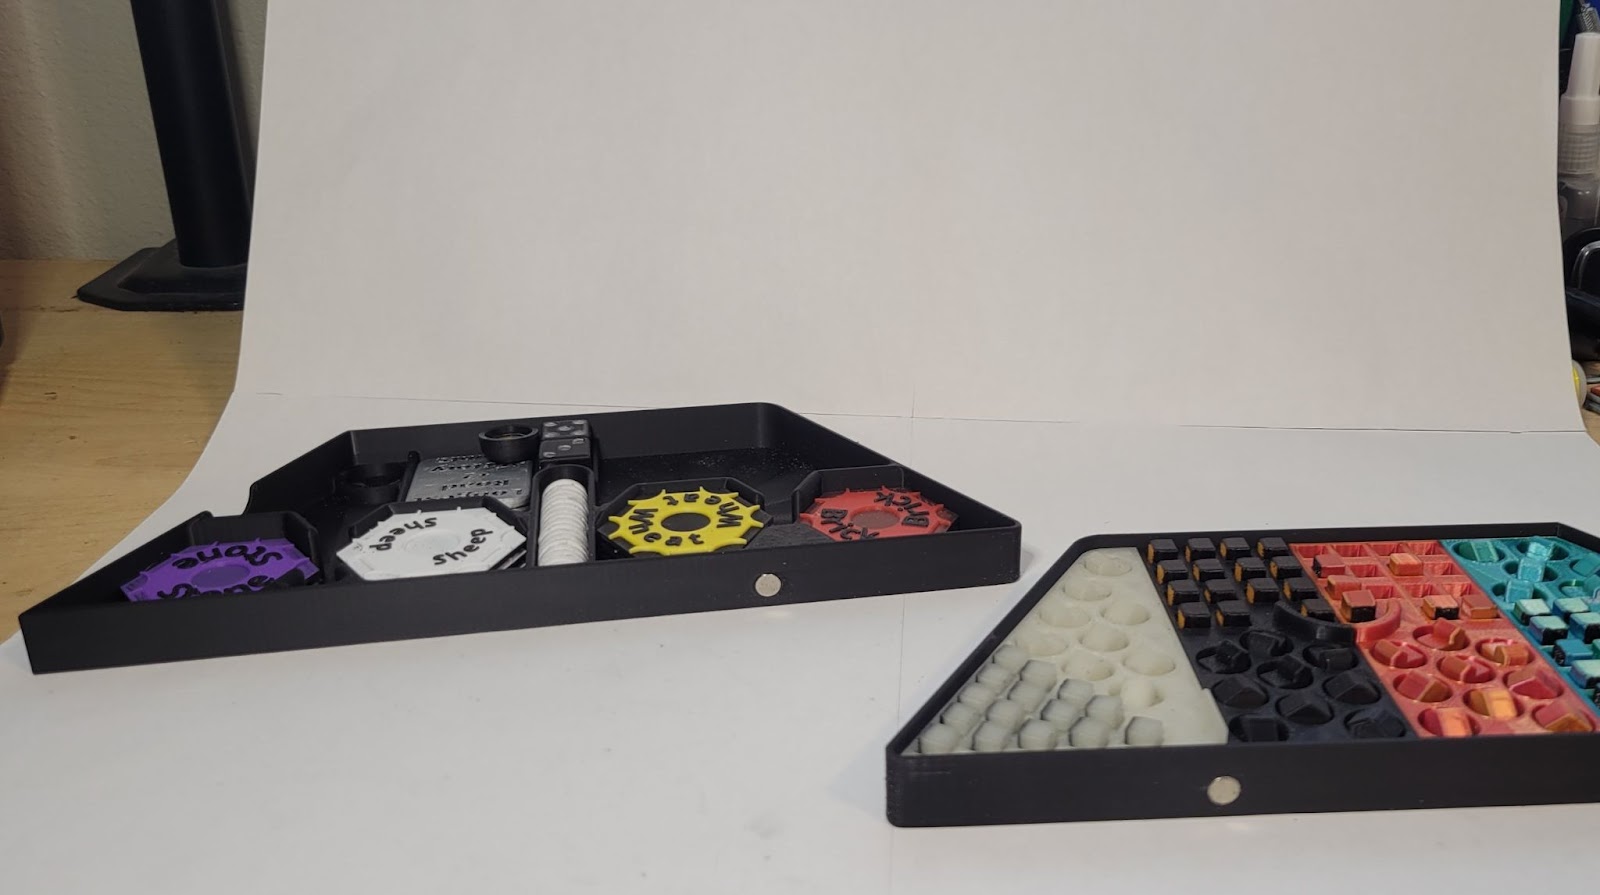
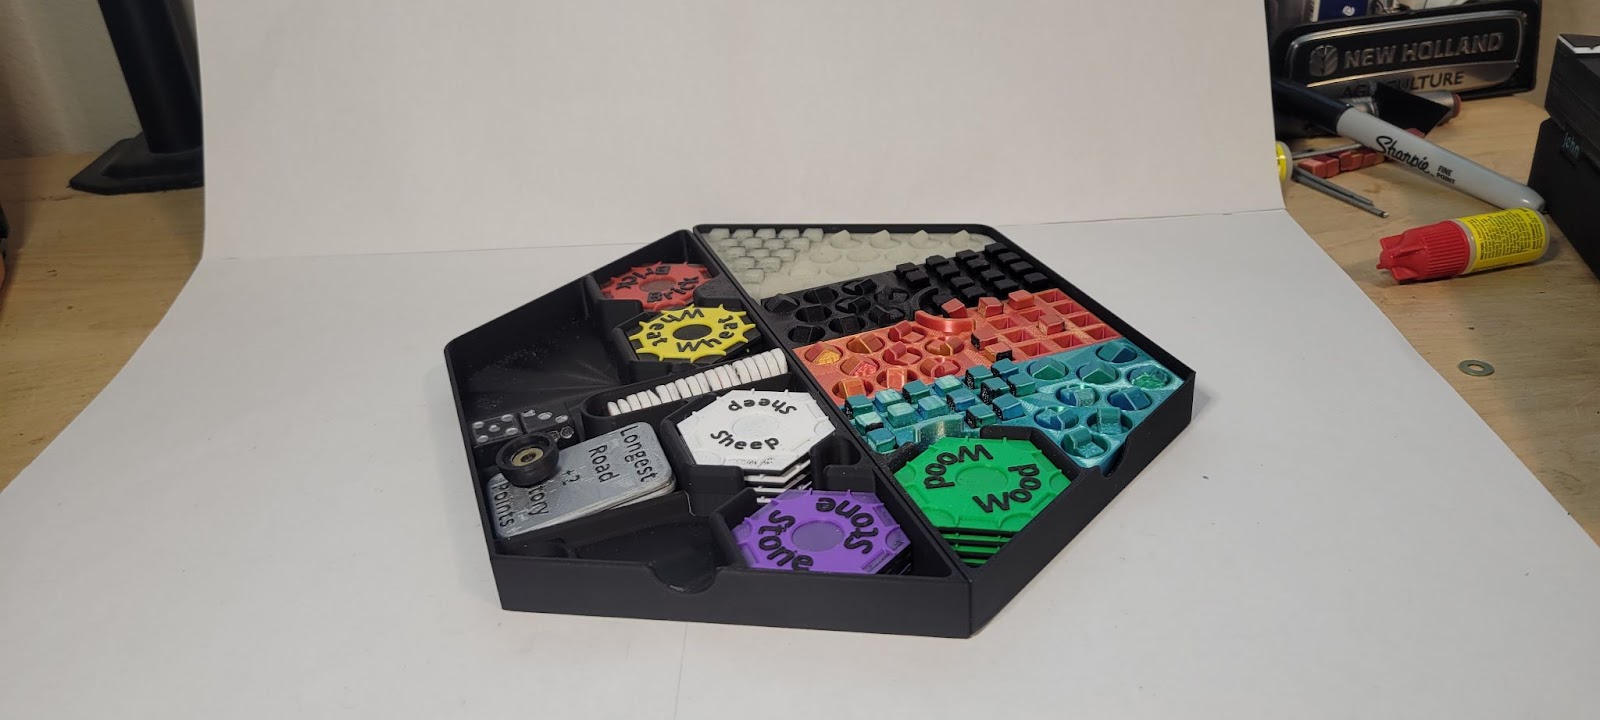
Initially, I designed the resource tiles at 30mm width but found this scale to be too small for some components, especially the roads. I then resized the tiles to 40mm, which improved usability. To ensure the pieces stayed in place during play, I integrated magnets into the design and added thin sheet metal pieces to the resource tiles for better magnetic adhesion. The final design includes a foldable board with drawers underneath for storing all game pieces, ensuring the set is compact and portable. This careful planning and iterative redesign process ensured the mini Catan board was both functional and convenient for on-the-go play. If there is interest I may make an instructable that details my design process, and how I made material selections and what made this project successful as well as what parts gave me difficulties.
Supplies
- 3D printer
- (I used a Bambu Labs P1S)
- Filament
- I used 10 different colors of PLA in this project but you can print with less if desired and paint or draw colors accordingly.
- 1 wire hanger: Material Diameter 1.85mm or less.
- cut into 4 pieces 45mm. (Used as the shafts of the hinge)
- 12in x 12in sheet of 24 ga galvanized steel or other ferromagnetic sheet metal.
- will be cut into hexagons, I used metal banding I saved from a shipment I received 19mm wide, .65mm≈thick
- Sheet metal shears.
- Sandpaper or a file
- Magnets
- 60 (5mm spherical magnets or “buckyballs”)
- Disk magnets.
- 38 (.25in Diameter x 0.0625 in Height)
- 12 (.25in Diameter x 1/8in Height).
- Glue stick
- Double-sided Tape: Thickness=.15mm
- 37 (9mm Outer Diameter Washers)
- Superglue
- Cards from the Catan game.
OPTIONAL
- 3D printing pen.
All Printing files can be Found HERE : (https://makerworld.com/en/models/476060)
Cutting Metal Rods for Hinges


Materials Needed: Wire metal coat hanger (Diameter: ≈1.75mm).
Steps:
- Measure (4) 45mm sections of the hanger.
- Cut them with pliers cutting edge.
- Make sure they are as straight as possible.
3D Printing Overview

In total, there are 128 printed pieces for this project. To simplify the printing process, I’ve grouped multiple parts into STL files.
Printing instructions for each 3MF can be found below. These instructions list all the information necessary to print that specific file. But first, here are some general print settings I used. If a specific part requires different settings it will be listed in its respective printing instructions. I used Bambu Slicer, but most popular slicers have options to add pauses.
Print Settings (unless otherwise specified)
- Nozzle size .4mm
- Initial layer height: .2mm
- Layer height: .12mm
- Infill: 15% (unless otherwise specified)
- No Supports (unless otherwise specified)
- Brim: 5mm outer brim (unless otherwise specified)
- Vertical walls (side walls): 2
- Horizontal walls (top & bottom):4
Cutting Metal Hexagon for Resource Tiles


The metal hexagons are placed into the resource tiles mid-print so the magnets will stick to them.
Materials Needed: 24 ga galvanized sheet metal or metal banding, marker, Printed test fit parts, Sheet metal shears, Sandpaper/file, and Pliers.
Steps:
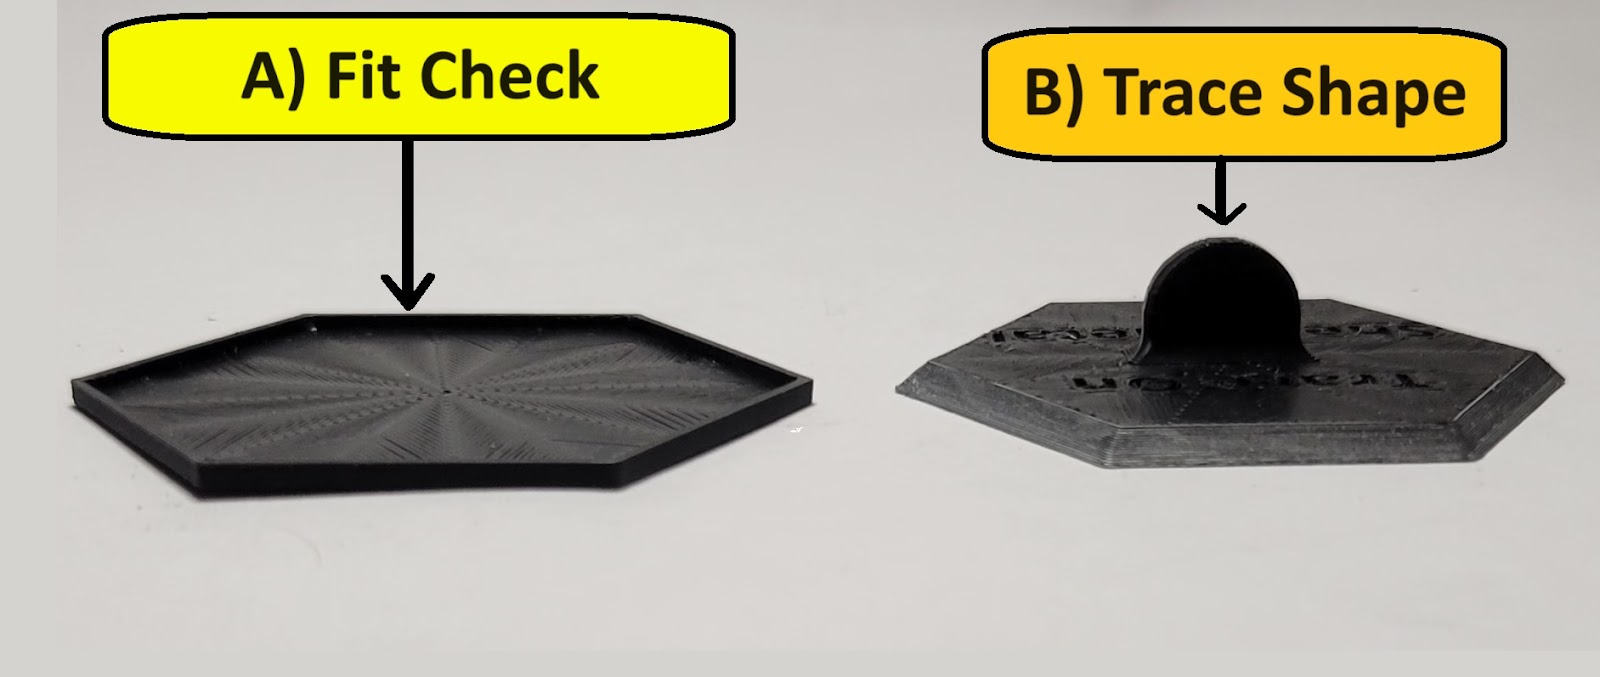
- Print the Fit_Test. This 3MF file contains 2 parts.(See photo)
- Part A) Is used to check the fit of the cut Hexagons
- Part B) Is used to trace the hexagon shape onto the sheet metal.
- Mark out 19 hexagons on the sheet metal plate using Part (B)
- Cut the sheet metal into hexagons with sheers or the cutting tool of your choice.
- Sand or file all edges of the sheet metal hexagons to remove all burrs and sharp edges.
- Flatten any bent edges of the sheet metal hexagons with pliers.
- Verify the fit of each cut hexagon with the printed part (A)
- The sheet metal piece must sit at or below the top layer of part (A) as shown in the photos.
Downloads
Printing Procedure: Player Pieces.


Follow the procedure for each of the player piece 1-4 files.
Materials required for each of these prints
- (15) 5mm spherical magnets
- (9) .25in Diameter x 0.0625 in HeightDisk magnets.
- (9) 9mm OD washers
- Filament
Additional Note: I suggest making the first 2 layers a different color than the rest to make it easy to identify what side of the road goes down.
- Choose the color of the pieces.
- Load one of the “Player Pieces” files into the slicer software.
- Select settings for the print.
- Brim: 5mm. (Brim helps ensure the pieces stay stuck to the bed during pause.)
- Infill: 100%
- Slice.
- Add Pauses to print.
- Use the layer selection tool/preview slider to scroll through the layers of the print and find the layer before each cavity is covered. Add a pause for each of these points.
- You should have 3 separate pauses set up in the print: 2 for adding magnets and 1 for adding washers.
- (Optional) If opting for the two-color suggestion, add a pause after the second layer to swap from a neutral color filament to the desired color of the pieces.
- Slice again with Pauses.
- Print.
- Pause 1 (Optional): If using two materials, the first pause will be to swap your filament to the piece color and resume.
- Pause 2 Settlement & City magnets: Add 9 magnets to the settlements and cities. Resume once completed.
- Ensure that the magnets are inserted at or below the height of the last layer printed before resuming
- Pause 3 Piece holder washers: superglue 9 washers in place. Resume after they are placed properly
- Glue ensures that the print head wont push the washers out of place.
- Pause 4 Road magnets: Add spherical magnets to the roads resume once they are all placed.
Printing Procedure: Number Tiles

.gif)
There are 2 number tile files Black Number Tiles & Red Number Tiles. Both Number Tiles share the same print settings and pauses the only difference is the color of the filiment used in the swap.
Materials Required:
- (18) magnets (.25in Diameter x 0.0625 in Height)
Print settings for number tiles:
- Support enabled.
Number Tiles Printing procedure:
- Load white filament into the printer.
- Load one of the Number Tiles files into the slicer.
- Slice
- Use a layer selection tool to find the second layer the numbers are being printed on and add a pause.
- Slice again if needed.
- Print.
- Once print pauses swap filament for either red or black depending on the file currently being printed.
- Purge out filament until the color changes.
- Resume print.
- After successful printing, remove supports from the hole and superglue magnets into place.
- Be sure to place all magnets in the same direction.
- Print the other Number Tile file following steps 1-5
Printing Procedure: Drawers


Materials required (post-printing)
- Super Glue
- 2 25in Diameter x 1/8in Height
- Load 3MF into slicer software
- Add Supports
- Slice
- Superglue magnets in place.
- Make sure that the magnets are glued in the correct direction.
- make sure they are pushed flush with the part.
(Photo showing magnets location)
(The two drawers should stick together if magnets are inserted correctly)
Printing Procedure: Base
This print does require supports and painting them will be your best option as you dont want supports in the holes for the magnets
Materials required:
- (10) (.25in Diameter x 1/8in Height).
- 4 added mid print and 6 added post print.
- Load Board.3MF into slicer software
- Slice.
- Add pause for magnets.
(Photo shows Pause points for magnets.)
- Slice.
- Print.
- At the first pause Add 4 12 (.25in Diameter x 1/8in Height) 2 Per side of board.
- Verify the magnets sit below last printed layer.
- Resume Print.
- Post Printing:
- Glue in magnets to the cavities on the external sides of the print.
- ensure that they are seated fully into the holes.
- check the directions of the magnets to ensure the two sides stick together.
Printing Procedure: Resource Tiles


All resouce tiles follow the same print settings EXCEPT for Misc. Misc must be printed with 100% infill to make the dice balanced. Once the Misc is finished printing you can glue a 9mm washer into the robber as shown
Resource tile files to print:
- Misc.
- Sheep_QTY4
- Stone_QTY3
- Wood_QTY4
- Wheat_QT4
- Brick_QTY3
The file for Misc. is too large to attach but can be found following the link in the supplies section.
Procedure:
- Start all resources in black or other neutral color, this is to make it possible to shuffle the tiles when laying them out to play.
- When slicing the resource tiles, set the first stop at the top of the hole for the sheet metal hexagon.
- Have your hexagons ready with double sided tape on one side trimmed tight to the edges.
- Before using the glue stick on the top surface of the metal that is in place, feel all edges to ensure no edges are raised above the last printed layer.
- Apply glue stick to the sheet metal surfaces (multiple layers suggested)
- Swap filament to the desired color for the resource tile.
- Once the metal has warmed from the headed bed resume the print
- Add another pause after the first layer of the letters are printed.
- At this pause in the print swap the colors to black or whatever color you want the letters to be. If you do not want different color letters you can skip this pause.
Assembly of Board


Assembly of Hinges.
- Use the 45mm shaft cut hanger pieces and put them through the hole and hinge.
- Use another shaft to push it in fully.
- Heat up filiment and use it to plug the hole the shaft is in.
- A 3D printing pen is a great way to accomplish this cleanly.
4. Repeat this for the 3 other shafts.
Final Thoughts and Reflections:
This project has been a great modeling exercise for me. Through this prototyping process I was able to explore new methods of integrating different materials into my prints. I gained a better understanding for the tolerances I can reach with my new 3D printer. All while creating something that I can enjoy with family and friends.
Although this project is ready to be used and functional. This being the first complete version there are things I’d improve on for the next version.
Future improvements:
- Redesign the roads with smaller magnets.
- I recently got smaller magnets that I plan on using for the roads so I can use a square shape.
- The spherical magnets currently used are very strong, they hold in place on the board well but are stronger than is necessary.
- Move the hinges to the top surface of the board.
- This will make moving the board when open more stable.
- Redesign of the drawers to fit cards.
- Refining details and aesthetics of the board.
Dispite the fact that there are several improvements I’d like to make, the current iteration I’m sharing with you is still more than functional, completes the objectives I had set for myself and is something I’m proud to share with you. I believe when doing a project like this it's important to always be looking for improvements and feedback from others.
This instructable has been focused on the procedure of printing and your own board. But that is only a small part of creating a project like this. I’ve documented a lot of the design processes and iterations, design choices I’ve made along the way. If there is interest, I may create an instructable that details the design process and issues I encountered and how I overcame them.
I sincerely hope that you enjoy the content. Any thoughts, comments, or feedback you have would be greatly appreciated!