Micro-Bit Star Collecter Game for Beginners
by SparkBark in Circuits > Electronics
1020 Views, 1 Favorites, 0 Comments
Micro-Bit Star Collecter Game for Beginners
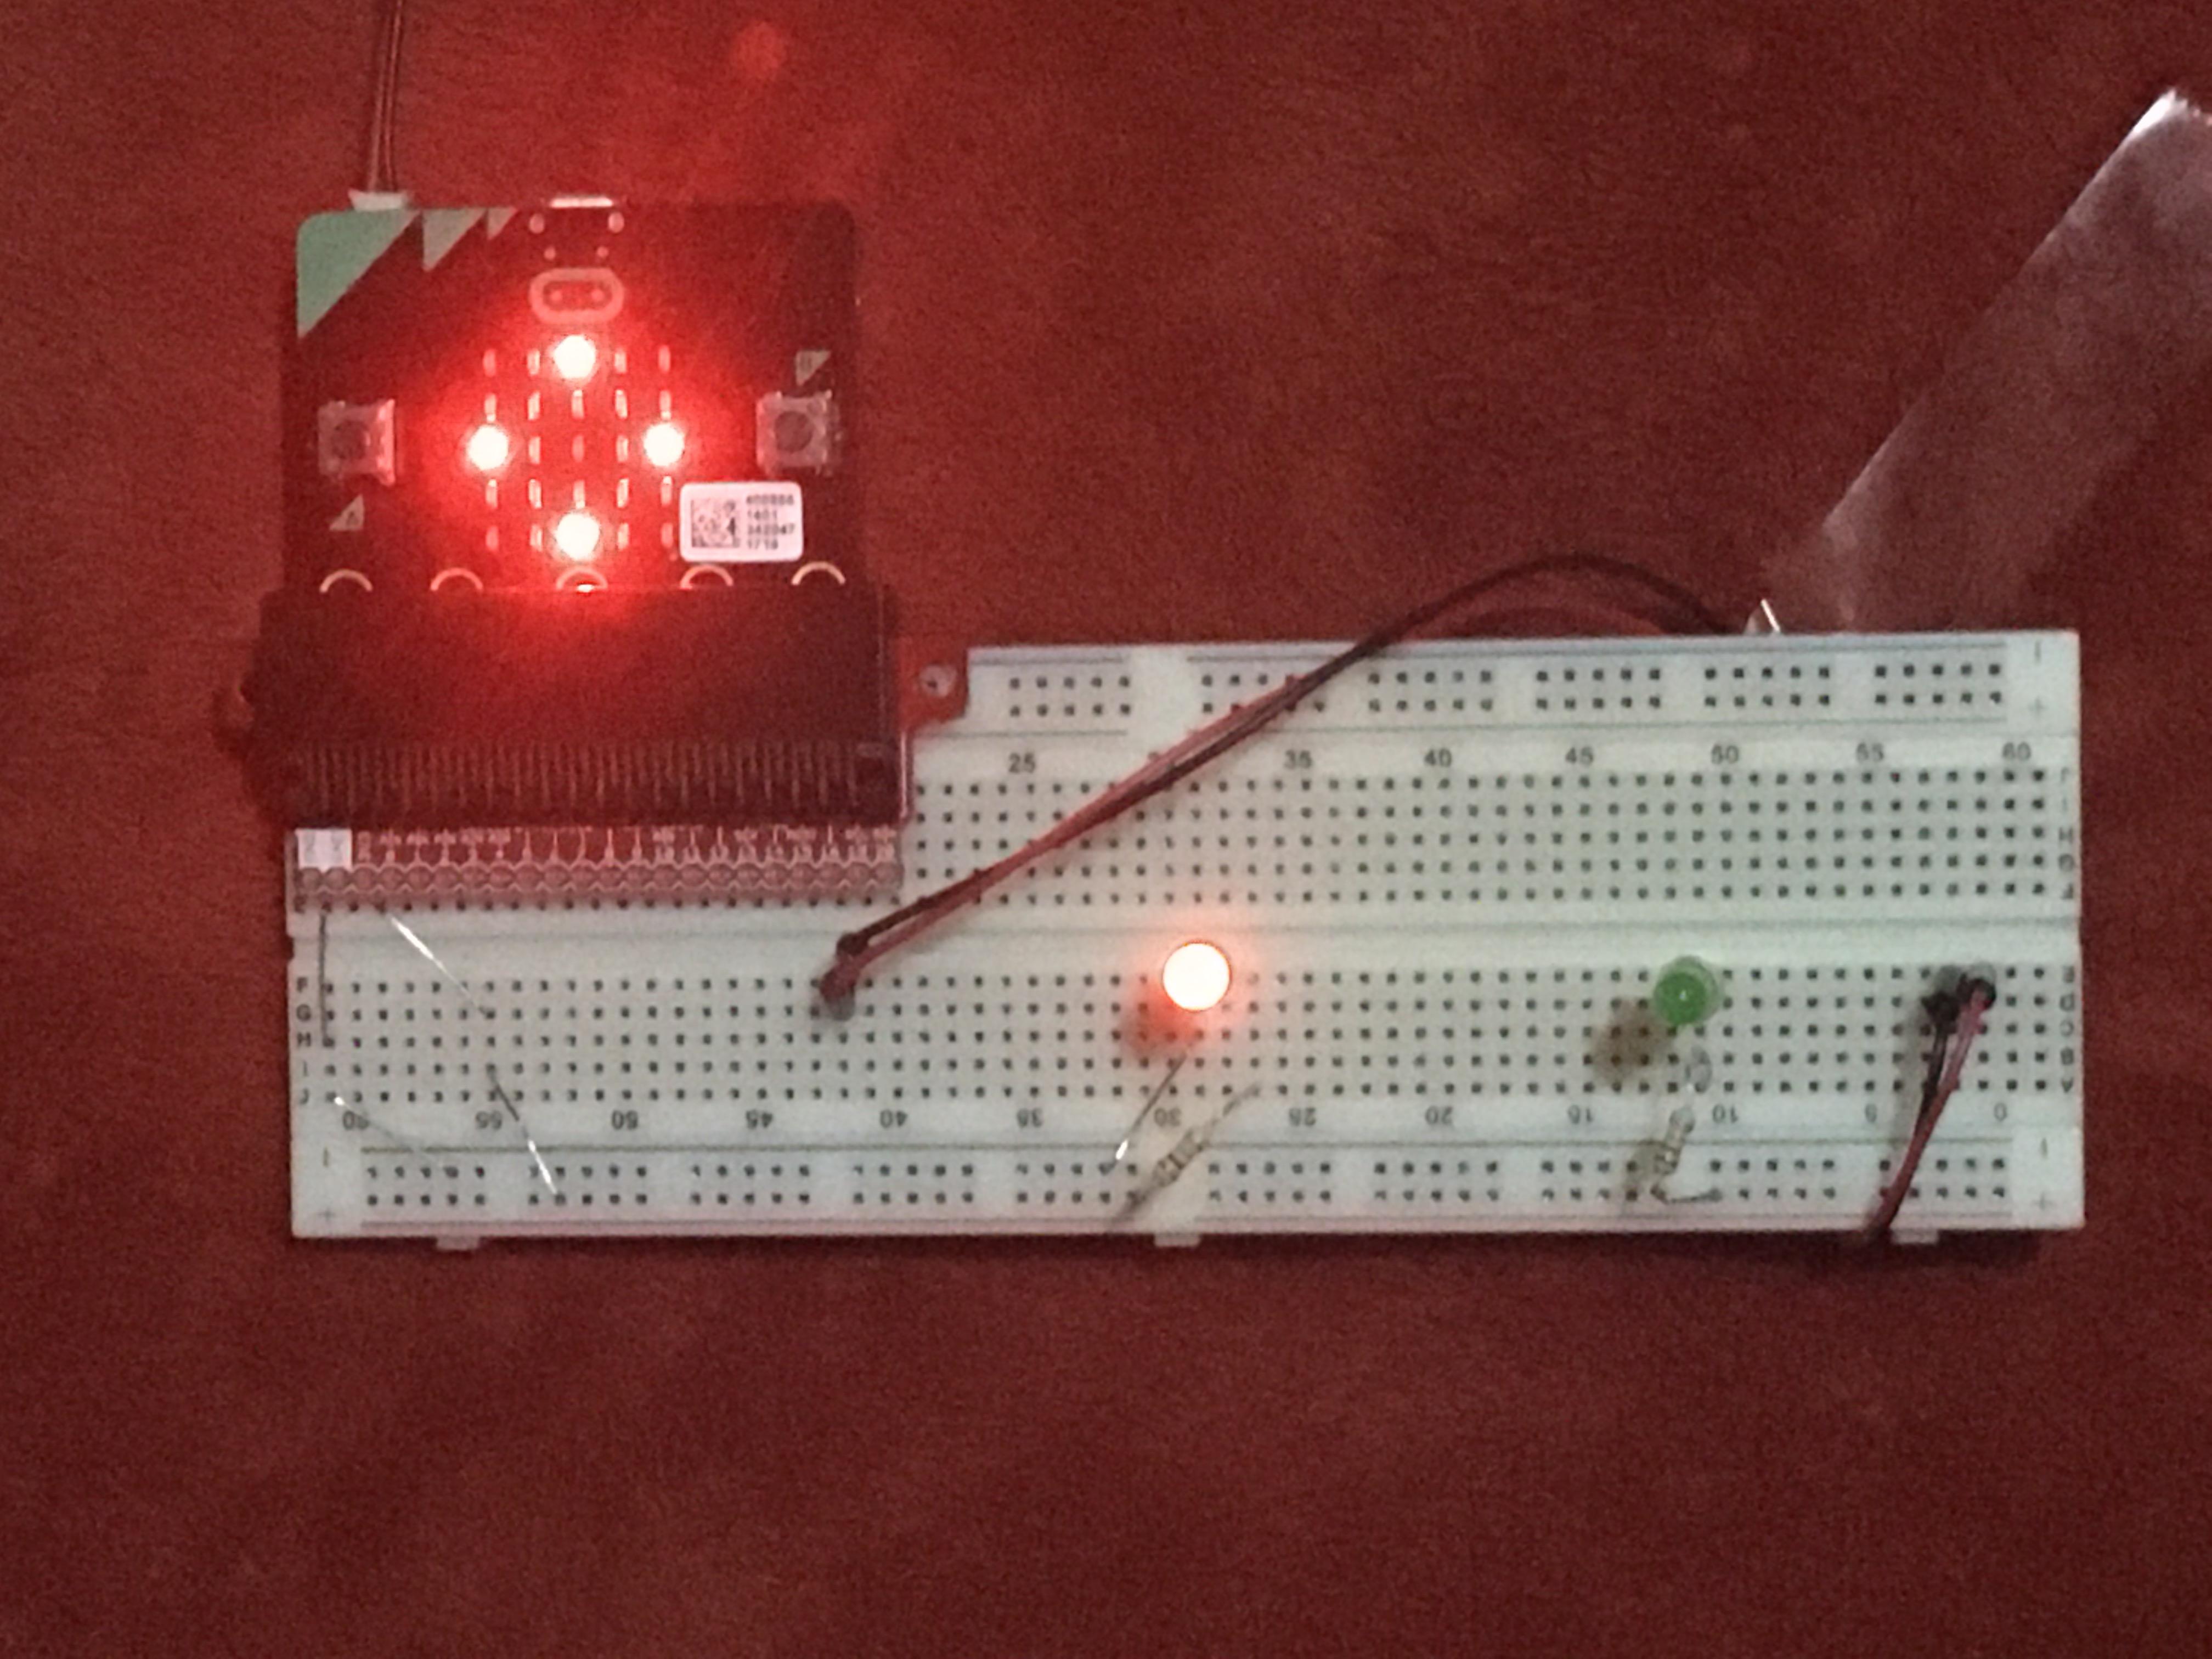
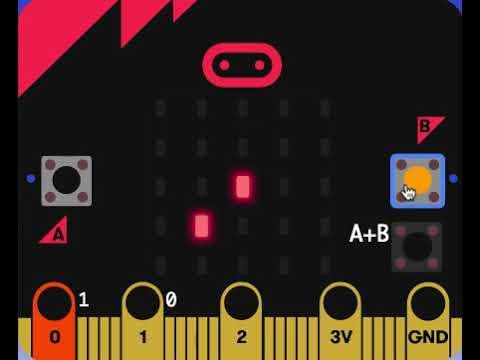
Think back, when was the last time you saw a program, or interacted with one before? You are actually using code right now, and changing it to as you scroll down to read this Instructable, or just moving your mouse. You also use programs in everyday things, like traffic lights, cars, or things as simple as a light switch.
Today I will be showing you how to make a coding program, a cool game I call Star Collector. In this game you are a little dot, trying to collect stars so that you can.... blow up the world!
Dictionary
variable-------A changing number
sprite----------An object on the screen
Breadboard--A circuit that holds electronics
LED------------A type of small light that has two metal sticks on it; the longer one is plus, the shorter one is minus
Script----------A length of code
Supplies
(Please note that you do not necessarily need any of the following to make this project, as you can make a simulation with just a computer and internet connection, but to make it real you will need all these)
--You will need a Micro-Bit, which you will be coding. It is a bit like a small computer.
--A breadboard, so that you can put all of the lights and things together.
--Breadboard jumper wires, I have found you can also use paper clips, also to put the lights and things together.
--A Micro-Bit breakout, to put the lights and things together!
--LED Lights, to put on the breadboard.
--Computer with internet connection.
--Battery and USB cable for the Micro-Bit.
Click on the File for a video of the finished product. \/
Part 1 the Code. Starting Your Adventure!
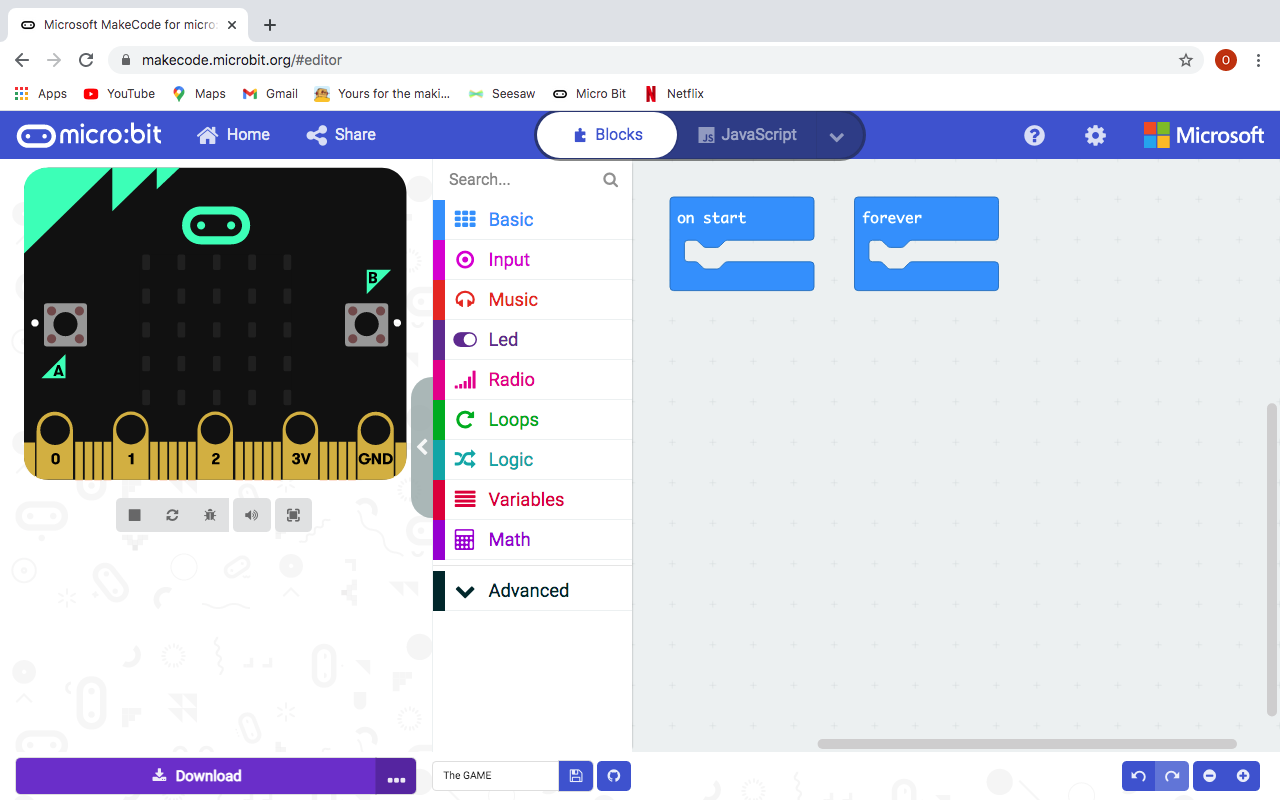
First things first, you will need to code your Micro-Bit so it can blow up the world.
Type https://makecode.microbit.org into your browser, or click the link. (Note: Makecode ONLY works on some browsers (the thing your using right now) I know it works on Chrome, but not Safari).
Click new project and make a name for it like Star Collector.
Ok, now you are ready to start coding! The type of coding that I will be teaching today is called Block Coding, and is the most basic type of coding. You will see to your left a micro bit, this is your simulation, and it will copy the code on the right.
In the middle of the screen is where you can find the coding Blocks. Try clicking on the Blue basic section and find the Show Icon block.
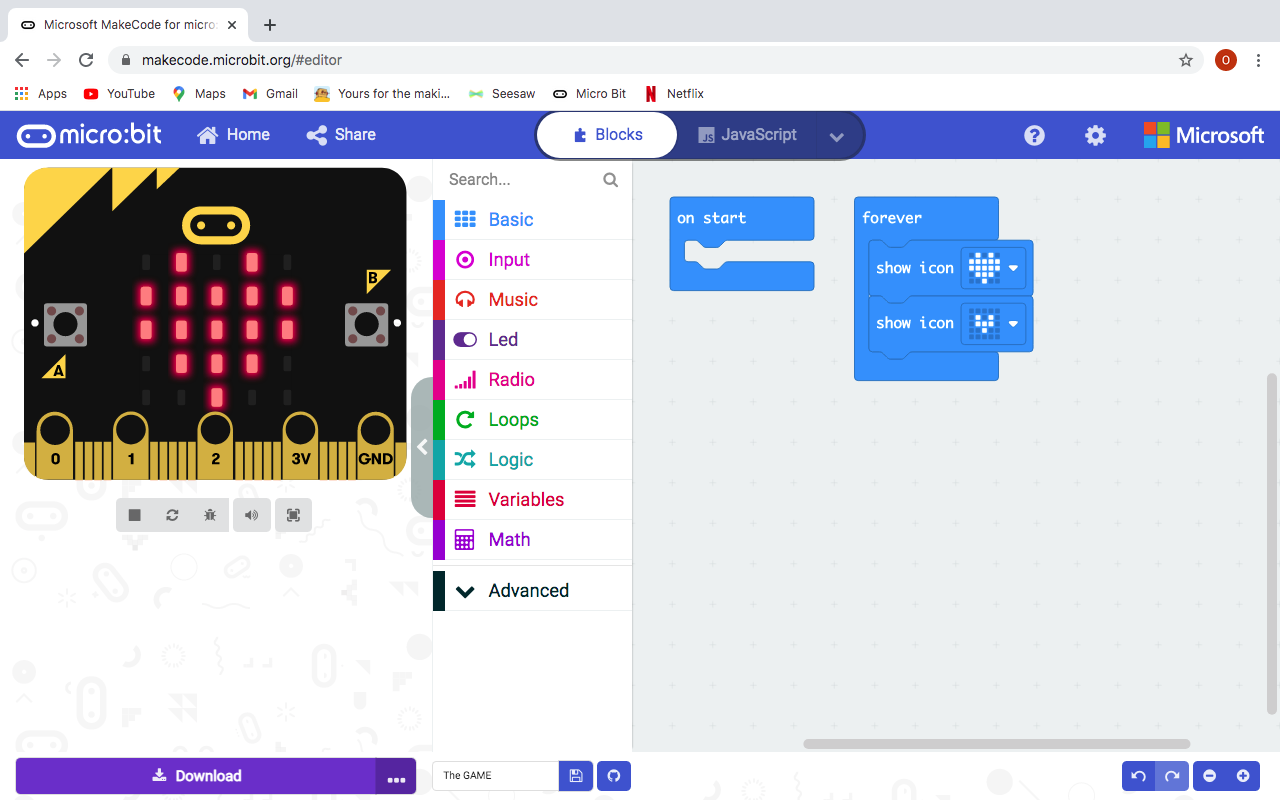
Now put this right under the Blue On start block to the right. If you look to your left on the micro bit it will show a little heart (it plays automatically when you update the code section) you can change what it says by clicking the show icon block and then clicking on the desired icon(picture). Now let's make an animation.
Place your Icon block and put it on the forever block, this block runs when the program starts, but also repeats the code forever. Now take another icon block and put it just below the first one, so that it attaches together. now change the first one to a heart, and the second one to a small heart, and watch the animation, a beating heart!
You are ready to make your game, so lets go!
A Gallon of Variables
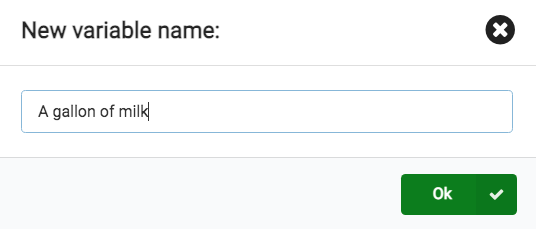
First, take your previous forever code, and drag it into the middle section, and it will be thrown away, but don't worry, you do not need it anymore. Next go and click on the red "Variables" section, and make a new variable.
Variables are changing numbers, like if you have a gallon of milk, but then you empty it a quarter, you would then have 3/4ths a gallon of milk left.
Make Seven variables, and call them, Died, Player, Fake player, Score, Start, The Coin, and The Coin2.
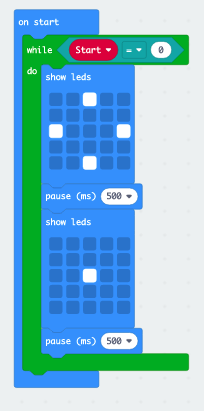
Now go into Loops, and take the, While True Do and put it in the On start block. The While True Do block repeats the inside blocks while whatever you want is true.
Now go into Math and take out a 0 = 0 block and put it in the True put of your While true do block, then take your variable start and put it on the first end of your 0 = 0 block.
Now for the fun part! take a Show LEDs block out of Basic, and put two inside of the "while true" block, with a pause for (500ms)(1,000 milliseconds = 1 second) block as shown in the middle. Make a pattern with the two Show LEDs block, like as shown.
Functions
For this step you will need to add a function.
A function is basically a homemade code block that can be called on when needed.
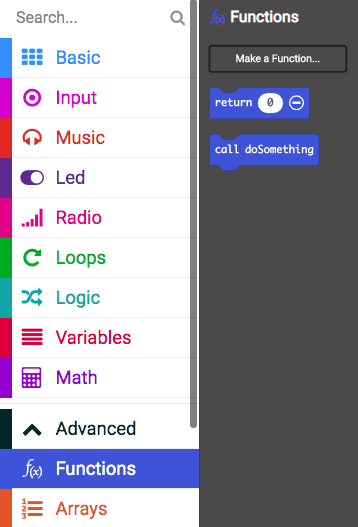
To make your Function go down Advanced, and click on Function. Add a function called New Game.
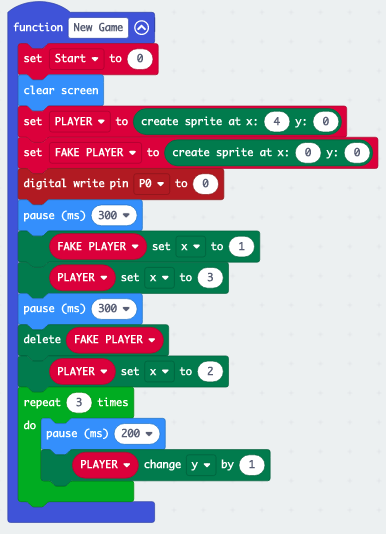
In the Describe New Game block, take the code as in the picture, (use the color code as a guide, like how basic is blue, or Variable is red.
Set start to 0
Clear screen
Set Player To Create sprite at 4-0 (find the set player at the veriable, and createSprite at 0-0 at game under Advanced(this will make a thing(sprite) become a veriable))
Set FAKE PLAYER to create sprite at 0-0 (same thing exept with Fake player)
Digital wright pin {P0} to 0 (under Pins we will get to this later) pause (300)
(Fake player) set x to 1 (x is horizontal position 0 1 2 3 4 and 5) moves the sprite
(Player) set x to 3 (moves player closer to the middle while Fake player moves away)
pause (300)
Delete fake player (Fake player is no longer needed)
Player set x to 2 (moves to center of the screen)
REPEAT 3 times (under loops).pause(300).Player change y by -1 (moves player down to starting position)
DONE!
The last thing you have to do with this section is go to functions and grab a call block and put it under the On start section. To test it out just temporarily remove the while true do block and play it!
Movement
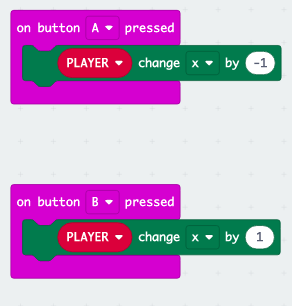
Go to the pink input section, and pull out two on button A pressed blocks.
These are starter blocks, and when they are triggered, they will run the script that is under them.
Change the second starter block to on button B pressed by clicking the A.
Get two Sprite change x by 0 and put them in both starter blocks, making sure to change the "sprite" variable to your "player" variable.
Now if you start the program you should be able to move if you temporarily remove the while true do block and try it out.
The Coins That Blew Up the Universe
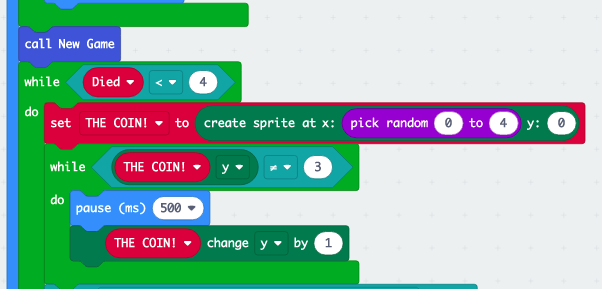
Let's make the coin script now.
As we can see from this picture, the top of the picture shows the Function that we have just made.
So, we can now continue.
First, let's take a While true do block, and put it under our function. next go into the math section and take out a
0 < 0 block and put it in the While true do, with a Died variable on the left side, and the number four on the right.
This will repeat the script inside of the While true do block until the variable Died is 4 or above, then it will end the game.
Put these blocks in the While true do block,
Set the coin to (create sprite at x {pick random 1-4}) y0. this will create a sprite at arandom position on the top While the (coin {y}) doesn't equal three,.pause (500).(The Coin) change y by {1} this will make it go down.Repeat!Good, now this will make the coin fall, but what happens when it is done falling? This is the code for that.
Duplicating and If, Else... Duplicating... Duplicating... Duplicating...
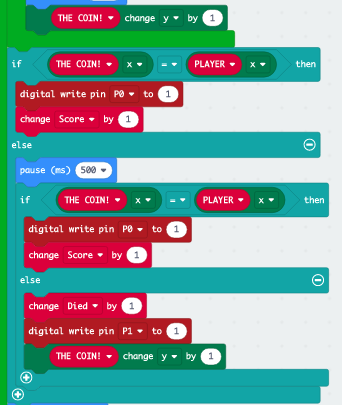
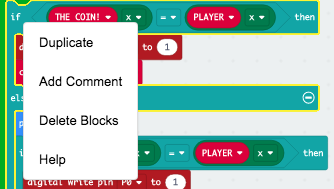
(Please click on the pictures)
You may see this picture and think, "this is the same!" It's true, this is a bug that I found, A problem with the code that makes it when you touch the coin after it reaches y3, it doesn't count. So let's fix this!
First step, when it's done falling, check and see if it is touching player.
Take an if true, else block, which checks if the first bit is true, and if it isn't, then it does the other. example;
if pie = 3.14, then say, "It's True!!!", otherwise say, "No Way, it's too delicious!"
If ({the coin} x) = ({Player} x) then.digital wright pin 0 to 1 (Turns on the 0 pin)(more on that later).Change (score) by 1 (YAY!)ELSEpause(500)this allows the player to get to the coin still.<br>Ok, now to duplicate your code! this will make it easier for you to make it.
Right click on your If true, else block, and you will see a duplicate option appear. click it, then just put the code into the else part of your script.
ELSE.Change Died by 1 (you can see that when you die 4 times it does not repeat the coin code<br> again).digital wright pin 1 to 1 (turns on the other pin).The coin change Y by 1 (goes down because you didn't catch it)
If you still have not gotten to the coin, then you lose a life...
Now, at the very end of your code, just barely inside of your on start block, put a,
Delete (Player)
found in the game section.
Duplicating EVEN MORE!
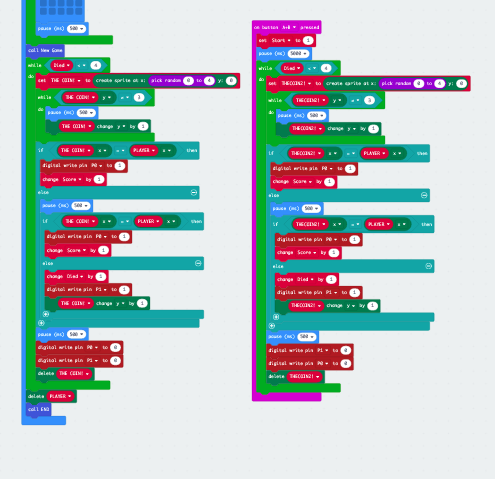
To make the second coin, you will have to take another starter On button A pressed block, and change it to On button A+B pressed instead. Under it take a set variable block and set it to, Start, and put it on 1 (This will start the game, ending the While true do loop. Now just add a pause for 5000ms (5seconds) under that. next, just duplicate the whole coin code, from While died < then 4 block.
From here, change all of the "The Coin" in this code to "The Coin2".
That's It! your done with coin two! now it would have been alot harder NOT duplicating all that code...
Finishing Your Game

Wow, your almost done! Whats left is to code the ending.
Make a Function called "End".
In this function block, write code that makes a cool pattern, as in the picture,
then put
Show string:(end or whatever you want)
Show Number (Score)
Now go your On start script, and at the very end, put your "End" call block function in.
That's it,
YOUR DONE!
Next, scroll down to make the light if you want.
Part 2 From Code to the Real Thing
The breadboard.
It is in the simplest of terms, A breadboard is a way of transporting and keeping electronic parts. basically, we will be using it to make a red light, or green light, appear.
How a breadboard works is, as what I like think, tiny metal lines that connect to other parts, with in the middle of the breadboard, it going vertically, and on the two outer sides, those minus and plus sides, going horizontally.
Adding the Micro-Bit
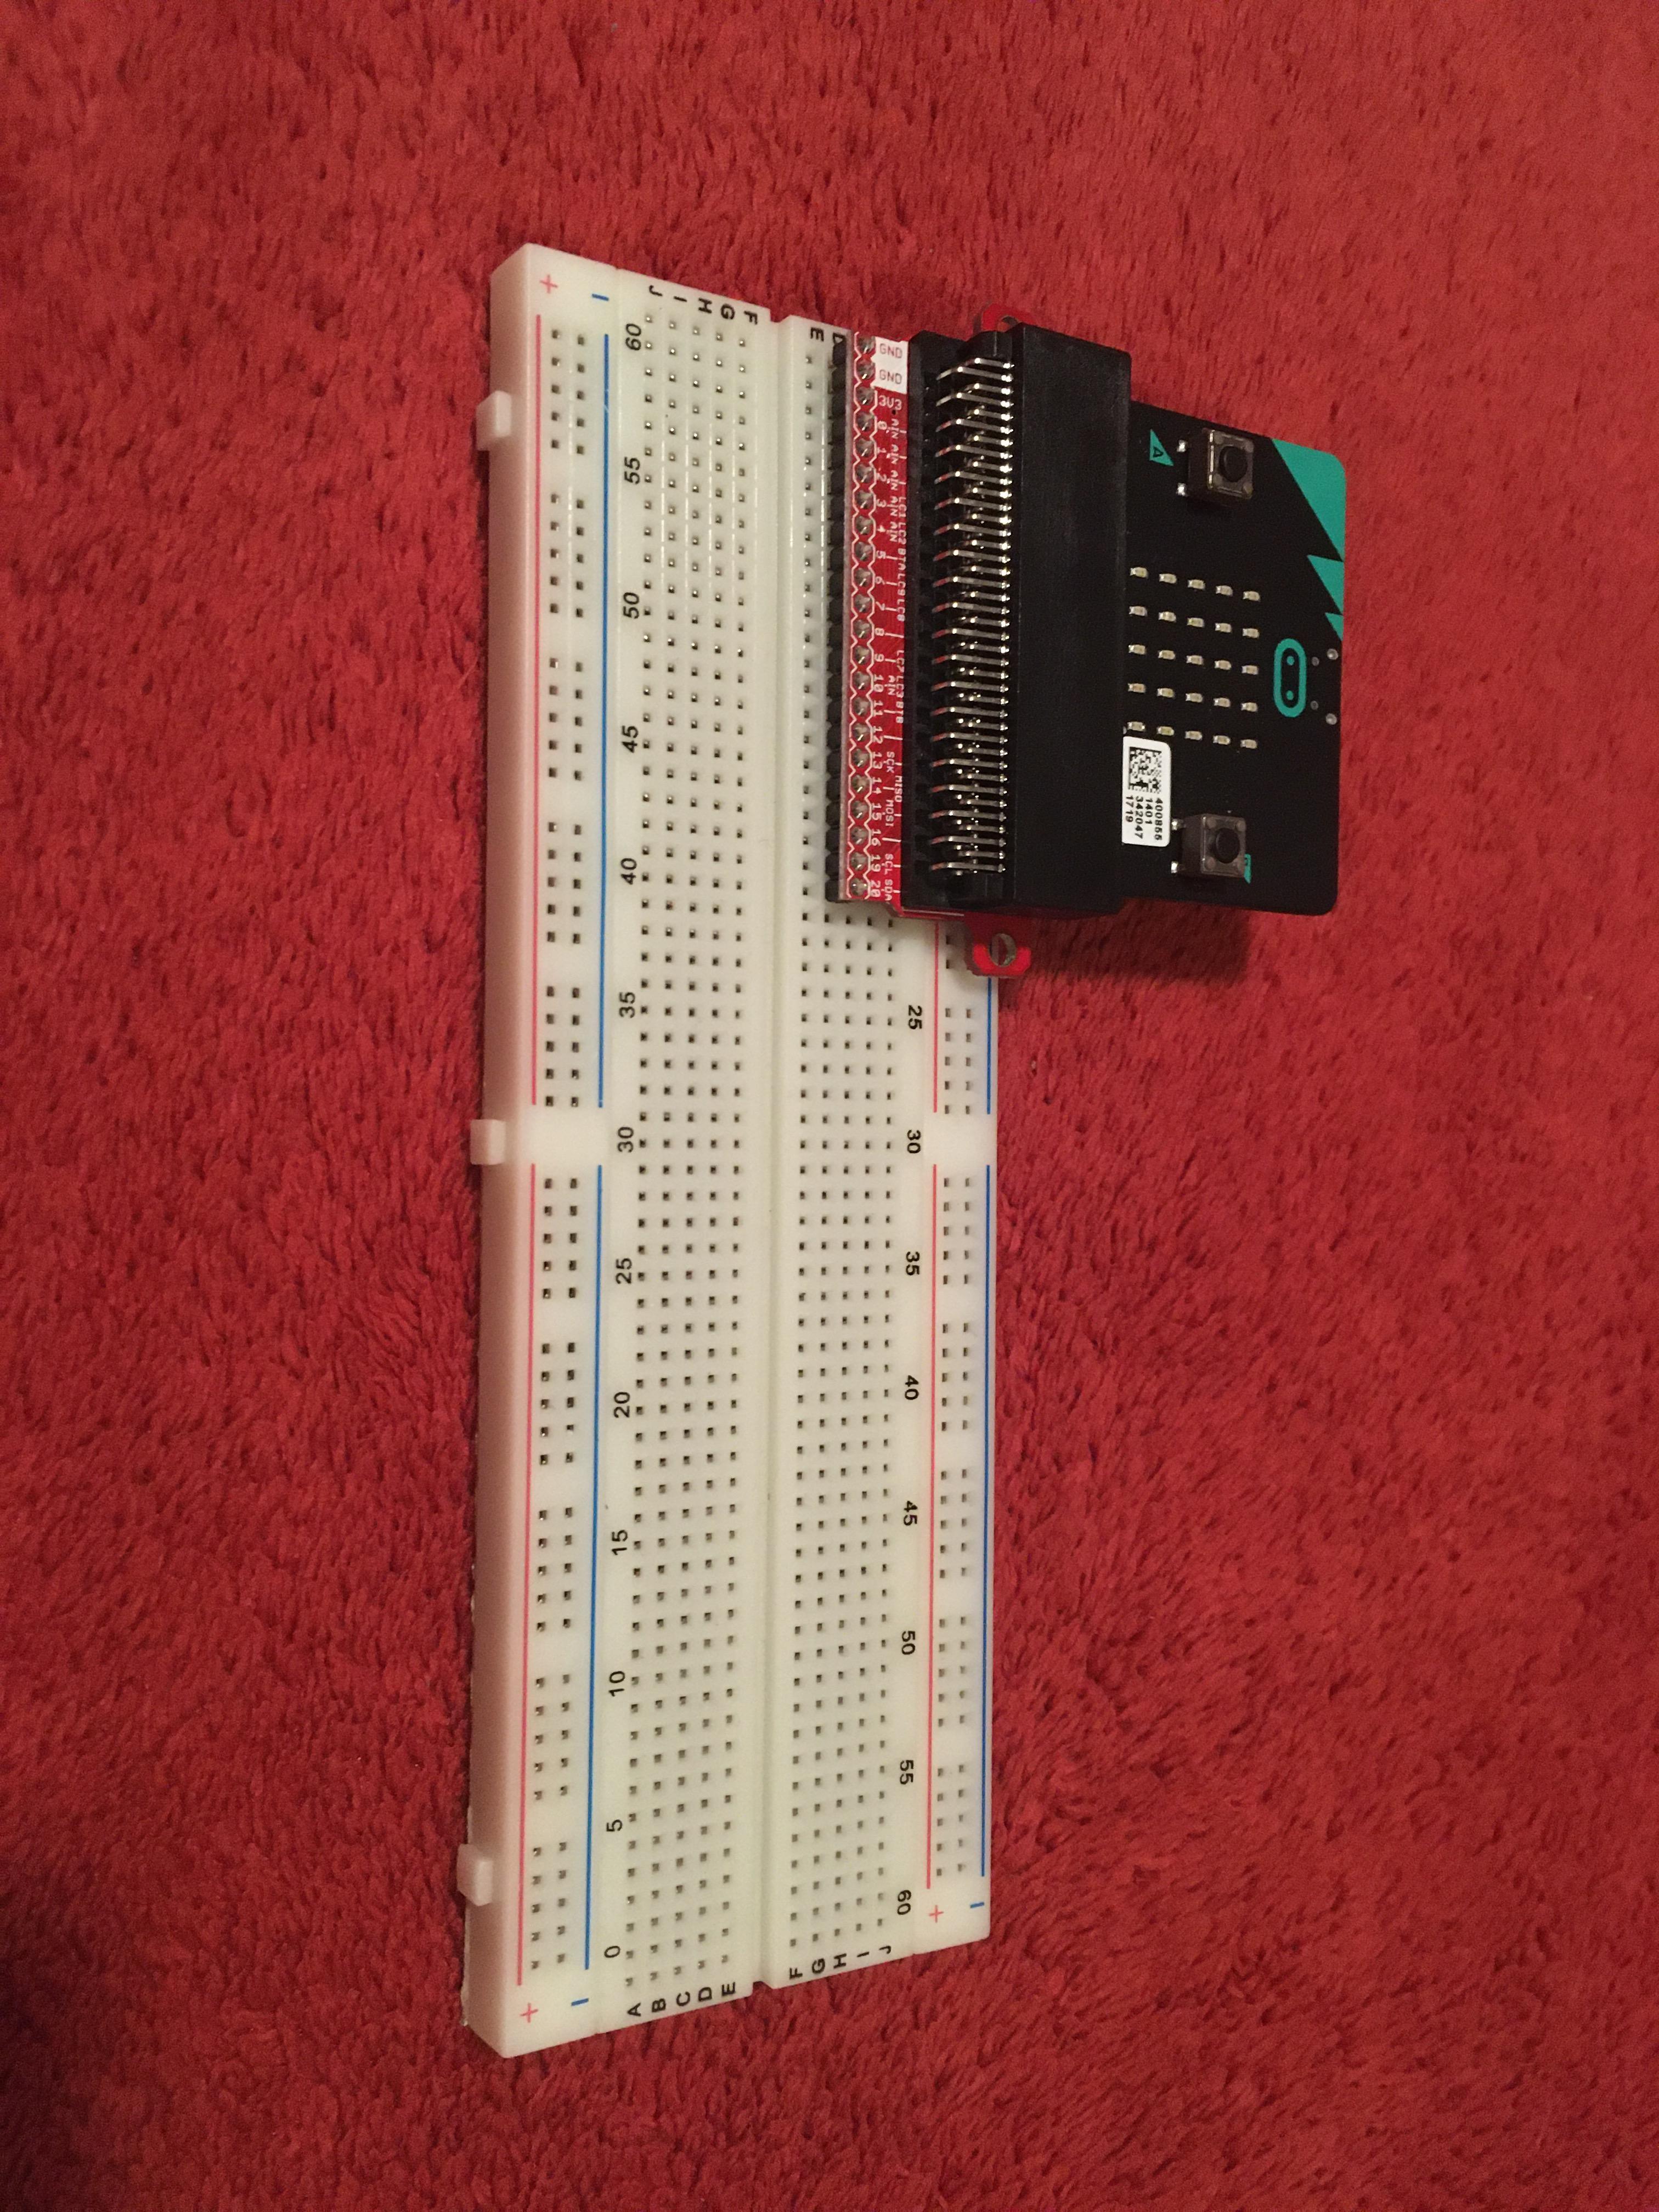
Take your Micro-Bit Breakout, and put it in the Micro-Bit. A Micro-Bit Breakout separates all the pins, and makes them easier to use. Next, put the Micro-Bit Breakout on the breadboard, on line 'D', so that there is still row 'E' before the middle line. It does not matter, but, you may put your Micro-Bit Breakout all the way to the left, so that it is neat.
Adding Your Power
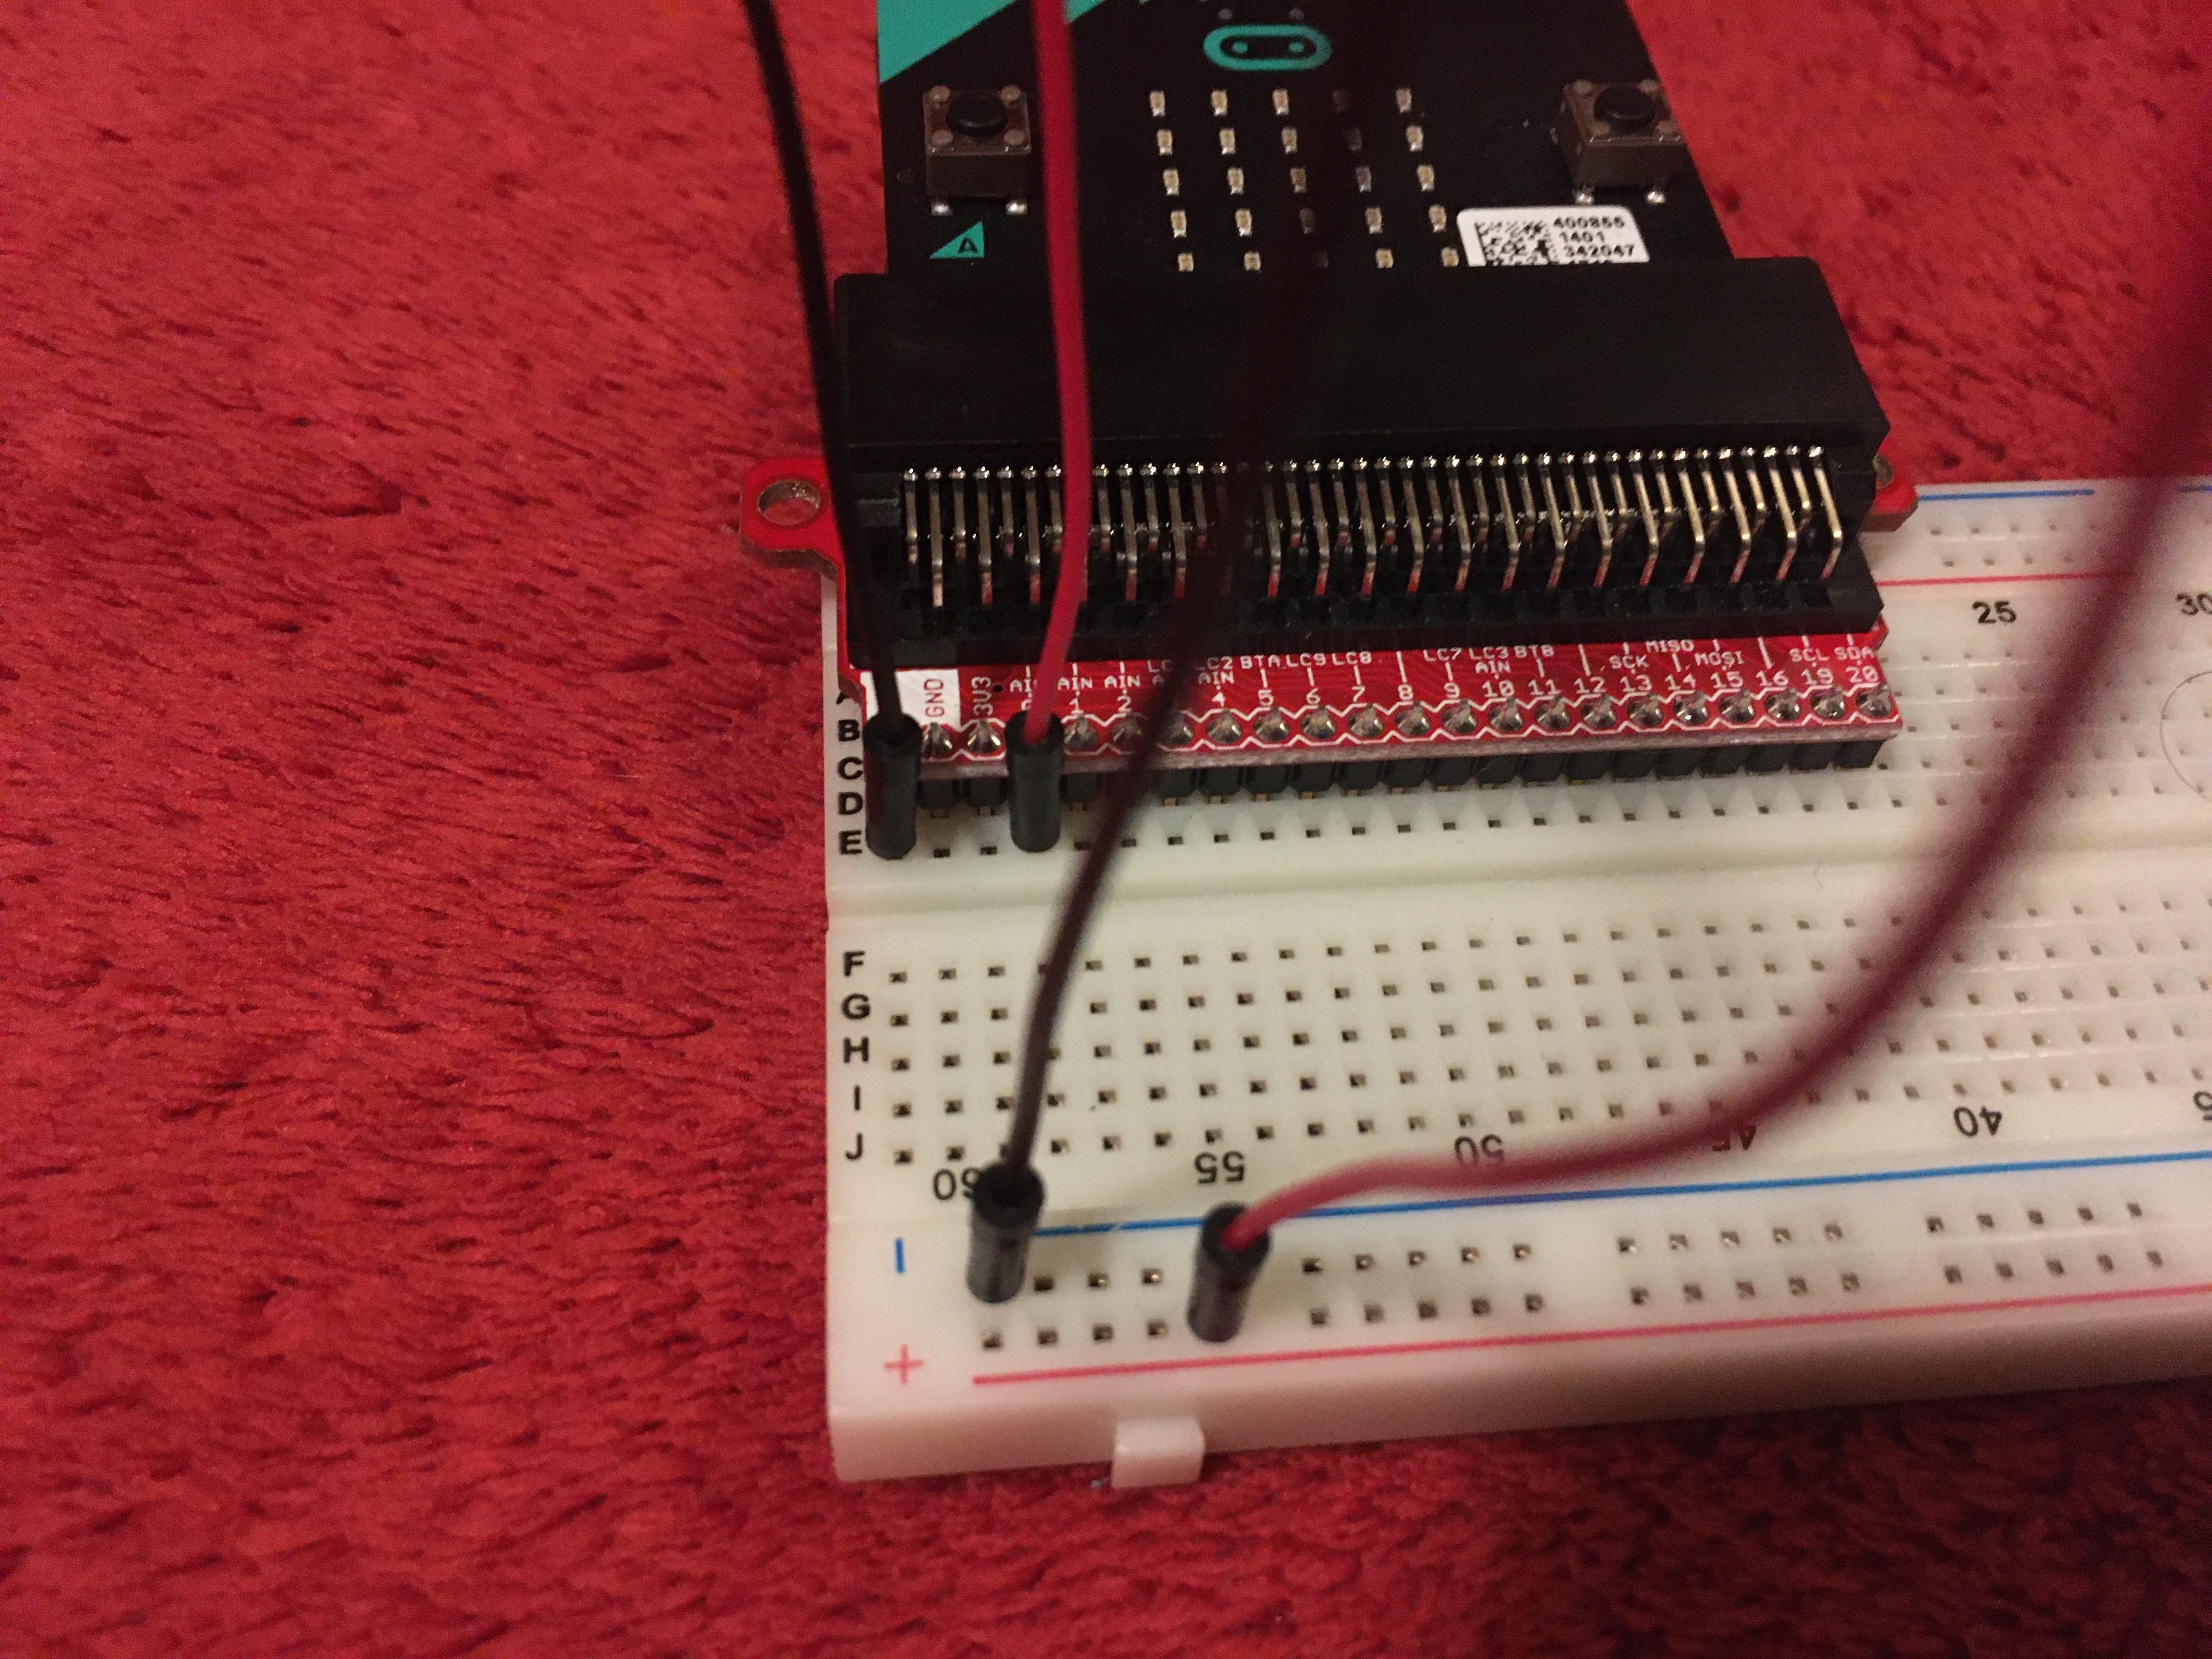
You will need a full circuit for each light, so you will need both a ground (GND), and a power source.
For ground, attach one of your two ground holes, (your holes on row 'E' that have the letters "GND" on them right on the top row 'D') with one end of a Breadboard Jumper Cable (or paper clips will work to). Attach the other end to the minus (-) row on the bottom of the board. Now attach your 0 pin hole (corresponding 'D' 0 pin on the 'E' Line) with another jumper cable end, with the other one going on the plus (+) row.
Making Power Go
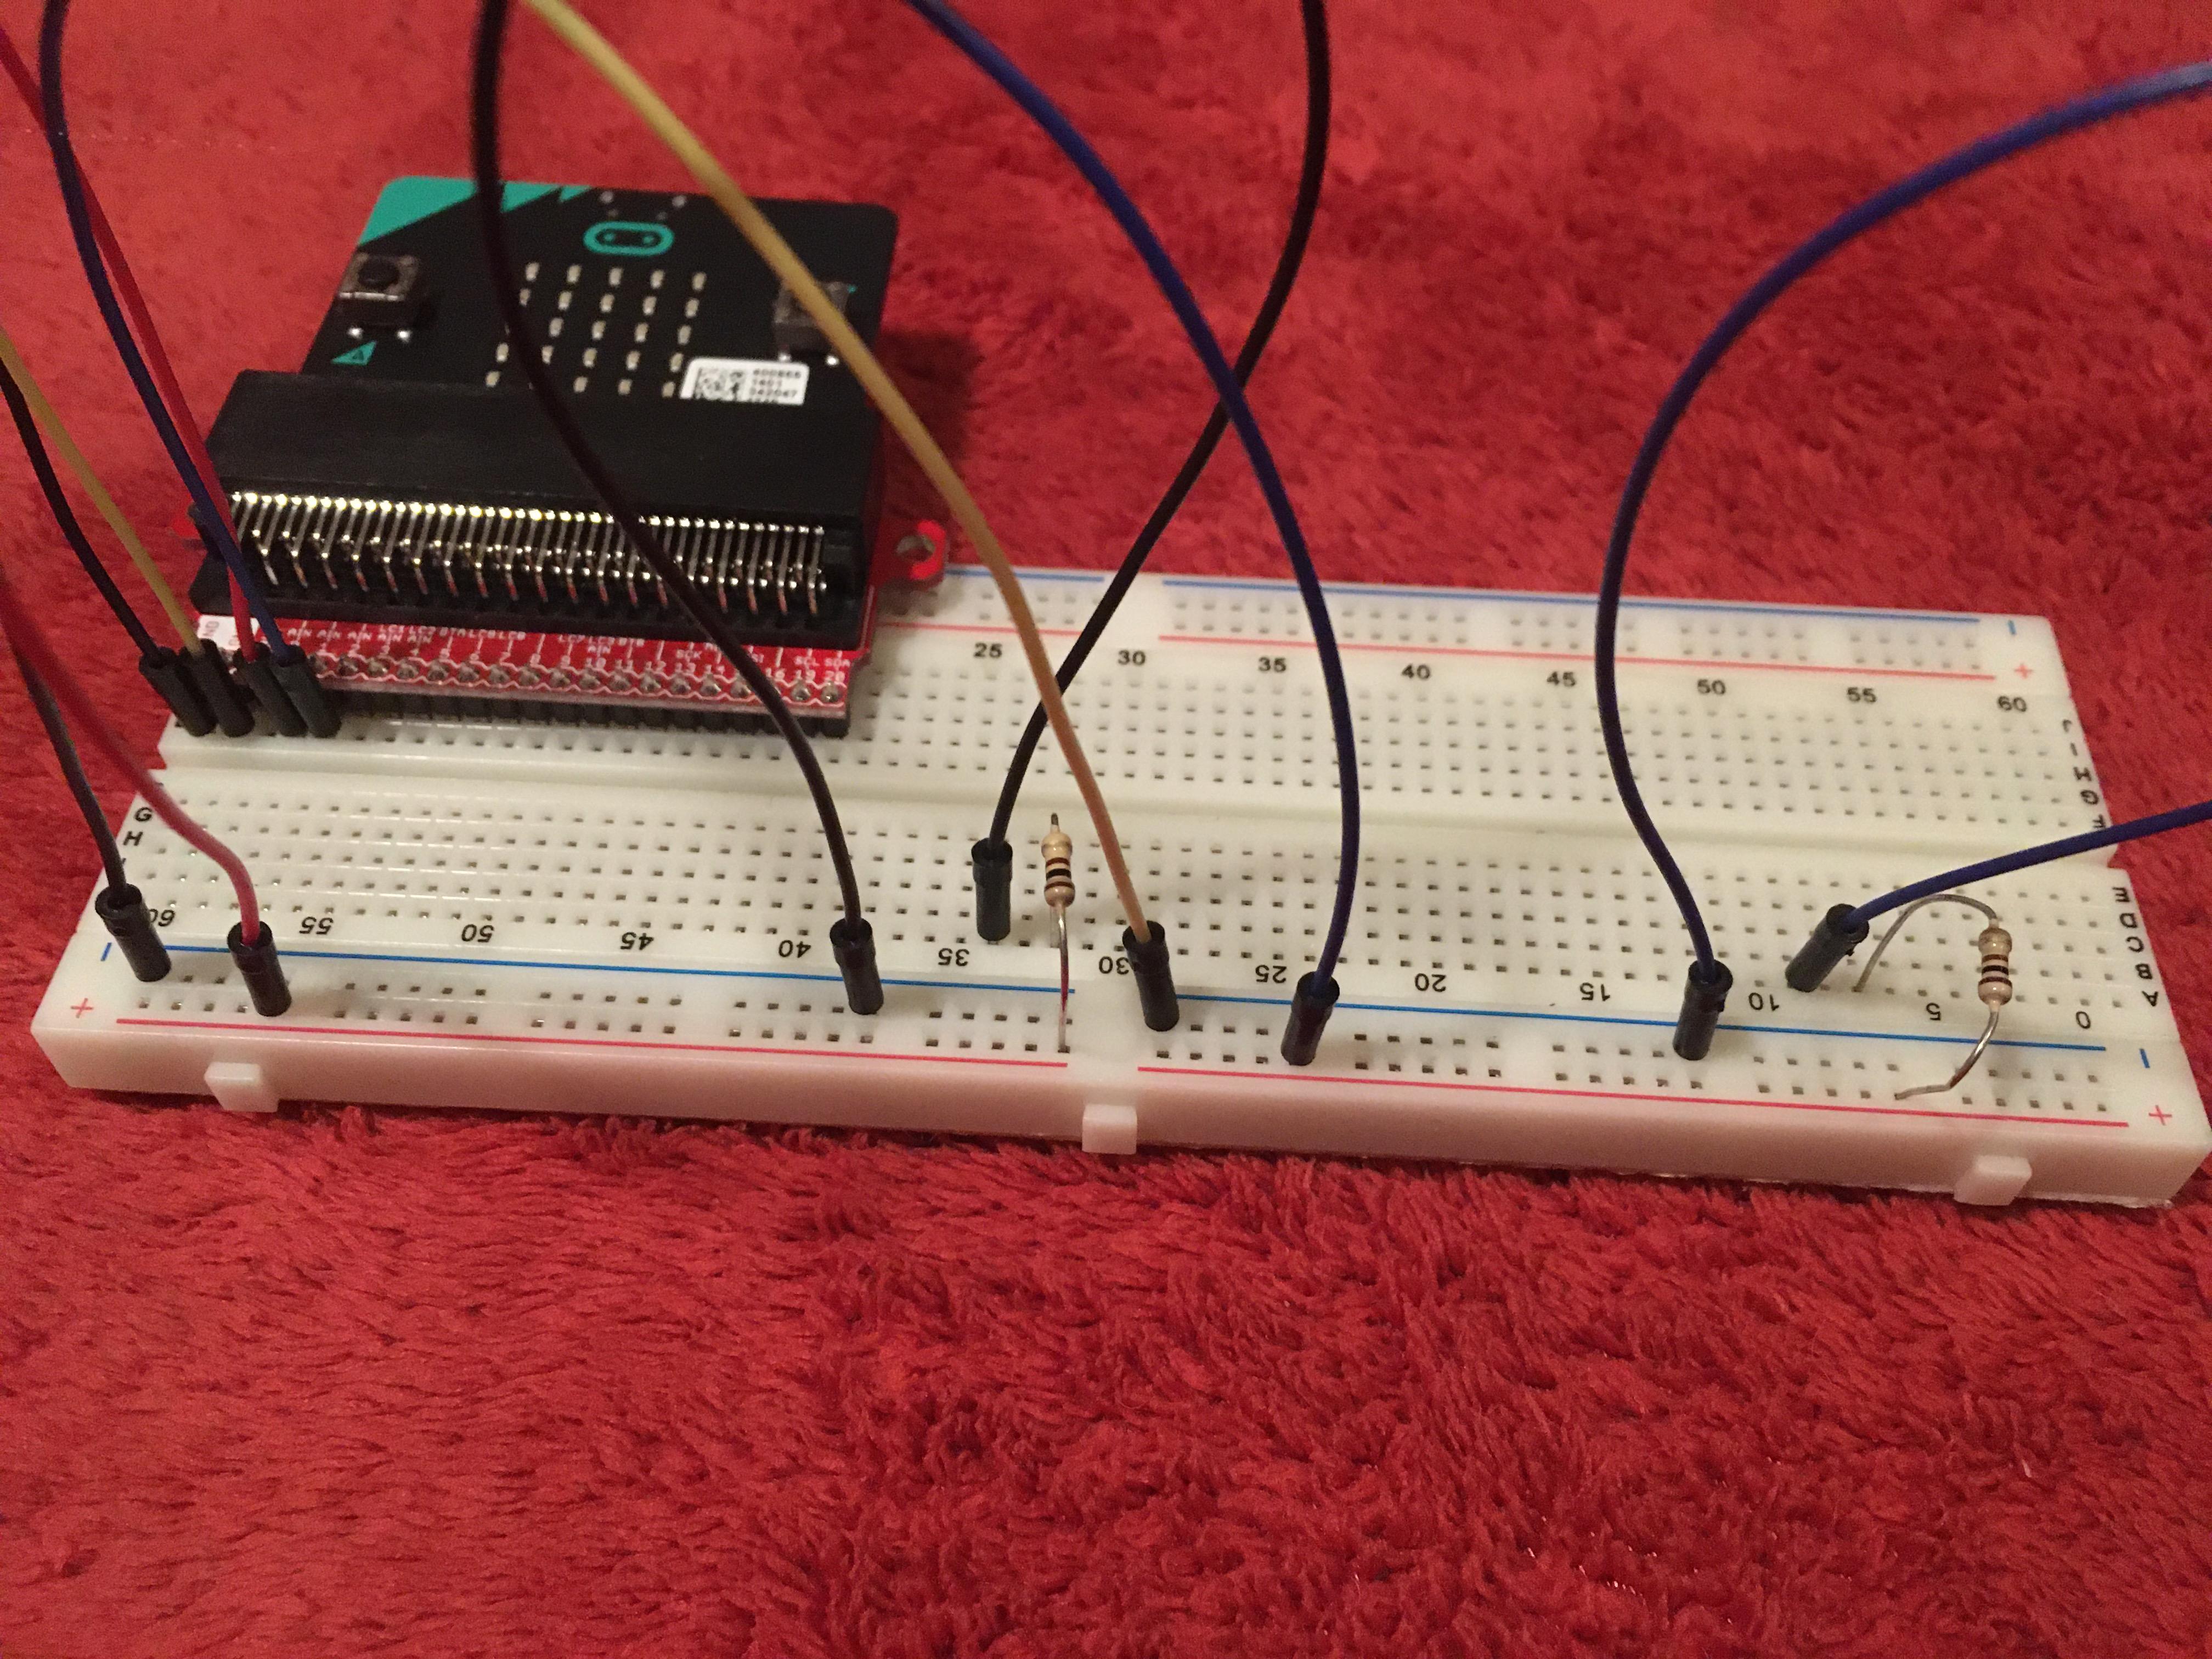
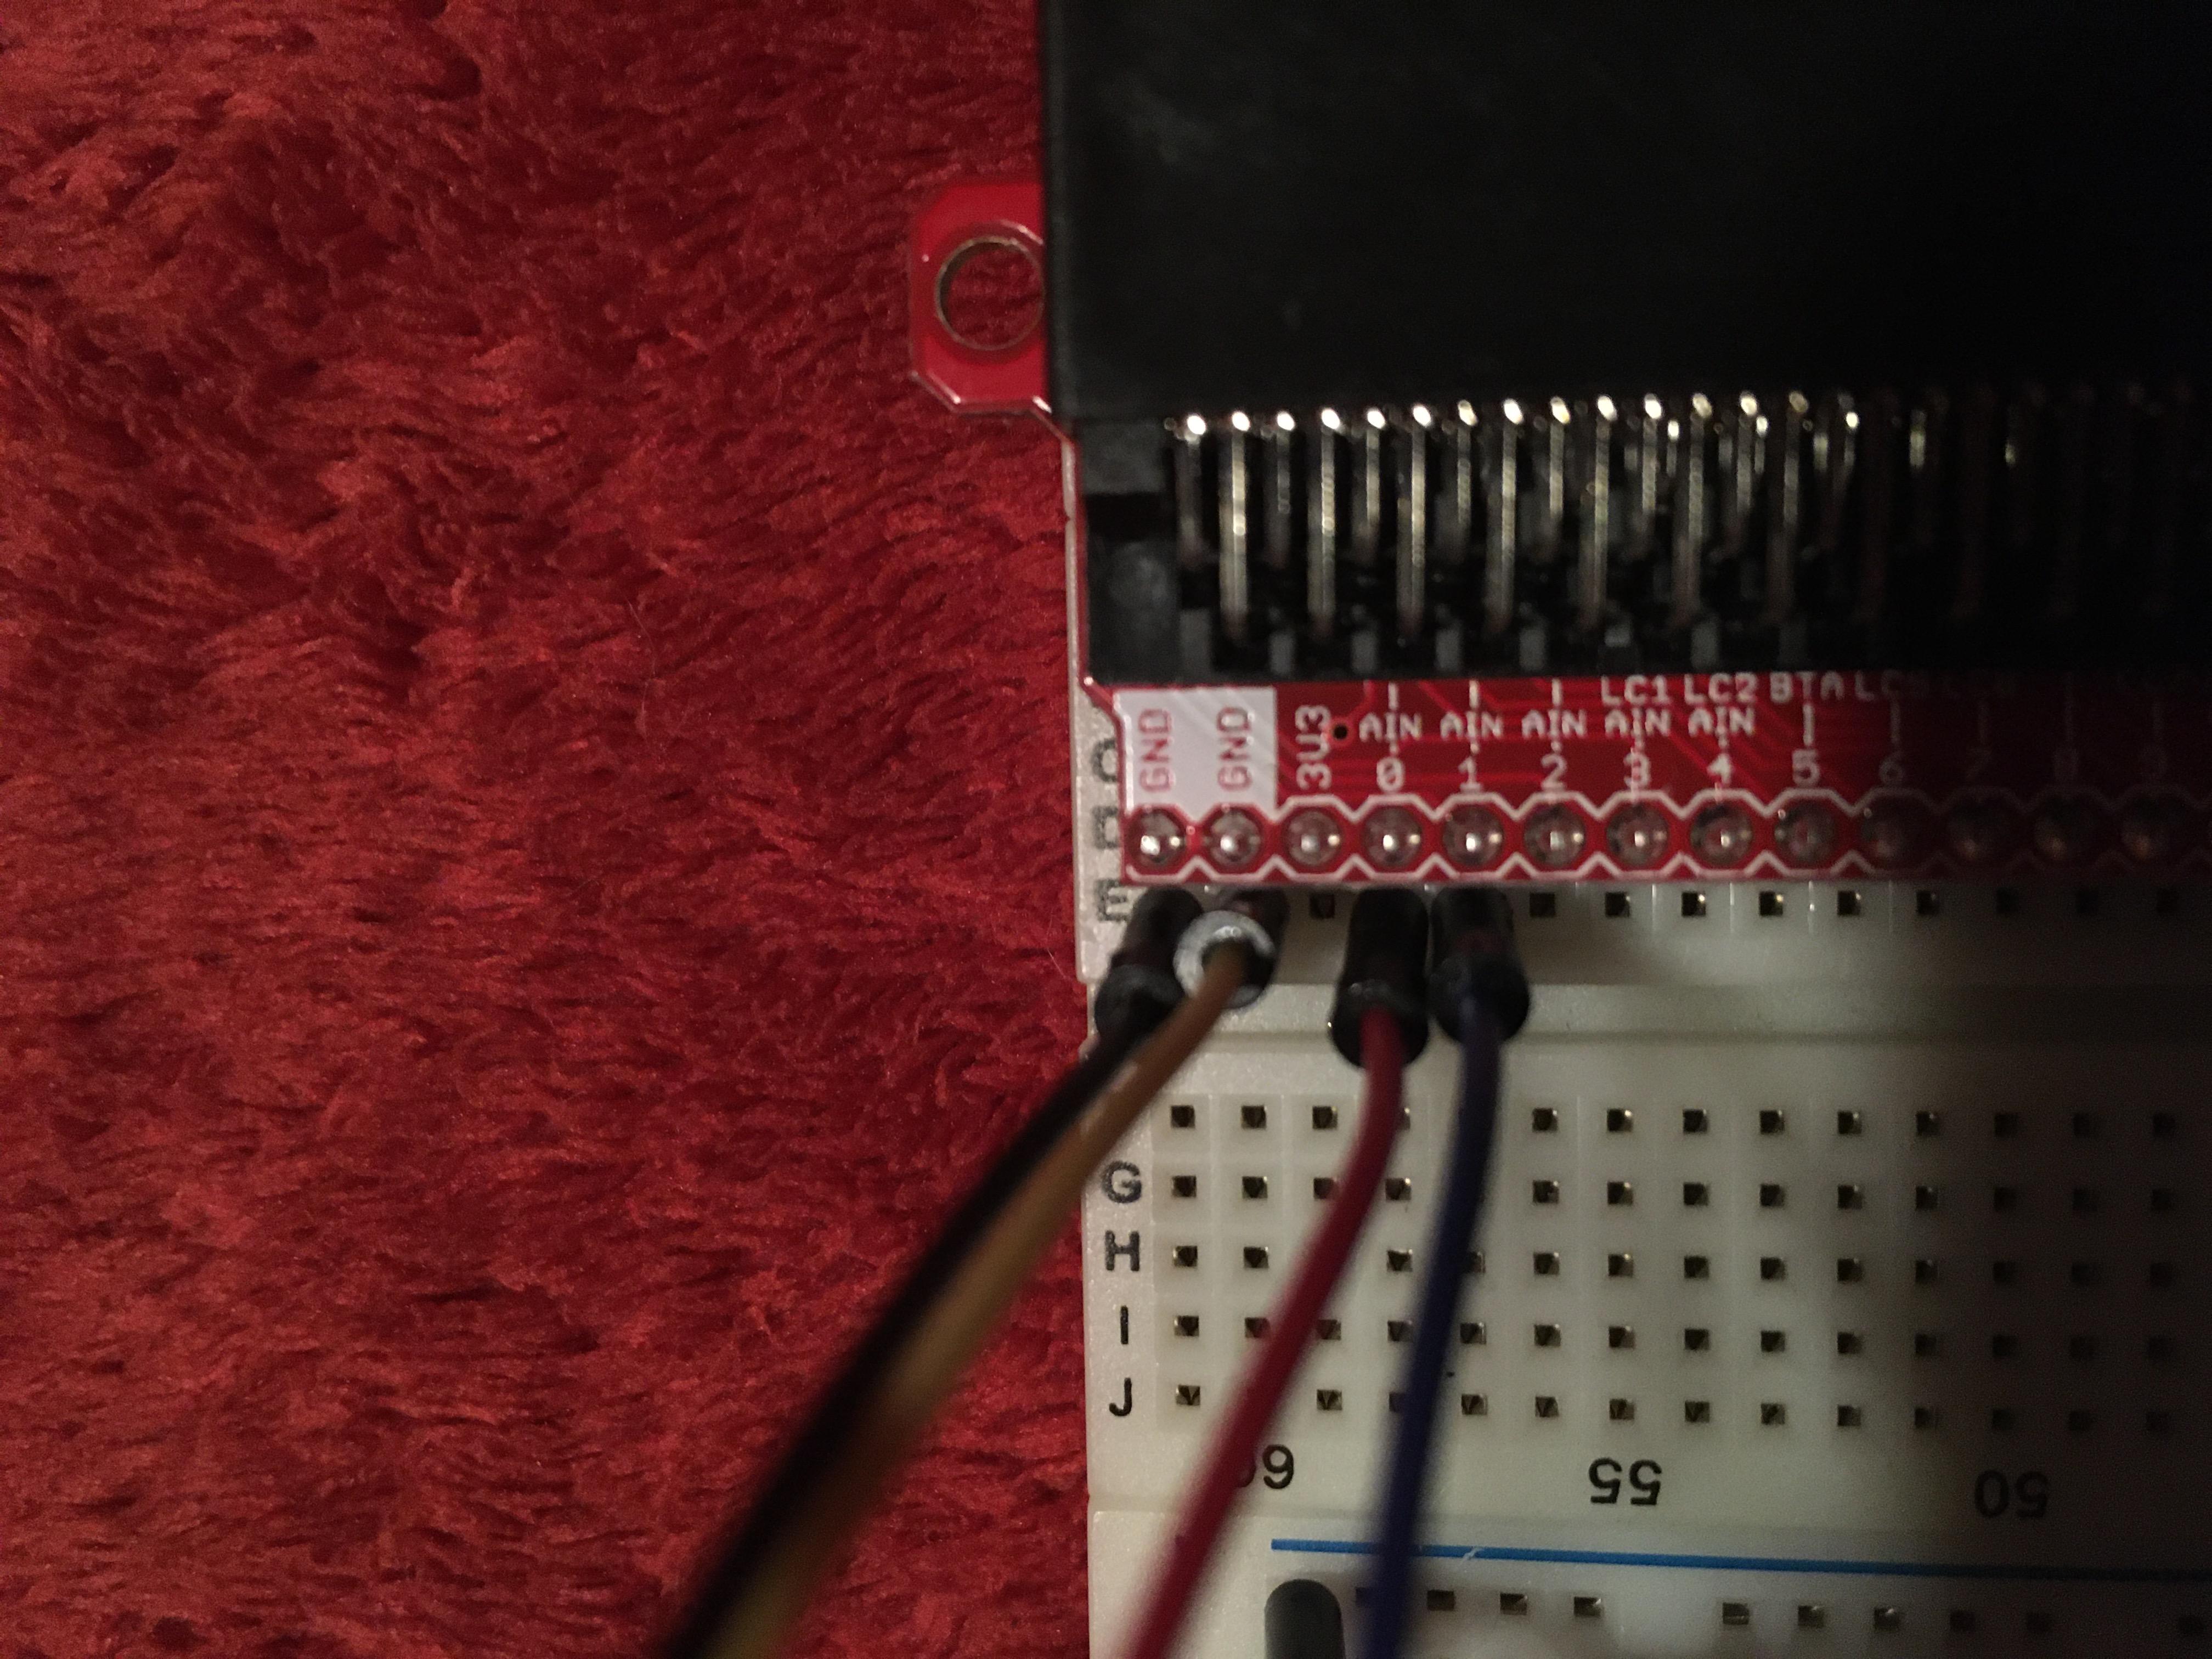
On the left half of the plus row, put the end of a 100 Ohms (that weird 'n' shaped symbol) resistor, on the other end, go to the 'J' row and put it near where you put the first end. On the minus row, take another jumper cable end and put it on. the other end goes 1-2 spaces left from the resistor, like so.
Do the same thing with the 0 pin, but this time make sure everything is on the right side.
Putting on the Lights
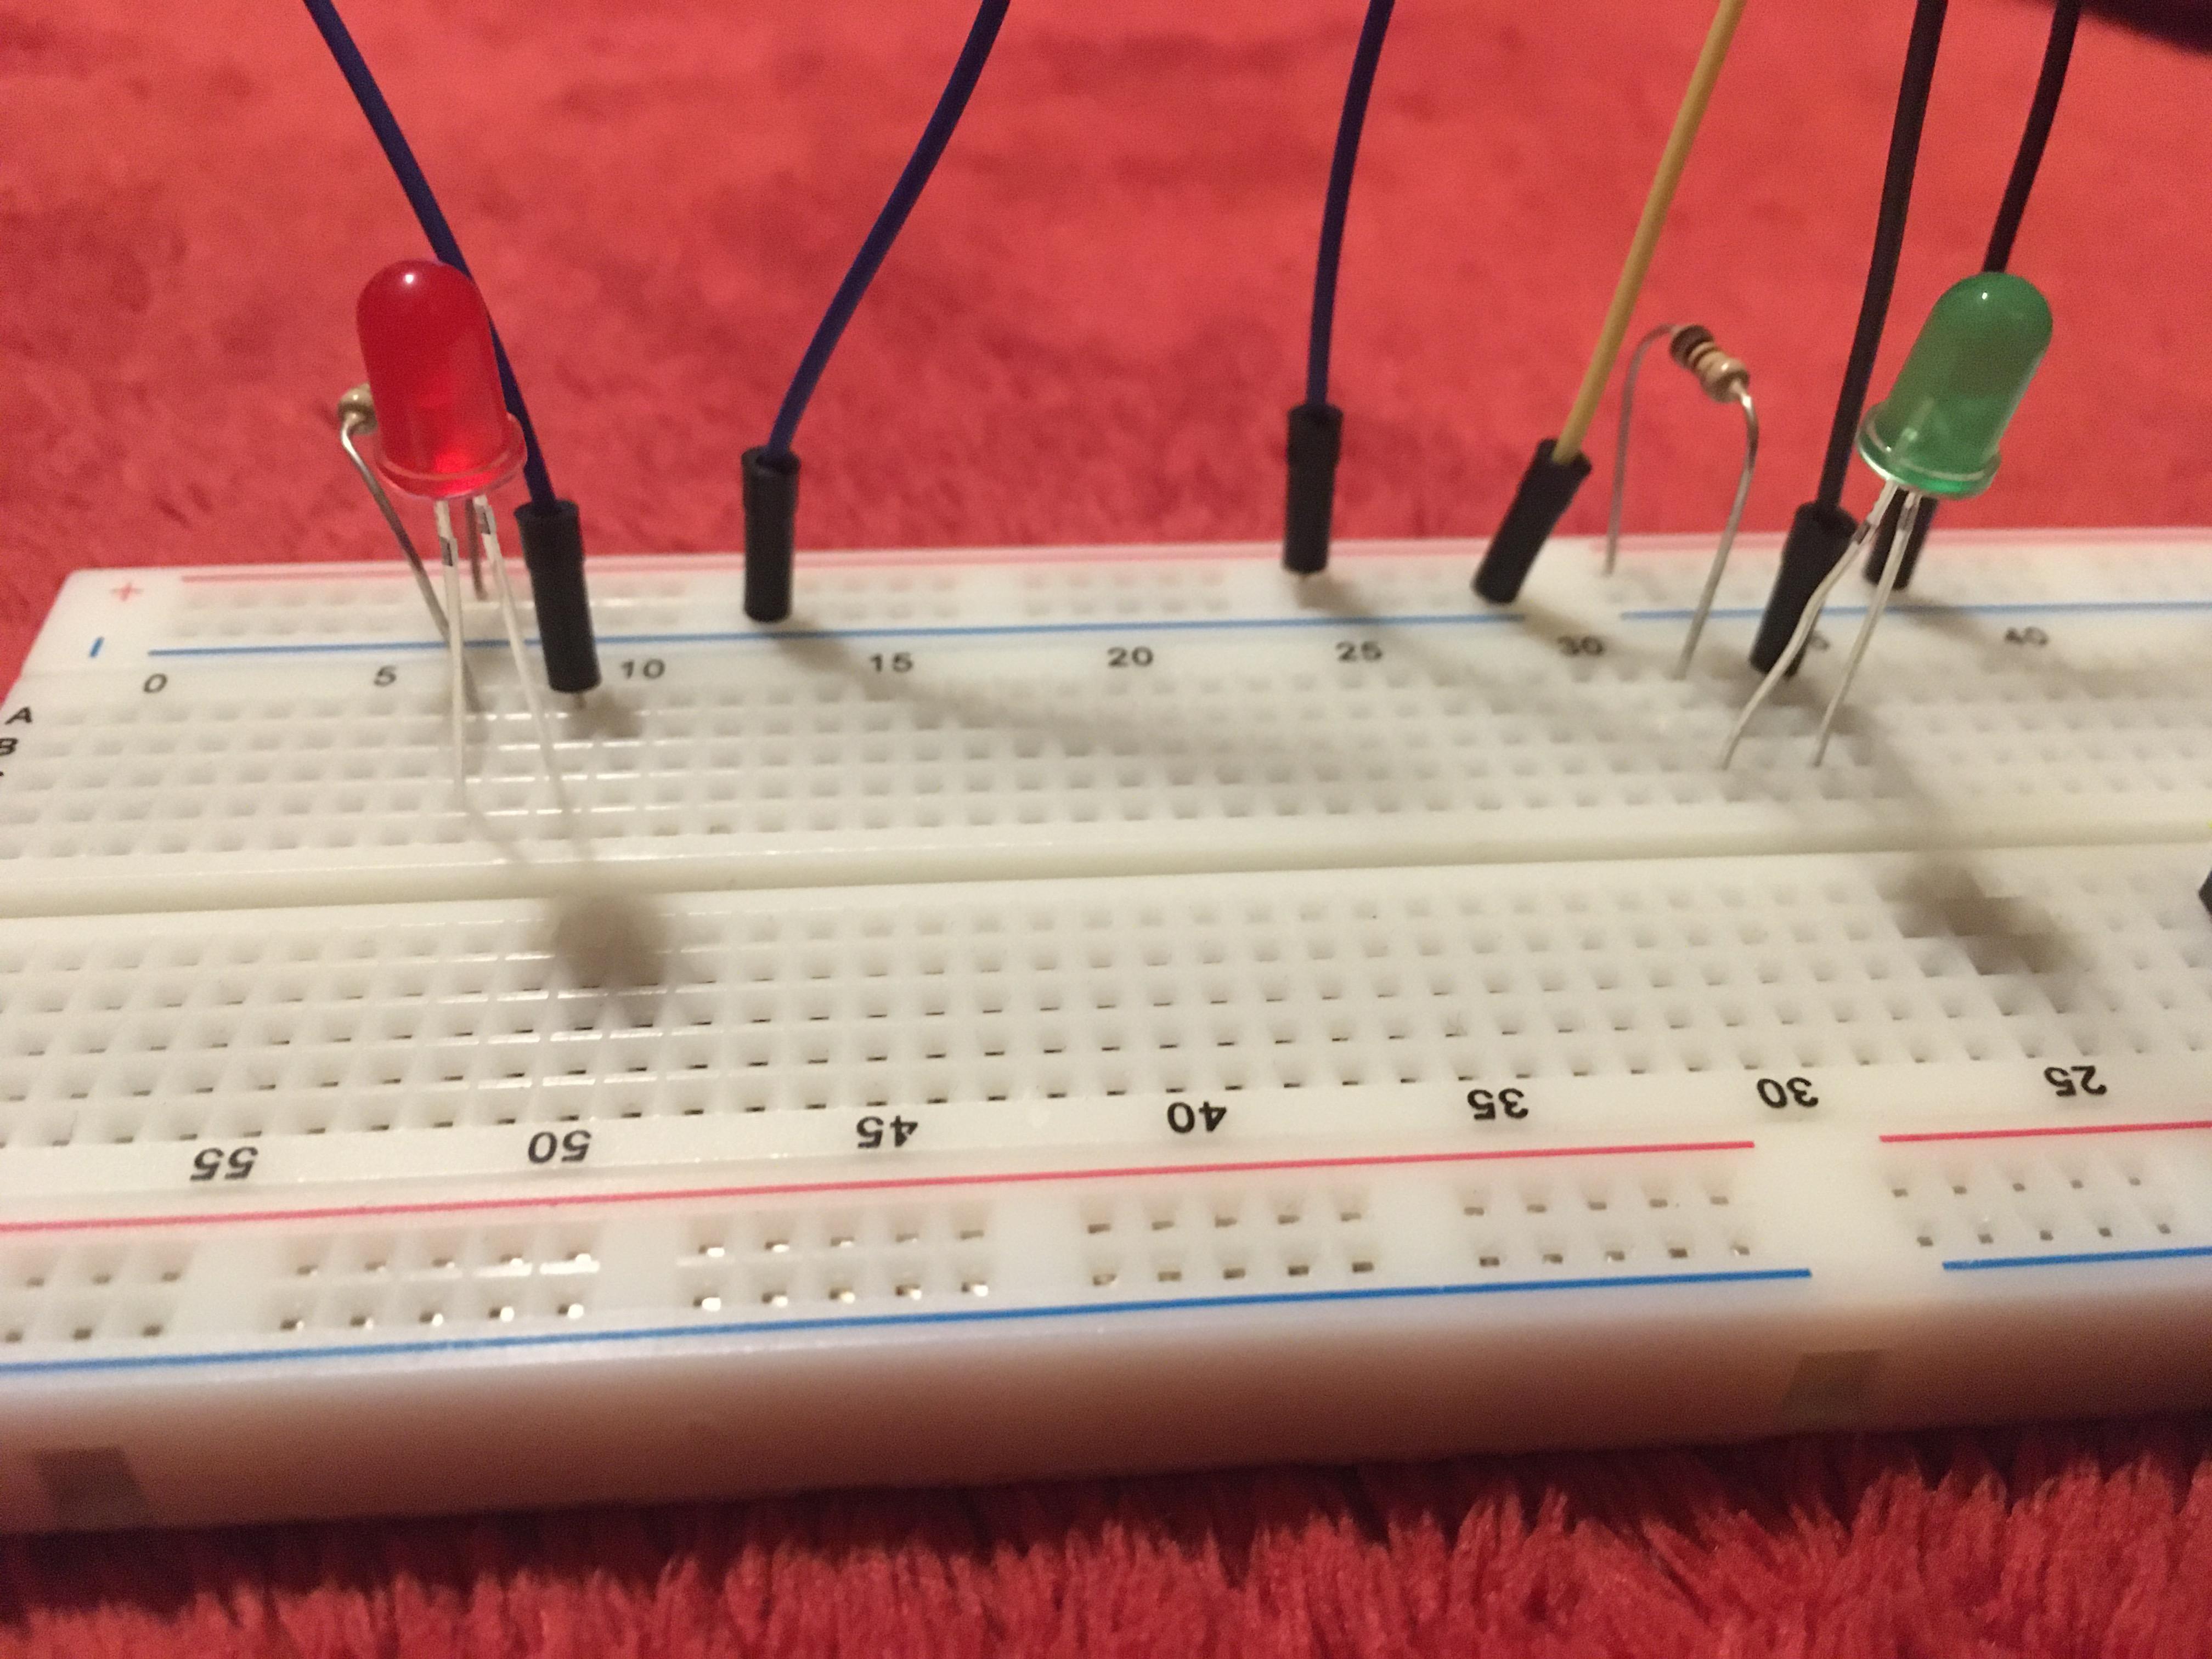
The last step, Putting on the lights.
there are two metal LED rods, the longer one going on the plus row (the row with the resistor), and the shorter side going on the minus side. Making sure that the rods are on the same line, (25th line, 27th line ect) put them onto the breadboard, the green LED going on the left, the red LED going on the right.
You Are All Done!
Acknowledgements
Thank You,
To Makecode, for having a great program to work with.
To Instructables, for giving me a place to share my ideas.
And To You, my reader (and hopefully soon-to-be coder if you aren't already), for taking the time to read, and possibly make this.