Medieval Leather Pouch


I started leather working when I needed an archery quiver for my medieval reenactment group. Next I needed a leather pouch for my money, keys and phone. (I know, they didn't have cell phones in the 14th century but emergencies happen) My pattern is based on a Celtic pouch pattern i found here when image searching Google. The hardest part of this project is deciding how you want to close the pouch.
Tools and Supplies


Tools:
- Wheel cutter
- Sharp leather knife, x-acto knife , etc.
- Leather punch/mini punch set/leather Awl
- Straight edge
- Rubber gloves
- Pencil
- Leather Stamps
- Rawhide mallet
- Rivet setter
- Wing divider
- 220 Sandpaper (clean up edges)
Supplies
- 4-5 oz leather (At least 10 X 17 inch piece )
- Rubber cement
- Leather dye
- Leather lace or waxed thread
- Leather water proofer
- Rivets
- Box latch (or something to keep it closed)
- 100% Neatsfoot Oil
Template and Leather Cutting


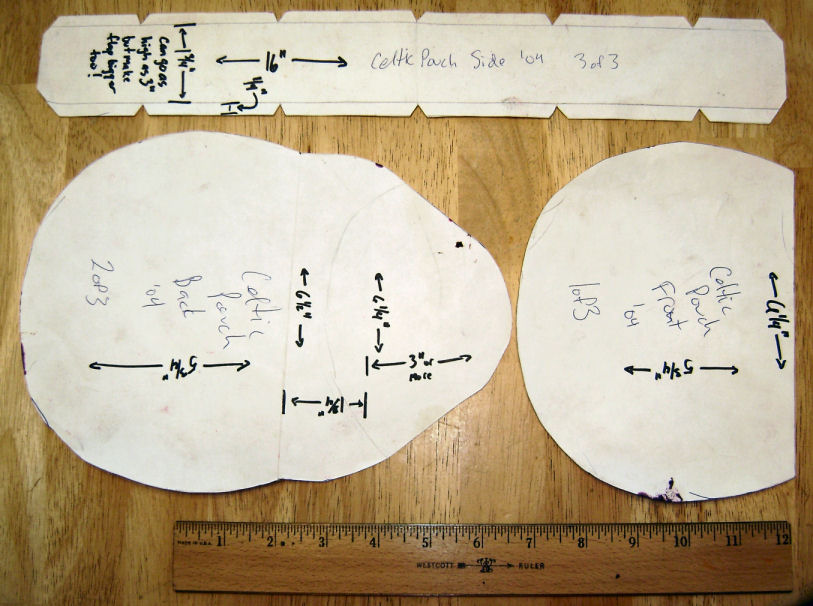
Below I have included the template I created in CAD, just print it and enlarge to fit your needs or until the given measurement (10 3/4") are equal. I enlarged it by 315% for it to equal true measurements.
I always like to transfer my pattern to or print directly on card stock or other stiff paper (for larger projects I use file folders). I learned the hard way to save my templates and I even use packing tape to protect the edges or the entire template; think of it as “laminating”. If you intend to make more than one, KEEP THE TEMPLATE.
If you “laminated” your pattern or simply cut it out, you can use rubber cement to attach your pattern to the leather. Rubber cement is great when working with leather; it dries quickly, secures your pattern and when you’re finished, simple peel off template and rub off the residue. I have never had any problems with it messing up my final project. Pencil is great to trace your template or if in a hurry (or lazy like me), cut the leather without removing the template. Be careful when doing this so you don’t ruin the template. When done tracing template, slowly peel template up and using clean hands, rub off all remaining rubber cement from your leather.
- This pouch has only four parts; back panel with front flap, front panel, side panel or “gusset” and belt straps.
Prep Work and Design


Start by lightly tracing the edge of the front panel with your wing divider set to ¼”. This gives you your sewing/lacing edge with enough support behind it. This can also be done using a ruler and marking ¼” along the edge using your pencil. Depending on how you decide to attach all the pieces, you will use a stitch wheel or a wing divider to evenly mark your holes.
Warning:
This part can be difficult since you must measure your newly created “lacing edge” minus first and last hole distance than divide it evenly, and setting your wing divider to that length and lightly pressing creating a new impression. If you used my template, set you wing divider to 5/16” and starting 3/16” from the edge you will end up with 40 marks. If you don’t have a wing divider, you can also use a ruler and mark the holes along the “lacing edge”.
After you have your marks, use your leather
punch or mini punch to create lacing holes for your leather lace. I like using 1/8” mini punch, it gives enough room to sew my lace but is tight enough it does not slip.
Optional: If you would like to add decoration to the front flap, now is the time. My first pouch I created had a cattle brand across the front flap which I did not notice until I started cutting. So I stamped a design to cover the brand and now you can’t tell.
Assembly

After your done stamping, it’s a good time to add your clasp
(I finished the entire pouch, then realized I didn’t have a way to keep it closed) Tape can be your friend at this stage. Take all pieces and put them together taping the gusset to the back and front panels. Next fold over the front flap and not where it closes to. I used a “Box latch” but you could use a strap and buckle, thong and toggle, etc. Mark with a pencil where the flap stops, then remove the tape. Now you can just work with the back panel and front panel lining the flap to the mark again, mark and punch out your holes for your latch.
Next is to stain, burnish (slick the sides) and first coat of protectant. This can be done with an edger, slicker and even a spoon. Neatsfoot Oil is only a conditioner and help keep your project soft. Use some kind of waterproofing.
Warning: If you’re like me and want to wear it out, then you need to waterproof it with your choice of waterproofing. After many recipes, I have come up with my very own waterproofing compound.
Add your style choice of belt loop to the back panel, punch and rivet them on. Take your front panel and front flap and rivet on the latch. Now start lacing the back panel to the gusset making a knot at the start and finish. Repeat the same process with the front panel and you’re almost done. Finally I would recommend adding one more application of your waterproofing, then done.