Mantel Clock Case for Chronulator (Meter Clock)
by paradug in Workshop > Woodworking
8604 Views, 57 Favorites, 0 Comments
Mantel Clock Case for Chronulator (Meter Clock)
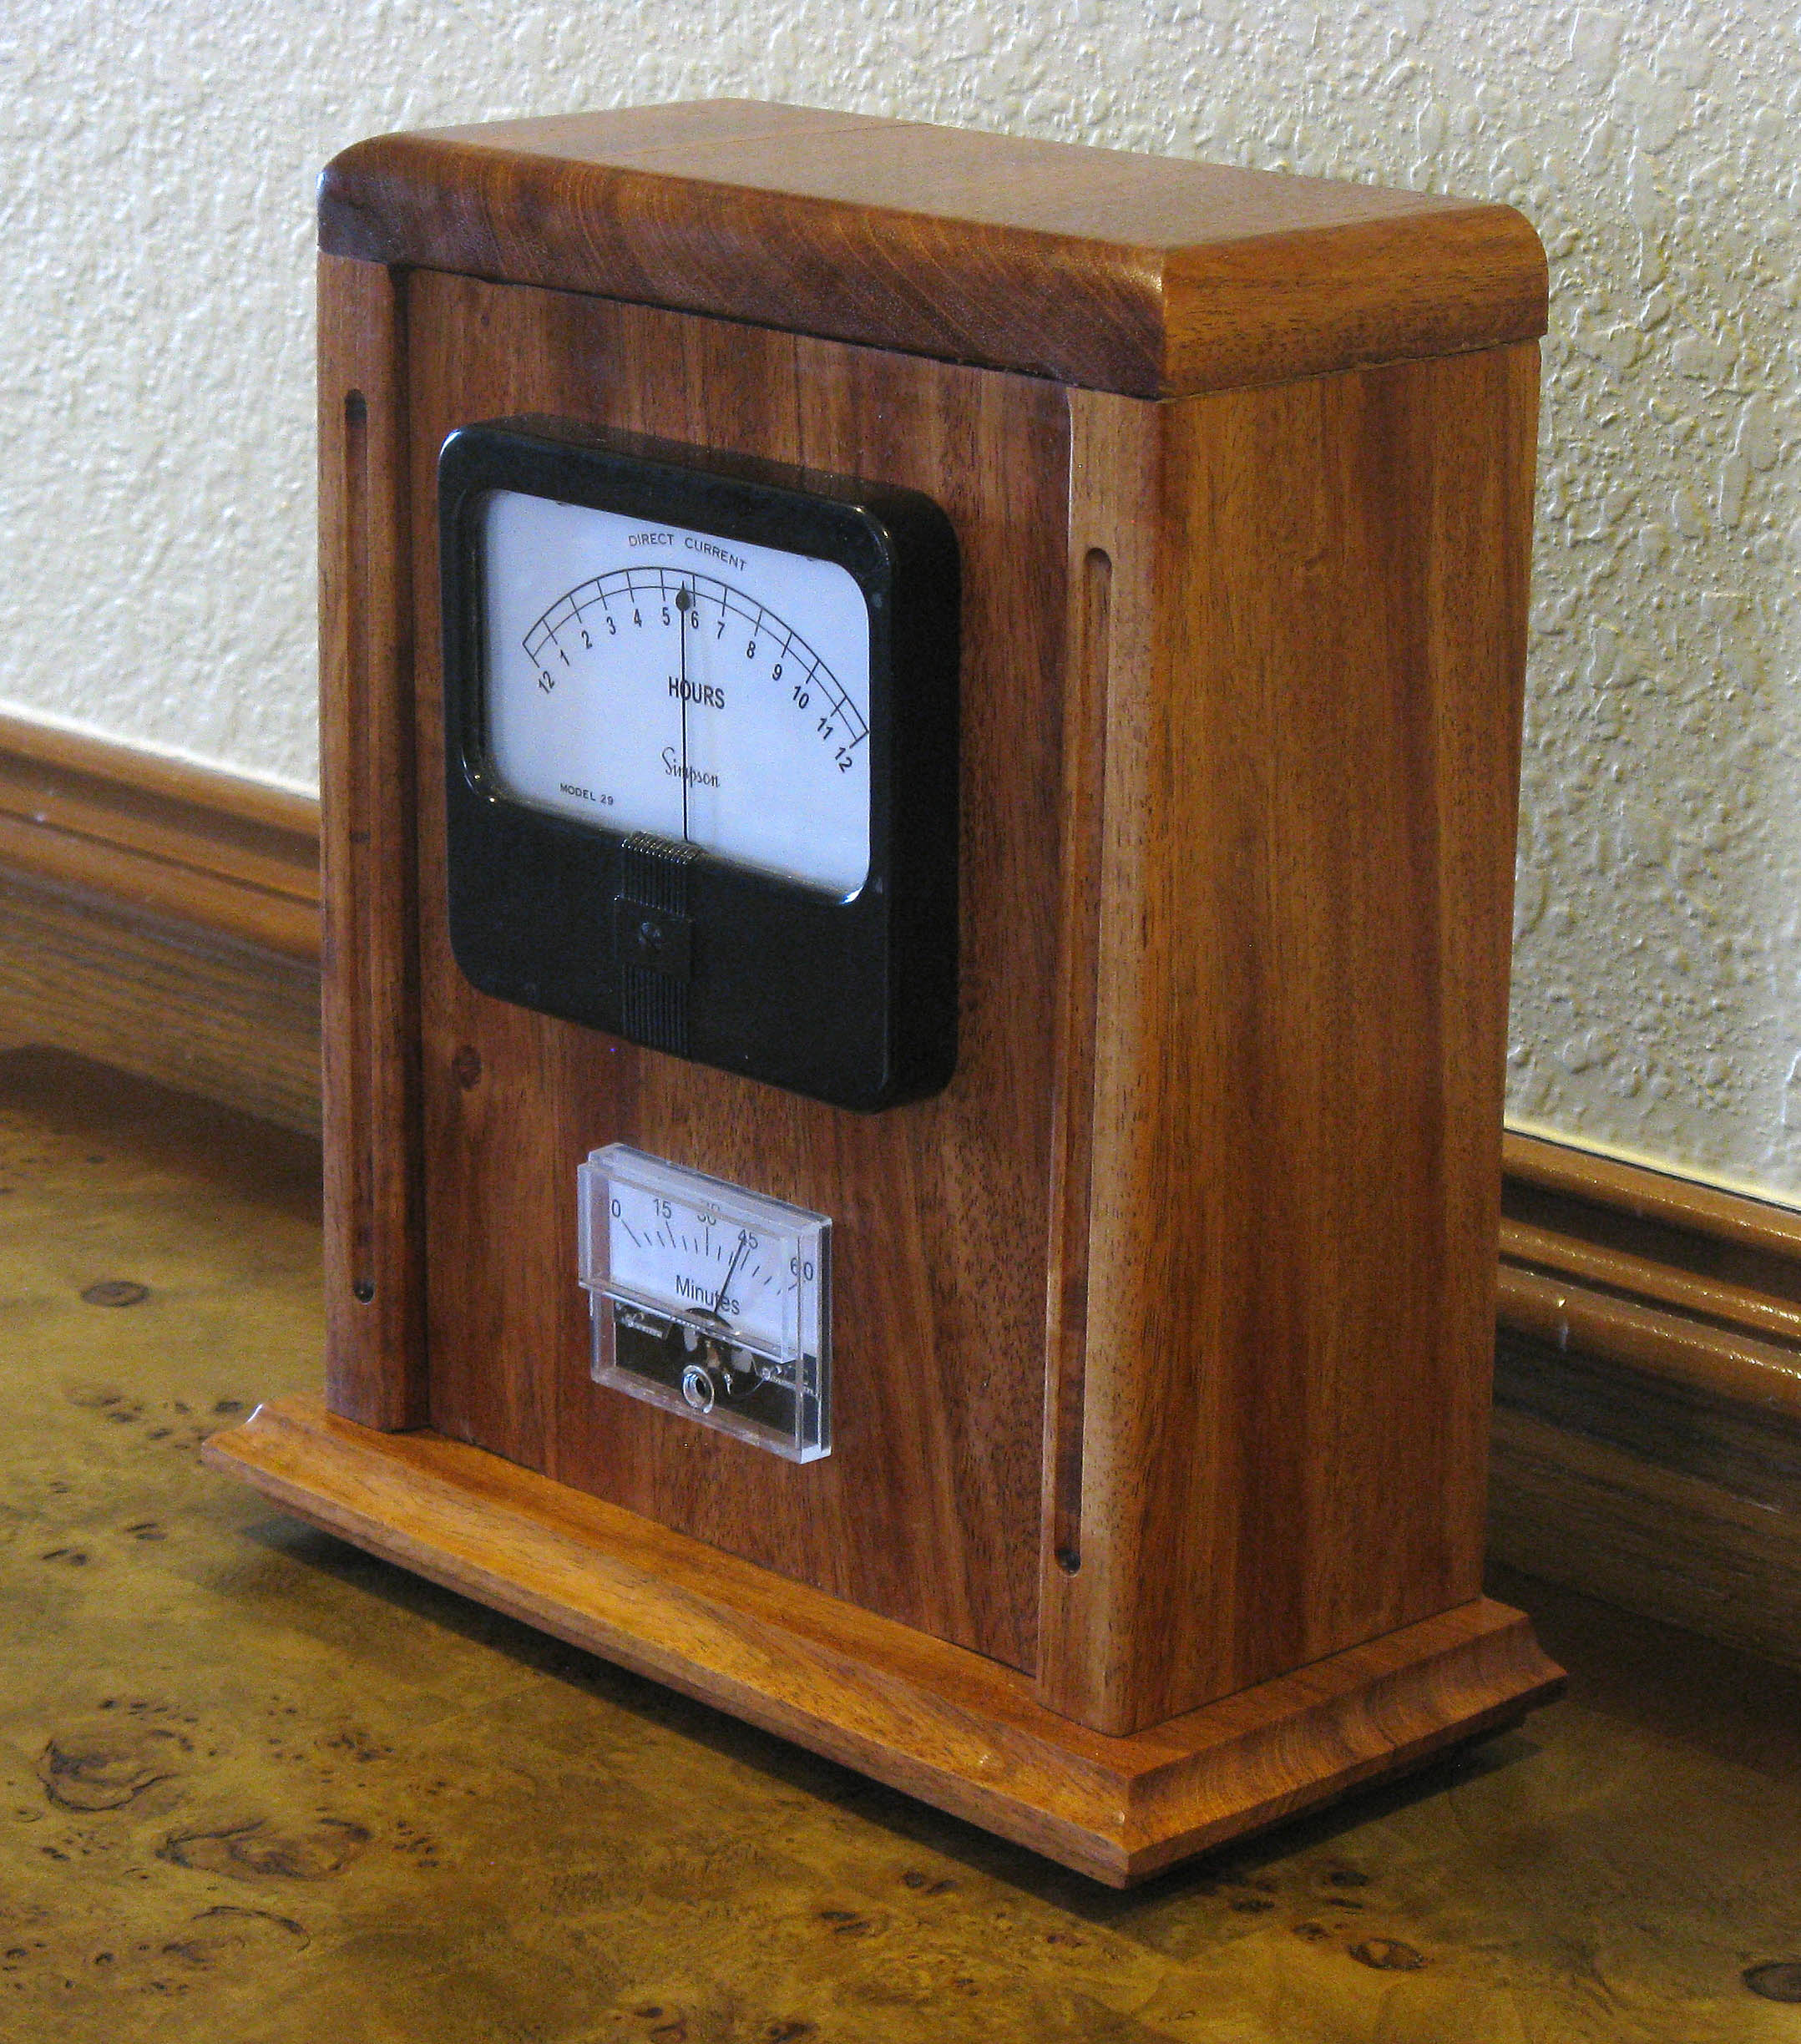
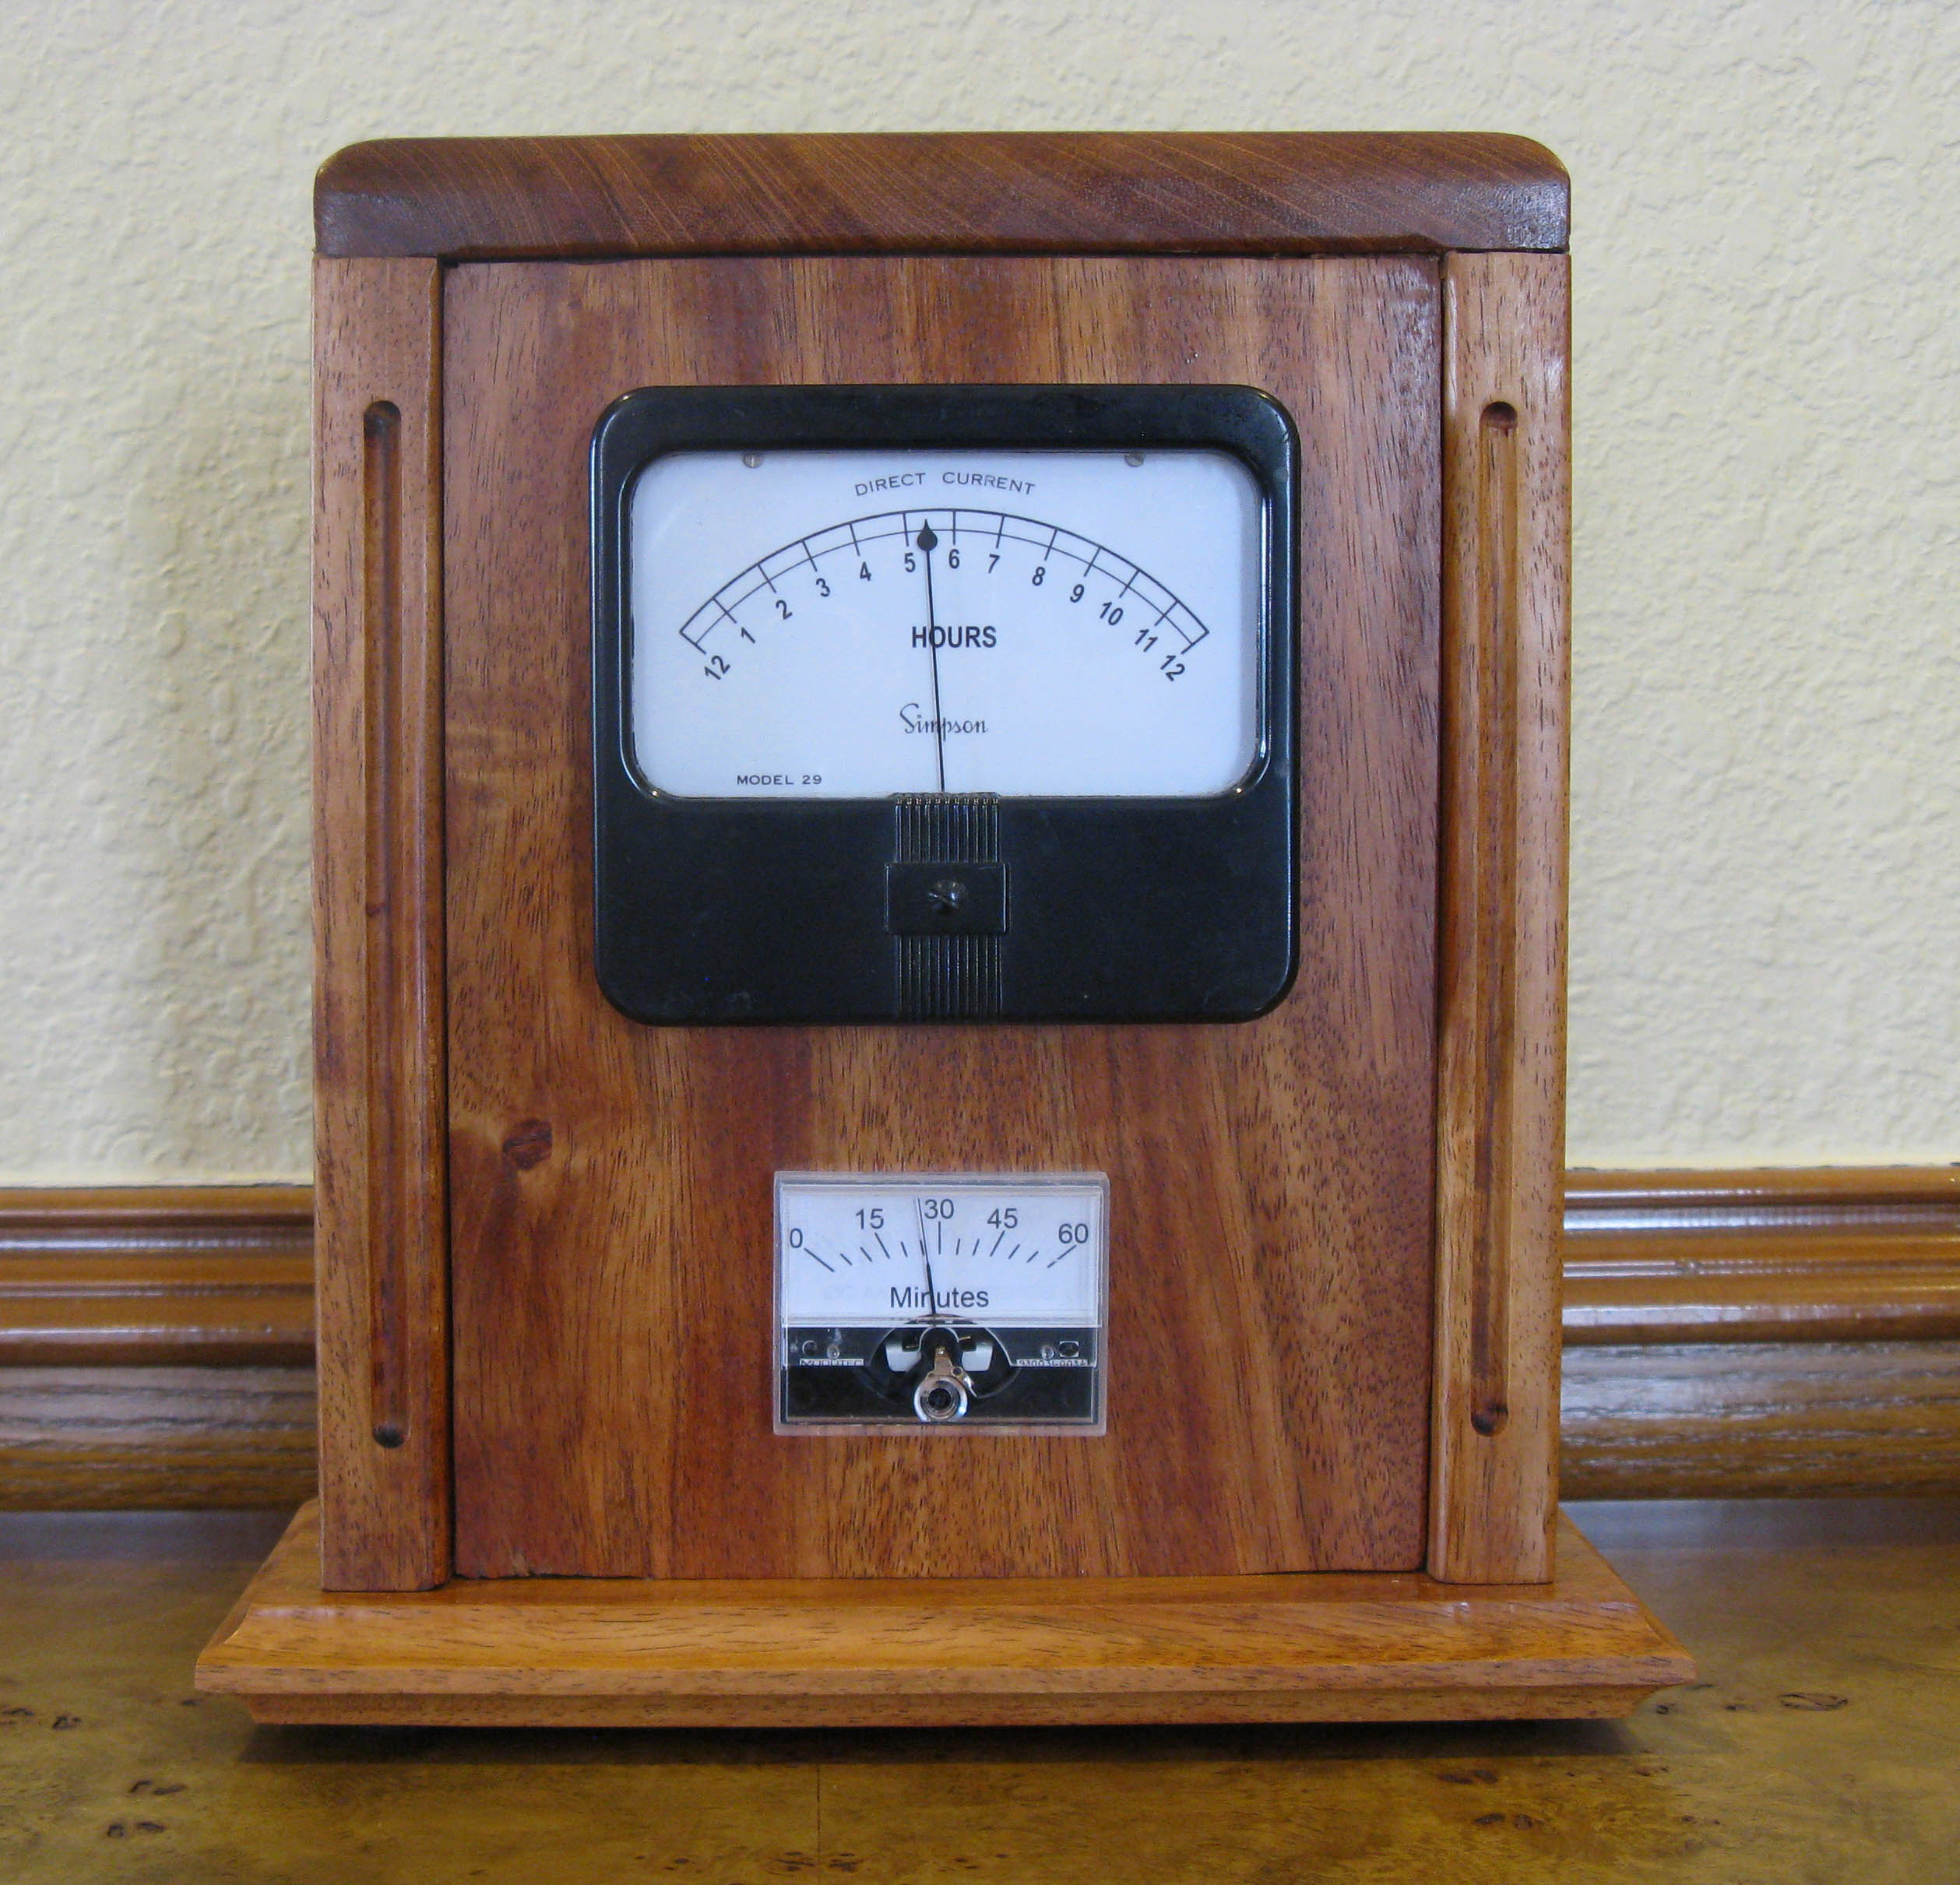
This mantel clock case was designed and built to house my MSP430 based Chronulator. A Chronulator is a retro clock that uses electrical panel meters to display hours and minutes.
See:
https://www.instructables.com/id/MSP430-Based-Chronulator-using-Launchpad-chip
I was looking for a style that would be appropriate for the old panel meters I used in my clock. So after some thought, I drew out the design you see below. I think it invokes a 30's to 50's look.
As with any woodworking project I always learn a lot, especially how to recover from mistakes. It was a very enjoyable project, which came out well.
Materials and Tools

My case was built using a board from a small lumber mill that handles furniture quality wood. Lumber from this type of source is often thicker than "standard" and also comes in unusual widths. I will list both the dimensions that I used, as well as, what the dimensions would be from wood purchased at a store like Home Depot.
List of Materials:
1. Board (either 9 inches wide by 3 feet long or 8 inches wide by 4 feet long)
note: Standard lumber sizes: 10 inch lumber is 9 1/4 inches and 8 inch lumber is
really 7 1/4 inches wide - either will work, see next step.
2. Wood glue
3. Minwax wood finish (I used cherry)
4. Minwax wipe-on poly (I used clear satin)
5. Sandpaper - 80, 120, 220 grit
(If you get wood from a Home Depot type store you might not need the 80 grit.)
6. Minerial spirits
7. Steel wool
8. Disposable gloves
9. Rags (they should be as lint free as possible)
10. Furniture wax (optional)
Tools Required:
These are the tools that I used. With woodworking there are a million ways to do something,
use the tools you have.
1. Table saw
2. Router and router table
3. Router bits - 3/8" straight, 3/8" cove, 1/8" and 1/2" roundover with bearing
(I got these bits in a set of router bits from Harbor Freight.)
4. Sander
5. Drill Press (used to make holes for meters)
6. Adjustable hole saw (Harbor Freight $4.99)
7. Square and ruler
8. Eye and hearing safety protection
9. Small hand saw
Design and Cutting


The 5 Pieces of the Case:
1. Front - 7 3/8 x 9 3/4
2. Sides (2 pieces) - 3 3/4 x 9 3/4
3. Base - 4 3/4 x 10
4. Top - 3 3/4 x 8 3/4
note: dimensions are for 10" wide lumber
Cutting Schedule:
The images below show how to cut the pieces from the board for both "Lumberyard" sized wood and for "standard" size wood. If you can not get 10 inch standard sized lumber, an alternative plan for 8 inch lumber is shown. This option requires some dimensional changes. If you see a drawing with 2 possible values for a dimension, the second value is for the 8 inch lumber option.
Before cutting wood, always check for squareness. Usually if you are using "Lumberyard" wood you will have to establish a true edge. If you purchase your wood from a Home Depot type store, it will usually already have true edges. Use a square to check your board.
The Sides


I use a table saw to make tenons. Set the fence using a spacer block and use the miter gauge to hold the wood. Remove the spacer block and cut a test piece to make sure that your measurement and cutting depth are correct. The depth of the cut will depend on the thickness of your board. The goal is to have a 3/8 inch tenon running down the center of the ends of the piece. The first cut establishes the farthest into the wood that you plan to go for the tenon. In this case, it would be 3/8 inches. After establishing the inner edge, adjust the wood one saw kerf towards the edge to remove waste. Keep doing this until the tenon is formed. For the clock case side pieces, we form a tenon on each end.
A similar technique can be used to make the 3/8 inch through dado (groove) that runs parallel to the front of the piece. Another way is to use a router with a 3/8 inch straight bit.
After the through dado has been formed, cut off the tenons at the front of the piece on both ends to the backside of the dado. I used a small hand saw.
The Front


The front has a 3/8 inch tenon running around the complete edge. Use the technique explained in the previous step.
After the tenons are formed, notch the corners in the same manner that you did the side pieces. See the pictures below.
The Top


The top piece has a boxed U shaped dado (groove) on the underside. The open part of the U points to the back of the case.
Forming this U can be tricky. I recommend marking both the router table and the wood with tape (around the edge so you can see when cutting) as explained in step 7 for cutting the front decorative grooves.
The Base


The base piece has a boxed U shaped dado (groove), similar to the top piece.The open part of the U points to the back of the case.
Use the 3/8 inch cove bit to rout a cove along the front and sides of the base on both the top and bottom sides of the base. Do not rout the backside of the base. See the pictures below to see what it should look like. The point of the edge formed by the top and bottom cove treatment should be 1/4 inch.
After routing the U into the base you should be able to dry fit the pieces. You might have to do some minor adjustment to get everything to fit. The fit should be snug, but not so snug that you need a mallet to fix the pieces together. See picture below.
I suggest that you glue the top and sides together at this time. The front should be in place to prevent a bad fit. Be careful not to glue the front into the case at this time. After the glue drys (8 hours), sand the face of the sides and the edge of the top smooth. There should be no bump at the joint. If you have a low spot, fill it in with sand-able putty that has been stained the color of the wood you are using. Make sure you keep the front piece in place. There is a danger of cracking the top if you remove it.
Front Decorative Grooves


One way of doing this is to use tape on the item you want to rout. Mark where the start and stop points are located, extend the tape around the piece so you can see the locations of the points.
You also have to mark where the edges of the cutting blades of the bit are on the router table.
In the second picture below, the 2 bars of tape define where the router bit is located. Again the tape should extend far enough so that you can see the location.
The procedure for making a non-through cut is to position the piece at the starting point of the cut slightly elevated so that the cutter is not engaged. Line the starting point to the tape defining the cutter edge, and gently push down on the piece until the router bit has started the cut. Move the piece until the end point tape lines up to the cutter's edge tape and lift piece from cutter.
Assuming that the router moves right to left when cutting.
-- Holding piece above cutter, line up starting mark tape with the left cutter edge tape
-- Plunge router into bit
-- Push to the left until ending mark tape lines up with the right cutter edge tape
-- Lift piece from router
Radiusing the Front Edges


With the front piece in position radius the front and topsides of the top piece with a 1/2 inch roundover bit.
Change to a 1/4 inch roundover bit and radius the outside front edge of both sides.
Remove the front piece and radius the inside front edge of each side and the bottom side of the top with a 1/4 inch roundover bit. Be careful not to stress the top.
Drilling the Meter Holes


When everything is marked out, tape completely around the edge of the paper, so it will not move.
Use a punch to dent the wood at the the center of each circle. This will keep the pilot drill from skidding across the case front.
Instead of using the drill bit of the circle cutter to make a pilot hole use a separate drill bit, preferably one designed for wood.
Finally use the hole cutter to cut the meter holes. Make sure you have a scape piece of lumber under the case front to prevent the hole cutter from damaging your drill press table.
Sanding and Finishing


Sanding:
Sand the pieces using a progression of sandpapers (coarse, medium, and fine). When you have finished sanding all the pieces, wipe them down with a cloth to remove as much dust as possible. Next, wipe the pieces with mineral spirits to remove the final bit of dust. Let the wood sit until the mineral spirits has evaporated (15 - 30 mins).
Finishing:
Use Minwax wood cherry finish to stain the wood. Make sure you follow the directions on the can. After staining the wood, wipe on two coats of Minwax wipe-on poly clear satin finish separated by about 16 hours. When the finish has well dried (at least a day) use steel wool to buff out the finish. Carefully remove all the steel wool dust. Wipe on a final coat of Minwax wipe-on poly and let the finish harden for a day. As a final step, use a soft dry cloth, to buff the case.
Final Gluing Up

I glued the front only at the bottom side. The other three sides of the front are allowed to float in the dadoes of the sides and top. This will allow the front panel to change with the weather and not crack.
Inserting the Meters and Electronics

Place the meters in their respective positions and connect the meter harness. The battery case and project board are attached to the inside of the case using Velcro.
Next, the meter and battery connections are made to the project board.
The final item on the case build is to stick circular felt pads to the underside of the case. This lifts the case up just a little highlighting the shaped base and prevents furniture scratching.
Finished Case and FAQs
FAQ:
Q: What type of wood did you use?
A: Jatoba (frequently referred to as Brazilian cherry).
Q: Would you use it again?
A: I love the color of the wood. It is very hard. While I was working it, I did not think I would ever use it again. Now after seeing how it finished out, I would like to try it on another project.
Q: Was the wood expensive?
A: The 7/8" x 9 5/8" x 36" board cost me $15. I priced an 3/4" x 7 1/4" x 48" board of Oak at Lowe's for $16.75. I believe the price is reasonable.
Q: Did you use a plan?
A: No, this is completely my design. I enjoy going through the concept, design, build cycle.
Q: Where are the plans for the clock's electronic part?
A: See the instructable:
https://www.instructables.com/id/MSP430-Based-Chronulator-using-Launchpad-chip