Make a Dynamic Slideshow of Your Snaps With Photo Story 3
4451 Views, 9 Favorites, 0 Comments
Make a Dynamic Slideshow of Your Snaps With Photo Story 3
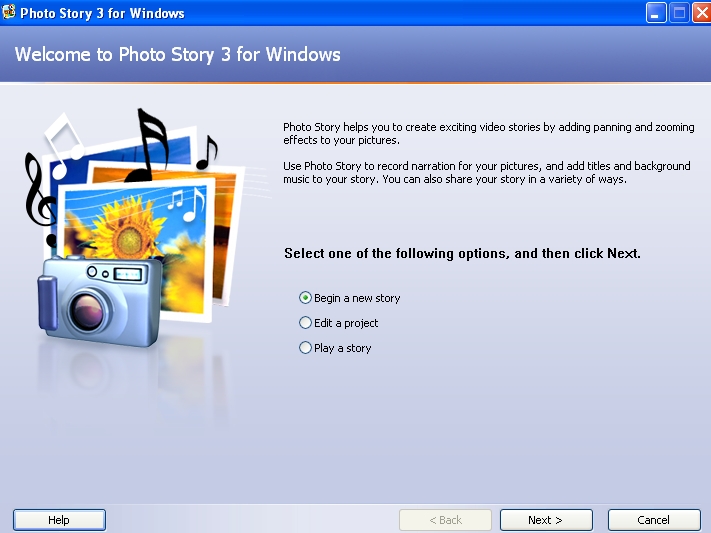
This is one way to make a nice .wmv photo slideshow with panning and zooming effects using mainly free software. I expect there are easier ways, but I couldn't find an instructable on the subject. My method goes round the houses a bit, but it works. I'd love to hear from anyone who has an easier one.
Using Windows Movie Maker and a DVD burner you can also put it on a DVD so your grandchildren can watch it on TV. But that's for another instructable!
I'm posting this because it took me ages to figure it all out, and I probably won't use it again for six months, by which time I will have forgotten it all again. So I'll come back here and see what I did. And maybe if you haven't been through the process already it will speed things up for you.
This instructable gives you guidance on Photo Story 3, but assumes you already know how to use your scanner, Irfanview (or your fave graphics software) etc. Most of the processes are very intuitive, but if there is an area I haven't covered that needs more detail please comment.
Large parts of my knowledge have been gleaned from the work of Papa John: www.windowsmoviemakers.net/PapaJohn. You will find more info there - including how to do 16:9 and even HD!
* NB A Photo Story file is limited to 300 pics. But you can make several and combine them in Movie Maker.
What You Need
You will need:
Hardware:
- a PC * preferably with XP or Vista
- a scanner
- a DVD drive and some blank discs
(You don't have to have these programs: you can use whichever software you like. These are just the ones I find useful and free/cheap.)
To edit your pics:
- Irfanview (free download from Tucows)
To make the .wmv slideshow:
- Photo Story 3 for Windows (free download from Microsoft)
You may want:
To rip music from CDs:
- CDex (free download) or your favourite CD ripping software
- a PC mic (if you want to do a voice-over)
To convert .wmv to .avi:
- Windows Movie Maker (free with XP)
To make a DVD:
- DVD burning software such as Roxio Copy and Convert (20 quid)
There may be a free (and reliable!) way to convert AVI files to DVD, but I couldn't find one. If you know of a good one, please comment.
Hardware:
- a PC * preferably with XP or Vista
- a scanner
- a DVD drive and some blank discs
- If you have an Apple it will do all the work for you and you don't need this tutorial :-)
(You don't have to have these programs: you can use whichever software you like. These are just the ones I find useful and free/cheap.)
To edit your pics:
- Irfanview (free download from Tucows)
To make the .wmv slideshow:
- Photo Story 3 for Windows (free download from Microsoft)
You may want:
To rip music from CDs:
- CDex (free download) or your favourite CD ripping software
- a PC mic (if you want to do a voice-over)
To convert .wmv to .avi:
- Windows Movie Maker (free with XP)
To make a DVD:
- DVD burning software such as Roxio Copy and Convert (20 quid)
There may be a free (and reliable!) way to convert AVI files to DVD, but I couldn't find one. If you know of a good one, please comment.
OK - Let's Get Started
1. Scan your pics into the computer.
2. Load them into Irfanview and straighten them (F12 for toolbox) and then crop them. NB: Irfanview is rubbish at correcting red-eye: use something else (eg Picasa - free download from Google. There are tools in Photo Story - the buttons underneath Winston in the screenshot - but they are basically rubbish).
You may want to resize/resample the files in Irfanview so that they are not too big. If all your pics are huge the files take forever to load; your eventual resolution will only be 768x576 anyway so more rez is wasted. I find under 1000 x 1000 pixels works well.
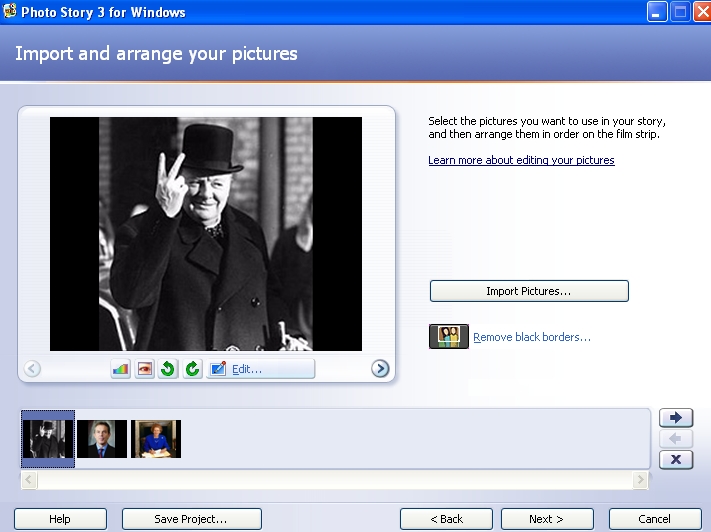
3. Open up Photo Story 3. On the opening screen NEW PROJECT is selected by daefault. Click NEXT and then IMPORT PICTURES. Load up some pics. Click NEXT. I suggest you ignore the REMOVE BLACK BORDERS thing: I find it just messes up your formatting. So when it asks incredulously if you REALLY want to continue without removing black borders just say YES. Unlike Barbara Bush.
For this example, we'll be making a slideshow about three British prime ministers. Here they are loaded into Photo Story. You can see that the first pic is showing in the main screen and all three are showing in the strip at the bottom.
Start Small (I Wish I Had!)
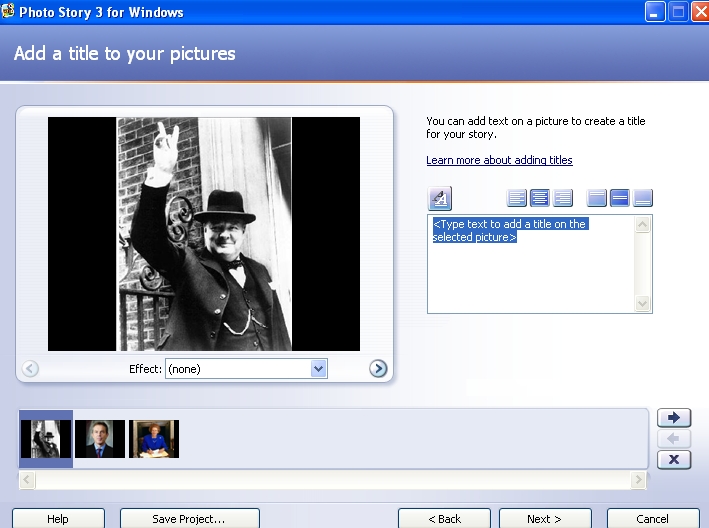
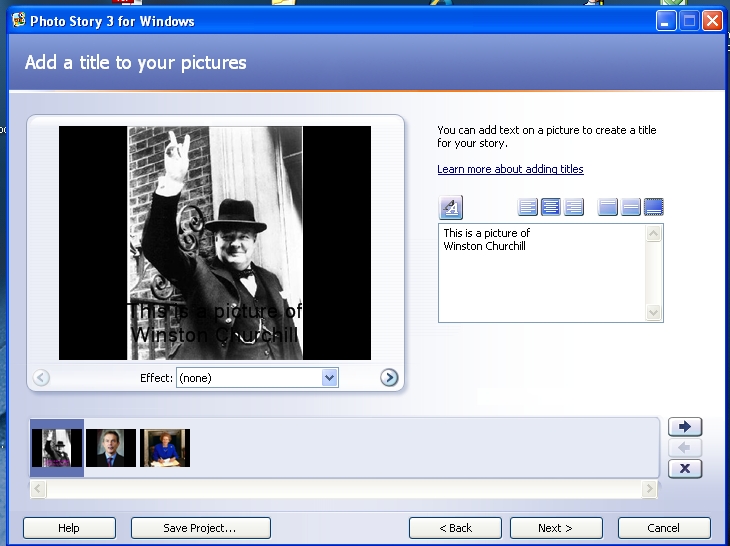
May I suggest you kick off (as I didn't. Bother.) with a short slideshow just as an experiment - say 5-10 pics? It helps to get to know the process before you start using big files. Once you have learned the ropes, you can build that 40-minute slideshow.
Now it says 'You can add text on a picture..' Just type some text into the box ( that's right - the one where it says type text...).
Format Text
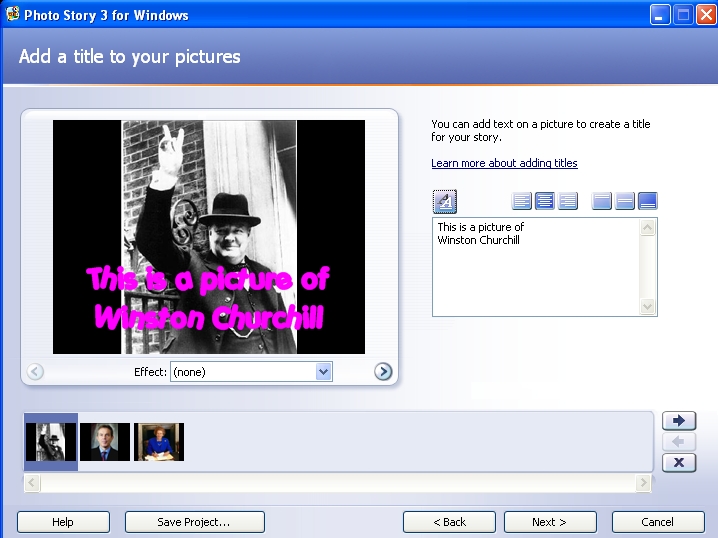
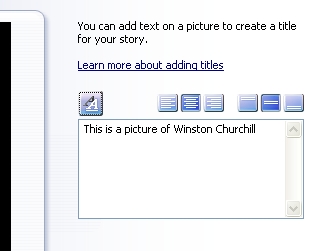
Maybe you could just see my black text appearing right across old Winnie's waistcoat?
Click on the AA symbol and you can change font, point size and colour. Click on the buttons to the right and your text centres, ranges left or right, appears at top, bottom or middle of the frame.
NOW we can see the writing... Tasteful, innit?
Notice under the box where Winnie appears a button saying EFFECT (none). We'll get to that later.
Have a Look at What You've Done
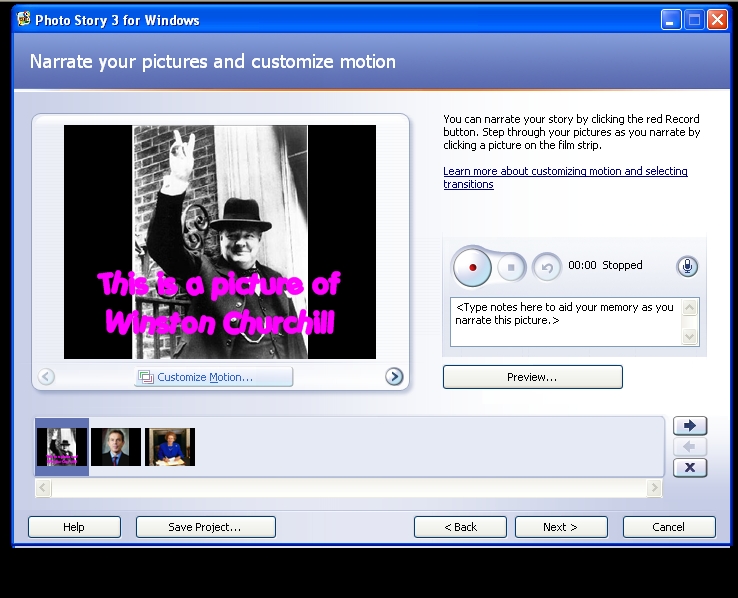
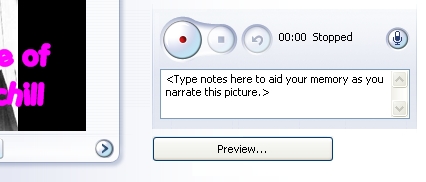
Now up comes a screen dealing with various things.
Notice that under WSC's tummy it now says CUSTOMIZE MOTION. We'll get to that later. The red button, the TYPE NOTES message and the STOPPED message are for voiceovers. We'll get to them later too.
Right now, click on PREVIEW to see what we are getting at. A new little window opens up, and I hope you will see our three great leaders (or whatever pics you have loaded up ) appear in succession with some panning and zooming effect added. It already looks SO much better than just a succession of jpgs.
First Rule of Computing: You Can Never Save Too Often
So let's close the PREVIEW window and save the project by clicking on, ummm, SAVE PROJECT.
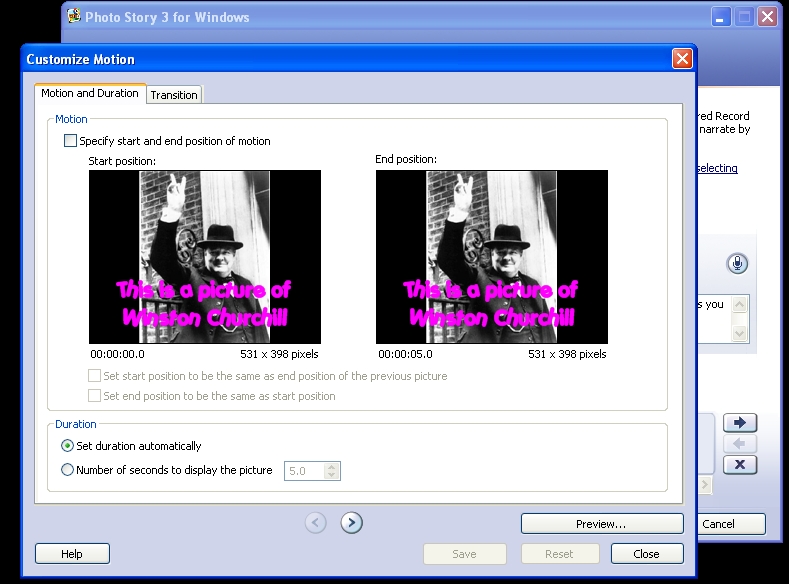
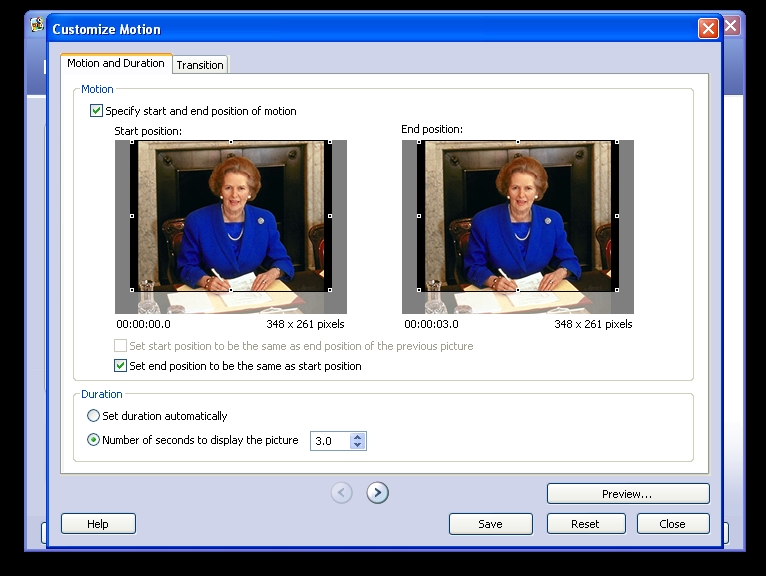
Done that? Great. You'll see we've been dragged back to the voiceovers screen. Let's see if we can't make those zooms and pans a bit more logical. Click on CUSTOMIZE MOTION please. You should get something like the first screenshot.
From the top, then.
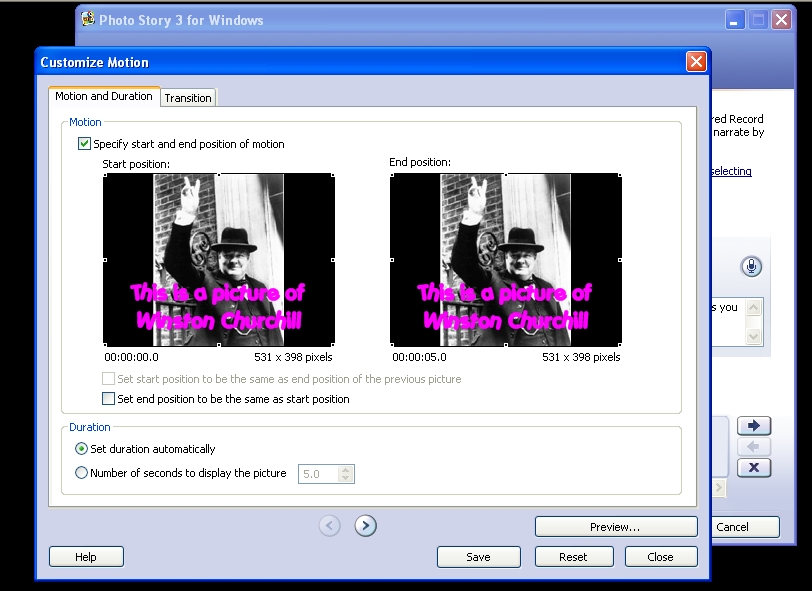
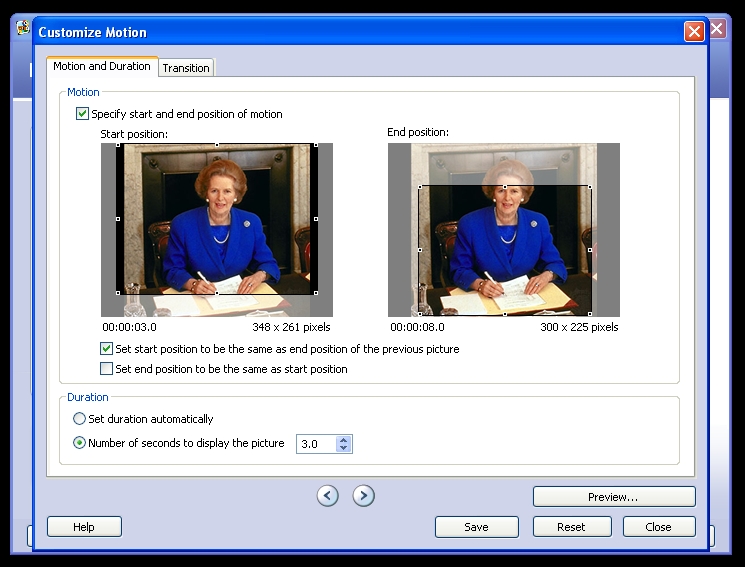
The tick box SPECIFY START AND END POSITION OF MOTION allows you to open up a dialogue handling where images start and finish. Click in it please. See how the box below opens up? (Second screenshot.)
Now you can click in SET POSITION TO BE... and SET DURATION... / NUMBER OF SECONDS...
Change How the Pic Moves in the Frame
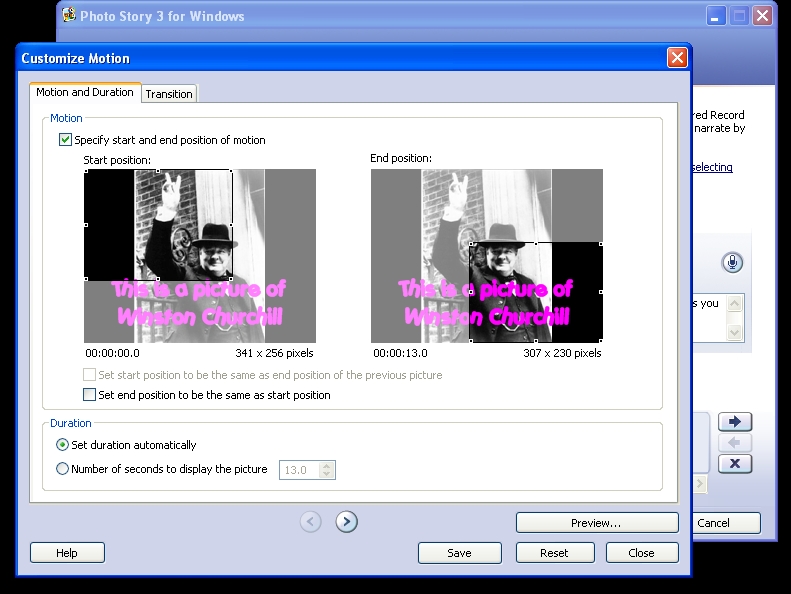
There are little handles around the two pics marked START POSITION and END POSITION. If you grab hold of thes pics with the mouse you can move them around. Have a go. Click on PREVIEW to see what you did. Hmm. Getting sexier all the time. Fiddle around some more till you like what you have. Save.
Now click on the little > button near the bottom middle to go to the next picture and do the same again.
Now click on the little > button near the bottom middle to go to the next picture and do the same again.
Next Bit
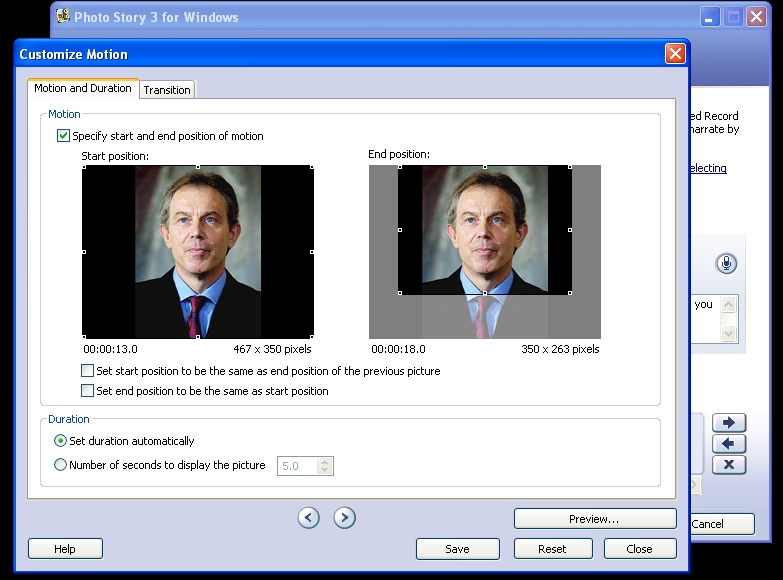
Now we are looking at the second pic (Tony Blair in my example), and it's the same deal - you can move the start and finish frames around.
There are two new things to note though:
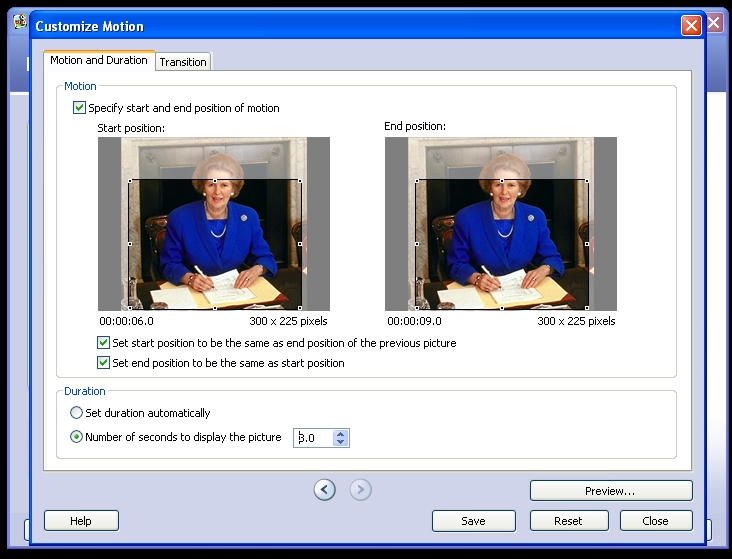
1) the box marked SET START POSITION TO BE THE SAME...
This allows you to tell the current pic to start in the exact part of the frame where the last one left off. This gets useful later!
and
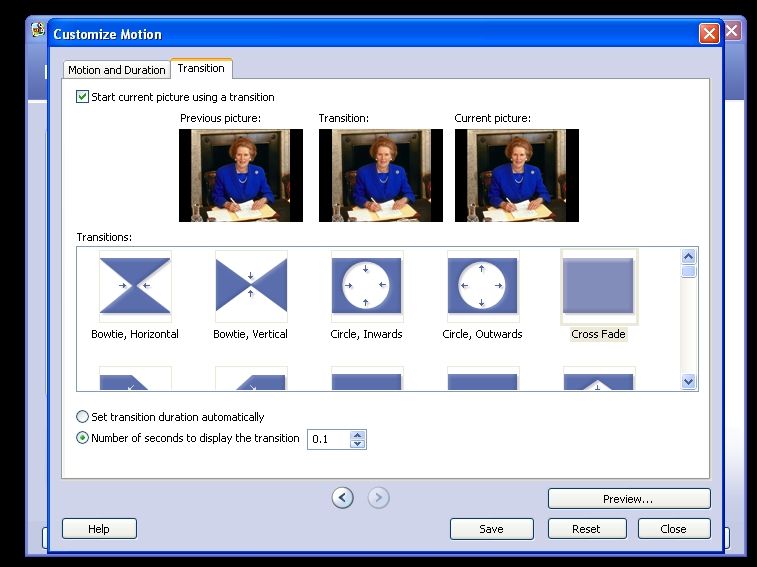
2) the tab marked TRANSITION. Click on that.
Transitions
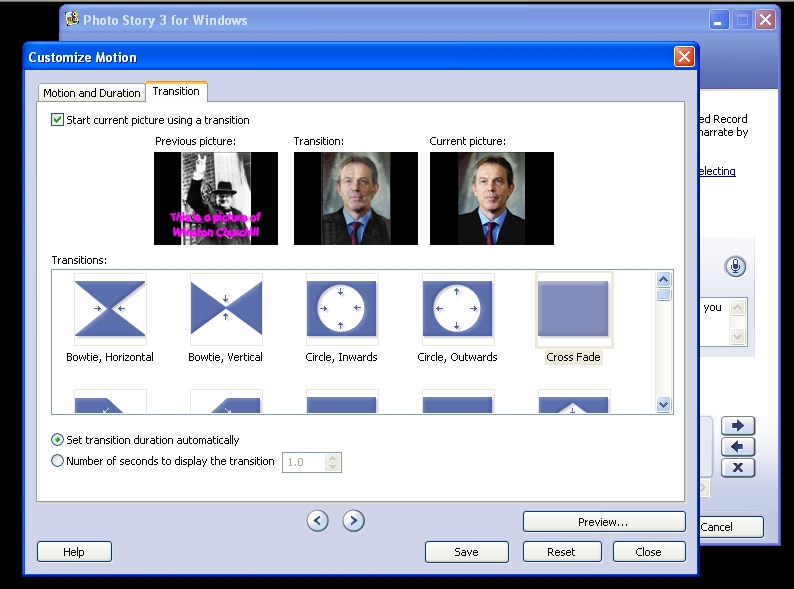
This window allows you to decide how the last picture will change into the next.
NB: The current picture is the one on the right and the previous is on the left. the middle frame shows the transition happening - and by default it should be giving you a cross fade.
OK, let's go nuts. Click on BOWTIE HORIZONTAL. Watch the effect in the middle window. Scroll down to the very bottom and click on WHEEL COUNTERCLOCKWISE. See what that does?
Choose something. Click on SAVE. Click on PREVIEW.
OK, now leave those jazzy transitions alone: good taste must prevail. Limit yourself to CROSS FADE, FADE TO BLACK, and a very occasional excusion into the realms of DIAGONAL UP LEFT - on your birthday. (Alright, I know you won't - but try for restraint, OK? Unless you WANT it to look like an '80s corporate video?)''
Now click the button NUMBER OF SECONDS TO DISPLAY THE TRANSITION and change the number to something else. PREVIEW. Cool, huh?
OK. Now SAVE and CLOSE to return to the previous window. Click on NEXT to go to a window about adding music.
Add Music
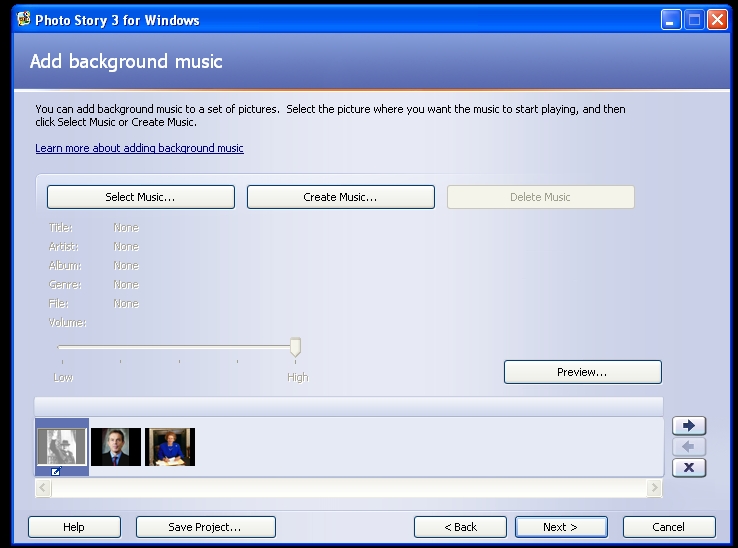
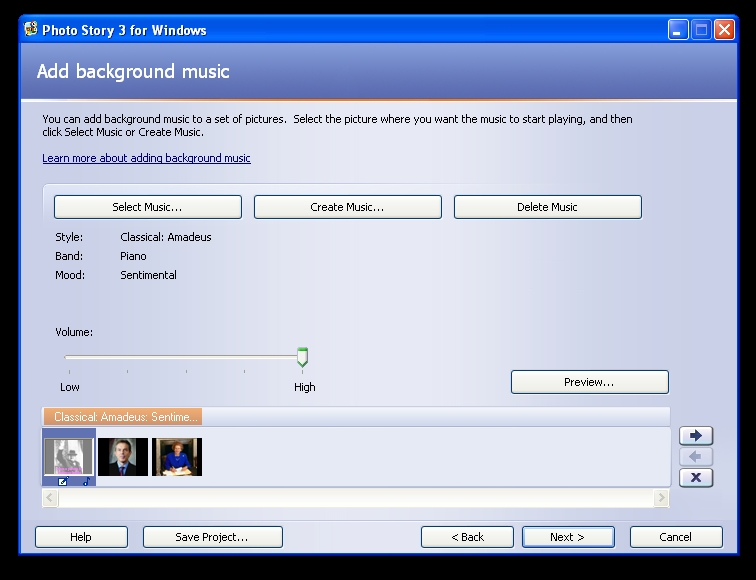
If you choose SELECT MUSIC you will call up a file selector which allows you to put in a sound file like a wav or an mp3 from your computer. Obviously you'll be using something legal.
If you choose CREATE MUSIC, you get to the next screen which gives you Photo Story's music generator. This is great fun! Let's go there.
NB: In the slideshow the music will start when the slide highlighted opens.
If you choose CREATE MUSIC, you get to the next screen which gives you Photo Story's music generator. This is great fun! Let's go there.
NB: In the slideshow the music will start when the slide highlighted opens.
Choose Your Cheesy Music, and Narrate
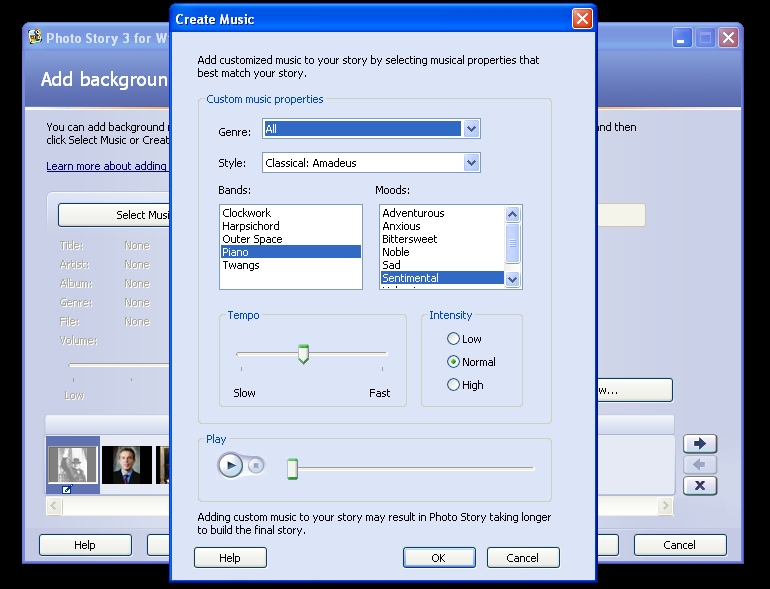
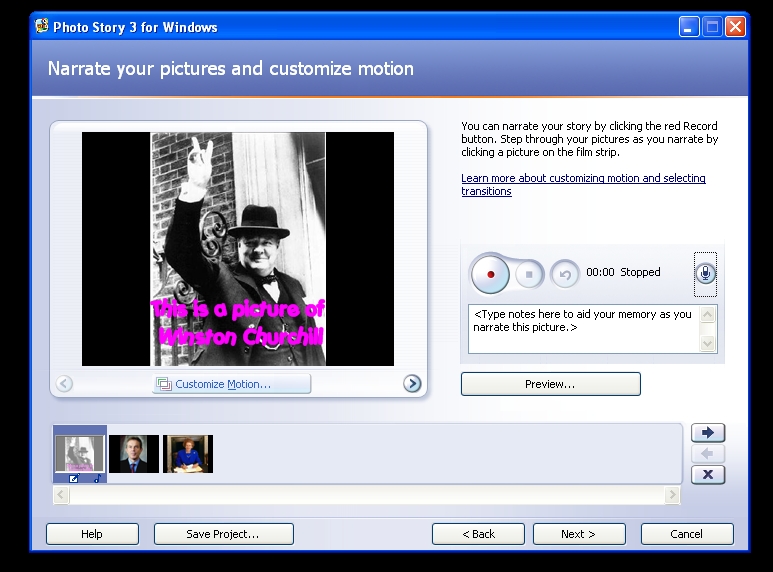
Have a play around with these options, and click on the go button to hear the effect.
When happy, click on OK, go back to the ADD BACKGROUND MUSIC screen, and click PREVIEW.
Crikey! What a difference the music makes, doesn't it?
This would be a good time to SAVE. Then click on the back button to return to the NARRATE YOUR PICTURES screen. Let's do a voiceover: click on the red button and speak into the microphone. (You do have a mic connected to your PC, don't you? We covered that in Step 2.)
and... PREVIEW.
Now you should hear the cheesy music AND hear your voiceover. Probably the balance is wrong, so you'll have to either a) shout or b) go to the music page and adjust the volume slider.
TIP:
The frame will last as long as your voiceover. If you talk for half an hour, you'll get the same pic on the screen for half an hour. If you want the pictures to flow over your voiceover without being held up, record your narration as a wav or an mp3 and import it as a soundtrack in the music section. Audacity software is good for this - free download from audacity.sourceforge.net.
Effects; Blank Pages
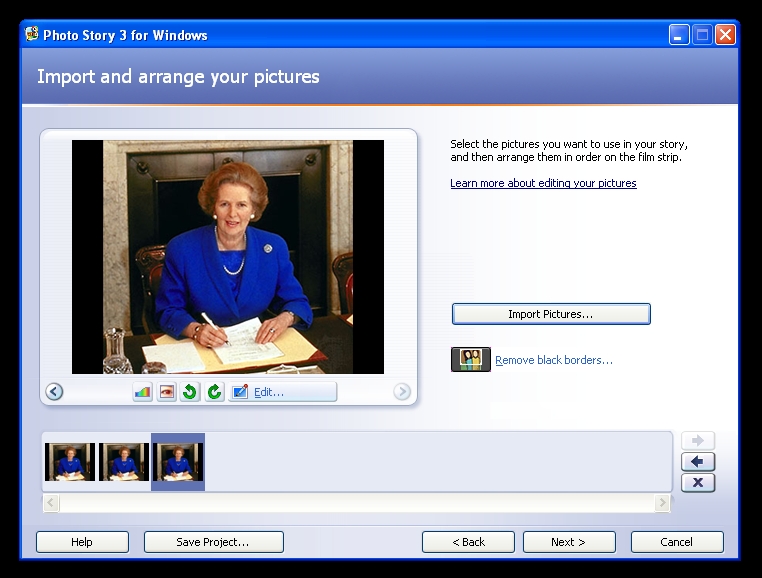
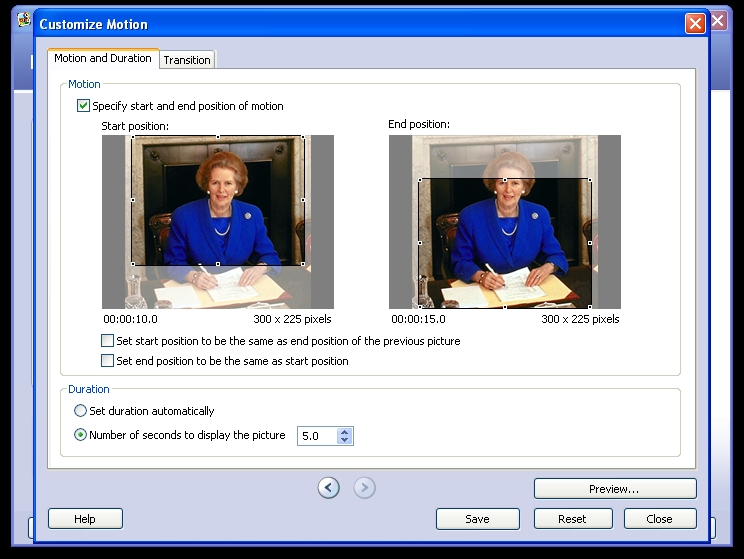
Okay - we've covered most of the bits of Photo Story 3 that you need to know about. You can play around and find out more -it is very intuitive.
EFFECTS
On the ADD A TITLE screen you'll see EFFECTS below the pic. Most of these are pretty rubbishy: if you want a pic to look like a watercolour, there are better graphics progs out there to do it. But sometimes it's nice to fade to a sepia version of the same pic, or whatever.
TIP
It's a good idea to create and import a blank white and a blank black page. That means you can fade to black - and hold it. Ditto white.). You can also import a blank white page and put black text on it - or vice versa.
You may find yourself also creating blank pages with different colours: you can get nice effects by fading to a blue blank page - or whatever. See video for examples.
Hold and Pan and Hold Again
TIP
When you pan across a photo, you very often want to linger on a part of the pic: you might want to open with a held shot of the left hand side, then pan to the right and then hold the right hand side to finish. Here's how:
- Import the same pic three times.
- In CUSTOMISE MOTION arrange the first pic to stay motionless for, say, three seconds, (tick the boxes SPECIFY START... and SET END...; click the radio button for NUMBER OF SECONDS and adjust the time you want the pic to be displayed).
- In CUSTOMISE MOTION arrange the second pic to start where the old one left off (SET START POSITION...)
- In CUSTOMISE MOTION arrange the third pic o start where the old one left off (SET START POSITION...) and stay motionless (SPECIFY START... and SET END...).
- In TRANSITIONS, adjust all the transition times to a minimum 0.1 seconds to avoid shadowing
- Adjust the duration of the slides to suit (click the radio button for NUMBER OF SECONDS and adjust the time you want the pic to be displayed)
Saving As a Wmv
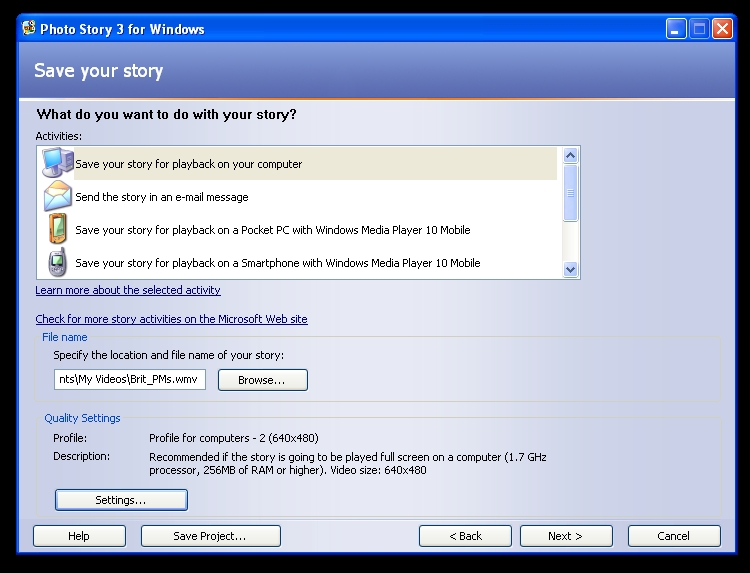
Now let's save a video. Go through the screens to the music screen, and then click NEXT. Here you choose the resolution of the resulting video (click on SETTINGS to change it) and where the resulting file will be saved. When you're happy click NEXT again and a wmv file will be saved.
Example Videos

The videos show some examples. There are more on YouTube or at the Photo Story and Movie Maker forums. (NB The quality is reduced when you upload: using the originla files, or on a DVD the quality is excellent.)
Using templates:
Pan:
Zoom:
Pan and zoom:
Zoom and repeat:
Slant:
Morphing (well, sort of!)
Fade in text:
Fade from b/w to colour and vice versa:
Don't overdo the transitions:
Or the effects:
And here's a closing title sequence I cooked up (yes that's a real wombat sample!):
Using templates:
Pan:
Zoom:
Pan and zoom:
Zoom and repeat:
Slant:
Morphing (well, sort of!)
Fade in text:
Fade from b/w to colour and vice versa:
Don't overdo the transitions:
Or the effects:
And here's a closing title sequence I cooked up (yes that's a real wombat sample!):
The End
I hope you have enjoyed this instructable and look forward to your comments.