Make Easy Spray Paint Stencils in Inkscape
by SiddharthS141 in Design > Digital Graphics
5025 Views, 22 Favorites, 0 Comments
Make Easy Spray Paint Stencils in Inkscape


Honestly, once I figured out the trick to making stencils, every flat surface in my house has now become a canvas. Let me share my workflow so that you too can make awesome stencils from images.
Note: I laser cut my stencils, which allows me to do a certain level of precision easily. Remember, if you are using an x-acto knife to make your stencils, you may want to keep them simpler or you will suffer.
Yes, I am speaking from experience.
Through this workflow, I have added images and a couple videos of my processes to try and explain things better. Hopefully they help. Let me know in the comments if you have any questions.
Supplies
Materials:
- Heavier weight paper or thin, laser cuttable plastic – something to cut the stencil out of that isn’t too thick (< 1/16th inch thick).
- Inkscape or your preferred vector editor (which should be Inkscape. Inkscape is the best)
- Laser cutter, or, if you’re studying to become a surgeon, an x-acto knife
- Spray paint of various color
- Flat surface to paint on – I used an old coffee table that I wanted to spruce up
Importing and Tracing an Image
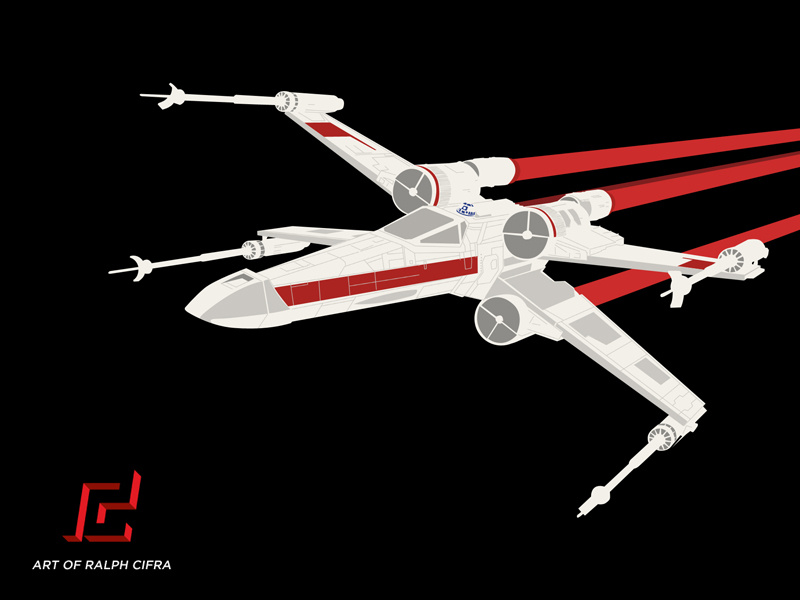
So for this demo, I am going to use an image of an X-wing fighter that I found online:

Source because plagiarism isn’t cool: https://vectorified.com/image/x-wing-vector-22.jp...
When selecting an image for tracing, consider the following:
- It is hard to do color gradients with a spray paint stencil
- If the details are too fine, they may not be cut properly and blurring at the edges of a stencil affects the sharpness of that detail
- You will have to cut out that detail (It’s not as bad as doing it by hand, but it’ll still be difficult)
I chose this image because it does not have gradients/has regions of one color and the details are not too fine. The exception being the linework on the body, but I am going to get rid of that. Some common search terms I look for when finding such an image are “vector,” “minimalist,” “wallpaper” and “black and white” I also find that comic book style art also works well for this process.
- Open up inkscape and click File > Import.
- Locate your image and click Open
- Then, my favorite tool in all of inkscape: bitmap trace!
- Select the image in inkscape, then click Path > Trace Bitmap
- A GUI pops up. In the “Multiple Scans” section, select “Colors.” Also make sure “Live Preview” is selected to see the results of your trace before executing it. Increasing the number of scans adds more detail. I use no more than 8 scans, even for the most detailed images. If you need more than 8 to capture the detail you want, maybe spray paint isn’t the best medium for the image.
- The other reason I don’t go more than 8 is because each scan will be a vector. Operations on vectors can stress your computer, especially when there are lots of nodes describing this vector.
- For this image, 4 scans worked fine for me. I ungrouped them and separated them.
- The last processing I will do in this step is to get the holes of the scan as a solid body, rather than the negative that exists right now. To do so, I select an image, click Path > Break apart, then click on the parts you do not want and delete them.
 Result after trace
 Layering of a Stencil – Order and No Holes

Video Demo:
Here is a video demo of the below process. I converted a green lantern logo into a stenciled version that won't fall through when cut. The notes below elaborate on the video.
Layering:
This idea can be a bit tricky to grasp as we have grown up with coloring books where each region is a separate color – we do not color everything and then paint over the colors. In stencil design the order matters, but you do not have to worry about your lower level stencils having the same detail as the upper level stencils. An example helps to elucidate this idea:
 Separate stencil layers
  Stacked stencil layers
Holes:
This idea is hopefully a bit easier to grasp: if you have a shape inside another shape in your stencil, the outer shape is the only one that will be seen because the smaller shape will fall out with the rest of the inside of the bigger shape. Again, an example to explain:
Path breaking...
...is the key to figuring out layers in a stencil. When you select a body and click Path > Break Apart, the result will separate all the independent closed paths in a shape. This lets you isolate the holes that are contained within other shapes and move them away to create a new layer of the stencil.
 Complex separate stencil layers
  Complex stacked stencil layers
The node tool…
…is a powerful friend when making fine detail changes to the shape and continuity of a curve. Changing the position of a node changes the shape of the curve. You can use the node tool to break paths and rejoin them in different ways. I use the node tool to connect holes by joining the inner body’s node path with the outer body’s node path. This is the key tool to fixing any holes that you could not rectify with the "break apart" path step.
Laser Cut the Stencil


Once you have a stencil with no holes that is properly layered, you can add an outline to the shapes by holding shift and clicking a color. You need this outline so that you can make an SVG file to send to a laser cutter to cut out of a sheet plastic/etc. Make sure you also add a rectangular boundary to each of the stencils so that they mask the rest of the space that isn’t holes.
If you click File > Save As, you can then save this outline file as an SVG or a DXF – or whatever file type your laser cutter needs.
The Spray Paint Process


Once you have your stencil and a flat surface to spray on, you should prep the surface however you want.
I had an old coffee table that I wanted to spruce up, so I scraped off the paint, sanded it to 200 grit and put a layer of black wood paint on it.
You are now ready to spray. Make sure you have the stencils in the order you will be spraying them. You mount the stencil on the surface and weigh it down. I used rocks from my back yard. It does not have to be fancy. I used old paper grocery bags to cover the rest of my table just to protect it from any stray spray paint. Then, after shaking the can to activate the paint and aerosol, I held the can about 1 foot away from the stencil and sprayed. Nice streaks across, not too heavy application of paint.
It is important to let the paint completely dry before removing the stencil and moving on to the next one. I recommend a warmer day that isn’t rainy – the paint dries a lot quicker.
Other Designs and Demo

Here are some other stencils I made along with a demo video of me creating a new stencil of Ahsoka Tano (Star Wars: The Clone Wars) from scratch so you can see my thought process.
Ahsoka image: Link to Ahsoka Image
Green Lantern image: Link to Green Lantern Image
I have also attached the link to a bunch of stencils I have made, including ones that have been featured in this instructable. Thanks for reading! I hope you enjoyed this! Let me know any feedback in the comments.