MacOS Ventura for Unsupported Macs
by catlover9000 in Circuits > Apple
10181 Views, 0 Favorites, 0 Comments
MacOS Ventura for Unsupported Macs


Get macOS Ventura on unsupported macs. Works amazing! and totally free, too. Give it a go!
Supplies
1X USB stick (15 GB or more)
1X USB Stick (Enough to fit a backup of your data)
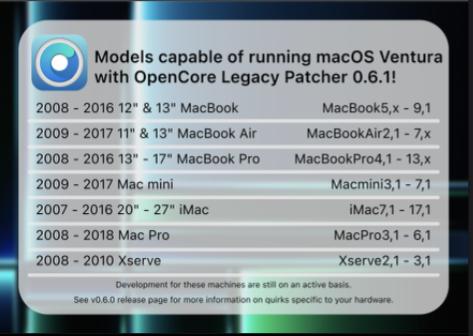
Can You Patch It on Yours?

look at the picture and see if you’re Mac falls into the supported patching year range.
Download OpenCore
If you can patch it on your Mac, (availability in step 1) go to https://github.com/dortania/OpenCore-Legacy-Patcher/releases/download/0.6.7/OpenCore-Patcher-GUI.app.zip to download the patcher program.
Making the Installer and Backing Up Your Data
Take that USB Stick that you have a throw it into the USB port (Don’t actually slam it into the port, insert it gently or it could cause damage). Open the OpenCore app (it’s in your downloads folder, if you haven’t moved it). And select “Create macOS Installer” then choose 13.3.1 (the best one - but choose your pick) then choose your USB Drive that you hopefully didn’t slam it into the port. It will begin making the USB a patched installer. Wait 15-30+ minutes. In the main-time, you should backup your data. Use Time Machine to do this. See: https://support.apple.com/en-us/HT201250
After backing up your data and the OpenCore thing is finished, you’ll get a couple of alerts from OpenCore. Just click the buttons in blue on all of them except the last one (reboot). We’re going to do this separately to make things easier for you.
Booting Into the Installer
Reboot with Alt (option).
When you see the boot manager (a black screen with icons on it) select the icon with the OpenCore icon on it, then, Install macOS.
Installing Ventura
Select a language then click continue.
Select your user account, enter the Password, then click next/continue.
Select Disk Utility, then click continue.
Select the top icon, then click erase.
Enter your desired disk name in the first field, APFS in the second, and GUID Partition Map in the third. Click the next erase button.
After it’s finished erasing, press Command + Q then select Install macOS Ventura. Follow through the onscreen instructions then choose the name of the disk you formatted a few minutes ago. Wait about 25 minutes then it should reboot. Press command + option then choose the icon with the OpenCore icon on it, then choose the icon with the disk icon on it. It will cycle through this a few times, just keep rebooting with option.
Set It Up.
After rebooting many times, go through the setup screen. And when the screen shows up, restore your Time Machine backup. After that wait a minute, maybe open an app, then a pop up should appear. Install OpenCore to the disk using the blue button. If you don't do this, you need the USB Stick to boot your Mac.
Finished
You’re all done. Enjoy the new features!