MAX6675 Temp Sensor With XIAO M0
by Arnov Sharma in Circuits > Arduino
1810 Views, 9 Favorites, 0 Comments
MAX6675 Temp Sensor With XIAO M0
.gif)
.gif)

Hello everyone, welcome back.
Here's a fun little project that involves the MAX6675 sensor and the XIAO M0 DEV Board.
This automatic cut-off setup was created for an upcoming hotplate project. The idea is to use a MAX6675 temperature sensor to measure temperature. The load connected to the D1 pin is turned off when a specific temperature is reached, and it turns back on again when the temperature returns to the set point.
This is a proportional-integral-derivative, or PID, example, where the load is controlled by the state of the sensor readings.
This is simply a how-to tutorial for using the MAX6675 with the XIAO DEV Board; in general, this configuration will be used in an upcoming hotplate project.
Alright, let's get started with the project.
Supplies
Following were the materials used in this build-
- MAX6675 TEMP SENSOR with NTC Probe
- XIAO M0 DEV Board
- Breadboard
- Jumper wires
- Lighter (source for heat)
MAX6675 TEMP SENSOR


The MAX6675 is a popular digital temperature sensor that uses the thermocouple principle to measure temperature. It can measure temperatures from 0°C to 1024°C with a 0.25°C resolution. Here are some key details about the MAX6675 temperature sensor:
The MAX6675 uses a K-type thermocouple for temperature measurement. A thermocouple consists of two different metal wires joined at one end. When there is a temperature difference between the two ends, it generates a voltage that can be measured and used to calculate the temperature.
The MAX6675 provides a digital output in a 12-bit format over an SPI (Serial Peripheral Interface) interface. This makes it easy to interface with microcontrollers like Arduino or Raspberry Pi.
The sensor has a resolution of 0.25°C, which means it can detect temperature changes as small as 0.25 °C.
The MAX6675 typically operates at 5V, making it compatible with most microcontrollers. Some variants might work at lower voltages as well.
The MAX6675 has built-in cold-junction compensation. This means it compensates for the temperature at the point where the thermocouple wires are connected to the MAX6675 chip.
The sensor has three main pins: VCC (power supply), GND (ground), and an output pin that provides the digital temperature reading. It also has a couple of additional pins for SPI communication (SCK, CS, and MISO).
The accuracy of the MAX6675 depends on the quality of the thermocouple being used. Typically, it has an accuracy of around ±2°C.
When using the MAX6675 sensor, you need to connect it properly to your microcontroller, read the digital output using SPI communication, and then convert the digital reading to actual temperature using the provided formulas in the datasheet.
Make sure to refer to the MAX6675 datasheet and technical documentation for detailed information on its usage and specifications, as these details might vary slightly between different manufacturers or versions of the sensor.
SEEED XIAO DEV BOARDs


The Seeed Xiao is a series of development boards that provide a compact and versatile platform for prototyping and building electronic projects.
The Xiao boards are designed by Seeed Studio and come in different versions, each catering to specific requirements and functionalities.
The original Seeed Xiao board features an ARM Cortex-M0+ microcontroller and offers a rich set of I/O pins, including digital, analog, and specialized communication pins. It also has a built-in micro USB port for programming and power supply. Additionally, Seeed has released variants such as the Seeed Xiao Lite, which is a smaller and more affordable version, and the Seeed Xiao RP2040, which is based on the Raspberry Pi RP2040 microcontroller and offers enhanced processing power and connectivity options.
The newest XIAO ESP32S3 Sense from SEEED was just released; it features the ESP32S3 32-bit dual-core Xtensa processing chip, as well as an inbuilt camera module and a digital microphone.
Regardless of the version, Seeed Xiao development boards are popular choices among hobbyists, makers, and professionals alike due to their compact form factor, extensive I/O capabilities, and ease of use for a wide range of projects.
You can check out more details about the XIAO M0 below.
https://www.seeedstudio.com/Seeeduino-XIAO-Arduino-Microcontroller-SAMD21-Cortex-M0+-p-4426.html
For this project, we will be using Seeed XIAO M0, which is based on the powerful SAMD21G18 microcontroller, which is part of the ATSAMD21 family from Microchip/Atmel
Seeed Fusion
Seeed Fusion offers one-stop prototyping for PCB manufacture and PCB assembly, and as a result, they produce superior-quality PCBs and fast-turnkey PCBA within 7 working days.
Seeed Studio Fusion PCB Assembly Service takes care of the entire fabrication process, from PCB manufacturing, parts sourcing, assembly, and testing services, so you can be sure that they are getting a quality product.
After gauging market interest and verifying a working prototype, Seeed Propagate Service can help you bring the product to market with professional guidance and a strong network of connections.
Basic Setup

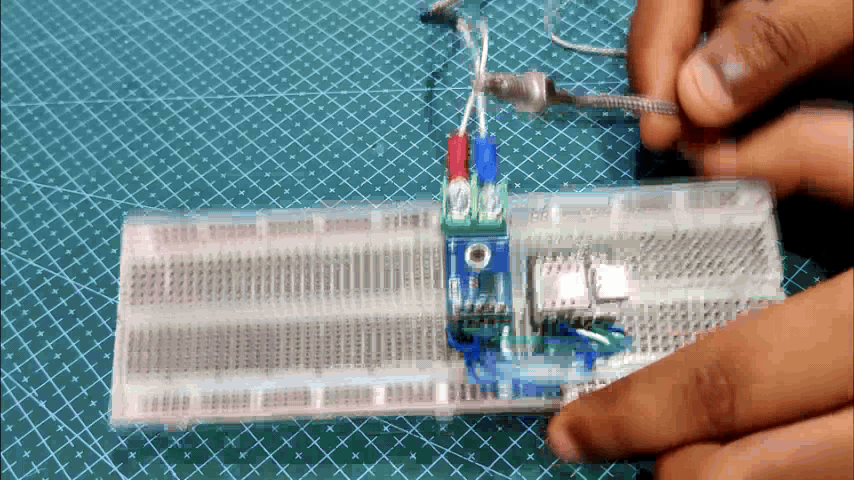.gif)
We mount the MAX6675 TEMP SENSOR Module on a breadboard with the Seeed XIAO M0 DEV Board and link the vcc of the MAX6675 to the XIAO's 3V Pin, GND to GND, SO to Miso Pin D9, CS to D7, and SCK to D8 by following the provided wiring schematic.
Additionally, we added an LED with GND and the D1 pin of XIAO.
CODE
Here's the code that was used in this project. Before compiling, download and install the MAX6675 library.
https://github.com/adafruit/MAX6675-library
#include "max6675.h"

int thermoDO = 9;
int thermoCS = 7;
int thermoCLK = 8;

const int RelayPin = 1;
const int threshold = 40;//cuttoff temp

MAX6675 thermocouple(thermoCLK, thermoCS, thermoDO);

void setup() {
  Serial.begin(9600);
  pinMode(RelayPin, OUTPUT);
  Serial.println("MAX6675 test");
  // wait for MAX chip to stabilize
  delay(500);
}

void loop() {
  // basic readout test, just print the current temp

   Serial.print("C = ");
   Serial.println(thermocouple.readCelsius());
   Serial.print("F = ");
   Serial.println(thermocouple.readFahrenheit());


  if (thermocouple.readCelsius() > threshold) {
    digitalWrite(RelayPin, LOW);
  } else {
    digitalWrite(RelayPin, HIGH);
  }

   // For the MAX6675 to update, you must delay AT LEAST 250ms between reads!
   delay(1000);
}
This Arduino code reads temperature data from a MAX6675 thermocouple sensor and controls a relay based on the temperature value read. Here's a breakdown of the code:
Include Libraries:
#include "max6675.h"
This line includes a library for interfacing with the MAX6675 thermocouple sensor.
Pin Definitions:
int thermoDO = 9;
int thermoCS = 7;
int thermoCLK = 8;
const int RelayPin = 1;
These variables define the digital pins to which the MAX6675 sensor's Data Out (DO), Chip Select (CS), and Clock (CLK) pins are connected, as well as the pin to which the relay is connected.
Threshold and MAX6675 Object Initialization:
const int threshold = 40; // Temperature cutoff threshold in Celsius
MAX6675 thermocouple(thermoCLK, thermoCS, thermoDO);
The threshold variable sets the temperature cutoff point in Celsius. The MAX6675 object is initialized with the specified CLK, CS, and DO pins.
Setup Function:
void setup() {
  Serial.begin(9600); // Initialize serial communication
  pinMode(RelayPin, OUTPUT); // Set RelayPin as an output pin
  Serial.println("MAX6675 test");
  delay(500); // Wait for MAX chip to stabilize
}
In the setup() function, the serial communication is initialized, the RelayPin is set as an output pin, and a message is printed to the serial monitor. There's also a delay of 500 milliseconds for the MAX chip to stabilize.
Loop Function:
void loop() {
  Serial.print("C = ");
  Serial.println(thermocouple.readCelsius()); // Read temperature in Celsius
  Serial.print("F = ");
  Serial.println(thermocouple.readFahrenheit()); // Read temperature in Fahrenheit

  if (thermocouple.readCelsius() > threshold) {
    digitalWrite(RelayPin, LOW); // If temperature exceeds threshold, turn off the relay
  } else {
    digitalWrite(RelayPin, HIGH); // If temperature is below threshold, turn on the relay
  }

  delay(1000); // Delay for 1 second (1000 milliseconds) before reading temperature again
}
The loop() function continuously reads the temperature in Celsius and Fahrenheit from the MAX6675 sensor. If the temperature in Celsius is greater than the specified threshold, it turns off the relay (by setting RelayPin to LOW), indicating that the temperature has exceeded the cutoff point. If the temperature is below the threshold, it turns on the relay (by setting RelayPin to HIGH). The loop then waits for 1 second before reading the temperature again. This delay is necessary because the MAX6675 sensor requires at least 250 milliseconds between reads to update its data.
Overall, this code reads temperature data from a MAX6675 thermocouple sensor and controls a relay based on the temperature value. If the temperature exceeds the specified threshold, the relay is turned off, and if it's below the threshold, the relay is turned on. The temperature values are also printed on the serial monitor for monitoring purposes.
WORKING PROCESS
.gif)
.gif)
After adding the code to the XIAO, we open the serial monitor and start the test using a lighter.
We use a lighter to heat the metal tip of the NTC, and the serial monitor shows the temperature rising as a result.
LED turns off as soon as the temperature crosses the 40 degree Celsius mark.
LED turns on after a few minutes when the NTC cools down and the temperature returns to 40 degrees Celsius.
Let me explain how the heating element in the upcoming Hotplate Project will be controlled. Replace the LED with a relay that is connected in series with the hotplate's heating element. An NTC monitors the hotplate's temperature, with a set cutoff temperature of 230 degrees Celsius.
As soon as the hotplate exceeds 230 degrees Celsius, a relay is triggered, cutting off the element's power and causing it to cool. This process repeats itself repeatedly until the temperature drops below 230 degrees Celsius.
CONCUSION
.gif)

Depending on the attached sensor, we can obtain accurate TEMP readings with the MAX6675 ranging from 0°C to 1024°C. Our current probe has a maximum temperature reading of 450°C.
Now that the cutoff functionality functions, we are able to incorporate it into the next hotplate project.
One serious issue with my prior hotplate concept was that it did not have temperature control. This simple setup will address the problem and significantly improve the project.
Check out the previously-made hotplate project if you are into DIY tool-related projects.
https://www.instructables.com/DIY-SMT-Hotplate-Project/
https://www.instructables.com/PCB-Hotplate-Mini-Edition/
https://www.instructables.com/PCB-Hotplate-Slightly-Bigger-Edition/
https://www.instructables.com/PCB-Hotplate-V3/
Thanks to Seeed Studio for supporting this project. You guys can check them out if you need great PCB and stencil service for less cost and great quality.
And I'll be back with a new project pretty soon!