Leather Scissors Case

My wife and youngest daughter both enjoy embroidery and needlework. My wife has a small pair of really sharp pointed scissors that didn't have a case. Having recently taken up leather craft I thought this would be good project to make.
I was pleased with the result and so for my daughters birthday purchased a pair of scissors and made a case for them as well.
In this Instructable, which is suitable for leather work beginners, I'm going to show you what you need to make your own, starting with what leather and tools you need followed by how to make a basic pattern then construction. Along the way I'll try and give you a few tips and ideas.
Supplies and Tools

I've tried to do this using as few tools as possible and offer alternatives where I can.
Leather
Lets start with the leather. This project can be made with a variety of leather types. The first scissors case I made used chrome tanned leather (often used in upholstery or leather garments) since then I've made a mixture using both vegetable tanned and chrome.
I'd recommend a thickness of around 0.8mm to 1.4mm (2oz to 3 1/2 oz) as this will be thick enough to protect the scissors but not too thick to work with.
I recently purchased a swatch of different coloured A4 sized leathers and so have made a few cases.
Below are a list of tools used to make this project.
Tools and Supplies
- Pencil
- Ruler
- French curves, used for making a pattern
- Knife, a utility or box knife is ideal.
- Cutting mat, protects the work surface
- Awl, to mark out the pattern and marking hole positions
- Hole punches which can be bought as a set
- Press studs and poppers, around 10mm, these can be purchased on eBay and often come complete with a fixing tool
- Contact cement or glue
- Sandpaper or sanding block
- Piece of canvas
- Pair of dividers
- Stitching chisels, I used 3mm but slightly bigger would work just as well. These can be purchased cheaply from eBay
- Polyboard
- Stitching pony, securely holds the leather for stitching. You could use a woodworking vice instead
- Hammer or maul, note not a metal headed one which can damage the chisels
- Needles, I use John James harness needles size 002
- Thread, I used Ritza 25 size 0.6mm
- Bone folder (optional) you can use a knotting needle instead
Creating a Pattern: First Steps


The first step is to create our pattern. This will help us when it comes to marking out the leather.
To create our pattern we will need at least paper and a pencil. I find it much easier to draw curves using a french curve set, but you may be able to draw them freehand.
Place the pair of scissors on the paper and mark dots about 5mm 1/4" away from the point and sides, also mark where the top of the scissors touch the paper.
Using a french curve or drawing freehand, draw a curve from the bottom point up through the top dot and level with the top of the scissors.
Repeat for the other side.
Pattern: Completing the Scissor Back


Next draw a line across to meet the two top points.
Then draw two lines on the sides, roughly 5mm 1/4" in from the top and approximately 10mm 1/2" down the side.
Draw a dotted line from the point up through the centre of the top line.
With the dotted line as a guide draw the curve for the top of the flap, use a french curve or draw freehand.
Repeat for the other side.
Then cut out with a pair of scissors. This will be the template for the back of the case.
Pattern: Marking Out the Front


We will use our cut out piece to make a template for the front of the case.
Using the front template, we draw round the lower part, to create the bottom curves.
We can now use a ruler and draw a line across the two end points.
We complete the pattern by marking out the position of the top fold.
We can now cut out the template using a pair of scissors.
Pattern: Complete

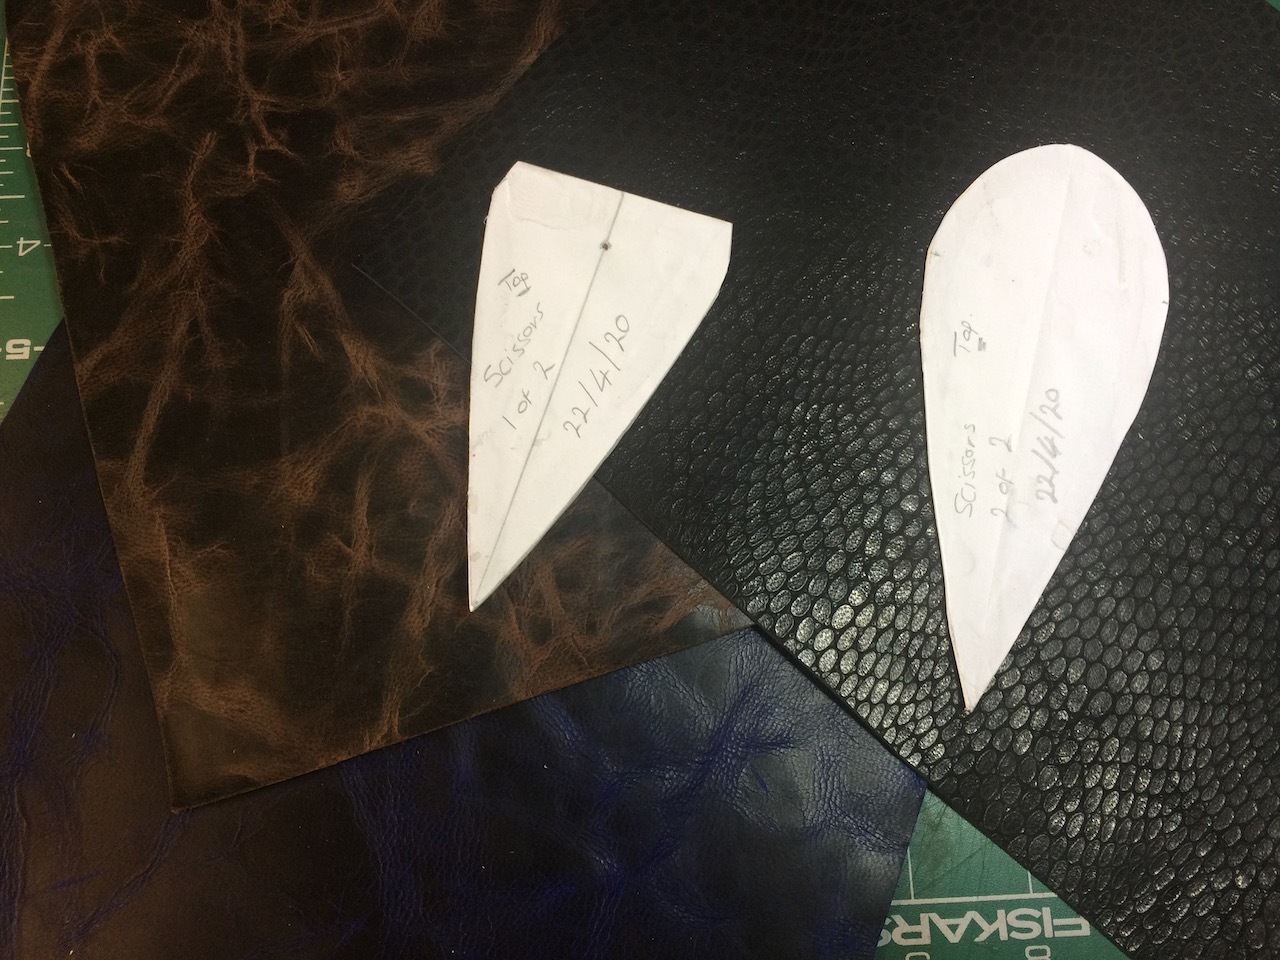
If want you can stick your paper templates to thick white card, mount board is really good for this, and then cut that out.
This would allow you to re-use the pattern a number of times.
If using card I would recommend labeling the pattern, with a name, number of pieces 1 of 2, 2 of 2 etc. and the date.
I store my patterns together in a plastic wallet folder for easy reference later.
Layout


Having completed making our pattern we can now begin to make our scissors case. We are going to use the pattern to transfer our design to our piece of leather.
First lay the pattern on the piece of leather leather. If using a cardboard template draw around the outside of each pattern piece with an awl, alternatively if creating a one off you can stick the paper pattern directly to the leather using masking tape.
Once the pattern has been transferred to the leather it is ready to be cut out.
Cutting Out


Having transferred our design to our piece of leather we can now cut it out.
The picture above shows a standard utility/box knife and a more specialist knife called a clicker knife that is designed for cutting out more intricate shapes. Whatever you use make sure the blade is sharp.Using a knife we can now cut out our leather pieces.
Taking our time and trying not to press too hard on the leather, initially make a score line all round the pattern then carefully follow it, a number of times if necessary, until the pattern is cut out.
Adding a Popper

We need to add a popper to our case so that the flap can be closed properly this needs to be added before the two pieces are glued together.
We first need to mark the position for the placement of the popper. This should be placed in the center approximately 12mm (1/2") below the top of the front of the case. Mark the position using an awl.
Fixing the Popper


Having marked the position for the popper.
We use a punch to create a hole for the stud of the the popper to pass through.
Place the stud in then fix the popper.
When fixing the popper to the stud, make sure to hammer the tool on to a hard surface.
When I first started making leather items and using studs and poppers I had all sorts of issues with them coming detached. The issues stopped when I started using a solid piece of granite under the tool.
If you haven't used poppers before It might be worth practicing on a bit of scrap leather with some spare ones first to see how everything comes together.
Gluing


Having attached your popper we can now glue the two pieces together.
Apply a thin bead of glue to the rough (flesh) side of the leather, as in the second picture. Making sure they line up accurately put the two pieces of leather together and press firmly. Use a piece of kitchen towel to clean any glue that squeezes out from the edges.
Leave the glue to dry thoroughly before proceeding to the next step I often leave it overnight.
Edge: Burnishing


You can leave your edges rough cut, which is what I did with the first case I made, but it can make the case look much more professional if the edges have been finished/polished.
I'm going to show you two methods that I use. The first will use a burnishing technique and the second edge paint.
Which ever method you choose you need to make sure that the edges are flush and smooth. Use a knife and trim the case edges so that they neatly line up then use sandpaper or a sanding block to sand the edges all round.
Burnishing
This is really suitable only for vegetable tanned leather as chrome tanned leather is too soft. You might have problems with some thin vegetable tanned leathers as well.
Burnishing lays the edges of the leather flat and makes it shiny.
Wet the edge to be burnished using some saliva or a little water, some leather workers use gum tragacanth or a professional product like Tokonole. I use CMC (how to make below) which I apply using a lolly stick and my finger. Mop any excess off using kitchen towel. Vigorously rub the edge back and forth using a piece of folded canvas. Repeat until you get a smooth shiny surface. The last photo shows before and after burnishing.
CMC
CMC is a powder used in sugar craft and cake making, it can be obtained quite cheaply from cake decorating suppliers. Thoroughly mix three grams of CMC with 200ml of hot water and leave in a fridge overnight. Keep in fridge when not using.
Edge: Edge Paint


When it isn't feasible to burnish your leather edges as they are too thin or in the case of chrome tanned too soft. Instead you can use edge paint.
I use edge paints from an Italian company called Giardini but there are others readily available. They come in a variety of colours.
In the example shown I've used two coats of dense black, sanding between each coat, and finished with a glossy top coat.
You can use a proper edge paint tool but the simplest method I have found is to just use a pencil. It lays down a really nice thin uniform layer.
Stitch Marking Out and Hole Punching


Traditionally leather workers have used either a pricking iron or wheel to mark out where the holes in the leather were to be placed. They then used an awl to complete making the holes during the stitching process. It is more commonplace to now use stitching irons/chisels, particularly on smaller projects like wallets and bags. The stitching chisel is hammered, using a maul, directly through the leather and makes small slits or holes in the leather.
There are two main types of stitching chisel, diamond or European and they come in a number of sizes, available from a number of sources and ranging widely in price. It is possible that on some of the cheapest ones that you may need to polish the tines first before using them. Either diamond or European is suitable for this project and I would suggest a size between three and four mm. Mine are three mm European style.
Marking the stitch line
Use a pair of dividers set at 4mm (1/4") to mark out the stitch line, by running one of the legs down the side of the leather. Mark from where the two leathers are glued together down to the far pointed end.
Stitch hole punching
Having completed marking the stitch line. Use a stitching chisel and maul to make the stitch holes, punch onto a scrap piece of leather, with a polypropylene board underneath.
Ensure that the chisel is perpendicular to the leather and that the teeth are on the center of the stitch line.
Stitching: Thread


To correctly join the two pieces of leather they need to be stitched together. There are a number of different types of thread and diameters.
A popular thread used by many leather workers is Ritza 25 which is a waxed polypropylene thread. This is widely available in a range colours and diameters.
For the scissor case shown I used a contrasting thread with a diameter of 0.6mm. Depending on the size of stitch holes you could use 0.8mm instead.
The needles used are John James size 002, which are well known for their reliability and quality.
Saddle Stitching: Start


The saddle stitch a hand is a sewn stitch used by leather workers to properly hold two or more pieces of leather together. Done properly and with the correct materials it can safely hold a saddle together on a horse weighing over a tonne at 40mph. So it should certainly be good enough to hold together the leather on a scissors case.
I'm not going to cover saddle stitching in any detail here as it is probably best learned by either being directly taught or by carefully watching a video on YouTube.
I would suggest doing a search on YouTube and look for videos by either Nigel Armitage or Ian Atkinson.
The secret to good stitching is practice and more practice.
In the image above you can see that I've used a stitching pony to hold the leather firmly in place, alternatively you could use a wood working vice.
I've started with a back stitch and stitched towards me.
Saddle Stitch: Finishing


Finish your stitching with another back stitch and closely trim the end of the thread using a knife or pair of scissors.
Use a lighter to melt the ends and push them down.
Breaking the Glue


We are now getting close to finishing our project.
Use either a bone folder or a knitting needle to break the glue and separate the inside pouch part of the case up to the stitch line.
Push a pair of scissors into the case, should be a nice snug fit with the scissors just about peeking out
Punching a Hole for the Stud


Evenly fold the top of the case over and press it onto the popper. This will create an indentation, where you can fit the closing stud.
Mark the center of the indentation then punch a hole for the button stud.
Fitting the Button Stud


Fit the button stud through the leather then place on the holding popper.
Open the stud shaft using the flaring tool and a hammer. Make sure to use a solid surface, like a piece of granite, to hammer onto.
Try opening and closing the flap number of times to make sure everything is secure
Final


You should now have a nice custom made scissors case that you can either keep for yourself or give someone as a gift.
I made a number of cases using a variety of leathers, thread colours and stud poppers.