Learning Unreal Engine From Scratch
by TedtheFluffy in Design > Software
2670 Views, 8 Favorites, 0 Comments
Learning Unreal Engine From Scratch
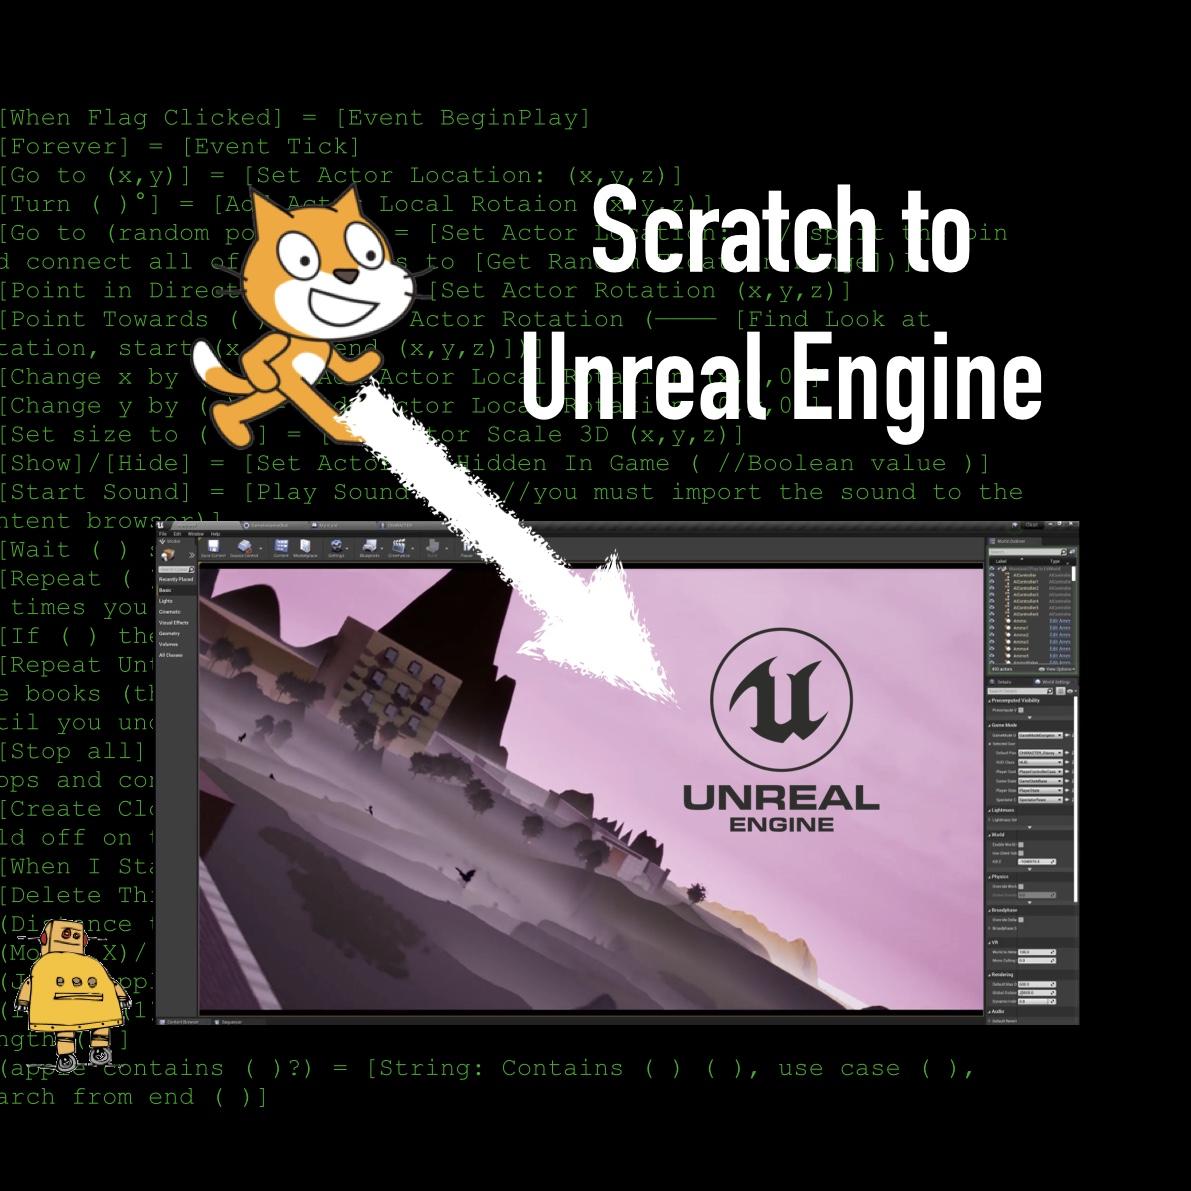
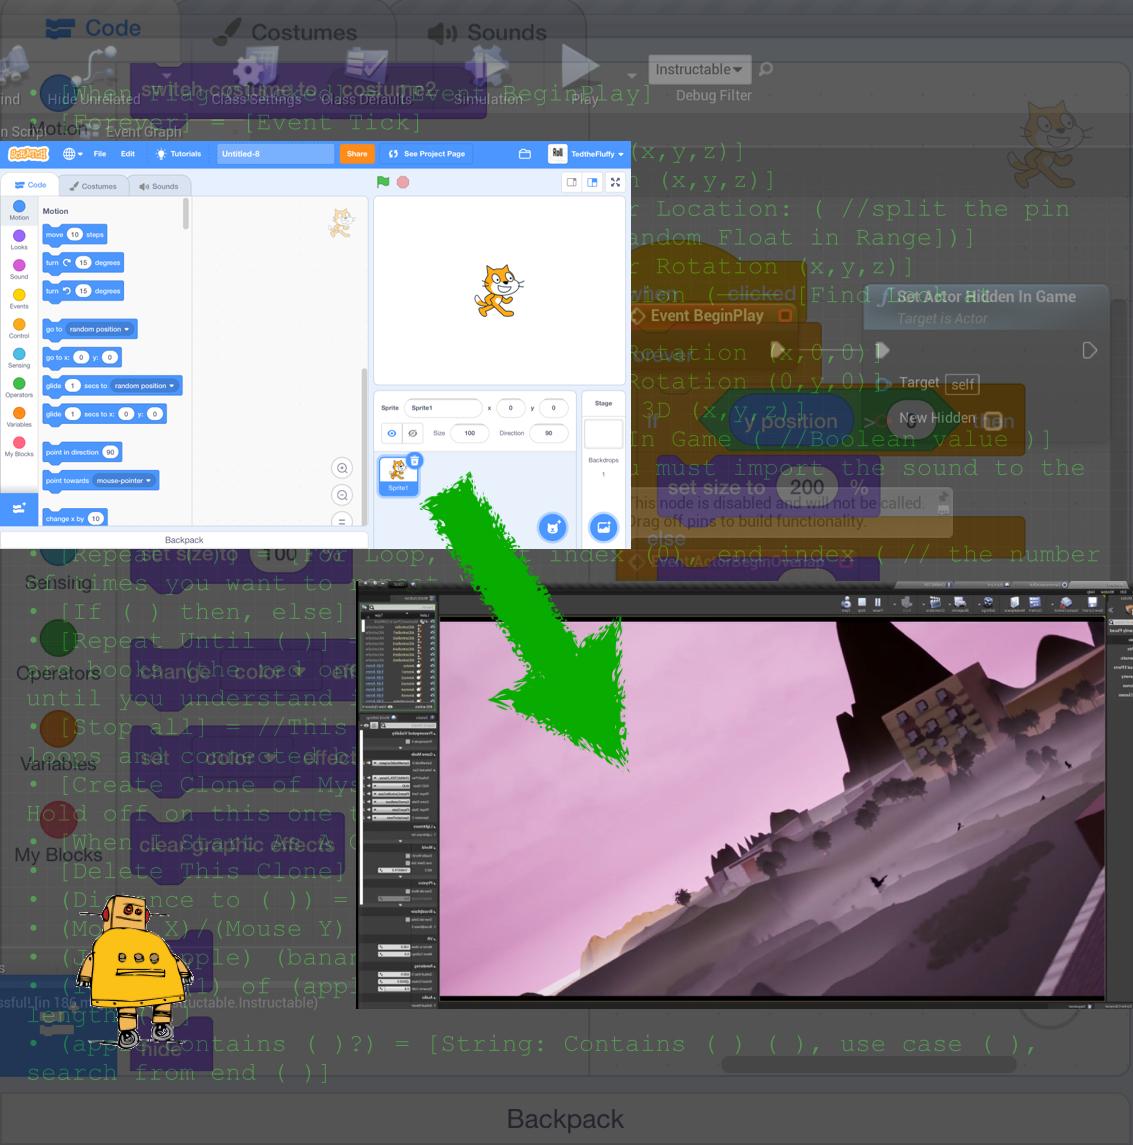
Who would have thought that an elementary school block coding language could help someone access to the world’s top game development software?
Scratch is a basic blocked based coding language developed by MIT for children (the average target is 12). On the other side of the spectrum, we have Unreal Engine, developed by Epic Games, which is the world’s most powerful game development platform. Many of the top games in the industries such as Jedi: Fallen Order, Mortal Kombat 11, and the Final Fantasy VII remake run in Unreal Engine. With Unreal 5 about to release (2021), many game development companies are dropping their in-house engines in favor of Unreal. Now Unreal Engine can be quite daunting. The engine is vast and massive and can easily overwhelm users. But if you are proficient in Scratch, you essentially have the skills (with some proper direction and additional education) to build a decent indie game in Unreal Engine. Now I’m not promising that your first unreal game will be Mortal Kombat or Final Fantasy (though it’s possible), but you can recreate almost any Scratch game and much much more in 3D. How you ask? Well, I’m going to take all of your Scratch skills and turn them into (gasp) UNREAL ENGINE SKILLS!!! (applause).
So Scratch is doing it’s job quite well: providing a way for children to learn skills that will apply to more advanced coding. As a middle school kid with only knowledge of Scratch, I was able to become proficient in Unreal Engine in a little over 6 months. You can play my old Scratch games here: tedgamesonline.weebly.com, and check out my new Unreal project trailer.
Now, a short disclaimer: Unreal is incredibly complicated, and by no means will you be able to hop on and build a triple-A quality game overnight. However, knowledge of Scratch provides access to a majority of Unreal basics (like, the very basics).
Downloads
Supplies
Scratch
Unreal Engine
(Yup, that’s it.)
The Interface
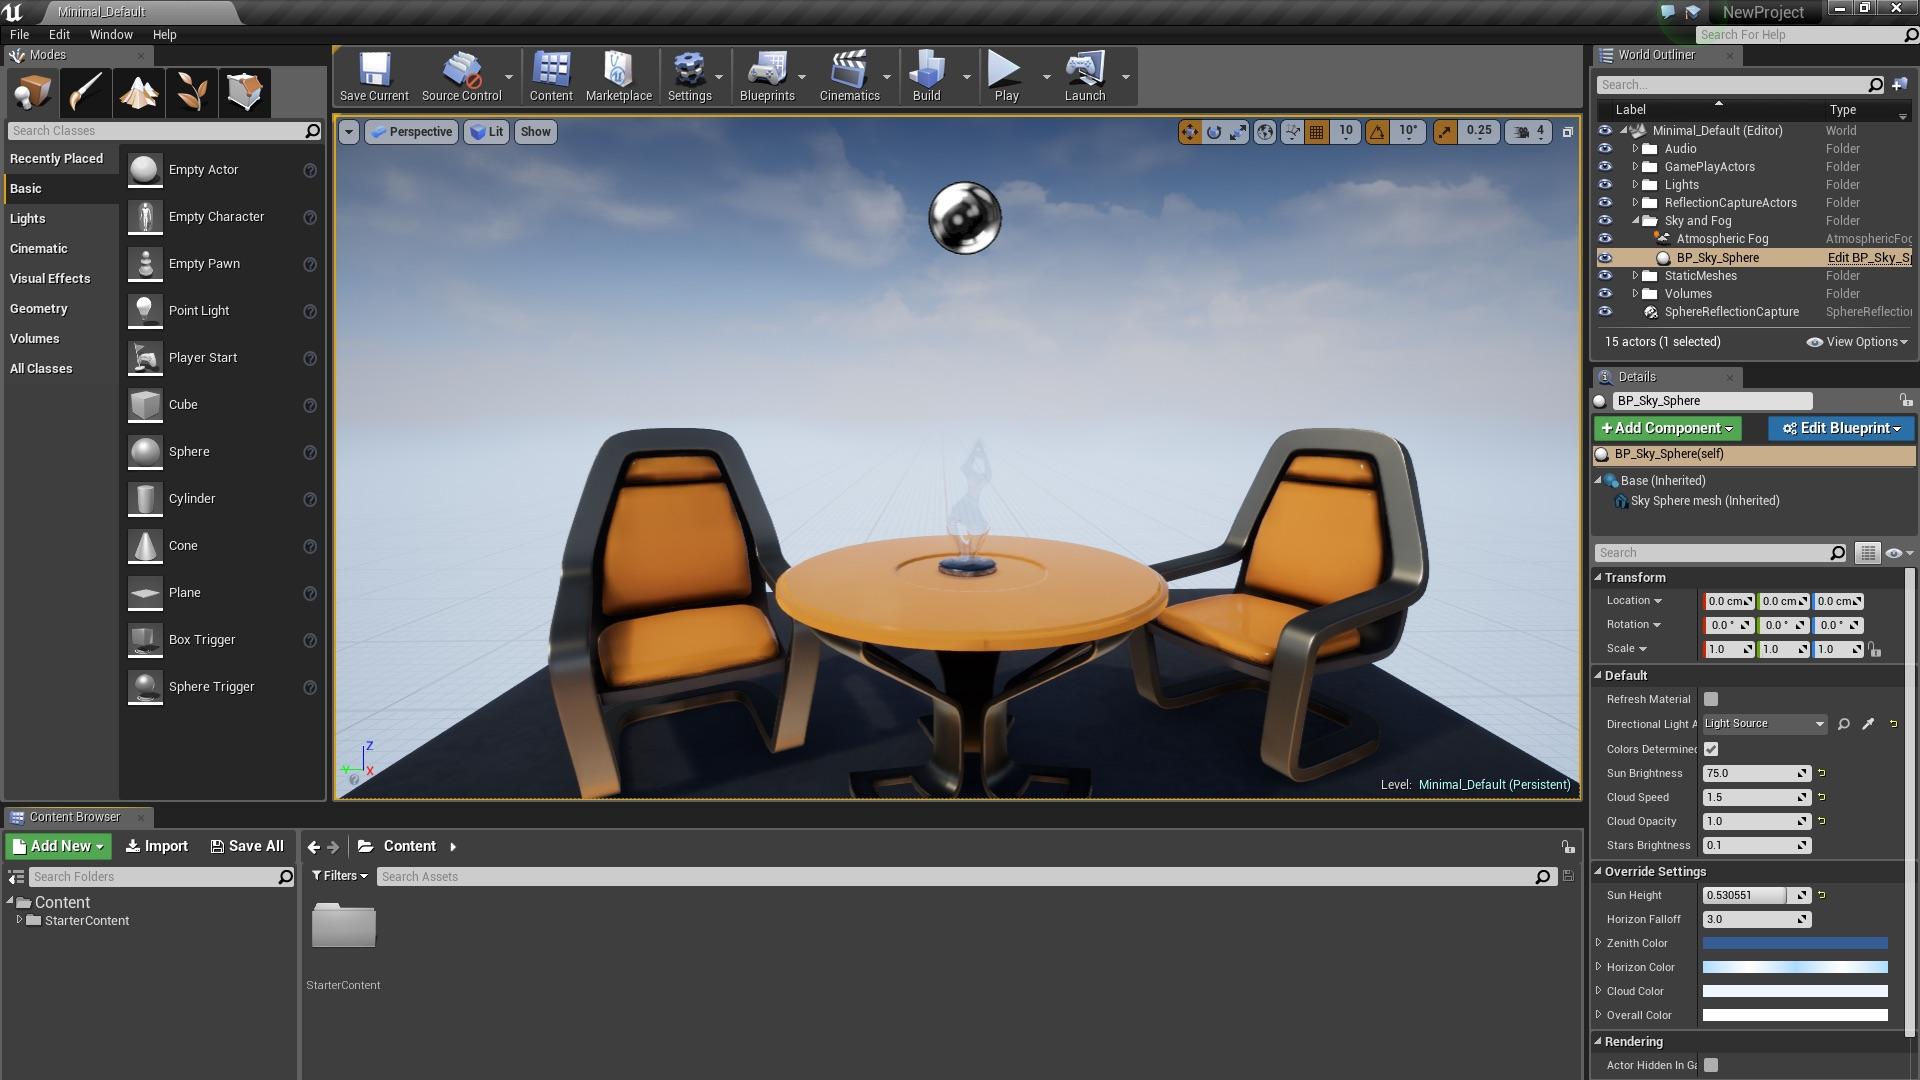
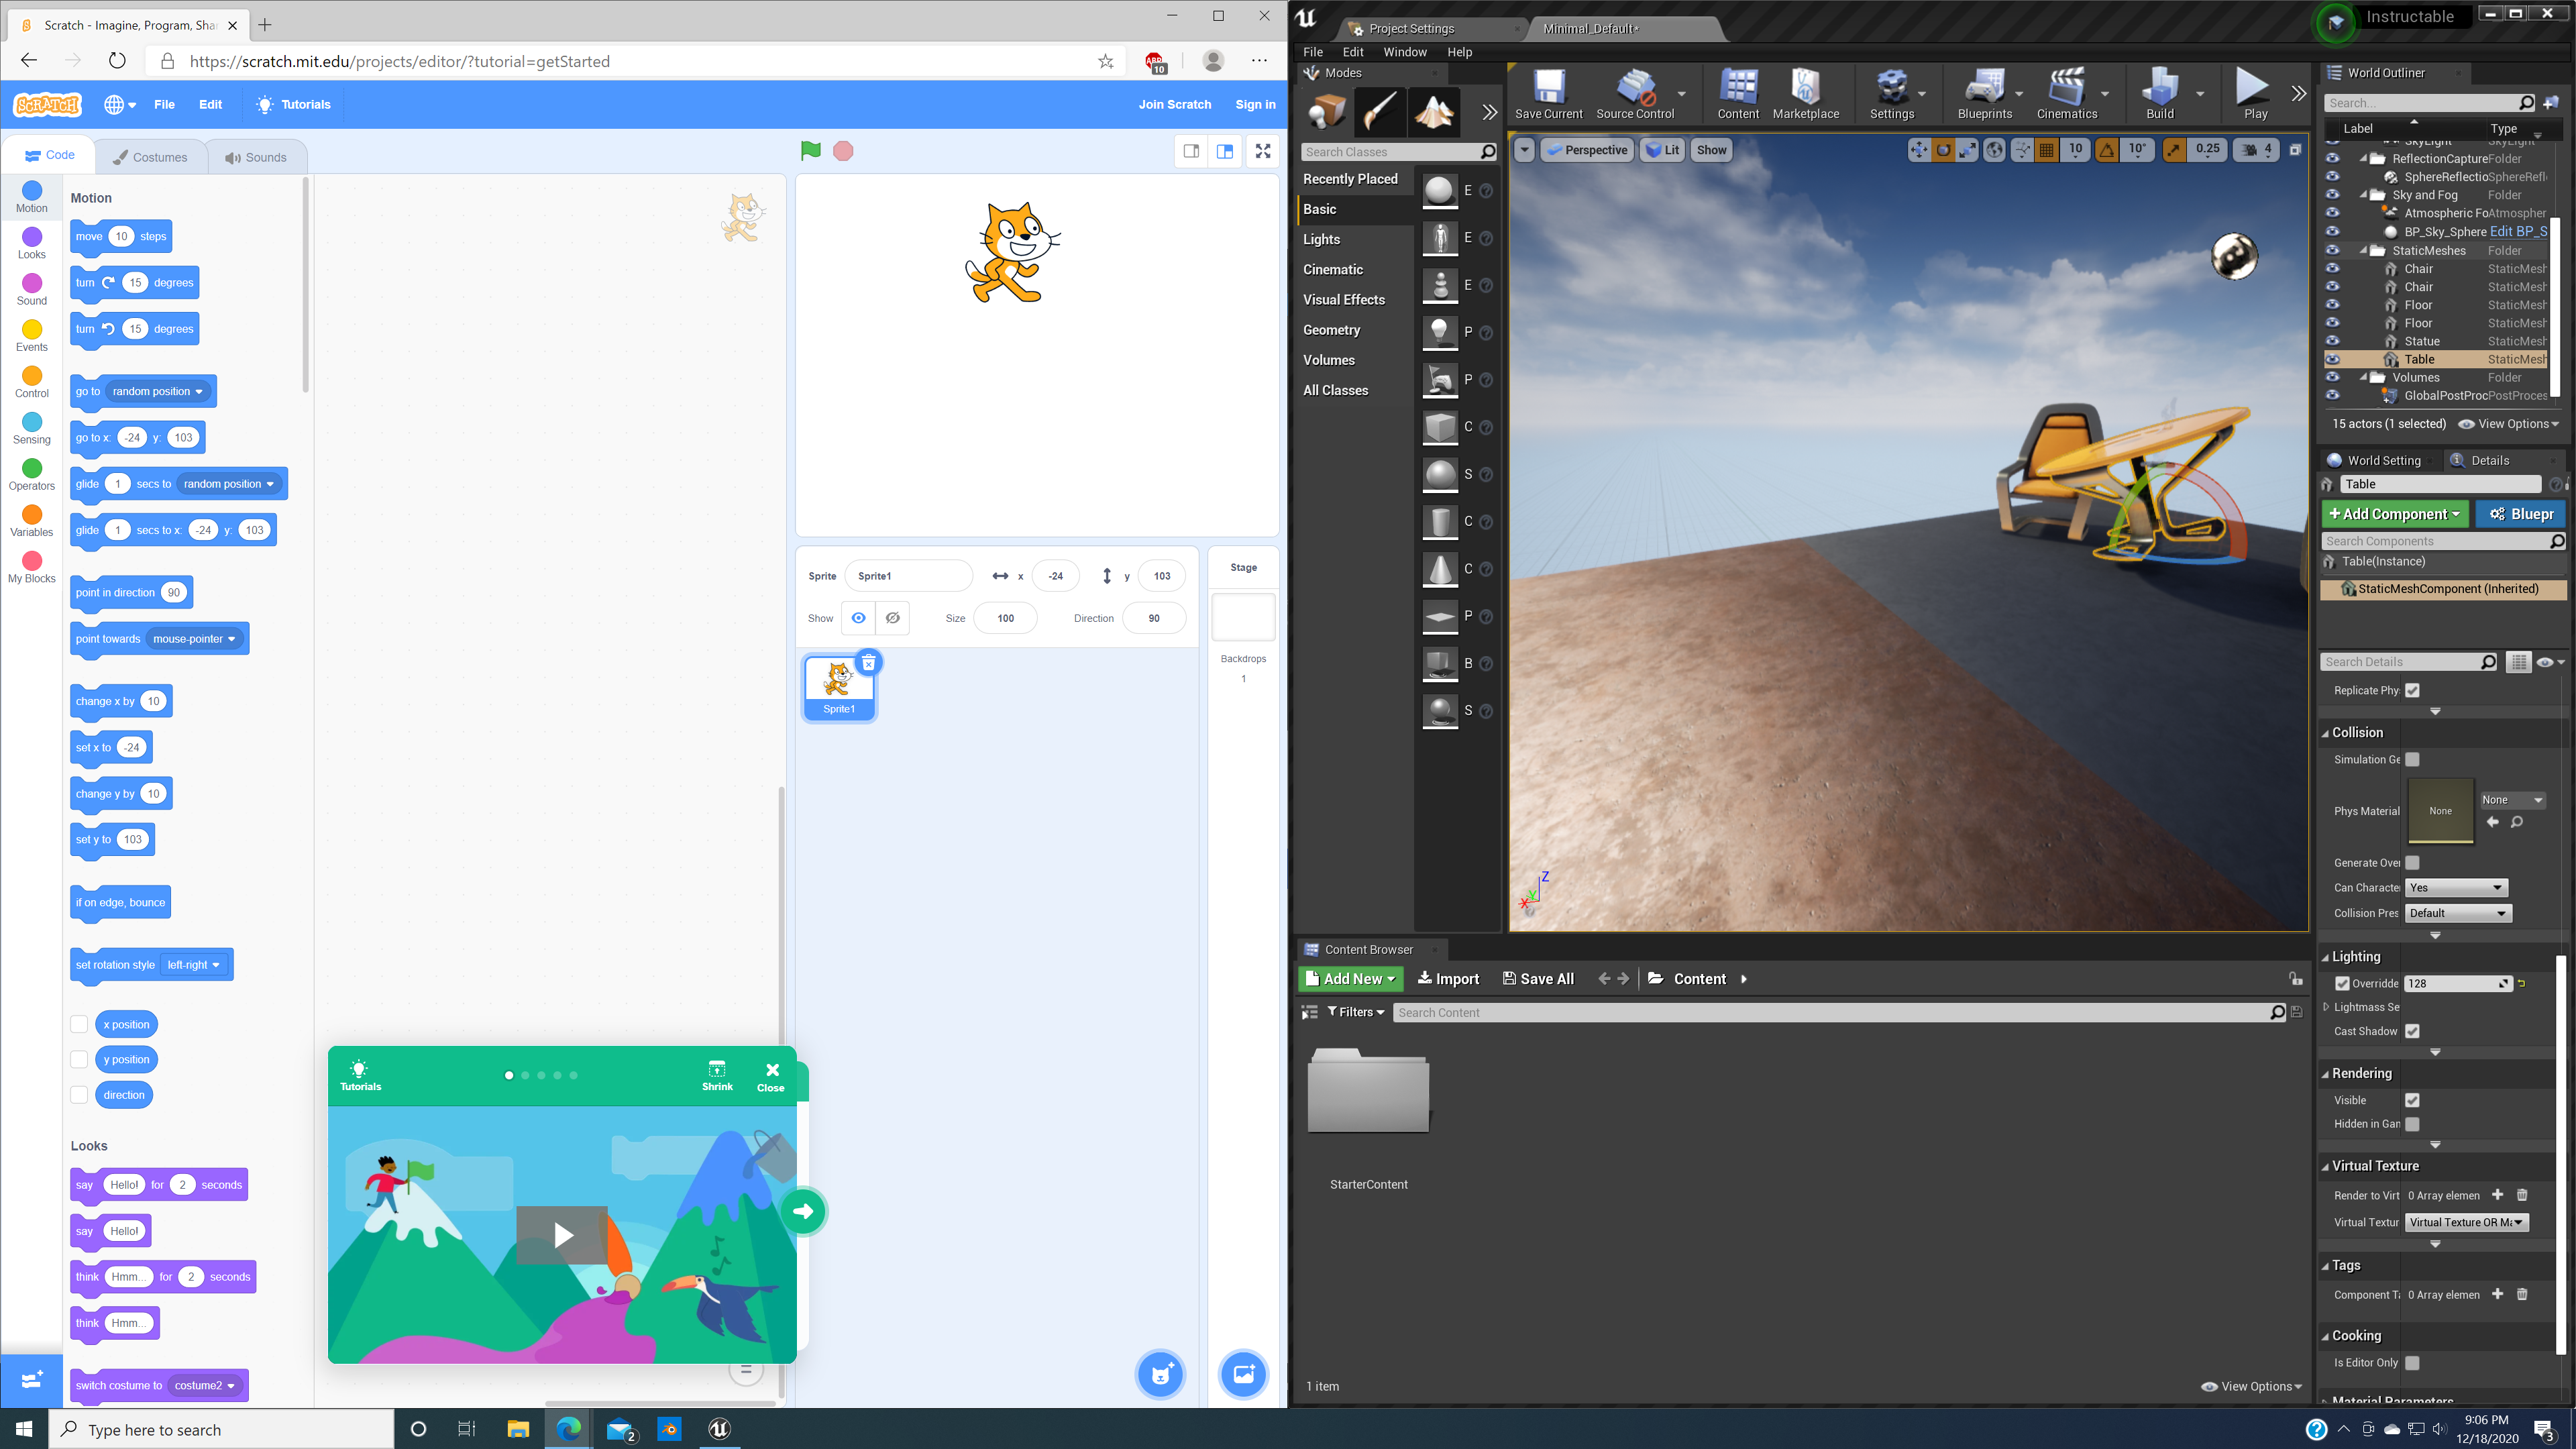
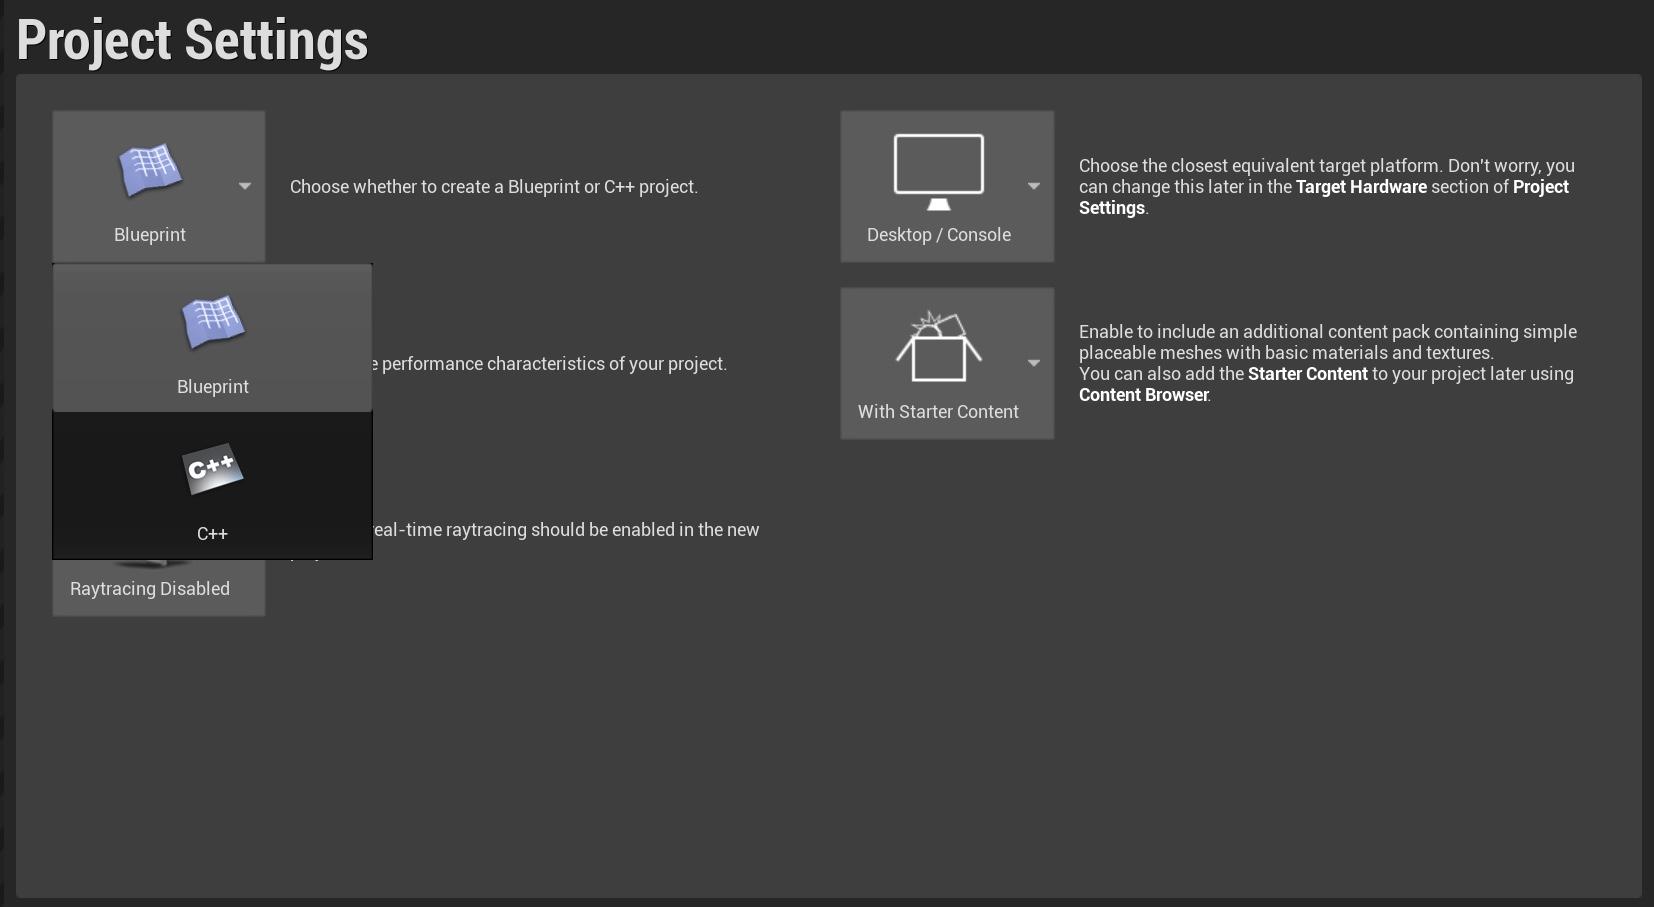
First, download Unreal Engine. (https://www.unrealengine.com) Create a new project (select game) and choose blank. These projects can run in C++ or Blueprints. Choose Blueprints and create your project. Now, when you open a new Scratch project, you are greeted by a smiling orange cat. This is in fact Scratch the cat (or the Scratch cat). When you open Unreal Engine, you are greeted by something far less welcoming: nothing (dun dun dun) except possibly a few chairs and a table.
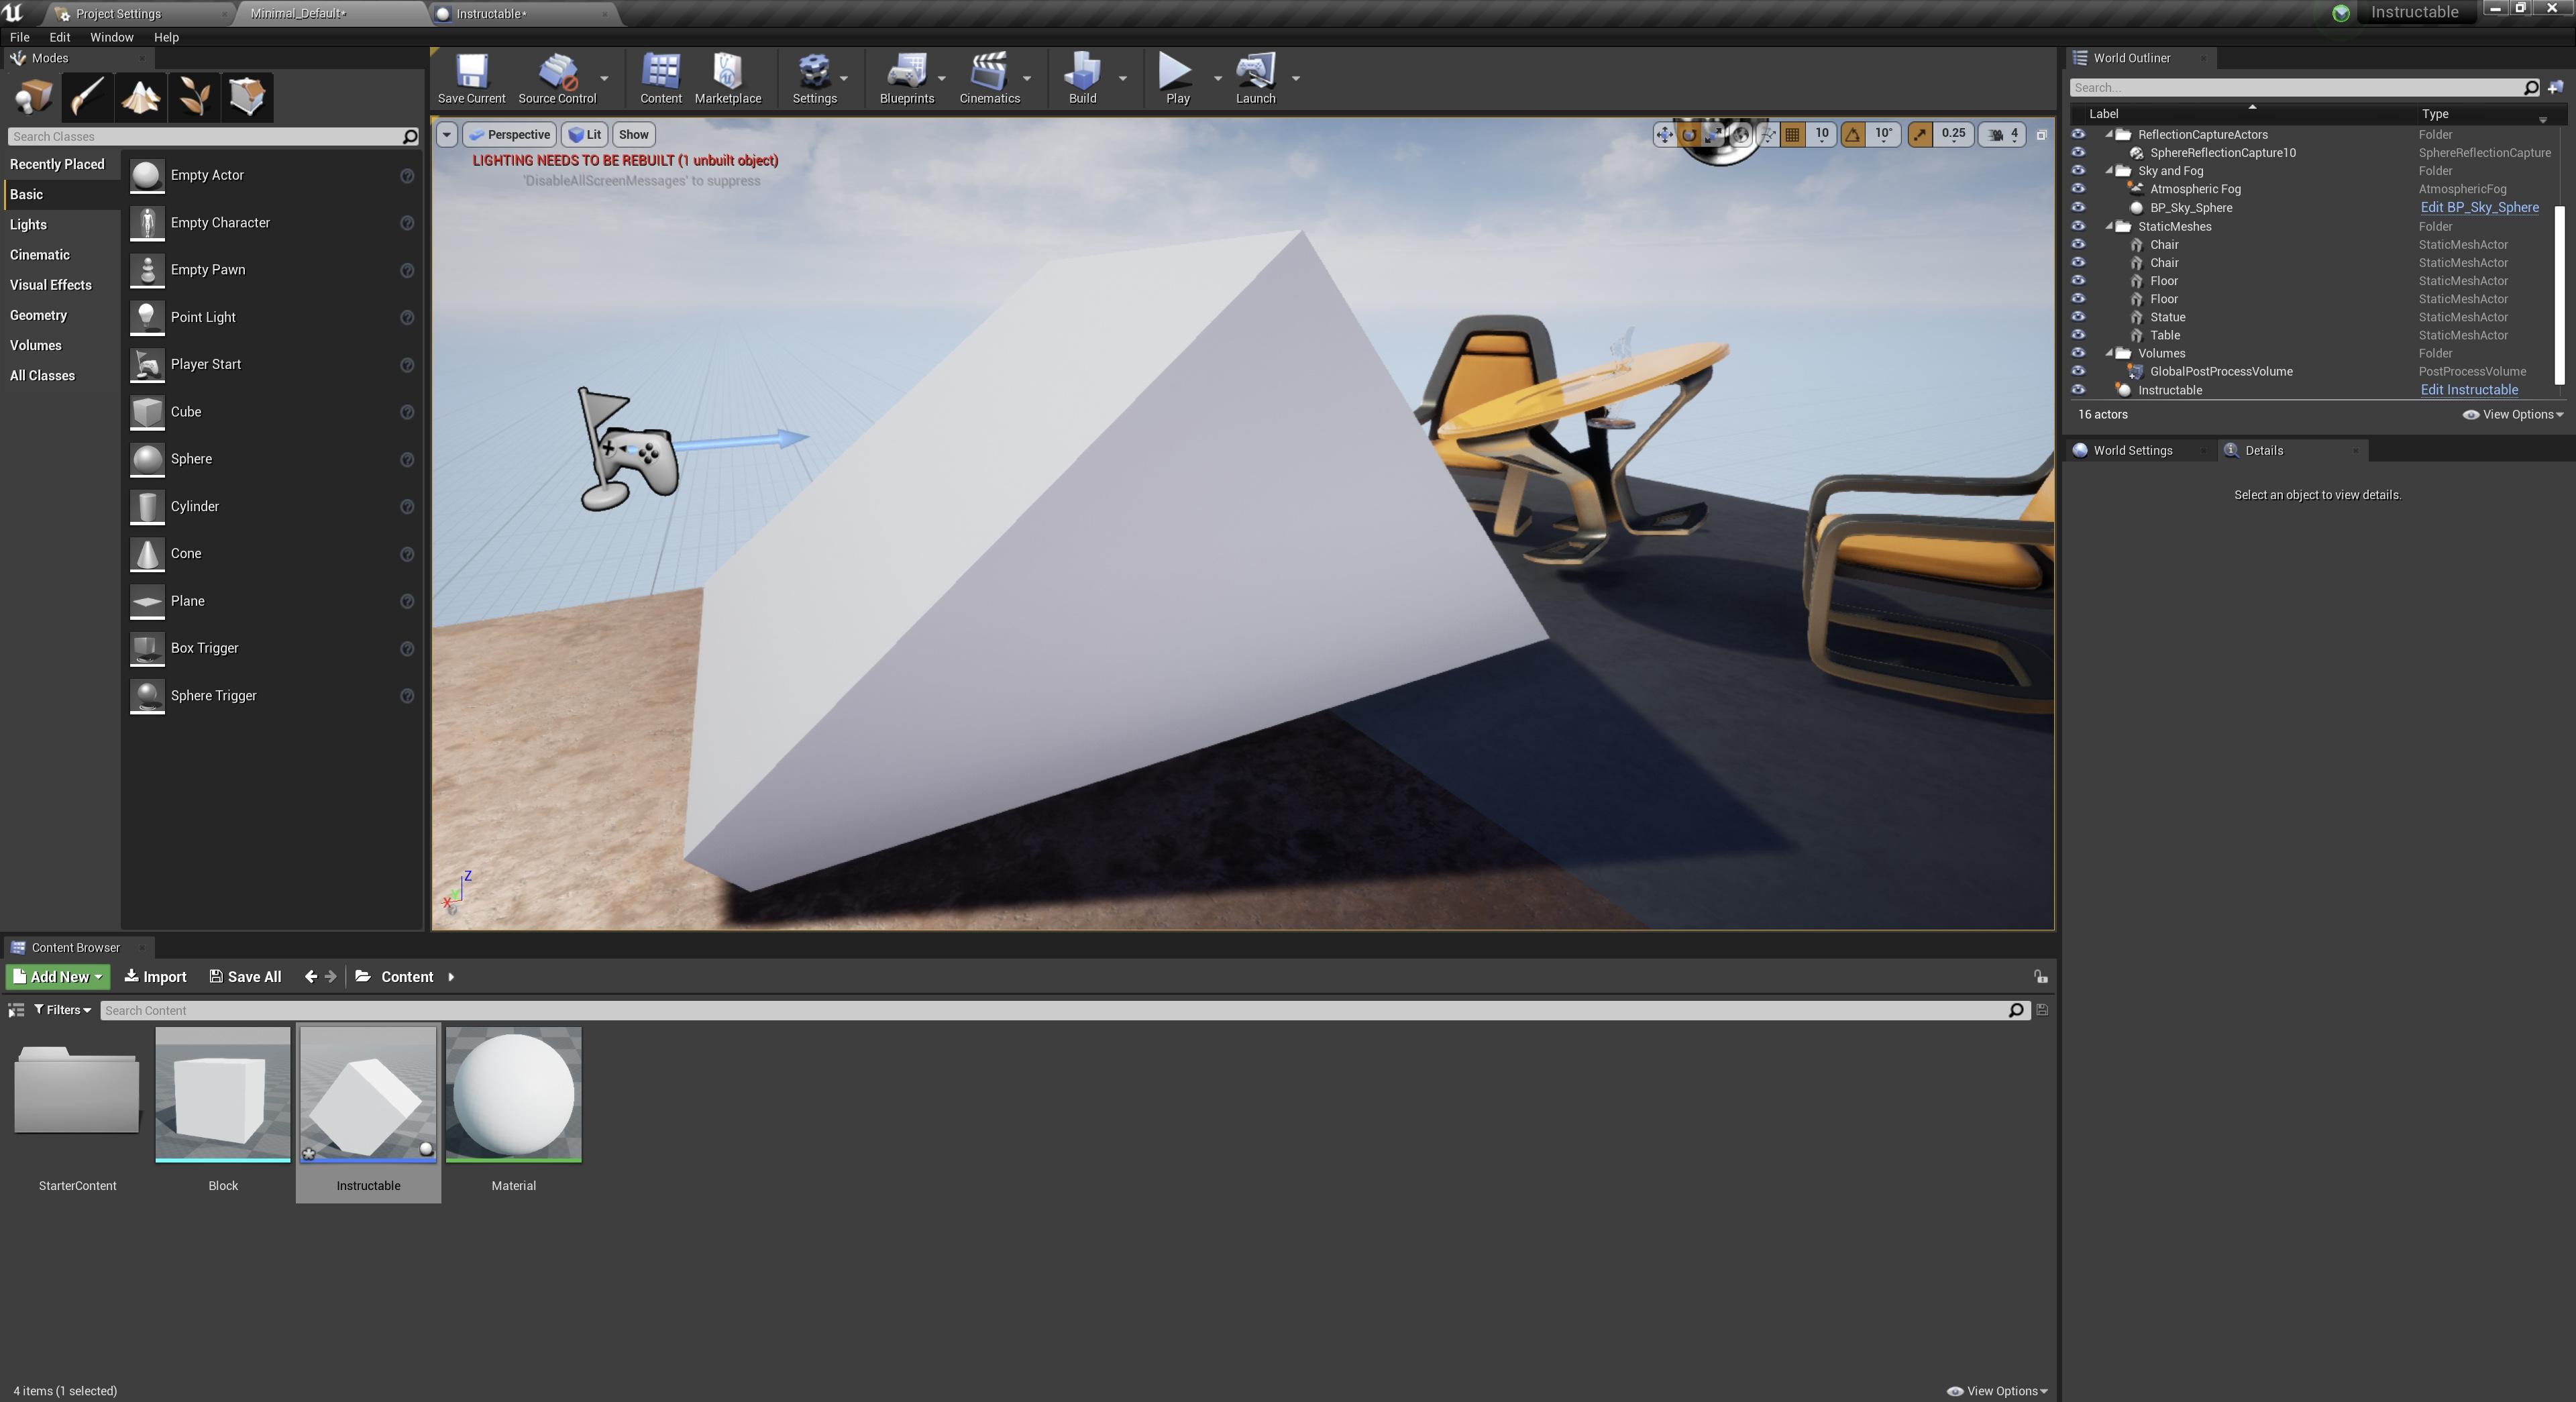
The Scratch interface and Unreal Engine interface are strikingly similar. See that viewport with the Scratch cat? Well, Unreal has one too but it’s home to two happy chairs (or a tiled floor depending on whether or not you chose starter content). Well, it’s pretty much the same here. In Scratch, you can drag that cat around to your liking. In Unreal, clicking on these chairs will give you three arrows that can be dragged along the three-axis. You can toggle these to change rotation and scale in the top right of the viewport.
Moving along, in the right of the Scratch interface, you’ll see that there is a place for block code but (gasp!) it’s not in Unreal! How odd... Well, it turns out that our happy coding space is only a few clicks away and we’ll get to that in a little.
Below the Scratch cat is a list of the sprites and the backdrops. We have that in Unreal but it’s called the content browser. More on that in a little. Now in Scratch, when you have a sprite it always shows up on the screen. You will have to hide it if you don’t want players to see it. In Unreal, an actor (that’s what we call ‘em here. Sprites do exist but they’re different. For the sake of simplicity actors=3D sprites) doesn’t show up in the viewport. It shows up in the content browser. If you want one in your level, you can simply drag one in. Or two. Or three. That’s right, if you have one Scratch cat in your content browser, you can drag 20 of them into your viewport. It’s similar to clones in Scratch.
Now, let’s create our first actor.
Happy Actors
.png)
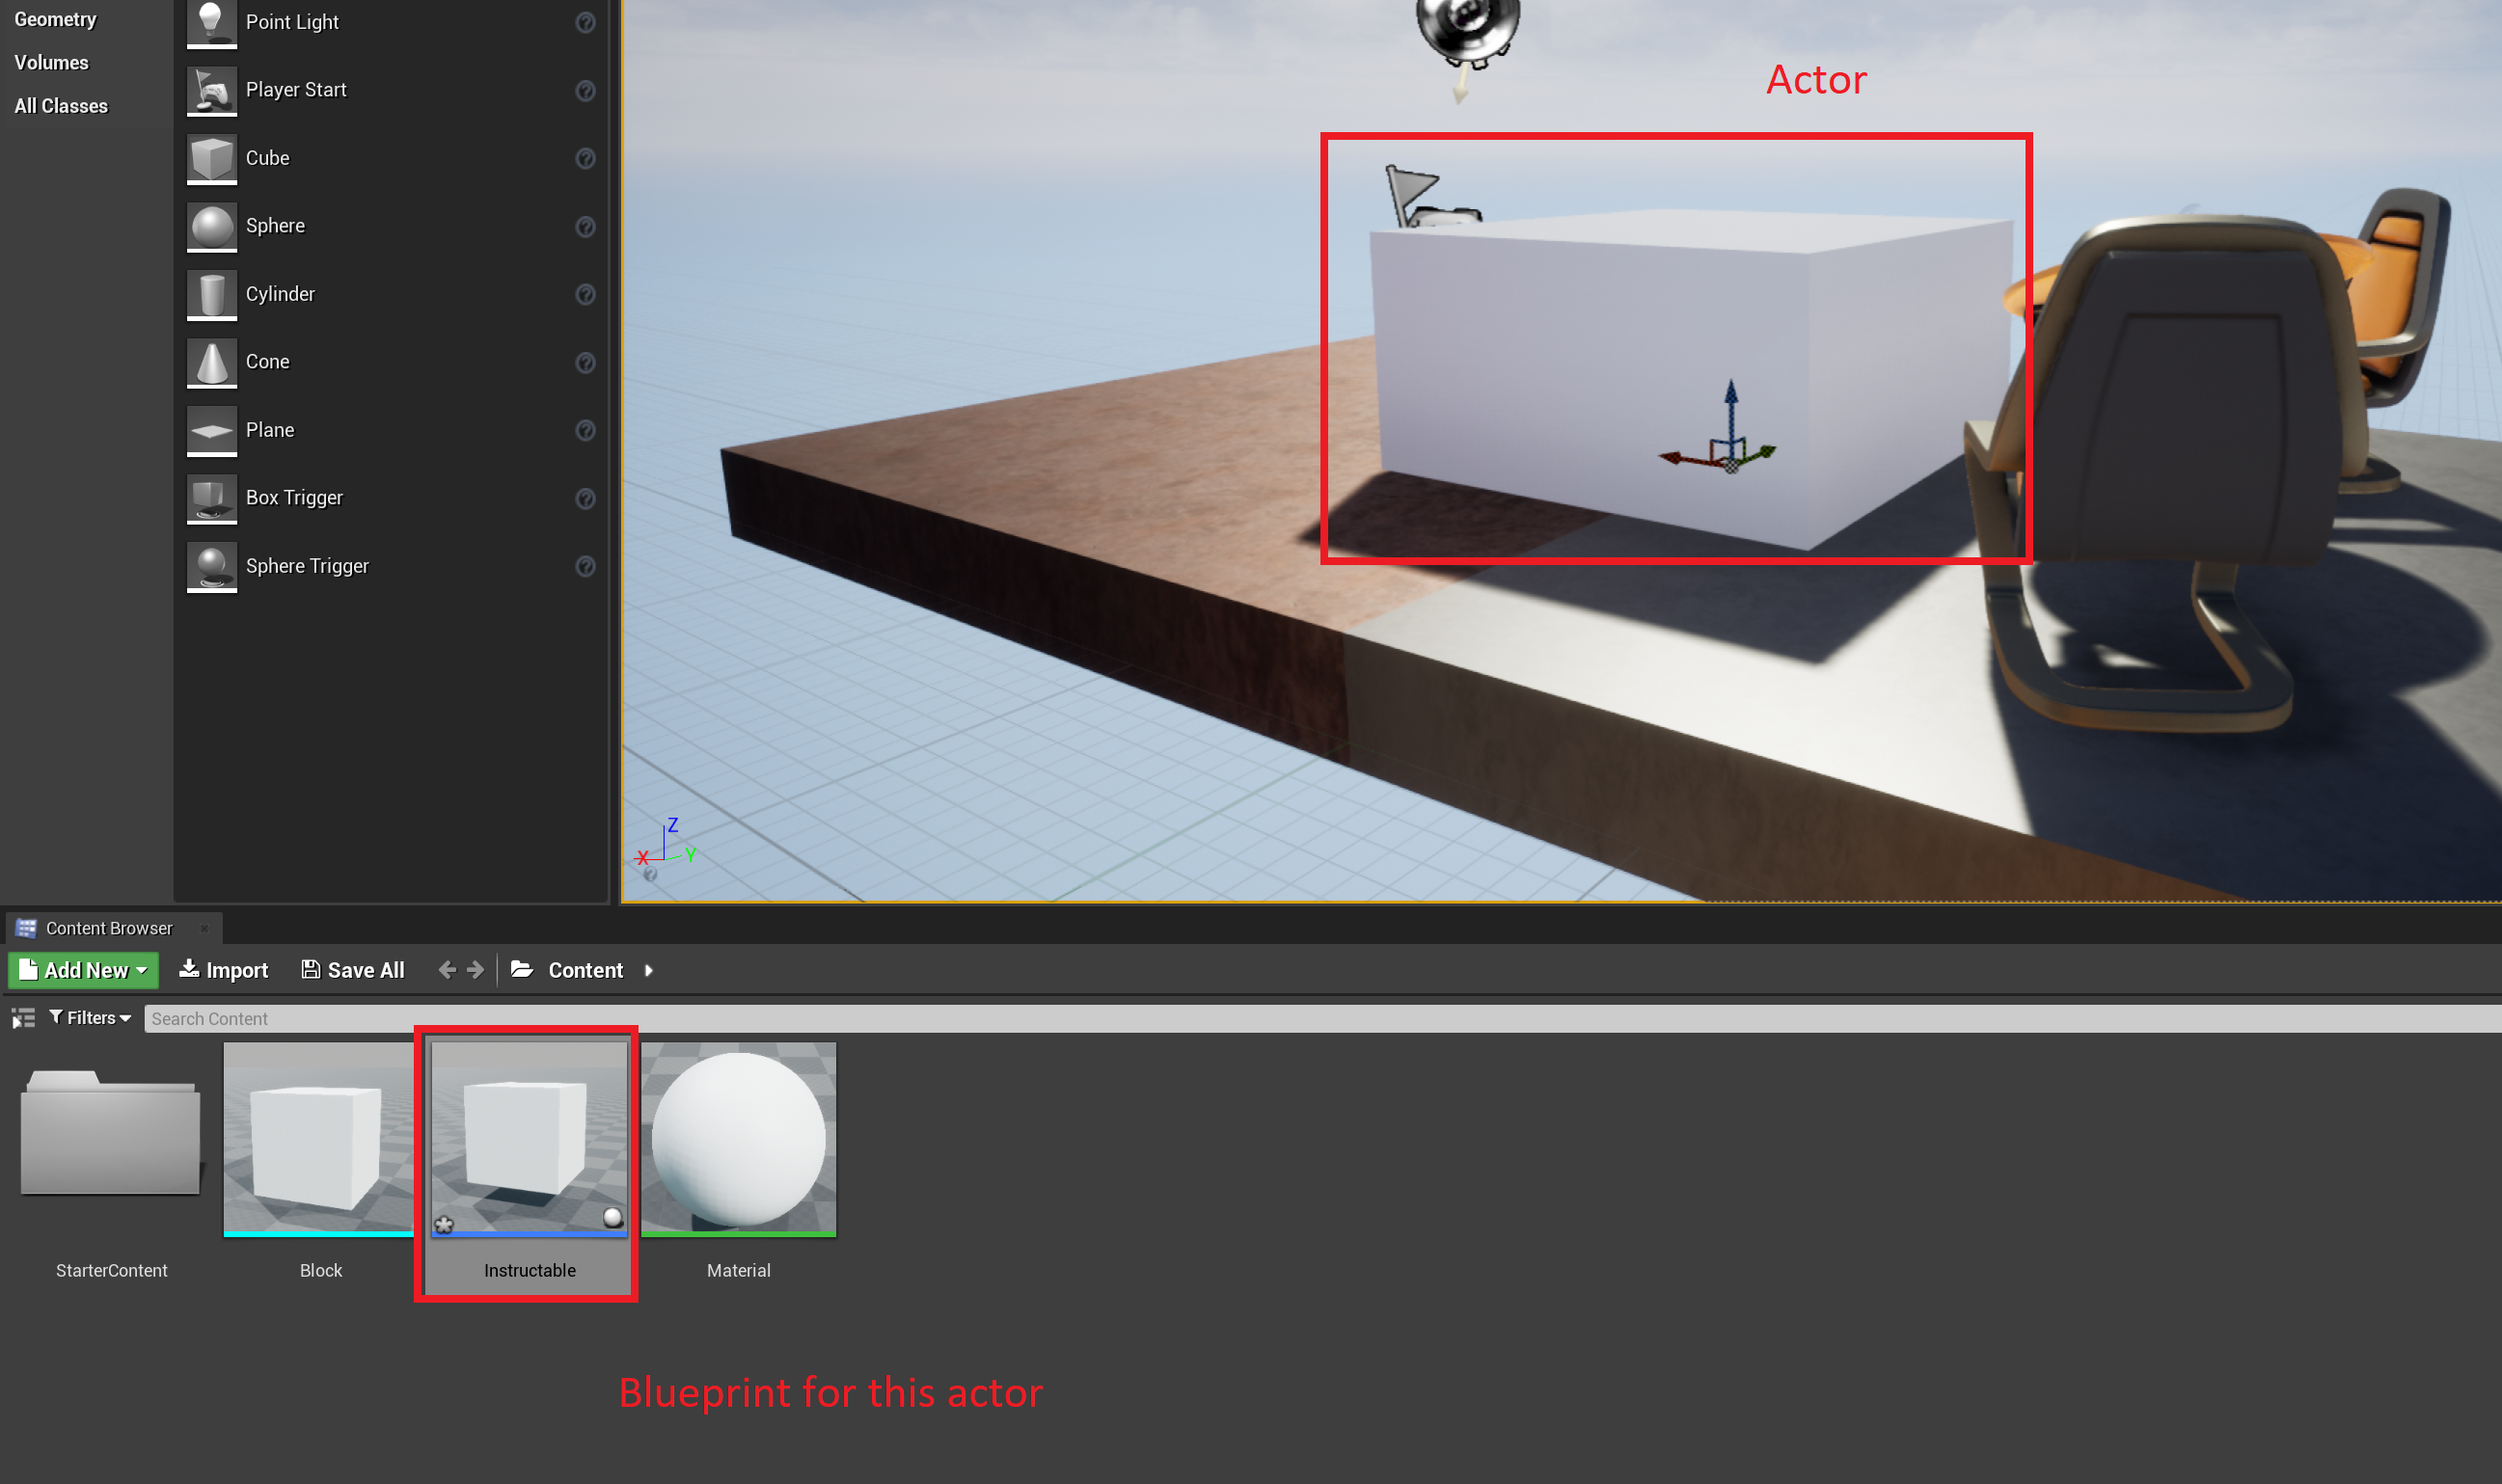
In Scratch, you can click the blue plus button to add a new sprite. Same with Unreal. In the content browser, click the green “Add New” button. Now it gets a bit more complex. What do you choose? A blueprint? A particle system? A material? Let’s choose Blueprint Class. In Scratch, there’s only one choice: a sprite (you can draw it, upload, or choose it but it’s still a sprite). Let’s choose an actor. Well now there are different types of actors! Which one? Well, they’re each a bit different.
A basic actor is just an object. Any object in a game. Like a balloon or a chair. A pawn is something that the player may be able to control. Like a space ship or a drone. A character is, well, a character. Like an enemy, NPC, or playable character. A game mode base is a mode of gameplay. It’s a bit more complicated but we’ll get there. There are a lot of other actors too but let’s move on.
Select a basic actor. One will appear in the content browser and you can give it a name and click it. Now it will open up the blueprint editor, select Event Graph in the top tab menu underneath the toolbar and WOW!!! IT’S OUR OLD FRIEND MR. BLOCK CODING SPACE. Yup. That grid is where we will do our coding. There may even be a few blocks in there right now. Let’s save. It may be tempting to save on the blueprint editor and be done, but that will only save that one blueprint. If you save on the level editor, it will only save the level. Luckily, there is a save all button.
So essentially, the left side of the screen in Scratch is the editor for whichever sprite you have selected while the right side is the level editor. In Unreal, they are two different places. But in Scratch, you can also click a tab to see the costumes for your sprite. There is one here too! At the top of the blueprint editor underneath the toolbar, select viewport. (Remember: Code Editor=Event Graph, Costumes Editor=Viewport). Sounds get more complicated but we’ll get there. In the viewport, we see a white circle. He’s just there for reference and he won’t appear in the game. This means that our sprite looks like nothing. Let’s make him look like something. It’s not going to be as easy as drawing a sprite. You will need an FBX file to import. You can draw your own in Blender or a similar software. You should also be able to find some nice ones at Mixamo.com, which is a free character library by Adobe (at least it’s free as of December 2020).
We will need to head back to the level editor now (it will likely be named “Minimal_Default” or something similar). Find the content browser and click import. Find your FBX and import it (it may seem like a hassle to go make or download an FBX but any FBX will work. They are also easy to make and find. You may even be able to make one in Microsoft Paint 3D. It could be as complex as a Mixamo character or as simple as a cube). Make sure you save it (you can use save all). You also want to organize your content into folders.
Return to the Blueprint editor for your actor. Select the plus button (“Add Component” button) in the Components browser (where you can see the DefaultRootScene) and search for a static mesh (not a static mesh simulation). Add one in. A static mesh is a 3D shape. That’s basically the best way to describe it. Now select that static mesh and its details should appear in the right side of the screen (where it says details). Find the Static Mesh section drop-down menu (next to the blue square that says “none”). Select your newly imported FBX.
And yippeeeeee!! You have made an actor. Now compile and save. Go back to the level editor and drag your actor into your level. Now those chairs aren’t so lonely anymore. Press the play button to see your game so far. It’s not much yet but it will be!
You can position your actor wherever you want by dragging it or using the details panel on the right side. (In Scratch the details panel is directly below the viewport)
Let’s Get Coding!!!
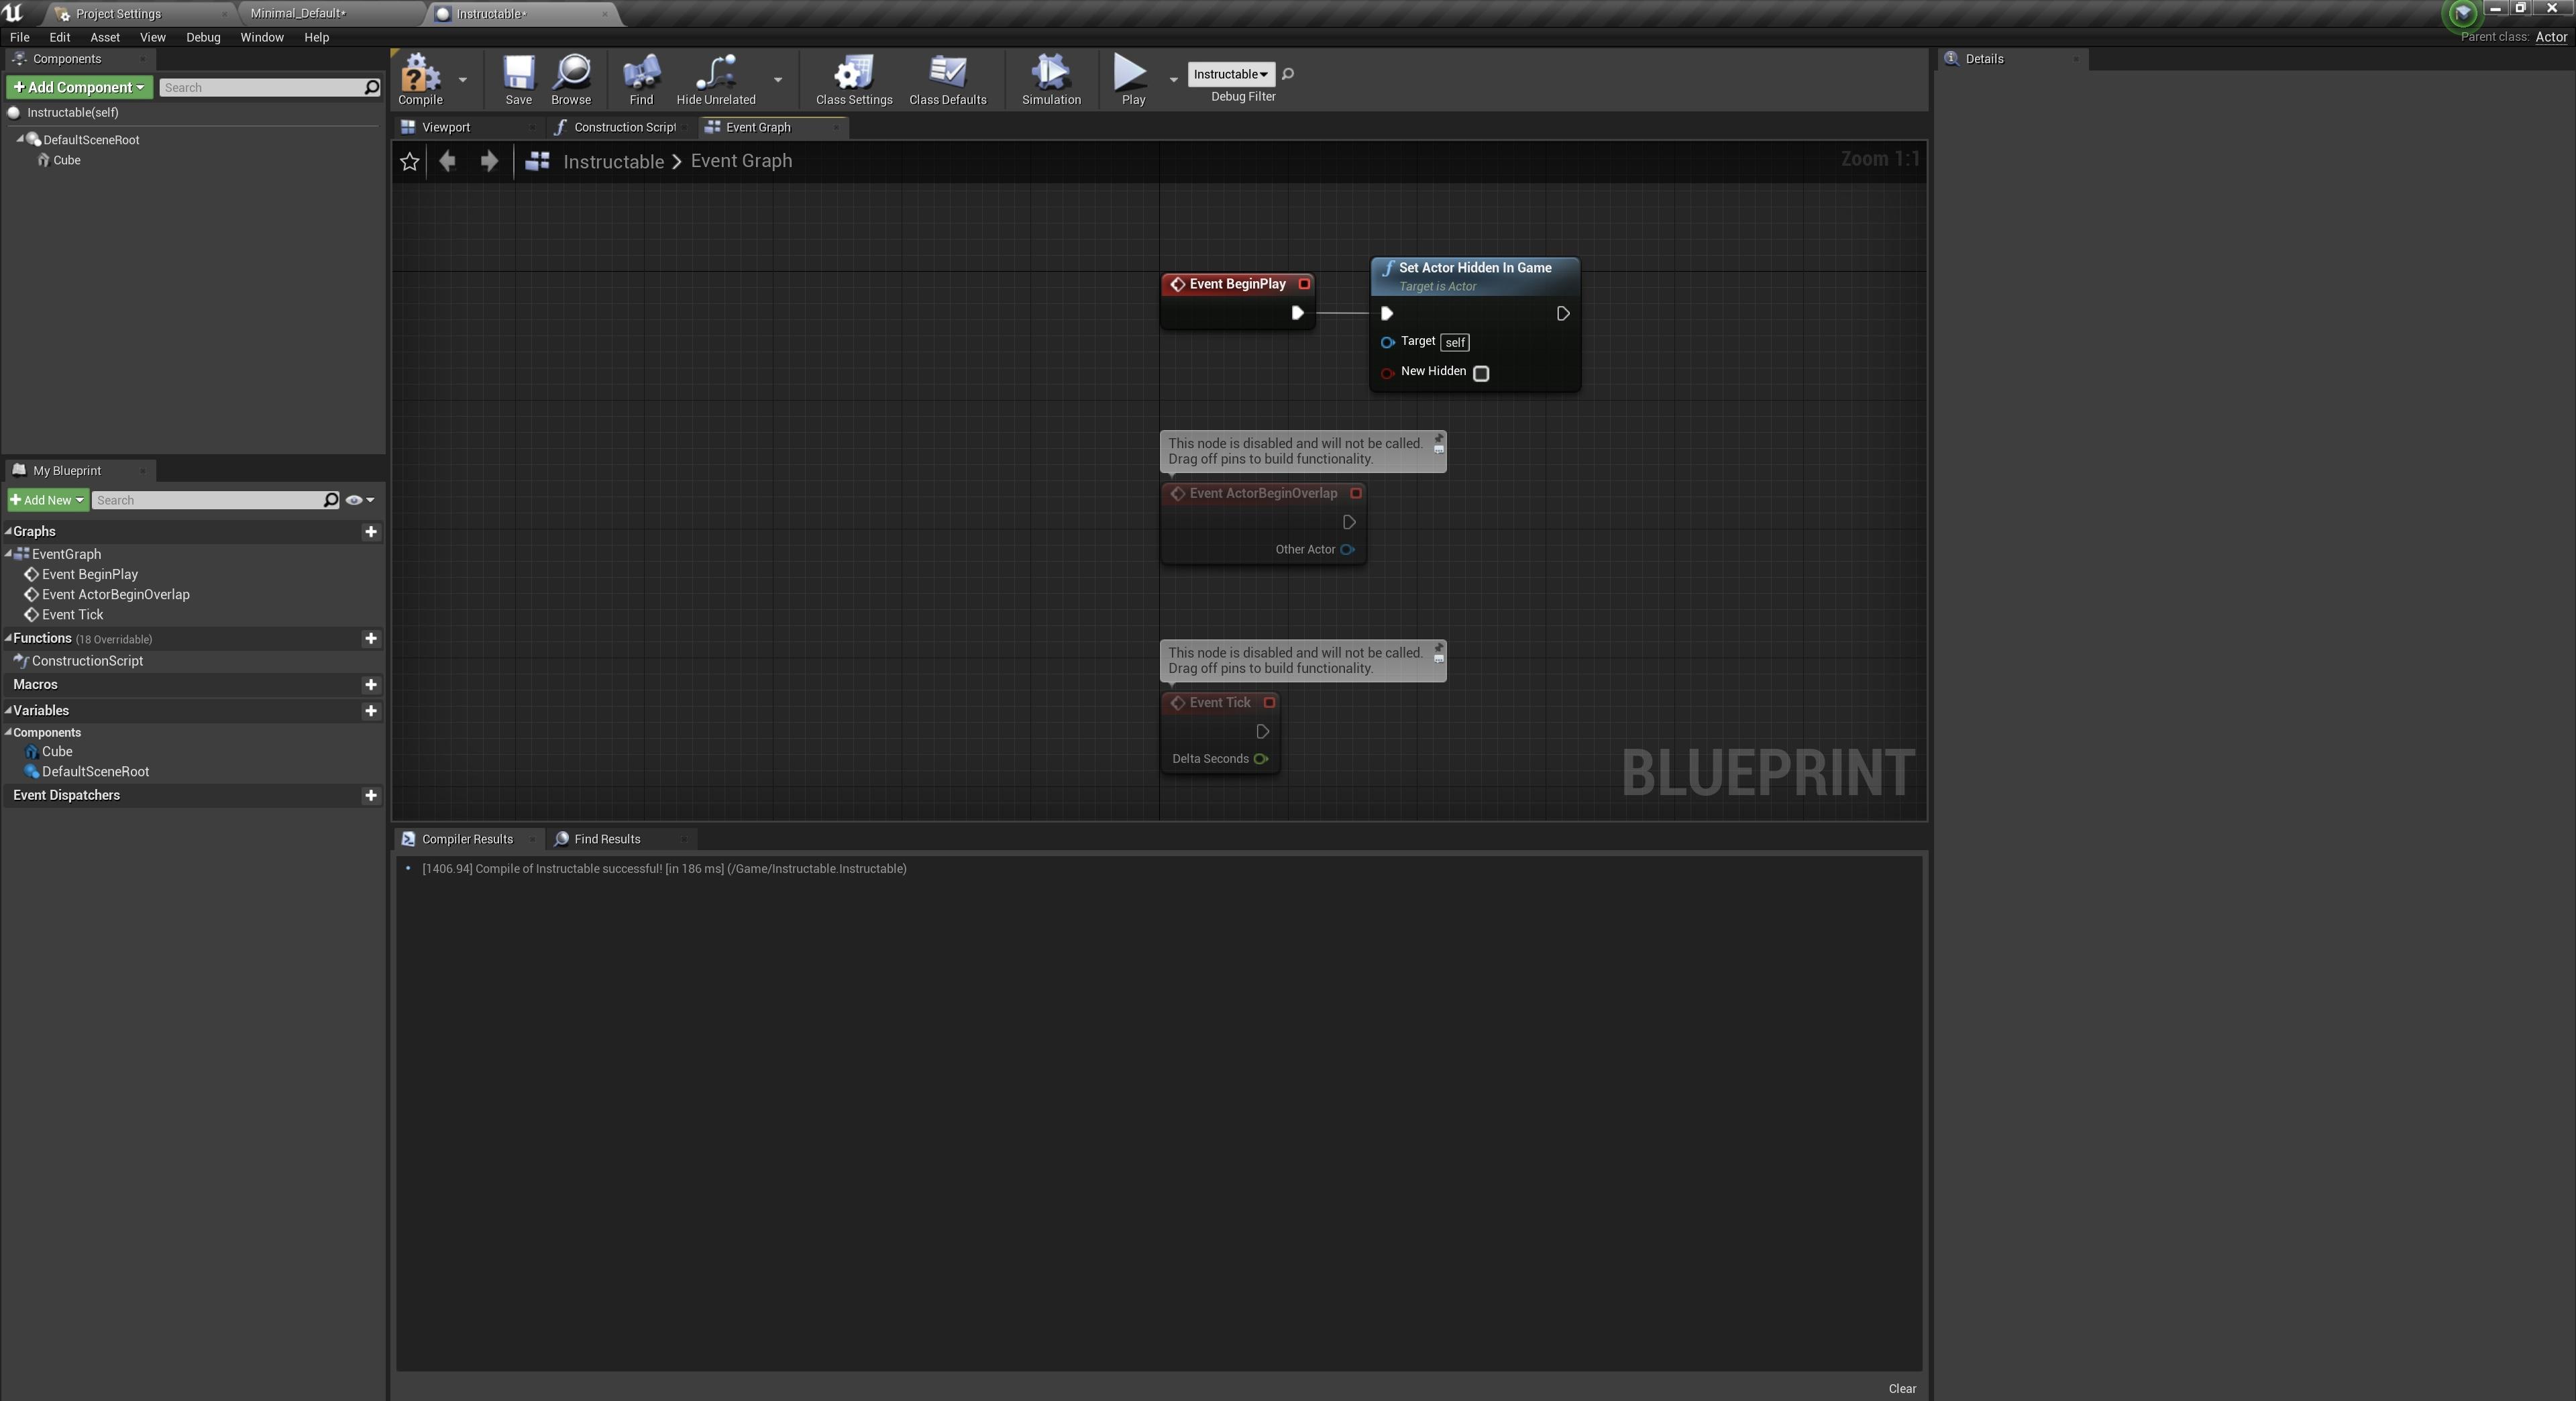
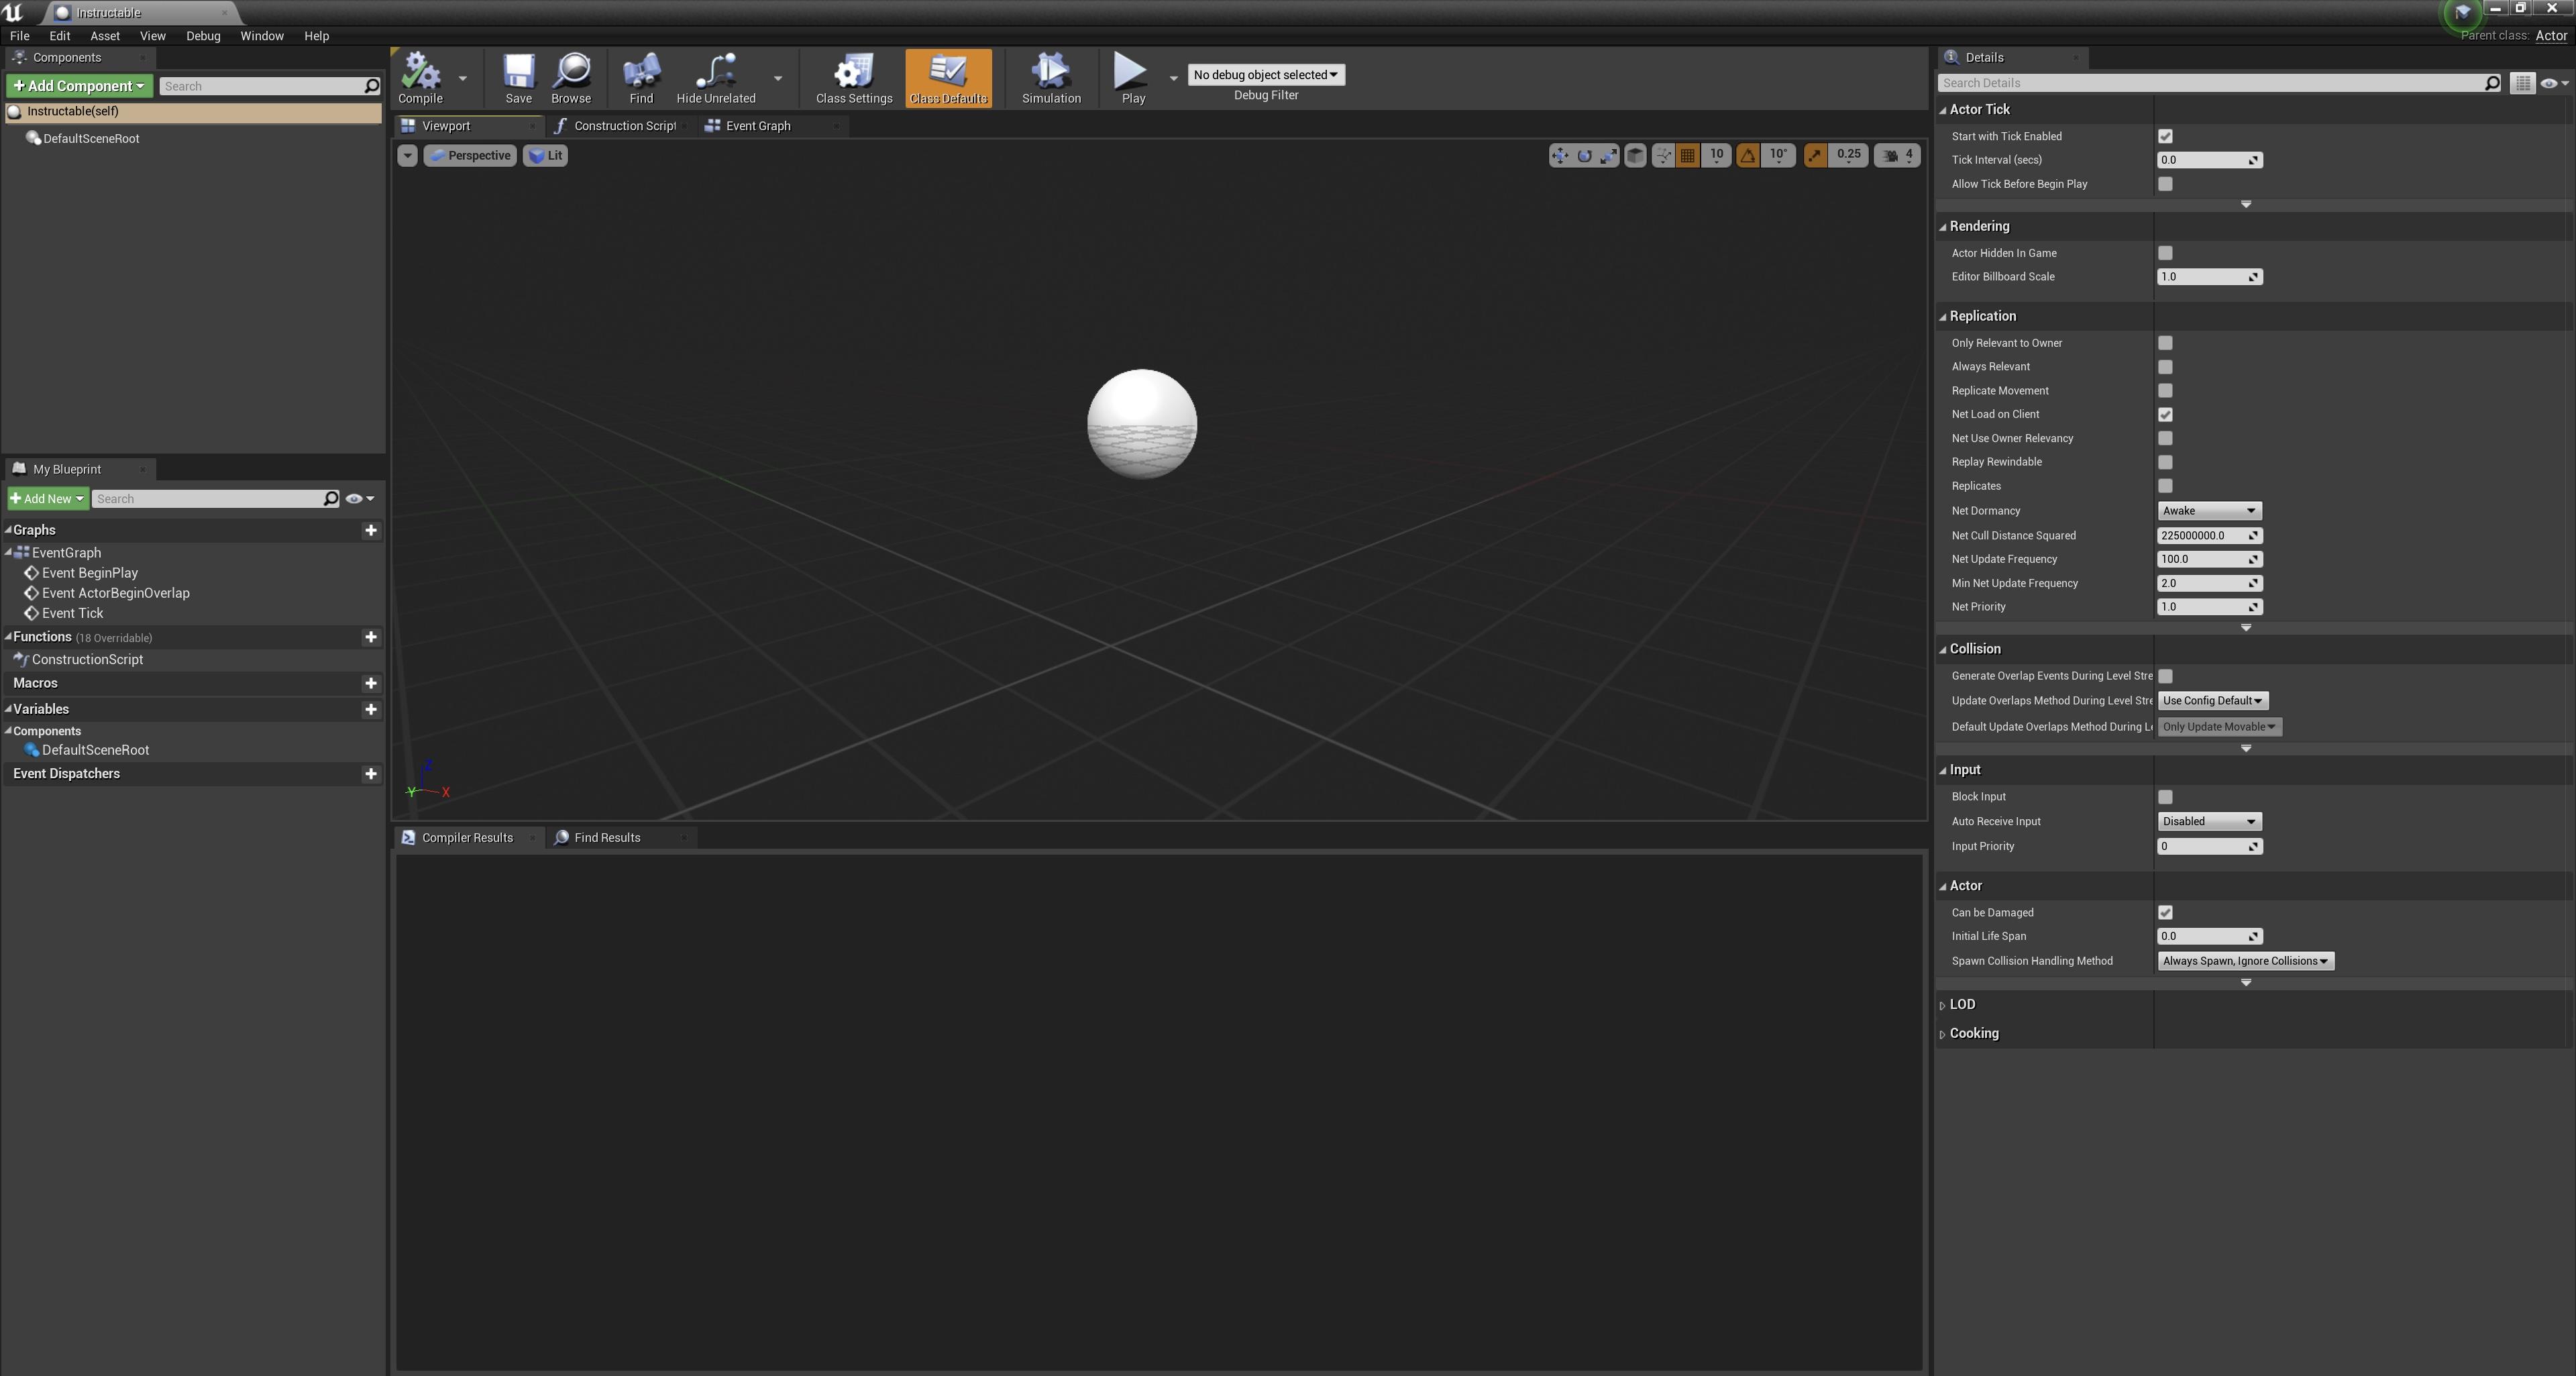
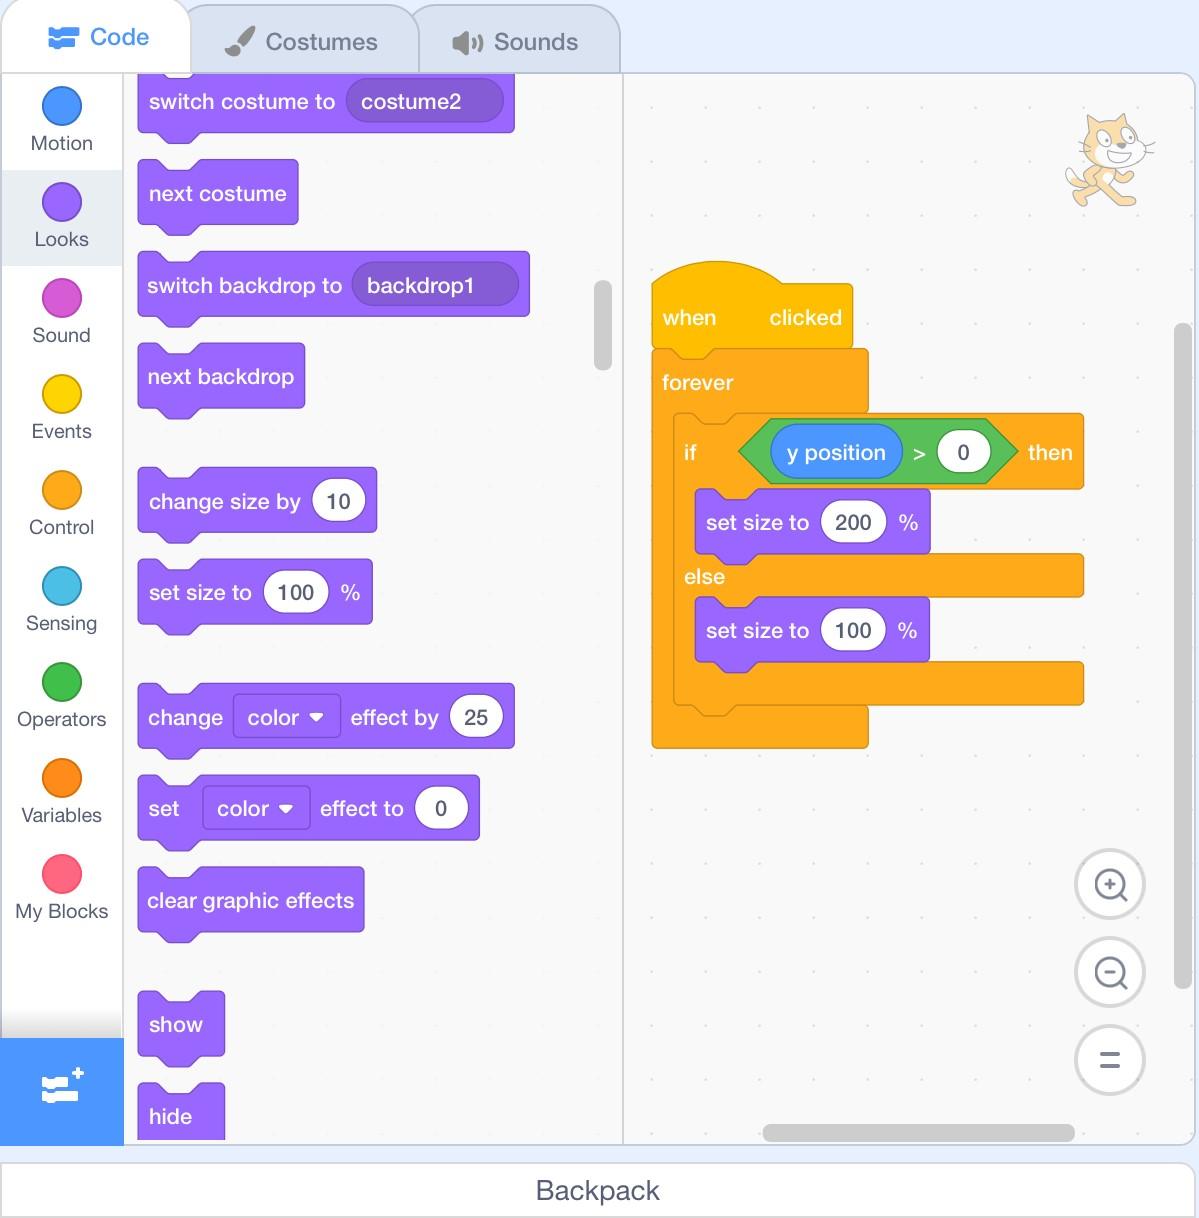
And now let the coding begin!!! In the Blueprint Editor Event Graph, you’ll notice three blocks there. These blocks are: Event BeginPlay, Event ActorBeginOverlap, and EventTick. They may sound scary but they are actually quite friendly. They don’t bite.
Let’s start with our friend Event BeginPlay. Now he is pretty much the same as the When Flag Clicked block from Scratch. Except for one major difference. Remember, an actor does not have to be in a level. An actor could actually spawn in a level mid-game. So this event fires off whenever the actor begins play, whether that be at the beginning or when it spawns in.
(Note: in scratch, there is another block called When I Start As A Clone, but in Unreal the Event BeginPlay block serves both purposes)
Let’s drag off from the white arrow. A wire will extend from this and open up a menu. Unlike Scratch, Unreal has thousands of different nodes (that’s what they’re called here). However, today you will make friends with many of them. Scratch has you stacking blocks on top of each other. When one fires, it activates the ones underneath. Unreal uses wires. Think of it like an electrical current. When the BeginPlay fires, electricity runs through the wires and activates all of the connected nodes.
In Scratch, you usually connect a Motion Block, Looks Block, or Control Block. They are all here but with different names. The Motion Blocks are called Transform Nodes. The Control Blocks are called Flow Nodes. The Looks Blocks are actually split up and thrown into different categories. The simplest thing you can do in scratch is probably to show or hide a sprite using the hide/show blocks. Let’s try that here (except instead of a hide/show block, Unreal has a “Set Actor Hidden In Game” node. Sure, you can do that from the details panel (you can too in Unreal Engine) but what’s the fun in that? Let’s code it.
That unreal node menu will help you find all the nodes. If you ever want to bring the menu up, just right click in the event graph. Let’s search for the “Set Actor Hidden In Game” node (I’ll use quotes now since the names of the nodes are going to get quite lengthy). As you probably guessed, the “Set Actor Hidden In Game” node is the show/hide blocks in scratch combined in one. Connect the arrow from Event BeginPlay to this node. Now you can check that box to tell the engine if you want to hide or show your actor. Let’s try hiding it. Check the box. Now click where it says “Compile” in the toolbar. This will compile the code and let you know if there are any errors in your coding. Now press play. The actor should be invisible. Now go back to the editor and uncheck the box. Play the game and the actor will appear. You may need to add your Blueprint Editor tab into the same window as the level blueprint. Woooooooo! If that didn’t happen, there are several possible problems:
• Make sure the node is the “Set Actor Hidden In Game” node instead of “Set Component Hidden In Game” or “Get Actor Hidden In Game” node.
• Check to make sure there is a white wire connecting it to the “Event BeginPlay” node instead of one of the other event nodes.
• Make sure you have checked the box correctly.
Well. We haven’t really done much yet. Let’s make our actor spin. If your FBX happens to be a sphere or cylinder, we might have trouble seeing it spin so off-center it in the viewport. In Scratch, the block to spin things is “Point in Direction”. In Unreal, the node is called “Set Actor Rotation”. And you will have to set the rotation in three axes. However, if we use this node, it will keep setting our actor to the same rotation. We want our actor to actively spin. In scratch, there is a “turn” block to rotate the actor a certain number of degrees. Unreal has that here too. It’s called the “Add Actor Local Rotation” node. Let’s add it into the Event Graph and add set the desired rotation (just use X:1, Y:1, Z:1). In scratch, if we wanted something to keep spinning, we would put it comfortably inside of a “forever” loop block. Unreal doesn’t have those because it doesn’t need them. In fact, if Unreal detects an infinite loop in its code (such as a node plugged into a node plugged into itself), it will shut down the Play In Editor session. In Unreal we have the EventTick node. A tick is basically a frame. Most computers run either 30 or 60 frames/ticks per second. But the important thing is that ticks will be firing throughout your entire game so it will be similar to the “forever block”. Let’s plug the EventTick block into the “Add Actor Local Rotation” node. Compile, save, and press play. Is your actor spinning? If not, refer to the troubleshooting steps I listed earlier.
In Scratch, the code would be [When Flag Clicked]>[Forever]>[Turn 1°]. In Unreal, it will look like [EventTick]————[Add Actor Local Rotation: 1,1,1].
Sensing and Branches
.png)
In Scratch, actors can sense things using sensing blocks. They can sense if they are touching another sprite, what colors they are touching, and many other things. And they can also make decisions. For example, “if you are above the middle of the screen, get really big” can be written as [When Flag Clicked]>[Forever [If (y position>0), then [set size to 200%] else, [set size to 100%]].
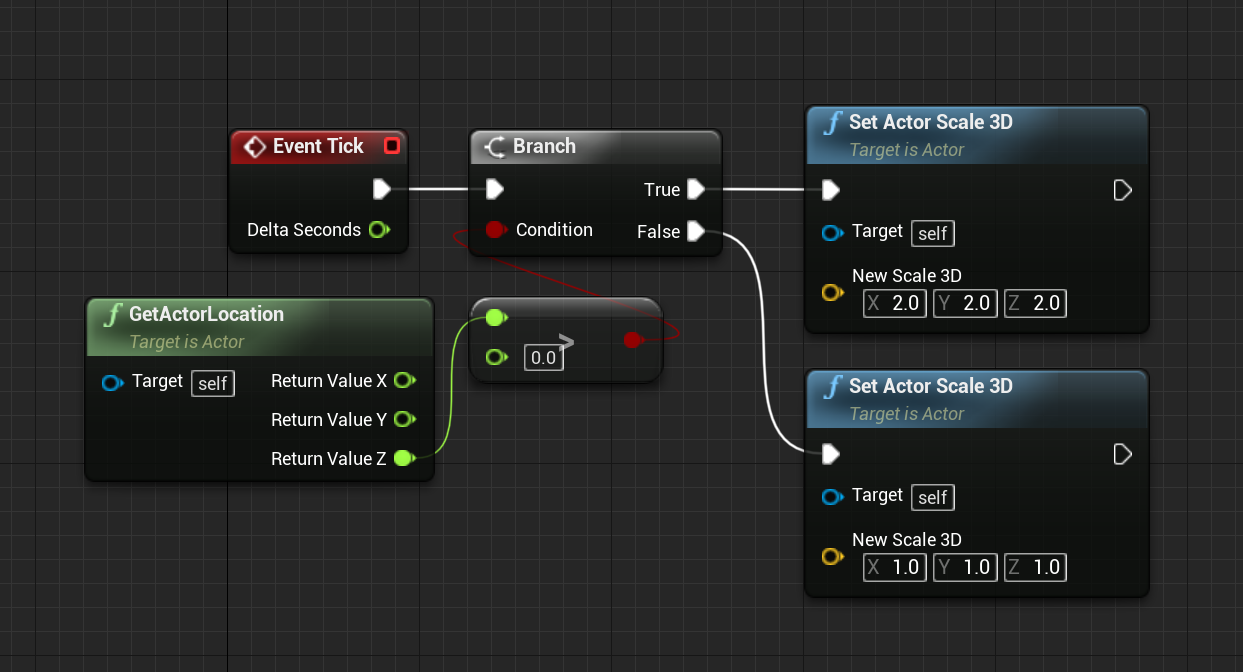
In Unreal Engine, these decisions are made using a “Branch”. Find the “Branch” node and plug it into the “EventTick” node (or the “Set Actor Local Rotation Node” since that is already connected to the “EventTick” node and the current will continue through). Hold the right mouse button and drag to recenter the screen. From the “True” pin on the branch, drag it out to a “Set Actor Scale 3D” node. This is the same as the "set size to" block. Make the scale (X:2, Y:2, Z:2). From the “False” pin on the branch, drag it out to another “Set Actor Scale 3D” node. In this one, make the scale (X:1, Y:1, Z:1). Now the only thing left is the sensor. Find the “Get Actor Location” node. Right click on the yellow circle and click “Split Struct Pin”. This will let us access the XY and Z values of the location. In a 3D space, the Z-axis is vertical height. Drag this out to another node called the “float > float” node. Set the second value in the “>” node to 0. You’ll notice that the line from the “Actor Location” node to the “>” node is green. This is because the wire is transferring a float (a decimal number). In Unreal, floats a represented by green. The “>” node will now check if the Z value of the actor is greater than 0. Drag from the red circle on the “>” to the red circle on the branch node. This line is red because it is transferring a Boolean value, that is a value that is either true or false. This "Branch" will now take the result of the “>” node and act accordingly.
Let’s test it out. Move the actor around, above and below the XY plane. Then press play to see how big the actor is. There are other ways to do this (like with the “select” node) but they are far more complicated.
The “Get Actor Location” Node is the same as the X and Y position motion blocks from scratch. Except the “Get Actor Location” returns a vector, which is a variable containing three floats. Splitting the struct pin (as well as the “break” node) allows us to access these floats. Think of it as opening a jar to access the cookies. If you want to give someone all the cookies, give them the jar. If you want to give them one cookie, open the jar and give them the cookie.
The “Get Actor Location” Node is a node that returns a value. Many nodes do this such as the “Get Actor Rotation” and “Get Random Float In Range” nodes. These nodes return floats. Other nodes will return Boolean, Vectors, and many others. More on that in the Variable section.
The Scratch to Unreal Glossary
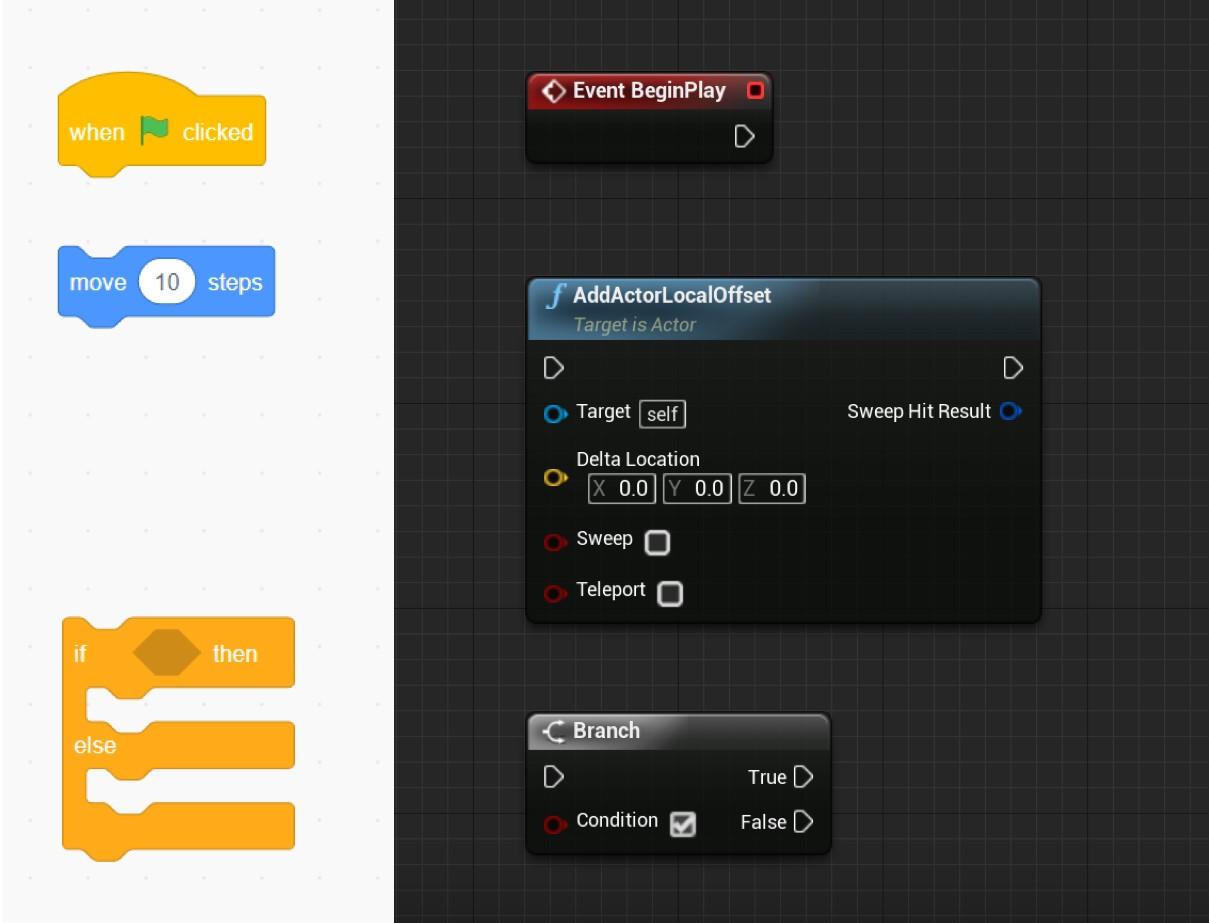
So now that you’ve started coding, go ahead and mess around. See what you can do. Here I have a glossary of common Scratch Blocks and their corresponding Unreal Nodes. Many Scratch Blocks are much more complicated in Unreal so I’ll leave them out and address some of them later. These blocks will not be exactly the same as the nodes but close enough. I’m sorry for the blocks I couldn’t fully explain. Unreal has a whole site to explain these at docs.unrealengine.com.
• [When Flag Clicked] = [Event BeginPlay]
• [Forever] = [Event Tick]
• [Go to (x,y)] = [Set Actor Location: (x,y,z)]
• [Turn ( )°] = [Add Actor Local Rotaion (x,y,z)]
• [Go to (random position)] = [Set Actor Location: ( //split the pin and connect all of the floats to [Get Random Float in Range])]
• [Point in Direction ( )°] = [Set Actor Rotation (x,y,z)]
• [Point Towards ( )] = [Set Actor Rotation (———— [Find Look at Rotation, start (x,y,z) end (x,y,z)])]
• [Change x by ( )] = [Add Actor Local Rotation (x,0,0)]
• [Change y by ( )] = [Add Actor Local Rotation (0,y,0)]
• [Set size to ( )%] = [Set Actor Scale 3D (x,y,z)]
• [Show]/[Hide] = [Set Actor Is Hidden In Game ( //Boolean value )]
• [Start Sound] = [Play Sound 2D ( //you must import the sound to the content browser)]
• [Wait ( ) seconds] = [Delay ( )]
• [Repeat ( )] = [For Loop, start index (0), end index ( // the number of times you want to repeat )]
• [If ( ) then, else] = [Branch ( //Booooooolean )]
• [Repeat Until ( )] = [While Loop ( //I think you can tell which ones are books (the red ones))] //Be careful with this one. Better hold off until you understand it better.
• [Stop all] = //This is a murderous block. It isn’t in Unreal since loops and connected blocks will all execute in the same frame.
• [Create Clone of Myself] = [Spawn Actor at Location //lots of input. Hold off on this one too.]
• [When I Start As A Clone] = [Event BeginPlay]
• [Delete This Clone] = [Destroy Actor (self)]
• (Distance to ( )) = [Get distance to (x,y,z)
• (Mouse X)/(Mouse Y) = [Get Mouse Cursor Position]
• (Join (apple) (banana)) = [Append (apple) (banana)]
• (letter (1) of (apple)) = [Get Substring (apple), start index (1), length (1)]
• (apple contains ( )?) = [String: Contains ( ) ( ), use case ( ), search from end ( )]
• Variables to come in next section!
Variables
.png)
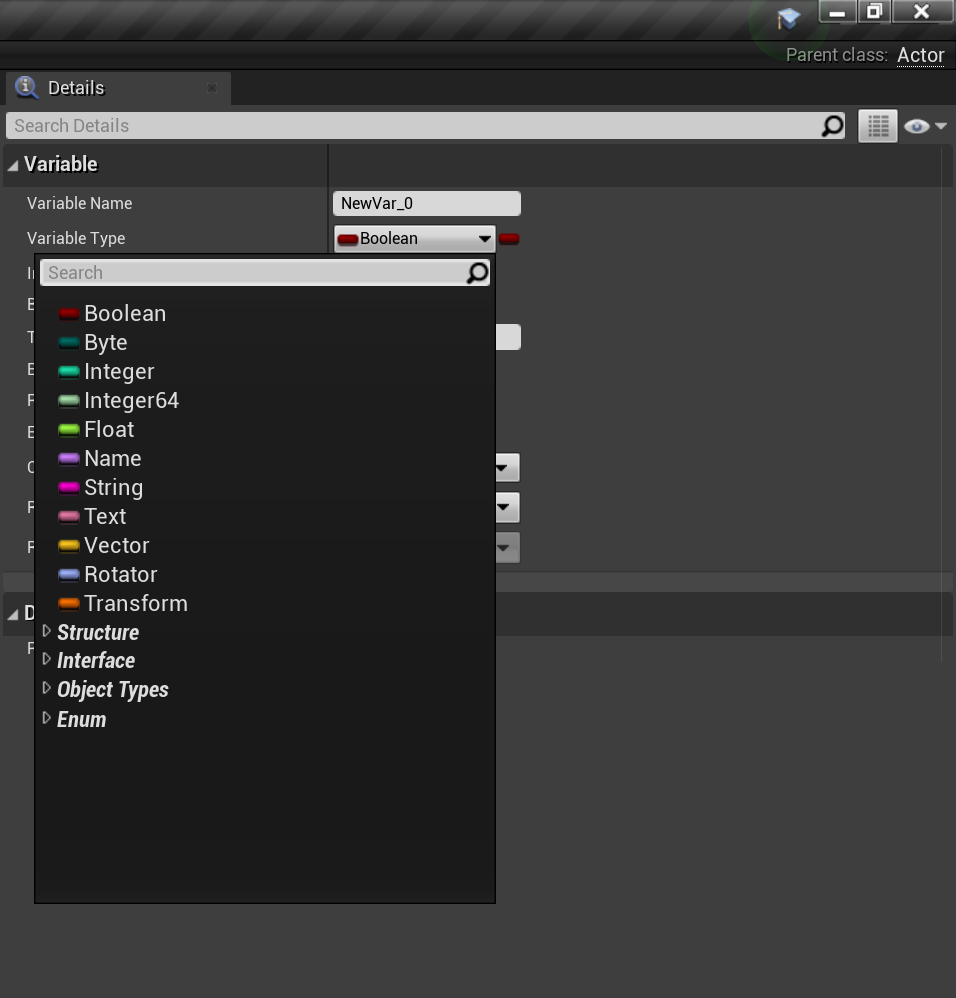
In the blueprint editor event graph, you may have noticed some variables in the far left. In Scratch, a variable is literally a number. In Unreal Engine, a variable can be much more than a number: a string (letters and numbers), a vector (an x y and z position), a rotator (an x y and z rotation), a transform (a rotator and two vectors to determine location, rotation, and scale) an actor (an object in the viewport), an actor class (an object in the content browser), a text (which is like a string but hold off on this one for now) and more. That may be confusing but I’ll break the main ones down for you:
• Float: a number, used for pretty much anything. It’s greeeeeeeen.
• Integer: an integer, mainly used for indexes or anything that can’t have decimals (i.e., the number of bananas on the screen will be an integer). It’s turquoise.
• Vector: a location or scale. It’s really just three floats. It’s yellow.
• Rotator: three rotation values for the axis. It’s really just three floats. It’s light purple.
• String: words. All of this text is a string. It’s hot pink.
• Text: hold off on this one. Just use the string. It’s light pink.
• Object: an actor or asset in the level. It’s blueeee.
• Class: an actor or asset in the content browser (this would cover all appearances of that actor in the level when the “Get All Actors of Class” node is used). It’s purple.
• Transform: the location, rotation and scale of an object. It’s orange.
• Boolean: true or false. Used like a sensing block. It’s red.
Let’s make a variable. Press the plus button on the left panel and select "variable". Name it whatever you want. Let’s change the type of variable to a Boolean.
Variables can also be what’s called an array. It’s the same thing as a list in Scratch. If you want to make a variable into an array, select the variable and next to the name and type, there will be a drop-down to make it a single variable, array, or set. Leave it as a single variable. Compile the blueprint. Now you can set the default value for the variable. Let’s set it to true (checked box since the variable should be a Boolean).
In Unreal Engine, there is a helpful tool that will allow you to detect bugs. It’s called the “Print String” node. It will print blue text for development. There is also a node called a “sequence” that lets you execute different nodes in order. This is useful for executing branches. Connect this to the “EventTick” node. Connect the first pin to the branch we made earlier. Connect the second pin the the “Print String” node. Now when you play the game, it will say hello a bunch of times on the left side of the screen. This is because it is saying hello every frame. Return to the editor and plug our new Boolean variable into the “Print String” node. This is done by literally dragging the variable in from the left and selecting “get”. You can also search for it. It may seem nonsensical since the input for the “print string” node is a string, not a Boolean. But Unreal will automatically convert the Boolean to the string. Basically, if the Boolean reads true, the string will say “true”. Now when you play the project, it will either say “true” or “false” on the left. Change the default value of the variable to see this change.
Changing variables in Unreal Engine is pretty much the same as it is in Scratch. If our variable is called Hedgehogs, you will find a “Set Hedgehogs” node in this blueprint only. There is no “Change Hedgehogs” node since this can be done like this:
[Set Hedgehogs ( [Get Hedgehogs] + 1)]
In addition, the operators in unreal are the same as in Scratch. Yaaaaay!
Costumes
.png)
Now graphics is a whole other thing in Unreal. It’s incredibly complicated and unfortunately your Scratch skills won’t help you. You might be better of reading a separate tutorial since this tutorial is about using Scratch skills but I’ll give you the basics. Bear with me, this will be fast:
Deeeeep breaths:
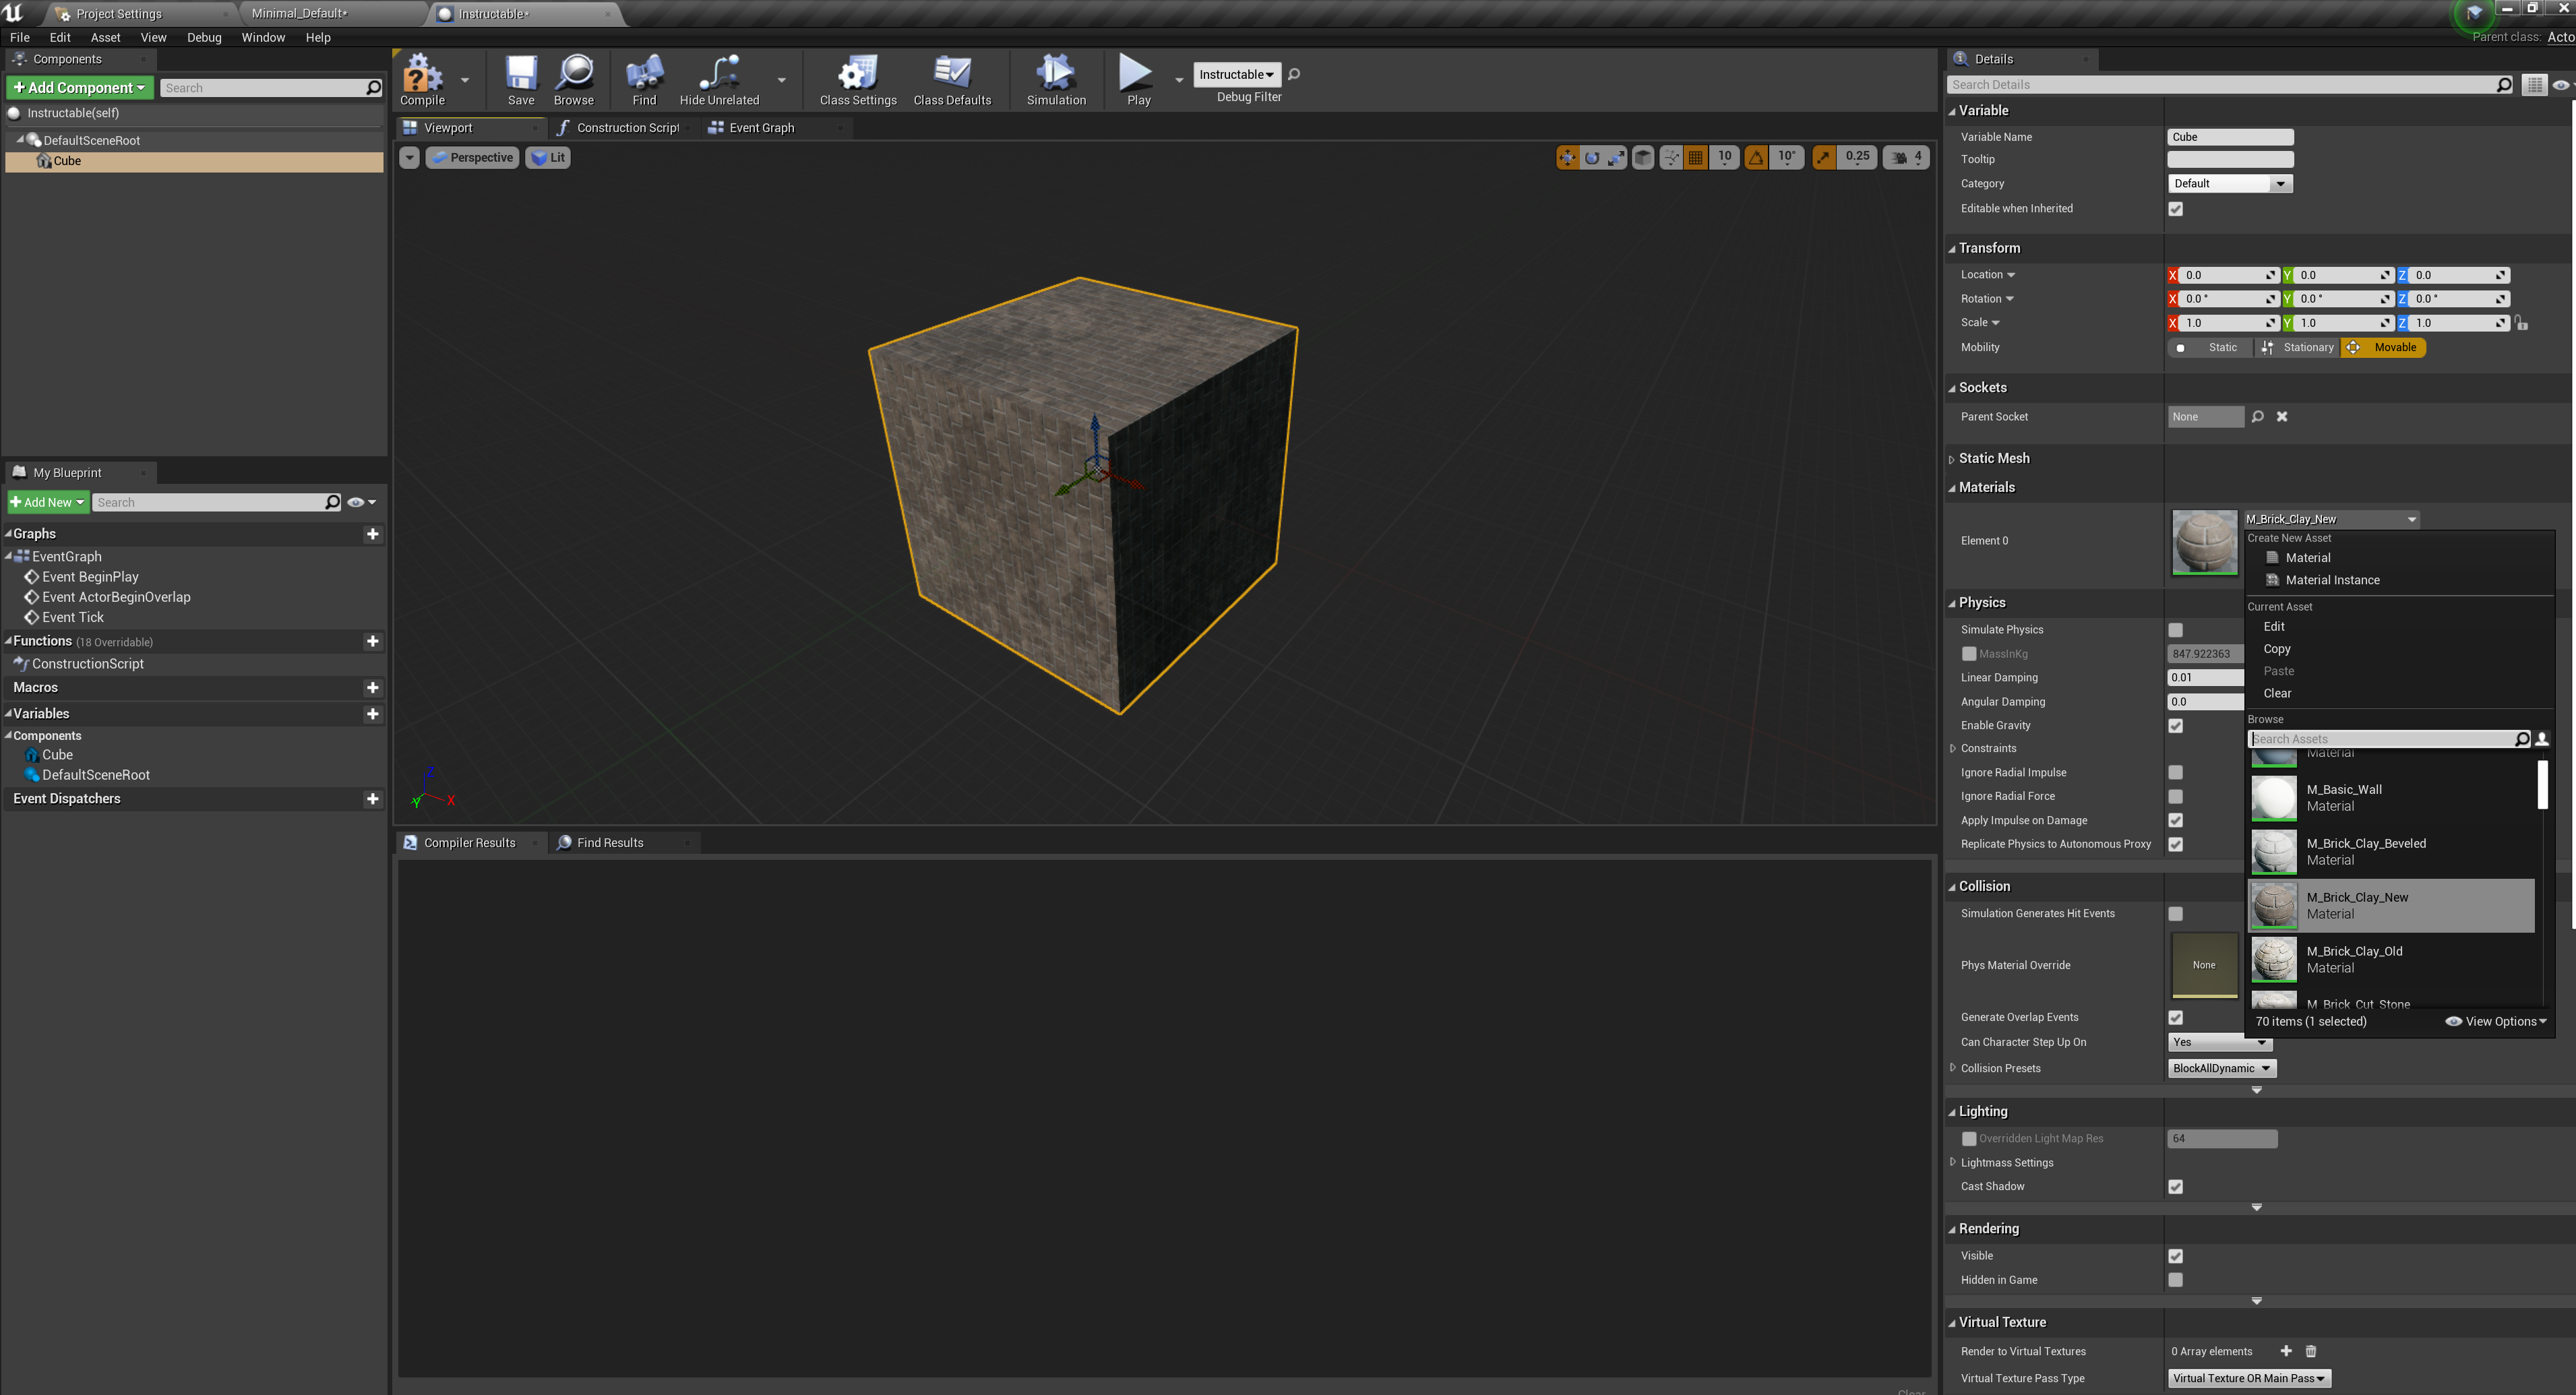
There are static meshes, which are shapes, and skeletal meshes, which as shapes that have joints. Both of these use materials, which can be made in the content browser. The simplest way to make a material is to plug in a Constant3Vector (color) into the base color of the material. You can also plug in constants to the other pins to see what happens. To apply a material to a mesh, select the mesh in the blueprint editor and scroll down to "material". Here you can select a material. You can change materials or meshes during the game using blueprints. The nodes are:
[Set Material ( //you must plug in the mesh of which you wish to change the material of. Drag it in from the outliner)] and [Set Static Mesh ( //same story)]
In Scratch, everything from characters to the title screen are expressed through sprites. In Unreal, there are things called widgets that are like 2D stickers that can be put on the game. They are usually used for UI, HUD, scoreboards, dialogue, and more.
Whew! That was an oversimplification. I’m really sorry but this Instructable is about “block coding” and block coding won’t help you with graphics. Therefore, a graphics section would be out of place and hundreds of tutorials for this already exist. Since Scratch skills don’t apply here, my tutorial would be no better than any other tutorial. Here are some recommendations:
https://www.raywenderlich.com/504-unreal-engine-4-materials-tutorial
https://www.raywenderlich.com/480-unreal-engine-4-ui-tutorial
https://docs.unrealengine.com/en-US/Engine/Content/Types/SkeletalMeshes/index.html
https://docs.unrealengine.com/en-US/Engine/Rendering/Materials/index.html
I would also recommend looking up some tutorials for building meshes in Blender and using Blender to create models. Then import them as an FBX into Unreal.
Characters
.png)
In Scratch, the player controls the character usually with the arrow keys. Unreal is similar but with a more efficient system: the input system. Sure, there is an “Event KeyPressed” node but the input system is made specifically for controlling the character. Open the input section of the project settings (found in the edit tab or the level editor). There are two types of input: action and axis. Action input is for specific actions such as jumping or punching. Axis mapping will return a float. These are used mostly for movement.
Let’s create an Action input and map it to the spacebar. Name it “jump”. Then create two axis inputs, named “forward movement” and “horizontal movement” (or “right movement” since the D key returns 1.0 and the A key returns -1.0). You can map them to the arrow keys or WASD. The idea is that W or the up arrow should return 1.0 on “forward movement” while S and the down arrow would return -1.0 etc.
Back on the character blueprint, it’s time to do some scripting. In the event graph, search for the “input forward movement” node. This node will return the value of your input. Connect this to an “add movement input” node. (With pawns, you will need to consume the movement input and create an offset but you will not need to do this with a character) Since it is a forward movement, we want the character to move forward (obviously). But how do we know which way is forward? Fortunately, Unreal Engine does this for us. Search for the “Get Actor Forward Vector” node and plug this into the “world direction” pin of the “add movement input” node. For the scale, plug in the return value of the “input forward movement” node. This means that when the return is positive, the character will move along the actor forward vector. When the return is negative, the character will move backward along the vector. Let’s do this with the horizontal movement and the “Get Actor Right Vector” node. Find the “input action jump” node and plug that into the “jump” node (Unreal has set up the jumping for us, yay!). Select the “character movement” component and play around with the parameters. Now let’s add a camera into the viewport. Open the viewport and add a new component. Search for “camera” and add it.
The player controller is just that: a player controller. Think of it as a ghost that travels around and can possess different characters. Now, when the player controller looks around, the camera should look in the same direction. Locate the camera and check the boxes that say “use controller rotation”. While the camera can look in any direction, we want the character to only use the controller yaw rotation. Otherwise, the character will lean back whenever the camera looks up (that’s a simplification). Back in the event graph, let’s make it so the controller can actually look around. Find the “add controller pitch rotation” and “add controller yaw rotation” nodes. How will the character know how to rotate the controller? You guessed it: axis input mapping. Create two axis input mappings in the input section of the project settings. One for yaw rotation and one for pitch rotation. Map these to the X-axis mouse movement and Y-axis mouse movement. On the event graph, connect these input nodes to the controller rotation nodes. Now try out your character.
Troubleshooting:
• Check the inputs and make sure they are mapped correctly.
• Check that the return of the axis inputs is connected to the movement input scale value.
If you are still having trouble with this character, create a new project and select first-person shooter. Inspect the default character and compare the blueprints.
Our First Game
.png)
.png)
.png)
.png)
.png)
Create a new project and select game. Choose the third person template. Open it without starter content. Play around and check out the blueprints. This character is pretty much the same one we made in the last step. The one major difference is that the camera is on what’s called a spring arm. The spring arm will attempt to keep its children (any components attached to it) at a certain distance but will compress upon collision. Because the character and camera are no longer always in the same spot, the character has a skeletal mesh and uses movement orientation rather than controller yaw rotation. Once you understand the mechanics of the basic template, we’ll start making some enemies.
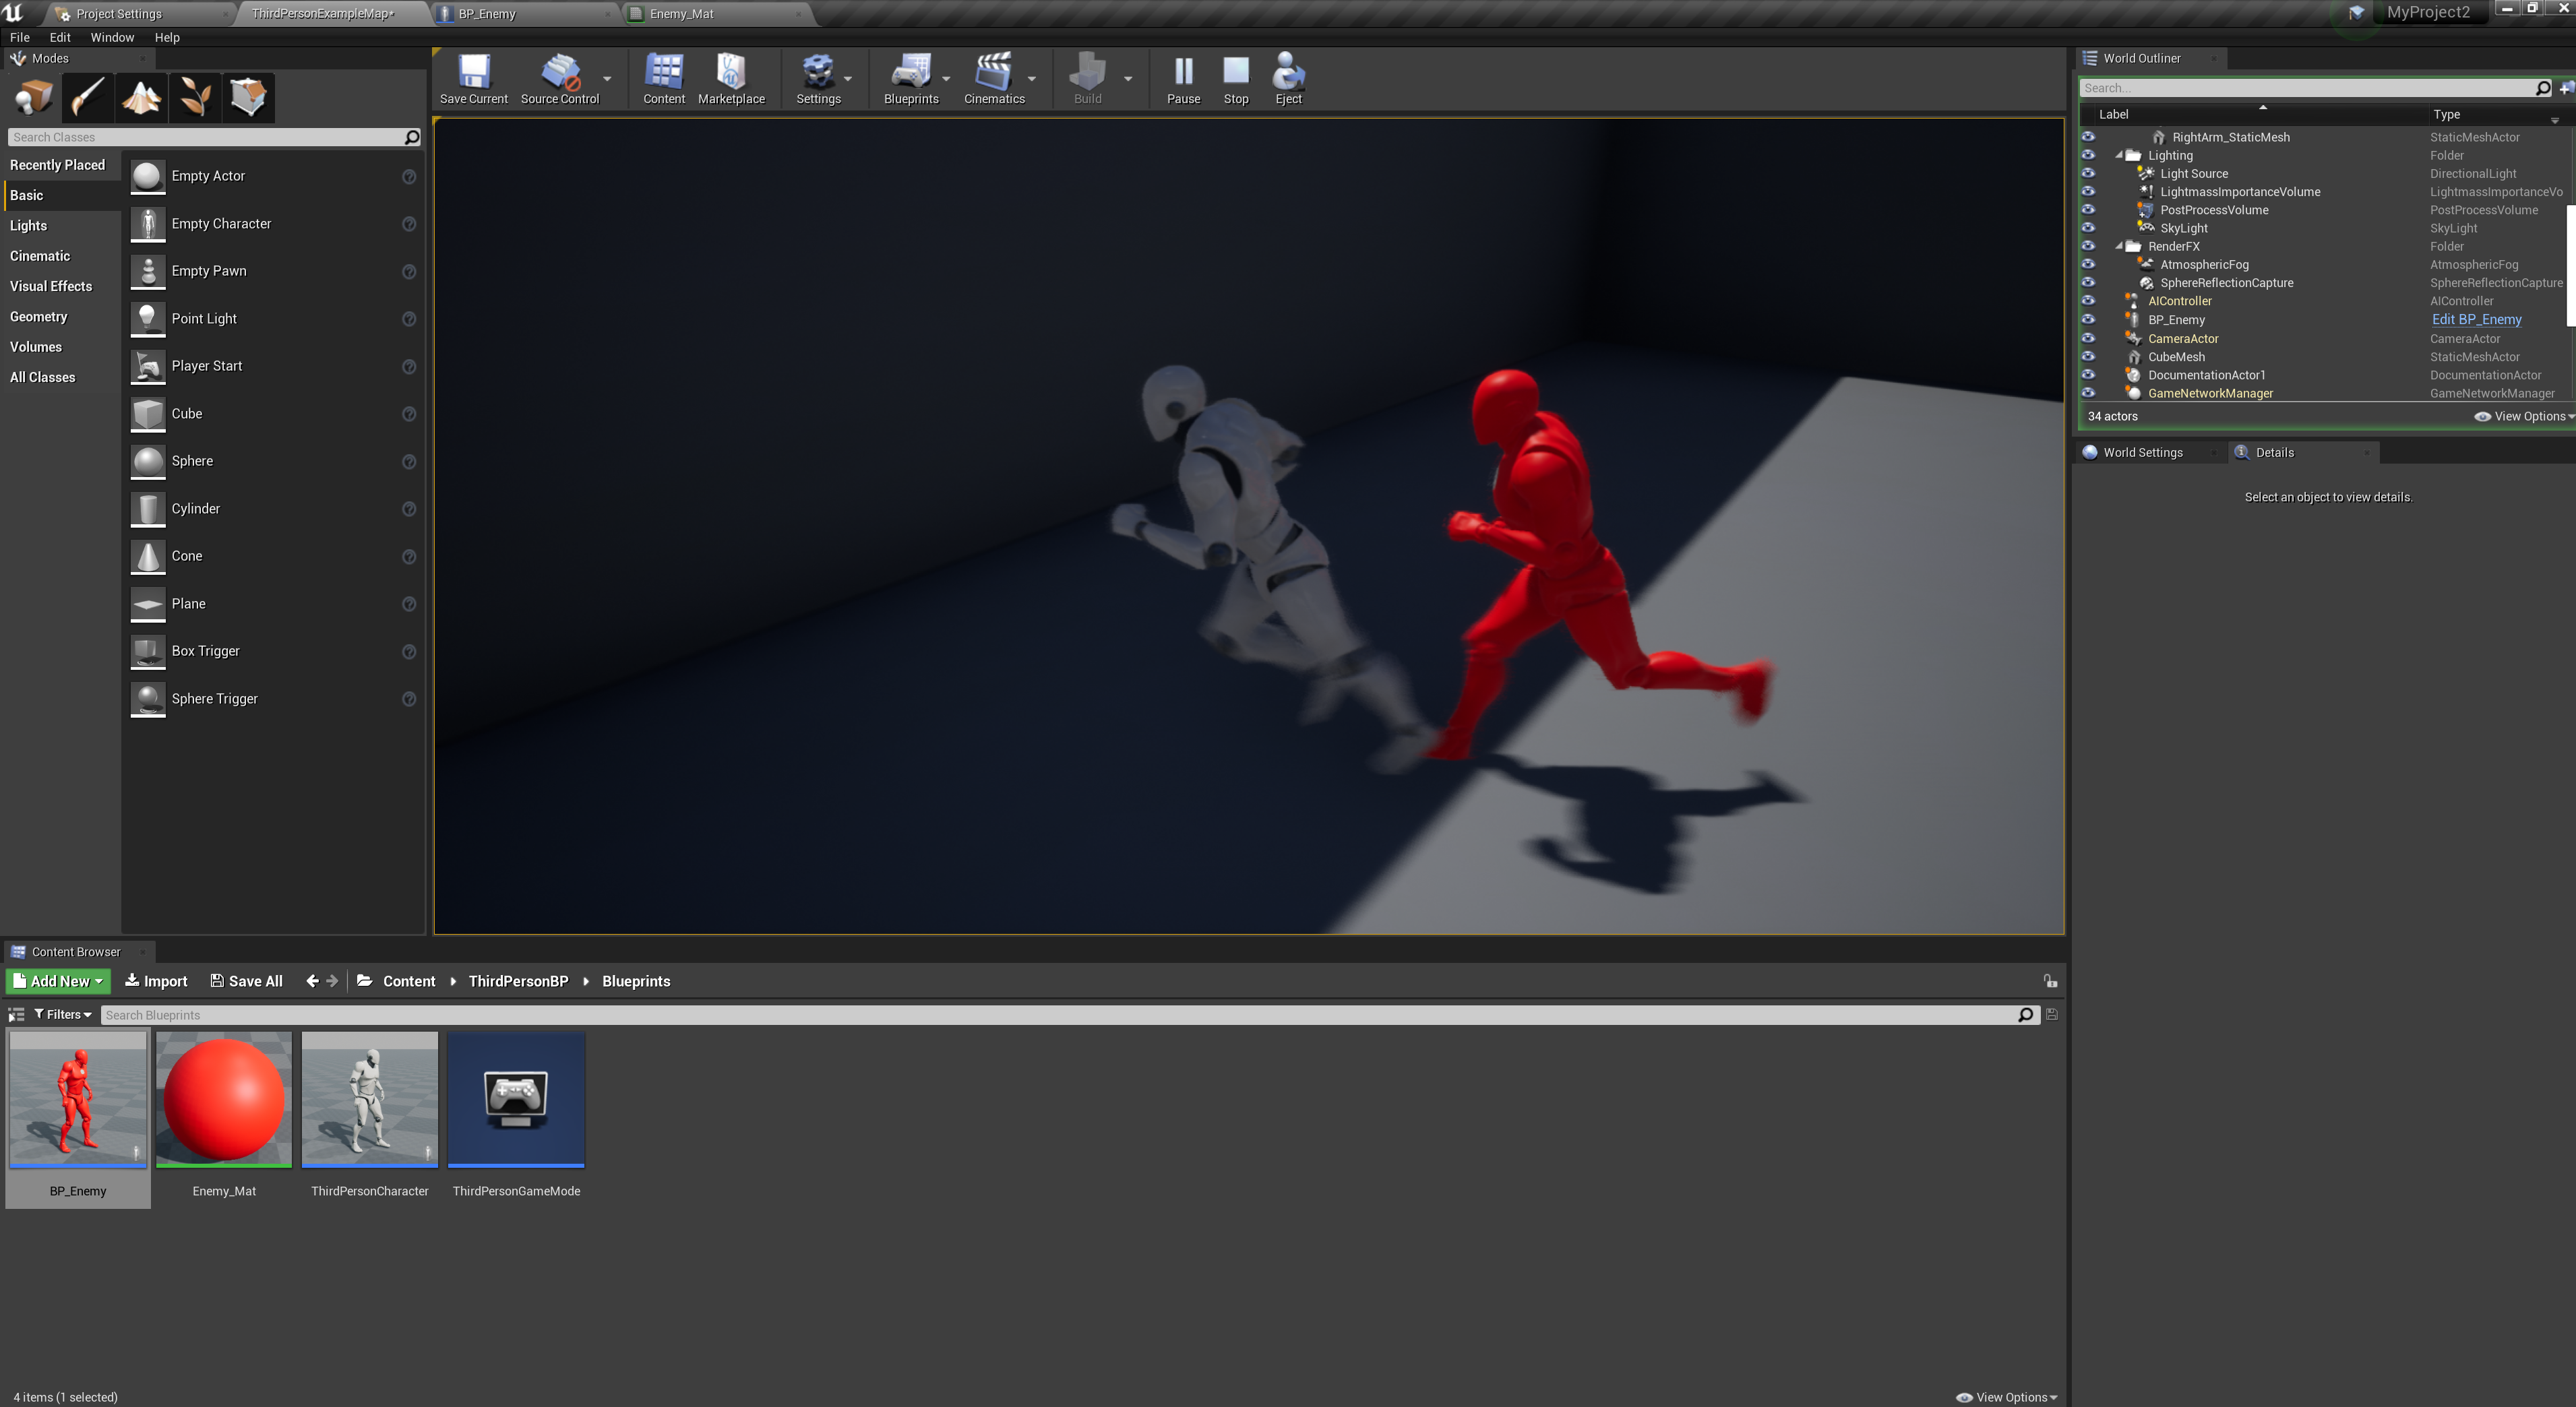
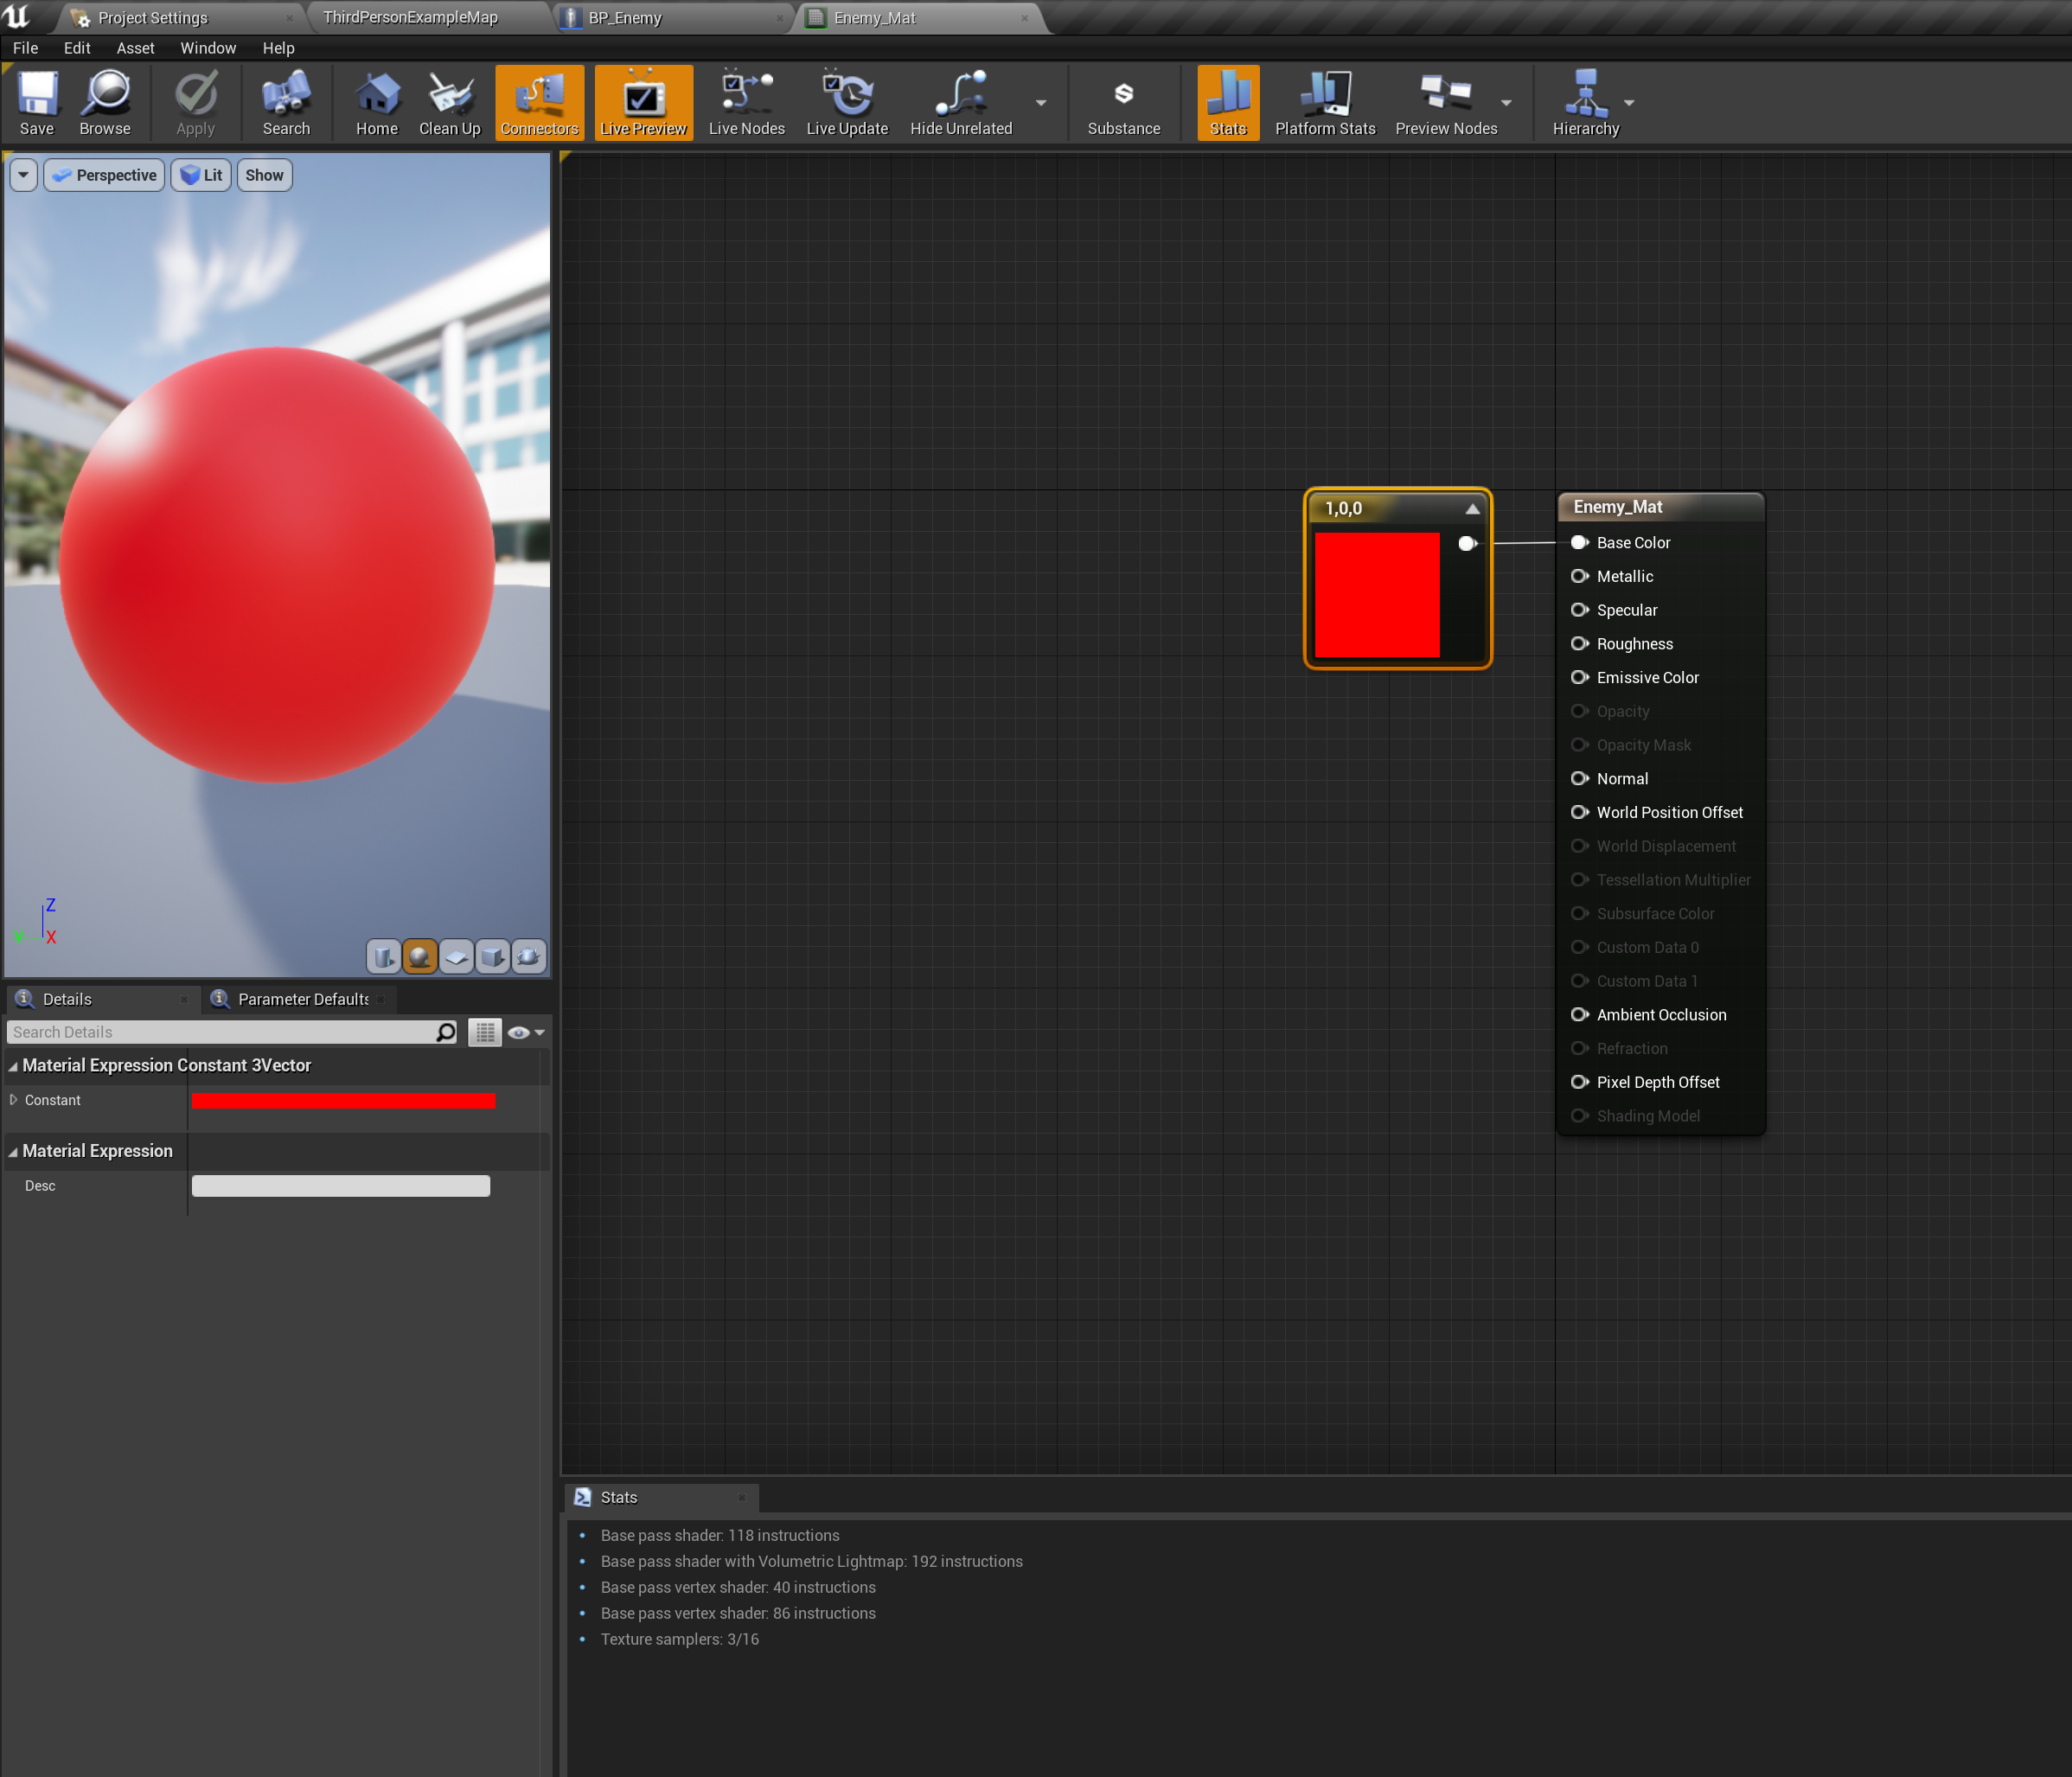
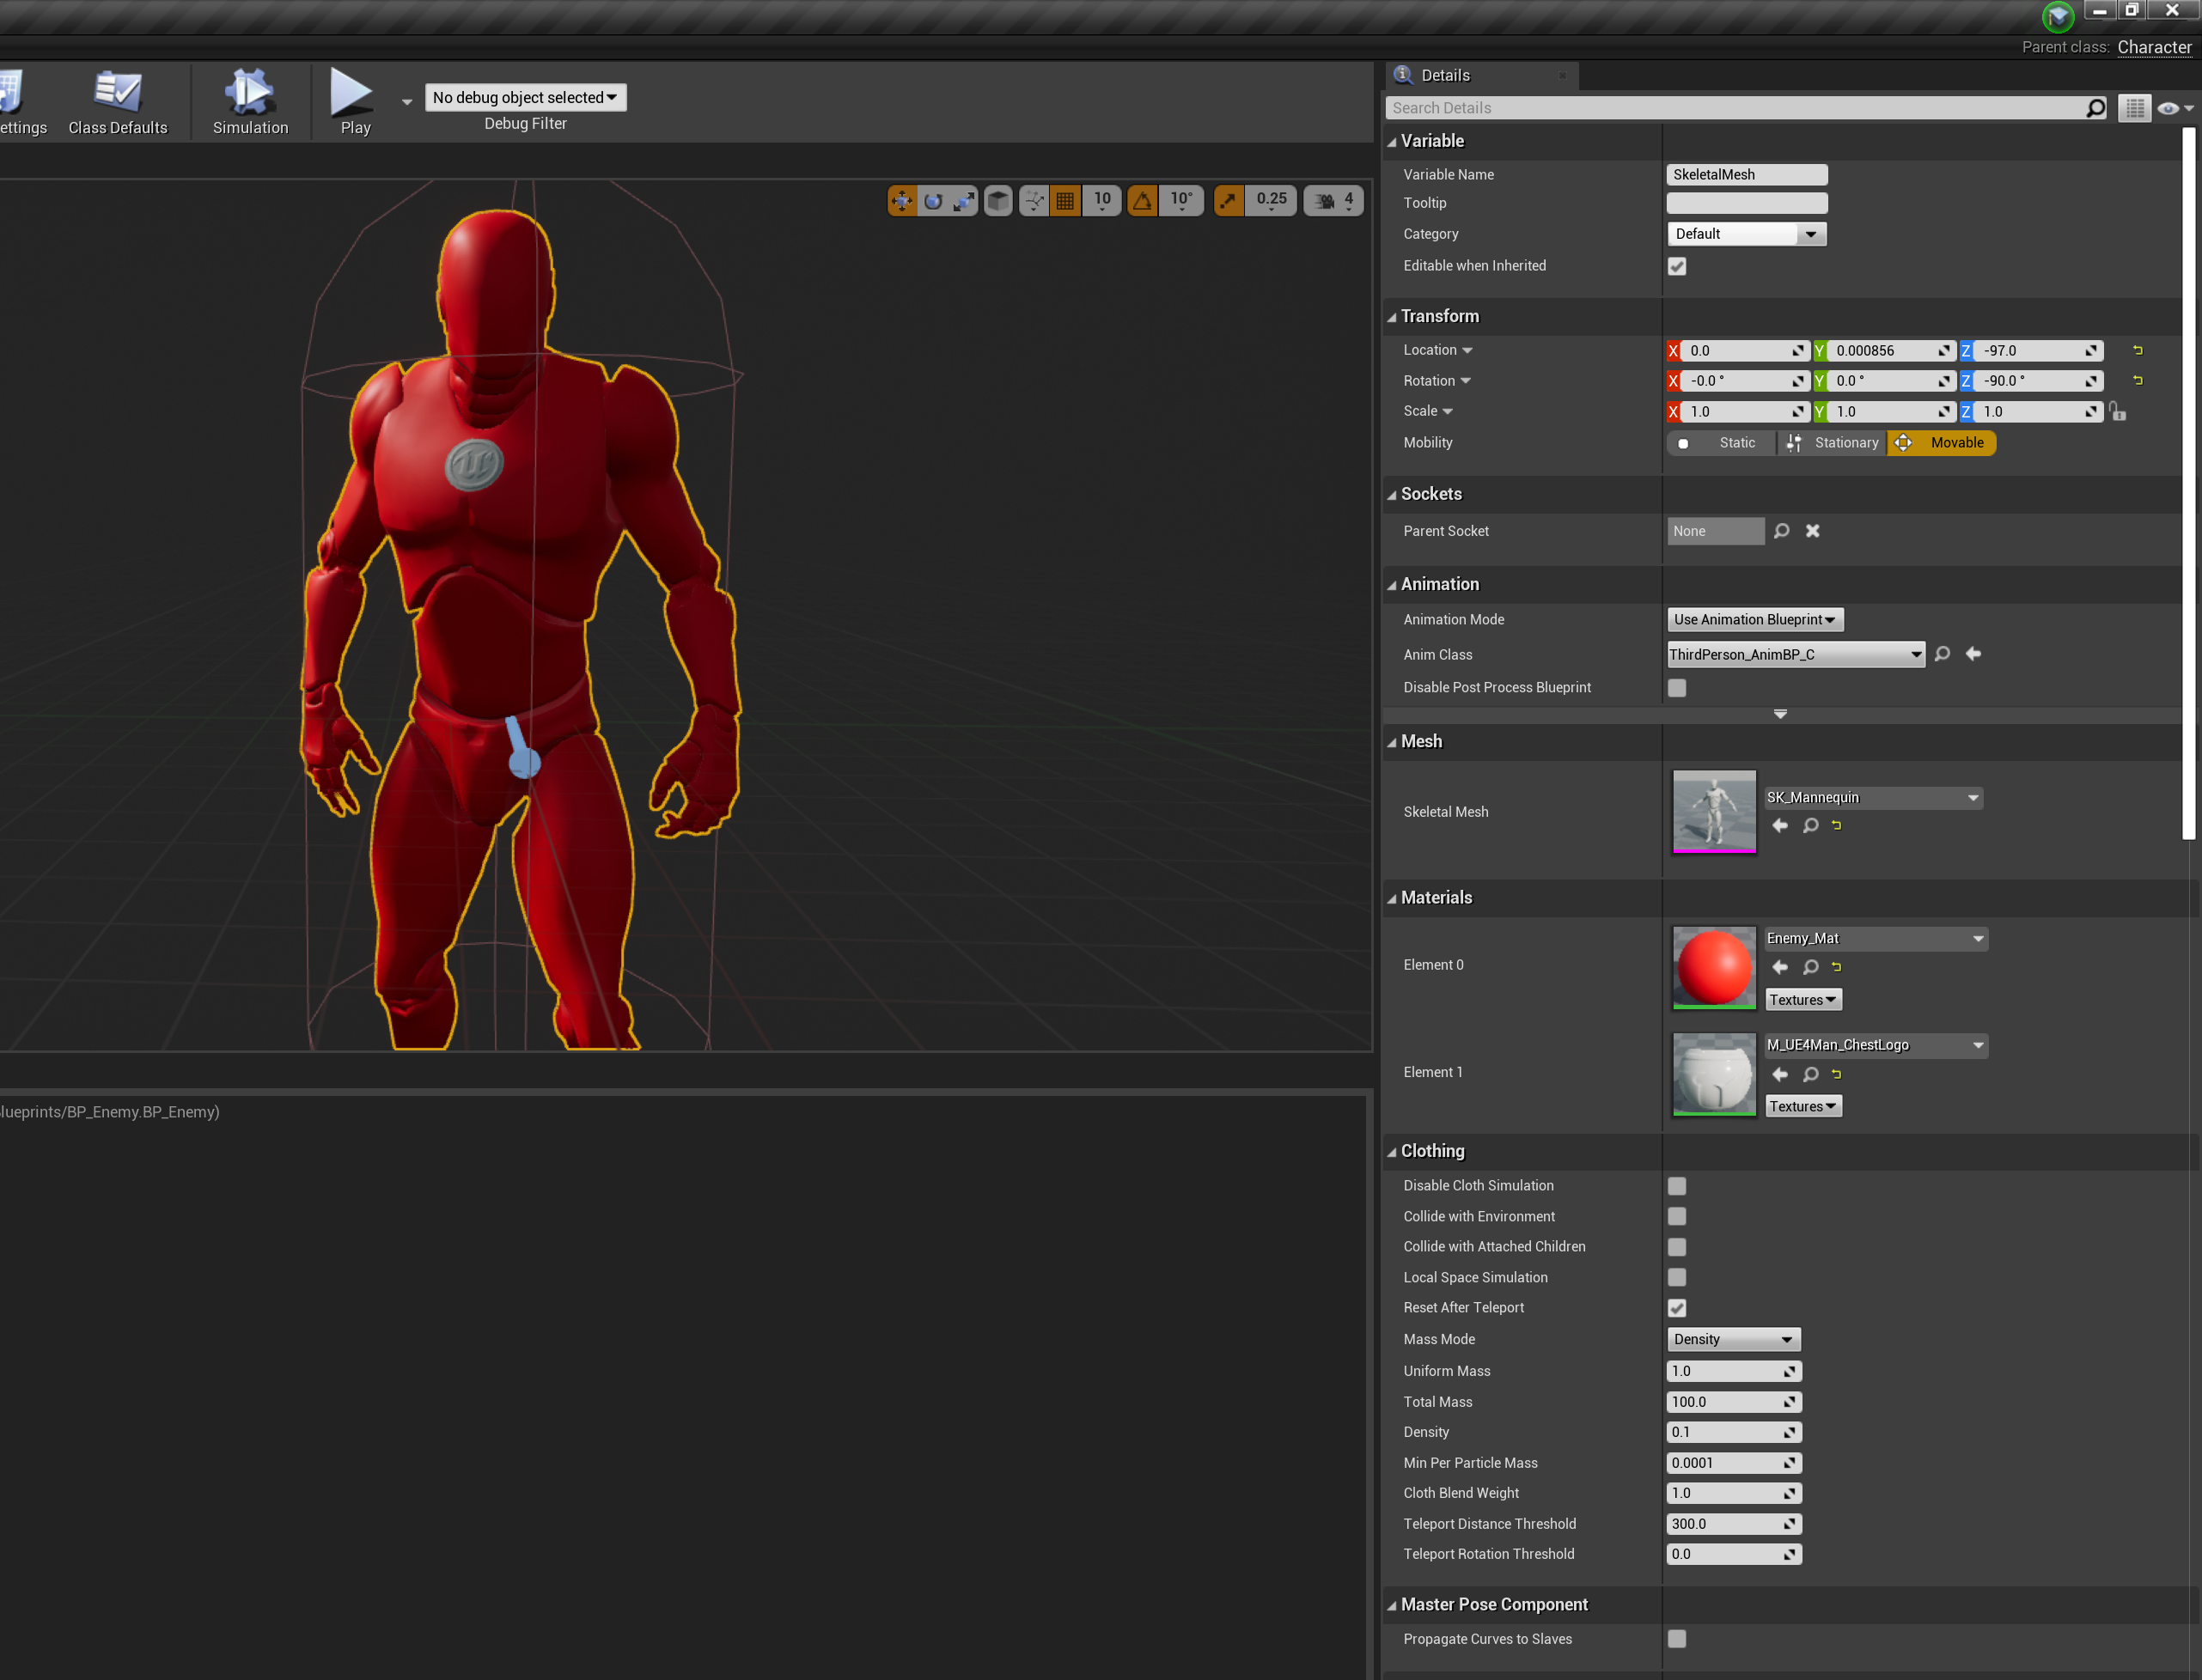
Create a new character blueprint and name it “BP_Enemy”. If you have your own skeletal mesh, you can add it to the mesh component of the enemy. If not, you can copy the mesh from the default third person character. We want our enemy to look different from the character though. Return to the level editor and create a new material and name it “Enemy_Mat”. Open it up. The material editor allows us to add textures or colors that we would like to apply to a mesh. Let’s say we want to make our enemy red. Search for the “Constant3Vector” node. This node allows us to create a vector, which we can use to make a color. Set the vector value to 1,0,0. This will make the node return red. Then plug this node into the base color of the material node. If you would like, you can multiply this constant by the original texture for the character to create a red robot material rather than just pure red. On the blueprint editor viewport for BP_Enemy, click the skeletal mesh and select material. Navigate to out new material and select it. Now we have an enemy blueprint. Add this blueprint into the level editor.
There are several ways to make the enemy move. You can use the Add Actor Local Offset node, the Add Impulse node (with physics), and many others. The one we are going to use is the “Add Movement Input” node. Since this is a character, it will automatically obey the movement input without needing to add an offset.
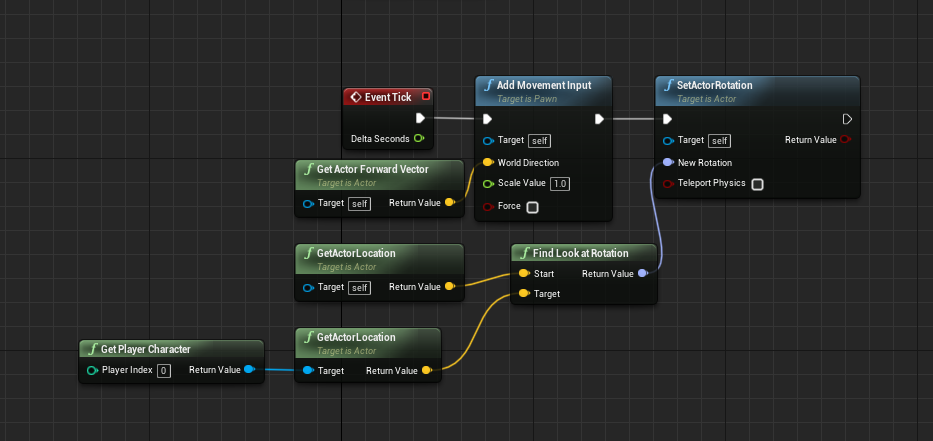
Plug the “Add Movement Input” node into the “Event Tick” node. In the “Add Movement Input”, make the world direction the “Actor Forward Vector” and the scale value 1.0. Now play the level and the red enemy should walk forward indefinitely. Not very difficult to avoid it? Let’s make it follow the character.
In the blueprint for this enemy, add the “Set Actor Rotation” node and plug it into the “Add Movement Input” node. How can we make the actor always at the character? Fortunately, Unreal does this for us as with many other things. Search for the “Find Look at Rotation”. To the starting point, plug in the “Get Actor Location” node. For the endpoint, we want the enemy to look at the player character. To do this, add the “Player Character” node. From the blue pin, drag it out to another “Get Actor Location” node. Now, this node will return the vector location for the player character. Plug this vector into the end location for the “Find Look At Rotation” node.
Now let’s test it out and see how the character moves. You’ve probably noticed the enemy is just sliding on the ground rather than walking (unless it is already using an animation blueprint". This is because the character currently had no assigned animation. Since this character will always be moving, we can assign it one animation. Select the mesh component and navigate to the animation section of the details panel. From the drop-down menu select an animation to assign to the character. There are many more ways to use animation in something called an animation blueprint. You can learn more about these here:
https://www.raywenderlich.com/383-unreal-engine-4-...
Now that our enemy is always running towards the character, let’s have some fun running away from him. You can adjust the speeds of both characters using the “Character Movement” component.
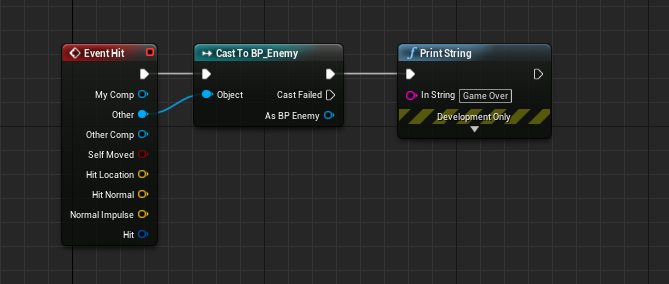
But we also want something to happen if the enemy catches the player. Unreal has something called collisions which are meshes that can collide. Characters automatically have capsule collisions. Collisions can be directly applied to meshes in the mesh editor as well. Collisions have several channels to describe how they will interact with other objects. They can either ignore, overlap, or block other actors. If they overlap another actor, they will fire off the “Event Overlap” node and the “is overlapping actor” node may return true. This is similar to the “is touching” block in Scratch. Objects that block each other will not overlap. Like objects in real life, they will simply bounce off of each other. Let’s make sure our character capsule collisions are set to block on all channels (but the pawn channel is mostly what matters). In the player character blueprint (likely called “Third Person Character” by default), add the “Event Hit” node. Now whenever the character hits something, it will fire off this node. But we want this node to only fire if the player hits the enemy. Find the “Cast to BP_Enemy” node. Plug it into the “Event Hit” node. Then plug the “Hit Actor” pin from the “Event Hit” node into the object pin in the cast node. Now this node will only continue if the hit actor is BP_Enemy. From the exec pin of the cast node, add a print string node. This node will print text on the screen when something happens. Let’s change the printed string from “hello” to “game over”. Now try your game. Whenever the enemy hits the player, it should say “game over”. You’ll notice the cast node had two exec pins. The top one is for what should execute if the cast succeeded (if the actor in the object pin was the same as the actor described by the node. In this case, if the hit actor was the BP_Enemy) while the second one is for what should execute should the cast fail.
There are better ways to convey the “game over” message, however. Let’s try using widgets. Create a new blueprint (in a new folder labeled “user interface”) and select [user interface -> widget blueprint]. Name it “BP_GameOverWidget”. Open up the blueprint and toggle it to the designer. Now here is something that looks familiar. It’s basically the sprite editor from scratch. Create a game over screen however you want. Borders are essentially squares. Buttons are clickable objects in a widget. Once you have designed a game over screen, return to the blueprint of the player character. Instead of using the “Print String” node, let’s use the “Create Widget From Class” node. In the class selector, select your “GameOver” widget. Then from the object pin (the blue one) drag it out to a “Add To Viewport” node. What good is creating a widget if the player cannot see it? The “Add To Viewport” node does just that. It adds the widget to the viewport.
Now our first game is complete. Woooooooo! It’s time for some heavy troubleshooting because so many things could have gone wrong somewhere along the line.
Note: If you want to fix the way the enemy will awkwardly fall over if you jump over them, try splitting the struct pins for "Find Look at Rotation" and "Set Actor Rotation" and only plugging in the Yaw rotation.
Other Types of Games
.png)
.png)
.png)
.png)
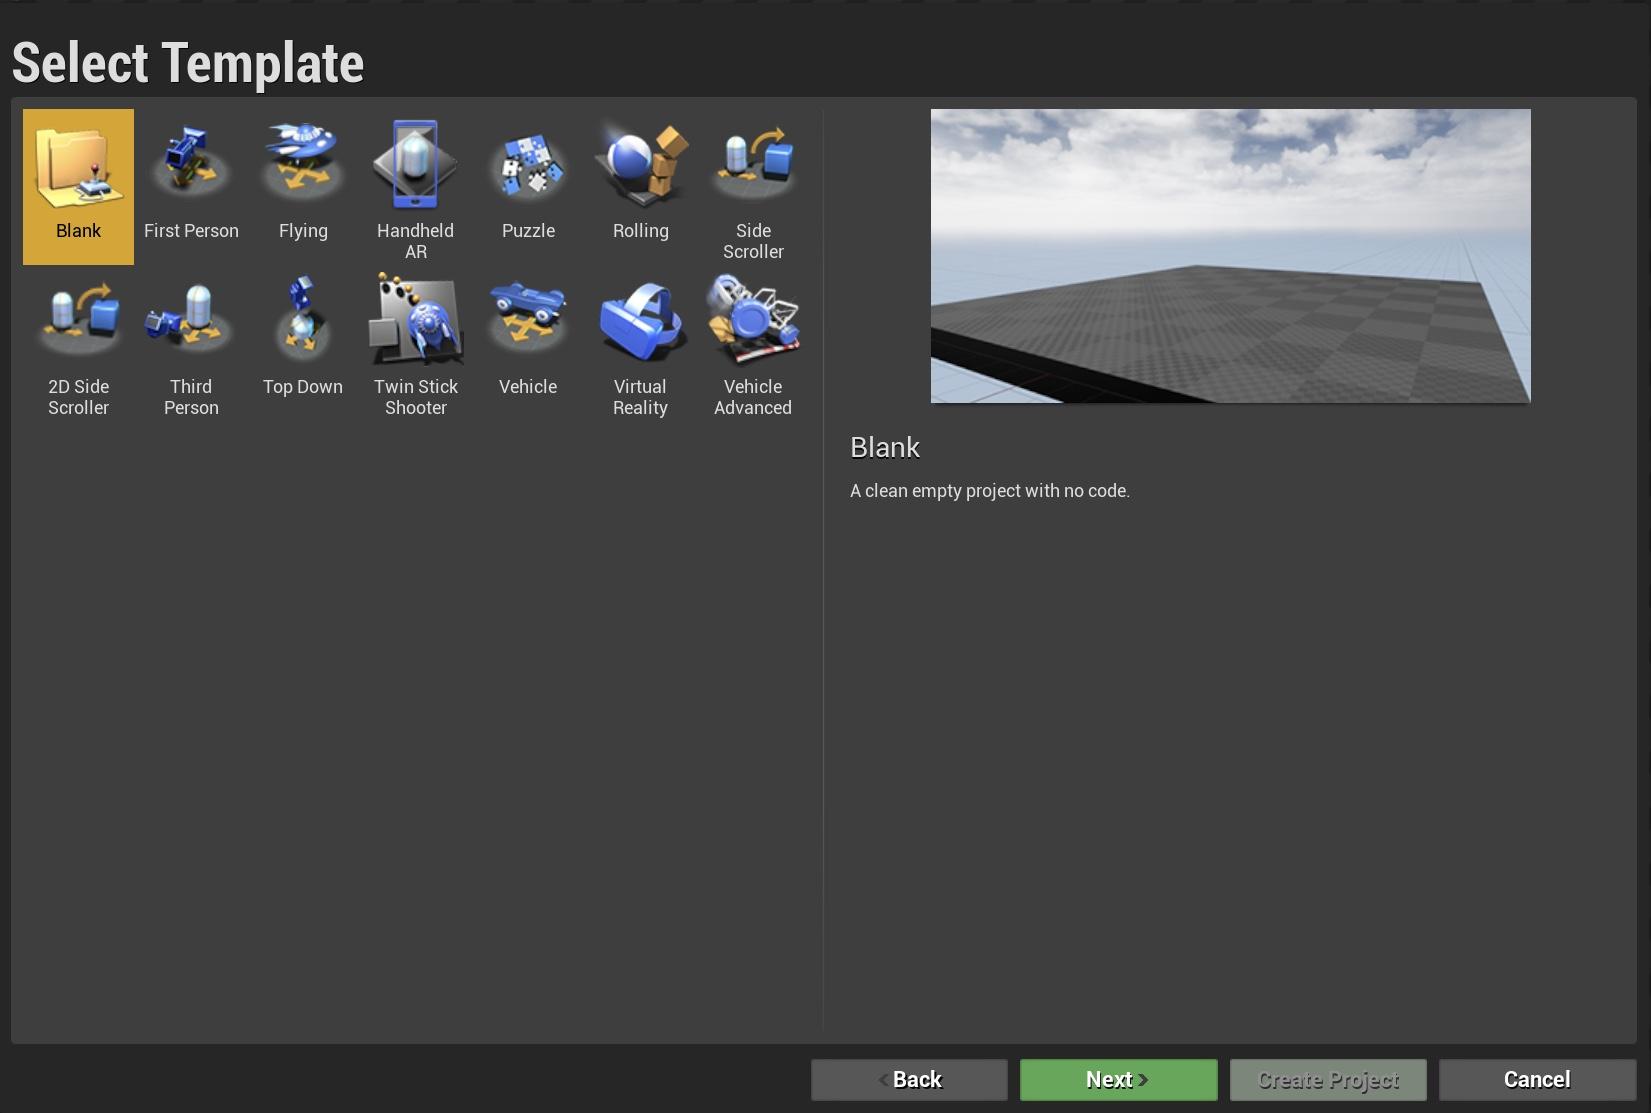
As you know, Scratch is full of every type of game imaginable (or, every time of game permitted by the limitations). Fortunately, Unreal Engine has templates for almost all of these games from side scrollers (platformers) to racing games to twin-stick shooters (which are for the most part not possible in Scratch). Feel free to mess around with these.
It can be good to make fun adjustments to these games or add extra controls using inputs. Here are some quick exercises you can do to enhance and test your understanding of Unreal Engine.
1: Adding a jump booster in a vehicle game:
Create a new project and select Vehicle. Open the project settings and find the input section. Add a new Action Input named "Jump". Map this to whatever you would like but the spacebar would probably be best. Navigate to the blueprint editor of the vehicle. In the blueprints search for the “Input Action Jump” node and add it to the event graph. Connect this to a “add impulse” node. Set the impulse value for Z to whatever you like. A higher value will make the car jump higher. The impulse node only works for objects that are simulating physics which is why it works on the car.
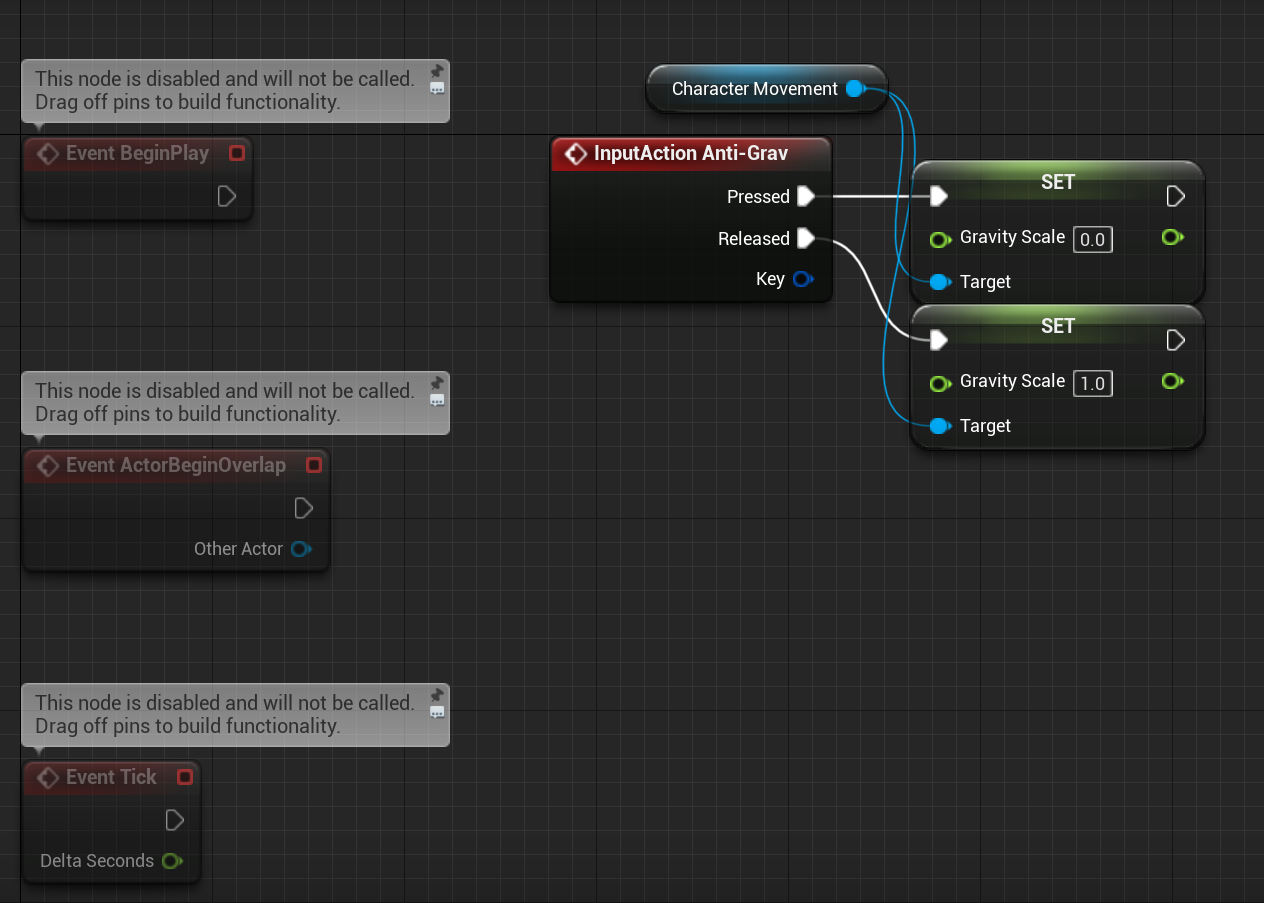
2: Adding Anti-Gravity boots in a Third-Person game.
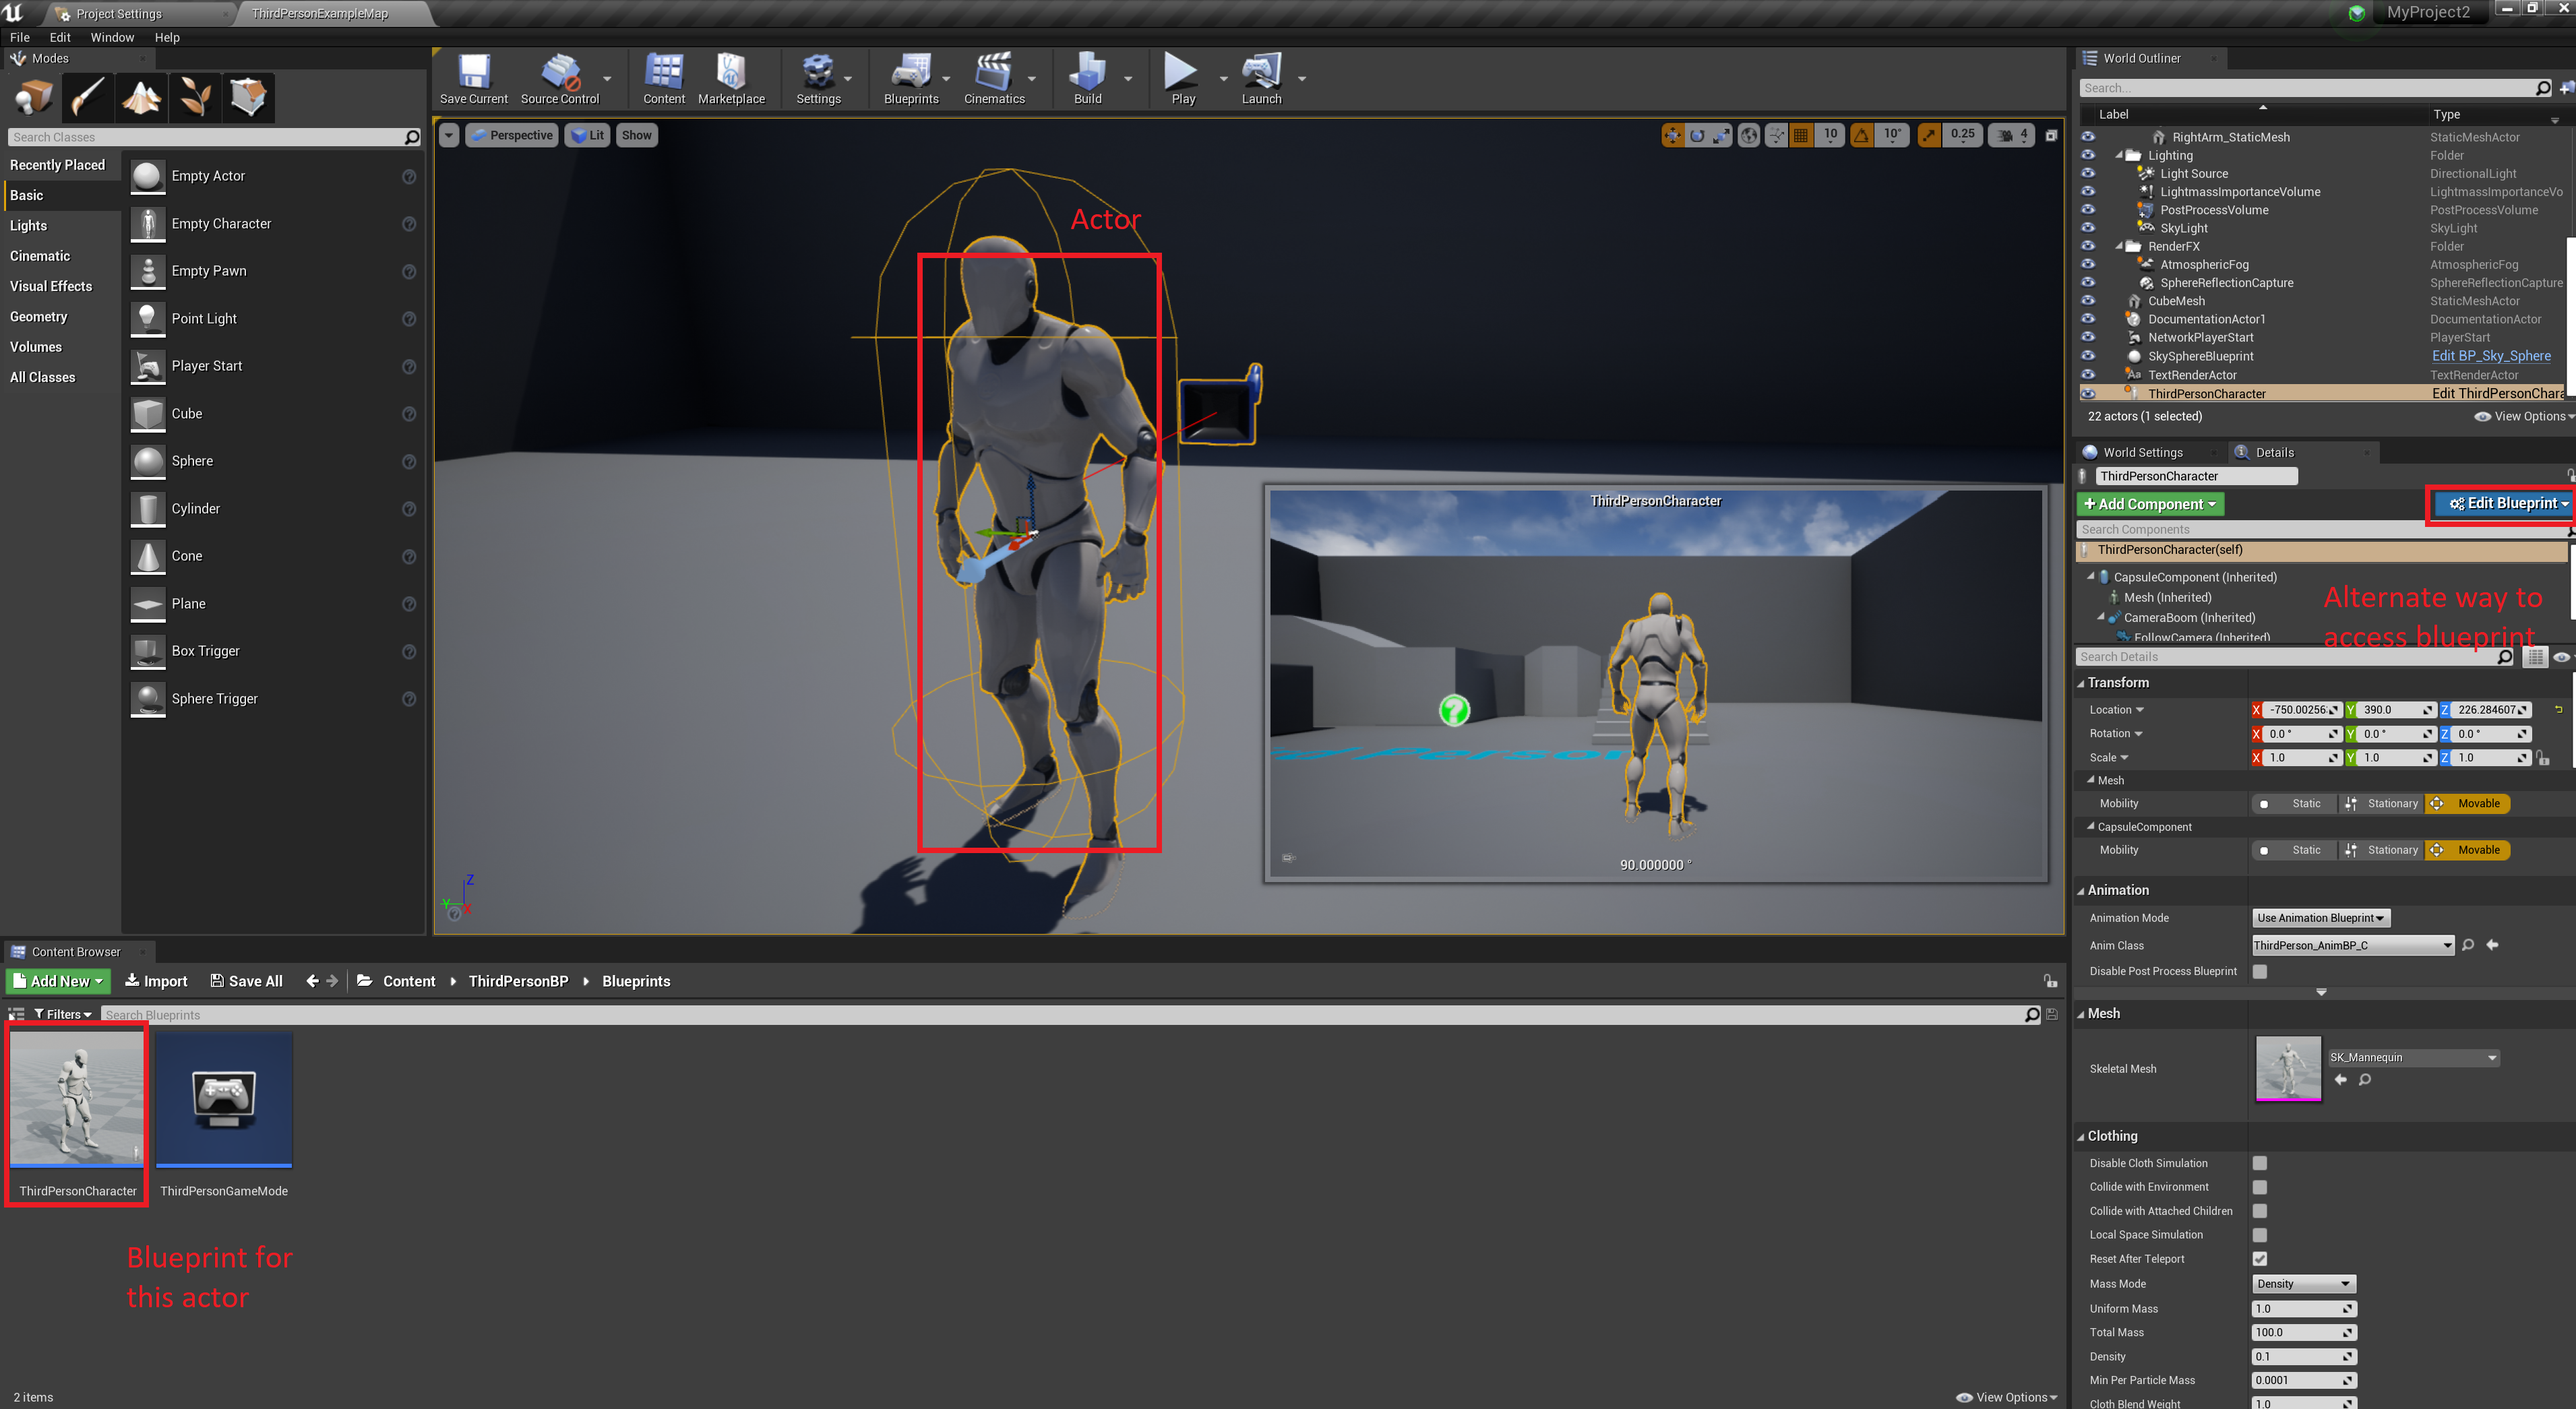
Create a new Third Person project. Open the project settings and find the input section. Add a new Action Input named Anti-Grav. Map this to whatever you would like but the shift key would probably be best. Select the third person character. In the blueprints panel, select edit blueprint (this is another way to access an actor’s blueprint). Open the event graph and add an “Input Anti-Grav” node. Find the “Character Movement” component in the components outliner and drag it into the event graph. This will create a reference to the “Character Movement” component. From the reference pin, drag out to a “Set Gravity Scale” node. Set the gravity value in the node to 0 and connect this node to the “Input Anti-Grav” “Pressed” exec pin. Duplicate the “Set Gravity Scale node and in this one, set the gravity scale to 1. Connect this one to the “Input Anti-Grav” “Released” exec pin. Now pressing shift will activate the boots and releasing shift will deactivate the boots.
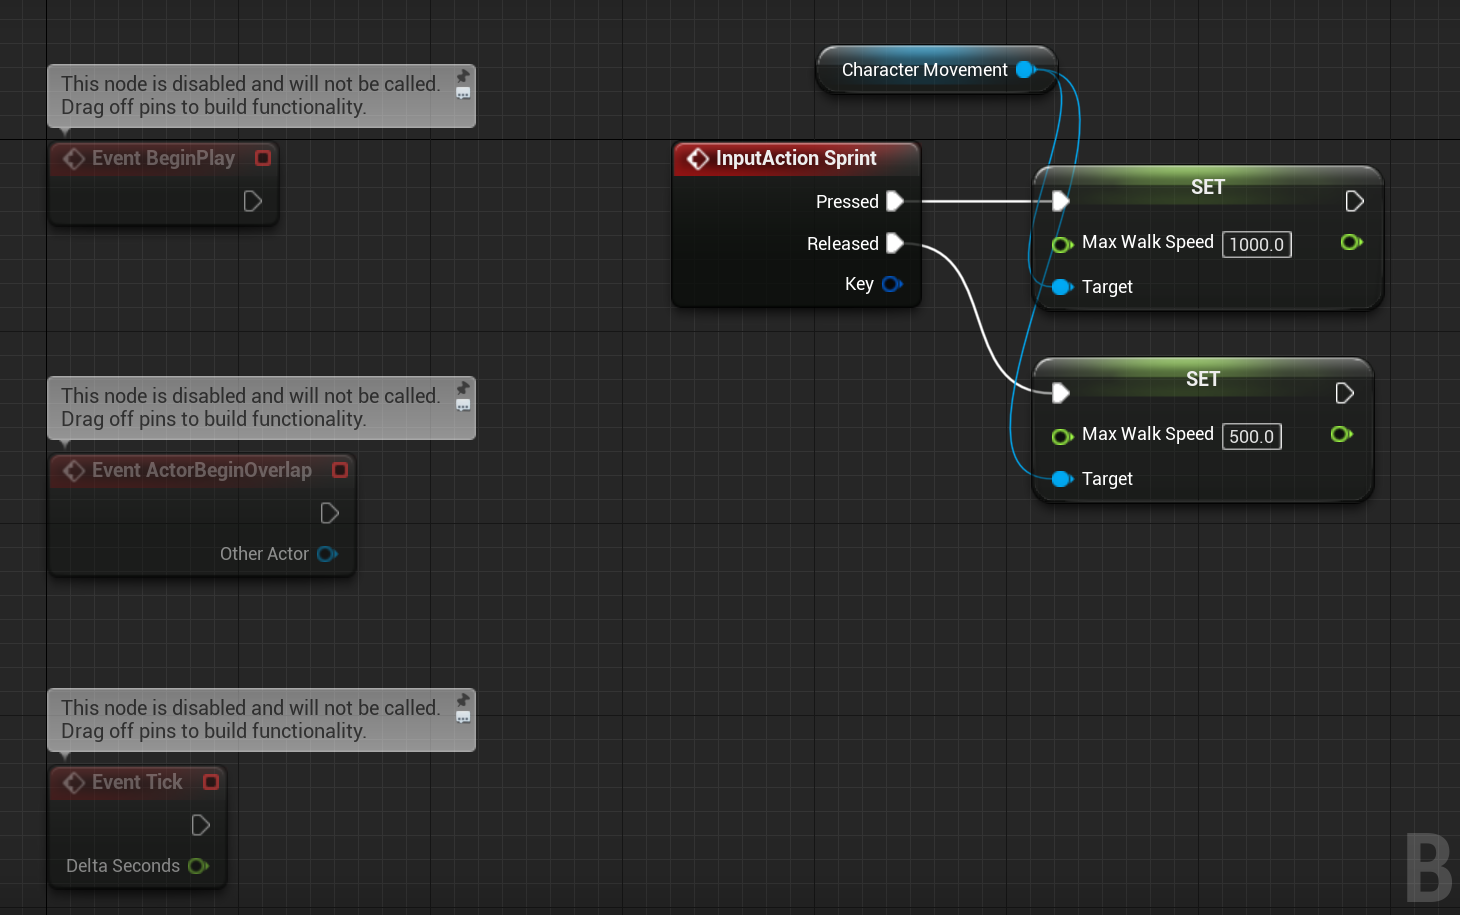
3: Adding a Sprint in a Top-Down game
Create a new project and select Top-Down. Open the project settings and find the input section. Add a new Action Input named Sprint. Map this to whatever you would like but the Right Mouse Button would probably be best. Navigate to the blueprint editor of the character. In the “Character Movement” component, set the Max Walk Speed to whatever you like. 500 is about a walking speed and 1000 is about a sprinting speed (for this example I will set the default speed to 500). In the blueprints search for the “Input Action Sprint” node and add it to the event graph. Find the “Character Movement” component in the components outliner and drag it into the event graph. This will create a reference to the “Character Movement” component. From the reference pin, drag out to a “Set Max Walk Speed” node. Set the speed in this to whatever you like. Duplicate this node and set the “Max Walk Speed” in the second node to the default value in the “Character Movement” component (in this example, 500). Connect the first “Set Max Walk Speed” node to the “Pressed” exec pin from the “Input Action Sprint” node and the second “Set Max Walk Speed” node to the “Released” exec pin from the “Input Action Spring” node. Now pressing the right mouse button will cause the character to sprint.
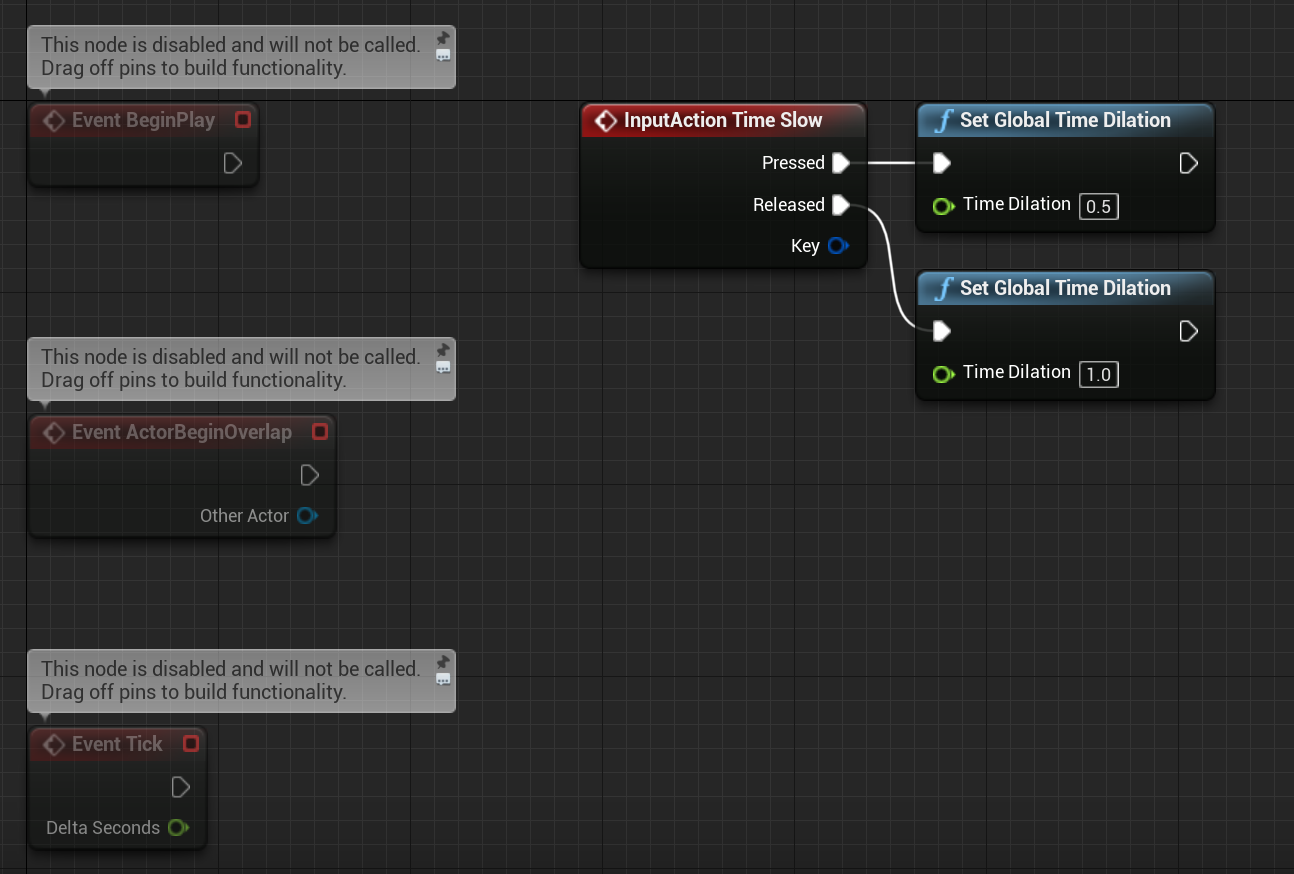
4: Slowing down time in any game
Create a new template project. Open the project settings and find the input section. Add a new Action Input named Time Slow. Map this to whatever you would like but the shift key would probably be best. Select the third person character. In the blueprints panel, select edit blueprint (this is another way to access an actor’s blueprint). Open the event graph and add an “Input Time Slow” node. Connect the “Pressed” and “Released” pin from this to different “Set Global Time Dilation” nodes. For the “Set Global Time Dilation” connected to the “Pressed” pin, set the Global Time Dilation to 0.5. For the “Set Global Time Dilation” connected to the “Released” pin, set the Global Time Dilation to 1. Now pressing shift will slow down time and releasing shift will return time to normal.