Learn to Fly But It's 3D

Learn to Fly is a goofy little penguin flying game made for Adobe Flash in the web browser. It was released to the web May 16, 2009, and has since received three more titles as a Flash game series.
Every single game was done in two dimensions, though, and it therefore seems like a logical next step to create it in 3D space. The result is this project.
A Basic Explanation of the Premise of Learn to Fly
Essentially, the core gameplay consists of flying a penguin as far as possible. To this end, the player can use in-game money to buy upgrades, which they earn by flying. To beat the game, the player needs to unlock every medal, which can be seen from the ramp selection screen. Each flight counts as a "day," and the player will ideally attempt to finish the game in as few days as possible.
Additional Attributions
This project was done as a part of the Students Involved in Discovering Engineering (SIDE) project, run concurrently with a PLTW Principles of Engineering class instructed by Kristin Berbawy. Consider checking out Berbawy Makers, the non-profit organization responsible for organizing and funding this SIDE project along with many others like it.
Supplies
This is a fully software-based project, and as such the only needed supplies will be applications required for building the game. These include:
- Unity Game Editor (Free Edition ok)
- Includes Visual Studio IDE
- Image Editor
- GIMP was used to create 2D art for interface elements
- CAD software
- Autodesk Fusion 360 was used to create the 3D models for the game.
- I would also recommend a copy of the SuperNova Flash Player in the event that you refer to the original game (as I have) to direct your design decisions. Flash games no longer have official support from Adobe, so an emulator is required.
3D Models

A 3D game needs 3D models to go with it, so all of them need to be created first in Autodesk Fusion 360. I created models for all of the following:
- Snow pile ramp
- 3 gliders
- 3 rockets
- A penguin
- Block letters for the title screen
It seems logical to keep the appearances of items similar while expanding them to 3 dimensions, so the way these models were designed involved looking at the art included in the original Learn to Fly game and designing the 3D assets accordingly. The penguin was assumed to be 1.3 meters tall, and everything else was sized according to match the appearance of the penguin such that the size proportions of all items were similar if not identical.
Attached are the f3d files of all of the models I used in my game. Open them in Autodesk Fusion 360 and export them as FBX files to use later in Unity.
Unity Project Setup

The game is going to be a Unity Project, so it is time to boot up the Unity Editor and create a project. Any target platform works, though I have chosen to use WebGL, which enables the game to be published online and played from any browser window. When installing Unity, you will need to make sure the right platform module is installed and enabled, as this dictates which platforms you can publish to. (You will have the option of changing this later.)
Certain details are required for this project to function the way I would expect it to, which are configurable from the Project Settings:
- Under Time, Fixed Timestep is set to 1/180 (it will show as decimal)
- Maximum Allowed Timestep is set to 1/6
Importing Assets and Creating GameObjects

This is possibly the easiest step. Simply drag your assets (3D Models) into the Unity Editor and they will appear in a built-in file explorer.
GameObjects in the left-side bar also work in a hierarchy system, so it is advisable to put any related objects together under the same umbrella object. This allows top-level objects to control and reference any objects nested inside them. That being said, while the way these GameObjects are organized is often for organizational purposes, some arrangements are required to make this project work correctly:
- FlightObject is at the top level
- Inside FlightObject we have Body and Stage. Your glider and rocket models should be placed inside these objects respectively.
- Underneath Body we have the penguin object. (This has your penguin model in it.)
This arrangement allows the Flight Engine to only manipulate the FlightObject at the top level. Any additional assets inside will simply follow it as a result of being nested inside.
Flight Simulation

Unity code is written in the C# programming language. If you find that you are not entirely comfortable with programming in C#, consider visiting the Unity Scripting API as well as the C# Documentation at Microsoft.
I decided to start the programming portion of this project by devising the flight model that my game would use. It is an oversimplified model of flight that treats the aircraft as a singular mass. This enables all forces to be calculated in one place and applied on one object using a singular RigidBody component. The RigidBody component is used in Unity's physics simulation engine and has collision physics as well as gravity simulation built in. However, the gravity simulation is disabled for the purpose of keeping all force calculations in one script.
Basic Forces
There are four basic forces controlling flight, being:
- Lift, which works perpendicular to the wing and opposes the net velocity vector. Lift is generated by the airflow over the wing and aircraft body.
- Thrust, which works forward when a thruster is being used.
- Weight, which is the result of gravity. It points toward the center of the Earth, which for our purposes is straight down.
- Drag, which is the result of air resistance on the aircraft as it flies (or moves at all). It points opposite of the net velocity vector.
Calculations
For computational purposes, all variables are in SI Units.
- Lift is calculated as L = Cl*q*Al, where
- Cl is lift coefficient - more on that later
- q is dynamic pressure - more on that later
- Al is lifting area, which is dependent on the glider being used
- Drag is calculated as D = Cd*q*Ac, where
- Cd is drag coefficient, which is dependent on the glider being used
- q is dynamic pressure - more on that later
- Ac is cross-sectional area, which is dependent on the glider being used
- Weight is calculated as W = mg, where
- m is mass of the aircraft
- g is the acceleration due to gravity, or 9.81 m/s^2
- Thrust is a value of your choice. Set it aside.
- Dynamic Pressure is a recurring variable in flight. It can be calculated with q = 0.5*r*V^2, where
- r is the density of the atmosphere. It varies with altitude. Using data values from this site, the linear regression line I calculated was r = 1.224 - 0.000109x, where x is the altitude of the aircraft.
- V is flow velocity. Since we are not considering wind, this can be taken as aircraft velocity.
- At low angles of attack and subsonic speeds (which should encompass the entirety of this flight simulation), the coefficient of lift Cl can also be calculated as Cl = 2πa, where a is angle of attack.
- Angle of attack is the angle formed between the aircraft wing plane and the net velocity vector.
Information for these calculations was obtained from the NASA Glenn Research Center webpage. Individual pages will be linked below:
Programming
Declare every variable listed above and set up the equations the way they are shown. Every variable should use a double as its data type. Do this inside your script namespace above the Start() function.
When equations to calculate lift, drag, and weight forces have been programmed, the forces need to be applied. Use rb.AddRelativeForce() to add the calculated forces in the directions indicated above to the RigidBody component. Do this inside a FixedUpdate() function, which you will need to create as it does not appear by default. The difference between Update() and FixedUpdate() is that Update executes after every frame, while FixedUpdate() executes on a set time interval. This makes FixedUpdate() the ideal choice for physics simulations.
Do keep in mind that thrust should only be applied if the player is actually burning the rocket. (more on game control later)
Sideways Stability
You may find that while the flight simulation is technically correct, if you try to actually run it, the aircraft has a propensity to drift sideways uncontrollably. A fifth force is needed to counteract this. It can be treated and programmed like lift, but it will use the aircraft's side profile instead of top profile for its calculations and will apply sideways instead of vertically.
Angular Stability
For one final tweak, set angular drag on the RigidBody component to 8. This should prevent the aircraft rolling around on the ramp and in flight.
Attached below is the flight simulation script used in my project. Instructables does not allow CS files as a valid file type, so you will need to change the file extension or copy-paste the text as code.
Downloads
Game Control

Control of the penguin in flight is a core component of gameplay. Only a few controls are needed:
- W to tilt the nose down
- S to tilt the nose up
- Z to use the rocket
Keyboard strokes can be tracked using Input.GetKey() as a boolean inside an if() statement to check whether or not to execute a given control.
Tilting the aircraft can be done using rb.AddRelativeTorque() to the RigidBody component of the aircraft object.
Attaching Data to Items

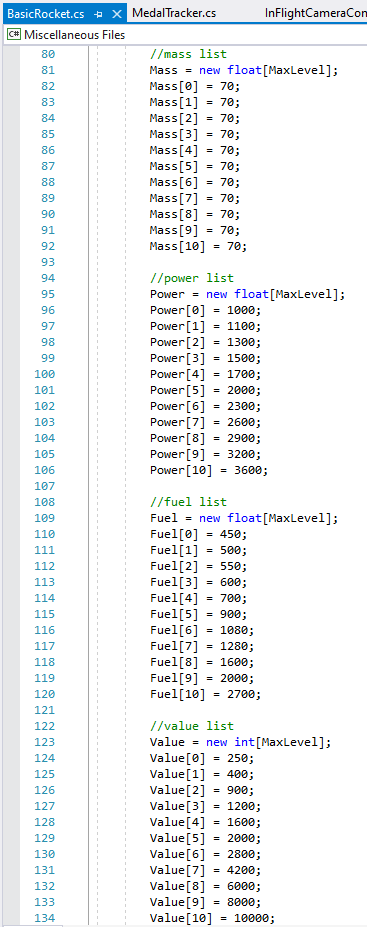

One of the core gameplay features of Learn to Fly is the ability to buy a glider and rocket as well as upgrade them. Obviously, the more you upgrade, the better your items should be. Recalling the Thrust, Al, Cd, and Ac variables from earlier, they can be affected by attaching stats to the gliders and rockets that we have made. Stats should vary in some form with upgrade level on the items. My method of choice was to make a list for each variable that varies with level, and manually input a variable for every stat for every level - doing this gives me the greatest control over the item's stats in case any changes are needed. (It is also the slowest, though, so there are other valid methods of assigning stats as well.)
Learn to Fly features 3 gliders and 3 rockets (hence the requirement for the models in the 3D Modelling section). However, for simplicity, I have elected to merge them such that there is only one glider and one rocket that can change appearances depending on how many upgrades it has. Of course, this decision is entirely optional - the requirement is to make a data script for every glider and every rocket and use them to assign stats to the Thrust, Al, Cd, and Ac variables in flight. Also, make one for the penguin, as it is possible for the penguin to fly without anything equipped (albeit, not particularly well).
The snow pile ramp also requires a data script as it is possible to upgrade. Rather than flight variables, the stats being changed are the ramp height and length, which together enable our penguin to get a head-start on their flight.
Programming with Interfaces
(No, I don't mean the interface the player will use. I mean the interface syntax.)
Interfaces act as a class of sorts where any script can carry it, and the script can be called using this new "class". This bypasses a slight restriction in calling functions from other scripts where the other script has to know the target's class in order to make a reference and call a function. Simply declare the interface in any script and it can be used anywhere.
I have gone ahead and attached the data script for the "Basic Glider" item so you can get an idea for how it is structured. Instructables does not allow CS files as a valid file type, so you will need to change the file extension or copy-paste the text as code.
Downloads
Tracking Player Save Data

Some player data is required to be persistently stored. A script should be created with the variables to hold this data. This includes:
- Money, as an int
- Day Counter, as an int
- Glider the player has purchased, as well as its level
- Launcher the player has purchased, as well as its level
- Rocket the player has purchased, as well as its level
- For the previous three items, use a string for the name of the item, and an int for its level
As this is a rather short game, it is fine to reset the game data every time the game boots up. A completely clean save should have:
- Money set to 0
- Day Counter set to 1
- Glider "Empty" at level 0
- Launcher "Basic Ramp" at level 1
- Different from the other items in that this item is provided for free at its base level. Just like the original game.
- Rocket "Empty" at level 0
Programming with Interfaces (2)
Perhaps you were wondering why I felt the need to be able to call a function from any item data script regardless of its name. This enables our save script to declare a common class that all of the item data scripts share, which enables our save script to remember them inside a variable.
Attached below is the save data script used in my project. Instructables does not allow CS files as a valid file type, so you will need to change the file extension or copy-paste the text as code.
Downloads
Buying and Upgrading Items Using a Shop Window


Buying the items and upgrades is how the game regulates progression - after all, if the player immediately had access to all the best items, there would be no game. As every glider and rocket as well as all of their upgrades have a set price attached to them, it makes sense to refer back to the item data scripts created earlier and simply add a price data set to each one. Add a price for every level to simulate an upgrade.
The way a player is meant to interface with these upgrades and items to purchase them is via a shop window. There is admittedly not a correct way to go about making this window, so the way I have chosen to do it is to style the window after the one found in Learn to Fly 3, the most recent entry in the original Flash game series. The graphical window hierarchy can be described as follows:
- Main Window
- Money Counter
- Day Counter
- Mass Counter (of the aircraft)
- A button to view the glider stats
- A button to view the launcher stats
- A button to view the rocket stats
- Side Window
- A button to quickly view the controls and objectives of the game, labelled "Tutorial"
- A button to quit to the title screen
- A button to view the medals obtained
- Medals are relevant to the game in the sense that for the player to finish the game, they must obtain every medal.
- To program this, make a list of tuples. Each tuple should contain: the medal's name, the medal's image, and whether or not it has been unlocked (use a boolean).
- The image is used to bring up a description of the medal when the player hovers the mouse over the medal
- Aircraft Window
- A little feature I chose to include, which includes a somewhat isometric view of the penguin standing on the ramp. This enables the camera to simply pan to start the flight.
- A green FLY! button is included at the bottom of this window - clicking this starts the penguin flying.
- Purchase Pane
- Responsible for displaying the stats of a purchased item
- This pane appears on the right side only after clicking on one of the buttons to view the item stats (under the Main Window)
- Shows the name and level of the item and up to four different statistics based on which item is being viewed.
- A progress bar is present to show the current level against the maximum level of the item.
- Two buttons are present to upgrade and downgrade the item. Prices for each transaction will be shown.
- A picture is at the top to display the item's artwork and rough appearance (as the aircraft window is obscured)
- If the colored item pane shows an empty item, an alternate version of this window should appear showing which items may be purchased. After all, you can't upgrade or downgrade an empty item.
Interface Art


Though much of the novelty of this project lies in the fact that it is simulated in 3 dimensions, it is still required for the GUI to be flat, which requires 2D art. Artwork appears inside the purchase pane and main window of the shop, as well as other places. GIMP was used to create the artwork for this project, although any vector art program will do. Every red box outlined in the large picture above is a spot filled with an image created for the interface.
That being said, not every piece of 2D imagery was created with GIMP. The thumbnails of the items seen in the colored panes are actually screen captures taken inside Autodesk Fusion 360.
Game Transitioning


You may have noticed that the game is still programmed in two distinct phases, being the shop window and flight screen. It is time to string them together into a coherent game.
FLY! Button
Using the green fly button, change the view of the aircraft such that it is centered. This is done by rotating the camera. You may make use of the Unity AnimatorController (as I did) or write a script to manually change the angle values using slerp interpolation.
To keep the flight and shop phases of the game distinct, add a check to the Flight Script to disable it if a flight is not in progress. However, once the FLY! button is pressed, the flight will start and you will need to run the check to enable the Flight Script. This can be done using an if() statement to check whether or not a flight is in progress.
Title Screen
The game needs to have a title screen to boot to, which is the reason one of the 3D models called for is a set of block letters. This is meant to reflect the original Flash game series, which also used block letters in its title screens. The only functionality necessary for the title screen is to pan the screen and camera to the view seen in the shop. To make this simple, use an AnimatorController to move the camera between the position on the title screen and the shop.
End Screen
Finally when the flight ends, a screen pops up to show the results of the flight, after which it loops back to the shop screen for another day and another flight.
Make a script to handle this transition. It should include a visual transition of some kind run by an IEnumerator Coroutine or an AnimatorController. I have chosen to pass a fading dark object over the screen via a Coroutine and simply change the screen to the shop while the object is obscuring the screen. This script will also need to do calculations for how much money is earned after each flight. There are four attributes it tracks:
- Distance, where for every meter $1 is awarded
- Altitude, where for every meter $2 is awarded
- Speed, where for every meter $4 is awarded
- Duration, where for every second $10 is awarded
- The total earnings is the sum of all four of these values.
Also be sure to add 1 to the day counter after each flight ends.
Publishing

 Penguin Flying Game)
As I chose WebGL to be the target platform, this tutorial will only be for those who intend to have their games playable in browsers. If you chose a different platform, this will not apply. (Again, you can change your target platform at any point.)
Unity includes a tutorial for publishing WebGL games to Unity Play here. A rehash of the steps will be included below for convenience, if for some reason the Unity Learn webpage becomes unavailable.
- Go to Window > Package Manager and check for the WebGL publisher module. If it does not appear, you will need to install it.
- In the top-left, an option for "Publish" will appear. Clicking on it drops down a "WebGL Project" button, which you click on.
- At the bottom of the resulting window, click "Create and Publish New Build".
- A File Explorer will open. Select the folder you wish to have the build saved inside.
- A loading bar should inform you of the progress of your build.
- After the loading bar finishes, a browser window will open with your project on it. Enter an appropriate name and description of your game.
- Click "Save" to finish.
Your game should be published and visible to everyone. For comparison, my project on Unity Play is linked here, and a source download can be found here.