Laser Engraving Test Grid Using Color Mapping
by togo1919 in Workshop > Laser Cutting
9722 Views, 15 Favorites, 0 Comments
Laser Engraving Test Grid Using Color Mapping
I created this at TechShop, San Jose...
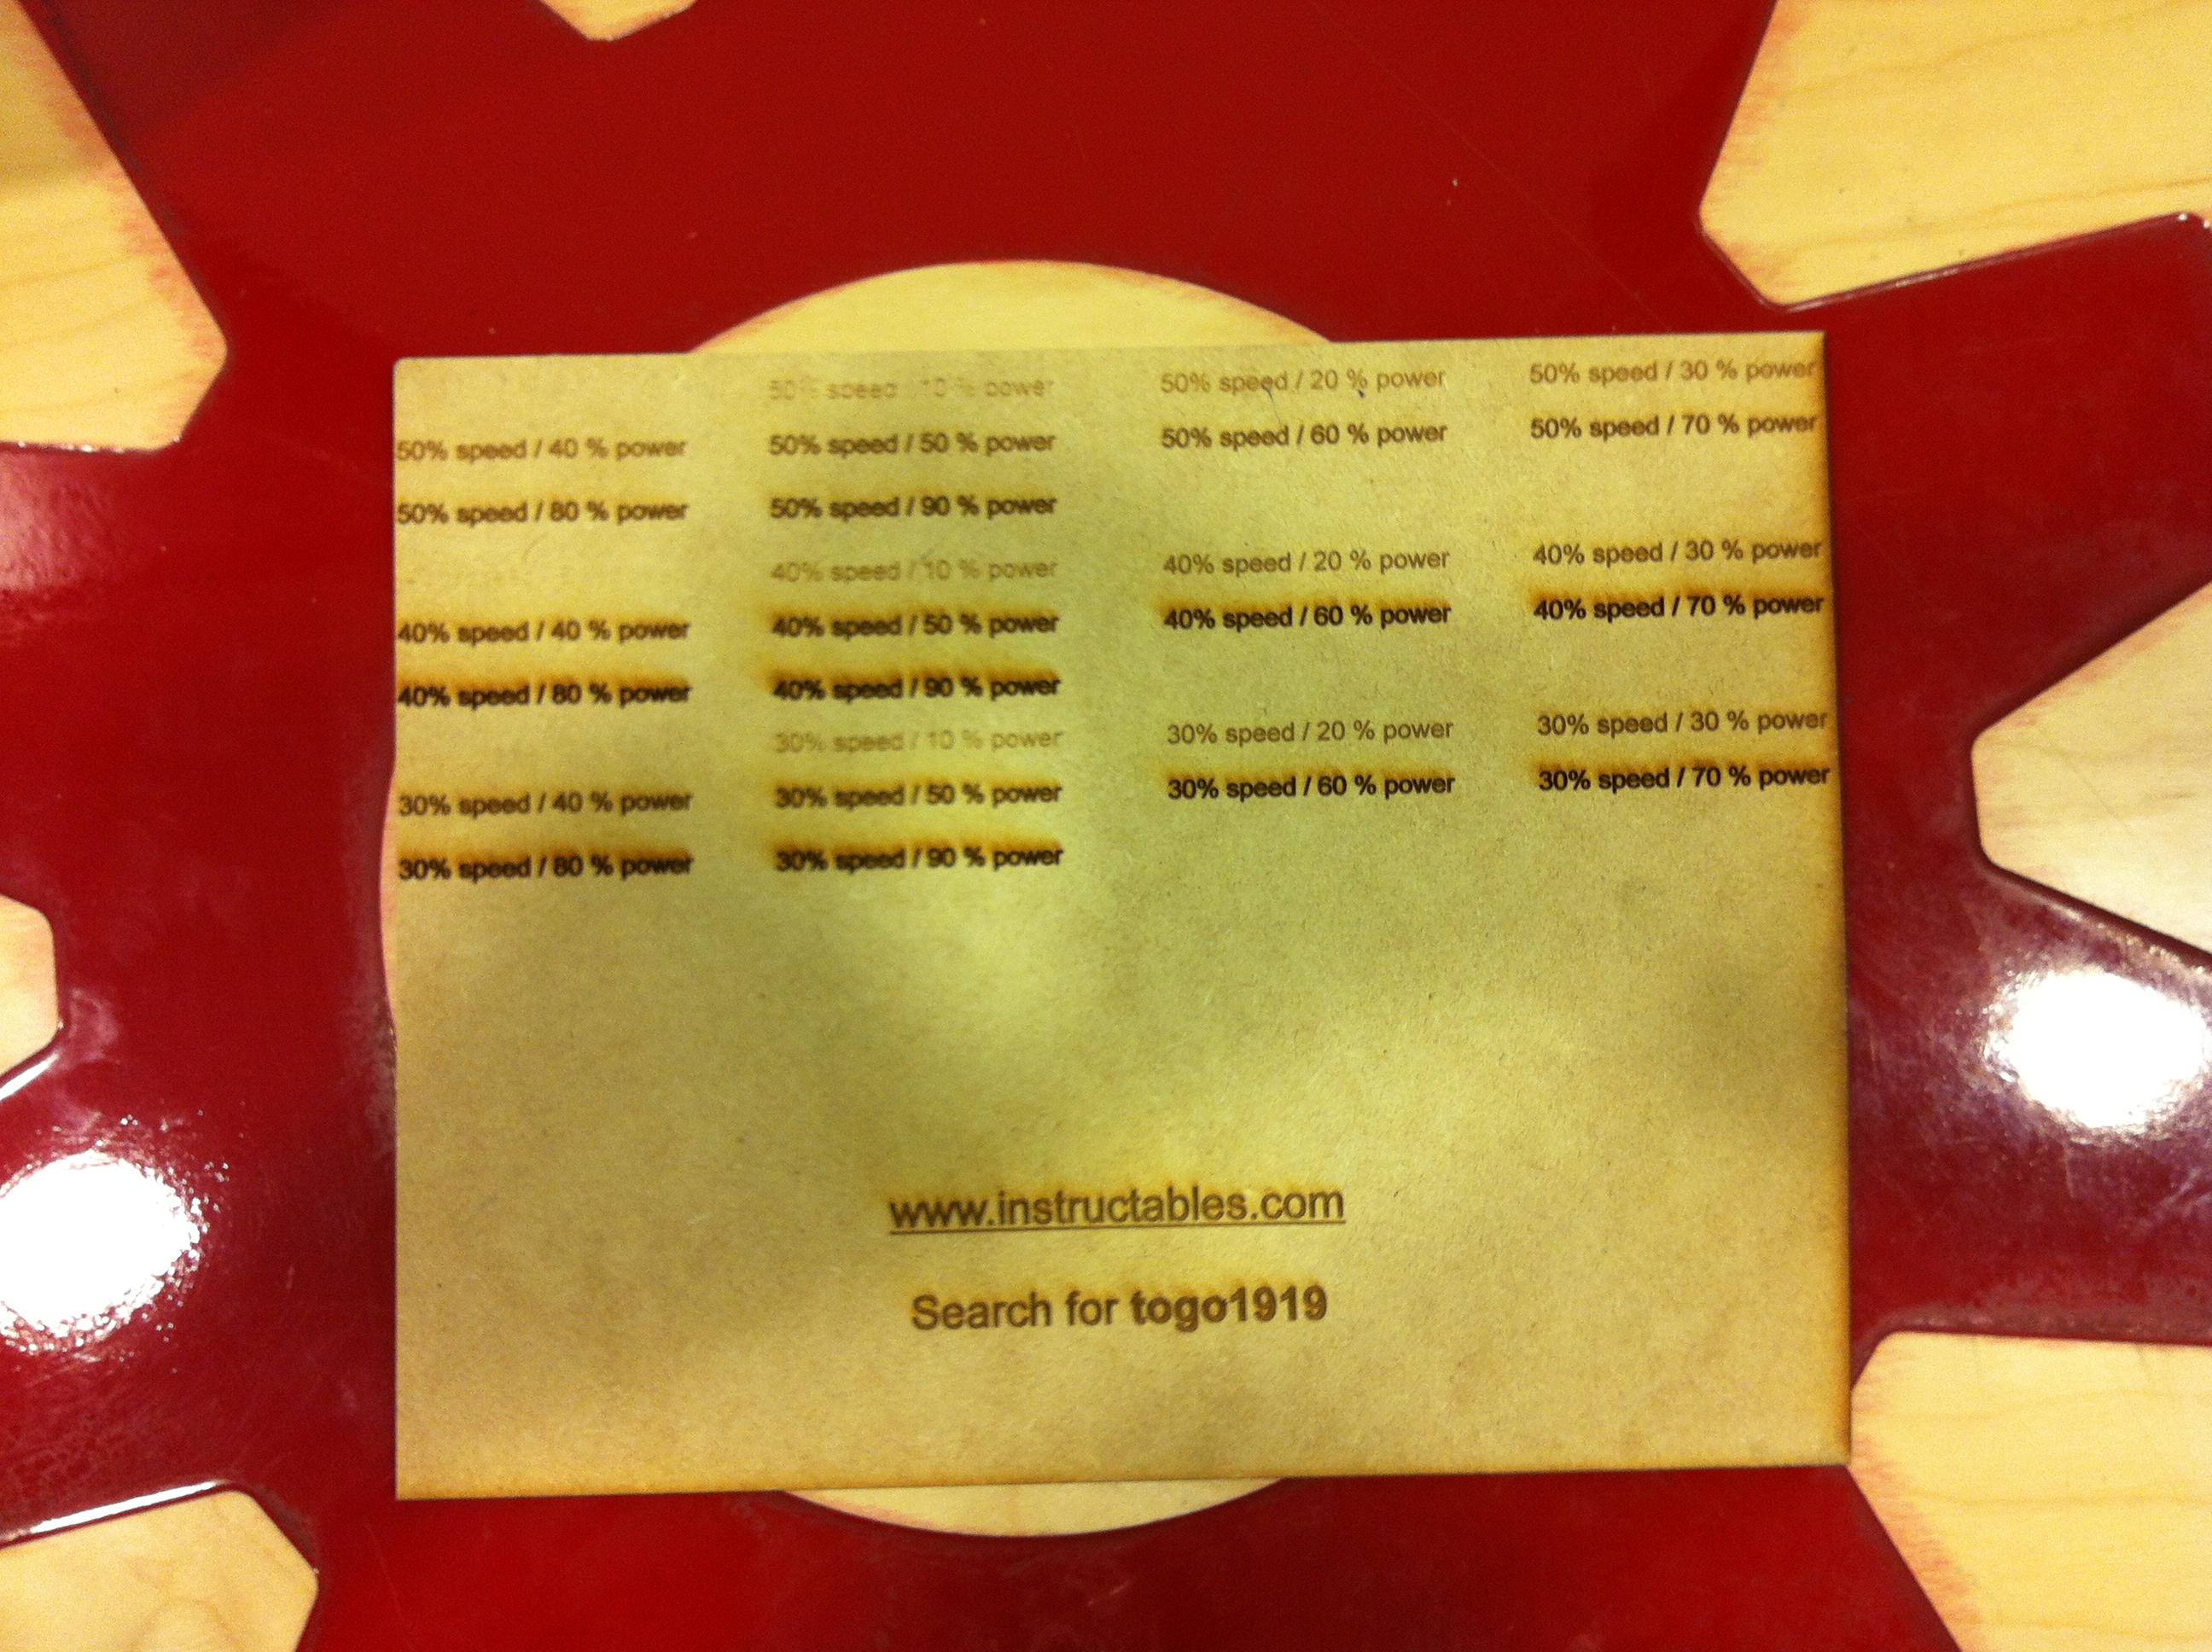
I often want to see how different speed/power settings will etch into a variety of woods.
I did a bit of learning and created a group of files to help me run a Test Grid of Speed and Power Settings.
These are for an Epilog Helix laser engraver.
Here's the (slightly out-of-focus...) picture showing the results:
!!!!!!!!!!!!!!!!!!!!!!!!!!!!!!!!!!!!!!!!!!!!!!!!!!!!!!!!!!!!!!!!!!!!!!!!!!!!!!!!!!!!!!!!!!!!!!!!!!!!!!!!!!!!!!!!!!!!!!!!!!!!!!!!!!!!!!!!!!!!!!!!!!!!!!!!!!!!!!!!!!!!!!!!!!!!!!!
!!!!!!!!!!!!!!!!!!!!!!!!!!!!!!!!!!!!!!!!!!!!!!!!!!!!!!!!!!!!!!!!!!!!!!!!!!!!!!!!!!!!!!!!!!!!!!!!!!!!!!!!!!!!!!!!!!!!!!!!!!!!!!!!!!!!!!!!!!!!!!!!!!!!!!!!!!!!!!!!!!!!!!!!!!!!!!!
Load the CorelDraw V15 File
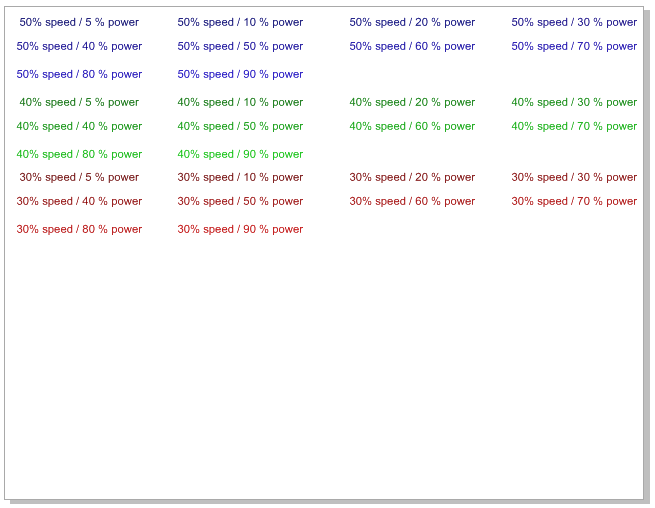
The file itself looks pretty simple. I used Arial font for all the text, and the font size is 14.
Of course, the font style and size can be modified to best suit the etching you'll be doing. In Corel, you can ungroup the 50%-speed, 40%-speed, and 30%-speed text groups, then modify each individual text/font setting.
I am using Raster settings for my fonts. I do not, as a rule, have a need to use Vectors in the fonts I use.
In my case, I set the drawing size to 11" x 8.5" , or basic Landscape settings for standard paper.
The filename is 50_40_30_SPEED at 5_to_90_POWER.cdr
This shows what the file looks like when opened.
!!!!!!!!!!!!!!!!!!!!!!!!!!!!!!!!!!!!!!!!!!!!!!!!!!!!!!!!!!!!!!!!!!!!!!!!!!!!!!!!!!!!!!!!!!!!!!!!!!!!!!!!!!!!!!!!!!!!!!!!!!!!!!!!!!!!!!!!!!!!!!!!!!!!!!!!!!!!!!!!!!!!!!!!!!!!!!!
!!!!!!!!!!!!!!!!!!!!!!!!!!!!!!!!!!!!!!!!!!!!!!!!!!!!!!!!!!!!!!!!!!!!!!!!!!!!!!!!!!!!!!!!!!!!!!!!!!!!!!!!!!!!!!!!!!!!!!!!!!!!!!!!!!!!!!!!!!!!!!!!!!!!!!!!!!!!!!!!!!!!!!!!!!!!!!!
Downloads
Note on Color Mapping With the Epilog Print Driver
I'd have liked to load all 30 color mappings at once and run a single print job to the Laser, but there seems to be a 16-mapping limitation in the driver.
So... I went ahead and separated my mappings by speed settings (in groups of 10)...
!!!!!!!!!!!!!!!!!!!!!!!!!!!!!!!!!!!!!!!!!!!!!!!!!!!!!!!!!!!!!!!!!!!!!!!!!!!!!!!!!!!!!!!!!!!!!!!!!!!!!!!!!!!!!!!!!!!!!!!!!!!!!!!!!!!!!!!!!!!!!!!!!!!!!!!!!!!!!!!!!!!!!!!!!
!!!!!!!!!!!!!!!!!!!!!!!!!!!!!!!!!!!!!!!!!!!!!!!!!!!!!!!!!!!!!!!!!!!!!!!!!!!!!!!!!!!!!!!!!!!!!!!!!!!!!!!!!!!!!!!!!!!!!!!!!!!!!!!!!!!!!!!!!!!!!!!!!!!!!!!!!!!!!!!!!!!!!!!!!
Why Did I Put the 50% Speed As First in This Grid??
Ha! There's a method to this madness!
When I'm learning about the etch-ability of a material, I first work at the speeds which have the lowest chance of etching too deep into the material.
This way, I can work my way up to etching which applies more laser energy and may end-up burning or charring my material. Going from 50% to 40% to 30% speed will help this.
I can track the progress of the laser burns and cancel the job if I'm getting into a burn that is just not working.
!!!!!!!!!!!!!!!!!!!!!!!!!!!!!!!!!!!!!!!!!!!!!!!!!!!!!!!!!!!!!!!!!!!!!!!!!!!!!!!!!!!!!!!!!!!!!!!!!!!!!!!!!!!!!!!!!!!!!!!!!!!!!!!!!!!!!!!!!!!!!!!!!!!!!!!!!!!!!!!!!!!!!!!!!!!!!!!!!!!!!!!!!!!!!!!!!!!!!!!!!!
!!!!!!!!!!!!!!!!!!!!!!!!!!!!!!!!!!!!!!!!!!!!!!!!!!!!!!!!!!!!!!!!!!!!!!!!!!!!!!!!!!!!!!!!!!!!!!!!!!!!!!!!!!!!!!!!!!!!!!!!!!!!!!!!!!!!!!!!!!!!!!!!!!!!!!!!!!!!!!!!!!!!!!!!!!!!!!!!!!!!!!!!!!!!!!!!!!!!!!!!!!
More Drawing Details
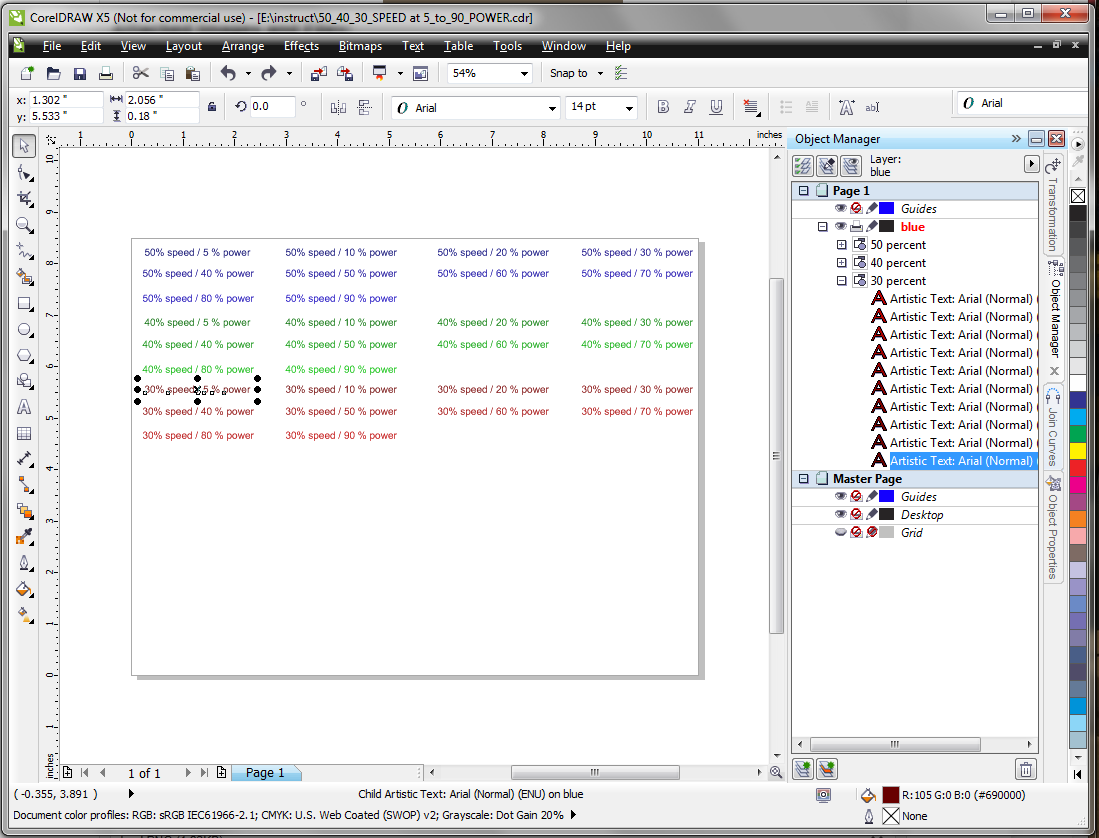
And here's what the drawing looks like with CorelDraw settings.
You might want to look a larger size of the drawing (here in Instructables) by clicking the drawing and selecting one of the size options that has sufficient detail.
Some details to tune-in to:
1. Right side of window
Here I've selected an individual power/speed text block to show its settings. Because I've selected it, the text block is outlined with marks for sizing and centering.
2. Bottom Right of window:
You'll see the RGB color settings. In this case, R=105, G=0, and B=0.
These settings are used with Color Mapping in the Epilog Engraver print driver to modify speed and power settings.
These settings are used with Color Mapping in the Epilog Engraver print driver to modify speed and power settings.
!!!!!!!!!!!!!!!!!!!!!!!!!!!!!!!!!!!!!!!!!!!!!!!!!!!!!!!!!!!!!!!!!!!!!!!!!!!!!!!!!!!!!!!!!!!!!!!!!!!!!!!!!!!!!!!!!!!!!!!!!!!!!!!!!!!!!!!!!!!!!!!!!!!!!!!!!!!!!!!!!!!!!!!!!!!!!!!!!!!!!!!!!!!!!!!!!!!!!!!!!!
!!!!!!!!!!!!!!!!!!!!!!!!!!!!!!!!!!!!!!!!!!!!!!!!!!!!!!!!!!!!!!!!!!!!!!!!!!!!!!!!!!!!!!!!!!!!!!!!!!!!!!!!!!!!!!!!!!!!!!!!!!!!!!!!!!!!!!!!!!!!!!!!!!!!!!!!!!!!!!!!!!!!!!!!!!!!!!!!!!!!!!!!!!!!!!!!!!!!!!!!!!
!!!!!!!!!!!!!!!!!!!!!!!!!!!!!!!!!!!!!!!!!!!!!!!!!!!!!!!!!!!!!!!!!!!!!!!!!!!!!!!!!!!!!!!!!!!!!!!!!!!!!!!!!!!!!!!!!!!!!!!!!!!!!!!!!!!!!!!!!!!!!!!!!!!!!!!!!!!!!!!!!!!!!!!!!!!!!!!!!!!!!!!!!!!!!!!!!!!!!!!!!!
Let's Start the Print Process Using Color Mapping...
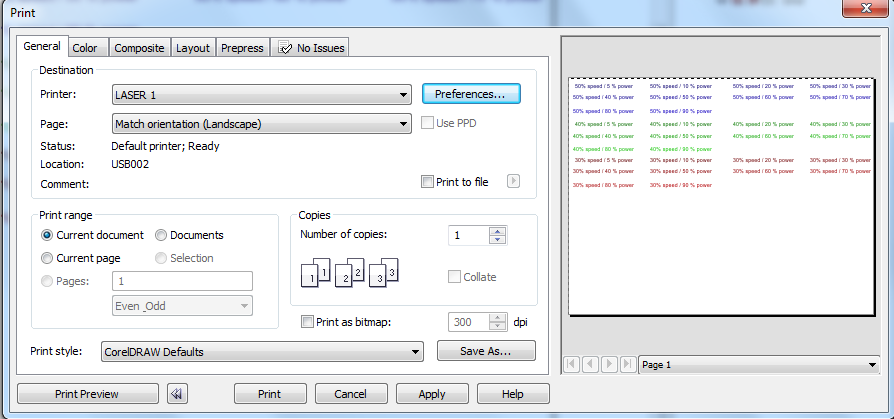
Once the Printer icon or Print is selected from the File Menu, you'll get a window that looks similar to this.
1. If you've got more than one printer attached to your computer, then make sure the appropriate Laser is selected as the printer.
2. If the Preview on the right-hand side does not look exactly correct yet, Don't Panic! The paper size/dimensions in the Preferences window will need to match the sheet size/dimensions from the Drawing before the Preview will look correct.
3. Select the Preferences button and go to the next step.
!!!!!!!!!!!!!!!!!!!!!!!!!!!!!!!!!!!!!!!!!!!!!!!!!!!!!!!!!!!!!!!!!!!!!!!!!!!!!!!!!!!!!!!!!!!!!!!!!!!!!!!!!!!!!!!!!!!!!!!!!!!!!!!!!!!!!!!!!!!!!!!!!!!!!!!!!!!!!!!!!!!!!!!!!!!!!!!!!!!!!!!!!!!!!!!!!!!!!!!!!!
!!!!!!!!!!!!!!!!!!!!!!!!!!!!!!!!!!!!!!!!!!!!!!!!!!!!!!!!!!!!!!!!!!!!!!!!!!!!!!!!!!!!!!!!!!!!!!!!!!!!!!!!!!!!!!!!!!!!!!!!!!!!!!!!!!!!!!!!!!!!!!!!!!!!!!!!!!!!!!!!!!!!!!!!!!!!!!!!!!!!!!!!!!!!!!!!!!!!!!!!!!
Properties Window Settings
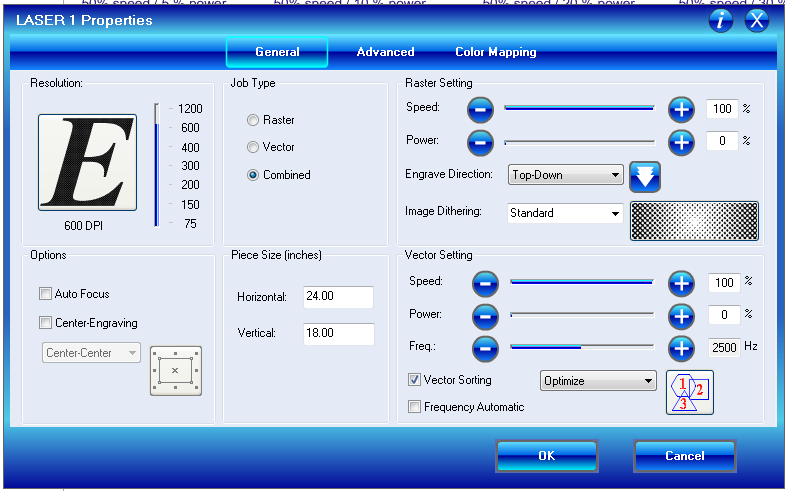
Once you've selected Properties, the Properties Window comes up.
Stuff to do here:
- Make sure the Piece Size dimensions match the Page dimensions that were used in the drawing. This screenshot shows 24" width by 18" height, but I will modify that in a later step to match the 11" width by 8.5" height I used in my drawing.
- Since I'm using a Raster font, I made sure that Raster or Combined is selected under Job Type.
- All Speed and Power settings can remain as they are for now. These need to be checked in a later step.
!!!!!!!!!!!!!!!!!!!!!!!!!!!!!!!!!!!!!!!!!!!!!!!!!!!!!!!!!!!!!!!!!!!!!!!!!!!!!!!!!!!!!!!!!!!!!!!!!!!!!!!!!!!!!!!!!!!!!!!!!!!!!!!!!!!!!!!!!!!!!!!!!!!!!!!!!!!!!!!!!!!!!!!!!!!!
Now Select the Color Mapping Tab...
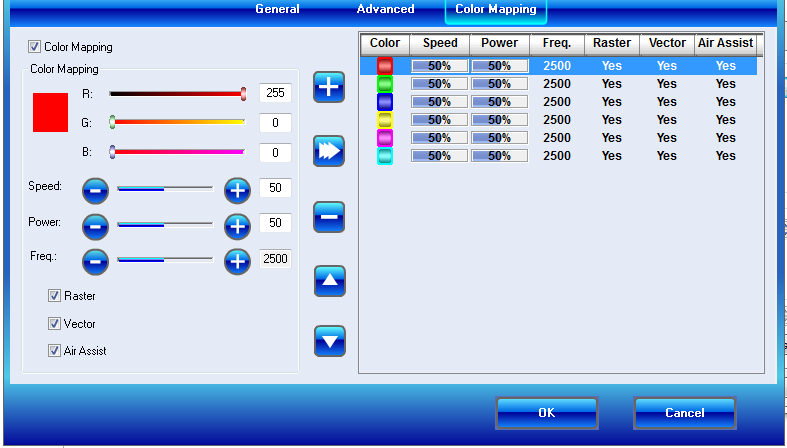
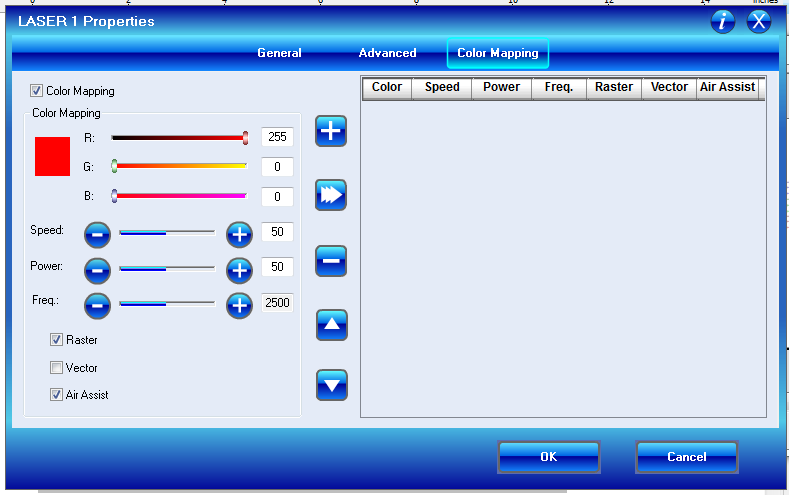
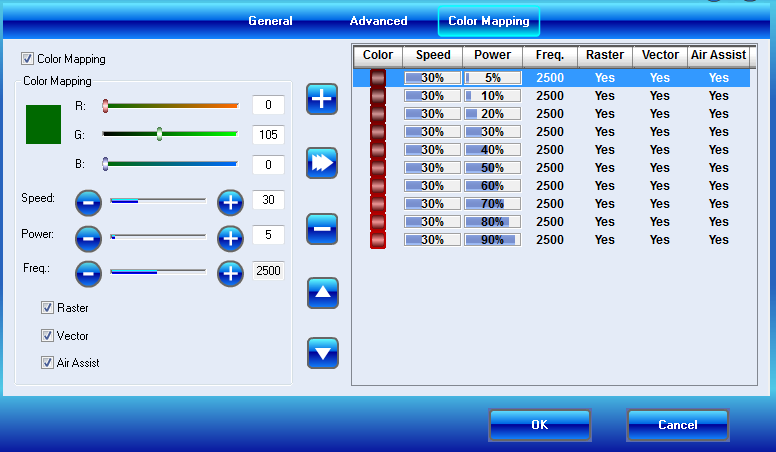
And once you're in the Color Mapping Window, select the Color Mapping button at the Top Left. This allows us to remove all the existing, default Color Mapping settings that you see in the picture.
You can see that the Red (RGB 255,0,0) row is automatically selected. Hit the - (minus sign) button in the middle of the window to remove this row.
Repeat this step to remove all default existing Color Mapping rows.
I make sure that the Raster and Air Assist buttons are selected. The second picture here shows the result.
!!!!!!!!!!!!!!!!!!!!!!!!!!!!!!!!!!!!!!!!!!!!!!!!!!!!!!!!!!!!!!!!!!!!!!!!!!!!!!!!!!!!!!!!!!!!!!!!!!!!!!!!!!!!!!!!!!!!!!!!!!!!!!!!!!!!!!!!!!!!!!!!!!!!!!!!!!!!!!!!!!!!!!!!!!!!
!!!!!!!!!!!!!!!!!!!!!!!!!!!!!!!!!!!!!!!!!!!!!!!!!!!!!!!!!!!!!!!!!!!!!!!!!!!!!!!!!!!!!!!!!!!!!!!!!!!!!!!!!!!!!!!!!!!!!!!!!!!!!!!!!!!!!!!!!!!!!!!!!!!!!!!!!!!!!!!!!!!!!!!!!!!!
Now Go to the Advanced Window...
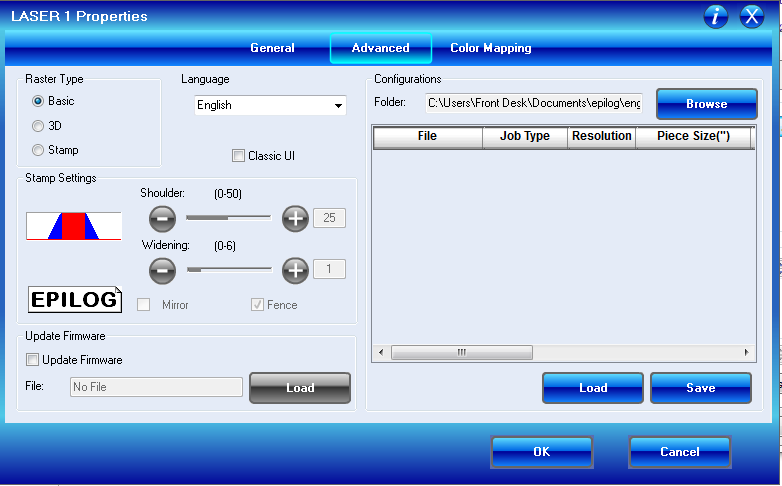
Selecting the Advanced Tab will show you this window.
- Make sure Raster Type is set to Basic.
- Classic UI and Update Firmware buttons should NOT be selected.
!!!!!!!!!!!!!!!!!!!!!!!!!!!!!!!!!!!!!!!!!!!!!!!!!!!!!!!!!!!!!!!!!!!!!!!!!!!!!!!!!!!!!!!!!!!!!!!!!!!!!!!!!!!!!!!!!!!!!!!!!!!!!!!!!!!!!!!!!!!!!!!!!!!!!!!!!!!!!!!!!!!!!!!!!!!!
Save the Zip File With 3 .dat Files to Your Computer...
I have zipped-up the following 3 files, and you'll need to download and unzip them into a handy folder.
Limitation of the Print Driver!
I suggest putting the zip file in a directory very close to the root. That will make it easier to locate the files when you will soon Load them.
Once unzipped, the files are:
30 percent speed.DAT
40 percent speed.DAT
50 percent speed.DAT
!!!!!!!!!!!!!!!!!!!!!!!!!!!!!!!!!!!!!!!!!!!!!!!!!!!!!!!!!!!!!!!!!!!!!!!!!!!!!!!!!!!!!!!!!!!!!!!!!!!!!!!!!!!!!!!!!!!!!!!!!!!!!!!!!!!!!!!!!!!!!!!!!!!!!!!!!!!!
!!!!!!!!!!!!!!!!!!!!!!!!!!!!!!!!!!!!!!!!!!!!!!!!!!!!!!!!!!!!!!!!!!!!!!!!!!!!!!!!!!!!!!!!!!!!!!!!!!!!!!!!!!!!!!!!!!!!!!!!!!!!!!!!!!!!!!!!!!!!!!!!!!!!!!!!!!!!
Downloads
Locate the Folder With the .DAT Files...

Select the Browse button in the top right corner and locate the folder with your unzipped .DAT files.
Once you've found the directory, select OK. The folder will now appear next to the Browse button.
!!!!!!!!!!!!!!!!!!!!!!!!!!!!!!!!!!!!!!!!!!!!!!!!!!!!!!!!!!!!!!!!!!!!!!!!!!!!!!!!!!!!!!!!!!!!!!!!!!!!!!!!!!!!!!!!!!!!!!!!!!!!!!!!!!!!!!!!!!!!!!!!!!!!!!!!!!!!!!!!!!!!!!!!!!!!
!!!!!!!!!!!!!!!!!!!!!!!!!!!!!!!!!!!!!!!!!!!!!!!!!!!!!!!!!!!!!!!!!!!!!!!!!!!!!!!!!!!!!!!!!!!!!!!!!!!!!!!!!!!!!!!!!!!!!!!!!!!!!!!!!!!!!!!!!!!!!!!!!!!!!!!!!!!!!!!!!!!!!!!!!!!!
Now Load the 50 Percent Speed .DAT File...
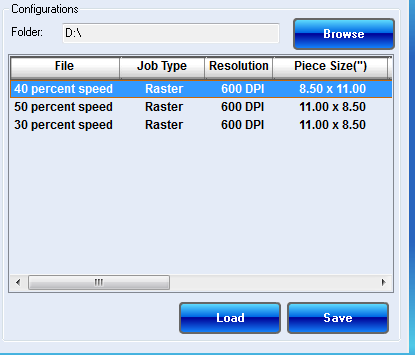
The .DAT files will now appear in the Advanced window.
NOTICE THE PIECE SIZES for these files. One of them will show Portrait settings of 8.5" x 11", while the others show Landscape settings of 11" x 8.5". These can be modifed as needed after the Color Mapping is done.
In this screenshot, you can see that the 40 percent speed mapping is already selected.
Select 50 percent speed and select Load to add these mappings.
!!!!!!!!!!!!!!!!!!!!!!!!!!!!!!!!!!!!!!!!!!!!!!!!!!!!!!!!!!!!!!!!!!!!!!!!!!!!!!!!!!!!!!!!!!!!!!!!!!!!!!!!!!!!!!!!!!!!!!!!!!!!!!!!!!!!!!!!!!!!!!!!!!!!!!!!!!!!!!!!!!!!!!!!!!!!
!!!!!!!!!!!!!!!!!!!!!!!!!!!!!!!!!!!!!!!!!!!!!!!!!!!!!!!!!!!!!!!!!!!!!!!!!!!!!!!!!!!!!!!!!!!!!!!!!!!!!!!!!!!!!!!!!!!!!!!!!!!!!!!!!!!!!!!!!!!!!!!!!!!!!!!!!!!!!!!!!!!!!!!!!!!!
View the 50 Percent Speed Color Mappings...
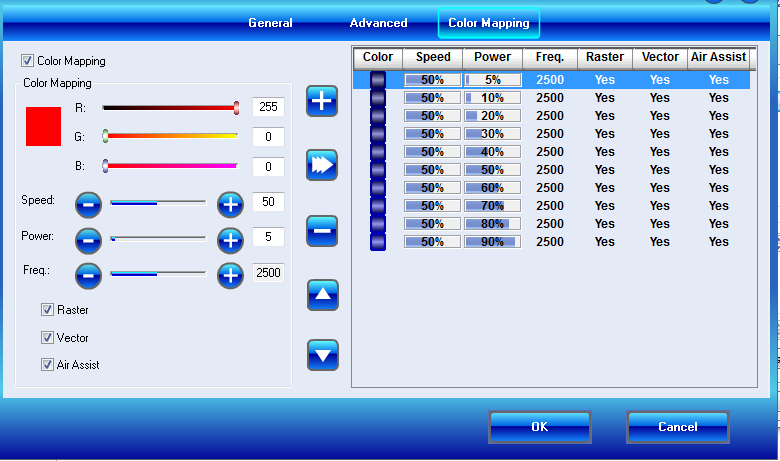
Select the Color Mapping Tab to see the 50 percent speed mappings.
!!!!!!!!!!!!!!!!!!!!!!!!!!!!!!!!!!!!!!!!!!!!!!!!!!!!!!!!!!!!!!!!!!!!!!!!!!!!!!!!!!!!!!!!!!!!!!!!!!!!!!!!!!!!!!!!!!!!!!!!!!!!!!!!!!!!!!!!!!!!!!!!!!!!!!!!!!!!!!!!!!!!!!!!!!!!
!!!!!!!!!!!!!!!!!!!!!!!!!!!!!!!!!!!!!!!!!!!!!!!!!!!!!!!!!!!!!!!!!!!!!!!!!!!!!!!!!!!!!!!!!!!!!!!!!!!!!!!!!!!!!!!!!!!!!!!!!!!!!!!!!!!!!!!!!!!!!!!!!!!!!!!!!!!!!!!!!!!!!!!!!!!!
Now Get Ready to Print the 50% Speed Text...
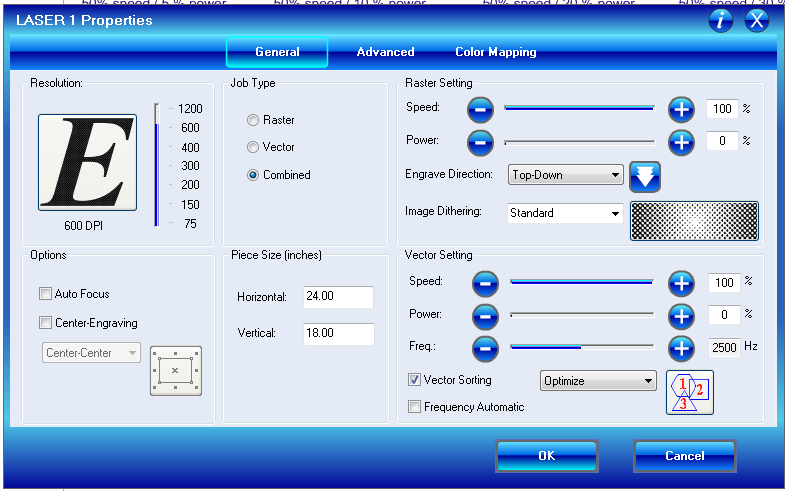
Select the General Tab and do the following:
NOTE: The print driver will send non-color-mapped text to be sent to the Laser! Step 2 below will keep the text from printing.
- Confirm the Piece Size dimensions are correct. Change them if needed. (mine are NOT correct in this screen capture)
- Set Raster Power to 0% ( this prevents any non-color-mapped text from being burned into your piece! )
- Select OK.
!!!!!!!!!!!!!!!!!!!!!!!!!!!!!!!!!!!!!!!!!!!!!!!!!!!!!!!!!!!!!!!!!!!!!!!!!!!!!!!!!!!!!!!!!!!!!!!!!!!!!!!!!!!!!!!!!!!!!!!!!!!!!!!!!!!!!!!!!!!!!!!!!!!!!!!!!!!!!!!!!!!!!!!!!!!!
Now Print the 50% Speed Text...
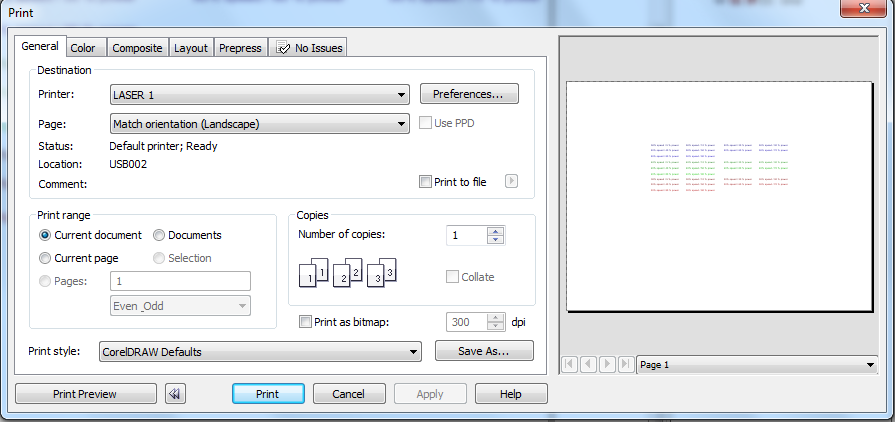
Now select Apply, then Print, and let the file load onto the Laser. This will also save the Raster settings from the previous step.
Assuming you've focused the laser, hit the GO button while the Job is selected.
Monitor your laser job!
- Once the 50% speed text has printed, you can hit STOP on the Laser, or lift the lid to turn off the Laser.
- Once the Laser gantry and mirrors are stopped, hit RESET to end the job.
- Leave the piece you are burning on the Laser table for the next steps.
- Close the Laser's lid.
!!!!!!!!!!!!!!!!!!!!!!!!!!!!!!!!!!!!!!!!!!!!!!!!!!!!!!!!!!!!!!!!!!!!!!!!!!!!!!!!!!!!!!!!!!!!!!!!!!!!!!!!!!!!!!!!!!!!!!!!!!!!!!!!!!!!!!!!!!!!!!!!
40% Speed Mapping and Printing...
- Select Print from the drawing icon or the File menu.
- Select Preferences
- Select Color Mapping
- Clear all default Color Mapping
- Select the Advanced tab.
- Select the 40 percent speed color mappings.
- Load the color mappings.
- Confirm the color mappings under the Color Mapping tab.
- Select the General tab and confirm Raster power is 0% (zero percent), piece size is correct, and Raster or Combined is selected.
- Select OK and return to the main Print window.
- Select Print to send the print job to the Laser.
- Select GO on the Laser.
- Monitor your laser job!
- Once the 40% speed text has printed, you can hit STOP on the Laser, or lift the lid to turn off the Laser.
- Once the Laser gantry and mirrors are stopped, hit RESET to end the job.
- Leave the piece you are burning on the Laser table for the next step.
- Close the Laser's lid.
!!!!!!!!!!!!!!!!!!!!!!!!!!!!!!!!!!!!!!!!!!!!!!!!!!!!!!!!!!!!!!!!!!!!!!!!!!!!!!!!!!!!!!!!!!!!!!!!!!!!!!!!!!!!!!!!!!!!!!!!!!!!!!!!!!!!!!
Print the 30% Speed Text...
Select Print from the drawing icon or the File menu.
- Select Preferences
- Select Color Mapping
- Clear all default Color Mapping
- Select the Advanced tab.
- Select the 30 percent speed color mappings.
- Load the color mappings.
- Confirm the color mappings under the Color Mapping tab.
- Select the General tab and confirm Raster power is 0% (zero percent), piece size is correct, and Raster or Combined is selected.
- Select OK and return to the main Print window.
- Select Print to send the print job to the Laser.
- Select GO on the Laser.
- Monitor your laser job!
- Once the 30% speed text has printed, you can hit STOP on the Laser, or lift the lid to turn off the Laser.
- Once the Laser gantry and mirrors are stopped, hit RESET to end the job.
!!!!!!!!!!!!!!!!!!!!!!!!!!!!!!!!!!!!!!!!!!!!!!!!!!!!!!!!!!!!!!!!!!!!!!!!!!!!!!!!!!!!!!!!!!!!!!!!!!!!!!!!!!!!!!!!!!!!!!!!!!!!!!!!!!!!!!!!!!!!!!!!!!!!!!!!!!!!!!!!!!!!!!!!!!!!!!!
Okay. You're Done...
Of course this can be done in whatever wood or other material you are working with.
I hope this Instructable helps, and that if you're planning on using Color Mapping, there are some handy pointers here.
Maybe I'll catch you at TechShop in San Jose!
Cheers!
!!!!!!!!!!!!!!!!!!!!!!!!!!!!!!!!!!!!!!!!!!!!!!!!!!!!!!!!!!!!!!!!!!!!!!!!!!!!!!!!!!!!!!!!!!!!!!!!!!!!!!!!!!!!!!!!!!!!!!!!!!!!!!!!!!!!!!!!!!!!!!!!!!!!!!!!!!!!!!!!!!!!!!!!!!!!!!!
!!!!!!!!!!!!!!!!!!!!!!!!!!!!!!!!!!!!!!!!!!!!!!!!!!!!!!!!!!!!!!!!!!!!!!!!!!!!!!!!!!!!!!!!!!!!!!!!!!!!!!!!!!!!!!!!!!!!!!!!!!!!!!!!!!!!!!!!!!!!!!!!!!!!!!!!!!!!!!!!!!!!!!!!!!!!!!!