Laptop Cooling Pad - 3* 120mm Fans
by TrumanGilbert in Workshop > 3D Printing
375 Views, 0 Favorites, 0 Comments
Laptop Cooling Pad - 3* 120mm Fans
.png)
.png)
.png)
This tutorial will walk you through how to design a laptop cooling pad in Fusion 360. This cooler will use 3 120mm computer case fans.
**Disclaimer**:
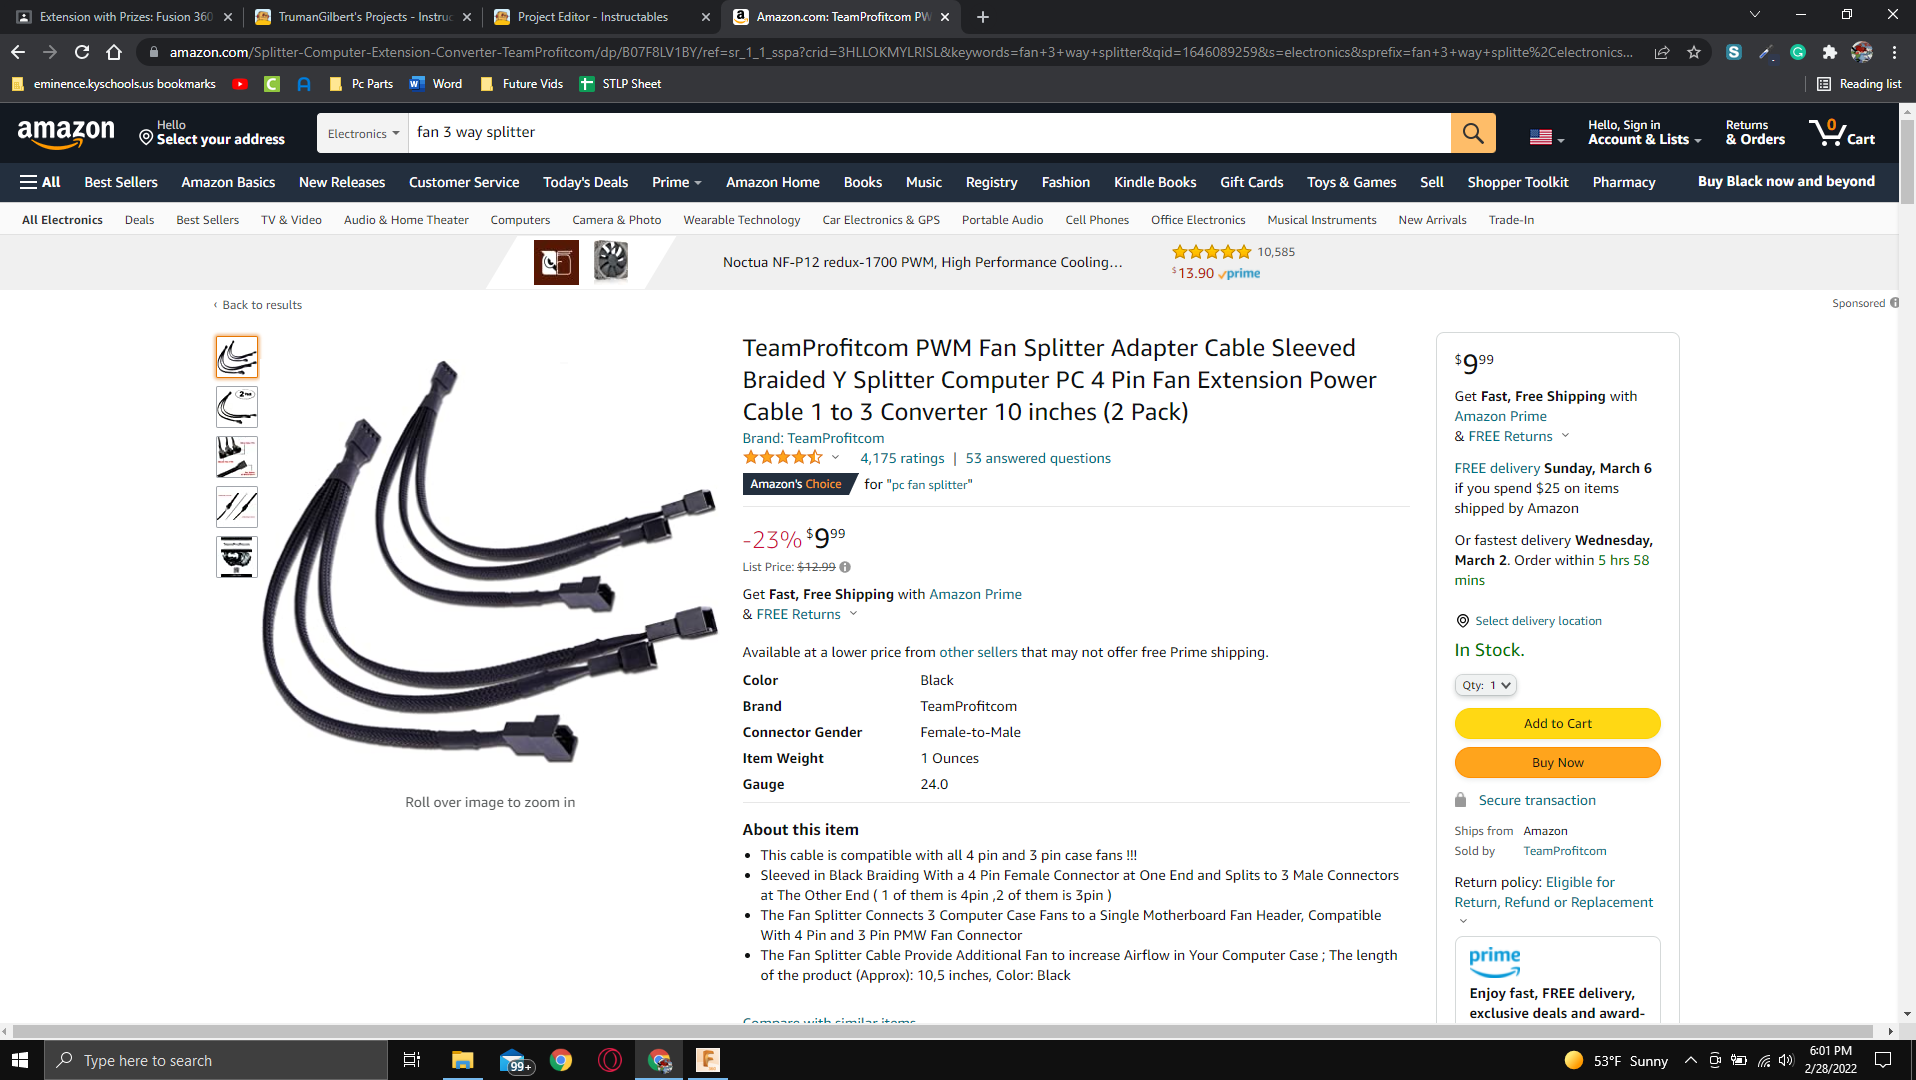
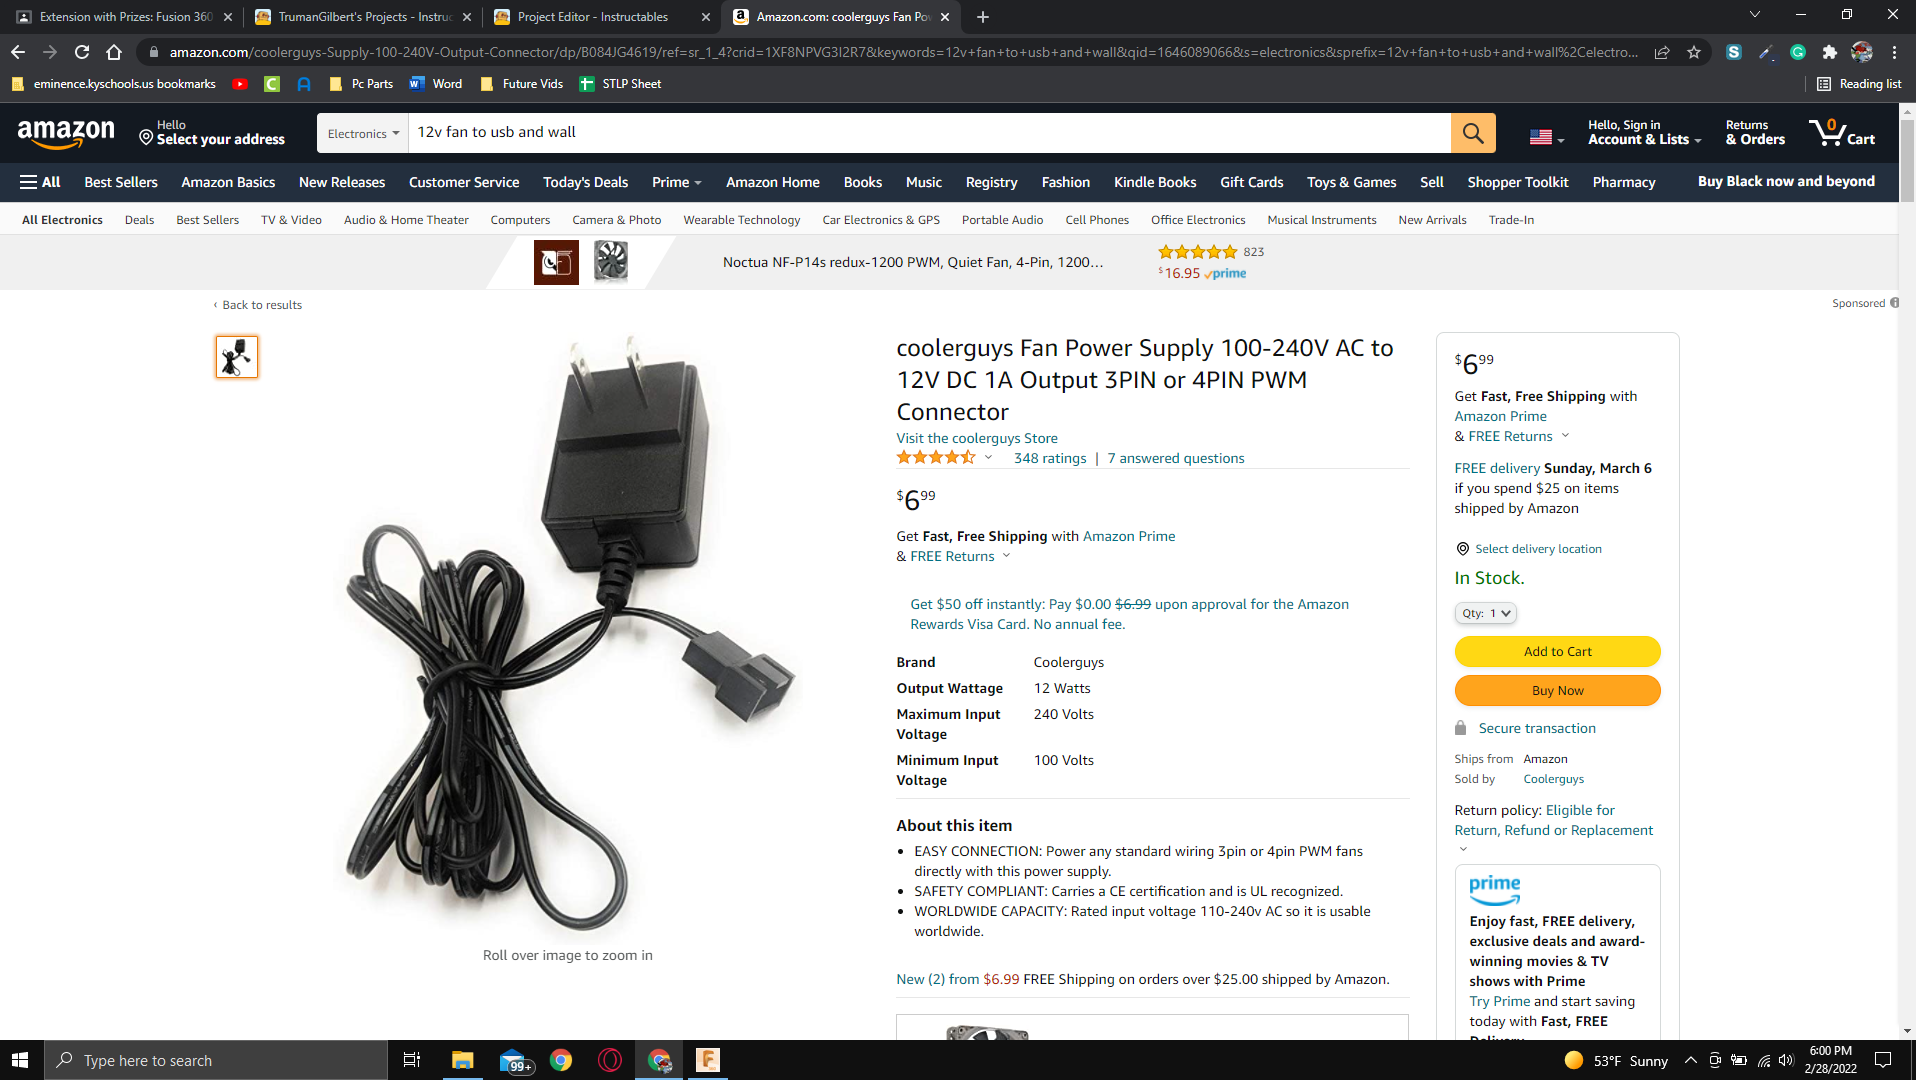
This design will not walk you through how to connect the fans to power and whatnot (because my 3d printer is too small to actually create this), but that is fairly self-explanatory. Use the included fan screws to connect the fan to the shell. Then connect the 3 fans to the fan splitter and the splitter to the wall brick.
Supplies
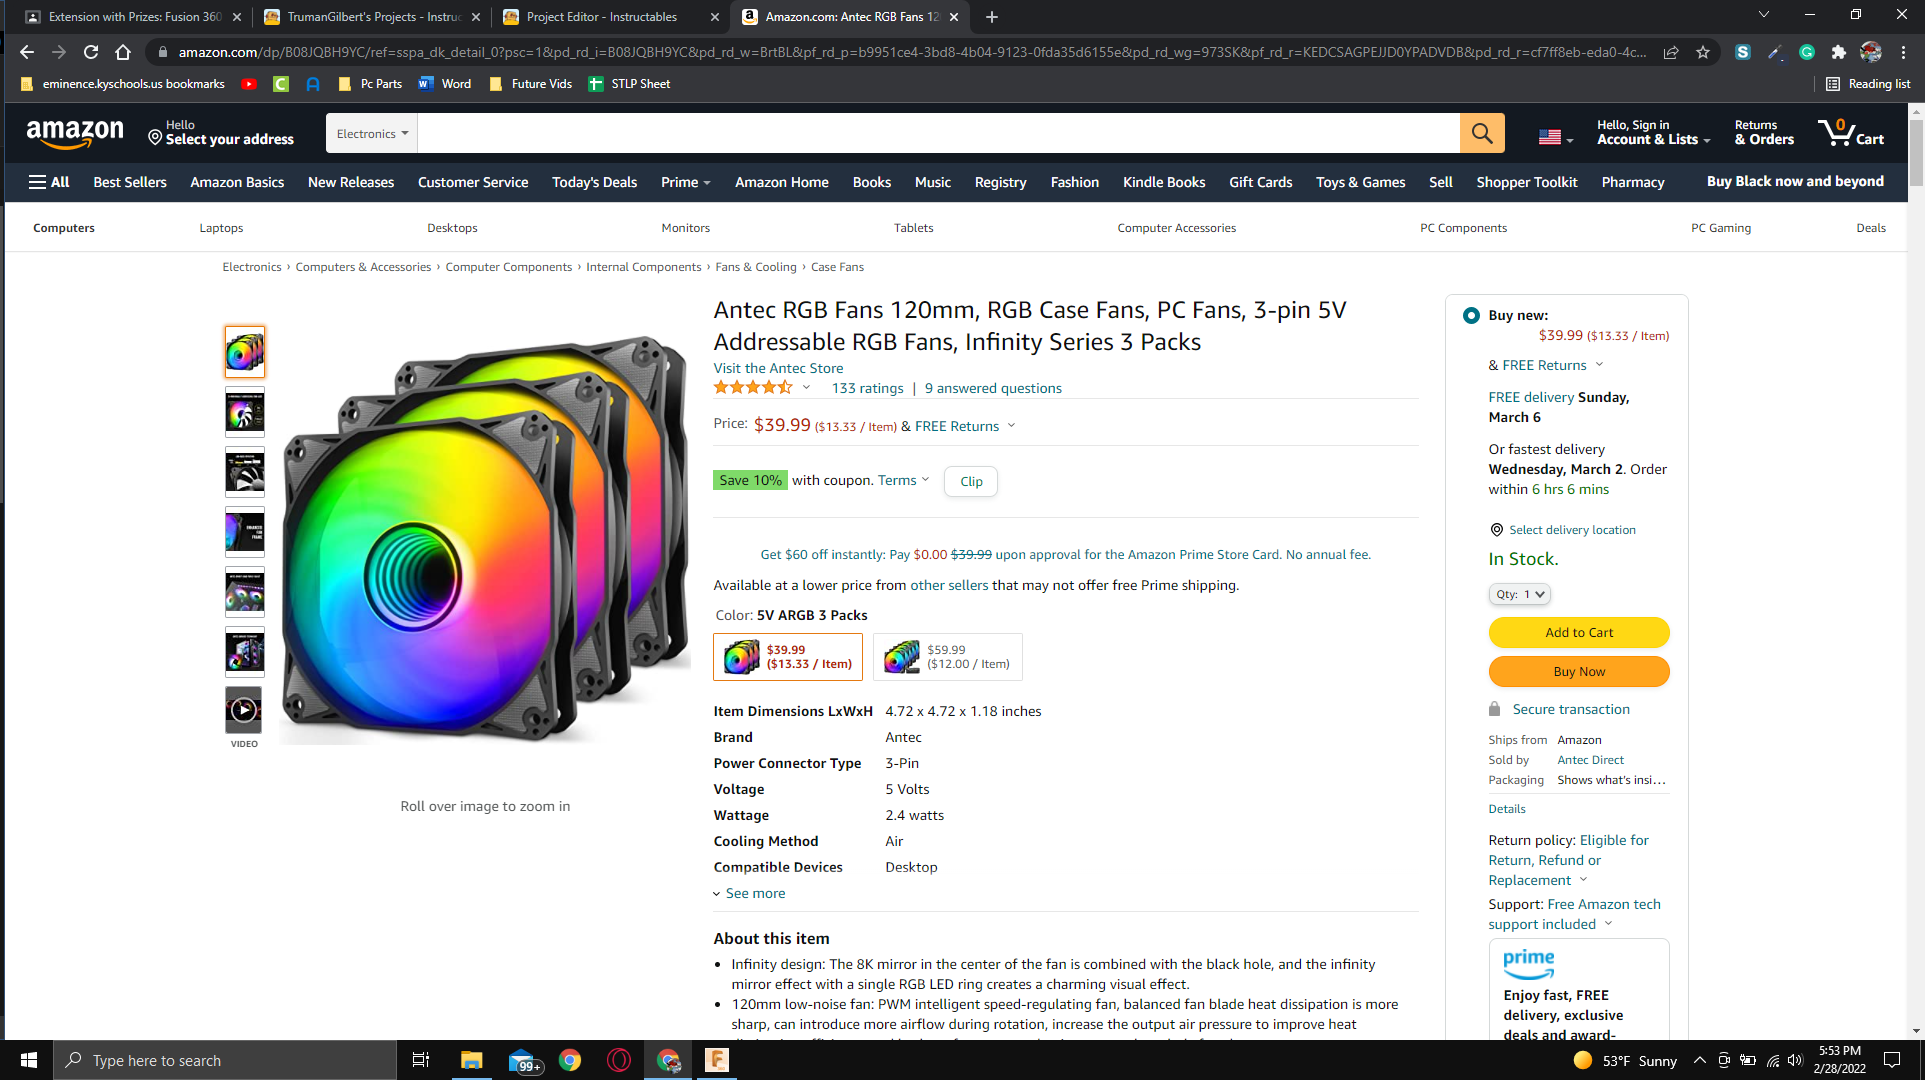
The picture shows Antec fans from amazon, but you will not need these exact ones. These were just some spare fans I had laying around. With these fans, you will also need a 12v fan to USB or wall connector. This will supply the power needed for the fans.
Links to all items from Amazon (you don't need to use these exact ones, these are just some well recommended/cheap options on Amazon):
https://www.amazon.com/Splitter-Computer-Extension...
Step 1: Initial Sketch
In Fusion 360 open a new document
Click the "Create Sketch" button in the top left
Then select the bottom plane (between the green and red axis lines). This will create a new sketch where you will draw the basic layout of the design.
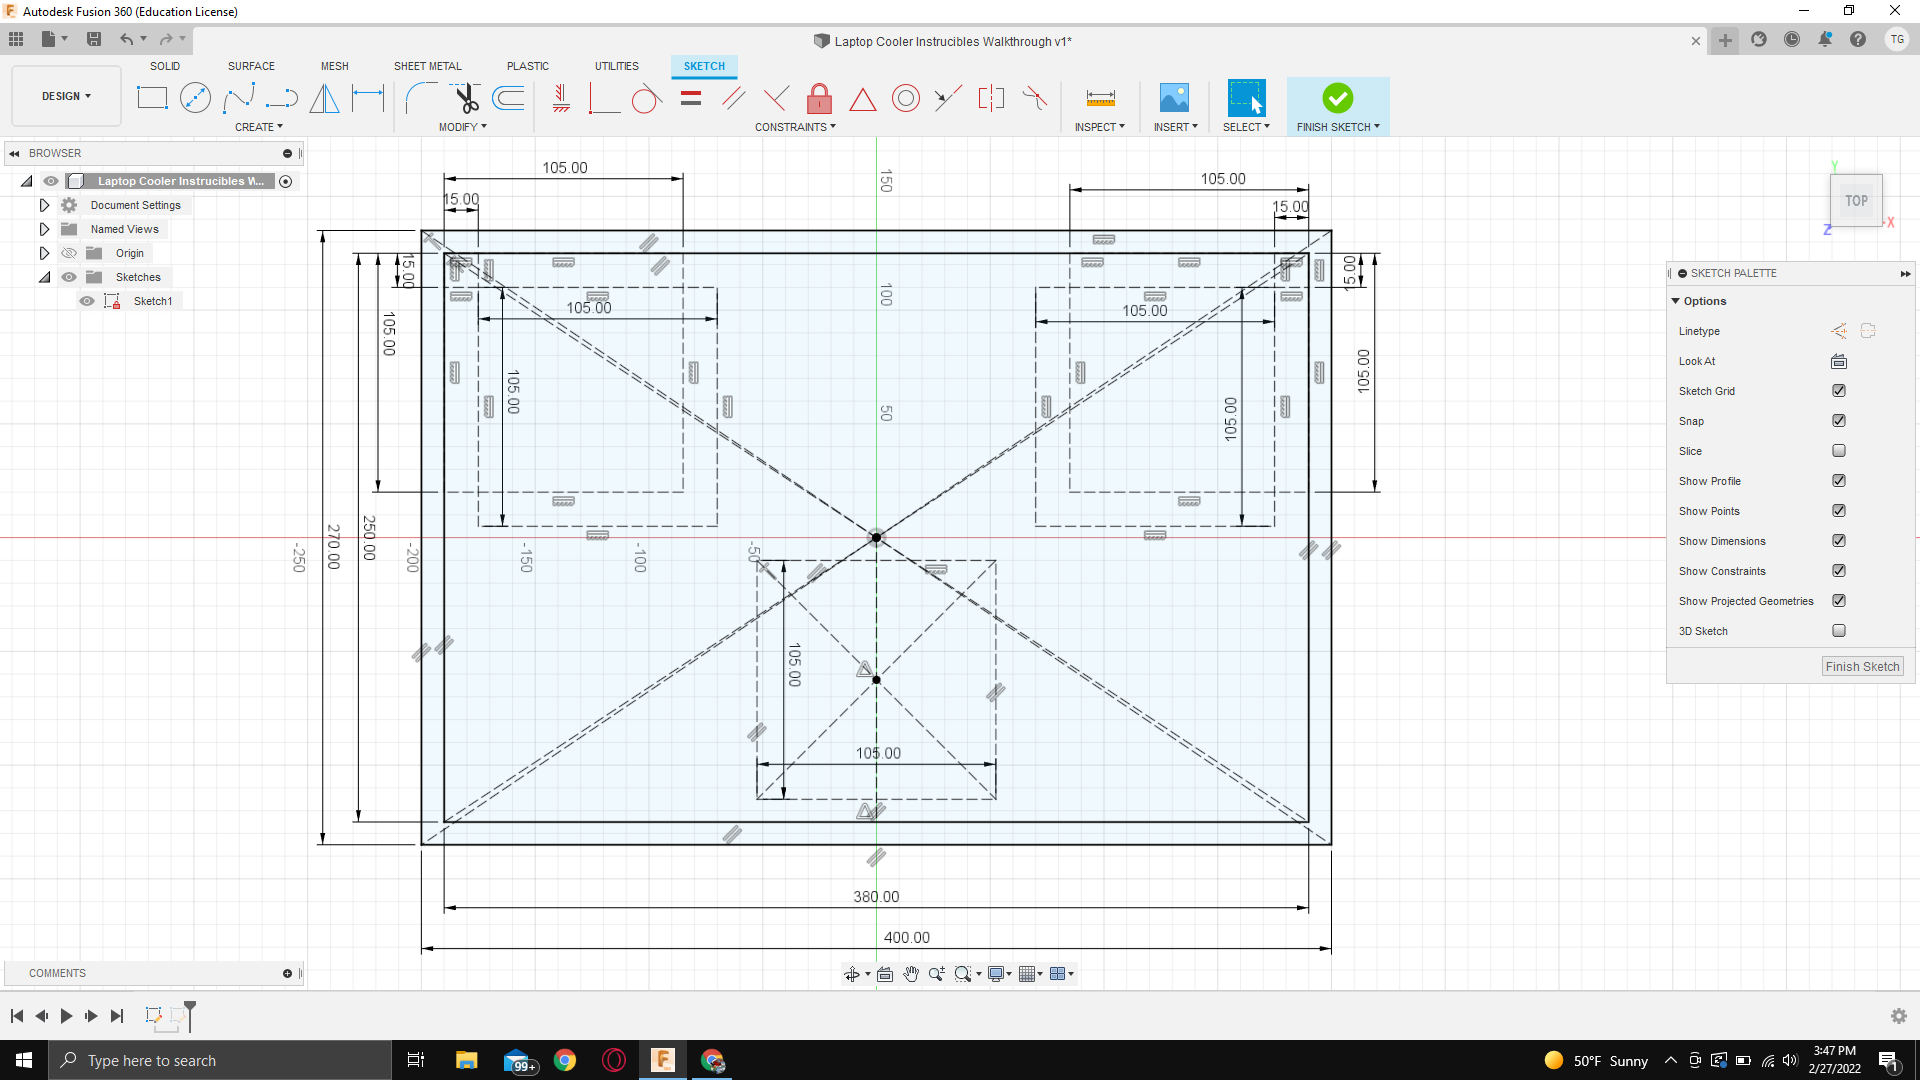
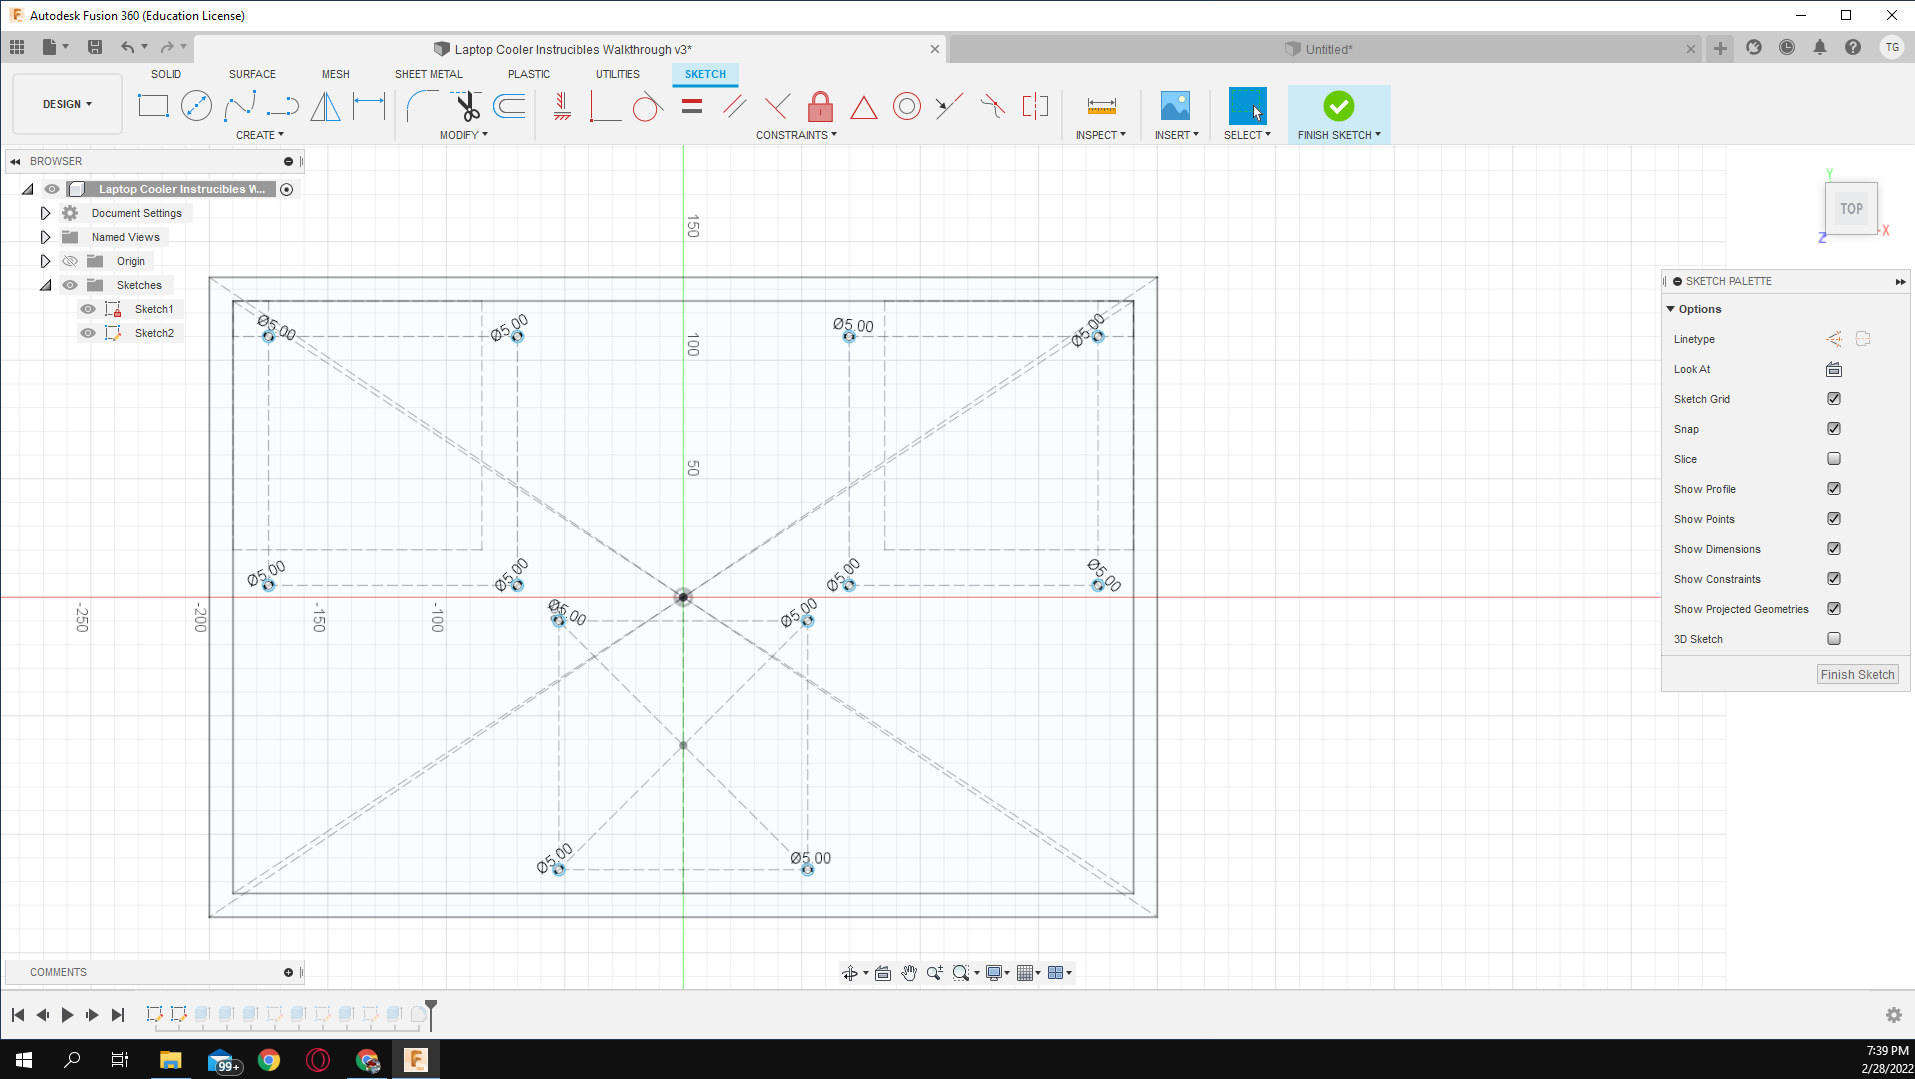
Then you want to basically recreate the picture shown above.
- Click the Create tab in the top left. Go to rectangle, then center point rectangle. This will create a rectangle from the center outwards.
- Make this rectangle 400mm wide by 270 wide/long. Do this by typing "400mm" then hit the "Tab" key then type "270mm"
- Next, make the smaller rectangle on the inside. Do this by creating another center point rectangle(from the same spot) and make this one 380mm by 250mm.
- Then select the "2 point rectangle" tool from the top right(just above the create tab). Next, go to the side panel, and next to "Line Type", click construction. This will create a line you can use for reference but won't be in the final design. Then click the top right of the inside rectangle and then type "15mm" hit "Tab" then type "15mm" again.
- Do the same thing in the top right but inverted. This should make 2 little squares in the top left and right of the inside rectangle.
- Next, click the bottom right of the little square in the top left. Make another 2 point, construction line, rectangle. However, this time make it 105mm by 105mm.
- Repeat this process for the top left as well, it will just be inverted.
- Then make a line from the origin point(or wherever you based your center point rectangles) and make the line from this point to the midpoint of the inside rectangle's baseline. Make sure this is also a construction line. To find the midpoint, just drag your mouse along the line until it snaps to a little blue X.
- Finally, make another center point rectangle from the midpoint of this new line and make this rectangle 105mm by 105mm.
- Once completed, click the Finish Sketch button in the top right of the screen to complete this step.
The end result should look like the picture above. The solid lines are non-construction lines and the dashed lines are construction lines. The dimensions are not necessary, however, they can be helpful and make it easier to recreate.
Step 2: Create the Holes Guidelines
.png)
With this sketch out of the way, we can now make this 3 dimensional. Make sure your sketch is visible by going to the left panel, sketches, then click the eye next to the sketch labeled as "Sketch 1". Feel free to rename it as you wish. Then follow these instructions:
- Click the new sketch button
- Select the same plane as before(the bottom, between the red and green axis lines)
- Click the "Center Diameter Circle" button in the top left or in the create menu, This is like the center point rectangle, but instead, it makes a circle from the midpoint to the other selected point
- Create circles with a diameter of "5mm" at the corners of each of the larger inside squares. Do this by selecting the very corner of the square(you might need to zoom in) and type "5mm". These will be the holes where the screws will be placed
- This will leave you with 12 5mm diameter circles on your sketch
- Next, hit the finish sketch in the top right corner
Again, make sure all these sketches are visible by clicking the eyeball next to there name on the left.
Adding Height
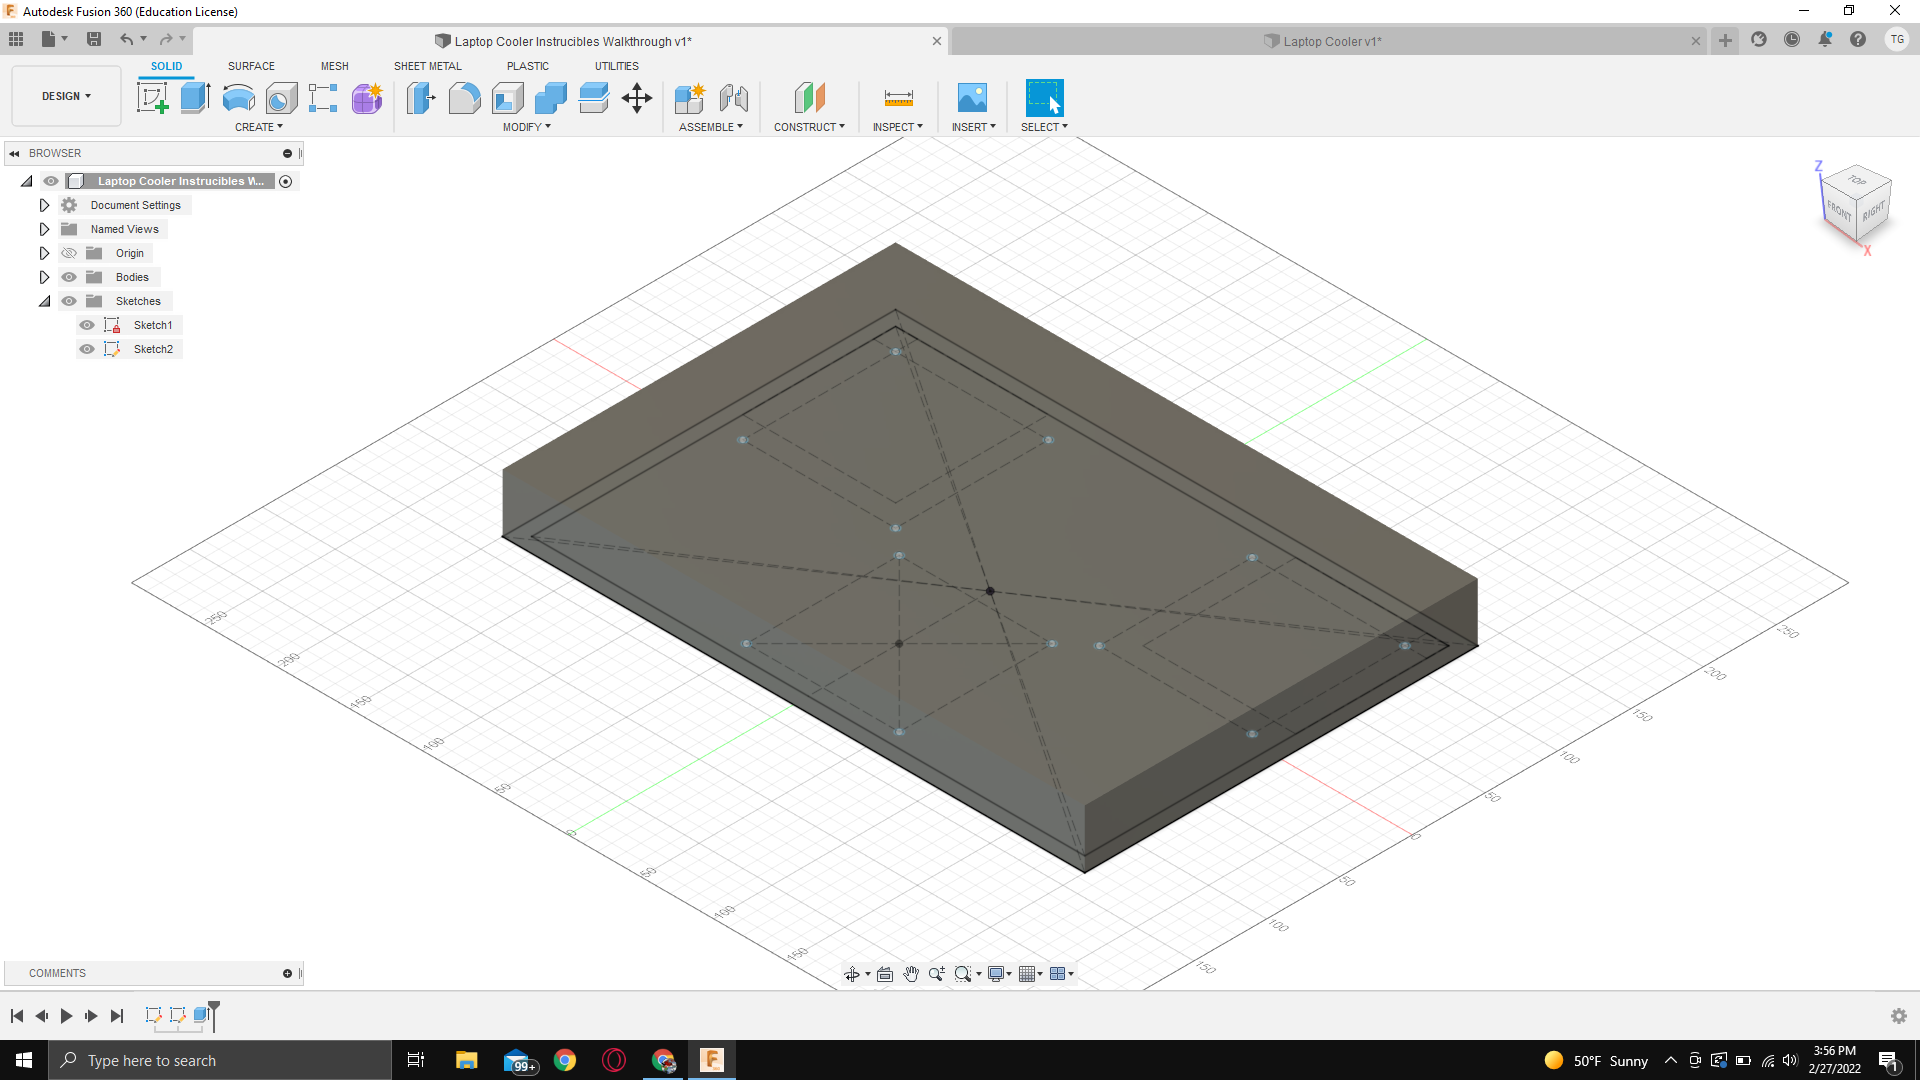
Next, we need to add height to our project. We do this using the extrude tool.
- Head over to the top left, again, and click the extrude button
- Then click both the inside and outside rectangles on our sketches
- Next, go to the right panel and change the distance to 4cm
- Then click "Ok"
Hollowing It Out
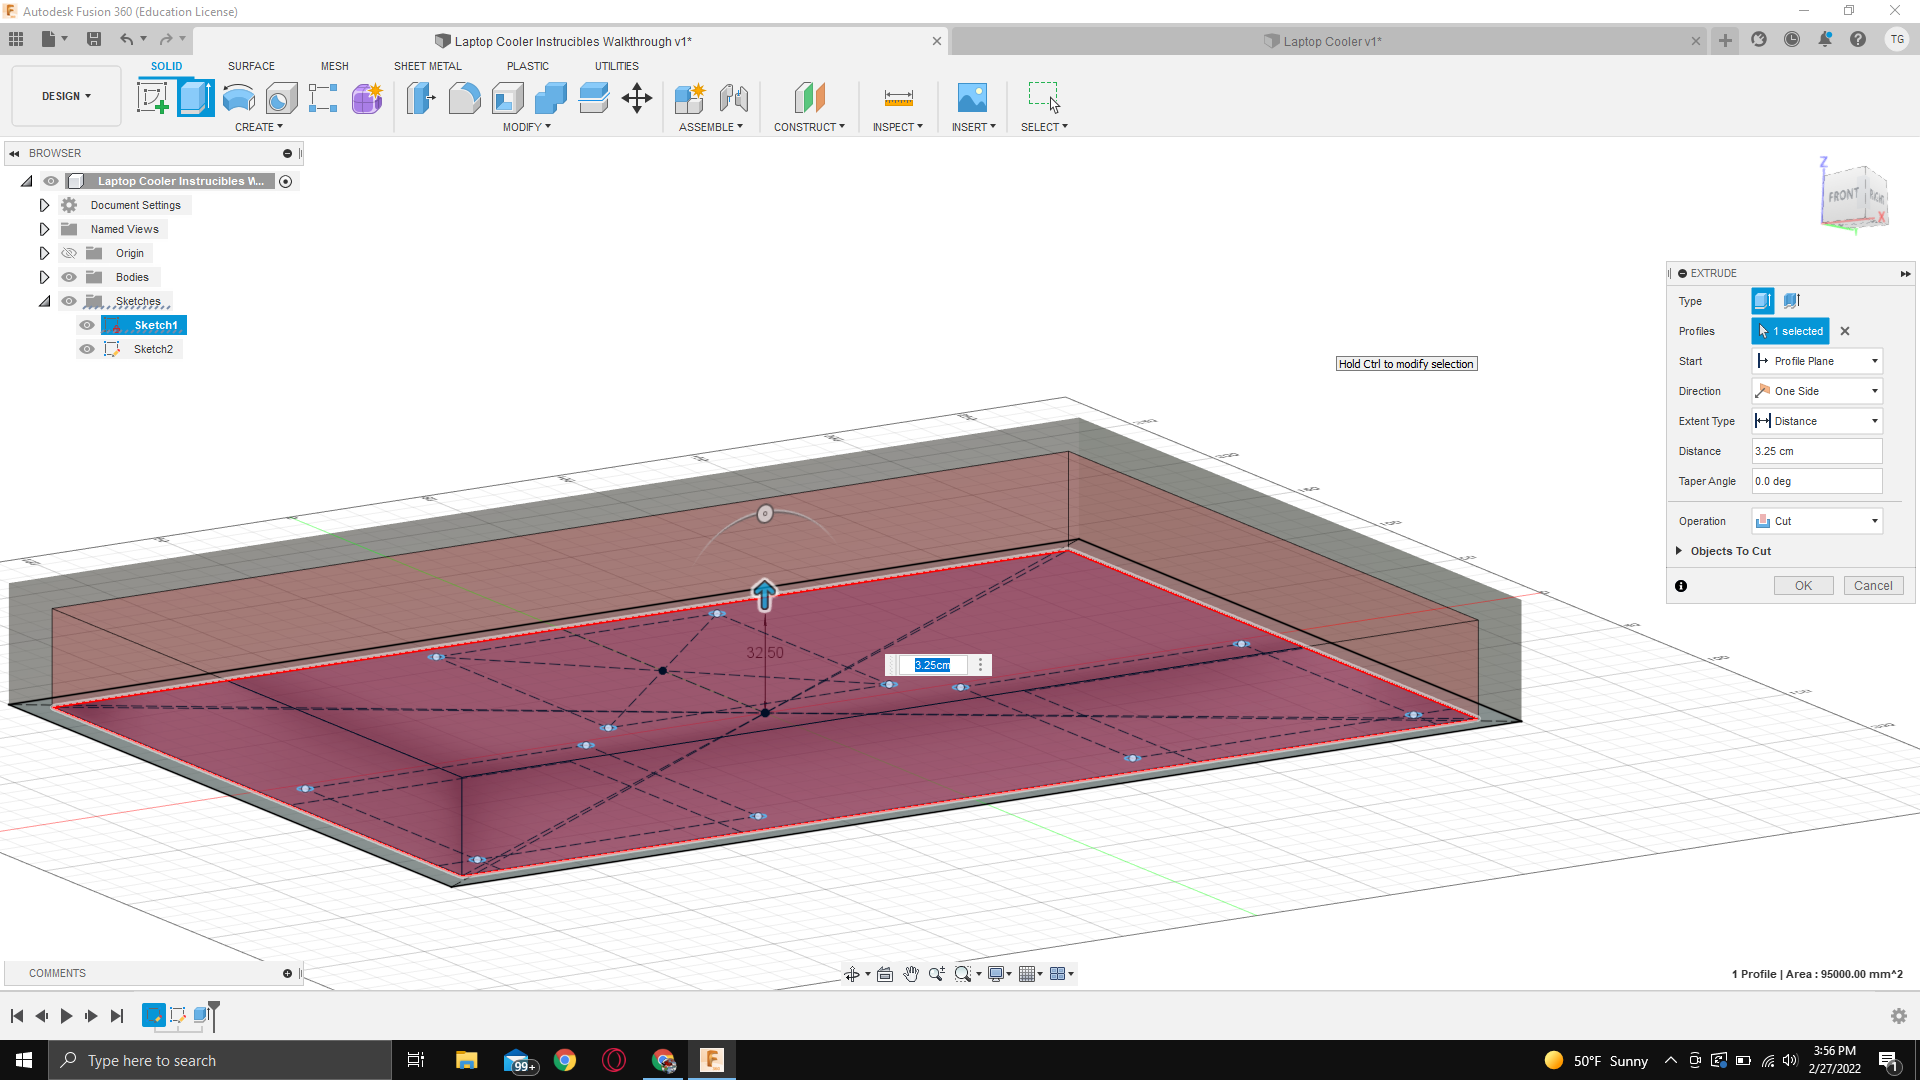
- Now click the extrude button again
- Then rotate the screen until you can see the sketches on the bottom
- Click the inside rectangle ONLY
- Then change the distance to "3.25cm"
- Next, go to the bottom of the dropdown and change the operation to "Cut" (this will remove material instead of adding it)
- Before you click "Ok" you should have something that looks like the picture above
- Finally, click the "Ok" button
Adding Screw Holes
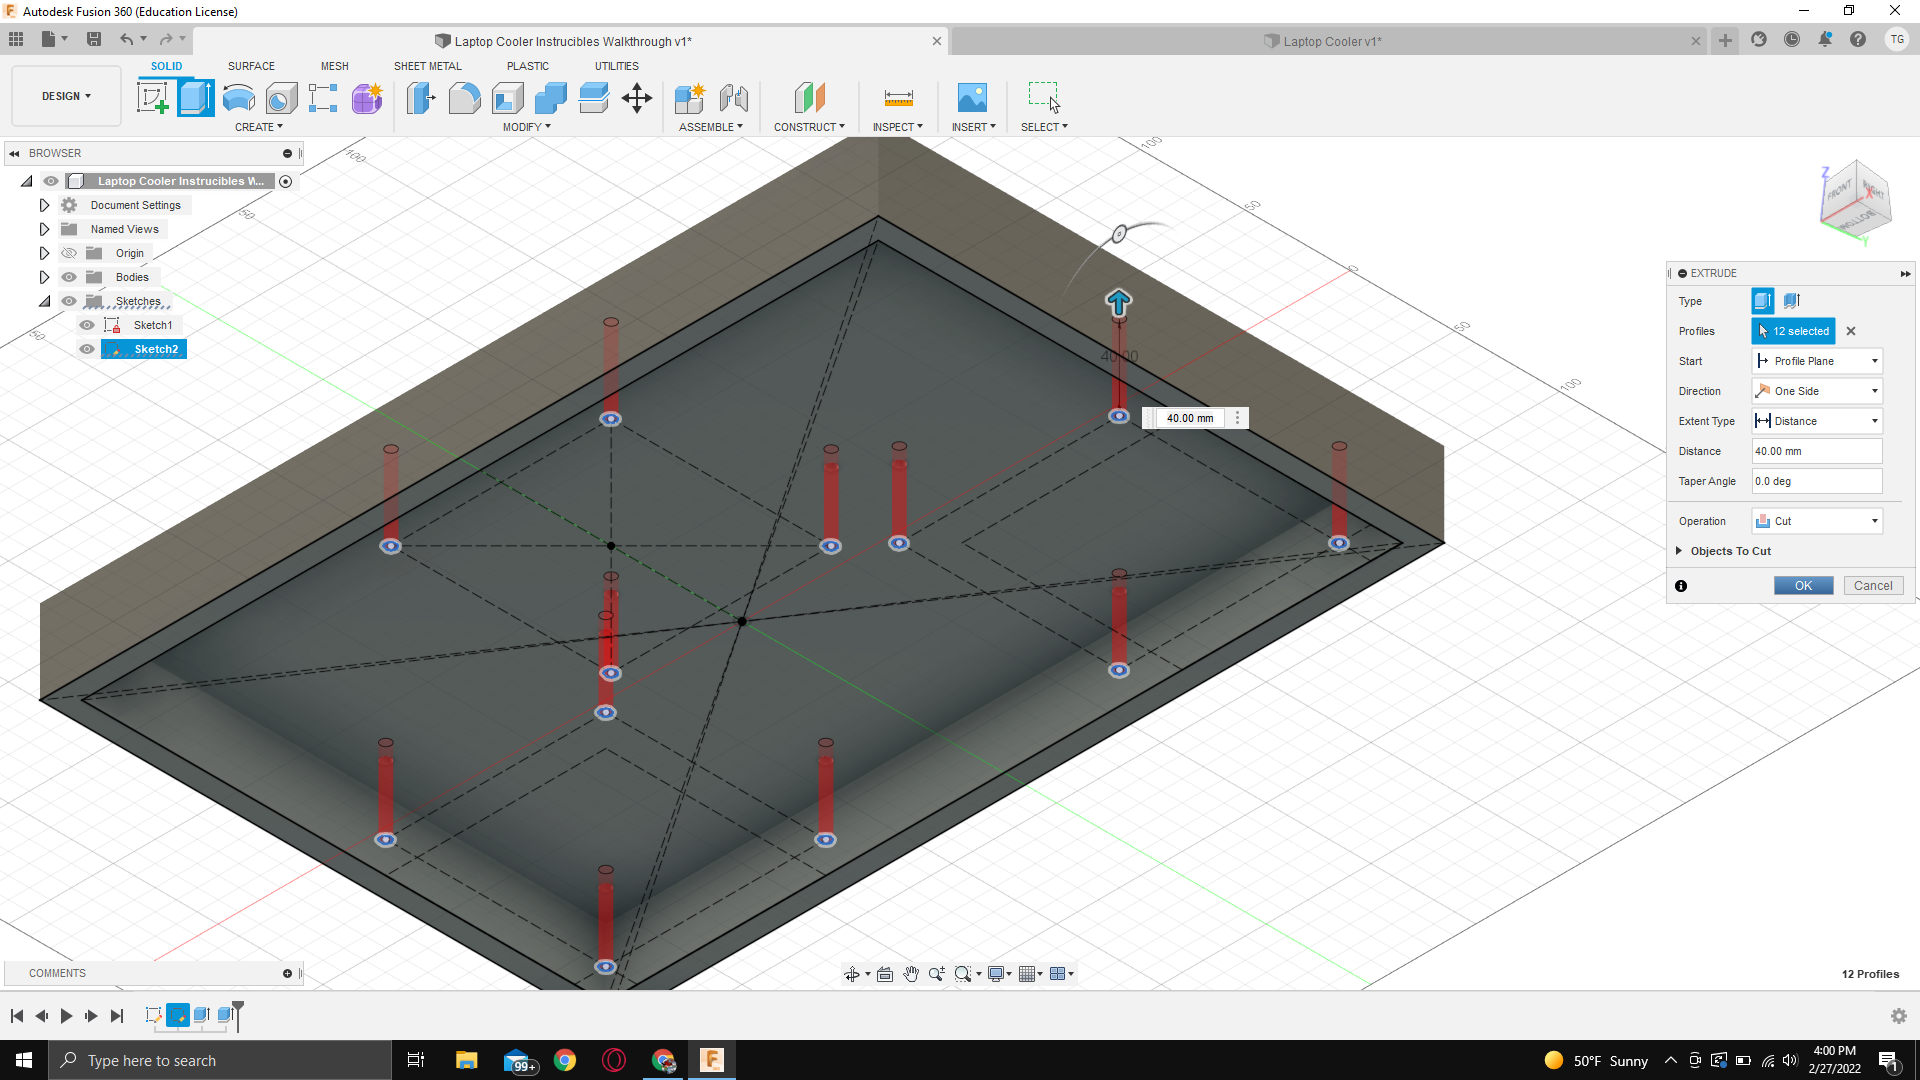
Rotate your screen until you can see the bottom again.
- Click the extrude button
- Select all of the circles on sketch 2, that we made earlier
- Change the distance to 40mm
- Change the operation to cut
- Hit the "Ok" button
Now you should have holes going through the top of your design
Adding Side Vents
Select New Sketch
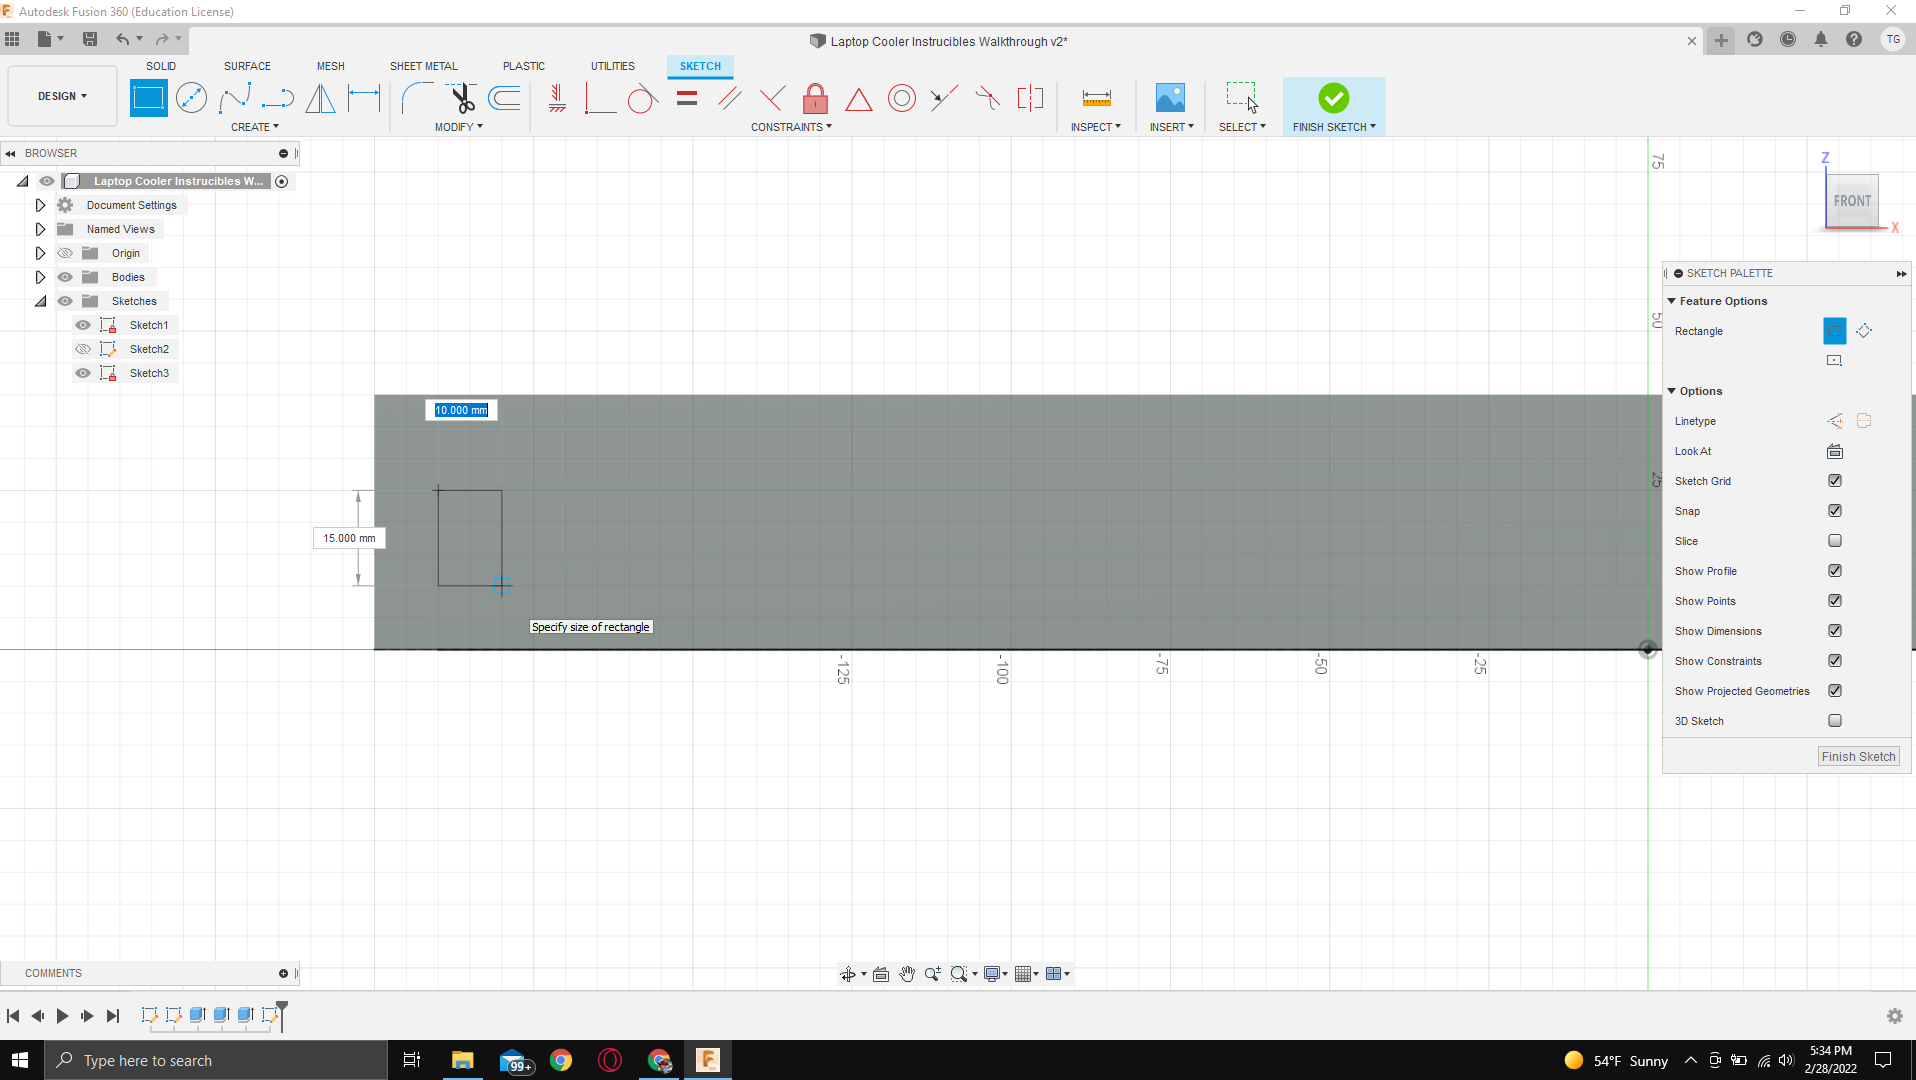
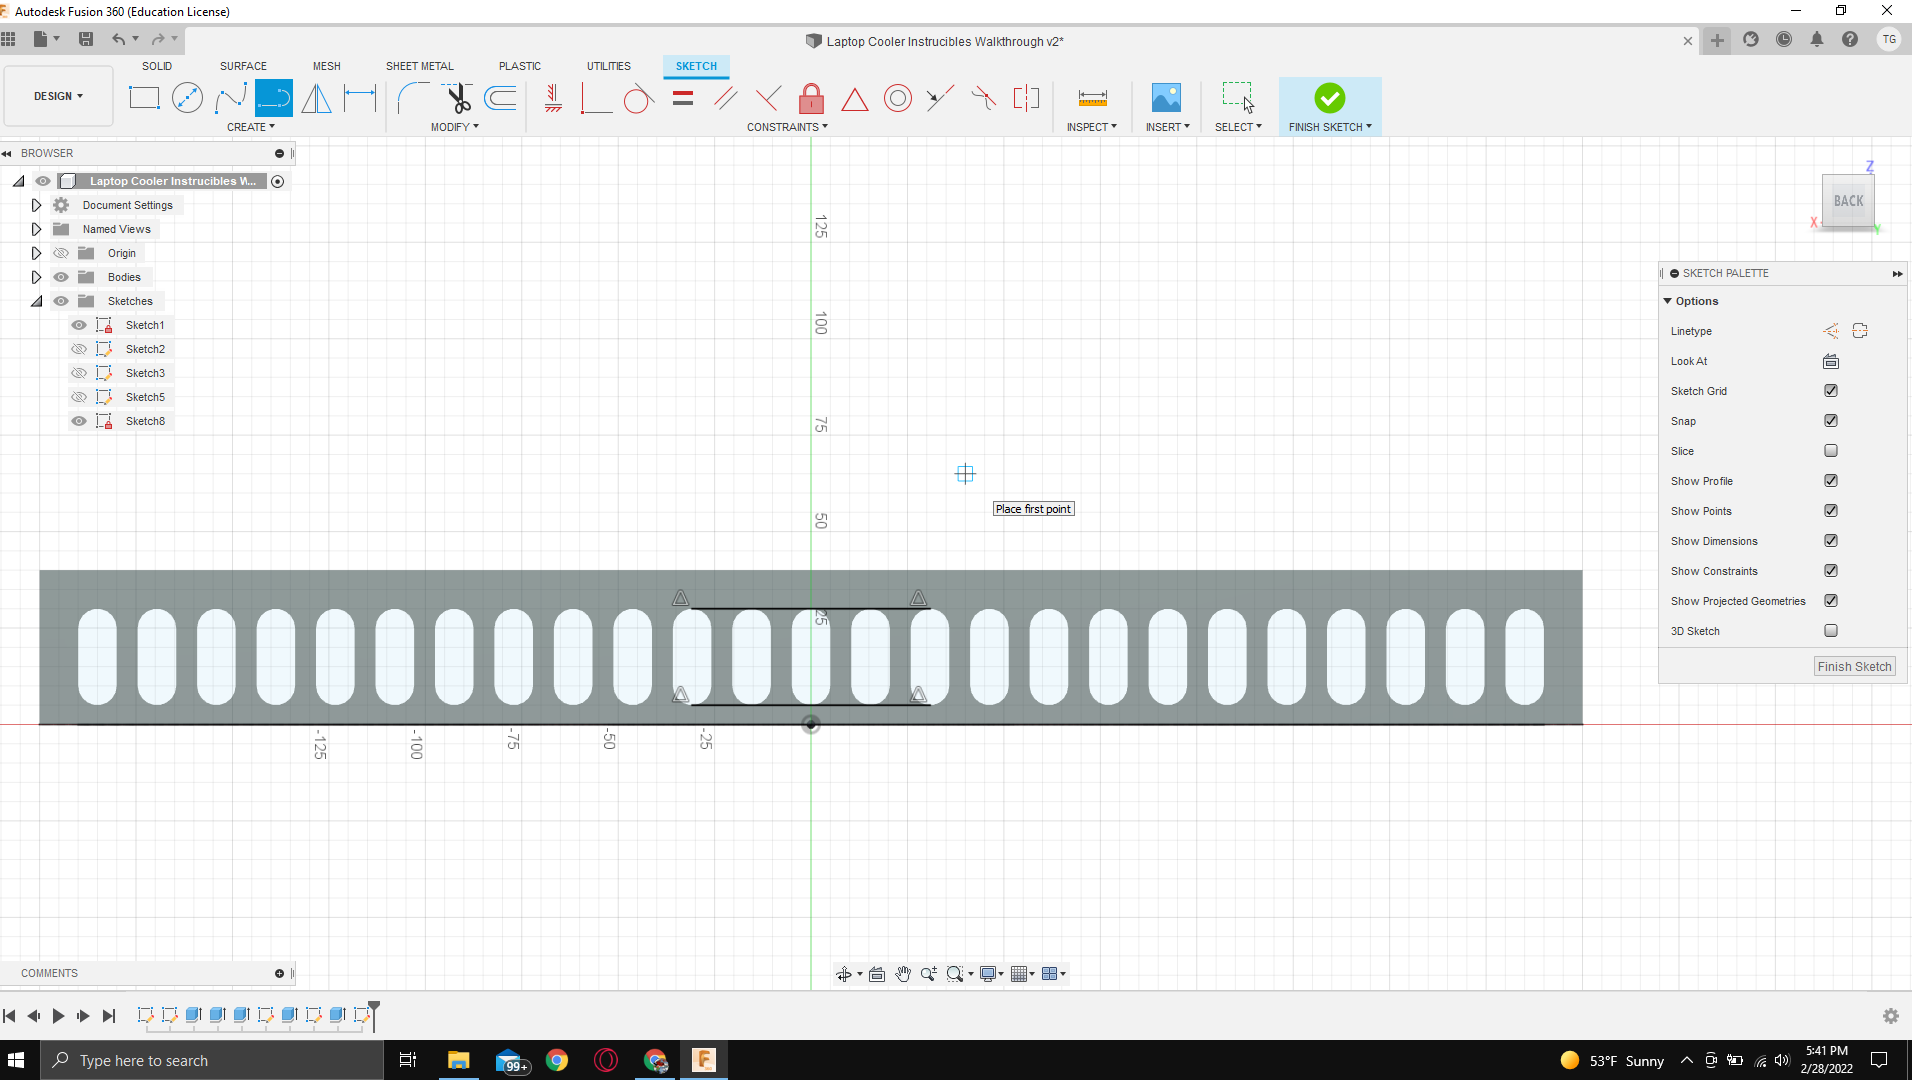
- Click a long, skinny side of the rectangle(as shown in the images)
- Draw a short rectangle with the dimensions of 10mm by 15mm(as shown in the pictures) Make sure this is 30mm away from the top and 20mm away from the bottom to ensure the plastic remains thick enough. Also, make it 10mm away from the right side. In this view, that is 2 squares exactly, however, the square size will change depending on your zoom.
- Hit "Enter"
- Create a new center diameter circle
- Click the middle of the top line to set the first point
- Click the top right corner to set the second point
- Do the same for the bottom
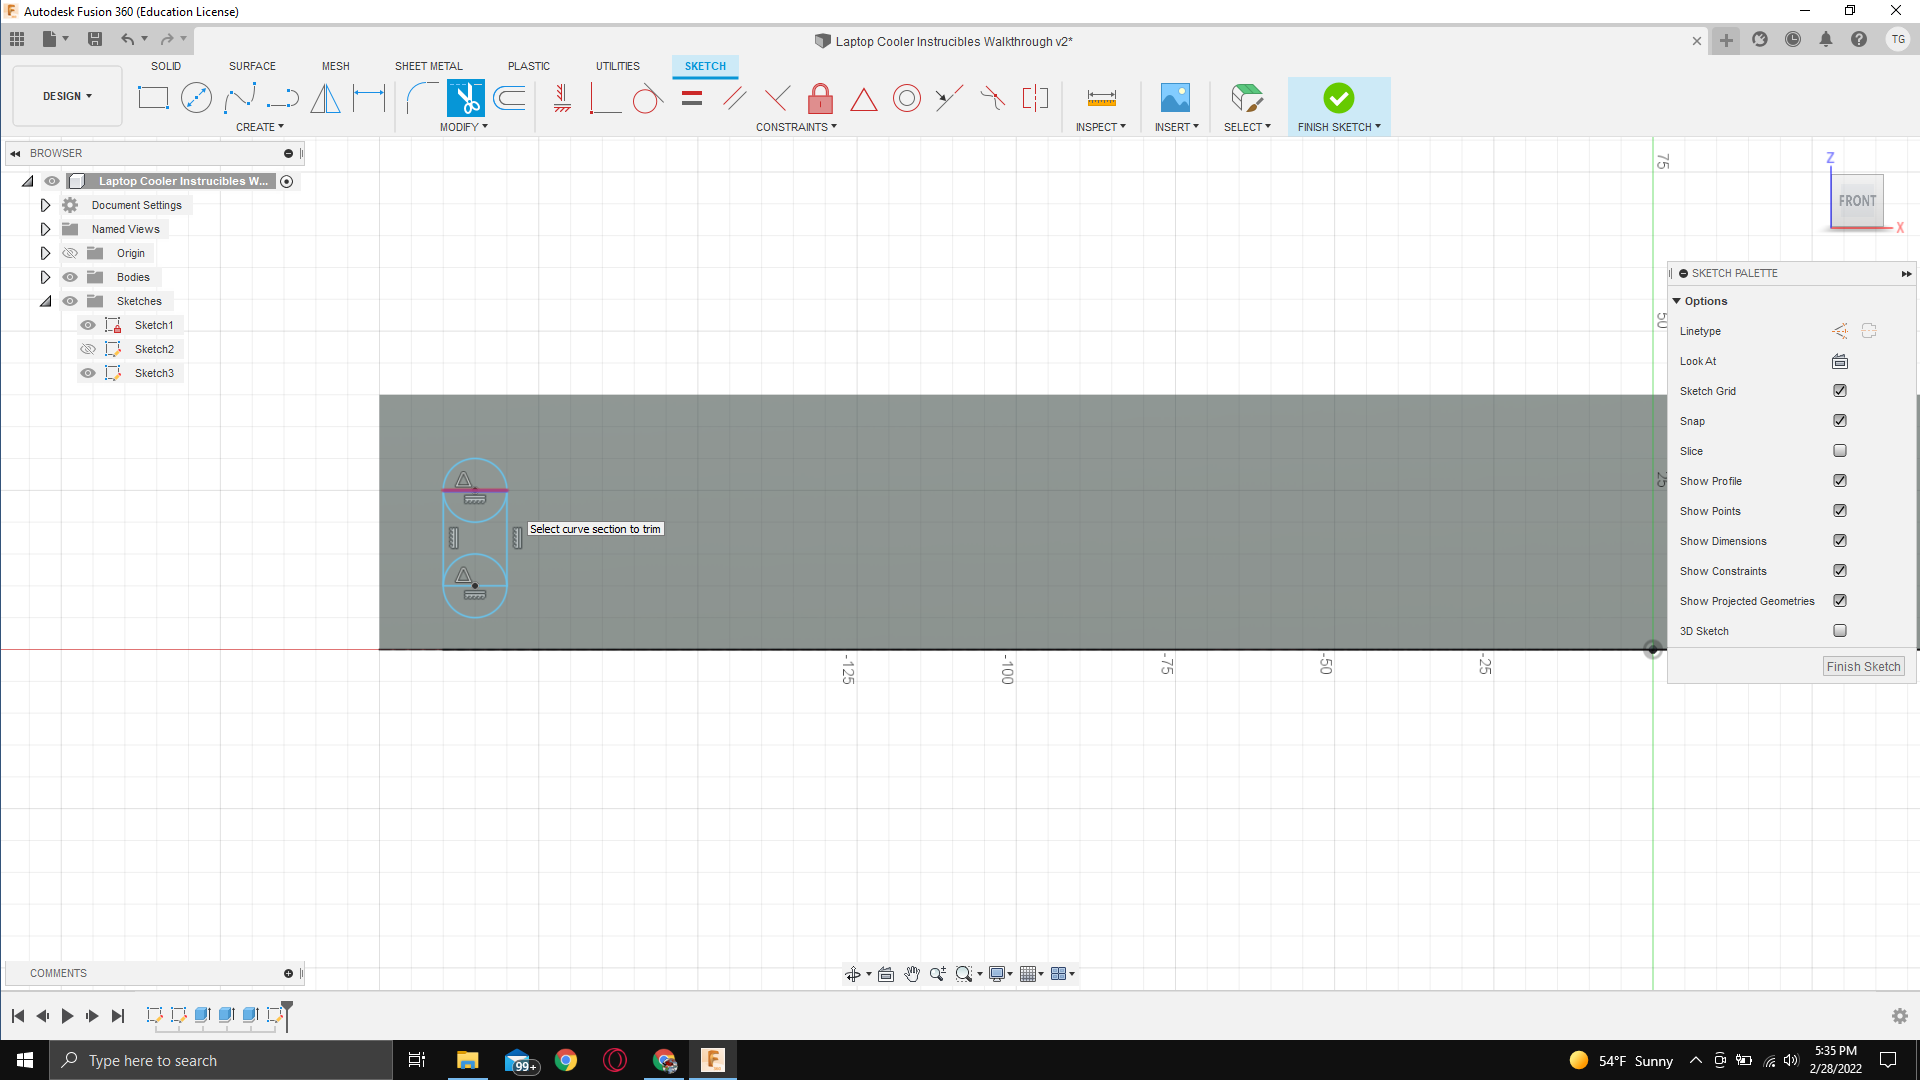
- Select the trim tool
- Click all of the lines of the rectangle and circle that are on the inside of the outer shape. You should be left with a long rectangle with a curved top and bottom(as shown in pictures)
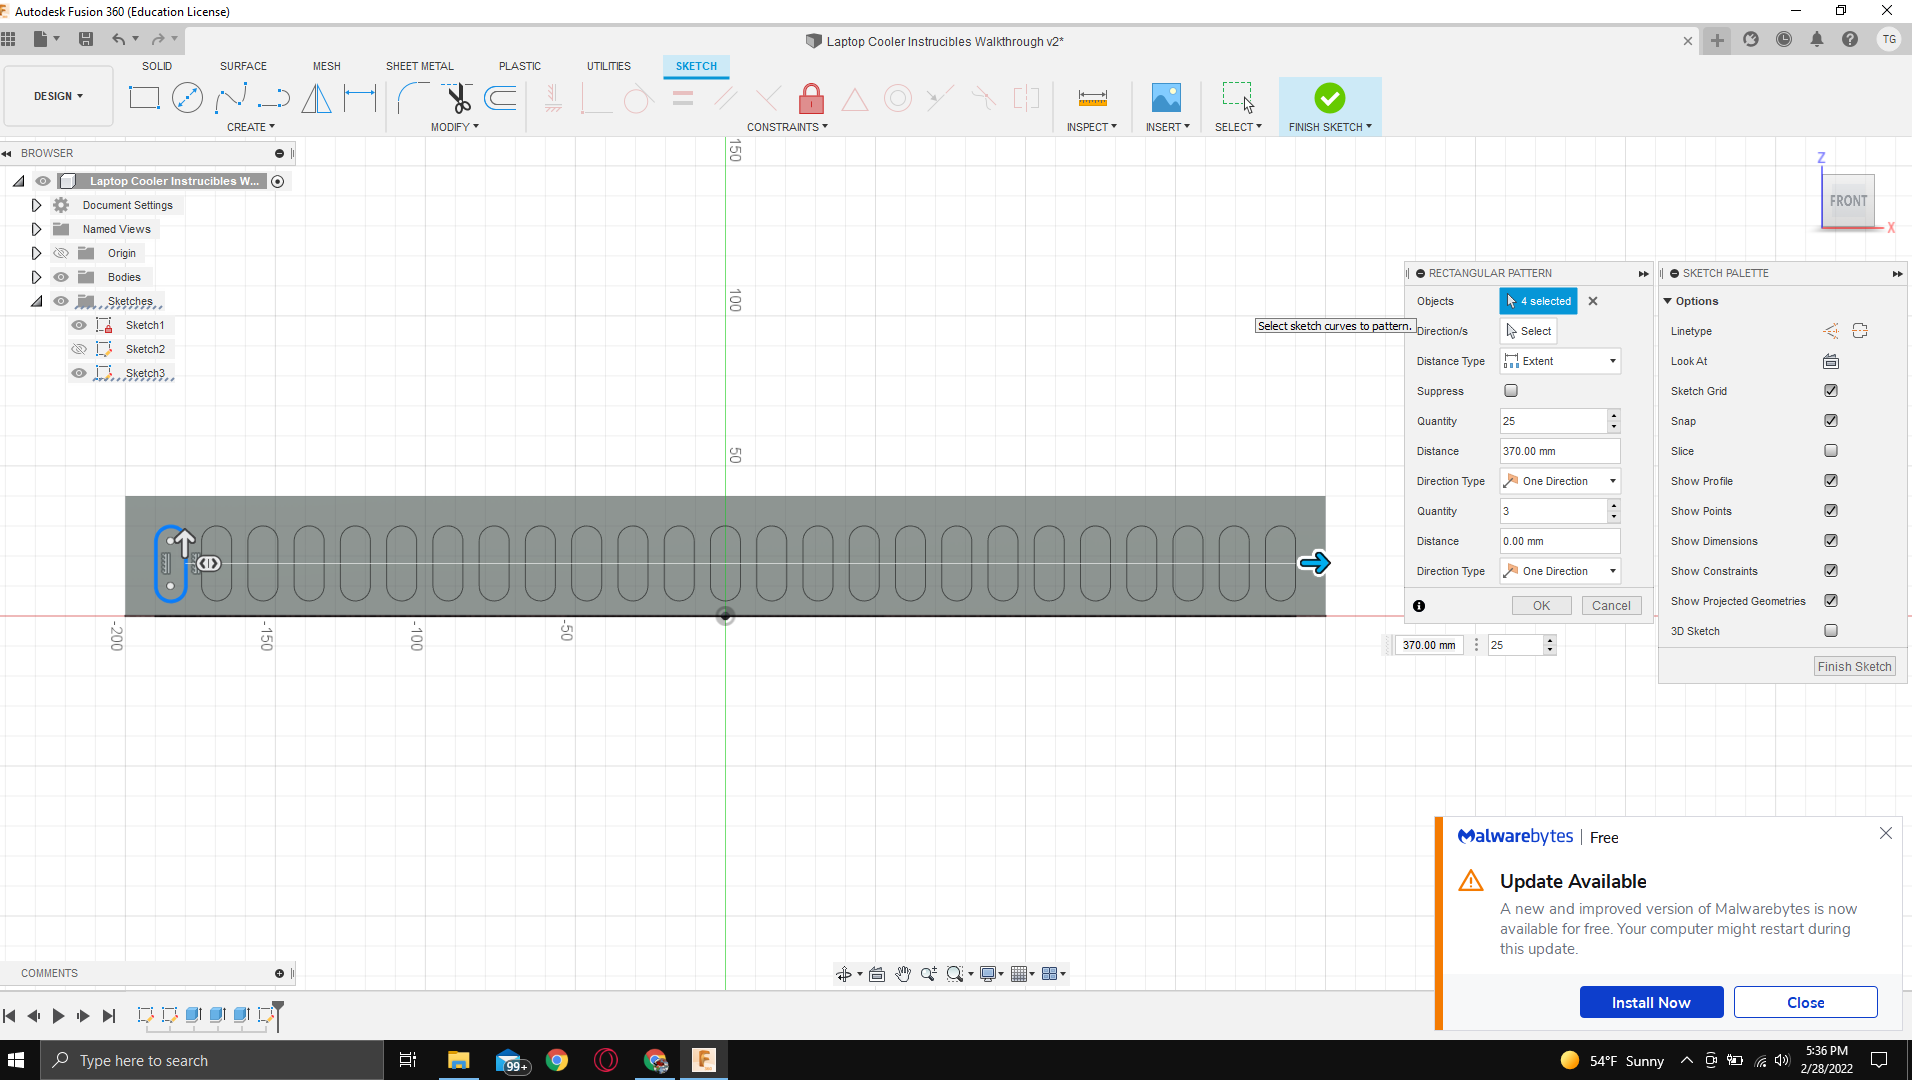
- Next, go to create, pattern, rectangular pattern.
- Change the "type" on the right panel to
- Then click on the curved top, bottom, and straight sides
- Then drag the right arrow until it is 10mm(2 squares) from the right side
- Next, change the "Quantity" of the repeat to something around 25 or until you're satisfied with the potential airflow. Remember, more holes equal more airflow, but less structurally sound.
- Click "Ok" then "Finish Sketch"
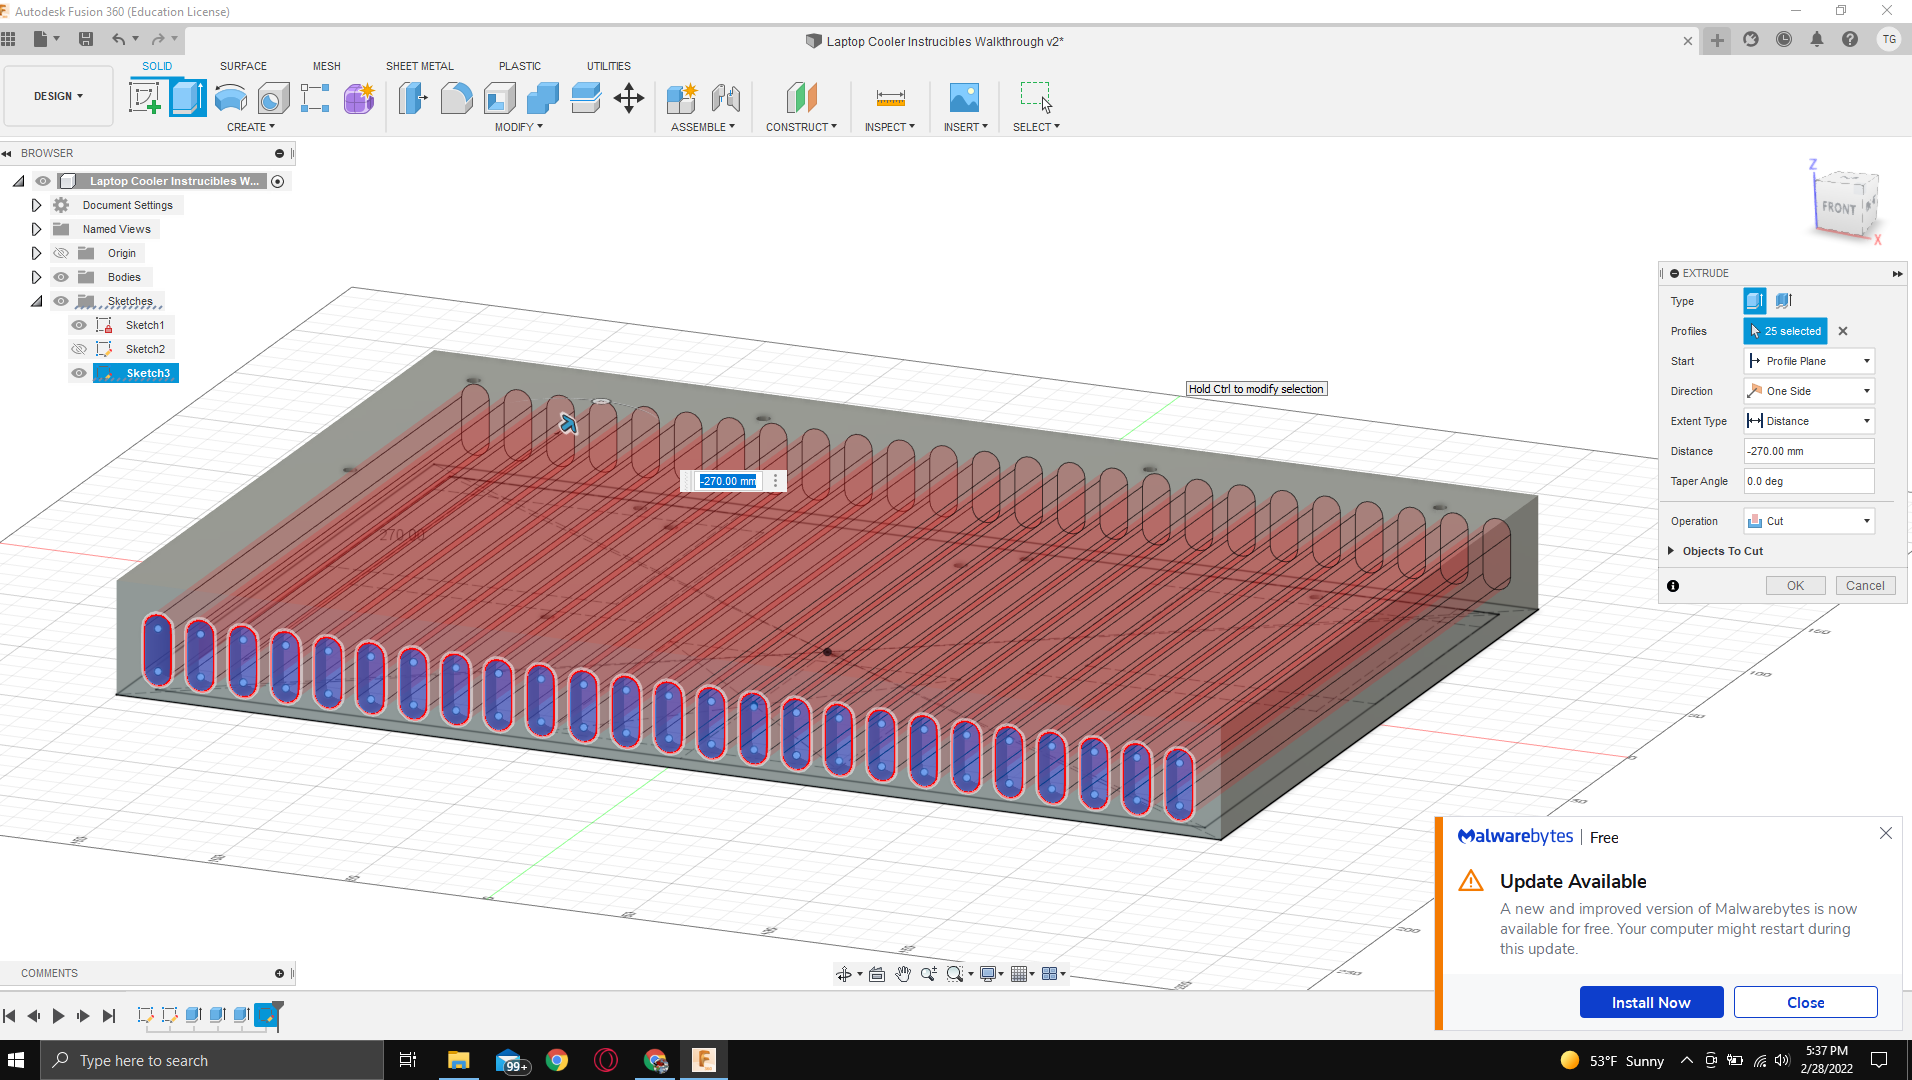
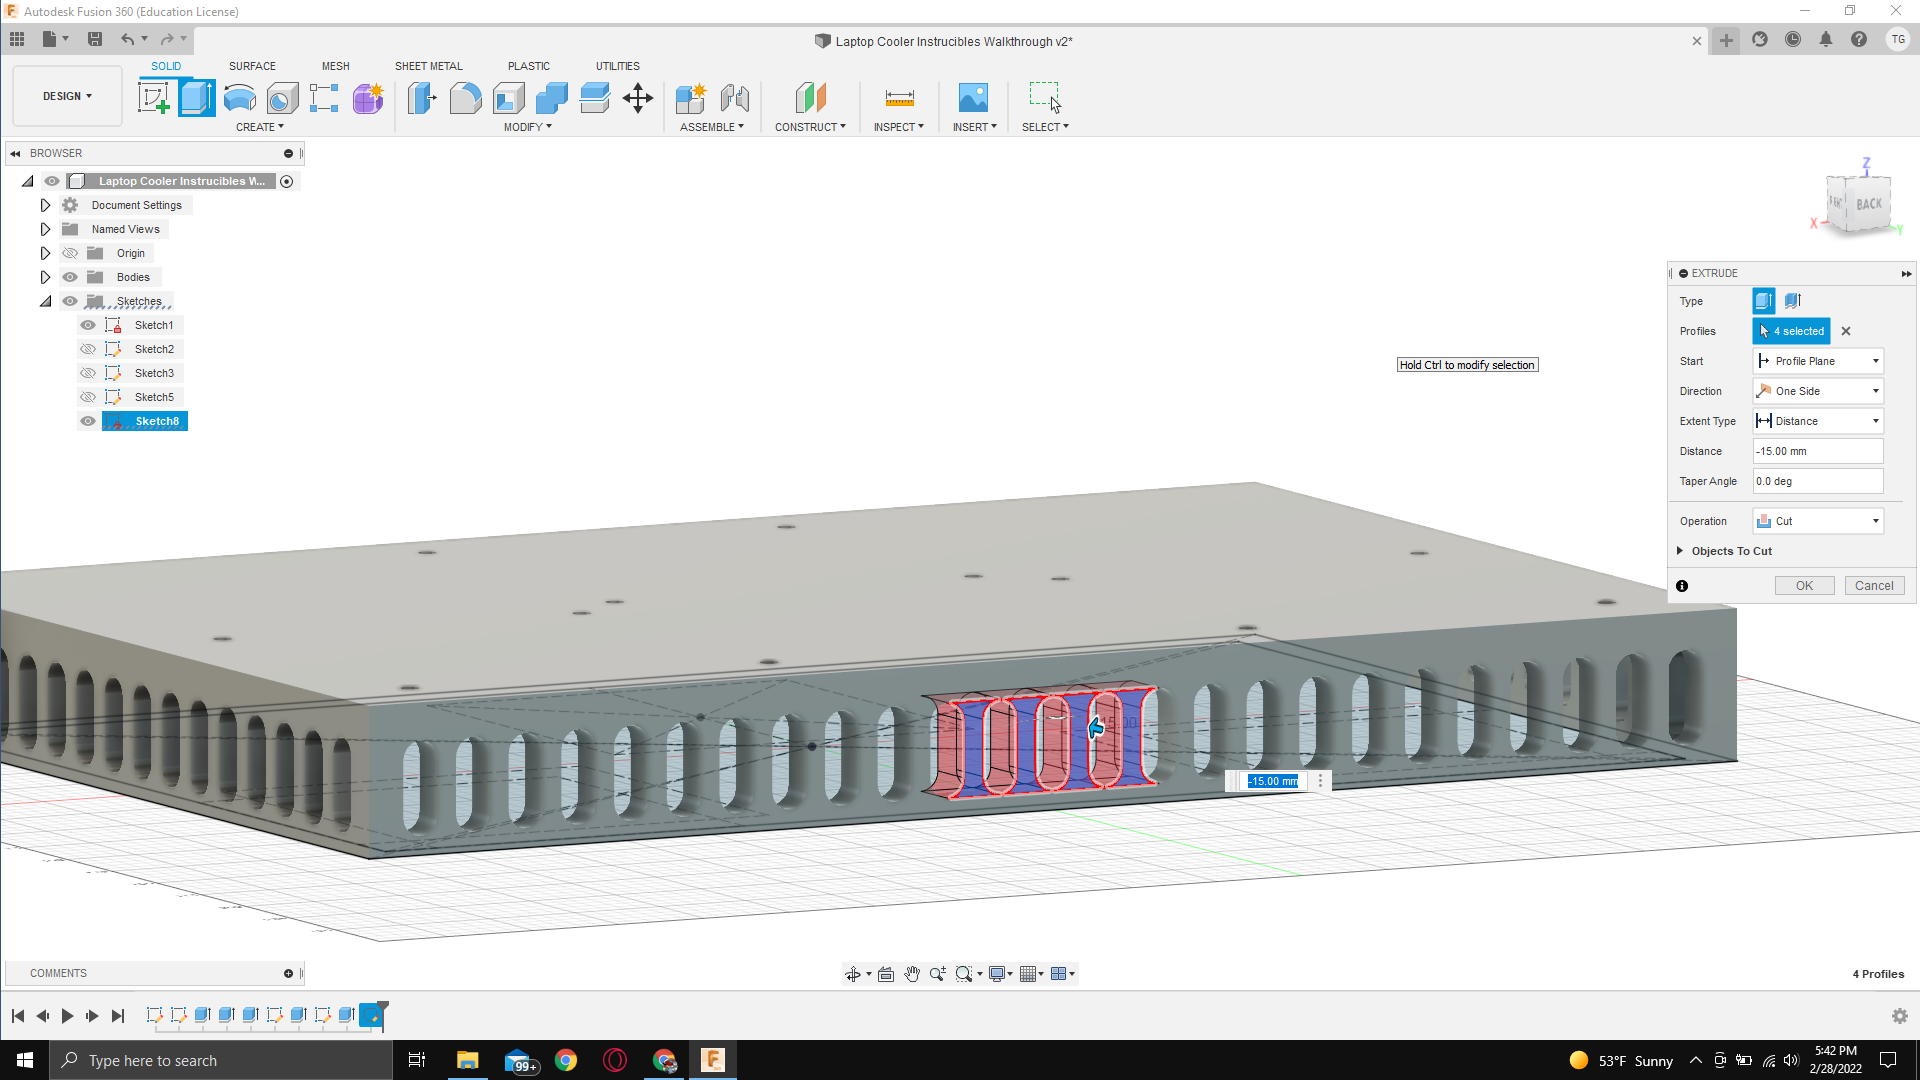
- Then Select Extrude, and click all of the insides of the shapes you have just made
- Set the distance to -270mm(depends which side you drew it on) and change the Operation to Cut
- When this is all set correctly hit the OK button.
- This should create holes the size and shape you want all the way through one side of the figure
Repeat steps 1-15 but on the shorter, skinny side of the rectangular prism. Keep in mind you should probably change the quantity of the Rectangular Pattern to something around 15 because this side is much shorter and can fit less shapes on it.
- Select extrude
- Click the insides of all the shapes you just made on the shorter side of the rectangle
- Set the distance to -400mm
- Set the operation to "Cut"
- Click "OK"
Now you should have the same size and shape cutting through your design both ways. Look at the pictures to see references.
Adding Back Hole

Watch the video to see how it's done. I wasn't sure how to explain it with words, so I showed how I did it myself.
Creating Fan Grills

Watch this video embedded. Sorry for the length and background noise. It just takes a bit to do this step and I didn't feel like writing it out. Like I said in the video, feel free to make your own designs, this is just a very simple one.
Touch Ups

Watch the embedded video for final touch-ups and customizations!
The End
Thank you so much for using my instructable, sorry I used videos at the end. It was getting late, and I was tired of wanting to finish this. This is my first instructable so tell me how I did by commenting on my youtube videos linked.
Thank you and have a great day!