Lady Gaga Cosplay - Making the LED Matrix Mask From the VMAs
by TechnoChic in Craft > Costumes & Cosplay
27791 Views, 154 Favorites, 0 Comments
Lady Gaga Cosplay - Making the LED Matrix Mask From the VMAs

Lady Gaga's LED Matrix Mask from the VMAs was inspirational. I had to make one!
In this instructable, I'll show you how I discovered the tech behind Lady Gaga's LED mask, tweaked the design to be more appropriate for cosplay, and created the sine wave code for the LED matrix. I've included links to all of my research, references, and code so that you can follow along and make one too.
Watch me make the mask:
When I started this project, I had never worked with an LED matrix before so I was super excited to have the opportunity to go into a second dimension! Another big first was working with spandex - I also build the entire bodysuit and learned a ton!
To see how I made the custom spandex bodysuit, check out the instructable here.
This LED Matrix Mask is part of this complete cosplay:

Supplies
I've included links to all of the supplies, and some are from Amazon. As an Amazon Associate, I earn a small commission on purchases made through the links above, and that helps me make more tutorials like this. Thank you!
Research


Build the Matrix of Matrices Display


Now that I had the example from Instagram, I made sense of it by sketching my own plan in my notebook. My first task was to clip the mounting holes off of the matrices with wire cutters and sand the edges so that all 9 matrices would sit flush together perfectly.
Solder the LED DotStar Matrix


I taped the matrices to a piece of cardboard to keep them in place and soldered them together according to my diagram. I also added the microphone and an Itsy Bitsy M4 Express to control the display.
Here's a diagram of the whole circuit:

Follow the Example LED Matrix Code


I followed the Adafruit DotStarMatrix Library setup tutorial to test and orient my matrix correctly.
It was helpful to test with a color wipe to be sure that all pixels were operational and showing in the correct order. This was a bit of a tedious process but the tutorial helps with this.
Code the Sine Wave - Processing


To learn to create the sine wave animation, I started with what I knew - a program called Processing. I followed this example by Daniel Shiffman to learn the concept of coding a sine wave. I recently discovered that he also made a video about coding sine waves on his YouTube channel - here's the link to the video.
You can also view my code that makes a pink sine wave in Processing here.
Code the Sine Wave - Arduino


Now that I had a sine wave on my computer screen, I translated the concept into Arduino. To do this, I used the Adafruit GFX library for Arduino to create the graphics on the display.
Once I had a sine wave moving on the display, I made it respond to the signal strength of the microphone.
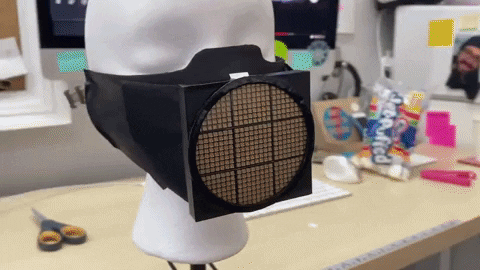
Create the Project Enclosure


It's build time! Lady Gaga's original mask was 3D printed, but I don't have a 3D printer, and that's totally ok because I love making things from cardboard! So, I recreated the box around the display with cardboard and vinyl. I cut the pieces out of cardboard first.
Add Vinyl to Make It Look Like Plastic


Then, I added vinyl. The ring was shiner than the box so I used shiny black vinyl to cover the ring and matte black to cover the box.
Add Cosplay Foam to Make the Mask


I cut a piece of cosplay foam to make the part of my mask that touches my face, and two more pieces to make the LED matrix stand off of my face a bit.
I glued the two side pieces to the matrix box and sewed those side pieces to the main mask piece. While sewing, I created a path for the power cable to escape on one side so that it could run down my back to a battery pack sitting inside my belt.
Add a Reset Button

I realized that the tiny reset button was hard to reach with the mask on my face, so I added a larger button to the bottom so that I can easily press it while wearing the mask.
Finishing Touches


To finalize the mask, I added black spandex to the sides to match the fabric look of the original and a white square of vinyl because Lady Gaga's mask had a white reflector on top.
I added a standard USB battery pack to my belt and plugged in the mask.
Rock Out!

And I was ready to rock!
I hope you enjoy this tutorial! If you want to see more of my work, you can follow me here on Instructables and on Instagram and YouTube - Please Subscribe! You can also buy tech-craft kits designed by me at TechnoChic.net.

Thank you!
:)