LOG Arduino Sketches 101
So this Lazy Old Geek (LOG) gets bored sometimes and wants something to do. Actually, sometimes I get tired of trying to solve hardware problems, which are sometimes software problems. So I decided to do a tutorial on Arduino sketches.
What is a Sketch? I’m not sure where the term Arduino sketch came from but it is basically the program or code that is written to tell an Arduino what to do.
There are already some great tutorials on sketches. Here’s a couple of great ones:
http://www.ladyada.net/learn/arduino/lesson2.html
http://arduino.cc/en/Tutorial/Sketch
For some readers, the problem may be that they go into too much detail too fast.
TIP: Since I’m old and can’t remember things as well as I used to, this is my goto reference when I’m writing sketches:
http://arduino.cc/en/Reference/HomePage
Sketches 100
For beginners to Arduino, here’s some basic things you need to know.
Requirements:
Arduino, e.g., Arduino UNO
Personal computer (I’m only going to talk about Windows)
USB cable, one that will connect to the Arduino
Arduino software (environment), get it from:
http://arduino.cc/en/Main/Software
Download it and install it on your computer.
Technobabble: Yes, I know there are a lot of variations on these requirements, but I’m LAZY.
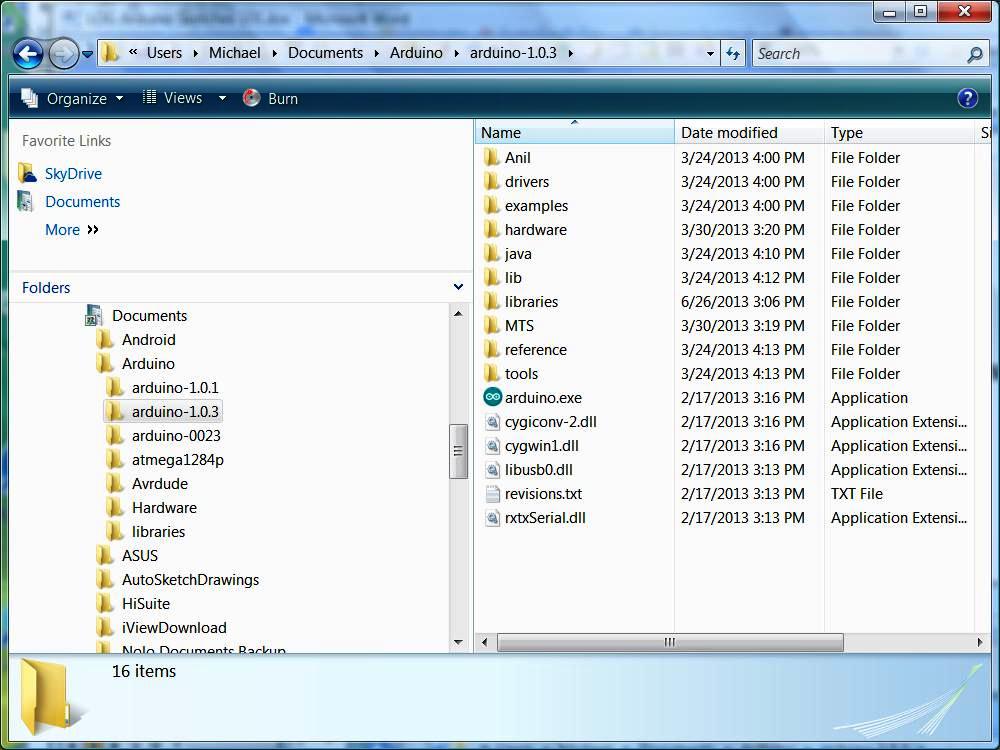
So this will (probably) create a directory under your ‘Documents’ called Arduino and a subdirectory named Arduino-1.0.3 (or whatever version you downloaded) and a bunch of subdirectories. I call this the Arduino environment.
One of the files is called Arduino.exe. (see picture)
Suggestion: I would right-click on Arduino.exe and ‘send to desktop’. I even changed the name to Arduino.exe-1.0.3 as I have a couple of versions I use at different times.
WARNING: Some sketches, especially those written before version 1.0 will not work on newer versions.
Notice that I have a directory called ‘MTS’. This is where I create most of the sketches I write. I have this directory under Arduino-1.0.3 as that is where I developed it and ‘know’ that it works.
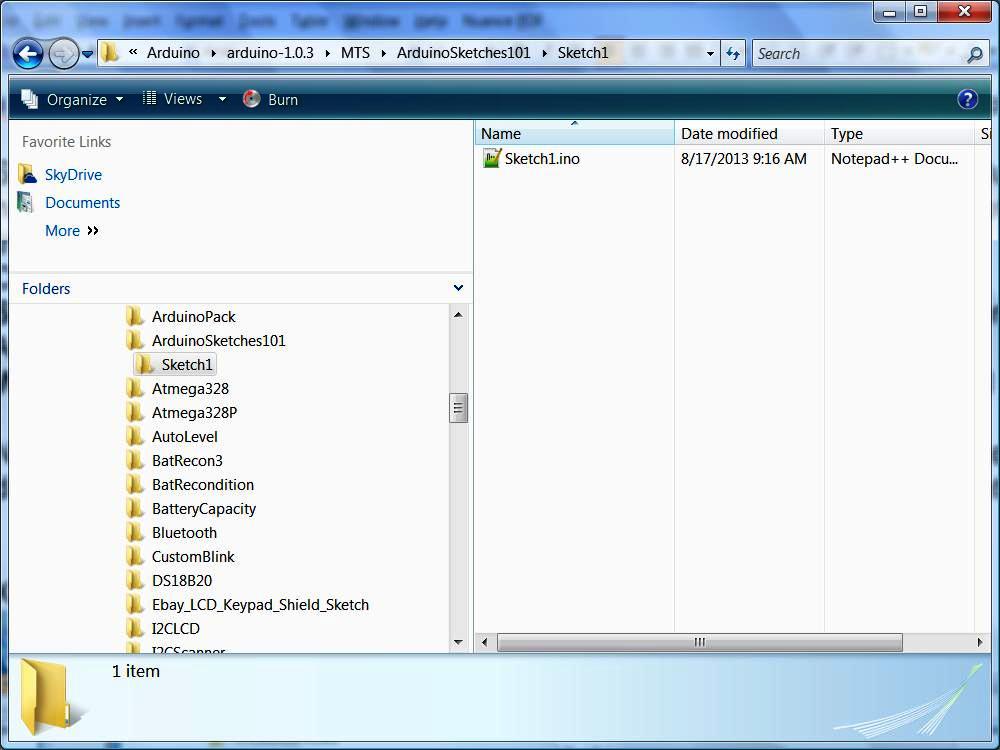
The next picture shows the location of a sketch, Sketch1.ino.
TIP: Arduino sketches all have the file extension of .ino or .pde. I think this is required for them to work. I don’t know (or care) where they came up with these extensions.
TIP: Notice that Sketch1.ino is under a directory called Sketch1. This is important! When writing sketches they must be in a directory with the same name as the sketch and capitalization is important. If memory serves me the name cannot start with a number.
Writing/editing Sketch files: Sketch files are text so they can be edited using Wordpad. (For some reason when I tried Notepad, the line feeds weren’t there). You can also use other text editors. Now I like to use a free text editor called Notepad++:
http://notepad-plus-plus.org/
Technobabble: Sketches are text files written in Arduino language. The Arduino language is basically C++.
Arduino Environment
So let’s start.
Connect the USB cable to the Arduino and to a USB connector on your computer. Most likely you will see some LEDs blinking on your Arduino.
TIP: You may need to load the driver for the USB. There is a driver subdirectory under your Arduino-1.0.3 directory.
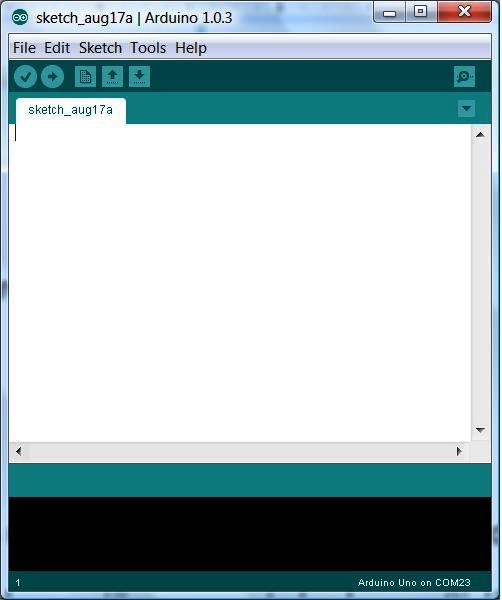
Click on that Arduino.exe icon. You will see something like this: (see picture)
The next thing you will want to do is click on Tools and select Serial Port. Unfortunately, I don’t have a screen saver to capture this).
Technobabble: Serial port? Those went away years ago. Well, not exactly. USB stands for Universal Serial Bus. This USB driver actually emulates the ‘old’ serial ports of the good ole days.
So you may see only one serial port listed and it will be checked. Yeah, you are in luck and don’t have to figure out which serial port is connected.
But sometimes, I have a bunch of stuff connected and have to figure out which serial port is the right one. If you just connected your Arduino, it’s probably the largest number.
TIP: If you disconnect and re-connect your Arduino, you might have to close and open Arduino.exe. Sometimes you might have to restart your computer.
The next thing you need to do is click on Tools and select Board. Now a list of Boards will appear. Select the one you are using, e.g., Arduino UNO.
The Simplest Sketch
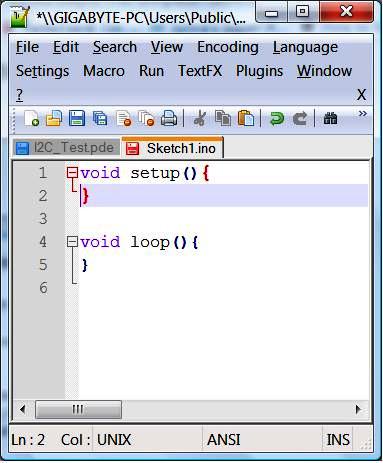
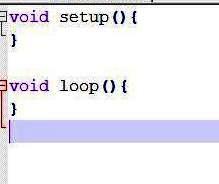
The first picture shows the simplest sketch. It’s not even worth loading as it doesn’t do anything. But it’s a good learning step.
The Arduino language is very strict. When you have a ( you must also have a ) . When you have a { you must have a } .
All Arduino sketches require everything in this one to be there. There may be a bunch of code before void setup(). There may be a bunch of code between both of the { } s and there may be code after the last } but all of these needs to be in there somewhere.
WARNING: Capitalization is important. If you capital Void or Setup or Loop, it will not work.
TIP: While capitalization is important, spacing and line feed are not (usually). You could have:
void setup(){} void setup( ) { }
void setup()
{
}
It doesn’t care.
TIP: void setup() everything between this { and this } is only run once.
TIP: void loop() everything between this { and this } is run repeatedly until power is removed.
Technically, this is not always the case, you can write the program where it gets stuck inside loop().
TIP: anytime you see a ‘word’ followed by (), that means it’s a function, e.g., setup(). A function is a group of instructions that do something specific. Sometimes it’s preceded by void and sometimes by something else. Sometimes there is stuff inside the ().
Technobabble: If there’s stuff inside the (), the stuff is called parameters. Parameters are information used by the function.
Technobabble: If the word preceding the function is not ‘void’, that means the function returns some information.
e.g., int addTwoNumbers( int x, int y) could be a function that takes the numbers, adds them and returns the results.
The thing that’s nice about a function is that you can call it many different times with different parameters and different results. E.g., z= addTwoNumbers(7, 4), z is 11.
E.g., z= addTwoNumbers(33, -4), z is 29.
Second Sketch
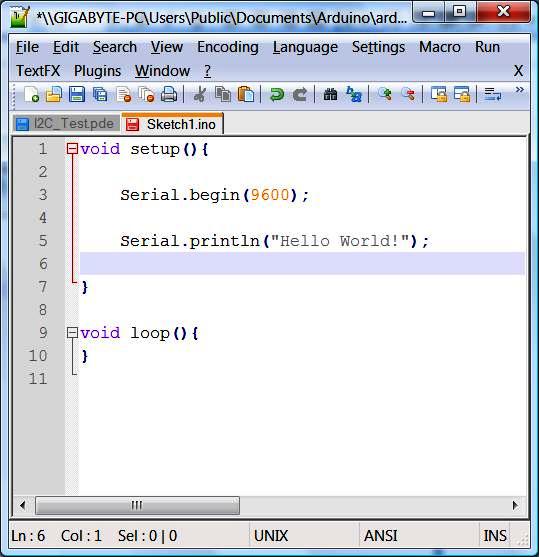
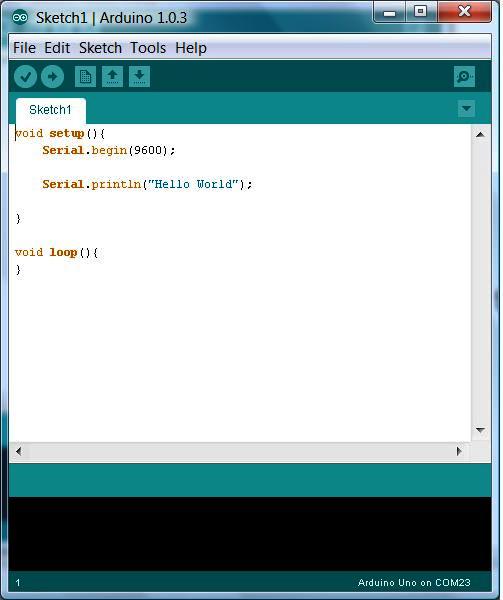
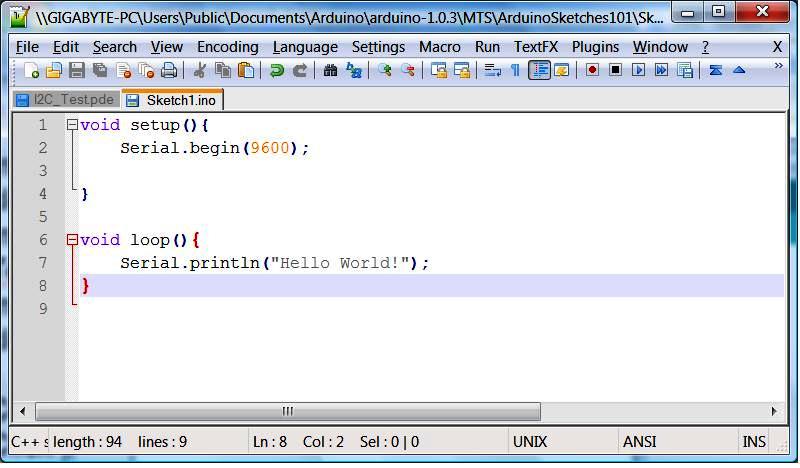
So let’s do something. Instead of starting with the usual blink.ino, I decided to start with the traditional Hello Word. (see picture)
Okay, assuming you wrote this and saved it into a file. Let’s load it.
Sketch comments: Notice that the two new statements are between the { } of the setup() function.
Sketch comments: The first line is Serial.begin(9600);.
Since all of you readers are so alert, you know that this is a function. (The .begin means it’s a function in the Serial library. ) This function is already in one of all those files you unzipped.
The 9600 is a parameter passed to the function. In this case it’s the serial baud rate (the speed at which the communications occur. So how do I know that this means baud rate? In this case, I would look on the Arduino website and find this:
http://arduino.cc/en/Serial/Begin
Note also that Serial is capitalized.
And don’t forget the all important semicolon ;
All code statements need to end with ;
Technobabble: The Arduino language is based on the language C++ which is based on C. Most programming of microcontrollers and microprocessors is done in some variation of C. C and C++ statements are very close to the way micros work so the compiler code is much more compact than what you would see in most languages. I am fairly certain most Windows operating systems were written in a variation of C.
Technobabble: I have to mention why it’s called C++. One of the new operators in C++ is ++. What this means is increment. So C++ is an increment of the language C. Oh, those programmer geeks are so clever.
Connect Arduino and start Arduino.exe, set/check Serial port and Boards.
Click on File, then Open and navigate to where you have the sketch (sketch1.ino), then click on it. (see next picture)
Okay, this shows your sketch.
TIP: You can actually edit the sketch using the Arduino environment but it doesn’t allow you to easily save it. However, this is a good way to make minor changes to try to get things to work.
The next step is verify and upload. In the upper left corner, there’s a row of icons. The first is a check mark called verify and the second is an arrow called upload. I would call them compile and compile and upload. I always click on the upload arrow as it automatically does the compile first then the upload. This saves me a mouse click and saves me from getting carpal tunnel syndrome. HA! HA!
Technobabble: So what is compile? Many of you know that Arduinos only speak 0s and 1s or more exactly 0v and 5v. For those of you who don’t, you should read my Computers Are Dumb:
https://www.instructables.com/id/Computers-are-Dumb/#intro
So what compiling does is convert the Arduino language to machine language that the Arduino microcontroller can understand.
Hint: When you select the Board type, you are actually selecting the microcontroller type. There are several.
While it is compiling, it is also looking for syntax errors. Syntax errors are like grammatical errors like a missing paranthesis ( or semicolon ; or misspelling or wrong capitalization.
If it finds an error, it will tell you by but putting a red message at the bottom of the Arduino screen.
Upload: So if the compile is successful, upload sends the machine code over the USB to the Arduino and actually starts running the program.
Results: In the Arduino environment, on the line of icons, there’s one all the way to the right. I don’t know what the symbol is supposed to be but it’s the serial monitor.
Click on it.
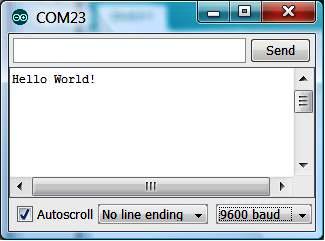
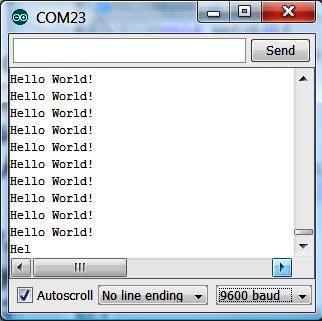
Another window will open up. This is the serial monitor(see picture). On the bottom right, click on the down arrow and select 9600 baud (so that it matches up with what we put in the program)
The “Hello World!” will show up on the serial monitor screen.
HINT: Whenever you start or restart the serial monitor, the program in the Arduino restarts.
How did it work? The Serial.begin(9600) opens up the serial port and sets the baud rate to 9600.
The Serial.println() sends whatever is between the quotes to the USB connection.
The serial monitor sees it and puts it on the screen.
VOILA!
Okay, that was too easy. I’m going to make one simple change (see picture).
Can you guess what’s going to happen?
TIPS: The first picture is Notepad++. Under Language, I selected C++. Please note that some of the words are in color. I think the purple means a keyword that has special meaning to C++(and Arduino).
Also note if you highlight a parenthesis or bracket, it will highlight the corresponding one. Numbers are in orange and text is grey. This can be helpful if you’re writing code.
Here’s the results(see picture). Can you explain the difference?
Hint: Read the Tips in the last step.
Blink.ino
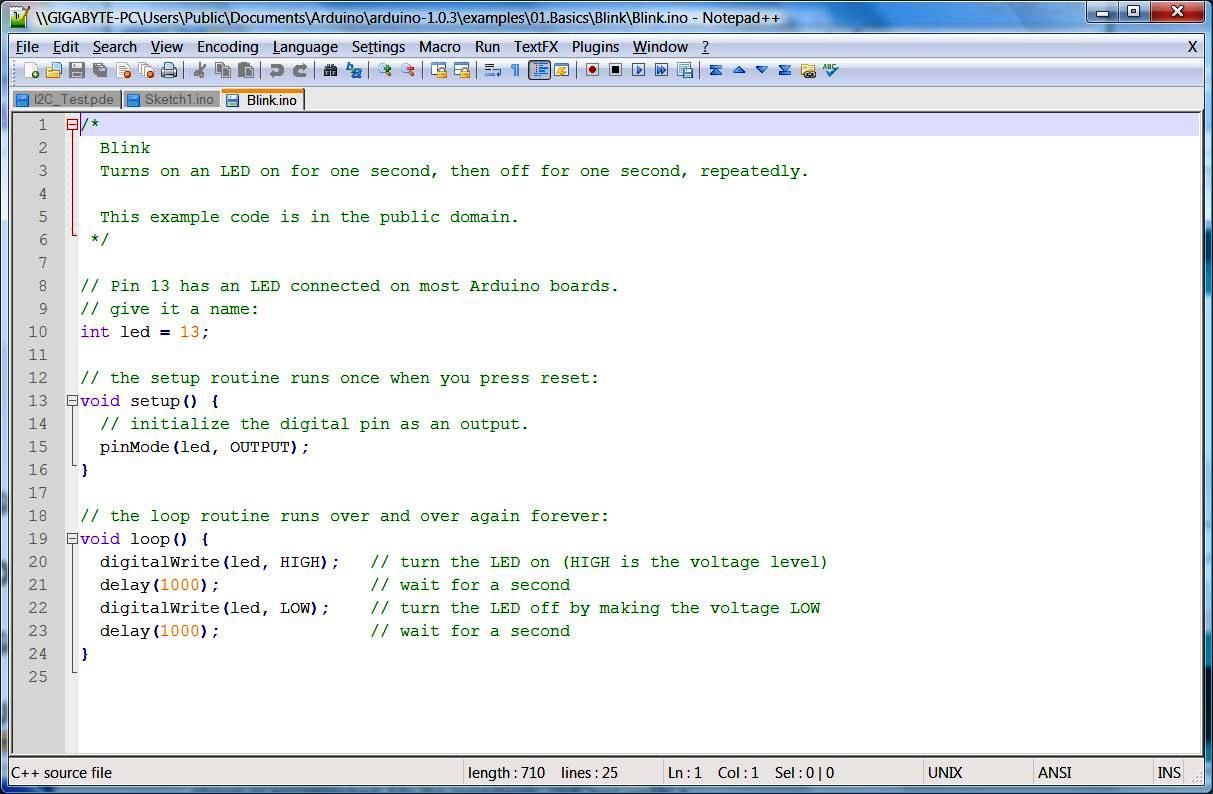
Okay, Blink.ino has got some new stuff to learn.
Since this is already in the environment, you don’t have to write it.
Under File, select Examples, carefully move over to 01.Basics and select Blink(see picture)
TIPS: /* and */ are like parentheses, ( and ). They need to come in pairs.
Comments: Anything after /* and before */ is a comment. As in this example this can extend over several lines. (Notepad++ puts them in green). Comments are ignored by the compiler and they are not sent to the Arduino.
So what good are they? Well, they make the program more readable. Good programmers add lots of comments so that anyone reading the program will have a better understanding of what is going on. And it is helpful to the programmer when he is troubleshooting a program or trying to remember what he/she was doing, two years ago when he/she first wrote the program.
TIPS: // is also a comment. (This one may have been added in C++). These are a little different. They only extend to the end of the line and you don’t need to have a matching pair at the end. These take only two keystrokes instead of four, so again less carpal tunnel syndrome!!
Technobabble: Lots of programmers don’t use the former but I like to use them when troubleshooting and you want to skip over a large section of code.
int led = 13;
Variables: This simple little line introduces variables. Instead of telling you what a variable is, I’m going to tell you how it works. One of the things a compiler does with this is whenever it sees led in the sketch it replaces it with 13.
So you may ask, why not just put 13 in instead of led in the first place.
There are two good reasons:
1. When someone reading the program sees led, it makes more sense than 13. It gives you a better idea of what the program is doing.
2. Let’s say you use 13 instead of led in ten places in your code. But you decide to change it to led = 10. If you had 13s in your code, you would have to find all ten places and change them all. Plus you might come across a 13 that doesn’t refer to led and change it by mistake. This way you only have to do it in one place.
TIP: Variables are case sensitive.
So what is the 'int'? It is the variable type. Remember computers only deal with 0s and 1s. See:
https://www.instructables.com/id/Computers-are-Dumb/#intro
You need to tell it what the 0s and 1s represent and how much space they take up. An int is an integer, a number with no decimal point. (And it can be negative as opposed to an unsigned int). On the standard Arduino, the int is 2 bytes (16 bits). This limits it to from -32,768 to 32,767.
Technobabble: If you are a curious Geek and wonder where these values came from, you can look up binary math and 2’s complement math.
By the way, the size of an int varies widely in C and C++ depending on the compiler. There’s even a 4 byte int in the Arduino world (Arduino Due).
So you should know what setup() is.
pinMode(led, OUTPUT);
This is specific to the Arduino. It tells the microcontroller that a certain pin (designated as D13, in this case) will be set as an output pin. This only needs to be done once so it’s in setup().
loop()
digitalWrite(led, HIGH); // turn the LED on (HIGH is the voltage level)
This is an Arduino specific function with two parameters. The first tells it what pin to use. The second tells it to set it HIGH (5V) or LOW (0V). The white space after the ; and the comment is ignored by the compiler.
TIP: Note capitalization on all of these functions and defined parameters. I can’t remember them so often refer to: http://arduino.cc/en/Reference/HomePage
delay(1000); // wait for a second
Another Arduino specific function. The program generally runs one step after another. When it sees the delay(1000) it will pause for one second (1000 milliseconds) before going to the next step.
You should probably have a good idea what the next two steps do.
Summary: The program turns on the LED, waits 1 second, turns off the LED, waits 1 second.
Then it repeats this process over and over ( loop() ).
For Loop
A For loop is good for doing the same thing many times.
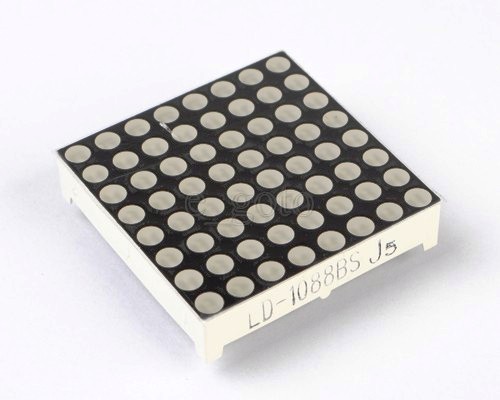
Example: Suppose you had an 8x8 LED like the one in the picture and you wanted to turn them all on at the same time. A For loop is the best way to do this. (Actually, you would use a For loop inside of a For loop, called a nested For loop).
Example: In a recent project, I used a For loop to display several different temperatures on an LCD screen.
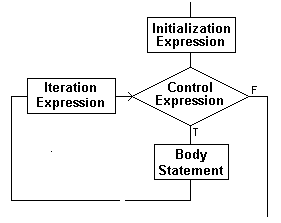
Okay this looks like a function but it’s not exactly a function. Instead of parameters, it has three statements within the parentheses. The For loop is standard in all versions of C.
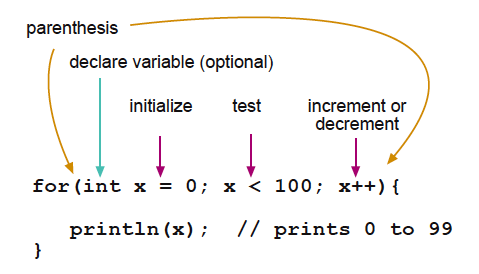
(see third picture)Quoting Arduino:
“The initialization happens first and exactly once. Each time through the loop, the condition is tested; if it's true, the statement block, and the increment is executed, then the condition is tested again. When the condition becomes false, the loop ends.”
int x = 0; This is just creating a variable but also initializing to a given value.
x < 100; The < symbol means less than. For the For loop as long as this is true, it keeps going thru the loop. Once it is false, it drops out of the loop and runs the code after the }.
x++ This means that the variable x is incremented by one.
Technobabble: x++ could also be written as x = x +1. x = x +1 is not a mathematical statement as this wouldn’t be true. It is a programming statement. What it means is that the variable x has a certain value, say 6. The right side of the = side is performed x + 1 which equals 7 then this value is stored in the variable on the right side so x becomes 7. For programming statements with an = sign, the right side of the = sign is evaluated and stored in the variable on the left side of the = sign.
NOTE: Just to confuse you further, x++ could also be written x+=1.
println(x); This should actually be Serial.println(x); This is a little different from the last Serial.println() where it printed some characters. This actually prints the numerical value of x, instead of the character, x.
for loop in action:
first, the initialization is performed, x = 0, then the test is performed. If x < 100, then the rest of the loop is performed, println(x).
Once it reaches the end of the loop, then the increment is performed, x = 1, then the test and the rest of the loop. Once the test fails, x= 100 so x is not less than 100, then the program exits the loop.
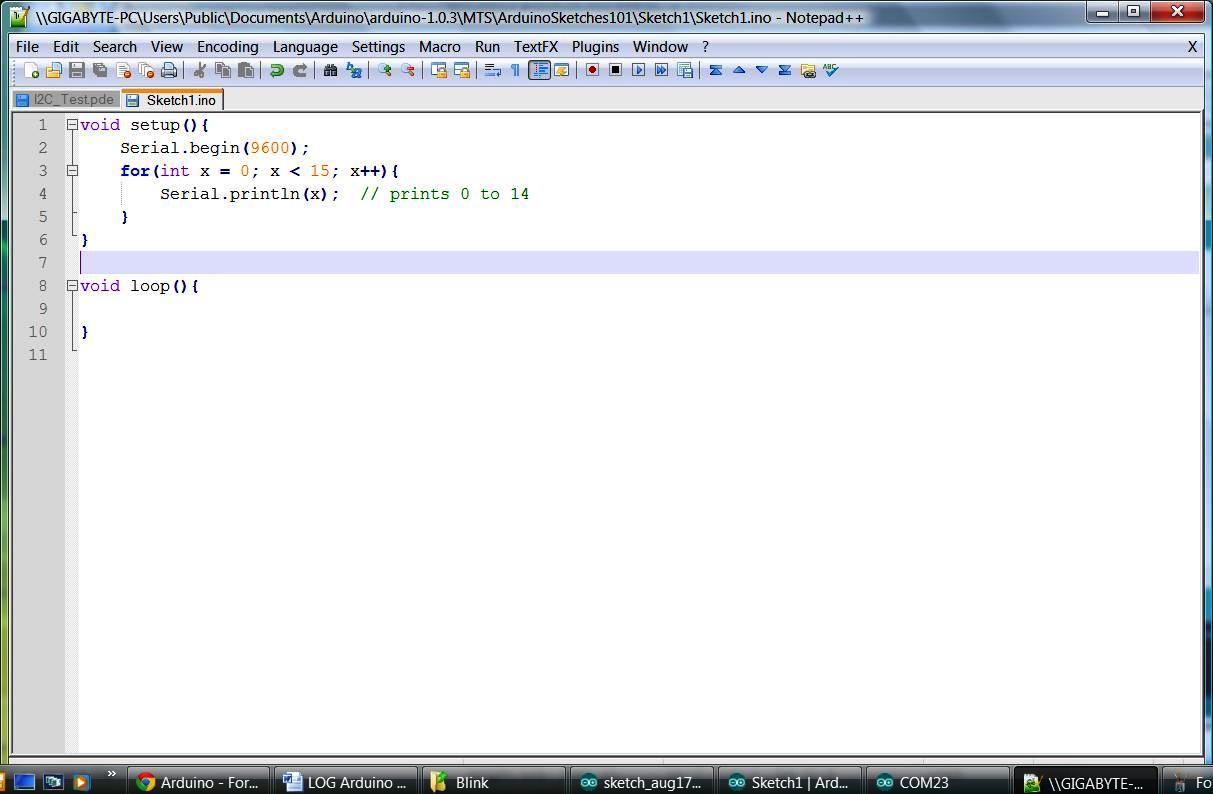
A smaller version of this For loop is shown in the next picture.
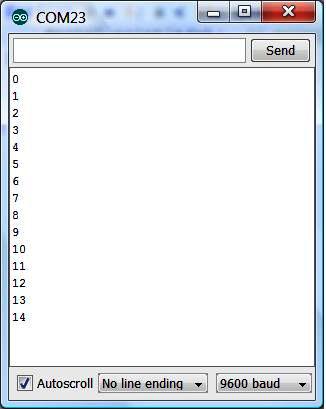
The results of the smaller version is shown in the last picture.
If()-else
An if statement will do something only if certain things are true. If not true then it will continue on past the if statement.
An if()-else will do the if part if something is true otherwise it will do the else part.
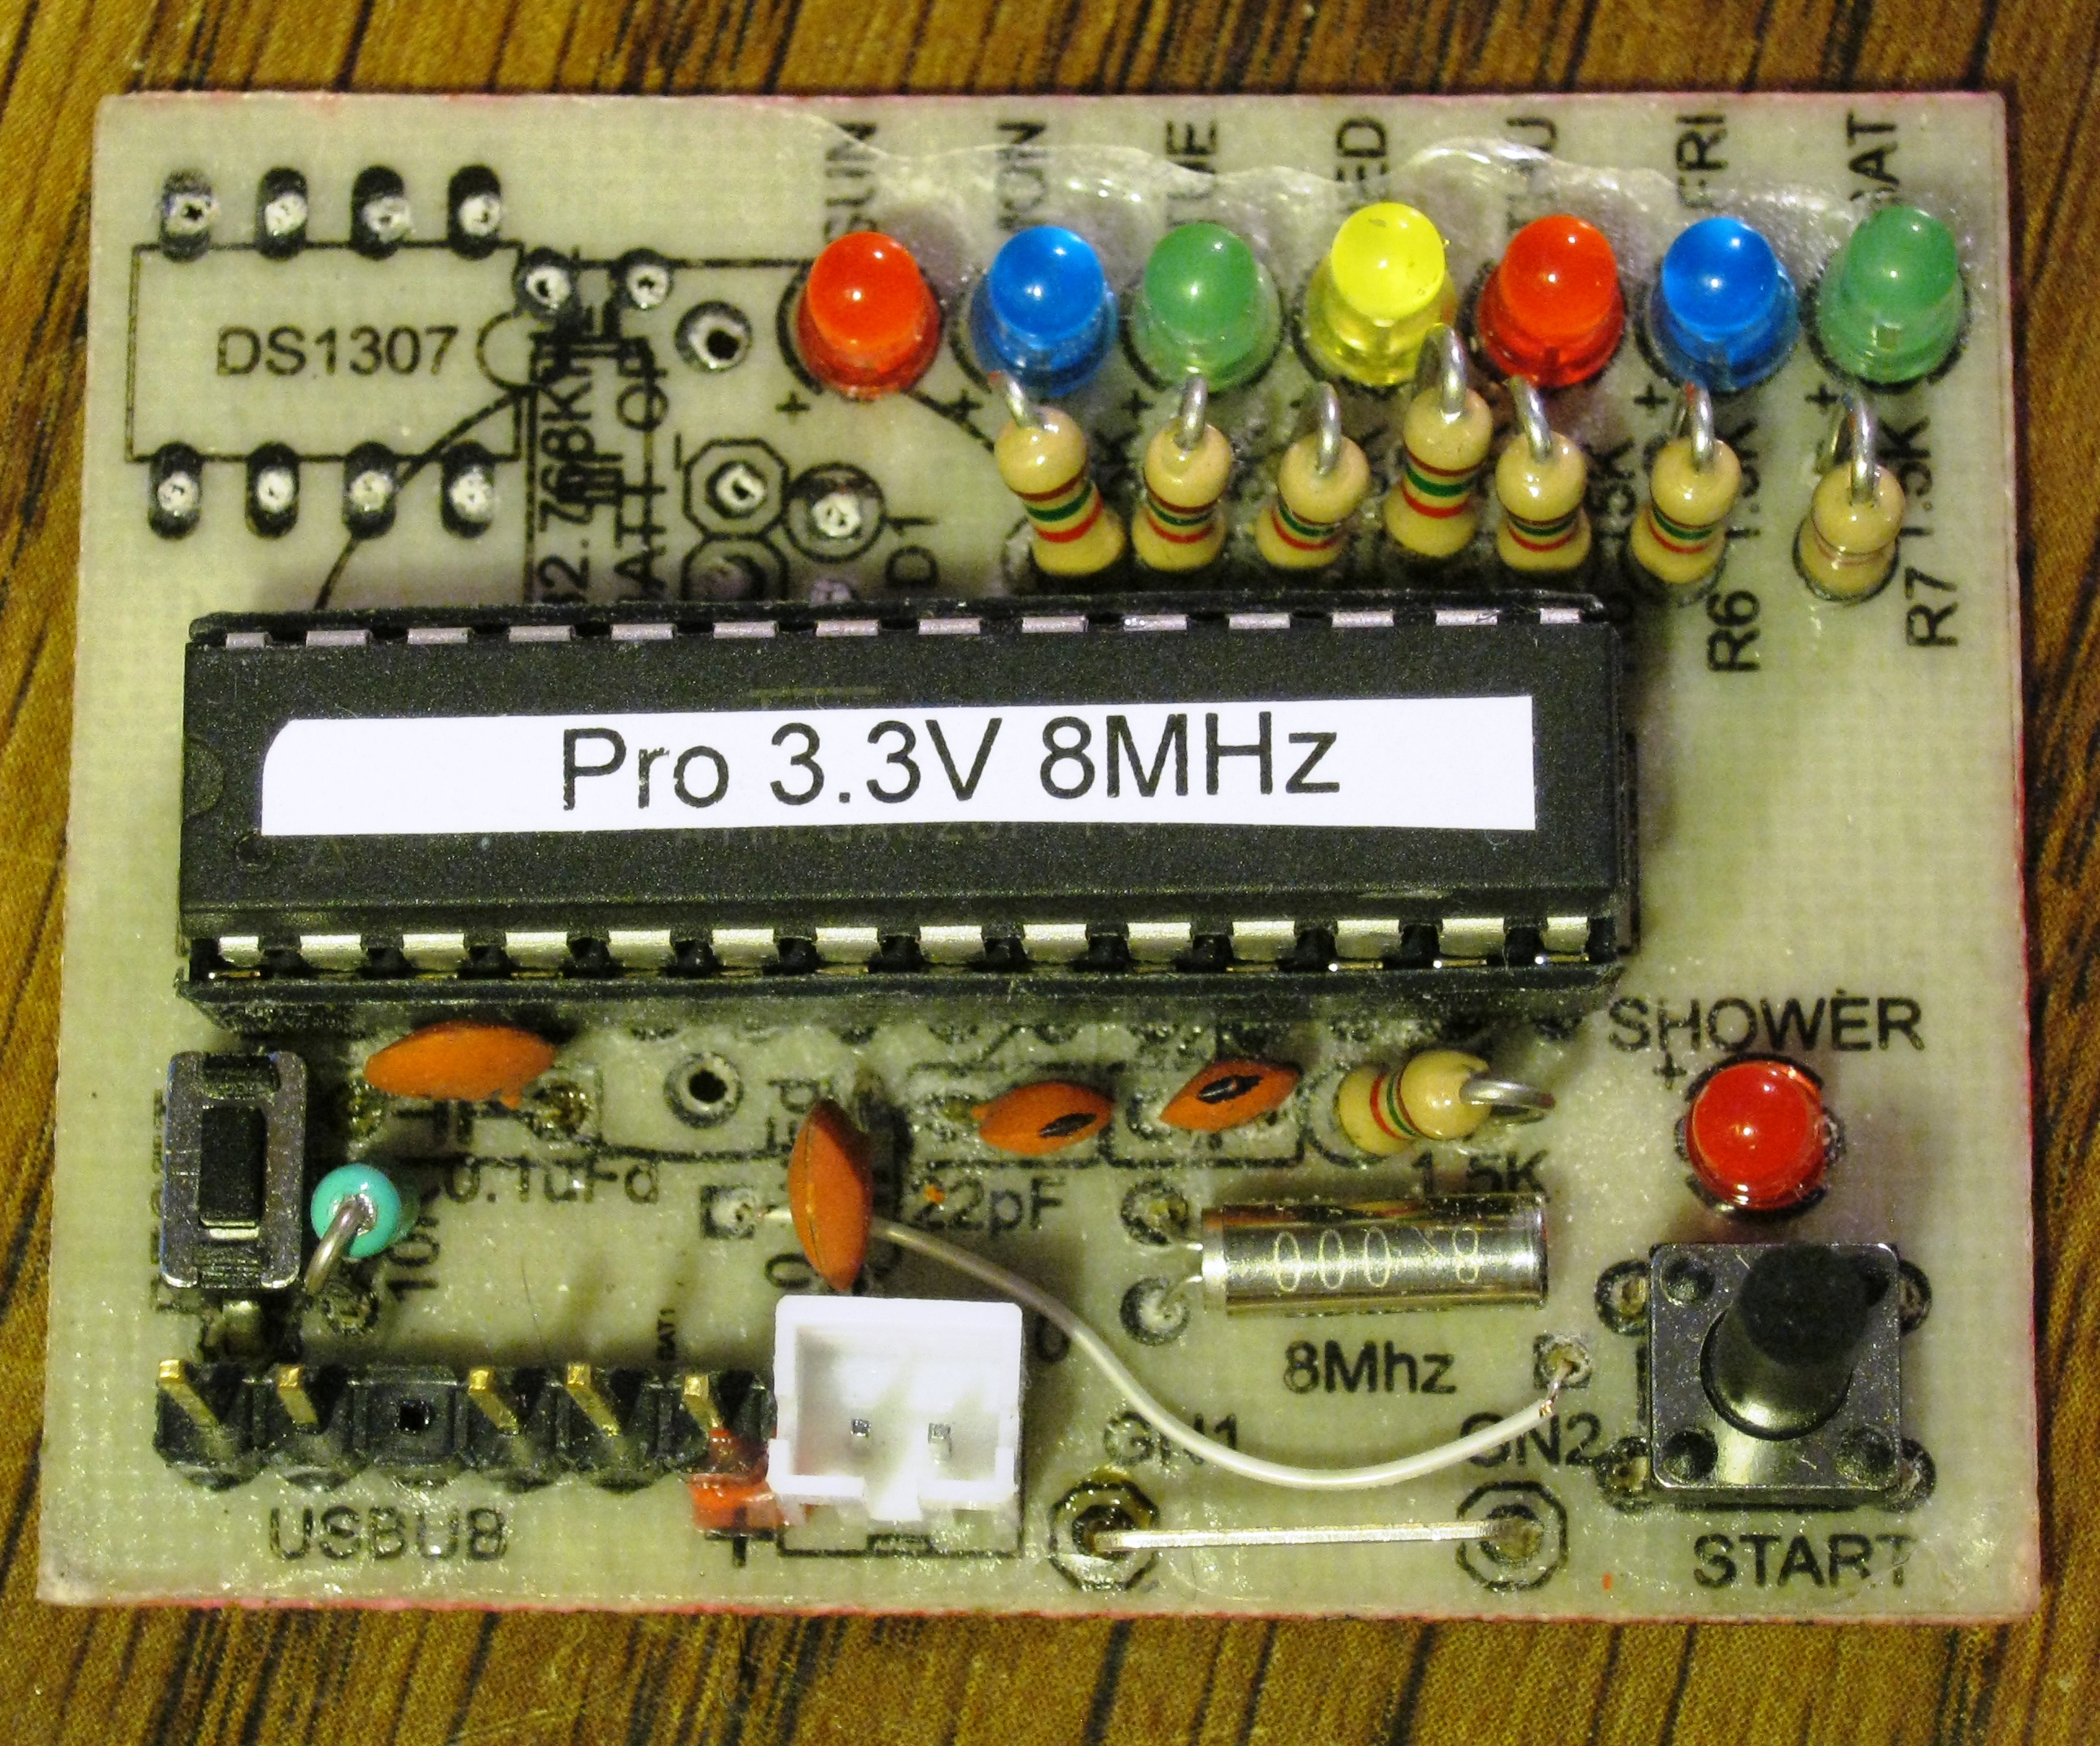
Example: The picture shows an ‘Arduino’ from one of my Instructables. There are seven LEDs representing the days of the week. So I want to turn the LED on only if the day of the week matches. This is a good place to use an if statement.
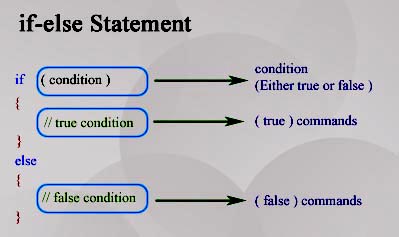
The next picture shows how the if()- else will look.
Arduino calls it conditional instead of condition. Now a conditional can be many things but for Sketches 101, I am going to limit my discussion to conditionals using comparison operators.
There are four comparison operators: == , != , < , > . We’ve already seen the < in For loops.
So comparison operators look at what’s on the left side of the operator and the right side of the operator and determines if the whole statement is true or false.
Symbol English Example True condition
== is equal to x == 7 if x is 7 then x == 7 is true
!= not equal to x != 7 if x is 32 then x != 7 is true
< is less than x < 7 if x is -33 then x < 7 is true
> is greater than x > 7 if x is 42 then x > 7 is true
WARNING: When using comparison operators in if statements (and while statements) make sure you use == and not =. x == 7 is asking if the value in x is 7. x=7 is setting the value of x to 7. Both of these will compile in an if() statement but with very different results.
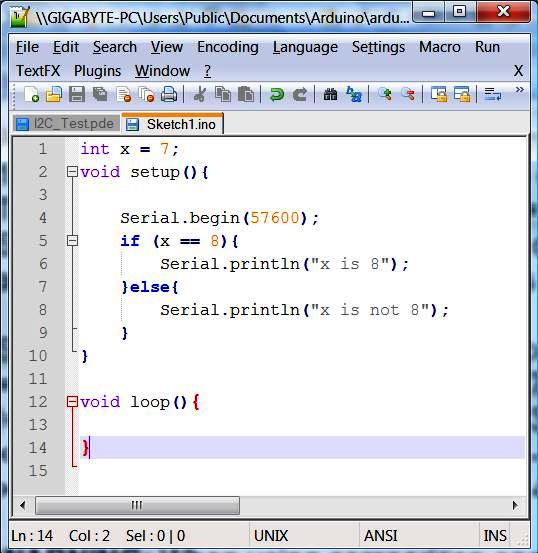
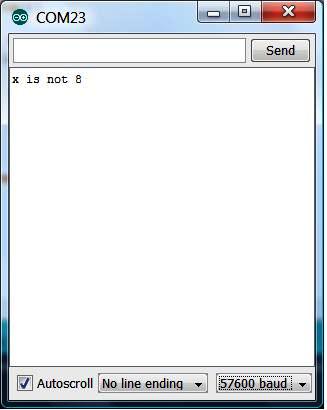
So my simple little if()-else example is shown in the picture. Since I am LAZY, I’m not going to go through an explanation. Hopefully, you can figure it out.
So I hope Sketches 101 helps some readers get a better understanding of sketches. Hopefully, it will give you a start on reading other people’s sketches and maybe writing your own.
HOMEWORK: No, I’m kidding, but here is some code I wrote to work with the PCB in the first picture. Its mostly concepts that we already covered but there’s also a few little variations.
for (day = 0; day < 7; day++){
if ( day != now.dayOfWeek() ) digitalWrite(dayPin[day], LOW); // Turn off LED
else digitalWrite(dayPin[day], HIGH); // Turn on correct LED
}
See if you can figure it out. Use the Arduino site and Internet to help.