Kleenex Box Cover

Here is a Kleenex Box Cover you can customize for any home. I used a box maker on line and a laser. you can make this out of many materials I chose acrylic for this project since I had some available. I made this at Techshop. http://www.techshop.ws/. On this project I tried to engrave a picture on the box and it did not come out as good as I wanted. It is still very functional.
Getting the Box Made.


The first step is to go to web site http://boxmaker.rahulbotics.com/. Here you will enter the dimensions of the box you would like. The Tissue box was 4.5" X 4.5" X 5.125". For the width and Depth dimension I needed to add 2 times the thickness of the material since the site ask for outside dimensions. So since my material is .115 thick I entered 4.73" for the Width and Depth and for the height I took the height of the box and added only one thickness of the material since the bottom will not be used. This was 5.24".
Add in the material thickness and press design.
Once you hit design there will be a file link pop up at the bottom. Open that file and save the file to your computer. (If you hover you mouse in the lower right hand corner a save menu should pop up so you can save it.
Add in the material thickness and press design.
Once you hit design there will be a file link pop up at the bottom. Open that file and save the file to your computer. (If you hover you mouse in the lower right hand corner a save menu should pop up so you can save it.
Open File in Adobe Illustrator and Modify the Drawing.


Open the file using Adobe Illustrator and make some edits. ( you can use Correl draw if you prefer but I will show this in illustrator.) The first step to do is grab the text in the upper left corner and delete it.
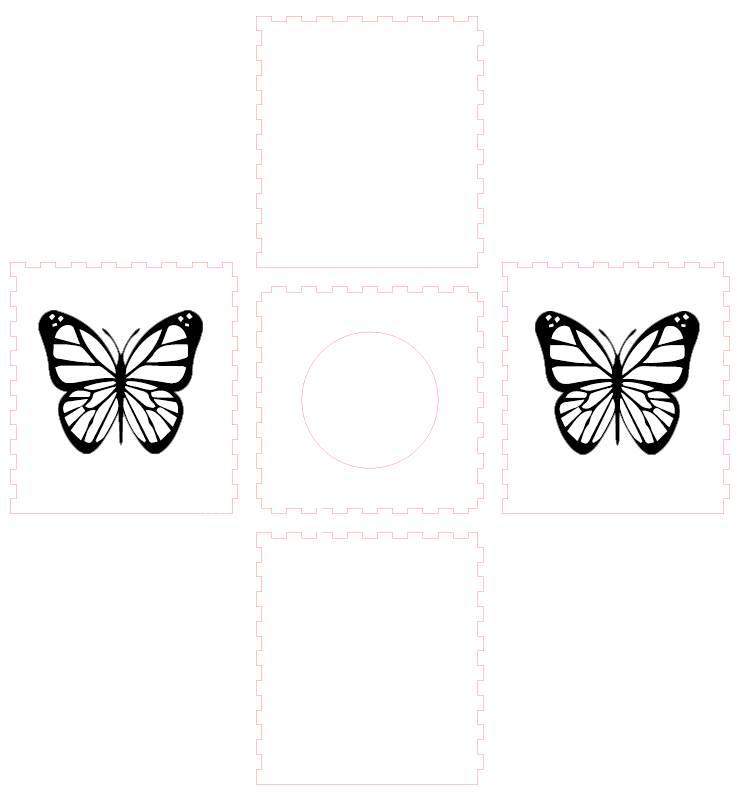
Add a circle to the inner most square for the cutout for the tissue. This can be any design you would like. I chose a simple circle.
Then select the whole drawing and change the line format to Red (RGB) with a .001" line width. This will set it to Cut the perimeter. This is a requirement for the Universal laser for cutting.
At this point you can add images or vector art to the other box sides. My original we added a photo which did not come out as well as I would have liked. The new layout I did with butterflies.
The top square can be removed since we do not need a bottom. Also since we do not need a bottom I removed the jagged cut line from the bottom of each of the sides to give it a flat surface to set on. (This only a preference you can leave it as is if you would like.)
Also to save material you may want to move the sides around to maximize the material uses.
Glue Up

Since I chose to use acrylic for my box I used acrylic glue to glue this up. You can make these out out cardboard or thin wood if you like. You could use standard glue for that.. This was a very quick project I did in one evening and it turned out nice. I will be making more of these in the future. Again I made this at techshop. http://www.techshop.ws/