Keeping Ghosts Grounded: Smart Wind Protection for Inflatable Decorations Using a Smart Plug
by MrMemory in Living > Holidays
710 Views, 4 Favorites, 0 Comments
Keeping Ghosts Grounded: Smart Wind Protection for Inflatable Decorations Using a Smart Plug


I created WindGuard, a smart IoT system that automatically protects inflatable decorations from wind damage using real-time weather monitoring and a smart plug you can find at any hardware or electronics store! When wind speeds exceed safe thresholds, as they often do around the holidays, WindGuard instantly turns off the smart plug powering your decorations, preventing costly damage from sudden gusts.
If you're like me, you've patched many a hole in your inflatable decorations caused by them whipping around in wind gusts while I'm not home to unplug them or mess with my old plug-in timers. Manually monitoring weather 24/7 around busy holidays just isn't practical.
This project solves this by combining:
- Real-time local weather data from OpenWeatherMap
- Smart home automation via TP-Link Kasa plugs
- Cloud infrastructure for reliable 24/7 monitoring
- Intelligent notifications so you know when your decorations are being protected
This is a fully automated system that costs less than $5/year to run and has already saved my decorations multiple times this season. You don't need to know anything about IoT or cloud computing to deploy it- it deploys in a single click with no coding required!
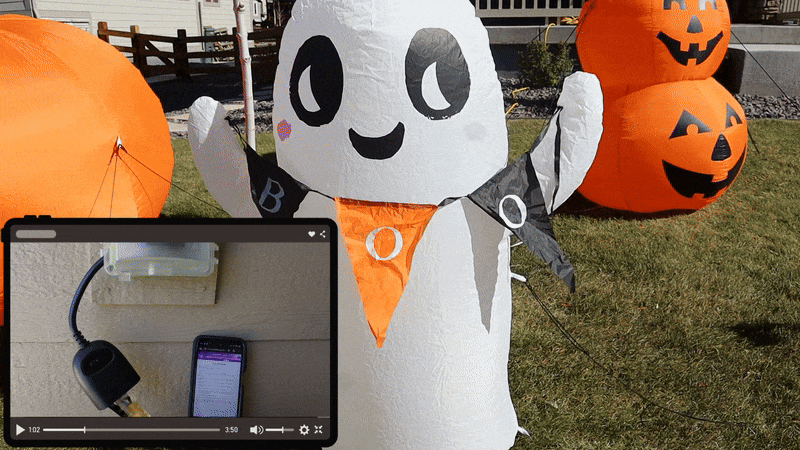
The GIF here shows WindGuard in action - you can see my inflatable ghosts and pumpkins safely deflating when high winds are detected! They'll reinflate if later the winds die down. When I'm away I get emails letting me know when and why my decorations turned off!
How it Works
WindGuard creates an intelligent feedback loop between real-time weather data and your smart plug, automatically protecting your decorations when Mother Nature gets too aggressive.
The diagram above shows the different services this project makes sue of:
- Weather Monitoring: Every 5 minutes, AWS Lambda fetches current wind speed data from OpenWeatherMap API for your exact location
- Smart Decision Making: The system compares wind speed against your custom thresholds (default: turn OFF at 20+ mph, turn ON below 10 mph)
- Time Awareness: WindGuard only acts during your decoration hours (default 5 PM - 10 PM) using your local timezone
- Automatic Protection: When dangerous winds are detected, Lambda sends commands through TP-Link's cloud API to instantly cut power to your decorations
- State Tracking: DynamoDB remembers the last action taken, preventing notification spam while ensuring decorations stay protected
- Smart Notifications: You only get alerted via email when the plug state changes
Supplies

Hardware
TP-Link Kasa Smart Outdoor Plug - $25-35
Recommended Models: KP400 (dual outlet), EP40 (single outlet), but others will work as well
Requirements: Must be outdoor-rated and WiFi-capable
Inflatable Decorations - $20-100
Any plug-in inflatables!
Outdoor Extension Cord (if needed) - $15-25
Weather-resistant, appropriate length for your setup
Software/Services
- AWS Account - Free tier eligible. New accounts get 12 months of free tier benefits
- OpenWeatherMap API Key - Free. Sign up at openweathermap.org/api. Free tier includes 1,000 calls/day (more than enough)
- TP-Link Kasa Account - Free. Download the Kasa app and create account!
Tools
- Computer with internet access
- Smartphone (for Kasa app setup)
Total Cost
- Hardware: ~$40-160 (depending on decorations)
- AWS Services: $0.41/month ($5/year)
- API Services: Free
Note: Test your smart plug in the Kasa app before starting the AWS setup to ensure compatibility and note the exact device name you'll need for configuration.
Set Up Your Smart Plug


What You'll Do:
Get your smart plug connected to WiFi and ready to control your decorations. This is the foundation that WindGuard will use to automatically protect your inflatables.
Instructions:
- Download the Kasa App
- Open your phone's app store
- Search for "Kasa Smart" (by TP-Link)
- Download and install the official Kasa app
- Open the app and tap "Create Account" if you're new
- Prepare Your Smart Plug
- Unbox your Kasa smart plug
- Plug it into an indoor outlet near your WiFi router (for initial setup)
- The LED should blink amber and green - this means it's ready to configure
- Add the Device in Kasa App
- In the Kasa app, tap the "+" button to add a new device
- Select "Smart Plug" from the device list
- Follow the on-screen instructions to connect the plug to your WiFi
- When prompted, enter your WiFi network password
- Name Your Device
- Give your plug a clear, memorable name like:
- "WindGuard"
- "Halloween Decorations"
- "Outdoor Inflatables"
- "Front Yard Ghosts"
- Critical: Write down this exact name! WindGuard will need it later
- Avoid special characters - stick to letters, numbers, and spaces
- Set a Schedule
- Tap your device and then the schedule tab. Set an "on" and "off" time for your plug. You'll use this same on and off time when you deploy WingGuard. This way WindGuard does not turn on/off your decorations outside your set schedule.
- Test Your Setup
- Plug a small lamp or device into your smart plug
- Use the Kasa app to turn it on and off
- Verify you can control it remotely from anywhere in your house
- Move to Final Location
- Unplug your test device
- Move the smart plug to where your Halloween decorations will be
- Test the Kasa app again to ensure good WiFi signal at that location
Troubleshooting:
- Plug won't connect: Move closer to your WiFi router and try again
- Can't find device: Make sure your phone is on the same WiFi network
- Poor signal outdoors: Consider a WiFi extender for your decoration area
Get Your Weather Credentials


What You'll Do:
Obtain the free API keys that let WindGuard monitor your local weather conditions and find your exact location coordinates for accurate wind monitoring.
- Sign Up for Free Account
- Go to openweathermap.org
- Click "Sign Up" in the top right corner
- Fill out the registration form with your email and create a password
- Verify your email address when prompted
- Access Your API Keys
- Log into your OpenWeatherMap account
- Click on your username in the top right, then select "My API Keys"
- You may be prompted to choose a pricing plan. WindGuard uses too few queries a day (running only once every 5 minutes) to incur a charge, but you still will need to choose a plan and provide some payment details. I recommend the OneCall API myself.
- On the API keys page, you'll see an API key created for you like in the above screenshot.
- Click the "Copy" button next to your API key
- Important: Save this key somewhere safe - you'll need it for the next step
Find Your Location Coordinates

WindGuard needs your approximate latitude and longitude to get weather data for your decorations. This information is stored securely in your WindGuard deployment on your personal AWS account.
What You'll Do:
- Navigate to https://gps-coordinates.org/
- Enter your address or optionally give the website permission to retrieve your location
- Copy the coordinates that appear
Deploy WindGuard!


Can you believe we're almost done?
What You'll Do:
Deploy all of the cloud services with no coding required by clicking a link and filling in a simple form. This creates your serverless weather monitoring system that will protect your decorations 24/7.
- Sign Up for AWS
- Go to aws.amazon.com
- Click "Create an AWS Account"
- Follow the registration process (you'll need a credit card, but we'll stay within free tier limits)
- Cost: WindGuard costs $0.41/month ($5/year) to run
- Verify Your Account
- Complete email and phone verification
- Wait for account activation (usually takes a few minutes)
- Click here to deploy WindGuard to your AWS account!
- You'll first see a screen with the title "Create Stack". Verify that the URL shown is right for WindGuard (https://windguard.s3.us-east-1.amazonaws.com/cloudformation.yml) and click "Next".
- When the CloudFormation page opens, you'll see a form. Fill it out using the information from the previous steps:
- TPLinkEmail: Your Kasa account email
- TPLinkPassword: Your Kasa account password (this, along with your API key, will be stored securely in AWS Secrets Manager)
- TPLinkDeviceAlias: Exact name of your smart plug (as it appears in the Kasa app)
- OpenWeatherApiKey: Your API key (from Step 2)
- Latitude: Your location latitude (from Step 3)
- Longitude: Your location longitude (from Step 3)
- WindOffThreshold: Wind speed to turn OFF decorations (default: 20 mph)
- WindOnThreshold: Wind speed to turn ON decorations (default: 10 mph)
- OnStartHour: When monitoring starts (default: 17 = 5 PM)
- OnEndHour: When monitoring ends (default: 22 = 10 PM)
- TimeZone: Your timezone (default: America/New_York)
- NotifyEmail: Your email for alerts (optional but recommended)
- Launch your stack
- Review Your Settings
- Double-check all your parameters are correct
- Pay special attention to the device name - it must match exactly!
- Deploy WindGuard
- Check the box "I acknowledge that AWS CloudFormation might create IAM resources"
- Click "Create Stack"
- Wait 2-3 minutes for deployment to complete
- Confirm Success
- Watch the "Events" tab for progress updates
- When you see "CREATE_COMPLETE", WindGuard is live!
- Check the "Outputs" tab for your system details
- Check Your Email
- AWS will send you a subscription confirmation email if you provided one for alerts in the CloudFormation form.
- Click "Confirm subscription" in that email
- You're now set up to receive WindGuard alerts!
Troubleshooting:
- Stack creation failed: Check that your device name exactly matches the Kasa app
- No email confirmation: Check spam folder, or re-deploy after checking the email address you input is correct.
- Parameter errors: Review your credentials and try again
Enjoy WindGuard


On the next blustery evening, watch as WindGuard automatically turns your decorations off to protect thema and turns them back on when the wind dies down! If you provided your email for alerts, you should also see alerts come into your email when the switch is toggled on/off.
Here are some final troubleshooting tips:
- No plug response: Double-check device name matches Kasa app exactly
- No notifications: Confirm email subscription in your inbox/spam folder
- WindGuard not operating at the right times: Check that the TimeZone parameter matches your location